什么是生命周期?
- 从组件的角度
React特点是组件化开发,每一个组件的定义是一个类(也可以函数式定义无状态组件,但是没有生命周期,不讨论),
- 在实例化这个类的过程中 (组件挂载)
- 或存在过程中的某些事件触发 (组件更新)
- 或销毁这个实例的 (组件从页面删除)
所自动按照一定顺序调用的一些函数 称为生命周期函数。 即组件从出生到灭亡经历的一些方法。
- 从js语言的角度
这些函数是定义在es6类的方法,将会被类的实例共享。即SomeClass.prototype.生命周期函数
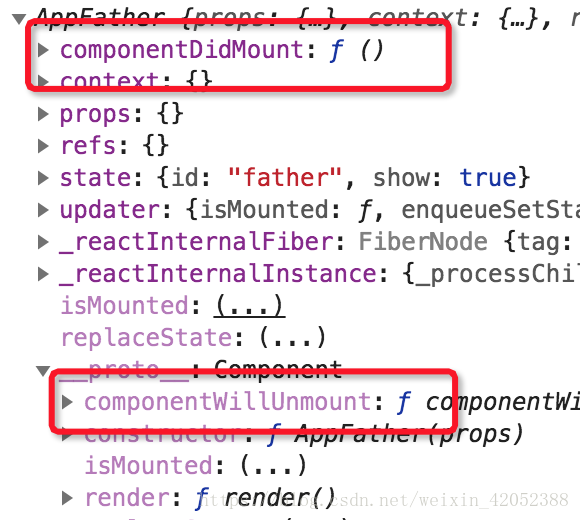
如图,输出类的实例,可以在对象原型指针上找到生命周期的方法。
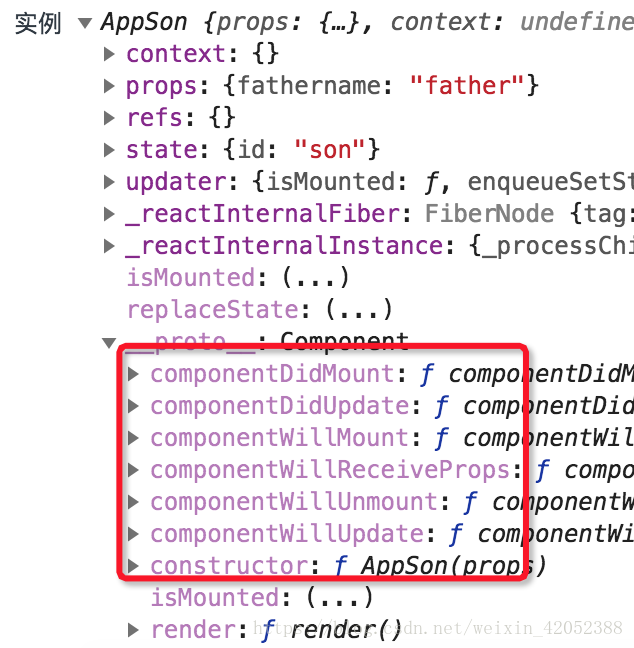
注意:es6 class 可以定义实例方法,可以定义原型方法,箭头函数定义的实例方法将会变成实例属性,两种定义函数的方式区别:
- 函数名=函数体的方式会成为实例属性,作用域搜索优于原型上的方法;
- 函数名(){}方式定义的原型方法可以被所有实例共享,节约内存
生命周期执行顺序

官方经典的生命周期图已经展示了初始化、更新、销毁分别对应生命周期函数执行顺序,不再复述,下面总结一些需要注意的点。
哪些生命周期不能setState?
思考setState会发生什么。。会执行上图中的 shouldComponentUpdate->componentWillUpdate->render->componentDidUpdate
因此在这四个函数里执行setState()就会进入死循环,导致内存泄漏,以下是浏览器报错

componentWillMount和componentWillReceiveProps的特殊顺序
正常来讲,setState会触发一套更新机制的生命周期,但如果在componentWillMount里进行setState,并不会触发re-render,而是会继续render->DidMount结束;componentWillReceiveProps也是这样,不会执行多余的一次scu->willud->render->didud(自行理解简写)
父子组件的生命周期顺序
demo:
import React, { Component } from 'react';
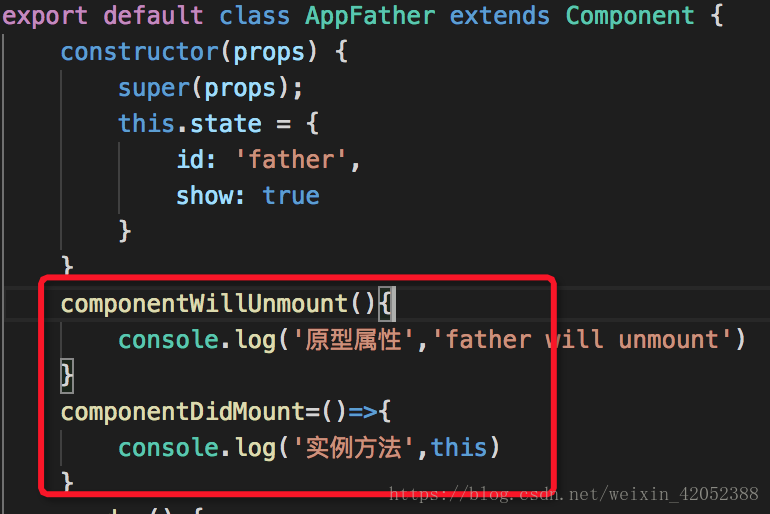
export default class AppFather extends Component {
constructor(props) {
super(props);
this.state = {
id: 'father',
show: true
}
}
componentWillUnmount(){
console.log('原型属性','father will unmount')
}
componentDidMount=()=>{
console.log('实例方法','father did mount')
}
render() {
console.log(this)
return (
<div>
<p onClick={()=>{this.setState({show:!this.state.show})}}>重置生命周期</p>
<p onClick={()=>{this.setState({id:'father1'})}} > im father:{this.state.id} </p>
{this.state.show && <AppSon fathername={this.state.id}></AppSon>}
</div>
)
}
}
class AppSon extends Component {
constructor(props) {
super(props);
this.state={
id:'son'
}
console.log('实例',this)
// this.w=()=>{};
}
// a=()=>{}
// c=3
// jason(){
// console.log('自定义this',this)
// }
componentWillMount(){
console.log('儿子 will mount')
// this.setState({id:'ss'})
}
componentDidMount(){
console.log('儿子 did mount')
//this.setState({id:'ssdid'})
}
// getSnapshotBeforeUpdate(){
// console.log('snap')
// }
// static getDerivedStateFromProps(){
// console.log('derive')
// return null
// }
componentWillReceiveProps(){
console.log('儿子 receive props')
return false
}
shouldComponentUpdate(...rest){
// console.log(rest)
// console.log(this.state,this.props)
console.log('儿子should props')
// this.setState({id:'ssdid'})
return true
}
componentWillUpdate(){
console.log('儿子will update')
// this.setState({id:'ssdid'})
}
componentDidUpdate(){
console.log('儿子did update')
}
componentWillUnmount(){
console.log('儿子 unmount')
}
render() {
console.log('儿子 render');
return (
<div onClick={()=>{this.setState({id:'son1'})}}>im son {this.state.id}
{/* <span>{this.props.fathername}</span> */}
<span> <AppSunZi></AppSunZi></span>
</div>
)
}
}
class AppSunZi extends Component {
componentWillMount(){
console.log('孙子will mount')
// this.setState({id:'ss'})
}
componentDidMount(){
console.log('孙子did mount')
//this.setState({id:'ssdid'})
}
shouldComponentUpdate(){
console.log('sunzi should props')
return true
}
componentWillUnmount(){
console.log('sunzi will unmount')
}
render(){
console.log('sunzi render')
return <div>
sunzi
</div>
}
}控制台打印如下:
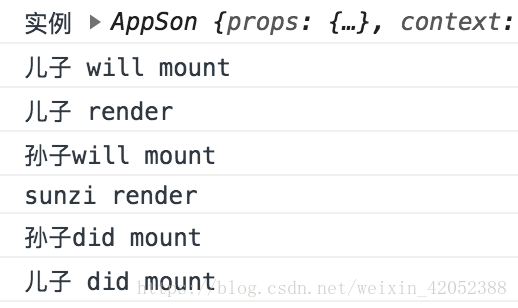
可以看出,父组件先进入willMount->render,子组件再willMount,当子组件渲染结束 执行子组件的didMount后,再执行父组件的didMount,更新过程同理。销毁过程顺序为:先执行父组件的willUnmount,再执行子组件的willUnmount。
何时销毁?
JSX里引入组件的闭合标签,代表组件的实例化过程,通过一定逻辑不渲染这个标签,也就是卸载组件的过程。
那么如何判断何时要卸载一个特定组件呢,这就涉及到react 虚拟dom的 diff算法(可移步其他博客,如https://segmentfault.com/a/1190000010686582)简单来讲,对于一个组件,卸载有两种情况:
- 同层级下,组件名变化,之前组件是A,更新后变成B(或空),就会删除A组件;
- 组件的Props的key是个特殊的props,算法会根据Key来判断是更新还是删除还是移动,因此前后组件的Key不同,也会删除重新渲染
示例:
{this.state.show && <AppSon fathername={this.state.id}></AppSon>}
<AppSon key={this.props.XX.id}></AppSon>
销毁一个组件有很实用的意义,当再次创建组件时,会重新调用渲染时的生命周期函数,并且在之前的异步操作可能导致的页面变化也不会生效。
React16版本新生命周期函数
componentDidCatch
生命周期用来处理错误边界,用法非常简单,注意:只会捕捉render的错误
//...
componentDidCatch(error, info) {
    this.setState({ error, info });
}
//...
render(){
    return {this.state.error ? <Error>错误的显示组件</Error> : <App>正常组件</App>}
}参考:https://segmentfault.com/a/1190000011379425
getDerivedStateFromProps getSnapshotBeforeUpdate
新的静态getDerivedStateFromProps生命周期在组件实例化以及接收新props后调用。它可以返回一个对象来更新state,或者返回null来表示新的props不需要任何state更新。
新的getSnapshotBeforeUpdate生命周期在更新之前被调用(例如,在DOM被更新之前)。此生命周期的返回值将作为第三个参数传递给componentDidUpdate。 (这个生命周期不是经常需要的,但可以用于在恢复期间手动保存滚动位置的情况。)
React遵循语义版本控制, 所以这种改变将是渐进的。目前的计划是:
- 16.3:为不安全生命周期引入别名UNSAFE_componentWillMount,UNSAFE_componentWillReceiveProps和UNSAFE_componentWillUpdate。 (旧的生命周期名称和新的别名都可以在此版本中使用。)
- 未来的16.x版本:为componentWillMount,componentWillReceiveProps和componentWillUpdate启用弃用警告。 (旧的生命周期名称和新的别名都可以在此版本中使用,但旧名称会记录DEV模式警告。)
- 17.0:删除componentWillMount,componentWillReceiveProps和componentWillUpdate。 (从现在开始,只有新的“UNSAFE_”生命周期名称将起作用。)
新生命周期函数参考:https://segmentfault.com/a/1190000014456811?utm_source=channel-hottest
总结
生命周期函数很基础,很重要。知道各种场景的函数调用顺序,才能做出相应的优化,提高加载效率。