本文分为一下几个功能:
- tinymce初始化的一些配置
- 在工具栏和文本中间插入特定的标题和摘要
- 自定义工具栏按钮,实现特定功能
- 上传图片时去掉网络上传功能
- 粘贴过来的图片实现默认上传
- 给图片添加水印功能
- 实现一键排版
一、tinymce初始化的一些配置
1、首先需要引入下面两个插件
cnpm install @tinymce/tinymce-vue --save 版本:2.0.0
cnpm install tinymce --save 版本:5.0.3
注:在之前使用时我发现,在tinymce 6 以上版本有些内置插件不存在了,导致一些功能无法使用,所以这里标注了一下版本
2、当下载好插件后,需要到node_modules中找到tinymce文件夹,将里面的skins文件夹复制出来放到vue项目的public文件夹中

3、还需要下载一个语言包,将插件翻译成中文,下载地址如下
官网地址:https://www.tiny.cloud/get-tiny/language-packages/
找到 zh-ch进行下载,如下:

之后将下载好的语言包,放置在vue的public文件夹中,然后在代码中引入进来,我下载的语言包名字是zh-Hans的,和其他人的可能不太一样,但最终效果都是一样的,根据文件名称直接引入即可
下面是代码及引入的一些插件和一些基础配置
<template>
  <div class="editor_wraper">
    <editor :init="tinymceInit" v-model="content"> </editor>
  </div>
</template>

<script>
import tinymce from "tinymce";
import Editor from "@tinymce/tinymce-vue";
import "tinymce/themes/silver";
import {
  toolbar,
  fontsizeFormats,
  fontFormats,
  lineheightFormats,
} from "@/utils/tinymceConfig";
export default {
  data() {
    return {
      content: "",
      tinymceInit: {
        language_url: "tinymce/langs/zh-Hans.js", //引入语言包文件
        language: "zh-Hans", //语言类型
        skin_url: "tinymce/skins/ui/oxide", //皮肤:浅色
        quickbars_image_toolbar: "", // 选中媒体文件时的弹框
        // skin_url: '/tinymce/skins/ui/oxide-dark',//皮肤:暗色
        toolbar: toolbar, //工具栏配置,设为false则隐藏
        menubar: false, //菜单栏配置,设为false则隐藏,不配置则默认显示全部菜单,也可自定义配置--查看 http://tinymce.ax-z.cn/configure/editor-appearance.php --搜索“自定义菜单”
        height: 500, // 富文本高度
        model: 'dom', // 是否可拉伸富文本框
        fontsize_formats: fontsizeFormats, //字体大小
        font_formats: fontFormats, //字体样式
        lineheight_formats: lineheightFormats, //行高配置,也可配置成"12px 14px 16px 20px"这种形式
        placeholder: "在这里输入文字",
        branding: false, //tiny技术支持信息是否显示
        resize: "both", //编辑器宽高是否可变,false-否,true-高可变,'both'-宽高均可,注意引号
        statusbar: false,  //最下方的元素路径和字数统计那一栏是否显示
        paste_data_images: true, //图片是否可粘贴
        elementpath: false, //元素路径是否显示
      },
    };
  },
  components: { Editor },
};
</script>
这里是上方引入的tinymceConfig文件中的一些配置
/**
 * @description: 工具栏配置
 * @return {*}
 */
export const toolbar = `
  undo redo restoredraft |
  removeformat|
  formatselect |
  subscript superscript |
  bold italic underline strikethrough link anchor |
  numlist bullist blockquote |
  alignleft aligncenter alignright alignjustify|
  quicklink searchreplace image|
  forecolor backcolor |
  fontselect fontsizeselect|
  outdent indent lineheight|`

/**
 * @description: 字体大小设置
 * @return {*}
 */
export const fontsizeFormats = `12px 14px 16px 18px 20px 22px 24px 28px 32px 36px 48px 56px 72px`
/**
 * @description: 字体设置
 * @return {*}
 */
export const fontFormats = `微软雅黑=Microsoft YaHei,Helvetica Neue,PingFang SC,sans-serif;苹果苹方=PingFang SC,Microsoft YaHei,sans-serif;宋体=simsun,serif;仿宋体=FangSong,serif;黑体=SimHei,sans-serif;Arial=arial,helvetica,sans-serif;Arial Black=arial black,avant garde;Book Antiqua=book antiqua,palatino;`
/**
 * @description: 行高设置
 * @return {*}
 */
export const lineheightFormats = "0.5 0.8 1 1.2 1.5 1.75 2 2.5 3 4 5"
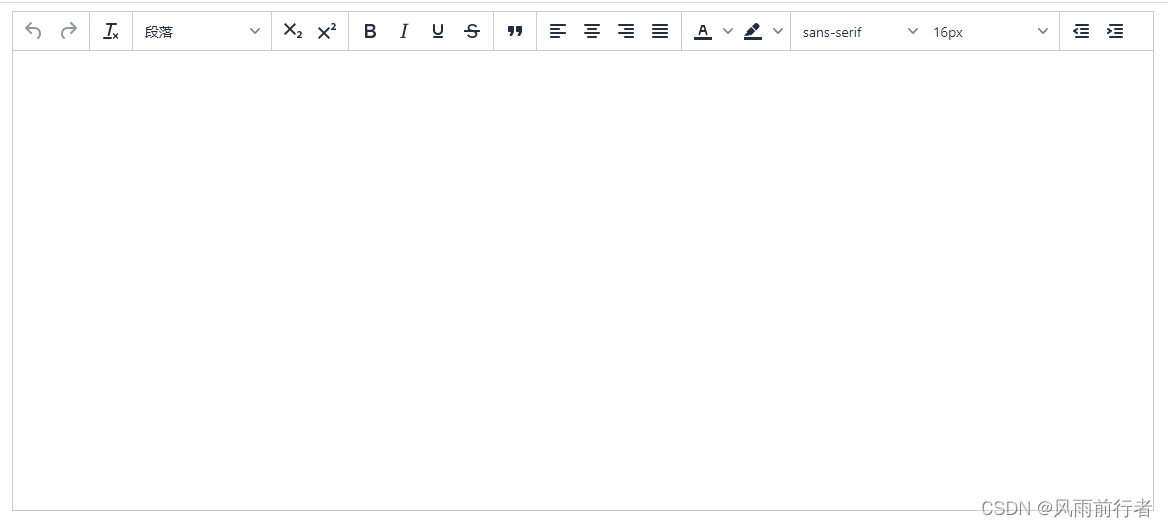
配置好以上内容,页面可能显示出如下效果
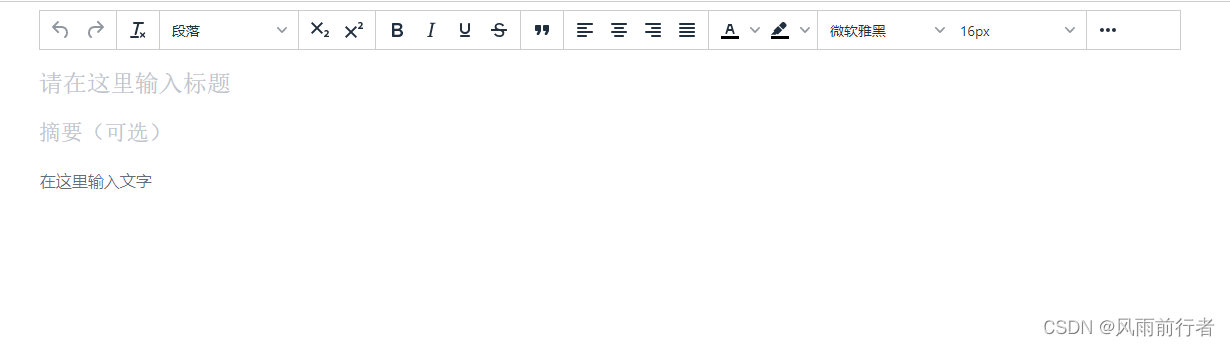
二、在工具栏和文本中间插入特定的标题和摘要
插入标题和摘要的方式是需要使用内联模式才可以实现,如下我是在上面代码的基础上进行的修改
注意:如果开启内联模式后配置了toolbar_persist为true,你的tinymce还是需要点击才能显示工具栏,而不是固定显示,那很有可能是你之前通过npm uninstall的方式删除tinymce包时没有删干净,node_modules中有很多个tinymce包,这时,你需要删除你整个的node_modules,然后重新install一下就好了,亲测的坑
<template>
  <div class="editor_wraper">
    <div id="mytoolbar"></div>
    <el-input
      class="titleStyle"
      v-model="defaultTitle"
      type="textarea"
      resize="none"
      :autosize="{ minRows: 1, maxRows: 3 }"
      placeholder="请在这里输入标题"
    ></el-input>
    <el-input
      class="abstractStyle"
      v-model="defaultAbstract"
      type="textarea"
      resize="none"
      :autosize="{ minRows: 1 }"
      placeholder="摘要(可选)"
    ></el-input>
    <editor :init="tinymceInit" v-model="content"> </editor>
  </div>
</template>

<script>
import tinymce from "tinymce";
import Editor from "@tinymce/tinymce-vue";
import "tinymce/themes/silver";
import {
  toolbar,
  fontsizeFormats,
  fontFormats,
  lineheightFormats,
} from "@/utils/tinymceConfig";
import "tinymce/icons/default"; // 方式工具栏的icon乱码
export default {
  data() {
    return {
      defaultTitle: "",
      defaultAbstract: "",
      content: "",
      tinymceInit: {
        language_url: "tinymce/langs/zh-Hans.js", //引入语言包文件
        language: "zh-Hans", //语言类型
        skin_url: "tinymce/skins/ui/oxide", //皮肤:浅色
        quickbars_image_toolbar: "", // 选中媒体文件时的弹框
        // skin_url: '/tinymce/skins/ui/oxide-dark',//皮肤:暗色
        toolbar: toolbar, //工具栏配置,设为false则隐藏
        menubar: false, //菜单栏配置,设为false则隐藏,不配置则默认显示全部菜单,也可自定义配置--查看 http://tinymce.ax-z.cn/configure/editor-appearance.php --搜索“自定义菜单”
        height: 500, // 富文本高度
        model: 'dom', // 是否可拉伸富文本框
        fontsize_formats: fontsizeFormats, //字体大小
        font_formats: fontFormats, //字体样式
        lineheight_formats: lineheightFormats, //行高配置,也可配置成"12px 14px 16px 20px"这种形式
        placeholder: "在这里输入文字",
        branding: false, //tiny技术支持信息是否显示
        resize: "both", //编辑器宽高是否可变,false-否,true-高可变,'both'-宽高均可,注意引号
        statusbar: false,  //最下方的元素路径和字数统计那一栏是否显示
        paste_data_images: true, //图片是否可粘贴
        elementpath: false, //元素路径是否显示

        inline: true, //使用内联模式
        toolbar_persist: true, // 在内联模式中,工具栏是否自动显示和隐藏
        fixed_toolbar_container: "#mytoolbar", // 将工具栏显示在一个固定的html元素上
      },
    };
  },
  components: { Editor },
};
</script>

<style lang="scss">
.editor_wraper {
  width: 60%;
  height: 80vh;
  margin: 0 auto;
}
.mce-content-body{
  height: 100%;
  outline: none;
}
.titleStyle .el-textarea__inner {
  width: 100%;
  height: 56px;
  font-size: 24px;
  font-weight: 500;
  margin-top: 10px;
  padding-left: 0;
  border: none;
}
.abstractStyle .el-textarea__inner {
  font-size: 22px;
  font-weight: 500;
  color: #bbb;
  margin-top: 5px;
  padding-left: 0;
  border: none;
}
</style>
配合好后就可以显示出以下效果
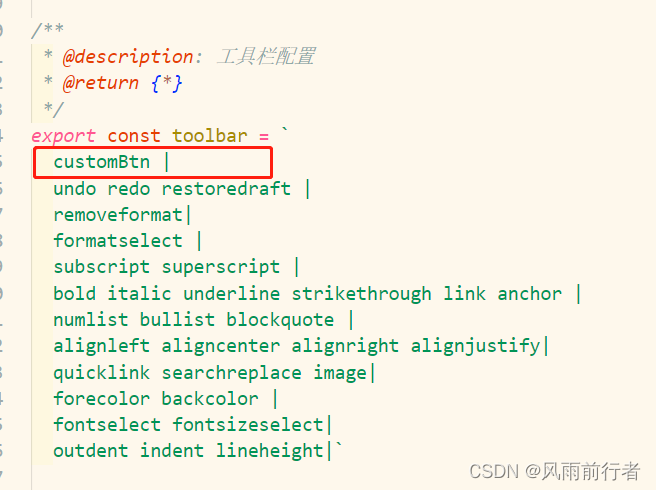
三、自定义工具栏按钮,实现特定功能
创建自定义按钮一共有三步:
1、在我的 tinymceConfig 文件中创建一个方法
/**
 * @description: 自定义按钮
 * @param {*} editor
 * @return {*}
 */
export const customBtn = (editor) => {
  // 参数一:自定义名称,需要放置在工具栏中
  editor.ui.registry.addButton("customBtn", {
    icon: "brightness", // 显示的图标
    tooltip: '自定义按钮', // 提示文字
    onAction: function () {
      console.log("点击了自定义按钮")
    }
  })
}
2、在tinymce配置中引用它

3、将你在addButton中声明的自定义名称放置在工具栏中
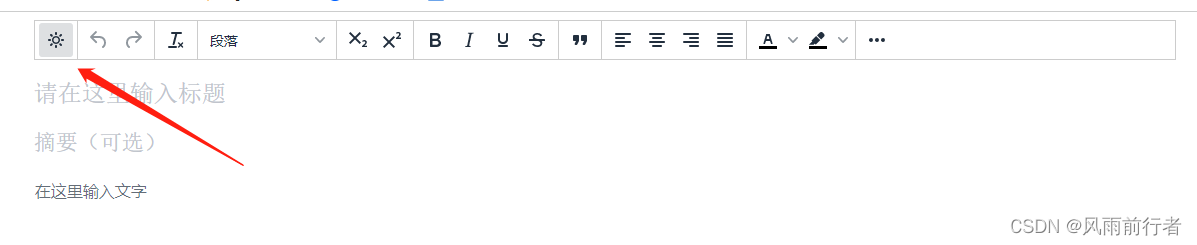
最后就能显示出来创建的按钮了
注:如果想要修改图标可以参照官网给出的一些图标
地址:https://www.tiny.cloud/docs/tinymce/6/editor-icon-identifiers/
四、上传图片时去掉网络上传功能
所谓去掉就是我自己重新自定义了一个图片上传,没有使用tinymce中的图片上传,创建自定义按钮可根据上面的方式进行创建,这里只写了如何进行图片上传
/**
 * @description: 自定义图片上传
 * @param {*} editor
 * @return {*}
 */
export const imageUpload = (editor) => {
  editor.ui.registry.addButton("imageUpload", {
    icon: "image",
    tooltip: '上传图片',
    onAction: function () {
      var input = document.createElement("input");
      input.setAttribute("type", "file");
      input.setAttribute("accept", "image/*");
      input.onchange = function () {
        var file = this.files[0];
        if (file.size / 1024 / 1024 > 20) {
          failure("上传失败,图片大小请控制在 20M 以内");
        } else {
          let formData = new FormData();
          formData.append("picture", file);
          formData.append("action", "add");
          // 上传后的逻辑
          uploadImage({ formData }).then((res) => {
            var reader = new FileReader();
            reader.onload = function () {
              var id = "blobid" + new Date().getTime();
              var blobCache = tinymce.activeEditor.editorUpload.blobCache;
              var base64 = reader.result.split(",")[1];
              var blobInfo = blobCache.create(id, file, base64);
              blobCache.add(blobInfo);
              // 将图片插入到文本中
              editor.insertContent(`<img src="${blobInfo.blobUri()}"/>`);
            };
            reader.readAsDataURL(file);
          }).catch(() => {
            failure("上传出错,服务器开小差了");
          });
        }
      };
      // 触发上传
      input.click();
    },
  });
}
五、粘贴过来的图片实现默认上传
使用粘贴复制功能需要引入一下paste插件 直接在页面中
import "tinymce/plugins/paste"; 引入即可,然后再配置中添加 plugins进行配置
然后在配置中通过paste_postprocess监听复制的内容,在paste_postprocess中写粘贴后的逻辑
<script>
import tinymce from "tinymce";
import Editor from "@tinymce/tinymce-vue";
import "tinymce/themes/silver";
import {
  toolbar,
  fontsizeFormats,
  fontFormats,
  lineheightFormats,
  customBtn,
  imageUpload,
} from "@/utils/tinymceConfig";
import "tinymce/plugins/paste"; // 复制粘贴的插件
import "tinymce/icons/default"; // 方式工具栏的icon乱码
export default {
  data() {
    return {
      defaultTitle: "",
      defaultAbstract: "",
      content: "",
      tinymceInit: {
        language_url: "tinymce/langs/zh-Hans.js", //引入语言包文件
        language: "zh-Hans", //语言类型
        skin_url: "tinymce/skins/ui/oxide", //皮肤:浅色
        quickbars_image_toolbar: "", // 选中媒体文件时的弹框
        plugins: "paste", //插件配置
        // skin_url: '/tinymce/skins/ui/oxide-dark',//皮肤:暗色
        toolbar: toolbar, //工具栏配置,设为false则隐藏
        menubar: false, //菜单栏配置,设为false则隐藏,不配置则默认显示全部菜单,也可自定义配置--查看 http://tinymce.ax-z.cn/configure/editor-appearance.php --搜索“自定义菜单”
        height: 500, // 富文本高度
        model: "dom", // 是否可拉伸富文本框
        fontsize_formats: fontsizeFormats, //字体大小
        font_formats: fontFormats, //字体样式
        lineheight_formats: lineheightFormats, //行高配置,也可配置成"12px 14px 16px 20px"这种形式
        placeholder: "在这里输入文字",
        branding: false, //tiny技术支持信息是否显示
        resize: "both", //编辑器宽高是否可变,false-否,true-高可变,'both'-宽高均可,注意引号
        statusbar: false, //最下方的元素路径和字数统计那一栏是否显示
        paste_data_images: true, //图片是否可粘贴
        elementpath: false, //元素路径是否显示

        inline: true, // 使用内联模式
        toolbar_persist: true, // 在内联模式中,工具栏是否自动显示和隐藏
        fixed_toolbar_container: "#mytoolbar", // 将工具栏显示在一个固定的html元素上
        // 粘贴内容时的回调
        paste_postprocess: (plugin, args) => {
          this.$nextTick(() => {
            // 获取当前编辑器标签
            const doc = tinymce.activeEditor.getBody();
            // 循序所有标签
            doc.childNodes.forEach(async (item) => {
              const tag = item.firstChild; // 获取当前标签下的第一个标签
              // 判断当前标签或当前标签下面的第一个标签是否是一个img
              if (item.localName === "img" || tag.localName === "img") {
                const src =
                  item.localName === "img"
                    ? item.getAttribute("src")
                    : tag.getAttribute("src");
                // 如果是则拿到当前标签的图片地址,传递给后端,进行保存
                const { data } = await uploadImgByUrl({ url: src });
                // 拼接后端保存后的图片地址
                const url = process.env.VUE_APP_BASE_API + data;
                // 然后将新地址重新赋值给img标签
                item.localName === "img"
                  ? item.setAttribute("src", url)
                  : tag.setAttribute("src", url);
              }
            });
          });
        },
        // 自定义工具栏配置
        setup: function (editor) {
          // 自定义图片上传功能
          customBtn(editor);
          // 图片上传
          imageUpload(editor);
        },
      },
    };
  },
  components: { Editor },
};
</script>
六、给图片添加水印功能
添加水印的功能,我也是单独创建了一个自定义按钮来实现,这里的添加水印是将文章中所有的图片都会添加上水印,如果有个别需求,大家可自行修改,创建自定义按钮看上面的方式即可
如果图片过多,加水印时可能时间会稍长一些,建议是添加一个加载状态
/**
 * @description: 添加图片水印
 * @param {*} editor
 * @return {*}
 */
export const imageWatermark = (editor) => {
  editor.ui.registry.addButton("imageWatermark", {
    icon: "edit-image",
    tooltip: '添加图片水印',
    onAction: function () {
      const doc = tinymce.activeEditor.getBody()
      doc.childNodes.forEach(item => {
        const tag = item.firstChild
        // 单独修改img标签
        if (item.localName === "img" || tag.localName === "img") {
          editImages(tag)
        }
      })
    }
  })
}

/**
 * @description: 给图片添加水印
 * @param {*} child
 * @return {*}
 */
const editImages = (child) => {
  const src = child.getAttribute("src")
  var image = new Image();
  image.crossOrigin = 'anonymous';
  image.src = src;
  image.onload = async () => {
    // 创建canvas,并将创建的img绘制成canvas
    const canvas = document.createElement('canvas')
    canvas.width = child.width
    canvas.height = child.height
    const ctx = canvas.getContext('2d')
    ctx.drawImage(image, 0, 0)
    ctx.textAlign = "left"
    ctx.textBaseline = "top"
    ctx.font = "18px Microsoft Yahei"
    ctx.fillStyle = "rgba(255, 255, 255, 0.5)"
    ctx.rotate((Math.PI / 180) * 15)
    for (let i = 0; i < child.height / 120; i++) {
      for (let j = 0; j < child.width / 50; j++) {
        ctx.fillText("这是水印", i * 200, j * 100, child.width)
      }
    }
    const base64Url = canvas.toDataURL()
    setTimeout(() => {
      // 将添加好水印的图片重新插入到富文本中
      child.setAttribute("src", base64Url)
    }, 5000)
  }
}
七、实现一键排版
一键排版的方式,同样新建了一个自定义按钮,实现方式基本一样,就是在获取dom节点后判断出对应节点标签,然后给对应的标签添加不同的样式
/**
 * @description: 一键排版
 * @param {*} editor
 * @return {*}
 */
const objLabel = {
  "h1": "title",
  "h2": "title",
  "h3": "title",
  "p": "paragraph"
}
const objStyle = {
  title: {
    "font-family": "微软雅黑",
    "font-size": "22px"
  },
  paragraph: {
    "font-size": "16px",
    "color": "red"
  }
}
export const oneClickLayout = (editor) => {
  // 参数一:自定义名称,需要放置在工具栏中
  editor.ui.registry.addButton("oneClickLayout", {
    icon: "orientation", // 显示的图标
    tooltip: '一键布局', // 提示文字
    onAction: function () {
      const doc = tinymce.activeEditor.getBody()
      doc.childNodes.forEach(item => {
        // 获取需要修改的标签
        const text = objLabel[item.localName]
        if (text) {
          // 找到对应样式循环进行配置
          for (let v in objStyle[text]) {
            item.style[v] = objStyle[text][v]
          }
        }
      })
    }
  })
}
到此所有的功能就已经完成了,下面附上整个功能的代码
<template>
  <div class="editor_wraper">
    <div id="mytoolbar"></div>
    <el-input
      class="titleStyle"
      v-model="defaultTitle"
      type="textarea"
      resize="none"
      :autosize="{ minRows: 1, maxRows: 3 }"
      placeholder="请在这里输入标题"
    ></el-input>
    <el-input
      class="abstractStyle"
      v-model="defaultAbstract"
      type="textarea"
      resize="none"
      :autosize="{ minRows: 1 }"
      placeholder="摘要(可选)"
    ></el-input>
    <editor :init="tinymceInit" v-model="content"> </editor>
  </div>
</template>

<script>
import tinymce from "tinymce";
import Editor from "@tinymce/tinymce-vue";
import "tinymce/themes/silver";
import {
  toolbar,
  fontsizeFormats,
  fontFormats,
  lineheightFormats,
  customBtn,
  imageUpload,
  oneClickLayout
} from "@/utils/tinymceConfig";
import "tinymce/plugins/paste";
import "tinymce/icons/default"; // 方式工具栏的icon乱码
export default {
  data() {
    return {
      defaultTitle: "",
      defaultAbstract: "",
      content: "",
      tinymceInit: {
        language_url: "tinymce/langs/zh-Hans.js", //引入语言包文件
        language: "zh-Hans", //语言类型
        skin_url: "tinymce/skins/ui/oxide", //皮肤:浅色
        quickbars_image_toolbar: "", // 选中媒体文件时的弹框
        plugins: "paste", //插件配置
        // skin_url: '/tinymce/skins/ui/oxide-dark',//皮肤:暗色
        toolbar: toolbar, //工具栏配置,设为false则隐藏
        menubar: false, //菜单栏配置,设为false则隐藏,不配置则默认显示全部菜单,也可自定义配置--查看 http://tinymce.ax-z.cn/configure/editor-appearance.php --搜索“自定义菜单”
        height: 500, // 富文本高度
        model: "dom", // 是否可拉伸富文本框
        fontsize_formats: fontsizeFormats, //字体大小
        font_formats: fontFormats, //字体样式
        lineheight_formats: lineheightFormats, //行高配置,也可配置成"12px 14px 16px 20px"这种形式
        placeholder: "在这里输入文字",
        branding: false, //tiny技术支持信息是否显示
        resize: "both", //编辑器宽高是否可变,false-否,true-高可变,'both'-宽高均可,注意引号
        statusbar: false, //最下方的元素路径和字数统计那一栏是否显示
        paste_data_images: true, //图片是否可粘贴
        elementpath: false, //元素路径是否显示

        inline: true, // 使用内联模式
        toolbar_persist: true, // 在内联模式中,工具栏是否自动显示和隐藏
        fixed_toolbar_container: "#mytoolbar", // 将工具栏显示在一个固定的html元素上
        // 粘贴内容时的回调
        paste_postprocess: (plugin, args) => {
          this.$nextTick(() => {
            // 获取当前编辑器标签
            const doc = tinymce.activeEditor.getBody();
            // 循序所有标签
            doc.childNodes.forEach(async (item) => {
              const tag = item.firstChild; // 获取当前标签下的第一个标签
              // 判断当前标签或当前标签下面的第一个标签是否是一个img
              if (item.localName === "img" || tag.localName === "img") {
                const src =
                  item.localName === "img"
                    ? item.getAttribute("src")
                    : tag.getAttribute("src");
                // 如果是则拿到当前标签的图片地址,传递给后端,进行保存
                const { data } = await uploadImgByUrl({ url: src });
                // 拼接后端保存后的图片地址
                const url = process.env.VUE_APP_BASE_API + data;
                // 然后将新地址重新赋值给img标签
                item.localName === "img"
                  ? item.setAttribute("src", url)
                  : tag.setAttribute("src", url);
              }
            });
          });
        },
        // 自定义工具栏配置
        setup: function (editor) {
          // 自定义图片上传功能
          customBtn(editor);
          // 图片上传
          imageUpload(editor);
          // 一键布局
          oneClickLayout(editor)
        },
      },
    };
  },
  components: { Editor },
};
</script>

<style lang="scss">
.editor_wraper {
  width: 60%;
  height: 80vh;
  margin: 0 auto;
}
.mce-content-body {
  height: 100%;
  outline: none;
}
.titleStyle .el-textarea__inner {
  width: 100%;
  height: 56px;
  font-size: 24px;
  font-weight: 500;
  margin-top: 10px;
  padding-left: 0;
  border: none;
}
.abstractStyle .el-textarea__inner {
  font-size: 22px;
  font-weight: 500;
  color: #bbb;
  margin-top: 5px;
  padding-left: 0;
  border: none;
}
</style>
这里是tinymceConfig文件的代码
/**
 * @description: 工具栏配置
 * @return {*}
 */
export const toolbar = `
  customBtn imageUpload oneClickLayout|
  undo redo restoredraft |
  removeformat|
  formatselect |
  subscript superscript |
  bold italic underline strikethrough link anchor |
  numlist bullist blockquote |
  alignleft aligncenter alignright alignjustify|
  quicklink searchreplace image|
  forecolor backcolor |
  fontselect fontsizeselect|
  outdent indent lineheight|`

/**
 * @description: 字体大小设置
 * @return {*}
 */
export const fontsizeFormats = `12px 14px 16px 18px 20px 22px 24px 28px 32px 36px 48px 56px 72px`
/**
 * @description: 字体设置
 * @return {*}
 */
export const fontFormats = `微软雅黑=Microsoft YaHei,Helvetica Neue,PingFang SC,sans-serif;苹果苹方=PingFang SC,Microsoft YaHei,sans-serif;宋体=simsun,serif;仿宋体=FangSong,serif;黑体=SimHei,sans-serif;Arial=arial,helvetica,sans-serif;Arial Black=arial black,avant garde;Book Antiqua=book antiqua,palatino;`
/**
 * @description: 行高设置
 * @return {*}
 */
export const lineheightFormats = "0.5 0.8 1 1.2 1.5 1.75 2 2.5 3 4 5"

/**
 * @description: 自定义按钮
 * @param {*} editor
 * @return {*}
 */
export const customBtn = (editor) => {
  // 参数一:自定义名称,需要放置在工具栏中
  editor.ui.registry.addButton("customBtn", {
    icon: "brightness", // 显示的图标
    tooltip: '自定义按钮', // 提示文字
    onAction: function () {
      console.log("点击了自定义按钮")
    }
  })
}

/**
 * @description: 自定义图片上传
 * @param {*} editor
 * @return {*}
 */
export const imageUpload = (editor) => {
  editor.ui.registry.addButton("imageUpload", {
    icon: "image",
    tooltip: '上传图片',
    onAction: function () {
      var input = document.createElement("input");
      input.setAttribute("type", "file");
      input.setAttribute("accept", "image/*");
      input.onchange = function () {
        var file = this.files[0];
        if (file.size / 1024 / 1024 > 20) {
          failure("上传失败,图片大小请控制在 20M 以内");
        } else {
          let formData = new FormData();
          formData.append("picture", file);
          formData.append("action", "add");
          // 上传后的逻辑
          uploadImage({ formData }).then((res) => {
            var reader = new FileReader();
            reader.onload = function () {
              var id = "blobid" + new Date().getTime();
              var blobCache = tinymce.activeEditor.editorUpload.blobCache;
              var base64 = reader.result.split(",")[1];
              var blobInfo = blobCache.create(id, file, base64);
              blobCache.add(blobInfo);
              // 将图片插入到文本中
              editor.insertContent(`<img src="${blobInfo.blobUri()}"/>`);
            };
            reader.readAsDataURL(file);
          }).catch(() => {
            failure("上传出错,服务器开小差了");
          });
        }
      };
      // 触发上传
      input.click();
    },
  });
}
/**
 * @description: 一键排版
 * @param {*} editor
 * @return {*}
 */
const objLabel = {
  "h1": "title",
  "h2": "title",
  "h3": "title",
  "p": "paragraph"
}
const objStyle = {
  title: {
    "font-family": "微软雅黑",
    "font-size": "22px"
  },
  paragraph: {
    "font-size": "16px",
    "color": "red"
  }
}
export const oneClickLayout = (editor) => {
  // 参数一:自定义名称,需要放置在工具栏中
  editor.ui.registry.addButton("oneClickLayout", {
    icon: "orientation", // 显示的图标
    tooltip: '一键布局', // 提示文字
    onAction: function () {
      const doc = tinymce.activeEditor.getBody()
      doc.childNodes.forEach(item => {
        // 获取需要修改的标签
        const text = objLabel[item.localName]
        if (text) {
          // 找到对应样式循环进行配置
          for (let v in objStyle[text]) {
            item.style[v] = objStyle[text][v]
          }
        }
      })
    }
  })
}

/**
 * @description: 添加图片水印
 * @param {*} editor
 * @return {*}
 */
export const imageWatermark = (editor) => {
  editor.ui.registry.addButton("imageWatermark", {
    icon: "edit-image",
    tooltip: '添加图片水印',
    onAction: function () {
      const doc = tinymce.activeEditor.getBody()
      doc.childNodes.forEach(item => {
        const tag = item.firstChild
        // 单独修改img标签
        if (item.localName === "img" || tag.localName === "img") {
          editImages(tag)
        }
      })
    }
  })
}
/**
 * @description: 给图片添加水印
 * @param {*} child
 * @return {*}
 */
const editImages = (child) => {
  const src = child.getAttribute("src")
  var image = new Image();
  image.crossOrigin = 'anonymous';
  image.src = src;
  image.onload = async () => {
    // 创建canvas,并将创建的img绘制成canvas
    const canvas = document.createElement('canvas')
    canvas.width = child.width
    canvas.height = child.height
    const ctx = canvas.getContext('2d')
    ctx.drawImage(image, 0, 0)
    ctx.textAlign = "left"
    ctx.textBaseline = "top"
    ctx.font = "18px Microsoft Yahei"
    ctx.fillStyle = "rgba(255, 255, 255, 0.5)"
    ctx.rotate((Math.PI / 180) * 15)
    for (let i = 0; i < child.height / 120; i++) {
      for (let j = 0; j < child.width / 50; j++) {
        ctx.fillText("这是水印", i * 200, j * 100, child.width)
      }
    }
    const base64Url = canvas.toDataURL()
    setTimeout(() => {
      child.setAttribute("src", base64Url)
    }, 5000)
  }
}
这是在使用tinymce期间的一些心得,也是花了很长时间才实现的,如果还有任何问题,欢迎大家一起讨论