刚开始学Android开发的时候,没有H5的基础总是分不清android布局文件的用法,真正要学会android布局还是得实战一次,下面不多说,直接上代码。
这是一个登陆界面,LinerLayout嵌套RelativeLayout的布局,去掉我写的注释就可以直接使用:
<?xml version="1.0" encoding="utf-8"?>
<LinearLayout xmlns:android="http://schemas.android.com/apk/res/android"
    android:layout_width="match_parent"  //match_parent是占满整行,设置宽
    android:layout_height="match_parent"  //占满整列,设置高
    android:orientation="vertical">  //里面的项目垂直排列,如果不写可能报错

    <RelativeLayout  //这是LinerLayout嵌套的第一个layout。显示在第一行
        android:layout_width="match_parent"
        android:layout_height="180dp"
        android:background="@mipmap/login_bg_no"> //设置背景图片,背景图片一般就是粘贴在mipmap的xhdpi中

        <ImageView  //图片控件,显示在父控件的第一行
            android:id="@+id/back1"  //设置id,后面可以用来设置点击事件或相对布局
            android:layout_width="20dp"  //设置图片大小,如果要展示原有大小就改为wrap_content
            android:layout_height="20dp"
            android:src="@mipmap/bg_back_white"  //背景图片,一个类似“<”的图片
            android:layout_marginTop="15dp"
            android:layout_alignParentLeft="true" //靠近父控件左侧
            android:layout_marginLeft="20dp" />  //离父控件左侧20dp,LinerLayout中不能这样用

        <TextView  //文字控件,由于是RelativeLayout,不设置相对布局,就会和上一个控件叠加
            android:id="@+id/register"
            android:layout_width="wrap_content"
            android:layout_height="wrap_content"
            android:text="注册"  //显示的文字
            android:textSize="13sp"  //文字大小
            android:textColor="@color/white"  //文字颜色,在value的color中设置颜色
            android:layout_alignParentRight="true"  //显示在父控件的右侧
            android:layout_marginTop="15dp"  //距父控件的上侧15dp
            android:layout_marginRight="20dp"
            />
    </RelativeLayout>

    <RelativeLayout  //由于LinearLayout中垂直排列,显示在上一个RelativeLayout的下侧
        android:layout_width="match_parent"
        android:layout_height="match_parent"
        android:background="@color/white">

        <EditText  //输入框
            android:id="@+id/loginnum"
            android:layout_width="match_parent"  //先占满一行
            android:layout_height="55dp"  //高度55dp
            android:layout_marginTop="20dp"  //再往下移20dp
            android:layout_marginRight="20dp"  //右侧减少20店铺
            android:layout_marginLeft="20dp"  //左侧减少20dp
            android:hint="请输入手机号码"  //设置默认文字
            android:textSize="20sp"  //文字大小
            android:numeric="integer"  //设置只能输入int类型的数
            android:maxLength="11"  //最长11位
            android:singleLine="true"/>  //单行,不能回车再起一行

        <EditText
            android:id="@+id/loginpassword"
            android:layout_width="match_parent"
            android:layout_height="55dp"
            android:layout_marginRight="20dp"
            android:layout_marginLeft="20dp"
            android:layout_marginTop="10dp"
            android:layout_below="@id/loginnum"  //相对于id为loginnum的控件往下
            android:hint="请输入密码"
            android:textSize="20sp"
            android:password="true"  //显示输入的为*
            android:singleLine="true"/> //单行

        <Button  //按钮
            android:id="@+id/loginbtn"
            android:layout_width="match_parent"
            android:layout_height="45dp"
            android:text="登 录"
            android:textSize="20sp"
            android:background="@drawable/backguound_shape" //这是自己定义的一个drawable,使button显示为圆角,并点击变色,具体参见下一条博客。
            android:textColor="@color/white"
            android:layout_marginLeft="20dp"
            android:layout_marginRight="20dp"
            android:layout_marginTop="30dp"
            android:layout_below="@id/loginpassword"/>
    </RelativeLayout>
</LinearLayout>
上面展示了几个常用的控件用法,最重要的是要对LinerLayout和RelativeLayout有所了解。
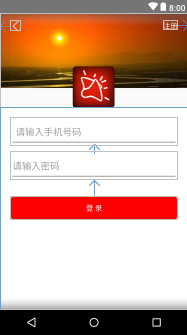
下面的完成后的样子:
掌握这些,一些简单的布局就已经能够完成了。
如果color中没有相关颜色可以插入
切记不要删除color默认的几个颜色,否则会报错。
    <color name="red">#ff0000</color> <!-- 红色 -->
    <color name="black">#000000</color> <!-- 黑色 -->
    <color name="white">#ffffff</color> <!-- 白色 -->
    <color name="darkred">#8b0000</color> <!-- 暗红色 -->