一、Nginx安装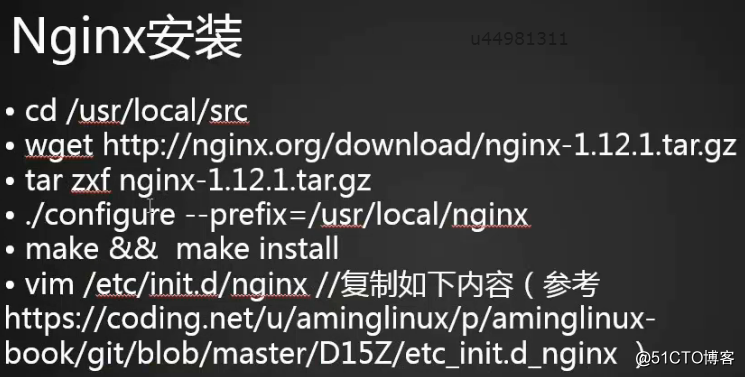
#cd /usr/local/src/
#wget http://101.44.1.3/files/514900000711527E/nginx.org/download/nginx-1.14.0.tar.gz
#tar zxf nginx-1.14.0.tar.gz //解压
#cd nginx-1.14.0/
#./configure --prefix=/usr/local/nginx
#make
#make install
#ls /usr/local/nginx/sbin/nginx //nginx启动路径,核心文件
#/usr/local/nginx/sbin/nginx -t //支持-t,查看配置文件是否有错
#vim /etc/init.d/nginx //复制如下内容(参考https://coding.net/u/aminglinux/p/aminglinux-book/git/blob/master/D15Z/etc_init.d_nginx?public=true)
#chmod 755 /etc/init.d/nginx
#chkconfig --add nginx
#chkconfig nginx on
#cd /usr/local/nginx/conf/
#mv nginx.conf nginx.conf.1 //给原来/usr/local/nginx/conf/目录下的nginx.conf修改名称为nginx.conf1,我们不使用默认的这个配置文件,使用自定义的
#vim nginx.conf //复制如下内容,(参考https://coding.net/u/aminglinux/p/aminglinux-book/git/blob/master/D15Z/nginx.conf?public=true)
配置文件注释:
user nobody nobody; //用来定义启动nginx是哪个用户
worker_processes 2; //定义子进程有几个
worker_rlimit_nofile 51200; //定义nginx最多可以打开多少个文件
worker_connections 6000; //定义进程最多有多少个连接
server //每一个server对应一个虚拟主机
{
listen 80;
server_name localhost; //定义域名
index index.html index.htm index.php;
root /usr/local/nginx/html; //网站根目录
location ~ .php$ //用来配置解析php的
{
include fastcgi_params;
fastcgi_pass unix:/tmp/php-fcgi.sock; //指定sock地址
fastcgi_pass 127.0.0.1:9000; //和sock是两种不同的方法,之前配置文件定义的哪一种,这里就选择哪个
fastcgi_index index.php;
fastcgi_param SCRIPT_FILENAME /usr/local/nginx/html$fastcgi_script_name;
}
}
#/usr/local/nginx/sbin/nginx -t //编辑完配置文件检查有没有语法错误
#/etc/init.d/nginx start //启动nginx,注意启动之前需要先把httpd关闭
#ps aux |grep nginx //查看进程
#curl localhost //测试下localhost
#vim /usr/local/nginx/html/1.php //编辑一个1.php文件
<?php
echo "This is nginx test page.";
#curl localhost/1.php //测试下是否可以成功解析
二、默认虚拟主机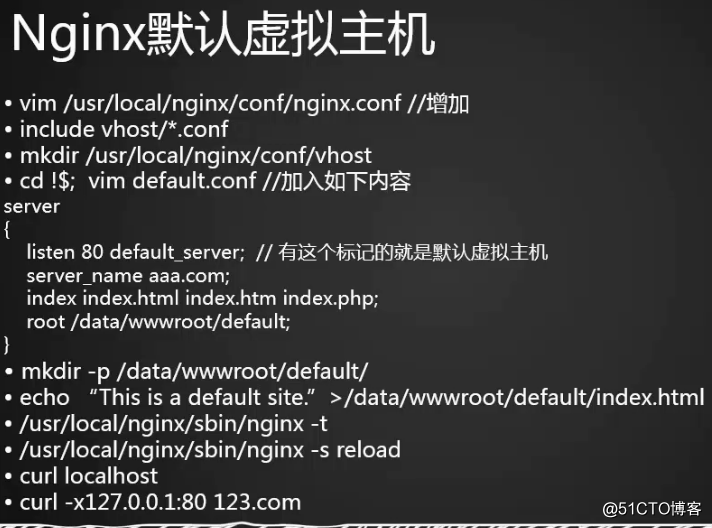
#vim nginx.conf //修改配置文件,删除最下面server那一段虚拟主机配置,添加如下一行在最后
include vhost/*.conf;
#mkdir vhost //在/usr/local/nginx/conf/这个目录下创建一个vhost文件夹
#cd vhost/
#vim aaa.com.conf //创建一个aaa.com.conf文件,加入如下内容
server
{
listen 80 default_server; // 有这个标记的就是默认虚拟主机
server_name aaa.com;
index index.html index.htm index.php;
root /data/wwwroot/default;
}
#mkdir /data/wwwroot/default //创建efault目录
#cd /data/wwwroot/default/
#vim index.html //创建index.html文件,在里面写一行内容
This is the default site.
#/usr/local/nginx/sbin/nginx -t //检查语法有没有错误
#/usr/local/nginx/sbin/nginx -s reload //重新加载,不需要重启nginx
#curl localhost
This is the default site.
#curl -x127.0.0.1:80 bbb.com //默认虚拟主机,不管什么域名,只要解析过来,它都能访问到这个站点
需要注意事项:
默认虚拟主机一定要加上default_server
nginx.conf支持include
三、Nginx用户认证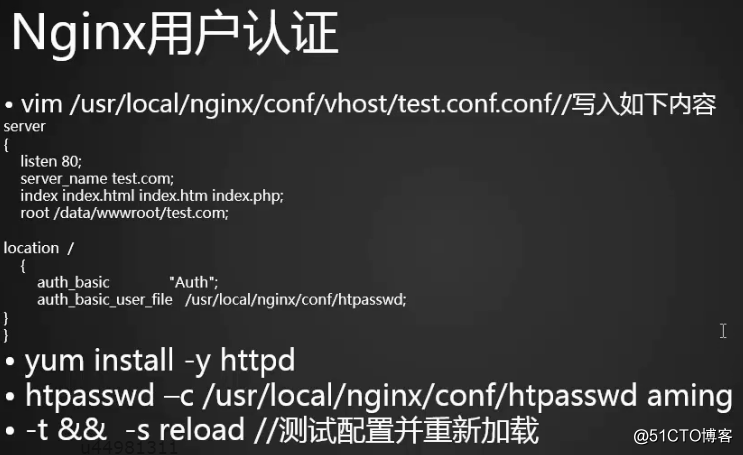
#cd /usr/local/nginx/conf/vhost/
#vim test.com.conf //再创建一个test.com.conf文件,加入如下内容
server
{
listen 80;
server_name test.com;
index index.html index.htm index.php;
root /data/wwwroot/test.com;
location /
{
auth_basic "Auth"; //定义用户认证的名字
auth_basic_user_file /usr/local/nginx/conf/htpasswd; //用户名密码文件路径
}
}
#/usr/local/apache2.4/bin/htpasswd //如果已经安装过Apache,可以使用这个命令
#yum install -y httpd //如果没有安装Apache,可以yum安装一下Apache,安装完成后可以使用上面那个命令
#/usr/local/apache2.4/bin/htpasswd -c /usr/local/nginx/conf/htpasswd aming
//在/usr/local/nginx/conf/目录下生成htpasswd文件,为aming用户设置密码
#cat /usr/local/nginx/conf/htpasswd //查看下这个文件里面生成一个密码
aming:$apr1$.5xIzl61$B9T1V85Z5LkqCKriYOl6g/
#/usr/local/apache2.4/bin/htpasswd /usr/local/nginx/conf/htpasswd user1 //再创建第二个用户就省略掉-c选项,如果再加上-c选项就会重置
#cat /usr/local/nginx/conf/htpasswd //看到文件下生成两个用户密码
aming:$apr1$.5xIzl61$B9T1V85Z5LkqCKriYOl6g/
user1:$apr1$snuqeeD2$HdkHaUKCwG4Hzk0L9CXDX0
#/usr/local/nginx/sbin/nginx -t //检查语法
#/usr/local/nginx/sbin/nginx -s reload //重新加载,-s reload的好处是有错误它不会重新加载,如果restart的话,配置文件有错误,那么服务就启动不了了
#curl -x127.0.0.1:80 test.com //访问提示401错误,需要用户名密码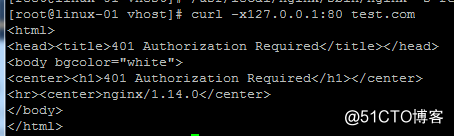
#curl -uaming:aming -x127.0.0.1:80 test.com //访问提示404代码
#mkdir /data/wwwroot/test.com
#echo "test.com" > /data/wwwroot/test.com/index.html
#curl -uaming:aming -x127.0.0.1:80 test.com //访问正常
设置单个目录访问需要密码: 如限制/admin/目录
#vi test.com.conf
server
{
listen 80;
server_name test.com;
index index.html index.htm index.php;
root /data/wwwroot/test.com;
location  /admin/         //直接把原来的根目录/修改为/admin/目录即可
{
    auth_basic              "Auth";         //定义用户认证的名字
    auth_basic_user_file   /usr/local/nginx/conf/htpasswd;    //用户名密码文件路径
}
}
#/usr/local/nginx/sbin/nginx -t //检查语法
#/usr/local/nginx/sbin/nginx -s reload //重新加载
#curl -x127.0.0.1:80 test.com/admin //访问提示401,这就需要密码了,证明限制admin目录成功