前面的文章已经介绍了全量导入 Solr(四)DIH实现数据库数据全量导入到solr索引库,这次来介绍增量导入并设置定时,为什么有了全量导入 还要 增量导入呢?因为全量导入的代价太大,假设我在mysql每一次只改一条记录,都要全部重新导入。
有了增量导入后,我可以只重新导入刚刚修改的记录,其他的记录不变。
下面介绍的增量导入是在前面的文章全量导入基础上进行演变的。(建议先看全量导入的文章)
1、数据库表的更改:
前面已经创建好了一个goods的表,这里为了能够进行增量导入,需要新增一个字段,类型为TIMESTAMP,默认值为CURRENT_TIMESTAMP

有了这样一个字段,Solr才能判断增量导入的时候,哪些数据是新的。
因为Solr本身有一个默认值last_index_time,记录最后一次做full import(全量导入)或者是delta import(增量导入)的时间,这个值存储在文件conf目录的dataimport.properties文件中。
2、data-config.xml中必要属性的设置:
<!--  transformer 格式转化:HTMLStripTransformer 索引中忽略HTML标签   --->
<!--  query:查询数据库表符合记录数据   --->
<!--  deltaQuery:增量索引查询主键ID    --->    注意这个只能返回ID字段
<!--  deltaImportQuery:增量索引查询导入的数据  --->
<!--  deletedPkQuery:增量索引删除主键ID查询  ---> 注意这个只能返回ID字段
有关“query”,“deltaImportQuery”, “deltaQuery”的解释,引用官网说明,如下所示:
- The query gives the data needed to populate fields of the Solr document in full-import
- The deltaImportQuery gives the data needed to populate fields when running a delta-import
- The deltaQuery gives the primary keys of the current entity which have changes since the last index time
最终针对步骤一中创建的goods表,我们的data-config.xml文件的配置内容如下:
<dataConfig>
    <dataSource type="JdbcDataSource" driver="com.mysql.jdbc.Driver" url="jdbc:mysql://192.168.157.1:3306/shop" user="root" password="123456" />
    <document>
        <entity name="productInfo" pk="goodsId"
		query="select * from goods"
		deltaQuery="SELECT goodsId FROM goods where updateTime > '${dataimporter.last_index_time}'"
	    deltaImportQuery="SELECT * FROM goods where goodsId = '${dih.delta.goodsId}'">
            <field column="goodsId" name="id"/>
            <field column="goodsName" name="goodsName"/>
			<field column="goodsType" name="goodsType"/>
			<field column="updateTime" name="updateTime"/>
        </entity>
    </document>
</dataConfig>
意思是首先按照query指定的SQL语句查询出符合条件的记录。
然后从这些数据中根据deltaQuery指定的SQL语句查询出所有需要增量导入的数据的ID号。
最后根据deltaImportQuery指定的SQL语句返回所有这些ID的数据,即为这次增量导入所要处理的数据。
核心思想是:通过内置变量“${dih.delta.id}”和 “${dataimporter.last_index_time}”来记录本次要索引的id和最近一次索引的时间。

注意:刚新加上的updateTime字段也要在field属性中配置,同时也要在schema.xml文件中配置:
<field name="updateTime" type="date" indexed="true" stored="true" />
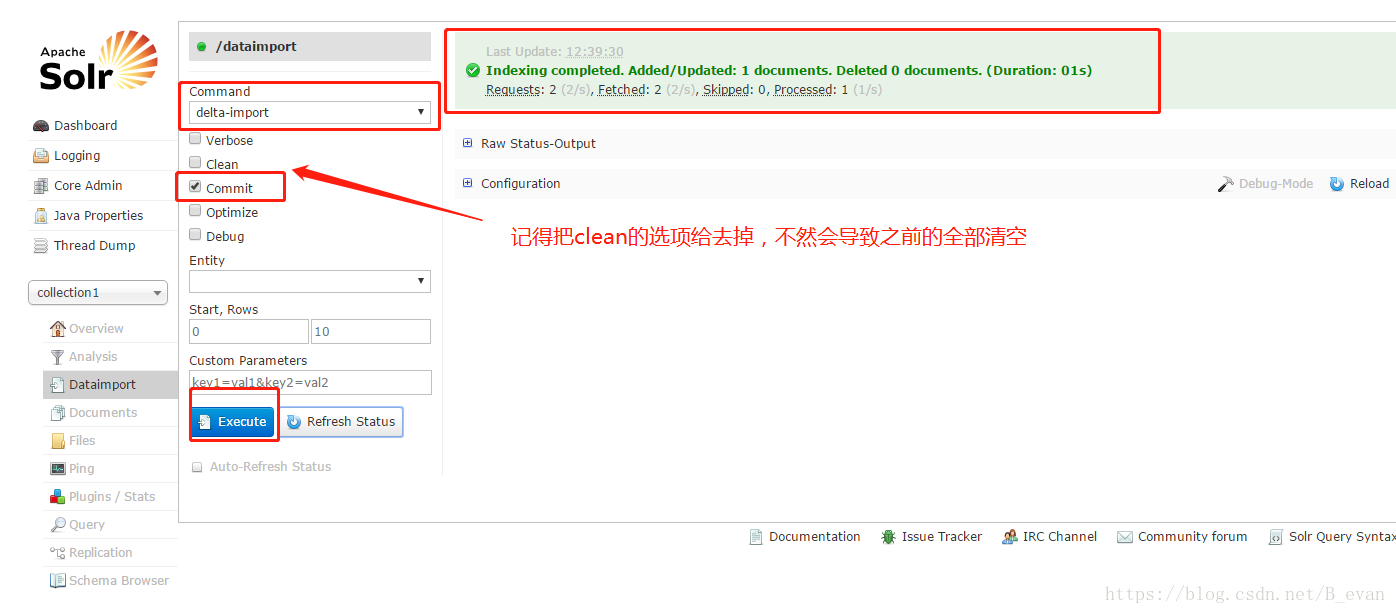
3、测试增量导入:
我们先查询一条不存在的记录,然后再去mysql增加一条新记录,再执行delta-import操作。这时会发现solr只添加了我们刚刚在mysql添加的记录。
4、设置增量导入为定时执行的任务:
1、下载apache-solr-dataimportscheduler-1.1.jar放到Tomcat的webapps的solr目录的WEB-INF的lib目录下:
下载地址:点击打开链接
2、修改solr的WEB-INF目录下面的web.xml文件:
为<web-app>元素添加一个子元素:
<listener>
    <listener-class>
            org.apache.solr.handler.dataimport.scheduler.ApplicationListener
    </listener-class>
  </listener>
3、新建配置文件dataimport.properties:
在home/solr/solrhome目录下面新建一个目录conf(注意不是solrhome/solr/collection1下面的conf),然后用解压文件打开solr-dataimportscheduler-1.1.jar文件,将里面的dataimport.properties文件拷贝过来,进行修改,下面是最终我的自动定时更新配置文件内容:
#################################################
#                                               #
#       dataimport scheduler properties         #
#                                               #
#################################################

#  to sync or not to sync
#  1 - active; anything else - inactive
syncEnabled=1

#  which cores to schedule
#  in a multi-core environment you can decide which cores you want syncronized
#  leave empty or comment it out if using single-core deployment
#	 syncCores=game,resource
syncCores=collection1

#  solr server name or IP address
#  [defaults to localhost if empty]
server=192.168.168.128

#  solr server port
#  [defaults to 80 if empty]
port=8080

#  application name/context
#  [defaults to current ServletContextListener's context (app) name]
webapp=solr

#  URL params [mandatory]
#  remainder of URL
#增量
#params=/dataimportUserDelta?command=delta-import&clean=false&commit=true&optimize=false&wt=json&indent=true&entity=user&verbose=false&debug=false
params=/dataimport?command=delta-import&clean=false&commit=true

#  schedule interval
#  number of minutes between two runs
#  [defaults to 30 if empty]
interval=1

#  重做索引的时间间隔,单位分钟,默认7200,即1天;
#  为空,为0,或者注释掉:表示永不重做索引
reBuildIndexInterval=2

#  重做索引的参数
#reBuildIndexParams=/dataimportUserFull?command=full-import&clean=true&commit=true&optimize=true&wt=json&indent=true&entity=user&verbose=false&debug=false
reBuildIndexParams=/dataimport?command=full-import&clean=true&commit=true

#  重做索引时间间隔的计时开始时间,第一次真正执行的时间=reBuildIndexBeginTime+reBuildIndexInterval*60*1000;
#  两种格式:2012-04-11 03:10:00 或者  03:10:00,后一种会自动补全日期部分为服务启动时的日期
reBuildIndexBeginTime=03:10:00
重启tomcat后,等个1分钟 数据就会变化啦!!