可以获取到以下文档:
1) sscanRecord.html:sscan记录文档。这也包含一些有关saveData的信息,把扫描数据写到磁盘的synApps客户端程序。
2)scanparmRecord.html:scanparm记录文档。
3)saveData_fileFormat.txt:由saveData写的'MDA'(多维存档)文件格式的描述。为了跨平台兼容,此文件格式使用XDR标准。
4)saveData.req:告诉saveData要做什么的文件的示例副本。
5)XDR_RFC1014.txt:一个XDR(外部数据表示)标准的描述。
6)Scans.ppt:描述这个sscan模块的ppt表示;显示如何使用sscan记录;描述saveData的MDA文件格式;以及解释EPICS putNotify/ca_put_callback()行为如何,以及如何处理不满足EPICS执行-跟踪要求的运行链。
一、安装和构建
在获取了一个这个发行包副本后,为了在你的使用,必须按照和构建它。通常,这些步骤值需要执行一次:
1)解压这个发行包,例如,在Linux上:
[blctrl@main-machine support]$ tar -xvzf sscan-R2-11-3.tar.gz
[blctrl@main-machine support]$ ln -s sscan-R2-11-3 sscan
通常在EPICS 'support'目录中做这件事,它将产生这个子目录:
[blctrl@main-machine support]$ ls -l | grep sscan
lrwxrwxrwx.  1 root   root        13 Sep 12  2022 sscan -> sscan-R2-11-3
drwxr-xr-x. 10 root   root       168 Sep 12  2022 sscan-R2-11-3
2) 编辑sscan的configure/RELEASE文件,并且设置这些路径指向你EPICS base以及其它依赖模块的安装路径。
#RELEASE Location of external products
# Run "gnumake clean uninstall install" in the application
# top directory each time this file is changed.

TEMPLATE_TOP=$(EPICS_BASE)/templates/makeBaseApp/top

SUPPORT=/usr/local/EPICS/synApps/support
-include $(TOP)/../configure/SUPPORT.$(EPICS_HOST_ARCH)

#If using the sequencer, point SNCSEQ at its top directory:
SNCSEQ=$(SUPPORT)/seq

# EPICS_BASE usually appears last so other apps can override stuff:
EPICS_BASE=/usr/local/EPICS/base
-include $(TOP)/../configure/EPICS_BASE.$(EPICS_HOST_ARCH)

#Capfast users may need the following definitions
#CAPFAST_TEMPLATES=
#SCH2EDIF_PATH=

# These lines allow developers to override these RELEASE settings
# without having to modify this file directly.
-include $(TOP)/../RELEASE.local
-include $(TOP)/../RELEASE.$(EPICS_HOST_ARCH).local
-include $(TOP)/configure/RELEASE.local
3) 返回到sscan模块的顶层目录,并且执行make,并且检查是否存在任何编译错误。
[blctrl@main-machine sscan]$ make
make -C ./configure install
...
make[1]: Leaving directory '/usr/local/EPICS/synApps/support/sscan-R2-11-3/sscanApp'
二、在一个EPICS IOC中sscan模块的用法
sscan模块不是用于直接运行一个IOC应用程序,而是为一个IOC应用程序贡献代码库,数据库,MEDM显示窗口等。SynApps包含了一个示例IOC应用程序(xxx模块),此模块从sscan模块抽取软件并且在一个IOC中部署它。
在一个IOC应用程序("sscan_ex")中使用sscan模块代码的必需步骤如下:
1) 按如下步骤,构建这个程序框架:
[root@main-machine exer]# mkdir sscan_ex
[root@main-machine exer]# cd sscan_ex/
[root@main-machine sscan_ex]# makeBaseApp.pl -t ioc sscan_ex
[root@main-machine sscan_ex]# makeBaseApp.pl -i -t ioc sscan_ex
Using target architecture linux-x86_64 (only one available)
The following applications are available:
    sscan_ex
What application should the IOC(s) boot?
The default uses the IOC's name, even if not listed above.
Application name?
[root@main-machine sscan_ex]# ls
configure  iocBoot  Makefile  sscan_exApp
2) 在这个程序的configure/RELEASE下,包含这以下行:
SUPPORT=/usr/local/EPICS/synApps/support

# If using the sequencer, point SNCSEQ at its top directory:
ASYN=$(SUPPORT)/asyn
SSCAN=$(SUPPORT)/sscan
SNCSEQ = $(SUPPORT)/seq
3)在/sscan_ex/sscan_exApp/src路径下,编辑Makefile:
TOP=../..

include $(TOP)/configure/CONFIG
#----------------------------------------
#  ADD MACRO DEFINITIONS AFTER THIS LINE
#=============================

#=============================
# Build the IOC application

PROD_IOC = sscan_ex
# sscan_ex.dbd will be created and installed
DBD += sscan_ex.dbd

# sscan_ex.dbd will be made up from these files:
sscan_ex_DBD += base.dbd

# Include dbd files from all support applications:
sscan_ex_DBD += sscanSupport.dbd
sscan_ex_DBD += sscanProgressSupport.dbd

# Add all the support libraries needed by this IOC
sscan_ex_LIBS += sscan scanProgress

# sscan_ex_registerRecordDeviceDriver.cpp derives from sscan_ex.dbd
sscan_ex_SRCS += sscan_ex_registerRecordDeviceDriver.cpp

# Build the main IOC entry point on workstation OSs.
sscan_ex_SRCS_DEFAULT += sscan_exMain.cpp
sscan_ex_SRCS_vxWorks += -nil-

# Add support from base/src/vxWorks if needed
#sscan_ex_OBJS_vxWorks += $(EPICS_BASE_BIN)/vxComLibrary

# Finally link to the EPICS Base libraries
sscan_ex_LIBS += $(EPICS_BASE_IOC_LIBS)

#===========================

include $(TOP)/configure/RULES
#----------------------------------------
#  ADD RULES AFTER THIS LINE
4)通过在st.cmd中以下行装载数据库standardScans和saveData:
dbLoadRecords("$(SSCAN)/sscanApp/Db/standardScans.db","P=SSCAN-EX:,MAXPTS1=2000,MAXPTS2=1000,MAXPTS3=1000,MAXPTS4=10,MAXPTSH=2000")
dbLoadRecords("$(SSCAN)/sscanApp/Db/saveData.db","P=SSCAN-EX:")
dbLoadRecords("$(SSCAN)/sscanApp/Db/scanProgress.db","P=SSCAN-EX:scanProgress:")
5)如果你使用autosave,在你的autosave request文件中包含standardScans_settings.req和saveData_settings.req:
file standardScans_settings.req P=$(P)
file saveData_settings.req P=$(P)
6)通过编辑saveData.req告诉saveData如何初始化,并且放置它在ioc的启动目录。通常,此文件中你修改的唯一部分是标记为[extraPV]的部分。在这部分,输入你想要saveData在每个扫描数据文件中要包含的PV的名称。如果一个PV未被其记录的.DESC字段明确地注释,你可以追加你自己地描述。
7)通过在st.cmd中iocInit后,包含以下行,初始化saveData:
saveData_Init("saveData.req", "P=xxx:")8)在运行任何扫描前,指定saveData写扫描数据文件到哪里。打开medm显示窗口,scan_saveData.adl并且在"File System"以及"Subdirectory"字段中填写。(例如:PV的$(P)saveData_fileSystem和$(P)saveData_subDir)。
9)以上步骤完成后,切换到这个IOC的顶层目录,执行make。
10)切换到ioc启动目录,执行这个IOC程序的启动脚本:
[root@main-machine iocsscan_ex]# ../../bin/linux-x86_64/sscan_ex st.cmd启动结果:
#!../../bin/linux-x86_64/sscan_ex
< envPaths
epicsEnvSet("IOC","iocsscan_ex")
epicsEnvSet("TOP","/usr/local/EPICS/exer/sscan_ex")
epicsEnvSet("SUPPORT","/usr/local/EPICS/synApps/support")
epicsEnvSet("ASYN","/usr/local/EPICS/synApps/support/asyn")
epicsEnvSet("SSCAN","/usr/local/EPICS/synApps/support/sscan")
epicsEnvSet("CALC","/usr/local/EPICS/synApps/support/calc")
epicsEnvSet("SNCSEQ","/usr/local/EPICS/synApps/support/seq")
epicsEnvSet("EPICS_BASE","/usr/local/EPICS/base")
cd "/usr/local/EPICS/exer/sscan_ex"
## Register all support components
dbLoadDatabase "dbd/sscan_ex.dbd"
sscan_ex_registerRecordDeviceDriver pdbbase
## Load record instances
#dbLoadRecords("db/xxx.db","user=blctrl")
dbLoadRecords("/usr/local/EPICS/synApps/support/sscan/sscanApp/Db/standardScans.db","P=SSCAN-EX:,MAXPTS1=2000,MAXPTS2=1000,MAXPTS3=1000,MAXPTS4=10,MAXPTSH=2000")
dbLoadRecords("/usr/local/EPICS/synApps/support/sscan/sscanApp/Db/saveData.db","P=SSCAN-EX:")
dbLoadRecords("/usr/local/EPICS/synApps/support/sscan/sscanApp/Db/scanProgress.db","P=SSCAN-EX:scanProgress:")
cd "/usr/local/EPICS/exer/sscan_ex/iocBoot/iocsscan_ex"
iocInit
Starting iocInit
############################################################################
## EPICS R7.0.3.1
## EPICS Base built Sep  8 2022
############################################################################
recDynLinkOut: waiting for CA context
recDynLinkOut: got CA context
iocRun: All initialization complete
## Start any sequence programs
#seq sncxxx,"user=blctrl"
epics> dbl
SSCAN-EX:scan1
...
SSCAN-EX:scanActive
11) 打开medm窗口,进行测试:
[blctrl@main-machine adls]$ medm -x -macro "P=SSCAN-EX:,S=scan1" scan_more.adl打开的窗口如下:
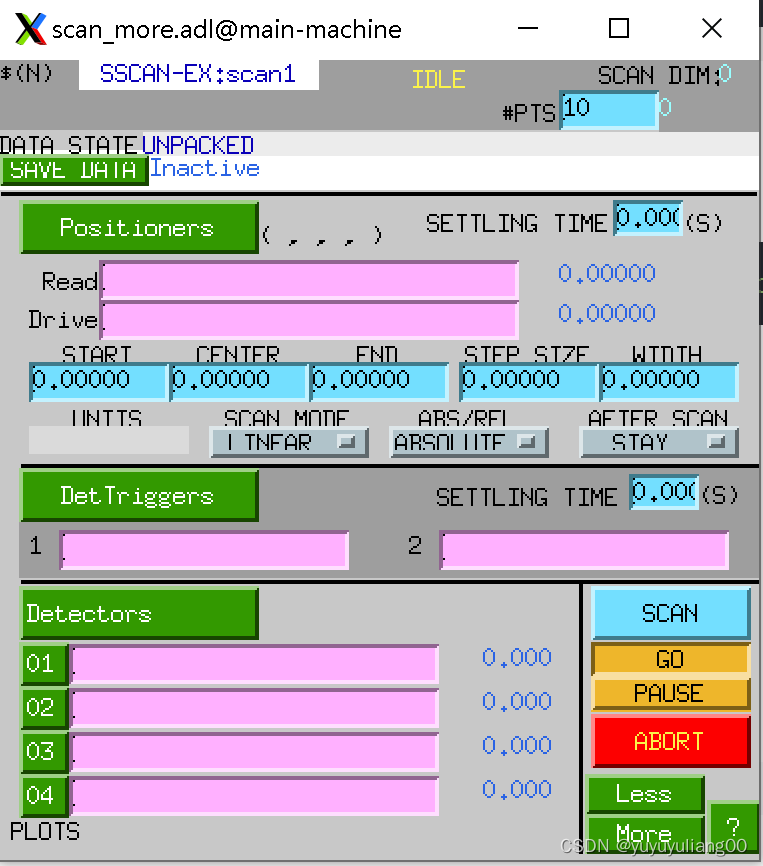
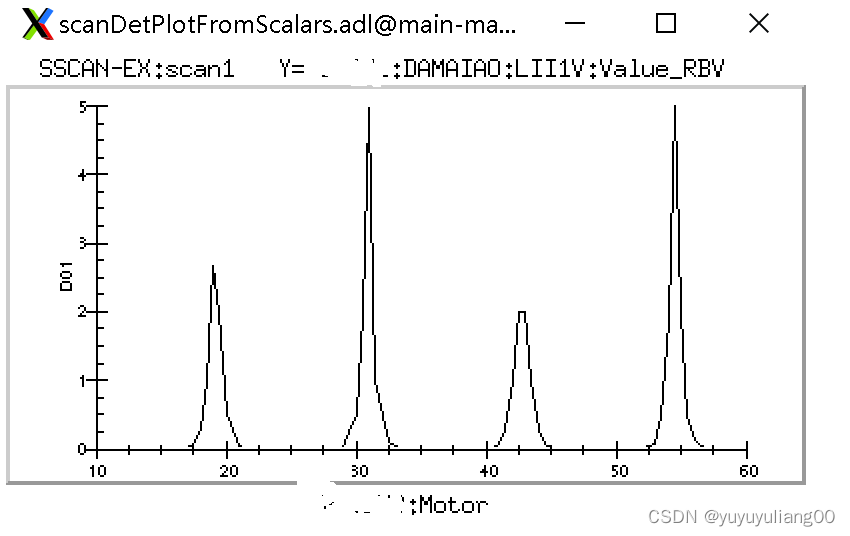
12)测试这个扫描,在以上窗口的Read和Driver中输入定位器PV名,并且指定定位器的启动位置,终点位置以及步长;在Detector中输入探测器名。

点击SCAN按钮开始扫描,结果如下: