目录
一、序言
在上一节 Spring声明式基于注解的缓存(2-实践篇)中给出了一些声明式基于注解的缓存实际使用案例。在这一节中,我们会通过自定义CacheResolver、RedisCacheManager还有Cache相关注解来实现带过期时间的缓存方案。
二、如何自定义过期时间
在实例化RedisCacheManager时,我们可以指定key过期的entryTtl属性,如下:
@EnableCaching
@Configuration
public class RedisCacheConfig {


	private static final String KEY_SEPERATOR = ":";

	/**
	 * 自定义CacheManager,具体配置参考{@link org.springframework.boot.autoconfigure.cache.RedisCacheConfiguration}
	 * @param redisConnectionFactory 自动配置会注入
	 * @return
	 */
	@Bean(name = "redisCacheManager")
	public RedisCacheManager redisCacheManager(RedisConnectionFactory redisConnectionFactory) {


		RedisSerializer<String> keySerializer = new StringRedisSerializer();
		RedisSerializer<Object> valueSerializer = new GenericJackson2JsonRedisSerializer();
		RedisCacheConfiguration cacheConfig = RedisCacheConfiguration.defaultCacheConfig()
			.serializeKeysWith(SerializationPair.fromSerializer(keySerializer))
			.serializeValuesWith(SerializationPair.fromSerializer(valueSerializer))
			.computePrefixWith(key -> key.concat(KEY_SEPERATOR))
			.entryTtl(Duration.ofSeconds(1));
		return RedisCacheManager.builder(redisConnectionFactory).cacheDefaults(cacheConfig).build();
	}
}
备注:这种方式有一个很明显的缺点,所有
key都会共享配置,比如这里会设置所有key的过期时间都为1秒。
三、解决方案
我们的需求是每个key都能自定义过期时间,如果能从原生@Cacheable等注解中获取过期时间,然后再动态注入到RedisCacheConfiguration中,其实就能实现我们想要的需求。
1、CacheManger的作用
在Spring声明式基于注解的缓存(1-理论篇)中我们了解到CacheManager主要有两个方法。一个是根据指定缓存名获取Cache实例,还有一个是获取所有缓存名称的。
public interface CacheManager {


	/**
	 * Get the cache associated with the given name.
	 * <p>Note that the cache may be lazily created at runtime if the
	 * native provider supports it.
	 * @param name the cache identifier (must not be {@code null})
	 * @return the associated cache, or {@code null} if such a cache
	 * does not exist or could be not created
	 */
	@Nullable
	Cache getCache(String name);

	/**
	 * Get a collection of the cache names known by this manager.
	 * @return the names of all caches known by the cache manager
	 */
	Collection<String> getCacheNames();

}
让我们看看RedisCacheManager对CacheManager的实现,实际上中间还继承了两个抽象类,如下:
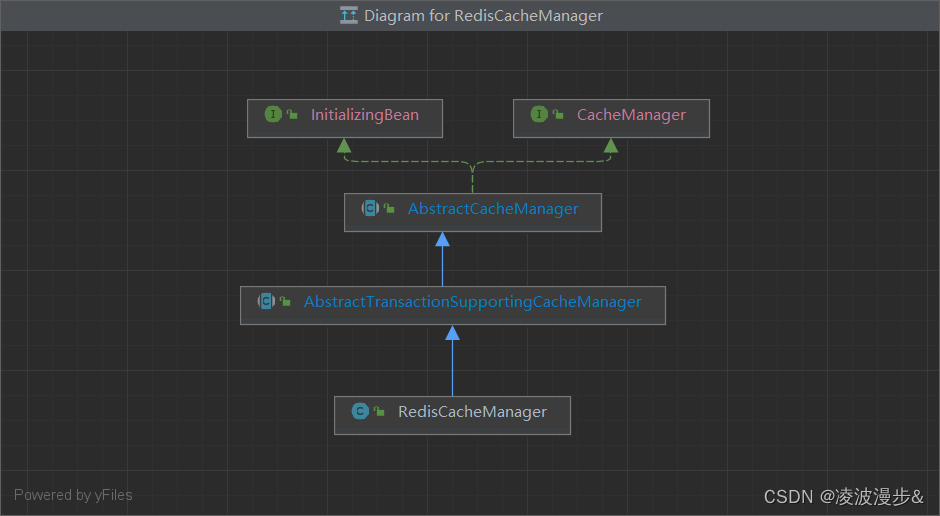
其中getCache()方法的实现逻辑主要在AbstractCacheManager中,如下:
@Override
@Nullable
public Cache getCache(String name) {


	// Quick check for existing cache...
	Cache cache = this.cacheMap.get(name);
	if (cache != null) {


		return cache;
	}

	// The provider may support on-demand cache creation...
	Cache missingCache = getMissingCache(name);
	if (missingCache != null) {


		// Fully synchronize now for missing cache registration
		synchronized (this.cacheMap) {


			cache = this.cacheMap.get(name);
			if (cache == null) {


				cache = decorateCache(missingCache);
				this.cacheMap.put(name, cache);
				updateCacheNames(name);
			}
		}
	}
	return cache;
}
有经验的同学在看到decorateCache方法时绝对会眼前一亮,见名知意,这个方法就是用来装饰根据指定缓存名称获取到的缓存实例的,这个方法也正是交给子类来实现。(Ps:这里用到的是模板方法模式)
而decorateCache方法实际上是由AbstractTransactionSupportingCacheManager来实现的,该抽象类在装饰缓存时会附加事务的支持,比如在事务提交之后缓存,如下:
@Override
protected Cache decorateCache(Cache cache) {


	return (isTransactionAware() ? new TransactionAwareCacheDecorator(cache) : cache);
}
其实我们也可以重写decorateCache()方法,然后让Cache实例支持带过期时间,我们需要做的就是从缓存相关注解中拿到过期时间配置,再重新对缓存进行实例化,而这一步需要通过CacheResolver来实现。
2、CacheResolver的作用
所谓缓存解析器其实就是从缓存相关注解对应的缓存操作上下文中解析缓存实例,如下:
@FunctionalInterface
public interface CacheResolver {


	/**
	 * Return the cache(s) to use for the specified invocation.
	 * @param context the context of the particular invocation
	 * @return the cache(s) to use (never {@code null})
	 * @throws IllegalStateException if cache resolution failed
	 */
	Collection<? extends Cache> resolveCaches(CacheOperationInvocationContext<?> context);
}
该接口有个抽象类实现AbstractCacheResolver,对resolveCaches的实现如下:
@Override
public Collection<? extends Cache> resolveCaches(CacheOperationInvocationContext<?> context) {


	Collection<String> cacheNames = getCacheNames(context);
	if (cacheNames == null) {


		return Collections.emptyList();
	}
	Collection<Cache> result = new ArrayList<>(cacheNames.size());
	for (String cacheName : cacheNames) {


		Cache cache = getCacheManager().getCache(cacheName);
		if (cache == null) {


			throw new IllegalArgumentException("Cannot find cache named '" +
					cacheName + "' for " + context.getOperation());
		}
		result.add(cache);
	}
	return result;
}
这里可以看到会通过CacheManager根据缓存名去获取缓存实例,我们可以通过给CacheManager实例传递相关过期时间的配置,在CacheManager创建Cache实例时根据时间配置进行初始化。
四、代码示例
1、自定义缓存相关注解
Spring中缓存相关注解同样可以作为元注解,这里我们自定义了@TTLCacheable和@TTLCachePut两个注解,并且指定了名为ttlCacheResolver的缓存解析器实例。
(1) @TTLCacheable注解
@Target(ElementType.METHOD)
@Retention(RetentionPolicy.RUNTIME)
@Cacheable(cacheResolver = "ttlCacheResolver")
public @interface TTLCacheable {


	@AliasFor(annotation = Cacheable.class)
	String[] value() default {

    };

	@AliasFor(annotation = Cacheable.class)
	String[] cacheNames() default {

    };

	@AliasFor(annotation = Cacheable.class)
	String key() default "";

	@AliasFor(annotation = Cacheable.class)
	String keyGenerator() default "";

	@AliasFor(annotation = Cacheable.class)
	String cacheManager() default "";

	@AliasFor(annotation = Cacheable.class)
	String condition() default "";

	@AliasFor(annotation = Cacheable.class)
	String unless() default "";

	@AliasFor(annotation = Cacheable.class)
	boolean sync() default false;

	/**
	 * time to live
	 */
	long ttl() default 0L;

	/**
	 * 时间单位
	 * @return
	 */
	TimeUnit timeUnit() default TimeUnit.MILLISECONDS;
}
(2) @TTLCachePut注解
@Target({

     ElementType.TYPE, ElementType.METHOD })
@Retention(RetentionPolicy.RUNTIME)
@CachePut(cacheResolver = "ttlCacheResolver")
public @interface TTLCachePut {


	@AliasFor(annotation = CachePut.class)
	String[] value() default {

    };

	@AliasFor(annotation = CachePut.class)
	String[] cacheNames() default {

    };

	@AliasFor(annotation = CachePut.class)
	String key() default "";

	@AliasFor(annotation = CachePut.class)
	String keyGenerator() default "";

	@AliasFor(annotation = CachePut.class)
	String cacheManager() default "";

	@AliasFor(annotation = CachePut.class)
	String condition() default "";

	@AliasFor(annotation = CachePut.class)
	String unless() default "";

	/**
	 * time to live
	 */
	long ttl() default 0L;

	/**
	 * 时间单位
	 * @return
	 */
	TimeUnit timeUnit() default TimeUnit.MILLISECONDS;
}
备注:这两个注解我都加了
ttl和timeUnit两个属性,当ttl为0时代表key永久不过期。
2、自定义CacheResolver
这里我们直接继承SimpleCacheResolver,在解析缓存时根据注解中的过期时间配置动态给CacheManager传值,然后再调用AbstractCacheResolver的resolveCaches方法进行实际的缓存解析操作。
public class TTLCacheResolver extends SimpleCacheResolver {


	public TTLCacheResolver() {


	}

	public TTLCacheResolver(CacheManager cacheManager) {


		super(cacheManager);
	}

	@Override
	public Collection<? extends Cache> resolveCaches(CacheOperationInvocationContext<?> context) {


		TTLCacheable ttlCacheable = context.getMethod().getAnnotation(TTLCacheable.class);
		TTLCachePut ttlCachePut = context.getMethod().getAnnotation(TTLCachePut.class);

		CacheManager cacheManager = super.getCacheManager();
		if (cacheManager instanceof TTLRedisCacheManager) {


			TTLRedisCacheManager ttlRedisCacheManager = (TTLRedisCacheManager) cacheManager;
			Optional.ofNullable(ttlCacheable).ifPresent(cacheable -> {


				ttlRedisCacheManager.setTtl(cacheable.ttl());
				ttlRedisCacheManager.setTimeUnit(cacheable.timeUnit());
			});
			Optional.ofNullable(ttlCachePut).ifPresent(cachePut -> {


				ttlRedisCacheManager.setTtl(cachePut.ttl());
				ttlRedisCacheManager.setTimeUnit(cachePut.timeUnit());
			});
		}

		return super.resolveCaches(context);
	}

}
3、自定义CacheManager
这里我们直接重写了RedisCacheManager的
public class TTLRedisCacheManager extends RedisCacheManager {


	/**
	 * 过期时间,具体见{@link com.netease.cache.distrubuted.redis.integration.custom.annotation.TTLCacheable}
	 * 中的ttl说明
	 */
	private long ttl;

	/**
	 * 时间单位
	 */
	private TimeUnit timeUnit;

	public TTLRedisCacheManager(RedisCacheWriter cacheWriter, RedisCacheConfiguration defaultCacheConfiguration) {


		super(cacheWriter, defaultCacheConfiguration);
	}

	public TTLRedisCacheManager(RedisCacheWriter cacheWriter, RedisCacheConfiguration defaultCacheConfiguration,
		String... initialCacheNames) {


		super(cacheWriter, defaultCacheConfiguration, initialCacheNames);
	}

	public TTLRedisCacheManager(RedisCacheWriter cacheWriter, RedisCacheConfiguration defaultCacheConfiguration,
		boolean allowInFlightCacheCreation, String... initialCacheNames) {


		super(cacheWriter, defaultCacheConfiguration, allowInFlightCacheCreation, initialCacheNames);
	}

	public TTLRedisCacheManager(RedisCacheWriter cacheWriter, RedisCacheConfiguration defaultCacheConfiguration,
		Map<String, RedisCacheConfiguration> initialCacheConfigurations) {


		super(cacheWriter, defaultCacheConfiguration, initialCacheConfigurations);
	}

	public TTLRedisCacheManager(RedisCacheWriter cacheWriter, RedisCacheConfiguration defaultCacheConfiguration,
		Map<String, RedisCacheConfiguration> initialCacheConfigurations, boolean allowInFlightCacheCreation) {


		super(cacheWriter, defaultCacheConfiguration, initialCacheConfigurations, allowInFlightCacheCreation);
	}

	public void setTtl(long ttl) {


		this.ttl = ttl;
	}

	public void setTimeUnit(TimeUnit timeUnit) {


		this.timeUnit = timeUnit;
	}

	/**
	 * CacheResolver调用CacheManager的getCache方法后会调用该方法进行装饰,这里我们可以给Cache加上过期时间
	 * @param cache
	 * @return
	 */
	@Override
	protected Cache decorateCache(Cache cache) {


		RedisCache redisCache = (RedisCache) cache;
		RedisCacheConfiguration config = redisCache.getCacheConfiguration().entryTtl(resolveExpiryTime(ttl, timeUnit));
		return super.decorateCache(super.createRedisCache(redisCache.getName(), config));
	}

	private Duration resolveExpiryTime(long timeToLive, TimeUnit timeUnit) {


		return Duration.ofMillis(timeUnit.toMillis(timeToLive));
	}

}
4、开启声明式缓存配置类
@EnableCaching
@Configuration
public class TTLRedisCacheConfig {


	private static final String KEY_SEPERATOR = ":";

	@Bean(name = "ttlRedisCacheManager")
	public TTLRedisCacheManager ttlRedisCacheManager(RedisConnectionFactory redisConnectionFactory) {


		RedisSerializer<String> keySerializer = new StringRedisSerializer();
		RedisSerializer<Object> valueSerializer = new GenericJackson2JsonRedisSerializer();

		RedisCacheConfiguration cacheConfig = RedisCacheConfiguration.defaultCacheConfig();
		cacheConfig = cacheConfig.serializeKeysWith(SerializationPair.fromSerializer(keySerializer));
		cacheConfig = cacheConfig.serializeValuesWith(SerializationPair.fromSerializer(valueSerializer));
		cacheConfig = cacheConfig.computePrefixWith(key -> "ttl" + KEY_SEPERATOR + key + KEY_SEPERATOR);
		RedisCacheWriter redisCacheWriter = RedisCacheWriter.nonLockingRedisCacheWriter(redisConnectionFactory);
		return new TTLRedisCacheManager(redisCacheWriter, cacheConfig);
	}

	@Bean(name = "ttlCacheResolver")
	public TTLCacheResolver ttlCacheResolver(TTLRedisCacheManager ttlRedisCacheManager) {


		return new TTLCacheResolver(ttlRedisCacheManager);
	}
}
备注:这里我们用自定义的
TTLCacheManager和TTLCacheResolver初始化配置即可,缓存key的名称指定了前缀ttl:。
五、测试用例
1、 测试服务类
@Service
public class TTLSpringCacheService {


	@TTLCacheable(cacheNames = "student-cache", key = "#stuNo", ttl = 200, timeUnit = TimeUnit.SECONDS)
	public StudentDO getStudentWithTTL(int stuNo, String stuName) {


		StudentDO student = new StudentDO(stuNo, stuName);
		System.out.println("模拟从数据库中读取...");
		return student;
	}

	@TTLCachePut(cacheNames = "student-cache", key = "#student.stuNo", ttl = 1, timeUnit = TimeUnit.MINUTES)
	public StudentDO updateStudent(StudentDO student) {


		System.out.println("数据库进行了更新,检查缓存是否一致");
		return student;
	}
}
@RunWith(SpringRunner.class)
@SpringBootTest(classes = Application.class)
public class TTLSpringCacheIntegrationTest {


	@Autowired
	private TTLSpringCacheService ttlSpringCacheService;

	@Test
	public void getStudentWithTTLTest() {


		StudentDO studentDO = ttlSpringCacheService.getStudentWithTTL(1, "Nick");
		System.out.println(studentDO);
	}

	@Test
	public void updateStudentWithTTLTest() {


		StudentDO studentDO = ttlSpringCacheService.updateStudent(new StudentDO(1, "Licky"));
		System.out.println(studentDO);
	}
}
2、 带过期时间的缓存操作
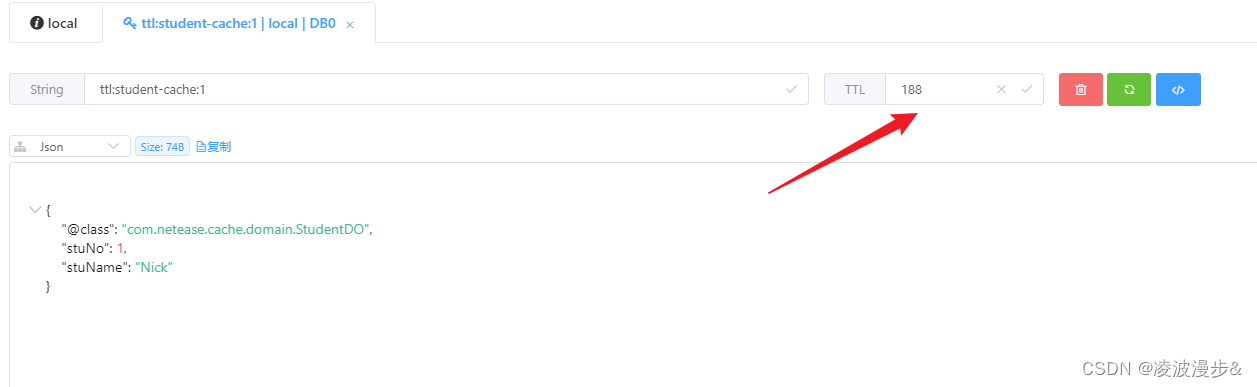
调用getStudentWithTTLTest方法,这里我们指定了缓存的过期时间为200秒,查看Redis中key对应的值,如下:
3、 带过期时间的更新操作
调用updateStudentWithTTLTest方法,更新时我们指定了缓存的过期时间为1分钟,查看Redis中key对应的值,如下:

六、结语
Spring基于注解的缓存抽象就到这里啦,Spring源码还是比较清晰易懂的,见名知意。除了自定义方案,阿里爸爸也有一个缓存抽象解决方案,叫做 jetcache。
它是Spring缓存抽象的增强版,提供的特性有带过期时间的缓存、二级缓存、自动缓存更新、代码操作缓存实例等,有兴趣的同学可以去体验一下。