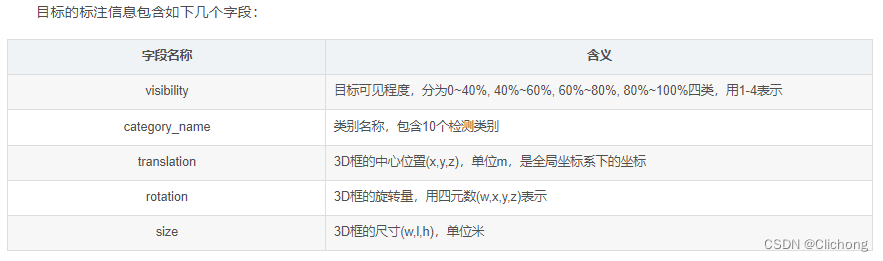
0. eval转换的目标
模型的训练和测试过程输出结果是不一样的,对于训练过程是为了构建损失函数来进行训练,而对于测试过程是为了对object进行预测生成预测内容。下面以VoxelNeX检测器的类代码可见,training和testing将会输出两个内容。
class VoxelNeXt(Detector3DTemplate):
    def __init__(self, model_cfg, num_class, dataset):
        super().__init__(model_cfg=model_cfg, num_class=num_class, dataset=dataset)
        self.module_list = self.build_networks()

    def forward(self, batch_dict):

        for cur_module in self.module_list:
            batch_dict = cur_module(batch_dict)

        if self.training:
            loss, tb_dict, disp_dict = self.get_training_loss()
            ret_dict = {


                'loss': loss
            }
            return ret_dict, tb_dict, disp_dict
        else:
            pred_dicts, recall_dicts = self.post_processing(batch_dict)
            return pred_dicts, recall_dicts
对于测试过中,这里的recall_dict是各阈值召回率的指标,而pred_dicts是一个字典存储相关的预测信息。
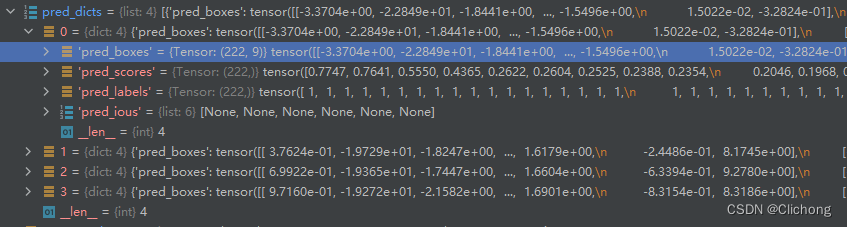
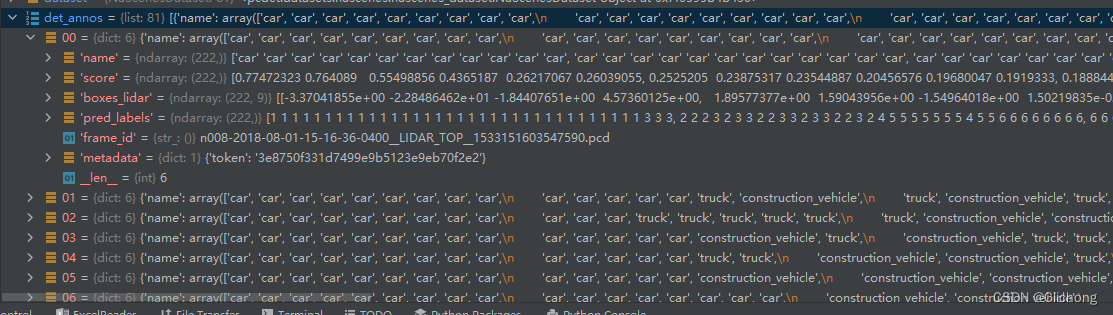
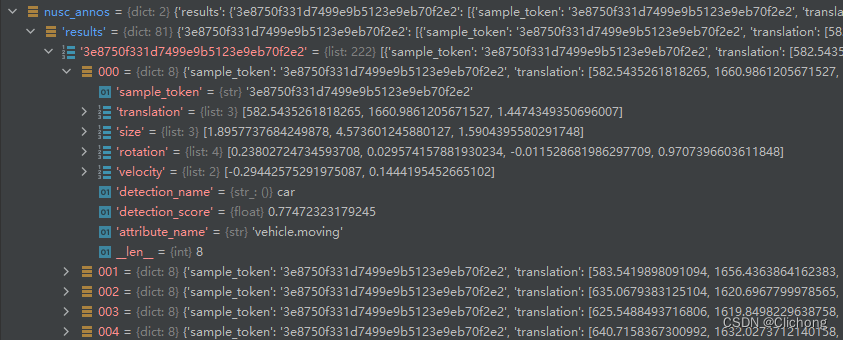
后续做内容就是把这些每一帧的预测数据进行转换,每个pred_boxes都从此转换为nuSences的数据结构,也就是下面的一个dict。这里的一个list集是对应着上面的shape为(222,9)的pred_boxes,在mini版本中验证集有81帧点云,所以最后的结果也是构建成81个字典,每个字典再有自己的每个预测object的列表。

知道了由很多个pred_dicts构建成nusc_annos列表的整个过程,就是eval过程,后续就会清晰很多,因为都是围绕着这个点来进行。现在整个eval_one_epoch函数主要分成两个步骤:dataset.generate_prediction_dicts和dataset.evaluation
1. dataset.generate_prediction_dicts
1.1 generate_prediction_dicts函数
通过dataset.generate_prediction_dicts来生成预测字典,核心代码如下所示:
model.eval()

if cfg.LOCAL_RANK == 0:
    progress_bar = tqdm.tqdm(total=len(dataloader), leave=True, desc='eval', dynamic_ncols=True)
for i, batch_dict in enumerate(dataloader):
    load_data_to_gpu(batch_dict)

    with torch.no_grad():
        pred_dicts, ret_dict = model(batch_dict)

    disp_dict = {

    }
    ......
    statistics_info(cfg, ret_dict, metric, disp_dict)

    annos = dataset.generate_prediction_dicts(
        batch_dict, pred_dicts, class_names,
        output_path=final_output_dir if args.save_to_file else None
    )
    det_annos += annos
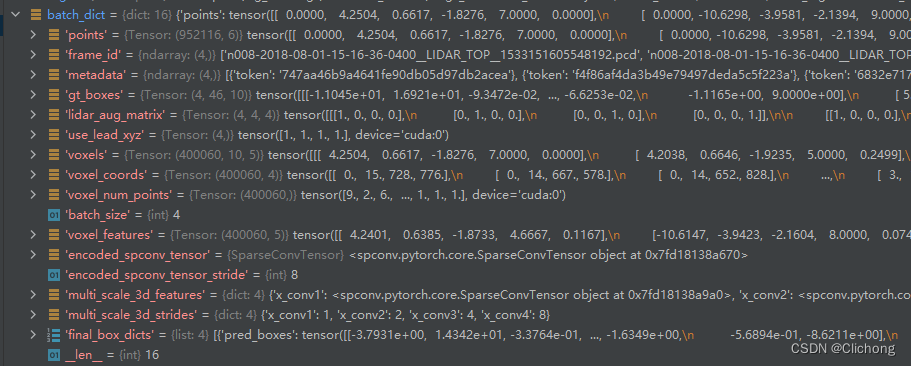
对于VoxelNeXt模型来说,这里的batch_dict对于不同的模型应该是一致的,输入一致,根据对应的配置文件以及获取到权重文件应该可以实现多模型集成的效果。这里我设置的batch_size为4,所以对应的pred_dicts列表有4个成员:

ret_dict是一个字典,包含当前点云帧的的预测点在gt中的召回率

随后利用batch_dict、pred_dict来生成当前batch的预测结果。batch_dict的结构如下所示:
1.2 generate_single_sample_dict函数
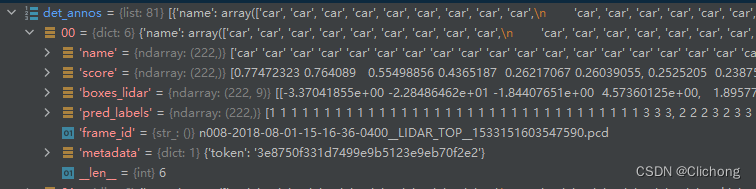
对每个点云帧场景的预测值进行处理,对应的label转换为对应名字,处理后如下所示。box_dict是一个点云帧的预测结果
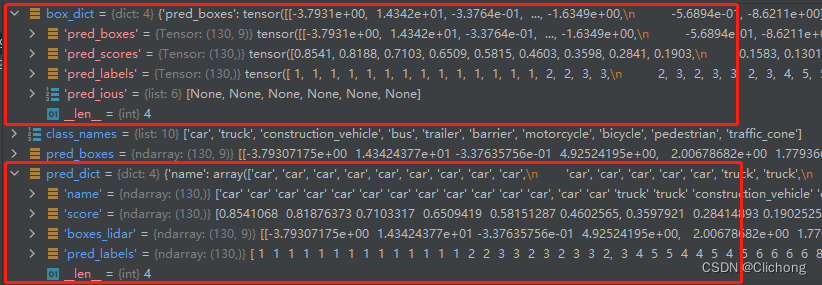
这里的label和nuScenes设置的label是不一样的,这里的label预测是根据在yaml文件中的CLASS_NAMES来进行一一对应顺序。然后进行相应的name转换,获取到具体的类别。也就是说,最后的类别检测对应是自己设定的类别列表,而不是nuScenes自带的类别列表。同时,这里的label没有0类,标号从1开始。
CLASS_NAMES: ['car','truck', 'construction_vehicle', 'bus', 'trailer',
              'barrier', 'motorcycle', 'bicycle', 'pedestrian', 'traffic_cone']
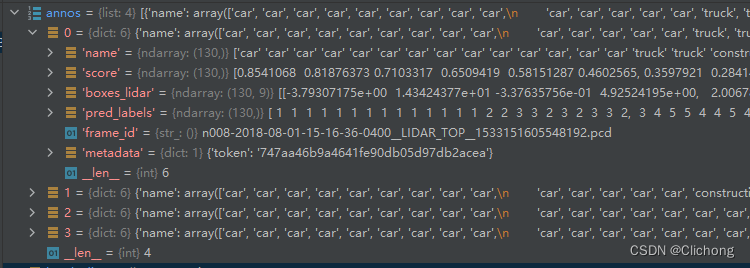
随后再把当前的binfile名字以及当前场景对应的token的信息再保存在字典中,再将结果添加到列表,结果如下:
核心代码:
def generate_prediction_dicts(self, batch_dict, pred_dicts, class_names, output_path=None):
    """
    Args:
        batch_dict:
            frame_id:
        pred_dicts: list of pred_dicts
            pred_boxes: (N, 7 or 9), Tensor
            pred_scores: (N), Tensor
            pred_labels: (N), Tensor
        class_names:
        output_path:
    """

    def get_template_prediction(num_samples):
        box_dim = 9 if self.dataset_cfg.get('TRAIN_WITH_SPEED', False) else 7
        ret_dict = {


            'name': np.zeros(num_samples), 'score': np.zeros(num_samples),
            'boxes_lidar': np.zeros([num_samples, box_dim]), 'pred_labels': np.zeros(num_samples)
        }
        return ret_dict

    def generate_single_sample_dict(box_dict):
        pred_scores = box_dict['pred_scores'].cpu().numpy()
        pred_boxes = box_dict['pred_boxes'].cpu().numpy()       # (N, 9)
        pred_labels = box_dict['pred_labels'].cpu().numpy()
        pred_dict = get_template_prediction(pred_scores.shape[0])   # fill with zero array
        if pred_scores.shape[0] == 0:
            return pred_dict

        # 预测标签是从1开始标号的,所以转换到类别名称需要label-1来获取
        pred_dict['name'] = np.array(class_names)[pred_labels - 1]    # label transformer to name
        pred_dict['score'] = pred_scores
        pred_dict['boxes_lidar'] = pred_boxes
        pred_dict['pred_labels'] = pred_labels

        return pred_dict

    annos = []
    for index, box_dict in enumerate(pred_dicts):   # process frame
        single_pred_dict = generate_single_sample_dict(box_dict)            # add other info
        single_pred_dict['frame_id'] = batch_dict['frame_id'][index]        # add lidar bin file name info
        if 'metadata' in batch_dict:
            single_pred_dict['metadata'] = batch_dict['metadata'][index]
        annos.append(single_pred_dict)

    return annos
随后就是对整个数据集的全部组建,直到结束。
2. dataset.evaluation
通过dataset.evaluation对预测字典进行评估
result_str, result_dict = dataset.evaluation(
    det_annos,
    class_names,
    eval_metric=cfg.MODEL.POST_PROCESSING.EVAL_METRIC,
    output_path=final_output_dir
)
2.1 transform_det_annos_to_nusc_annos函数
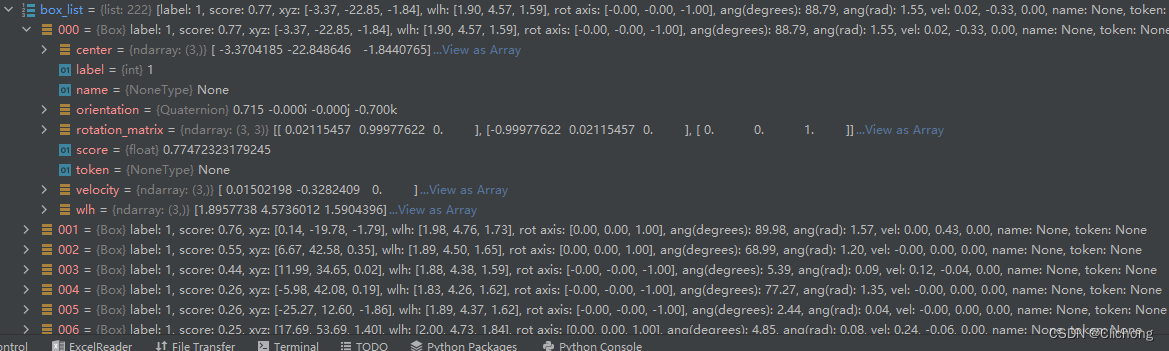
1)利用boxes_lidar_to_nusenes函数对annos的每个预测的gt信息进行重新构造字典结构:
代码如下:
def boxes_lidar_to_nusenes(det_info):
    boxes3d = det_info['boxes_lidar']   # (N, 9)
    scores = det_info['score']          # (N, )
    labels = det_info['pred_labels']    # (N, )

    box_list = []
    for k in range(boxes3d.shape[0]):
        quat = Quaternion(axis=[0, 0, 1], radians=boxes3d[k, 6])    # orientation
        velocity = (*boxes3d[k, 7:9], 0.0) if boxes3d.shape[1] == 9 else (0.0, 0.0, 0.0)    # *解包使用
        box = Box(
            boxes3d[k, :3],
            boxes3d[k, [4, 3, 5]],  # wlh
            quat, label=labels[k], score=scores[k], velocity=velocity,
        )
        box_list.append(box)
    return box_list
ps:这里利用了nuScenes定义的一个Box类以及Quaternion四元数库,这是因为nuScenes定义的相关函数是需要Quaternion的传参。这里Box的定义在nuscenes.utils.data_classes文件中。
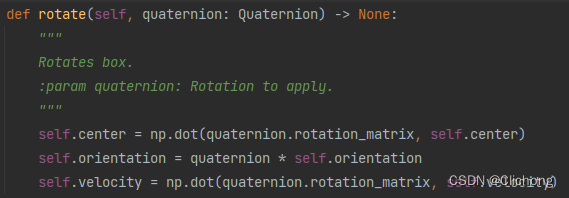
2)利用lidar_nusc_box_to_global函数对重新构造的gt box信息进行坐标系的转换,这里主要是利用当前sample的sample_data的传感器标定信息calibrated_sensor以及ego_pose信息进行坐标系的转换。数据集转换处理后的box列表结构不变:
def lidar_nusc_box_to_global(nusc, boxes, sample_token):
    s_record = nusc.get('sample', sample_token)
    sample_data_token = s_record['data']['LIDAR_TOP']

    # 坐标系的转化主要是calibrated_sensor和ego_pose相关信息的提取
    sd_record = nusc.get('sample_data', sample_data_token)
    cs_record = nusc.get('calibrated_sensor', sd_record['calibrated_sensor_token'])
    sensor_record = nusc.get('sensor', cs_record['sensor_token'])
    pose_record = nusc.get('ego_pose', sd_record['ego_pose_token'])

    data_path = nusc.get_sample_data_path(sample_data_token)    # lidar bin file path
    box_list = []
    for box in boxes:
        # Move box to ego vehicle coord system
        # 从激光雷达传感器坐标系转换到车身坐标系下
        box.rotate(Quaternion(cs_record['rotation']))
        box.translate(np.array(cs_record['translation']))

        # Move box to global coord system
        # 从车身坐标系转换到全局坐标系下
        box.rotate(Quaternion(pose_record['rotation']))
        box.translate(np.array(pose_record['translation']))
        box_list.append(box)
    return box_list
ps:这里用到了一个四元数的库Quaternion,表示rotation的四元数可以利用Python包pyquaternion转换成(pitch,yaw,roll)的形式,而且可以计算对应的旋转矩阵和逆矩阵,非常好用。
此时,将预测的box移动到到全局坐标系中。随后重新对每个box进行遍历依次处理。具体来说,模型预测的参数是基于激光雷达坐标系中的,那么现在需要利用ego参数将其转换到车身坐标系中,然后再从陈胜坐标系转换到全局坐标系下。
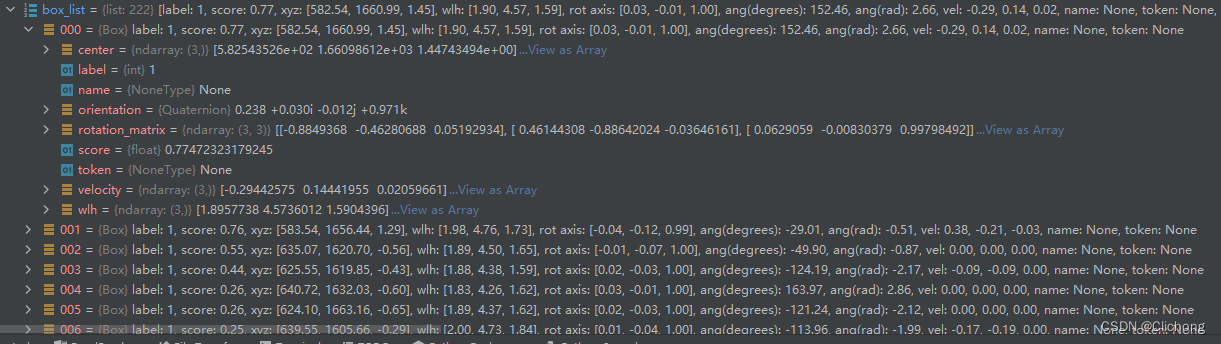
ps:为什么需要转到全局坐标系下,因为原本nuScenes的标注格式就是全局坐标系下的坐标。
3)处理完box_list后重新对其进行遍历,提取速度和类别来判断当前属性,重新对每个box构造一个nusc_anno的字典,并保存在annos列表变量中。annos的列表长度与box_list的列表长度是一致的。
nusc_anno = {


    'sample_token': det['metadata']['token'],
    'translation': box.center.tolist(),
    'size': box.wlh.tolist(),
    'rotation': box.orientation.elements.tolist(),
    'velocity': box.velocity[:2].tolist(),
    'detection_name': name,
    'detection_score': box.score,
    'attribute_name': attr
}
annos.append(nusc_anno)
此时的annos其实属于某一个sample中的预测信息信息。根据det变量中的boxes_lidar来进行构建。

4)最后将每个sample的预测lidar box信息,都构造成以上的一个annos列表。sample的token作为字典的key,处理后的预测annos作为字典的value,从而将所有的sample进行处理。
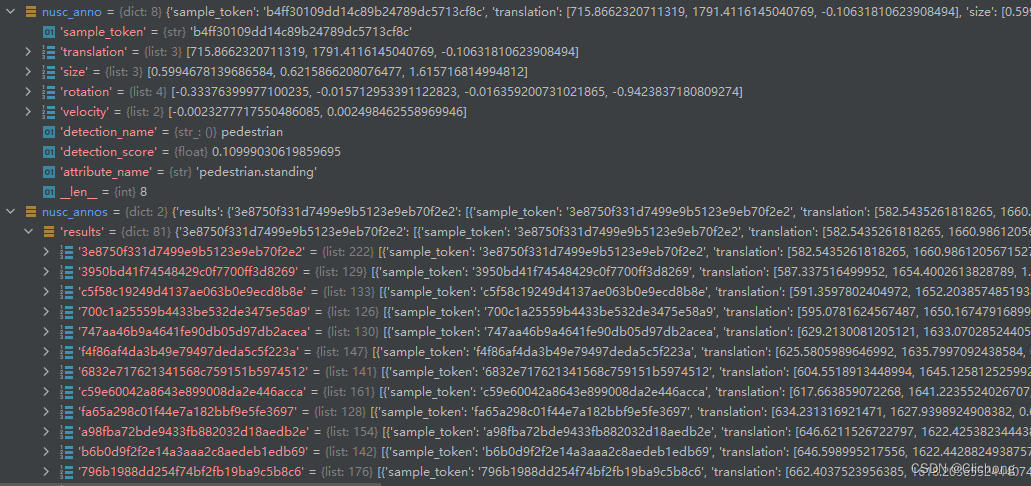
这里每个token列表的每个element都是nusc_anno结构的一个字典。
总结一下:
transform_det_annos_to_nusc_annos函数的作用是将原来的预测sample格式。
将gt进行坐标系的转换后分别构造成如下所示:
2.2 NuScenesEval
利用nuScenes提供的评价函数来获取预测的评估结果:https://github.com/nutonomy/nuscenes-devkit/blob/master/python-sdk/nuscenes/eval/detection/evaluate.py
class DetectionEval:
    """
    This is the official nuScenes detection evaluation code.
    Results are written to the provided output_dir.

    nuScenes uses the following detection metrics:
    - Mean Average Precision (mAP): Uses center-distance as matching criterion; averaged over distance thresholds.
    - True Positive (TP) metrics: Average of translation, velocity, scale, orientation and attribute errors.
    - nuScenes Detection Score (NDS): The weighted sum of the above.

    Here is an overview of the functions in this method:
    - init: Loads GT annotations and predictions stored in JSON format and filters the boxes.
    - run: Performs evaluation and dumps the metric data to disk.
    - render: Renders various plots and dumps to disk.

    We assume that:
    - Every sample_token is given in the results, although there may be not predictions for that sample.

    Please see https://www.nuscenes.org/object-detection for more details.
    """
    def __init__(self,
                 nusc: NuScenes,
                 config: DetectionConfig,
                 result_path: str,
                 eval_set: str,
                 output_dir: str = None,
                 verbose: bool = True):
        """
        Initialize a DetectionEval object.
        :param nusc: A NuScenes object.
        :param config: A DetectionConfig object.
        :param result_path: Path of the nuScenes JSON result file.
        :param eval_set: The dataset split to evaluate on, e.g. train, val or test.
                         {'v1.0-mini': 'mini_val', 'v1.0-trainval': 'val', 'v1.0-test': 'test'}
        :param output_dir: Folder to save plots and results to.
        :param verbose: Whether to print to stdout.
        """

    def evaluate(self) -> Tuple[DetectionMetrics, DetectionMetricDataList]:
        """
        Performs the actual evaluation.
        :return: A tuple of high-level and the raw metric data.
        """


    def render(self, metrics: DetectionMetrics, md_list: DetectionMetricDataList) -> None:
        """
        Renders various PR and TP curves.
        :param metrics: DetectionMetrics instance.
        :param md_list: DetectionMetricDataList instance.
        """


    def main(self,
             plot_examples: int = 0,
             render_curves: bool = True) -> Dict[str, Any]:
        """
        Main function that loads the evaluation code, visualizes samples, runs the evaluation and renders stat plots.
        :param plot_examples: How many example visualizations to write to disk.
        :param render_curves: Whether to render PR and TP curves to disk.
        :return: A dict that stores the high-level metrics and meta data.
        """

        ......

class NuScenesEval(DetectionEval):
    """
    Dummy class for backward-compatibility. Same as DetectionEval.
    """
其中,这里初始化result_path存储的上述处理完的数据所保存的序列文件。其内容还是如下所示:

在执行main函数时,会想进行评估然后再进行可视化,当然可以通过相关的参数设置为False取消显示。
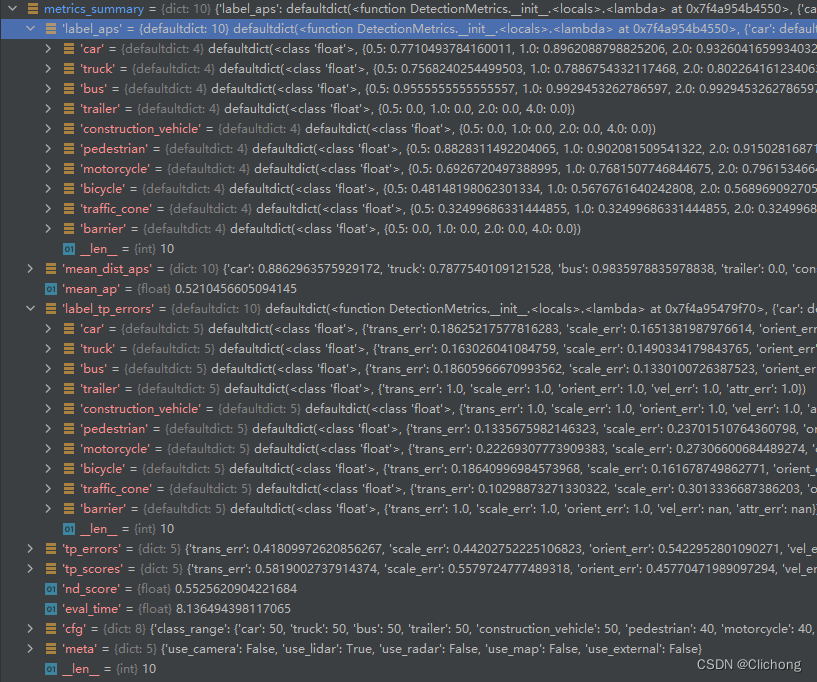
2.3 nuscenes_utils.format_nuscene_results
加载出metrics_summary.json文件,并进行相关信息的整理和输出,这里的评价指标最主要的是每个class的error和map,以及总map和nds。
在执行NuScenesEval时已经开始执行:
nusc_eval = NuScenesEval(
    nusc,
    config=eval_config,
    result_path=res_path,
    eval_set=eval_set_map[self.dataset_cfg.VERSION],
    output_dir=str(output_path),
    verbose=True,
)
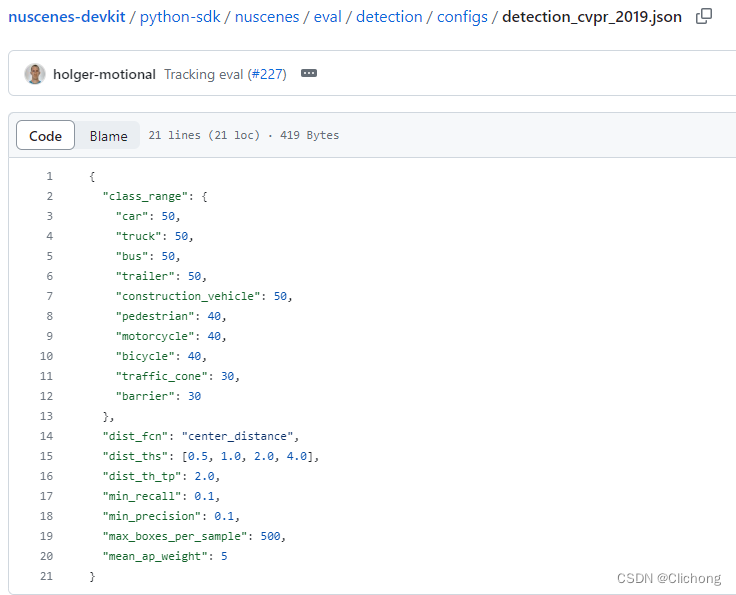
这里的eval_config文件在nuScenes-devkit中已经内置了,路径在:
python-sdk/nuscenes/eval/detection/configs/detection_cvpr_2019.json,内容如下:
在main中执行了保存相关文件的操作
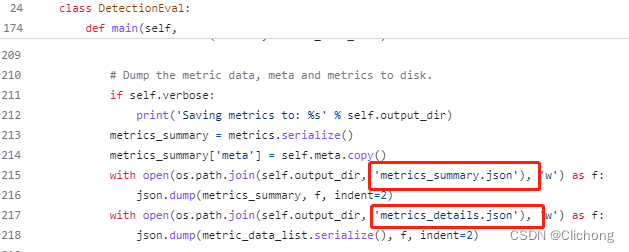
json文件既保存在output_path路径下的metrics_summary.json文件中,所以这里有两种方式对评价指标进行读取,其中一种是利用返回的结果,另外一种是读取json文件来读取评价信息。
# 方法1:
metrics_summary = nusc_eval.main(plot_examples=0, render_curves=False)

# 方法2:
with open(output_path / 'metrics_summary.json', 'r') as f:
    metrics = json.load(f)

# 相关指标的整理
result_str, result_dict = nuscenes_utils.format_nuscene_results(metrics, self.class_names, version=eval_version)
最后的结果保存如下:
