组件的定义
组件具备复用性 注意:全局组件,只要定义了,处处可以使用,性能不高,但是使用起来简单
<!DOCTYPE html>
<html lang="en">
<head>
    <meta charset="UTF-8">
    <meta http-equiv="X-UA-Compatible" content="IE=edge">
    <meta name="viewport" content="width=device-width, initial-scale=1.0">
    <title>lesson 14</title>
    <script src="https://unpkg.com/vue@next"></script>
</head>
<body>
    <div id="root"></div>
</body>
<script>
    const app = Vue.createApp({
        template:`
        <div><count-parent/></div>
        <div><count/></div>
        <div><count/></div>
        `
    });

    app.component('count-parent',{
        template:`<count/>`
    })

    app.component('count',{
        data(){
            return{
                count:1
            }
        },
        template:`<div @click="count+=1">{

   {count}}</div>`
    })
    const vm=app.mount('#root');
</script>

</html>![]() 与其对应的还有局部组件
与其对应的还有局部组件
const counter={
        data(){
            return{
                counter:1
            }
        },
        template:`
            <div @click="counter+=1">{

   {counter}}</div>
        `
    }
    const app = Vue.createApp({
        components:{'counter':counter},
        template:`
            <div><counter/></div>
        `
    });

    const vm=app.mount('#root');
解释:单引号'counter'代表组件名字,也可随意命名,但是为了见名其意,建议使用变量名(es6语法中在key和value一样时可以只写counter即可)
通常我们会这样写,代码如下![]()
const Counter={
        data(){
            return{
                counter:1
            }
        },
        template:`
            <div @click="counter+=1">{

   {counter}}</div>
        `
    }

    const HelloWorld={
        template:`<div>hello world</div>`
    }
    const app = Vue.createApp({
        components:{
            //counter:Counter,
            //'hello-world':HelloWorld
            Counter,
            HelloWorld
        },
        template:`
            <div>
                <hello-world/>
                <counter/>
            </div>
        `
    });

const vm=app.mount('#root');说明:局部组件定义了,要注册之后才能使用,性能比较高,但是使用起来麻烦,建议大写字母开头,驼峰命名法(注意:局部组件使用时,要做一个名字和组件间的映射对象,你不写映射,Vue底层也会自动尝试帮你做映射)
静态动态传参区别
子组件展示的内容不是固定的,而是父组件在调用子组件的时候给它传递动态的内容(注意:想要内容123是数字型,我们给他赋予动态传参v-bind:content,而content仅仅只是静态传参)
const app = Vue.createApp({
        data(){
            return {
                num:123
            }
        },
        template:`
            <div>
                <test :content="num"/>
            </div>
        `
    });

    app.component('test',{
        props:['content'],
        template:`<div>{

   {typeof content}}<div>`
    });
const vm=app.mount('#root');![]()
const app = Vue.createApp({
        data(){
            return {
                num:()=>{
                    alert(123);
                }
            }
        },
        template:`
            <div>
                <test :content="num"/>
            </div>
        `
    });
//    String,Boolean,Array,Object,Function
    app.component('test',{
        props:{'content':Function},
        methods:{
            handleClick(){
                alert(456);
                this.content();
            }
        },
        template:`<div @click="this.handleClick">{

   {typeof content}}<div>`
    });
const vm=app.mount('#root'); 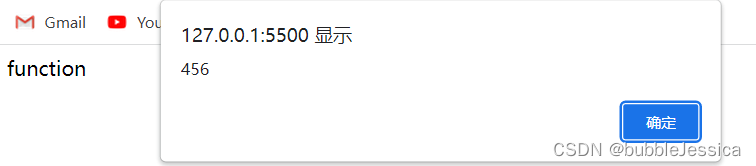
 const app = Vue.createApp({
        data(){
            return {
                num:123
            }
        },
        template:`
            <div>
                <test/>
            </div>
        `
    });

    // required 必须传值
    // default 默认值
    // validation 验证
    app.component('test',{
        props:{
            content:{
                type:Number,
                validation:function(value){
                    return value<1000;
                },
                default:function(){
                    return 456;
                }
            }
        },

        template:`<div>{

   {content}}</div>`
    });
const vm=app.mount('#root');当遇到子组件需要传递很多参数的时候,可以考虑使用精简的语法v-bind="params"
// v-bind="params"等价于
    // :content="params.content" :a="params.a" :b="params.b" :c="params.c"
    const app = Vue.createApp({
        data() {
            return {
                params:{
                    content: 1234,
                    a: 123,
                    b: 456,
                    c: 789
                }
            }
        },
        template: `
            <div>
                <test :content="params.content" :a="params.a" :b="params.b" :c="params.c"/>
            </div>
        `
    });

    app.component('test', {
        props: ['content', 'a', 'b', 'c'],
        template: `<div>{

   {content}}-{

   {a}}-{

   {b}}-{

   {c}}</div>`
    });
const vm = app.mount('#root');特殊语法:属性传的时候,使用content-abc这种命名,接的时候,使用contentAbc命名
const app = Vue.createApp({
        data() {
            return {
                content:123
            }
        },
        template: `
            <div>
                <test :content-abc="content"/>
            </div>
        `
    });

    app.component('test', {
        props: ['contentAbc'],
        template: `<div>{

   {contentAbc}}</div>`
    });
    const vm = app.mount('#root');
单项数据流:子组件可以使用父组件传递过来的数据,但是不能修改(想要修改的话得使用自己的属性赋值)
const app = Vue.createApp({
        data() {
            return {
                num:1
            }
        },
        template: `
            <div>
                <counter :count="num"/>
            </div>
        `
    });

    app.component('counter', {
        props: ['count'],
        data(){
            return{
                myCount:this.count
            }
        },
        template: `<div @click="myCount+=1">{

   {myCount}}</div>`
    });
    const vm = app.mount('#root');
Non-props属性
const app = Vue.createApp({
template: `
<div>
<counter msg="hello"/>
</div>
`
});
app.component('counter', {
template: `
<div>Count</div>
`
});
const vm = app.mount('#root'); 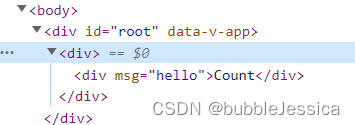 加了inheritAttrs属性设置为false就没有其msg属性了
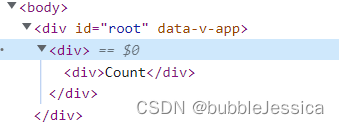
app.component('counter', {
        inheritAttrs:false,
        template: `
            <div>Count</div>
        `
    });
$attrs作用(把父组件传递过来的所有属性都放到该标签里)
const app = Vue.createApp({
        template: `
            <div>
                <counter msg="hello" msg1="hello1"/>
            </div>
        `
    });

    app.component('counter', {
        mounted(){
            console.log(this.attrs.msg);
        },
        template: `
            <div v-bind:msg="$attrs.msg">Count</div>
            <div v-bind="$attrs">Count</div>
            <div :msg1="$attrs.msg1">Count</div>
        `
    });
const vm = app.mount('#root'); 
触发外面事件 this.$emit()
const app = Vue.createApp({
        data(){
            return{
                count:1
            }
        },
        methods:{
            handleAddOne(){
                return this.count+=1;
            }
        },
        template: `
            <div>
                <counter :count="count" @add-one="handleAddOne"/>
            </div>
        `
    });

    app.component('counter', {
        props:['count'],
        emits:['addOne'],
        methods:{
            handleClick(){
                this.$emit('addOne');
            }
        },
        template: `
            <div @click="handleClick">{

   {count}}</div>
        `
    });
    const vm = app.mount('#root');
emits验证是否可以往外传不会报错只会警告
const app = Vue.createApp({
        data(){
            return{
                count:1
            }
        },
        methods:{
            handleAdd(count){
                this.count=count;
            }
        },
        template: `
            <div>
                <counter :count="count" @add="handleAdd"/>
            </div>
        `
    });

    app.component('counter', {
        props:['count'],
        emits:{
            add:(count)=>{
                if(count>10){
                    return true;
                }
                return false;
            }
        },
        methods:{
            handleClick(){
                this.$emit('add',this.count+3);
            }
        },
        template: `
            <div @click="handleClick">{

   {count}}</div>
        `
    });
    const vm = app.mount('#root');
高级东西(了解一下)
const app = Vue.createApp({
        data(){
            return{
                count:1
            }
        },
        template: `
            <div>
                <counter v-model="count"/>
            </div>
        `
    });

    app.component('counter', {
        props:['modelValue'],
        methods:{
            handleClick(){
                this.$emit('update:modelValue',this.modelValue+3)
            }
        },
        template: `
            <div @click="handleClick">{

   {modelValue}}</div>
        `
    });
    const vm = app.mount('#root');
const app = Vue.createApp({
data(){
return{
count:1
}
},
template: `
<div>
<counter v-model:app="count"/>
</div>
`
});
app.component('counter', {
props:['app'],
methods:{
handleClick(){
this.$emit('update:app',this.app+3)
}
},
template: `
<div @click="handleClick">{
{app}}</div>
`
});
const vm = app.mount('#root');选修课(较难)
拼接字符串且转换为大写形式(自定义修饰符:modelModifiers)
const app = Vue.createApp({
        data() {
            return {
                count: 'a'
            }
        },
        template: `
            <counter v-model.uppercase="count"/>
        `
    });

    app.component('counter', {
        props: {
            'modelValue': String,
            'modelModifiers': {
                default: () => ({})
            }
        },
        methods: {
            handleClick() {
                let newValue = this.modelValue + 'b';
                if (this.modelModifiers.uppercase) {
                    newValue = newValue.toUpperCase();
                }
                this.$emit('update:modelValue', newValue);
            }
        },
        template: `
            <div @click="handleClick">{

   {modelValue}}</div>
        `
    });
    const vm = app.mount('#root');
slot插槽
传递dom节点或者标签就可以使用插槽
父模板里调用的数据属性,使用的都是父模板里的数据
子模板里调用的数据属性,使用的都是子模板里的数据
const app = Vue.createApp({
        data(){
            return{
                text:'提交'
            }
        },
        template: `
            <myform>
                <div>{

   {text}}</div>
            </myform>
            <myform>
                <button>{

   {text}}</button>
            </myform>
        `
    });

    app.component('myform', {
        methods:{
            handleClick(){
                alert(123);
            }
        },
        template: `
            <input/>
            <span @click="handleClick">
                <slot></slot>
            </span>
        `
    });
    const vm = app.mount('#root');
具名插槽(拆分插槽)
简写形式#header相当于v-slot:header
const app=Vue.createApp({
        template:`
            <layout>
            <template v-slot:header>
                <div>header</div>
            </template>
            <template v-slot:footer>
                <div>footer</div>
            </template>
            </layout>
        `
    });

    app.component('layout',{
        template:`
            <slot name="header"></slot>
            <div>content</div>
            <slot name="footer"></slot>
        `
    });

    const vm=app.mount('#root');

插槽高级语法
作用域插槽(写Vue插件常用)
const app=Vue.createApp({
        template:`
            // <list v-slot="slotProps">
            //     <div>{

   {slotProps.item}}</div>
            // </list>
            <list v-slot="{item}">
                <div>{

   {item}}</div>
            </list>
        `
    });

    app.component('list',{
        data(){
            return{
                list:[1,2,3]
            }
        },
        template:`
            <slot v-for="item in list" :item="item"/>
        `
    });

    const vm=app.mount('#root');
说明:首先父组件去调用list子组件,这一块<div>{ {slotProps.item}}</div>就是传递给子组件的slot,在子组件去循环内容的时候,去调用slot意思就是通过<div></div>这种形式去展示内容,但是,我在调用slot的时候把数据传给slot(把item这些数据传给slot)然而slot怎么接收呢?它通过v-slot=“slotProps”这样的一个数据对象(传递过来的所有内容都放在这个对象中),接收了之后,这就可以使用传递过来的item内容(当子组件渲染的内容要由父组件决定的时候)
Vue动态组件
根据数据的变化,结合component这个标签,来随时动态切换组件的现实
const app = Vue.createApp({
        data() {
            return {
                currentItem: 'input-item'
            }
        },
        methods: {
            handleClick() {
                this.currentItem = this.currentItem === 'input-item' ? 'common-item' : 'input-item';
            }
        },
        template: `
            <keep-alive><component :is="currentItem"/></keep-alive>
            <button @click="handleClick">切换</button>
        `
    });

    app.component('input-item', {
        template: `
            <input/>
        `
    });

    app.component('common-item', {
        template: `
            <div>hello world</div>
        `
    });
    const vm = app.mount('#root');
Vue异步组件
是异步执行某些组件的逻辑,这叫异步组件
const app = Vue.createApp({
        template: `
            <common-item />
            <asyncComponent />
        `
    });
    app.component('common-item', {
        template: `
            <div>hello world</div>
        `
    });
    app.component('asyncComponent', Vue.defineAsyncComponent(() => {
        return new Promise((resolve,reject)=>{
            setTimeout(()=>{
                resolve({
                    template:`<div>this is an async component</div>`
                })
            },4000)
        });
    })
    );
    const vm = app.mount('#root');
v-once和ref
v-once 让某个元素标签只渲染一次
ref 实际上是获取dom节点/组件引用的一个语法
    const app = Vue.createApp({
        data(){
            return{
                count:1
            }
        },
        mounted(){
            this.$refs.common.sayHello();
        },
        template: `
            <div>
                <common-item ref="common"/>
            </div>
        `
    });

    app.component('common-item',{
        methods:{
            sayHello(){
                alert('hello');
            }
        },
        template:`<div>hello world</div>`
    })

    const vm = app.mount('#root');
 显示hello world之前弹出hello
provide/inject跨多级值的传递
const app = Vue.createApp({
        data(){
            return{
                count:1
            }
        },
        // provide:{
        //     count:1
        // },
        provide(){
            return{
                count:this.count,
            }
        },
        template: `
            <div>
                <child :count="count"/>
            </div>
        `
    });

    app.component('child',{
        template:`<child-child/>`
    })

    app.component('child-child',{
        inject:['count'],
        template:`<div>{

   {count}}</div>`
    })

    const vm = app.mount('#root');
注意:count变化provide里面的东西不会跟着变化,只渲染一次
动画
transform:translateX
<!DOCTYPE html>
<html lang="en">
<head>
    <meta charset="UTF-8">
    <meta http-equiv="X-UA-Compatible" content="IE=edge">
    <meta name="viewport" content="width=device-width, initial-scale=1.0">
    <title>lesson 23</title>
    <style>
        @keyframes leftToRight {
            0% {
                transform: translateX(-100px);
            }

            50% {
                transform: translateX(-50px);
            }

            0% {
                transform: translateX(0px);
            }
        }

        .animation {
            animation: leftToRight 3s;
        }
    </style>
    <script src="https://unpkg.com/vue@next"></script>
</head>
<body>
    <div id="root"></div>
</body>
<script>
    const app = Vue.createApp({
        data() {
            return {
                animate: {
                    animation: true
                }
            }
        },
        methods: {
            handleClick() {
                this.animate.animation = !this.animate.animation;
            }
        },
        template: `
            <div :class="animate">hello world</div>
            <button @click="handleClick">切换</button>
        `
    });

    const vm = app.mount('#root');
</script>
</html>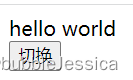
过渡
transition
<!DOCTYPE html>
<html lang="en">
<head>
    <meta charset="UTF-8">
    <meta http-equiv="X-UA-Compatible" content="IE=edge">
    <meta name="viewport" content="width=device-width, initial-scale=1.0">
    <title>lesson 23</title>
    <style>
        /* @keyframes leftToRight {
            0% {
                transform: translateX(-100px);
            }

            50% {
                transform: translateX(-50px);
            }

            0% {
                transform: translateX(0px);
            }
        }

        .animation {
            animation: leftToRight 3s;
        } */

        .transition{
            transition: 3s background-color ease;
        }

        .blue{
            background-color: blue;
        }

        .green{
            background-color: green;
        }
    </style>
    <script src="https://unpkg.com/vue@next"></script>
</head>
<body>
    <div id="root"></div>
</body>
<script>
    const app = Vue.createApp({
        data() {
            return {
                animate: {
                    transition:true,
                    blue:true,
                    green:false
                }
            }
        },
        methods: {
            handleClick() {
                if(this.animate.blue){
                    this.animate.blue=!this.animate.blue;
                    this.animate.green=!this.animate.green;
                }else{
                    this.animate.blue=!this.animate.blue;
                    this.animate.green=!this.animate.green;
                }
            }
        },
        template: `
            <div :class="animate">hello world</div>
            <button @click="handleClick">切换</button>
        `
    });

    const vm = app.mount('#root');
</script>
</html>
也可以下面这样写
<!DOCTYPE html>
<html lang="en">
<head>
    <meta charset="UTF-8">
    <meta http-equiv="X-UA-Compatible" content="IE=edge">
    <meta name="viewport" content="width=device-width, initial-scale=1.0">
    <title>lesson 23</title>
    <style>
        .transition{
            transition: 3s background-color ease;
        }
    </style>
    <script src="https://unpkg.com/vue@next"></script>
</head>
<body>
    <div id="root"></div>
</body>
<script>
    const app = Vue.createApp({
        data() {
            return {
                styleObj:{
                    background:'blue'
                }
            }
        },
        methods: {
            handleClick() {
                if(this.styleObj.background==='blue'){
                    this.styleObj.background='green';
                }else{
                    this.styleObj.background='blue';
                }
            }
        },
        template: `
            <div class="transition" :style="styleObj">hello world</div>
            <button @click="handleClick">切换</button>
        `
    });

    const vm = app.mount('#root');
</script>
</html>
单元素单组件的入场出场过渡动画
过渡
<!DOCTYPE html>
<html lang="en">
<head>
    <meta charset="UTF-8">
    <meta http-equiv="X-UA-Compatible" content="IE=edge">
    <meta name="viewport" content="width=device-width, initial-scale=1.0">
    <title>lesson 24</title>
    <style>
        .v-enter-from{
            opacity: 0;
        }
        .v-enter-active,.v-leave-active{
            transition: opacity 3s ease-out;
        }
        .v-enter-to{
            opacity: 1;
        }
        .v-leave-to{
            opacity: 0;
        }
    </style>
    <script src="https://unpkg.com/vue@next"></script>
</head>
<body>
    <div id="root"></div>
</body>
<script>
    // 单元素,单组件的出场入场动画
    const app = Vue.createApp({
        data() {
            return {
                show: false
            }
        },
        methods: {
            handleClick() {
                this.show=!this.show;
            }
        },
        template: `
            <div>
                <transition>
                    <div v-if="show">hello world</div>
                </transition>
                <button @click="handleClick">切换</button>
            </div>
        `
    });

    const vm = app.mount('#root');
</script>
</html>
动画
<!DOCTYPE html>
<html lang="en">
<head>
    <meta charset="UTF-8">
    <meta http-equiv="X-UA-Compatible" content="IE=edge">
    <meta name="viewport" content="width=device-width, initial-scale=1.0">
    <title>lesson 24</title>
    <style>
        @keyframes shake {
            0%{
                transform: translateX(-100px);
            }
            50%{
                transform: translateX(-50px);
            }
            100%{
                transform: translateX(50px);
            }
        }
        .v-enter-active,
        .v-leave-active{
            animation: shake 3s;
        }
    </style>
    <script src="https://unpkg.com/vue@next"></script>
</head>
<body>
    <div id="root"></div>
</body>
<script>
    // 单元素,单组件的出场入场动画
    const app = Vue.createApp({
        data() {
            return {
                show: false
            }
        },
        methods: {
            handleClick() {
                this.show=!this.show;
            }
        },
        template: `
            <div>
                <transition>
                    <div v-if="show">hello world</div>
                </transition>
                <button @click="handleClick">切换</button>
            </div>
        `
    });

    const vm = app.mount('#root');
</script>
</html>
如果我们给它命名的话<transition name="hello"></transition>,那么style里面的v-enter-from这些都需要换为hello-enter-from
引入第三方样式库
<!DOCTYPE html>
<html lang="en">
<head>
    <meta charset="UTF-8">
    <meta http-equiv="X-UA-Compatible" content="IE=edge">
    <meta name="viewport" content="width=device-width, initial-scale=1.0">
    <link
        rel="stylesheet"
        href="https://cdnjs.cloudflare.com/ajax/libs/animate.css/4.1.1/animate.min.css"
    />
    <title>lesson 24</title>
    <script src="https://unpkg.com/vue@next"></script>
</head>
<body>
    <div id="root"></div>
</body>
<script>
    // 单元素,单组件的出场入场动画
    // v-show隐藏还是会占用div的
    const app = Vue.createApp({
        data() {
            return {
                show: false
            }
        },
        methods: {
            handleClick() {
                this.show=!this.show;
            }
        },
        template: `
            <div>
                <transition
                    enter-active-class="animate__animated animate__flash"
                    leave-active-class="animate__animated animate__flash"
                >
                    <div v-show="show">hello world</div>
                </transition>
                <button @click="handleClick">切换</button>
            </div>
        `
    });

    const vm = app.mount('#root');
</script>
</html>
过渡和动画相结合
<!DOCTYPE html>
<html lang="en">
<head>
    <meta charset="UTF-8">
    <meta http-equiv="X-UA-Compatible" content="IE=edge">
    <meta name="viewport" content="width=device-width, initial-scale=1.0">
    <title>lesson 24</title>
    <style>
        @keyframes shake {
            0%{
                transform: translateX(-100px);
            }
            50%{
                transform: translateX(-50px);
            }
            100%{
                transform: translateX(50px);
            }
        }
        .v-enter-from{
            color: red;
        }
        .v-enter-active{
            animation: shake 3s;
            transition: color 3s ease-in;
        }
        /*动画从红变黑,再由黑变红*/
        .v-leave-active{
            animation: shake 3s;
            transition: color 3s ease-in;
            color: red;
        }
    </style>
    <script src="https://unpkg.com/vue@next"></script>
</head>
<body>
    <div id="root"></div>
</body>
<script>
    // 单元素,单组件的出场入场动画
    // v-show隐藏还是会占用div的
    const app = Vue.createApp({
        data() {
            return {
                show: false
            }
        },
        methods: {
            handleClick() {
                this.show=!this.show;
            }
        },
        template: `
            <div>
                <transition>
                    <div v-show="show">hello world</div>
                </transition>
                <button @click="handleClick">切换</button>
            </div>
        `
    });

    const vm = app.mount('#root');
</script>
</html>
当动画和过渡时间不一致时,可以在<transition type="animation"></transition>标签中添加type属性,表示以动画时间为准,当不想以css中设置时间来响应,可以在<transition :duration="{enter:1000,leave:3000}"></transition>标签中添加duration属性
使用js来处理动画和过渡
<!DOCTYPE html>
<html lang="en">

<head>
    <meta charset="UTF-8">
    <meta http-equiv="X-UA-Compatible" content="IE=edge">
    <meta name="viewport" content="width=device-width, initial-scale=1.0">
    <title>lesson 24</title>
    <style>
        /* @keyframes shake {
            0%{
                transform: translateX(-100px);
            }
            50%{
                transform: translateX(-50px);
            }
            100%{
                transform: translateX(50px);
            }
        }
        .v-enter-from{
            color: red;
        }
        .v-enter-active{
            animation: shake 10s;
            transition: color 3s ease-in;
        }
        .v-leave-active{
            animation: shake 10s;
            transition: color 3s ease-in;
            color: red;
        } */
    </style>
    <script src="https://unpkg.com/vue@next"></script>
</head>

<body>
    <div id="root"></div>
</body>
<script>
    // 单元素,单组件的出场入场动画
    // v-show隐藏还是会占用div的
    const app = Vue.createApp({
        data() {
            return {
                show: false
            }
        },
        methods: {
            handleClick() {
                this.show = !this.show;
            },
            handleBeforeEnter(el) {
                el.style.color = "red";
            },
            handleEnterActive(el, done) {
                const animation = setInterval(() => {
                    const color = el.style.color;
                    if (color === 'red') {
                        el.style.color = 'green';
                    } else {
                        el.style.color = 'red';
                    }
                }, 1000);
                setTimeout(() => {
                    clearInterval(animation);
                    done();
                }, 3000);
            },
            handleEnterEnd(){
                alert(123);
            }
        },
        template: `
            <div>
                <transition
                  :css="false"
                  @before-enter="handleBeforeEnter"
                  @enter="handleEnterActive"
                  @after-enter="handleEnterEnd"
                >
                    <div v-show="show">hello world</div>
                </transition>
                <button @click="handleClick">切换</button>
            </div>
        `
    });

    const vm = app.mount('#root');
</script>

</html>
多个单元素标签切换先隐藏再出现
<!DOCTYPE html>
<html lang="en">

<head>
    <meta charset="UTF-8">
    <meta http-equiv="X-UA-Compatible" content="IE=edge">
    <meta name="viewport" content="width=device-width, initial-scale=1.0">
    <title>lesson 25</title>
    <style>
        .v-enter-from,
        .v-leave-to{
            opacity: 0;
        }
        .v-enter-active,
        .v-leave-active{
            transition: opacity 1s ease-in;
        }
        .v-enter-to,
        .v-leave-from{
            opacity: 1;
        }
    </style>
    <script src="https://unpkg.com/vue@next"></script>
</head>

<body>
    <div id="root"></div>
</body>
<script>
    // 单元素,单组件的出场入场动画
    const app = Vue.createApp({
        data() {
            return {
                show: false
            }
        },
        methods: {
            handleClick() {
                this.show = !this.show;
            },

        },
        template: `
            <div>
                <transition mode="out-in" appear>
                    <div v-if="show">hello world</div>
                    <div v-else="show">bye world</div>
                </transition>
                <button @click="handleClick">切换</button>
            </div>
        `
    });

    const vm = app.mount('#root');
</script>

</html>
多个单元素组件切换先隐藏再出现一
<!DOCTYPE html>
<html lang="en">

<head>
    <meta charset="UTF-8">
    <meta http-equiv="X-UA-Compatible" content="IE=edge">
    <meta name="viewport" content="width=device-width, initial-scale=1.0">
    <title>lesson 25</title>
    <style>
        .v-enter-from,
        .v-leave-to{
            opacity: 0;
        }
        .v-enter-active,
        .v-leave-active{
            transition: opacity 1s ease-in;
        }
        .v-enter-to,
        .v-leave-from{
            opacity: 1;
        }
    </style>
    <script src="https://unpkg.com/vue@next"></script>
</head>

<body>
    <div id="root"></div>
</body>
<script>
    // 多个单组件之间的切换
    const ComponentA={
        template: `<div>hello world</div>`
    }
    const ComponentB={
        template: `<div>bye world</div>`
    }
    const app = Vue.createApp({
        data() {
            return {
                show: false
            }
        },
        methods: {
            handleClick() {
                this.show = !this.show;
            },

        },
        components:{
            'component-a':ComponentA,
            'component-b':ComponentB,
        },
        template: `
            <div>
                <transition mode="out-in" appear>
                    <component-a v-if="show"/>
                    <component-b v-else="show"/>
                </transition>
                <button @click="handleClick">切换</button>
            </div>
        `
    });

    const vm = app.mount('#root');
</script>

</html>
多个单元素组件切换先隐藏再出现二
<!DOCTYPE html>
<html lang="en">

<head>
    <meta charset="UTF-8">
    <meta http-equiv="X-UA-Compatible" content="IE=edge">
    <meta name="viewport" content="width=device-width, initial-scale=1.0">
    <title>lesson 25</title>
    <style>
        .v-enter-from,
        .v-leave-to{
            opacity: 0;
        }
        .v-enter-active,
        .v-leave-active{
            transition: opacity 1s ease-in;
        }
        .v-enter-to,
        .v-leave-from{
            opacity: 1;
        }
    </style>
    <script src="https://unpkg.com/vue@next"></script>
</head>

<body>
    <div id="root"></div>
</body>
<script>
    // 多个单组件之间的切换
    const ComponentA={
        template: `<div>hello world</div>`
    }
    const ComponentB={
        template: `<div>bye world</div>`
    }
    const app = Vue.createApp({
        data() {
            return {
                component: 'component-a'
            }
        },
        methods: {
            handleClick() {
                if(this.component==='component-a'){
                    this.component='component-b';
                }else{
                    this.component='component-a';
                }
            },

        },
        components:{
            'component-a':ComponentA,
            'component-b':ComponentB,
        },
        template: `
            <div>
                <transition mode="out-in" appear>
                    <component :is="component"/>
                </transition>
                <button @click="handleClick">切换</button>
            </div>
        `
    });

    const vm = app.mount('#root');
</script>

</html>
列表动画的实现
<!DOCTYPE html>
<html lang="en">

<head>
    <meta charset="UTF-8">
    <meta http-equiv="X-UA-Compatible" content="IE=edge">
    <meta name="viewport" content="width=device-width, initial-scale=1.0">
    <title>lesson 26</title>
    <style>
        .v-enter-from{
            opacity: 0;
            transform: translateY(30px);
        }
        .v-enter-active{
            transition: all .5s ease-in;
        }
        .v-enter-to{
            opacity: 1;
            transform: translateY(0px);
        }
        .list-item{
            display: inline-block;
            margin-right: 10px;
        }
        .v-move{
            transition: all .5s ease-in;
        }
    </style>
    <script src="https://unpkg.com/vue@next"></script>
</head>

<body>
    <div id="root"></div>
</body>
<script>
    // 列表动画的实现
    const app = Vue.createApp({
        data() {
            return {
                list:[1,2,3]
            }
        },
        methods: {
            handleClick() {
                this.list.unshift(this.list.length+1);
            },

        },
        template: `
            <div>
                <transition-group>
                    <span class="list-item" v-for="item in list" :key="item">{

   {item}}</span>
                </transition-group>
                <button @click="handleClick">增加</button>
            </div>
        `
    });

    const vm = app.mount('#root');
</script>

</html>
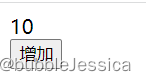
状态动画的实现
<!DOCTYPE html>
<html lang="en">

<head>
    <meta charset="UTF-8">
    <meta http-equiv="X-UA-Compatible" content="IE=edge">
    <meta name="viewport" content="width=device-width, initial-scale=1.0">
    <title>lesson 26</title>
    <script src="https://unpkg.com/vue@next"></script>
</head>

<body>
    <div id="root"></div>
</body>
<script>
    // 状态动画的实现
    const app = Vue.createApp({
        data() {
            return {
                number: 1,
                animateNumber: 1
            }
        },
        methods: {
            handleClick() {
                this.number = 10;
                if (this.animateNumber < this.number) {
                    const animation = setInterval(() => {
                        this.animateNumber += 1;
                        if (this.animateNumber === 10) {
                            clearInterval(animation);
                        }
                    }, 100);
                }
            },

        },
        template: `
            <div>
                <div>{

   {animateNumber}}</div>
                <button @click="handleClick">增加</button>
            </div>
        `
    });

    const vm = app.mount('#root');
</script>

</html>