<script src="https://unpkg.com/vue@next"></script>从面向dom编程到面向数据编程
输入显示列表
const app=Vue.createApp({
        data(){
            return{
                inputValue:'',
                list:[]
            }
        },
        methods:{
            handleAddItem(){
                this.list.push(this.inputValue);
                this.inputValue='';
            }
        },
        template:
            `
                <div>
                    <input v-model="inputValue" />
                    <button
                        v-on:click="handleAddItem"
                        v-bind:title="inputValue">
                        增加
                    </button>
                    <ul>
                        <todo-item v-for="(item,index) of list" v-bind:content="item" v-bind:index="index"/>
                    <ul>
                </div>
            `
    });


    app.component('todo-item',{
        props:['content','index'],
        template:'<li>{

   {index}}--{

   {content}}</li>'
    });

    app.mount('#root');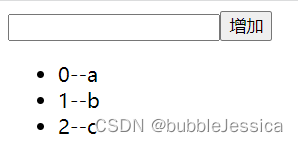
反转字符串
    Vue.createApp({
        data(){
            return{
                str:'hello world'
            }
        },
        methods:{
            handleReverse(){
                this.str=this.str.split('').reverse().join('');
            }
        },
        template:
            `
                <div>
                    {

   {str}}
                    <button v-on:click="handleReverse">反转字符串</button>
                </div>
            `

    }).mount('#root');
createApp表示创建一个Vue应用,存储到app变量中
传入的参数表示,这个应用最外层的组件,应该如何展示
MVVM设计模式,M->Model 数据,V->View 视图,VM-> ViewModel视图数据连接
生命周期函数(8个)
// 生命周期函数 在某一时刻自动执行的函数
const app = Vue.createApp({
data() {
return {
message: 'hello world'
}
},
beforeCreate(){
// 在实例生成之前自动执行的函数
console.log('beforeCreate');
},
created(){
// 在实例生成之后自动执行的函数
console.log('created');
},
beforeMount(){
// 在组件内容被渲染到页面之前自动执行的函数
console.log(document.getElementById('root').innerHTML,'beforeMounted');
},
mounted(){
// 在组件内容被渲染到页面之后自动执行的函数
console.log(document.getElementById('root').innerHTML,'mounted');
},
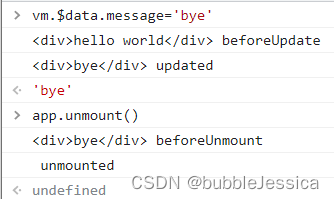
beforeUpdate(){
// 在data中数据发生变化时,自动执行的函数
console.log(document.getElementById('root').innerHTML,'beforeUpdate');
},
updated(){
// 在data中数据发生变化时,且重新渲染页面后,自动执行的函数
console.log(document.getElementById('root').innerHTML,'updated');
},
beforeUnmount(){
// 当Vue应用(实例)失效时,自动执行的函数
console.log(document.getElementById('root').innerHTML,'beforeUnmount');
},
unmounted(){
// 当Vue应用(实例)失效时,且DOM完全销毁之后,自动执行的函数
console.log(document.getElementById('root').innerHTML,'unmounted');
},
template: `<div>{
{message}}</div>`
});
const vm=app.mount('#root');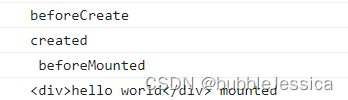
插值表达式{ {}}
const app = Vue.createApp({
        data() {
            return {
                message: '<strong>hello world</strong>'
            }
        },
        template: `<div>{

   {message}}</div>`
    });
const vm=app.mount('#root');![]() 结果却显示包含html标签的变量,这时想要显示加粗的变量,我们需要在模板里加上v-html指令即可
结果却显示包含html标签的变量,这时想要显示加粗的变量,我们需要在模板里加上v-html指令即可
const app = Vue.createApp({
        data() {
            return {
                message: '<strong>hello world</strong>'
            }
        },
        template: `<div v-html="message"></div>`
    });
const vm=app.mount('#root'); ![]()
添加title属性需要添加v-bind指令,此时页面上鼠标悬停在hello world时会出现hello world标题
v-bind:title简写成:title
const app = Vue.createApp({
        data() {
            return {
                message: 'hello world'
            }
        },
        template: `<div v-bind:title="message">hello world</div>`
    });
    const vm=app.mount('#root');
v-bind我们还可以结合输入框使用
const app = Vue.createApp({
        data() {
            return {
                disable:false
            }
        },
        template: `<input v-bind:disabled="disable"/>`
    });
const vm=app.mount('#root');![]()
注意:模板可以使用v-once指令使变量只渲染第一次时的值,之后修改变量的值不会跟随变化
事件绑定v-on:click() 简写@click
结合动态属性:[变量]
const app = Vue.createApp({
        data() {
            return {
                message:'hello world',
                name:'title',
                event:'click'
            }
        },
        methods:{
            handleClick(){
                alert('click');
            }
        },
        template: `<div :[name]="message" @[event]="handleClick">{

   {message}}</div>`
    });
    const vm=app.mount('#root');
阻止默认行为@click.prevent="handleClick"
const app = Vue.createApp({
        data() {
            return {
                message:'hello world'
            }
        },
        methods:{
            handleClick(){
                alert('click');
                //e.preventDefault();
            }
        },
        template:
        `
            <form action="http://www.baidu.com" @click.prevent="handleClick">
                <button type="submit">提交</button>
            </form>
        `
    });
    const vm=app.mount('#root');
computed计算属性
const app = Vue.createApp({
        data() {
            return {
                message:'hello world'
            }
        },
        computed:{
            // 当计算属性依赖的内容发生变化时,方法才会重新执行计算
            total(){
                return Date.now();
            }
        },
        methods:{
            // 只要页面重新渲染,方法就会执行
            formatString(string){
                return string.toUpperCase();
            },
            getTotal(){
                return Date.now();
            }
        },
        template:
        `
            <div>{

   {formatString(message)}} {

   {total}}</div>
            <div>{

   {formatString(message)}} {

   {getTotal()}}</div>
        `
    });
    const vm=app.mount('#root');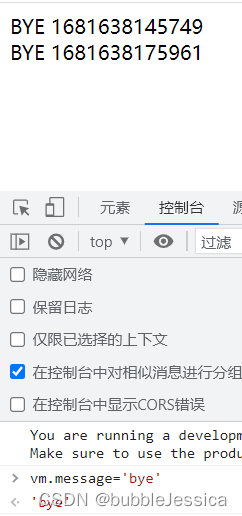
侦听器watch(通常异步操作使用)(监听对应属性)
const app = Vue.createApp({
        data() {
            return {
                message:'hello world',
                count:2,
                price:5,
                newTotal:10
            }
        },
        // 监听器
        watch:{
            // 当价格发生变化才会执行的函数
            price(current,prev){
                this.newTotal= current*this.count;
            }
        },
        computed:{
            // 当计算属性依赖的内容发生变化时,方法才会重新执行计算 建议使用因为有缓存、简洁
            total(){
                return this.price*this.count;
            }
        },
        methods:{
            // 只要页面重新渲染,方法就会执行
            formatString(string){
                return string.toUpperCase();
            },
            getTotal(){
                return this.price*this.count;
            }
        },
        template:
        `
            <div>{

   {formatString(message)}} {

   {total}}</div>
            <div>{

   {formatString(message)}} {

   {getTotal()}}</div>
            <div>{

   {formatString(message)}} {

   {newTotal}}</div>
        `
    });
    const vm=app.mount('#root');
改变字符串样式
<!DOCTYPE html>
<html lang="en">
<head>
    <meta charset="UTF-8">
    <meta http-equiv="X-UA-Compatible" content="IE=edge">
    <meta name="viewport" content="width=device-width, initial-scale=1.0">
    <title>lesson 5</title>
    <script src="https://unpkg.com/vue@next"></script>
    <style>
        .red{
            color: red;
        }
        .green{
            color: green;
        }
        .blue{
            color: blue;
        }
        .brown{
            color: brown;
        }
    </style>
</head>
<body>
    <div id="root"></div>
</body>
<script>
    // 改变样式
    // 1字符串/2对象/3数组
    const app = Vue.createApp({
        data(){
            return{
                classString:'green',
                classObject:{
                    'red':true,
                    'green':true,
                    'blue':true
                },
                classArray:['red','blue','green',{brown:true}]
            }
        },
        template:
        `
            <div :class="classString">Hello World</div>
            <div :class="classArray">Hello World</div>
            <div :class="classObject">Hello World</div>
        `
    });
    const vm=app.mount('#root');
</script>

</html>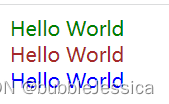
父元素包括多个子元素注意:$attrs.class使用
<!DOCTYPE html>
<html lang="en">
<head>
    <meta charset="UTF-8">
    <meta http-equiv="X-UA-Compatible" content="IE=edge">
    <meta name="viewport" content="width=device-width, initial-scale=1.0">
    <title>lesson 5</title>
    <script src="https://unpkg.com/vue@next"></script>
    <style>
        .red{
            color: red;
        }
        .green{
            color: green;
        }
        .blue{
            color: blue;
        }
        .brown{
            color: brown;
        }
    </style>
</head>
<body>
    <div id="root"></div>
</body>
<script>
    // 改变样式
    // 1字符串/2对象/3数组
    const app = Vue.createApp({
        data(){
            return{
                classString:'red',
                classObject:{
                    'red':true,
                    'green':true,
                    'blue':true
                },
                classArray:['red','blue','green',{brown:false}]
            }
        },
        template:
        `
            <div :class="classString">
                Hello World
                <demo class="green" />
            </div>
        `
    });
    app.component('demo',{
        template:
        `
            <div :class="$attrs.class">one</div>
            <div>two</div>
        `
    });
    const vm=app.mount('#root');
</script>

</html>
行内样式使用
<!DOCTYPE html>
<html lang="en">
<head>
    <meta charset="UTF-8">
    <meta http-equiv="X-UA-Compatible" content="IE=edge">
    <meta name="viewport" content="width=device-width, initial-scale=1.0">
    <title>lesson 5</title>
    <script src="https://unpkg.com/vue@next"></script>
    <style>
        .red{
            color: red;
        }
        .green{
            color: green;
        }
        .blue{
            color: blue;
        }
        .brown{
            color: brown;
        }
    </style>
</head>
<body>
    <div id="root"></div>
</body>
<script>
    // 改变样式
    // 1字符串/2对象/3数组
    const app = Vue.createApp({
        data(){
            return{
                classString:'red',
                classObject:{
                    'red':true,
                    'green':true,
                    'blue':true
                },
                classArray:['red','blue','green',{brown:false}],
                styleString:'color:yellow;background:orange',
                // 行内样式我们使用对象存储可读性更高
                styleObject:{
                    color:'orange',
                    background:'purple'
                }
            }
        },
        template:
        `
            <div :style="styleObject">
                Hello World
            </div>
        `
    });
    app.component('demo',{
        template:
        `
            <div :class="$attrs.class">one</div>
            <div>two</div>
        `
    });
    const vm=app.mount('#root');
</script>

</html>
v-if和v-show区别
const app = Vue.createApp({
        data(){
            return{
                show:false
            }
        },
        template:
        `
            <div v-if="show">Hello World</div>
            <div v-show="show">Bye World</div>
        `
    });
    const vm=app.mount('#root');
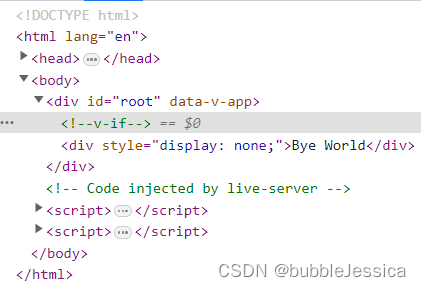
频繁需要修改元素的话我们建议使用v-show,因为不会把元素销毁掉
const app = Vue.createApp({
        data(){
            return{
                conditionOne:false,
                conditionTwo:true
            }
        },
        template:
        `
            <div v-if="conditionOne">if</div>
            <div v-else-if="conditionTwo">else if</div>
            <div v-else>else</div>

        `
    });
    const vm=app.mount('#root');
v-for用法
数组和对象使用 注意:v-for优先级比v-if优先级高,所以如果要判断的话需要嵌套标签但是我们发现此时多了个div标签,这里我们使用小技巧将外面的div标签替换为template标签相当于占位符
const app = Vue.createApp({
        data(){
            return{
                listArray:['dell','lee','teacher'],
                listObject:{
                    firstName:'dell',
                    lastName:'lee',
                    job:'teacher'
                }
            }
        },
        methods:{
            handleAddBtnClick(){
                // 1使用数组的变更函数
                //this.listArray.push('hello');结尾增加
                //this.listArray.pop();结尾删除
                //this.listArray.shift();开头删除
                //this.listArray.unshift('hello');//开头增加
                // this.listArray.reverse();

                // 2直接替换数组
                // this.listArray=['bye','world'];
                // this.listArray=['bye','world'].filter(item=>item==='bye');

                // 3更新数组内容
                // this.listArray[1]='bye';
                this.listObject.age=100;
                this.listObject.sex='male';
            }
        },
        template:
        `
            <div>
                <template v-for="(value,key,index) in listObject" :key="index">
                    <div v-if="key!=='lastName'">
                        {

   {value}}--{

   {key}}--{

   {index}}
                    </div>
                </template>
                <div v-for="item in 10">{

   {item}}</div>
                <button @click="handleAddBtnClick">新增</button>
            </div>
        `
    });
    const vm=app.mount('#root');
事件
当调用多个函数的时候,我们不能像以前一样直接写引用名,而是需要再加上()逗号分开才生效
const app = Vue.createApp({
        data(){
            return{
                counter: 0
            }
        },
        methods:{
            handleBtnClick(num,event){
                console.log(event.target);
                this.counter+=num;
            }
        },
        template:
        `
            <div>
                {

   {counter}}
                <button @click="handleBtnClick(2,$event)">新增</button>
            </div>
        `
    });
const vm=app.mount('#root');![]()
const app = Vue.createApp({
        data(){
            return{
                counter: 0
            }
        },
        methods:{
            handleBtnClick(){
                alert('1');
            },
            handleBtnClick1(){
                alert('2');
            },
        },
        template:
        `
            <div>
                {

   {counter}}
                <button @click="handleBtnClick(),handleBtnClick1()">新增</button>
            </div>
        `
    });
    const vm=app.mount('#root');
阻止冒泡(向外传播)@click.stop
const app = Vue.createApp({
        data(){
            return{
                counter: 0
            }
        },
        methods:{
            handleBtnClick(){
                this.counter+=1;
            },
            handleDivClick(){
                alert('div click');
            }
        },
        template:
        `
            <div>
                {

   {counter}}
                <div @click="handleDivClick">
                    <button @click.stop="handleBtnClick">新增</button>
                </div>
            </div>
        `
    });
    const vm=app.mount('#root');
点击自己标签才显示@click.self
const app = Vue.createApp({
        data(){
            return{
                counter: 0
            }
        },
        methods:{
            handleBtnClick(){
                this.counter+=1;
            },
            handleDivClick(){
                alert('div click');
            }
        },
        template:
        `
            <div>
                <div @click.self="handleDivClick">
                    {

   {counter}}
                    <button @click="handleBtnClick">新增</button>
                </div>
            </div>
        `
    });
    const vm=app.mount('#root');
事件修饰符:注意标签@click.prevent阻止默认行为发生、@click.capture捕获阶段(从外到内)默认是冒泡阶段(从内到外) 、@click.once只能点击一次
按键和鼠标修饰符
按键:enter,tab,delete,esc,up,down,left,right
鼠标:left,right,middle
const app = Vue.createApp({
        data(){
            return{
                counter: 0
            }
        },
        methods:{
            handleKeyDown(){
                console.log('keydown');
            }
        },
        template:
        `
            <div>
                <input @keydown.delete="handleKeyDown"/>
            </div>
        `
    });
    const vm=app.mount('#root');
const app = Vue.createApp({
data(){
return{
counter: 0
}
},
methods:{
handleClick(){
console.log('click');
}
},
template:
`
<div>
<div @click="handleClick">123</div>
</div>
`
});
const vm=app.mount('#root');双向绑定
复选框checkbox和单选框radio
// input,textarea,checkbox,radio
    const app = Vue.createApp({
        data(){
            return{
                message:[]
            }
        },
        template:
        `
            <div>
                {

   {message}}
                jack <input type="checkbox" value="jack" v-model="message"/>
                jessica <input type="checkbox" value="jessica" v-model="message"/>
                karry <input type="checkbox" value="karry" v-model="message"/>
            </div>
        `
    });
const vm=app.mount('#root');![]()
// input,textarea,checkbox,radio
    const app = Vue.createApp({
        data(){
            return{
                message:''
            }
        },
        template:
        `
            <div>
                {

   {message}}
                jack <input type="radio" value="jack" v-model="message"/>
                jessica <input type="radio" value="jessica" v-model="message"/>
                karry <input type="radio" value="karry" v-model="message"/>
            </div>
        `
    });
const vm=app.mount('#root');![]()
列表框
const app = Vue.createApp({
        data(){
            return{
                message:[],
                options:[{
                    text:'A',value:{value:'A'}
                },{
                    text:'B',value:{value:'B'}
                },{
                    text:'C',value:{value:'C'}
                }]
            }
        },
        template:
        `
            <div>
                {

   {message}}
                <select v-model="message" multiple>
                    <option v-for="item in options" :value="item.value">{

   {item.text}}</option>
                </select>
            </div>
        `
    });
    const vm=app.mount('#root');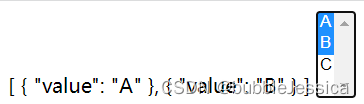
const app = Vue.createApp({
        data(){
            return{
                message:'world',
            }
        },
        template:
        `
            <div>
                {

   {message}}
                <input type="checkbox" v-model="message" true-value="hello" false-value="world"/>
            </div>
        `
    });
const vm=app.mount('#root');![]() world表示没选上的值
world表示没选上的值
注意:v-model.lazy等鼠标移开输入框点击外面一下才会双向绑定 v-model-trim去除字符串首尾空格