1 ray casting
ray casting(光线衍射) 和 ray tracing(光线追踪)都属于计算机图形学内的基础方法;用于对三维的实体建模和图片渲染;ray casting一词来自于General Motors Research Labs from 1978–1980;出自论文《Ray Casting for Modeling Solids》。ray casting 极大的简化了3D物体或场景到图片的渲染。详情可以查看该wiki。
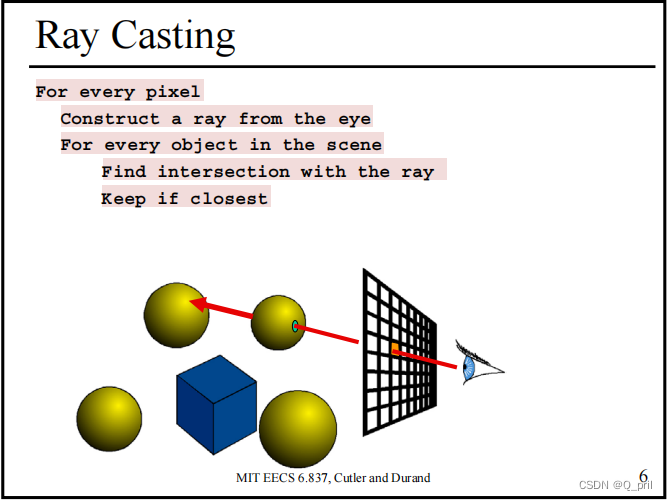
这里简单介绍以下ray casting;在假设光线不会二次或多次反射的情况下,从相机的focal point为中心点每个像素根据设定的FOV计算得到每个像素上对应的光线方向,并从该方向射出所有光线,如若光线与场景中的物体相交,则记录下来,并选取距离与相机最短的物体作为该光线的结果映射会图像上。简而言之:给定一个场景和相机的位姿,可以使用ray casting得到该位姿下拍摄得到的图像信息。
以下为几个网上ray casting示意图


在open3d中实现了RaycastingScene类用于基础的ray casting功能;下面介绍以下如何在open3d中创建一个简单的场景并使用ray casing来进行光线与物体的相交测试;同时可以使用该类为mesh;cad模型等创建虚拟的点云信息。
import open3d as o3d
import numpy as np
import matplotlib.pyplot as plt

if __name__ == "__main__":
    # Create meshes and convert to open3d.t.geometry.TriangleMesh .

    # 创建普通的geometry类型在cpu上
    # 创建立方体
    cube_ = o3d.geometry.TriangleMesh.create_box().translate([0, 0, 0])
    # 创建环面
    torus_ = o3d.geometry.TriangleMesh.create_torus().translate([0, 0, 2])
    # 创建球体
    sphere_ = o3d.geometry.TriangleMesh.create_sphere(radius=0.5).translate(
        [1, 2, 3])


    o3d.visualization.draw_geometries([cube_, torus_, sphere_],
                                      lookat=[0, 0, 2],  # 相机查看的方向
                                      front=[2, 3, 0],  # 相机的位置
                                      up=[0, 1, 0],
                                      zoom=1.0,
                                      )


    # 将cpu上的geometry类型转换成tensorgeometry的类型,可以运算在显卡等设备上加速处理
    # 由于ray casting操作运算量大,所以open3d没有基于cpu对该类进行实现,
    # 但是open3d做了对集成显卡的支持
    cube = o3d.t.geometry.TriangleMesh.from_legacy(cube_)
    sphere = o3d.t.geometry.TriangleMesh.from_legacy(sphere_)
    torus = o3d.t.geometry.TriangleMesh.from_legacy(torus_)

    # 初始化RaycastingScene类
    # param : nthreads用于指定使用多少个线程用于创建场景,0代表自动选择
    scene = o3d.t.geometry.RaycastingScene(nthreads=0)
    # 添加上述创建的物体到场景中,返回值为该geometry在RaycastingScene中的ID
    _ = scene.add_triangles(cube)
    _ = scene.add_triangles(torus)
    _ = scene.add_triangles(sphere)


    """
    生成的光线示例
    # We create two rays:
    # The first ray starts at (0.5,0.5,10) and has direction (0,0,-1).
    # The second ray start at (-1,-1,-1) and has direction (0,0,-1).
    rays = o3d.core.Tensor([[0.5, 0.5, 10, 0, 0, -1], [-1, -1, -1, 0, 0, -1]],
                           dtype=o3d.core.Dtype.Float32)

    """


    # 根据相机的参数设置光线的射出方向
    # 返回值是一个大小为(height_px,width_px,6)的张量为
    #  [ox, oy, oz, dx, dy, dz] 中心坐标时[ox,oy,oz] 方向为 [dx,dy,dz]
    rays = o3d.t.geometry.RaycastingScene.create_rays_pinhole(
        fov_deg=90,  # 相机的水平fov角度
        center=[0, 0, 2],  # 相机的位置
        eye=[2, 3, 0],  # 相机查看的方向
        up=[0, 1, 0],
        width_px=640,  # 图像的宽度
        height_px=480,  # 图像的高度
    )


    # We can directly pass the rays tensor to the cast_rays function.
    # 计算光线与场景中的物体第一次相交
    # 输入的rays的维度大于等于2,shape为{..,6},
    # 方向向量不必进行归一化操作,但是返回的最近的物体与相机的距离结果为方向单位向量的长度
    ans = scene.cast_rays(rays=rays, nthreads=0)
    """
    print(ans) 结果为
    dict_keys(['primitive_uvs', 'primitive_ids', 'geometry_ids', 'primitive_normals', 't_hit'])

    t_hit is the distance to the intersection. The unit is defined by the length of the ray direction. If there is no intersection this is inf
    t_hit 是光线与物体相交点距离相机的距离,单位是光线方向的单位向量,如果该光线没有与物体相交,则该值为inf

    geometry_ids gives the id of the geometry hit by the ray. If no geometry was hit this is RaycastingScene.INVALID_ID
    geometry_ids 给出了该光线与哪个ID的物体相交,如果该光线没有与物体相交,则该值为RaycastingScene.INVALID_ID

    primitive_ids is the triangle index of the triangle that was hit or RaycastingScene.INVALID_ID
    primitive_ids 返回了光线与triangle mesh的哪个mesh相交,返回了该mesh在triangle mesh中的索引,
    如果该光线没有与物体相交,则该值为RaycastingScene.INVALID_ID

    primitive_uvs is the barycentric coordinates of the intersection point within the triangle.
    primitive_uvs 是三角形内交点的重心坐标 shape:{.., 2}

    primitive_normals is the normal of the hit triangle.
    primitive_normals 相交triangle mesh的法线信息 shape: {.., 3}
    """
    # 使用matplotlib画出所有光线距离相机的图像,颜色越深代表距离越远
    plt.imshow(ans['t_hit'].numpy())
    plt.show()
    # 使用matplotlib画出所有光线对应mesh的法线信息
    plt.imshow(np.abs(ans['primitive_normals'].numpy()))
    plt.show()
    # 使用matplotlib画出所有光线对应的物体id,不同的物体颜色不同,相同的物体颜色相同
    plt.imshow(np.abs(ans['geometry_ids'].numpy()), vmax=3)
    plt.show()
注:其中相机视角的参数可以查阅opengl的相关内容,这里给一个tutorial的链接LearnOpenGL - Camera
相机与物体的深度图

物体表面的法线信息

每个像素代表一条光线,光线与某个物体相交则统一显示为同一个颜色

2 使用ray casting创建虚拟点云
结合上面的内容,可以根据光线与物体相交得到的深度信息来创建物体的点云信息,在虚拟的环境中可以使用根据虚拟的相机位姿信息通过raycasting来获取当前位姿下相机看到物体的深度图。
# 判断该点是否与物体相交
    hit = ans['t_hit'].isfinite()
    # 取出所有与物体相交的rays,并根据结果t_hit来获取每个相交光线与物体的深度距离,加在原光线点中
    points = rays[hit][:,:3]
    points_distance = rays[hit][:,3:]*ans['t_hit'][hit].reshape((-1,1))
    points+=points_distance
    pcd = o3d.t.geometry.PointCloud(points)
    # Press Ctrl/Cmd-C in the visualization window to copy the current viewpoint
    o3d.visualization.draw_geometries([pcd.to_legacy()],
                                      front=[0.5, 0.86, 0.125],
                                      lookat=[0.23, 0.5, 2],
                                      up=[-0.63, 0.45, -0.63],
                                      zoom=0.7)
    # o3d.visualization.draw([pcd]) # new API
3 TSDF中使用ray casting
此内容在重建TSDF时补充