这里写自定义目录标题
Detectron2是facebook主导的支持图像分类(Image classification),目标检测(Object detection),语义分割(Semantic segmentation)和实例分割(instance segmentation),全景分割(panoramic segmentation)的强大的图像识别工具。
官方安装说明
1、安装python
sudo apt install python3
sudo ln -s /usr/bin/python3 /usr/bin/python
sudo apt install python3-pip
2、安装opencv
sudo apt install python3-opencv
3、安装nvdia显卡驱动
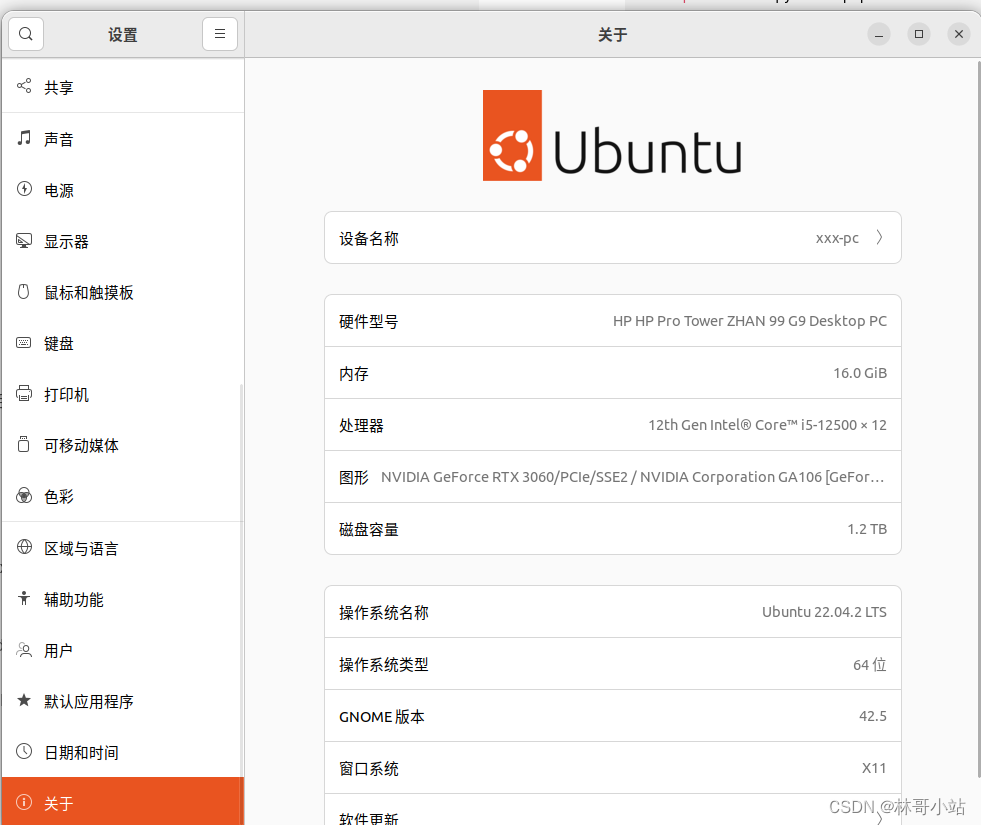
一般来说,如果你安装的是UBUNTU,并在安装时选择了安装第三方显卡驱动程序的话,那么UBUNTU开机就支持驱动了,可以在设置–关于时查看。如果看到如下图图形这时显示为NVIDIA GeForce RTX3060字样,则说明已经安装好驱动了。
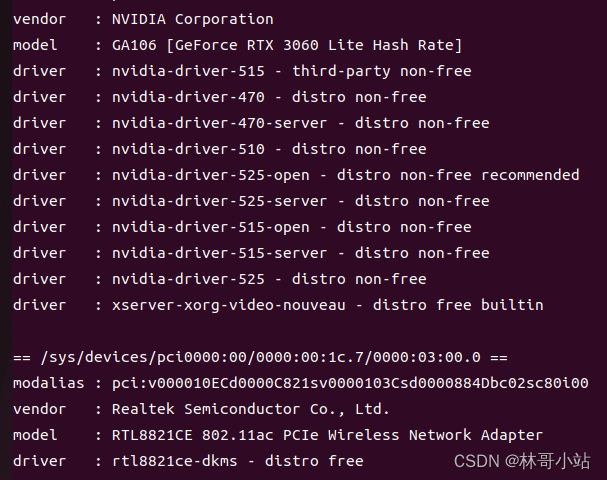
如果你没有安装好驱动或者驱动安装有问题,需要重新安装则可以用以下步骤进行。其中第三个命令会显示当前推荐的驱动,如下图带recommended字样的那个,选择它用第4个命令安装则可。
sudo add-apt-repository ppa:graphics-drivers/ppa
sudo apt-get update
sudo ubuntu-drivers devices
sudo apt install nvidia-driver-525-open
4、安装cuda11.7
参见官方安装连接,cuda11.7是detectron2官方推荐的版本,所以此处安装些版本:
也可以直接参照下面这些命令,依次安装。
wget https://developer.download.nvidia.com/compute/cuda/repos/ubuntu2204/x86_64/cuda-ubuntu2204.pin
sudo mv cuda-ubuntu2204.pin /etc/apt/preferences.d/cuda-repository-pin-600
wget https://developer.download.nvidia.com/compute/cuda/11.7.1/local_installers/cuda-repo-ubuntu2204-11-7-local_11.7.1-515.65.01-1_amd64.deb
sudo dpkg -i cuda-repo-ubuntu2204-11-7-local_11.7.1-515.65.01-1_amd64.deb
sudo cp /var/cuda-repo-ubuntu2204-11-7-local/cuda-*-keyring.gpg /usr/share/keyrings/
sudo apt-get update
sudo apt-get -y install cuda
重启系统后,用nvidia-smi看到如下结果,则说明驱动和cuda都已经安装好了
xxx@xxx-pc:~$ nvidia-smi
Sat Apr 15 14:15:04 2023
+-----------------------------------------------------------------------------+
| NVIDIA-SMI 515.65.01    Driver Version: 515.65.01    CUDA Version: 11.7     |
|-------------------------------+----------------------+----------------------+
| GPU  Name        Persistence-M| Bus-Id        Disp.A | Volatile Uncorr. ECC |
| Fan  Temp  Perf  Pwr:Usage/Cap|         Memory-Usage | GPU-Util  Compute M. |
|                               |                      |               MIG M. |
|===============================+======================+======================|
|   0  NVIDIA GeForce ...  On   | 00000000:01:00.0  On |                  N/A |
| 36%   34C    P8     9W / 170W |    182MiB / 12288MiB |      0%      Default |
|                               |                      |                  N/A |
+-------------------------------+----------------------+----------------------+

+-----------------------------------------------------------------------------+
| Processes:                                                                  |
|  GPU   GI   CI        PID   Type   Process name                  GPU Memory |
|        ID   ID                                                   Usage      |
|=============================================================================|
|    0   N/A  N/A      1831      G   /usr/lib/xorg/Xorg                 94MiB |
|    0   N/A  N/A      2131      G   /usr/bin/gnome-shell               85MiB |
+-----------------------------------------------------------------------------+
5、安装pytorch
需要先更新PIP安装源,pip默认的源在国外,速度比较慢,只有几十k,而pytorch很大,有好几个G,所以开始安装前要先设置安装源成国内的安装源,详见为pip永久性添加国内镜像安装源
打开网站https://pytorch.org/选择好合适的安装参数后,这里选择了detectron推荐的默认CUDA 11.7版本后,出现如下图提示的安装用命令

在命令行下输入命令则自动开始安装
pip install torch torchvision torchaudio
6、安装nijia
sudo apt install ninja-build
7、clone并安装detectron
git clone https://github.com/facebookresearch/detectron2.git
python -m pip install -e detectron2
8、试运行detectron
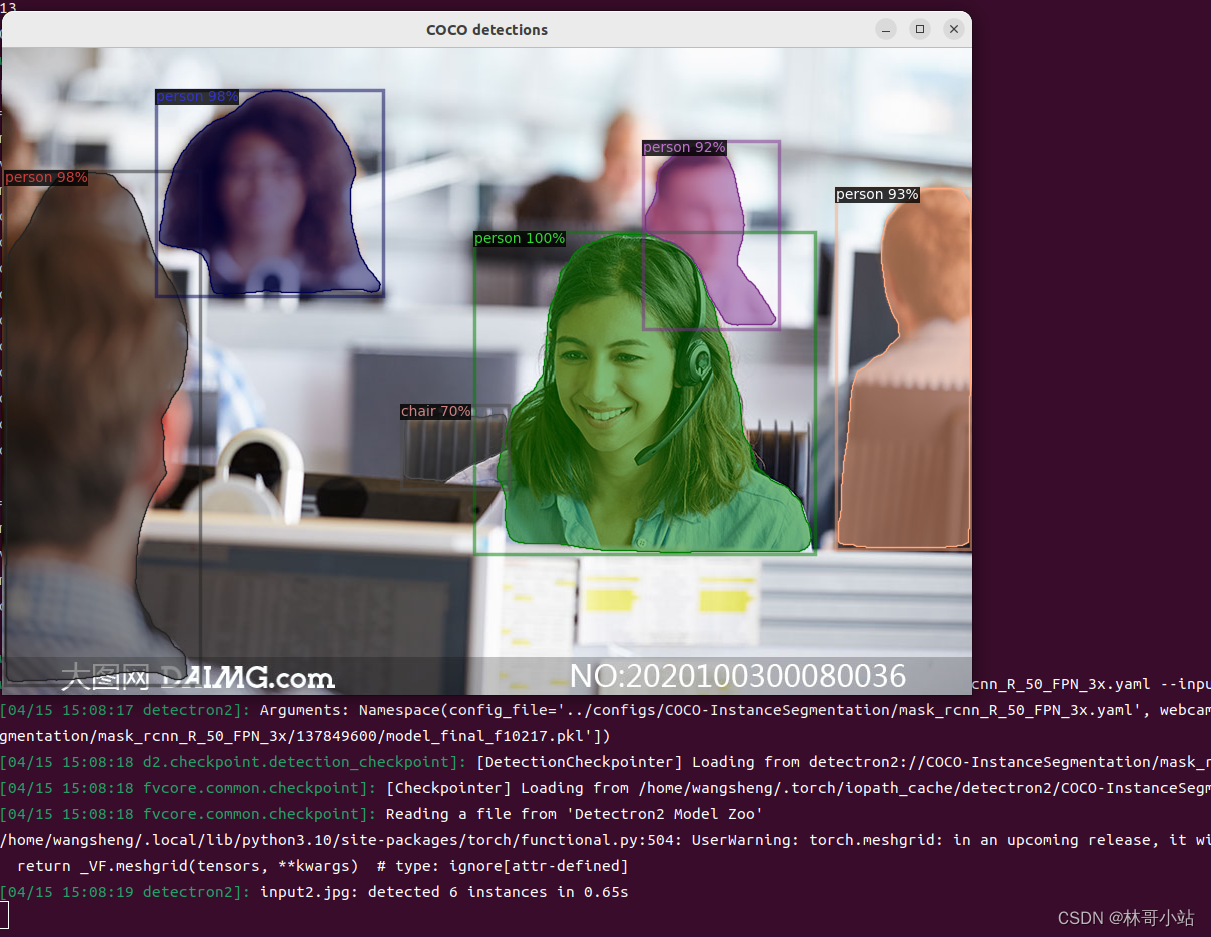
在~/detectron2/demo目录下,放入一张办公室场景的照片input1.jpg,然后运行以下命令用预训练好的模型进行目标检测演示。
cd demo
python demo.py --config-file ../configs/COCO-InstanceSegmentation/mask_rcnn_R_50_FPN_3x.yaml --input input1.jpg --opts MODEL.WEIGHTS detectron2://COCO-InstanceSegmentation/mask_rcnn_R_50_FPN_3x/137849600/model_final_f10217.pkl
演示结束时,会自动打开一张照片,如下图所示,检测到了5个人,1个椅子共6个物体。则说明detectron2已经安装成功。