文章目录
前置条件
已经完成 K8S安装过程十:Kubernetes CNI插件与CoreDNS服务部署
部署 istio 服务网格与 Ingress 服务用到了 helm 与 kubectl 这两个命令行工具,这个命令行工具依赖 ~/.kube/config 这个配置文件,目前只在 kubernetes master 节点中生成了这个文件。
以下操作在 Kubernetes Master 节点上执行。
1. 部署 istiod 服务
1.1 设置 helm 仓库
helm repo add istio https://istio-release.storage.googleapis.com/charts
helm repo update
1.2 安装 istio
- 创建 istio 命名空间
kubectl create namespace istio-system
- 部署 istio 服务
helm install istio-base istio/base -n istio-system
helm install istiod istio/istiod -n istio-system --wait
2. 部署 Ingress 服务
2.1 安装 ingress
kubectl create namespace istio-ingress
kubectl label namespace istio-ingress istio-injection=enabled
helm install istio-ingress istio/gateway -n istio-ingress --wait
2.2 修改 ingress svc 配置
kubectl edit svc istio-ingress -n istio-ingress

如下图红色框所示,将 type 的值替换成 NodePort。另外修改 ports 配置中的端口信息,后续外部服务访问 Kubernetes 集群内部的服务将会通过上述两个端口进行访问,一个用户 http 协议,另一个用于 https 协议。
2.3 重启 istio-ingress 服务
保存上述修改的配置文件后,服务会自动重启,如果没有重启,可通过手工重启 ingress 服务的方式执行一次重启。
kubectl rollout restart deployment istio-ingress -n istio-ingress
2.4 修改 HAProxy 配置
在 HAProxy 的每个节点中修改 /etc/haproxy/haproxy.cfg 文件,追加如下内容。(注意是追加不是覆盖,不要把之前配置的 kuber-apiserver 负载均衡配置删除了)
frontend http-web
        bind *:80
        mode tcp
        option tcplog
        default_backend http-web-backend

backend http-web-backend
        mode tcp
        option tcplog
        balance roundrobin
        default-server inter 10s downinter 5s rise 2 fall 2 slowstart 60s maxconn 250 maxqueue 256 weight 100
        server k8s-http-145 192.168.0.145:30080  check
        server k8s-http-200 192.168.0.200:30080  check

frontend https
        bind *:443
        mode tcp
        option tcplog
        default_backend https-backend

backend https-backend
        mode tcp
        option tcplog
        balance roundrobin
        default-server inter 10s downinter 5s rise 2 fall 2 slowstart 60s maxconn 250 maxqueue 256 weight 100
        server k8s-https-145 192.168.0.145:30443  check
        server k8s-https-200 192.168.0.200:30443  check
上边配置中的 192.168.0.145 与 192.168.0.200 为 Kubernetes Master 节点的 IP 地址。30080 与 30443 端口为 2.2 章节中设置的 nodeport 端口。
2.5 重启 haproxy 服务
systemctl restart haproxy
重启所有的 HAProxy 节点。重启完成后,即可对 80 端口和 443 端口访问的流量转发到 30080 与 30443 端口,从而将外部流量引入到 Kubernetes 容器集群内部的 Ingress 服务中。Ingress 根据转发规则将流量转发到具体的容器服务内,实现外部客户端访问容器内部服务的过程。
2.6 创建 Ingress 转发规则
- 创建
gateway.yaml文件
apiVersion: networking.istio.io/v1alpha3
kind: Gateway
metadata:
  name: admin-gateway
  namespace: istio-system
spec:
  selector:
    istio: ingress
  servers:
  - port:
      number: 1080
      name: http-gateway
      protocol: HTTP
    hosts:
    - "kiali.域名.com"
    - "grafana.域名.com"
    - "jaeger.域名.com"
    - "prometheus.域名.com"
  - port:
      number: 3443
      name: https-gateway
      protocol: HTTPS
    tls:
      mode: PASSTHROUGH
    hosts:
    - "harbor.域名.com"
    - "dashboard.域名.com"
上述配置中的 *.域名.com 为子域名,可申请一个域名,然后将子域名使用 DNS 解析到 Kubernetes Master 节点或者是负载均衡的 IP 地址。这一步需要在你的域名供应商管理后台设置域名解析规则。否则后续的操作无法进行。如果还没有域名的同学,则无法通过域名来设置 Ingress 转发规则。
- 创建 Gateway 服务
kubectl apply -f gateway.yaml
3. 部署服务网格管理工具
服务网格 istio 配套的管理工具有 kiali、grafana、jaeger、prometheus等,以下采用istio插件的方式部署这些管理工具,这种方式部署的管理工具参数比较通用,不太适合大规模的生产环境使用,如果在生产环境中部署这些服务网格管理工具,应对参数进行优化。
3.1 部署服务网格管理工具 Kiali
- 部署 Kiali 服务
yum install socat -y
kubectl apply -f https://raw.githubusercontent.com/istio/istio/release-1.16/samples/addons/kiali.yaml
- 创建 kiali-vs.yaml 文件
apiVersion: networking.istio.io/v1alpha3
kind: VirtualService
metadata:
  name: kiali-vs
  namespace: istio-system
spec:
  hosts:
  - kiali.域名.com
  gateways:
  - admin-gateway
  http:
  - route:
    - destination:
        host: kiali
        port:
          number: 20001
- 部署 Kiali VirtualService
kubectl apply -f kiali-vs.yaml
3.2 部署服务网格可视化工具 Grafana
- 部署 Grafana
kubectl apply -f https://raw.githubusercontent.com/istio/istio/release-1.16/samples/addons/grafana.yaml
- 创建
grafana-vs.yaml文件
apiVersion: networking.istio.io/v1alpha3
kind: VirtualService
metadata:
  name: grafana-vs
  namespace: istio-system
spec:
  hosts:
  - grafana.域名.com
  gateways:
  - admin-gateway
  http:
  - route:
    - destination:
        host: grafana
        port:
          number: 3000
- 创建 Grafana VirtualService
kubectl apply -f grafana-vs.yaml
3.3 部署服务网格调用链检测工具 Jaeger
- 部署 Jaeger 服务
kubectl apply -f https://raw.githubusercontent.com/istio/istio/release-1.16/samples/addons/jaeger.yaml
- 创建
jaeger-vs.yaml文件
apiVersion: networking.istio.io/v1alpha3
kind: VirtualService
metadata:
  name: jaeger-vs
  namespace: istio-system
spec:
  hosts:
  - jaeger.域名.com
  gateways:
  - admin-gateway
  http:
  - route:
    - destination:
        host: tracing
        port:
          number: 80
- 创建 Jaeger VirtualService 服务
kubectl apply -f jaeger-vs.yaml
3.4 部署服务网格检测工具 Prometheus
- 部署 Prometheus
kubectl apply -f https://raw.githubusercontent.com/istio/istio/release-1.16/samples/addons/prometheus.yaml
- 创建
prometheus-vs.yaml文件
apiVersion: networking.istio.io/v1alpha3
kind: VirtualService
metadata:
  name: prometheus-vs
  namespace: istio-system
spec:
  hosts:
  - prometheus.域名.com
  gateways:
  - admin-gateway
  http:
  - route:
    - destination:
        host: prometheus
        port:
          number: 9090
- 创建 Prometheus VirtualService 服务
kubectl apply -f prometheus-vs.yaml
4. 查看 istiod 与 ingress 是否成功部署
kubectl get pods -A

5. 登陆 Kiali 查看服务网格
在浏览器中输入 http://kiali.域名.com 访问 Kiali 服务。效果图如下所示:
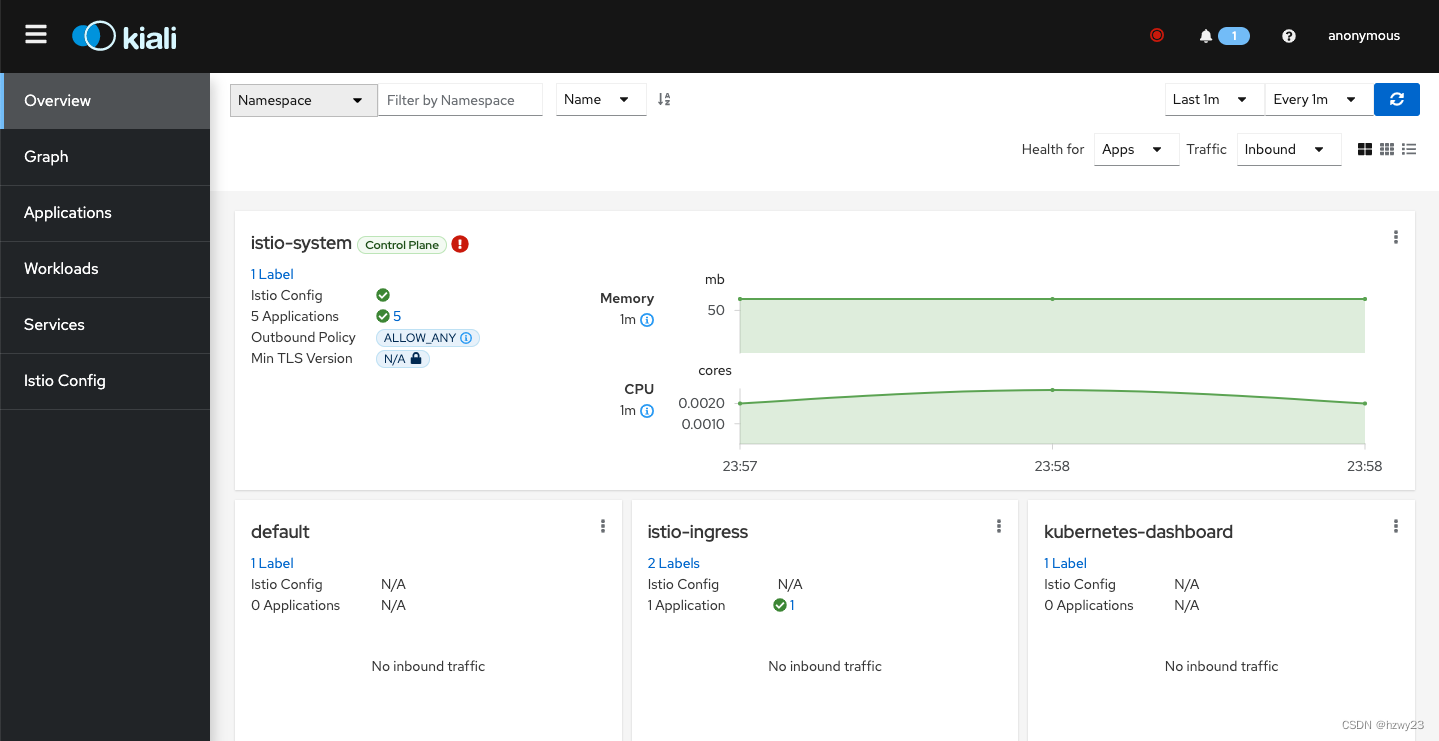
默认安装时,Kiali 没有设置账号密码,直接匿名登陆访问,如果在生产环境中或者管理比较规范的组织中使用 Kiali 管理服务网格,可通过修改 Kiali 配置来添加鉴权服务。配置信息在 ConfigMap 中可查看到。

- jaeger 地址:http://jaeger.域名.com
- prometheus 地址:http://prometheus.域名.com
- grafana 地址:http://grafana.域名.com
- dashboard 地址:https://dashboard.域名.com
6. 部署 kubernetes dashboard
- 部署 kubernetes 服务
kubectl apply -f https://raw.githubusercontent.com/kubernetes/dashboard/v2.7.0/aio/deploy/recommended.yaml
- 创建用户并授权
kubectl create serviceaccount dashboard-admin -n kubernetes-dashboard
kubectl create clusterrolebinding dashboard-admin-rb --clusterrole=cluster-admin --serviceaccount=kubernetes-dashboard:dashboard-admin
- 获取登陆 kubernetes dashboard 的 token
kubectl -n kubernetes-dashboard create token dashboard-admin
- 创建 dashboard-vs.yaml 文件
apiVersion: networking.istio.io/v1alpha3
kind: VirtualService
metadata:
  name: dashboard-vs
  namespace: istio-system
spec:
  hosts:
  - "dashboard.域名.com"
  gateways:
  - admin-gateway
  tls:
  - match:
    - sniHosts:
      - "dashboard.域名.com"
    route:
    - destination:
        host: kubernetes-dashboard.kubernetes-dashboard.svc.cluster.local
        port:
          number: 443
      weight: 100
- 创建 dashboard VirtualService
kubectl apply -f dashboard-vs.yaml
- 访问 dashboard
https://dashboard.域名.com
请注意 dashboard 使用的是 https 协议。效果图如下所示:

- 获取 dashboard 登陆 token
kubectl -n kubernetes-dashboard create token dashboard-admin
- 登陆系统效果图
7. 异常问题处理
7.1 kiali 无法连接 kubernetes apiserver
- 问题描述
unable to proxy Istiod pods. Make sure your Kubernetes API server has access to the Istio control plane through 8080 port
- 解决办法:
yum install socat -y