redis,lvs,nginx
- 一. redis搭建哨兵原理和集群实现。
- 二. LVS常用模型工作原理,及实现。
- 三. LVS的负载策略有哪些,各应用在什么场景,通过LVS DR任意实现1-2种场景。
- 四. web http协议通信过程,相关技术术语总结。
- 五. 总结网络IO模型和nginx架构。
- 六. nginx总结核心配置和优化。
- 七. 使用脚本完成一键编译安装nginx任意版本。
- 八. 任意编译一个第3方nginx模块,并使用。
一. redis搭建哨兵原理和集群实现。
1.1 哨兵
1.1.1 redis Sentinel介绍
主从架构和MySQL的主从复制一样,无法实现master和slave角色的自动切换,即当master出现故障时,
不能实现自动的将一个slave 节点提升为新的master节点,即主从复制无法实现自动的故障转移功能,如果
想实现转移,则需要手动修改配置,才能将 slave 服务器提升新的master节点.此外只有一个主节点支持写
操作,所以业务量很大时会导致Redis服务性能达到瓶颈
需要解决的主从复制的存在以下弊端:
-
master和slave角色的自动切换,且不能影响业务
-
提升Redis服务整体性能,支持更高并发访问
1.1.2 实现哨兵架构
以下案例实现一主两从的基于哨兵的高可用Redis架构

1.1.3 哨兵需要先实现主从复制
哨兵的前提是已经实现了Redis的主从复制
注意: master 的配置文件中masterauth 和slave 都必须相同
所有主从节点的 redis.conf 中关健配置
范例: 准备主从环境配置
#在所有主从节点执行
[root@centos8 ~]#dnf -y install redis
[root@centos8 ~]#vim /etc/redis.conf
bind 0.0.0.0
masterauth "123456"
requirepass "123456"
#或者非交互执行
[root@centos8 ~]#sed -i -e 's/bind 127.0.0.1/bind 0.0.0.0/' -e 's/^# masterauth
.*/masterauth 123456/' -e 's/^# requirepass .*/requirepass 123456/'
/etc/redis.conf
#在所有从节点执行
[root@centos8 ~]#echo "replicaof 10.0.0.8 6379" >> /etc/redis.conf
#在所有主从节点执行
[root@centos8 ~]#systemctl enable --now redis
master 服务器状态
[root@redis-master ~]#redis-cli -a 123456
Warning: Using a password with '-a' or '-u' option on the command line interface
may not
127.0.0.1:6379> INFO replication
# Replication
role:master
connected_slaves:2
slave0:ip=10.0.0.28,port=6379,state=online,offset=112,lag=1
slave1:ip=10.0.0.18,port=6379,state=online,offset=112,lag=0
master_replid:8fdca730a2ae48fb9c8b7e739dcd2efcc76794f3
master_replid2:0000000000000000000000000000000000000000
master_repl_offset:112
second_repl_offset:-1
repl_backlog_active:1
repl_backlog_size:1048576
repl_backlog_first_byte_offset:1
repl_backlog_histlen:112
127.0.0.1:6379>
配置 slave1
[root@redis-slave1 ~]#redis-cli -a 123456
Warning: Using a password with '-a' or '-u' option on the command line interface
may not be safe.
127.0.0.1:6379> REPLICAOF 10.0.0.8 6379
OK
127.0.0.1:6379> CONFIG SET masterauth "123456"
OK
127.0.0.1:6379> INFO replication
# Replication
role:slave
master_host:10.0.0.8
master_port:6379
master_link_status:up
master_last_io_seconds_ago:4
master_sync_in_progress:0
slave_repl_offset:140
slave_priority:100
slave_read_only:1
connected_slaves:0
master_replid:8fdca730a2ae48fb9c8b7e739dcd2efcc76794f3
master_replid2:0000000000000000000000000000000000000000
master_repl_offset:140
second_repl_offset:-1
repl_backlog_active:1
repl_backlog_size:1048576
repl_backlog_first_byte_offset:99
repl_backlog_histlen:42
配置 slave2
[root@redis-slave2 ~]#redis-cli -a 123456
Warning: Using a password with '-a' or '-u' option on the command line interface
may not be safe.
127.0.0.1:6379> REPLICAOF 10.0.0.8 6379
OK
127.0.0.1:6379> CONFIG SET masterauth "123456"
OK
127.0.0.1:6379> INFO replication
# Replication
role:slave
master_host:10.0.0.8
master_port:6379
master_link_status:up
master_last_io_seconds_ago:3
master_sync_in_progress:0
slave_repl_offset:182
slave_priority:100
1.1.4 编辑哨兵配置
sentinel配置
Sentinel实际上是一个特殊的redis服务器,有些redis指令支持,但很多指令并不支持.默认监听在
26379/tcp端口.
哨兵服务可以和Redis服务器分开部署在不同主机,但为了节约成本一般会部署在一起
所有redis节点使用相同的以下示例的配置文件
#如果是编译安装,在源码目录有sentinel.conf,复制到安装目录即可,
如:/apps/redis/etc/sentinel.conf
[root@centos8 ~]#cp redis-6.2.5/sentinel.conf /apps/redis/etc/sentinel.conf
[root@centos8 ~]#chown redis.redis /apps/redis/etc/sentinel.conf
[root@centos8 ~]#vim /etc/redis-sentinel.conf
bind 0.0.0.0
port 26379
daemonize yes
pidfile "redis-sentinel.pid"
logfile "sentinel_26379.log"
dir "/tmp"  #工作目录
sentinel monitor mymaster 10.0.0.8 6379 2
#mymaster是集群的名称,此行指定当前mymaster集群中master服务器的地址和端口
#2为法定人数限制(quorum),即有几个sentinel认为master down了就进行故障转移,一般此值是所有
sentinel节点(一般总数是>=3的 奇数,如:3,5,7等)的一半以上的整数值,比如,总数是3,即3/2=1.5,
取整为2,是master的ODOWN客观下线的依据
sentinel auth-pass mymaster 123456
#mymaster集群中master的密码,注意此行要在上面行的下面
sentinel down-after-milliseconds mymaster 30000
#判断mymaster集群中所有节点的主观下线(SDOWN)的时间,单位:毫秒,建议3000
sentinel parallel-syncs mymaster 1
#发生故障转移后,可以同时向新master同步数据的slave的数量,数字越小总同步时间越长,但可以减轻新
master的负载压力
sentinel failover-timeout mymaster 180000
#所有slaves指向新的master所需的超时时间,单位:毫秒
sentinel deny-scripts-reconfig yes #禁止修改脚本
logfile /var/log/redis/sentinel.log
三个哨兵服务器的配置都如下
[root@redis-master ~]#grep -vE "^#|^$" /etc/redis-sentinel.conf
port 26379
daemonize no
pidfile "/var/run/redis-sentinel.pid"
logfile "/var/log/redis/sentinel.log"
dir "/tmp"
sentinel monitor mymaster 10.0.0.8 6379 2   #修改此行
sentinel auth-pass mymaster 123456 #增加此行
sentinel down-after-milliseconds mymaster 3000   #修改此行
sentinel parallel-syncs mymaster 1
sentinel failover-timeout mymaster 180000
sentinel deny-scripts-reconfig yes
#注意此行自动生成必须唯一,一般不需要修改,如果相同则修改此值需重启redis和sentinel服务
sentinel myid 50547f34ed71fd48c197924969937e738a39975b
.....
# Generated by CONFIG REWRITE
protected-mode no
supervised systemd
sentinel leader-epoch mymaster 0
sentinel known-replica mymaster 10.0.0.28 6379
sentinel known-replica mymaster 10.0.0.18 6379
sentinel current-epoch 0
[root@redis-master ~]#scp /etc/redis-sentinel.conf redis-slave1:/etc/
[root@redis-master ~]#scp /etc/redis-sentinel.conf redis-slave2:/etc/
1.1.5启动哨兵服务
将所有哨兵服务器都启动起来
#确保每个哨兵主机myid不同,如果相同,必须手动修改为不同的值
[root@redis-slave1 ~]#vim /etc/redis-sentinel.conf
sentinel myid 50547f34ed71fd48c197924969937e738a39975c
[root@redis-slave2 ~]#vim /etc/redis-sentinel.conf
sentinel myid 50547f34ed71fd48c197924969937e738a39975d
[root@redis-master ~]#systemctl enable --now redis-sentinel.service
[root@redis-slave1 ~]#systemctl enable --now redis-sentinel.service
[root@redis-slave2 ~]#systemctl enable --now redis-sentinel.service
如果是编译安装,在所有哨兵服务器执行下面操作启动哨兵
[root@redis-master ~]##vim /apps/redis/etc/sentinel.conf
bind 0.0.0.0
port 26379
daemonize yes
pidfile "redis-sentinel.pid"
Logfile "sentinel_26379.log"
dir "/apps/redis/data"
sentinel monitor mymaster 10.0.0.8 6379 2
sentinel auth-pass mymaster 123456
sentinel down-after-milliseconds mymaster 15000
sentinel parallel-syncs mymaster 1
sentinel failover-timeout mymaster 180000
sentinel deny-scripts-reconfig yes
[root@redis-master ~]#/apps/redis/bin/redis-sentinel
/apps/redis/etc/sentinel.conf
#如果是编译安装,可以在所有节点生成新的service文件
[root@redis-master ~]#cat /lib/systemd/system/redis-sentinel.service
[Unit]
Description=Redis Sentinel
After=network.target
[Service]
ExecStart=/apps/redis/bin/redis-sentinel /apps/redis/etc/sentinel.conf --
supervised systemd
ExecStop=/bin/kill -s QUIT $MAINPID
User=redis
Group=redis
RuntimeDirectory=redis
RuntimeDirectoryMode=0755
[Install]
WantedBy=multi-user.target
#注意所有节点的目录权限,否则无法启动服务
[root@redis-master ~]#chown -R redis.redis /apps/redis/
1.1.6 验证哨兵服务
1.1.6.1 查看哨兵服务端口状态
[root@redis-master ~]#ss -ntl
State   Recv-Q Send-Q Local Address:Port Peer Address:Port
LISTEN  0       128          0.0.0.0:22         0.0.0.0:*
LISTEN  0       128          0.0.0.0:26379      0.0.0.0:*
LISTEN  0       128          0.0.0.0:6379       0.0.0.0:*
LISTEN  0       128             [::]:22           [::]:*
LISTEN  0       128             [::]:26379         [::]:*
LISTEN  0       128             [::]:6379         [::]:*
1.1.6.2 查看哨兵日志
master的哨兵日志
[root@redis-master ~]#tail -f /var/log/redis/sentinel.log
38028:X 20 Feb 2020 17:13:08.702 # oO0OoO0OoO0Oo Redis is starting oO0OoO0OoO0Oo
38028:X 20 Feb 2020 17:13:08.702 # Redis version=5.0.3, bits=64,
commit=00000000, modified=0, pid=38028, just started
38028:X 20 Feb 2020 17:13:08.702 # Configuration loaded
38028:X 20 Feb 2020 17:13:08.702 * supervised by systemd, will signal readiness
38028:X 20 Feb 2020 17:13:08.703 * Running mode=sentinel, port=26379.
38028:X 20 Feb 2020 17:13:08.703 # WARNING: The TCP backlog setting of 511
cannot be enforced because /proc/sys/net/core/somaxconn is set to the lower value
of 128.
38028:X 20 Feb 2020 17:13:08.704 # Sentinel ID is
50547f34ed71fd48c197924969937e738a39975b
38028:X 20 Feb 2020 17:13:08.704 # +monitor master mymaster 10.0.0.8 6379 quorum
2
38028:X 20 Feb 2020 17:13:08.709 * +slave slave 10.0.0.28:6379 10.0.0.28 6379 @
mymaster 10.0.0.8 6379
38028:X 20 Feb 2020 17:13:08.709 * +slave slave 10.0.0.18:6379 10.0.0.18 6379 @
mymaster 10.0.0.8 6379
slave的哨兵日志
[root@redis-slave1 ~]#tail -f /var/log/redis/sentinel.log
25509:X 20 Feb 2020 17:13:27.435 * Removing the pid file.
25509:X 20 Feb 2020 17:13:27.435 # Sentinel is now ready to exit, bye bye...
25572:X 20 Feb 2020 17:13:27.448 # oO0OoO0OoO0Oo Redis is starting oO0OoO0OoO0Oo
25572:X 20 Feb 2020 17:13:27.448 # Redis version=5.0.3, bits=64,
commit=00000000, modified=0, pid=25572, just started
25572:X 20 Feb 2020 17:13:27.448 # Configuration loaded
25572:X 20 Feb 2020 17:13:27.448 * supervised by systemd, will signal readiness
25572:X 20 Feb 2020 17:13:27.449 * Running mode=sentinel, port=26379.
25572:X 20 Feb 2020 17:13:27.449 # WARNING: The TCP backlog setting of 511
cannot be enforced because /proc/sys/net/core/somaxconn is set to the lower value
of 128.
25572:X 20 Feb 2020 17:13:27.449 # Sentinel ID is
50547f34ed71fd48c197924969937e738a39975b
25572:X 20 Feb 2020 17:13:27.449 # +monitor master mymaster 10.0.0.8 6379 quorum
2
1.1.6.3 当前sentinel状态
在sentinel状态中尤其是最后一行,涉及到masterIP是多少,有几个slave,有几个sentinels,必须是符合全部服务器数量
[root@redis-master ~]#redis-cli -p 26379
127.0.0.1:26379> INFO sentinel
# Sentinel
sentinel_masters:1
sentinel_tilt:0
sentinel_running_scripts:0
sentinel_scripts_queue_length:0
sentinel_simulate_failure_flags:0
master0:name=mymaster,status=ok,address=10.0.0.8:6379,slaves=2,sentinels=3 #两个
slave,三个sentinel服务器,如果sentinels值不符合,检查myid可能冲突
1.1.7 停止Master 实现故障转移
1.1.7.1 停止 Master 节点
[root@redis-master ~]#killall redis-server
# 查看各节点上哨兵信息:
[root@redis-master ~]#redis-cli -a 123456 -p 26379
Warning: Using a password with '-a' or '-u' option on the command line interface
may not be safe.
127.0.0.1:26379> INFO sentinel
# Sentinel
sentinel_masters:1
sentinel_tilt:0
sentinel_running_scripts:0
sentinel_scripts_queue_length:0
sentinel_simulate_failure_flags:0
master0:name=mymaster,status=ok,address=10.0.0.18:6379,slaves=2,sentinels=2
故障转移时sentinel的信息:
[root@redis-master ~]#tail -f /var/log/redis/sentinel.log
38028:X 20 Feb 2020 17:42:27.362 # +sdown master mymaster 10.0.0.8 6379
38028:X 20 Feb 2020 17:42:27.418 # +odown master mymaster 10.0.0.8 6379 #quorum
2/2
38028:X 20 Feb 2020 17:42:27.418 # +new-epoch 1
38028:X 20 Feb 2020 17:42:27.418 # +try-failover master mymaster 10.0.0.8 6379
38028:X 20 Feb 2020 17:42:27.419 # +vote-for-leader
50547f34ed71fd48c197924969937e738a39975b 1
38028:X 20 Feb 2020 17:42:27.422 # 50547f34ed71fd48c197924969937e738a39975d
voted for 50547f34ed71fd48c197924969937e738a39975b 1
38028:X 20 Feb 2020 17:42:27.475 # +elected-leader master mymaster 10.0.0.8 6379
38028:X 20 Feb 2020 17:42:27.475 # +failover-state-select-slave master mymaster
10.0.0.8 6379
38028:X 20 Feb 2020 17:42:27.529 # +selected-slave slave 10.0.0.18:6379
10.0.0.18 6379 @ mymaster 10.0.0.8 6379
38028:X 20 Feb 2020 17:42:27.529 * +failover-state-send-slaveof-noone slave
10.0.0.18:6379 10.0.0.18 6379 @ mymaster 10.0.0.8 6379
38028:X 20 Feb 2020 17:42:27.613 * +failover-state-wait-promotion slave
10.0.0.18:6379 10.0.0.18 6379 @ mymaster 10.0.0.8 6379
38028:X 20 Feb 2020 17:42:28.506 # +promoted-slave slave 10.0.0.18:6379
10.0.0.18 6379 @ mymaster 10.0.0.8 6379
38028:X 20 Feb 2020 17:42:28.506 # +failover-state-reconf-slaves master mymaster
10.0.0.8 6379
38028:X 20 Feb 2020 17:42:28.582 * +slave-reconf-sent slave 10.0.0.28:6379
10.0.0.28 6379 @ mymaster 10.0.0.8 6379
38028:X 20 Feb 2020 17:42:28.736 * +slave-reconf-inprog slave 10.0.0.28:6379
10.0.0.28 6379 @ mymaster 10.0.0.8 6379
38028:X 20 Feb 2020 17:42:28.736 * +slave-reconf-done slave 10.0.0.28:6379
10.0.0.28 6379 @ mymaster 10.0.0.8 6379
38028:X 20 Feb 2020 17:42:28.799 # +failover-end master mymaster 10.0.0.8 6379
38028:X 20 Feb 2020 17:42:28.799 # +switch-master mymaster 10.0.0.8 6379
10.0.0.18 6379
38028:X 20 Feb 2020 17:42:28.799 * +slave slave 10.0.0.28:6379 10.0.0.28 6379 @
mymaster 10.0.0.18 6379
38028:X 20 Feb 2020 17:42:28.799 * +slave slave 10.0.0.8:6379 10.0.0.8 6379 @
mymaster 10.0.0.18 6379
38028:X 20 Feb 2020 17:42:31.809 # +sdown slave 10.0.0.8:6379 10.0.0.8 6379 @
mymaster 10.0.0.18 6379
1.1.7.2 验证故障转移
故障转移后redis.conf中的replicaof行的master IP会被修改
[root@redis-slave2 ~]#grep ^replicaof /etc/redis.conf
replicaof 10.0.0.18 6379
哨兵配置文件的sentinel monitor IP 同样也会被修改

[root@redis-slave1 ~]#grep "^[a-Z]" /etc/redis-sentinel.conf
port 26379
daemonize no
pidfile "/var/run/redis-sentinel.pid"
logfile "/var/log/redis/sentinel.log"
dir "/tmp"
sentinel myid 50547f34ed71fd48c197924969937e738a39975b
sentinel deny-scripts-reconfig yes
sentinel monitor mymaster 10.0.0.18 6379 2  #自动修改此行
sentinel down-after-milliseconds mymaster 3000
sentinel auth-pass mymaster 123456
sentinel config-epoch mymaster 1
protected-mode no
supervised systemd
sentinel leader-epoch mymaster 1
sentinel known-replica mymaster 10.0.0.8 6379
sentinel known-replica mymaster 10.0.0.28 6379
sentinel known-sentinel mymaster 10.0.0.28 26379
50547f34ed71fd48c197924969937e738a39975d
sentinel current-epoch 1
[root@redis-slave2 ~]#grep "^[a-Z]" /etc/redis-sentinel.conf
port 26379
daemonize no
pidfile "/var/run/redis-sentinel.pid"
logfile "/var/log/redis/sentinel.log"
dir "/tmp"
sentinel myid 50547f34ed71fd48c197924969937e738a39975d
sentinel deny-scripts-reconfig yes
sentinel monitor mymaster 10.0.0.18 6379 2  #自动修改此行
sentinel down-after-milliseconds mymaster 3000
sentinel auth-pass mymaster 123456
sentinel config-epoch mymaster 1
protected-mode no
supervised systemd
sentinel leader-epoch mymaster 1
sentinel known-replica mymaster 10.0.0.28 6379
sentinel known-replica mymaster 10.0.0.8 6379
sentinel known-sentinel mymaster 10.0.0.8 26379
50547f34ed71fd48c197924969937e738a39975b
sentinel current-epoch 1
1.1.7.3 验证 Redis 各节点状态
新的master 状态
[root@redis-slave1 ~]#redis-cli -a 123456
Warning: Using a password with '-a' or '-u' option on the command line interface
may not be safe.
127.0.0.1:6379> INFO replication
# Replication
role:master   #提升为master
connected_slaves:1
slave0:ip=10.0.0.28,port=6379,state=online,offset=56225,lag=1
master_replid:75e3f205082c5a10824fbe6580b6ad4437140b94
master_replid2:b2fb4653bdf498691e5f88519ded65b6c000e25c
master_repl_offset:56490
second_repl_offset:46451
repl_backlog_active:1
repl_backlog_size:1048576
repl_backlog_first_byte_offset:287
repl_backlog_histlen:56204
另一个slave指向新的master
[root@redis-slave2 ~]#redis-cli -a 123456
Warning: Using a password with '-a' or '-u' option on the command line interface
may not be safe.
127.0.0.1:6379> INFO replication
# Replication
role:slave
master_host:10.0.0.18  #指向新的master
master_port:6379
master_link_status:up
master_last_io_seconds_ago:0
master_sync_in_progress:0
slave_repl_offset:61029
slave_priority:100
slave_read_only:1
connected_slaves:0
master_replid:75e3f205082c5a10824fbe6580b6ad4437140b94
master_replid2:b2fb4653bdf498691e5f88519ded65b6c000e25c
master_repl_offset:61029
second_repl_offset:46451
repl_backlog_active:1
repl_backlog_size:1048576
repl_backlog_first_byte_offset:1
repl_backlog_histlen:61029
在原 master上观察状态
[root@redis-master ~]#redis-cli -a 123456
Warning: Using a password with '-a' or '-u' option on the command line interface
may not be safe.
127.0.0.1:6379> INFO replication
# Replication
role:slave
master_host:10.0.0.18
master_port:6379
master_link_status:up
master_last_io_seconds_ago:0
master_sync_in_progress:0
slave_repl_offset:764754
slave_priority:100
slave_read_only:1
connected_slaves:0
master_replid:75e3f205082c5a10824fbe6580b6ad4437140b94
master_replid2:b2fb4653bdf498691e5f88519ded65b6c000e25c
master_repl_offset:764754
second_repl_offset:46451
repl_backlog_active:1
repl_backlog_size:1048576
repl_backlog_first_byte_offset:46451
repl_backlog_histlen:718304
[root@redis-master ~]#redis-cli -p 26379
127.0.0.1:26379> INFO sentinel
# Sentinel
sentinel_masters:1
sentinel_tilt:0
sentinel_running_scripts:0
sentinel_scripts_queue_length:0
sentinel_simulate_failure_flags:0
master0:name=mymaster,status=ok,address=10.0.0.18:6379,slaves=2,sentinels=3
127.0.0.1:26379>
观察新master上状态和日志
[root@redis-slave1 ~]#redis-cli -a 123456
Warning: Using a password with '-a' or '-u' option on the command line interface
may not be safe.
127.0.0.1:6379> INFO replication
# Replication
role:master
connected_slaves:2
slave0:ip=10.0.0.28,port=6379,state=online,offset=769027,lag=0
slave1:ip=10.0.0.8,port=6379,state=online,offset=769027,lag=0
master_replid:75e3f205082c5a10824fbe6580b6ad4437140b94
master_replid2:b2fb4653bdf498691e5f88519ded65b6c000e25c
master_repl_offset:769160
second_repl_offset:46451
repl_backlog_active:1
repl_backlog_size:1048576
repl_backlog_first_byte_offset:287
repl_backlog_histlen:768874
127.0.0.1:6379>
[root@redis-slave1 ~]#tail -f /var/log/redis/sentinel.log
25717:X 20 Feb 2020 17:42:33.757 # +sdown slave 10.0.0.8:6379 10.0.0.8 6379 @
mymaster 10.0.0.18 6379
25717:X 20 Feb 2020 18:41:29.566 # -sdown slave 10.0.0.8:6379 10.0.0.8 6379 @
mymaster 10.0.0.18 6379
1.1.7.4 原master重新加入Redis集群
1.1.8 Sentinel 运维
[root@redis-master ~]#cat /etc/redis.conf
#sentinel会自动修改下面行指向新的master
replicaof 10.0.0.18 6379
手动让主节点下线(磁盘闪黄灯报警)
127.0.0.1:26379> sentinel failover
范例: 手动故障转移
[root@centos8 ~]#vim /etc/redis.conf
replica-priority 10 #指定优先级,值越小sentinel会优先将之选为新的master,默为值为100
[root@centos8 ~]#systemctl restart redis
#或者动态修改
[root@centos8 ~]#redis-cli -a 123456
Warning: Using a password with '-a' or '-u' option on the command line interface
may not be safe.
127.0.0.1:6379> CONFIG GET replica-priority
1) "replica-priority"
2) "100"
127.0.0.1:6379> CONFIG SET replica-priority 99
OK
127.0.0.1:6379> CONFIG GET replica-priority
1) "replica-priority"
2) "99"
[root@centos8 ~]#redis-cli   -p 26379
127.0.0.1:26379> sentinel failover mymaster
OK
1.2 集群
1.2.1 Redis Cluster 介绍
使用哨兵sentinel 只能解决Redis高可用问题,实现Redis的自动故障转移,但仍然无法解决Redis Master
单节点的性能瓶颈问题
为了解决单机性能的瓶颈,提高Redis 服务整体性能,可以使用分布式集群的解决方案
早期 Redis 分布式集群部署方案:
客户端分区:由客户端程序自己实现写入分配、高可用管理和故障转移等,对客户端的开发实现较为
复杂
代理服务:客户端不直接连接Redis,而先连接到代理服务,由代理服务实现相应读写分配,当前代
理服务都是第三方实现.此方案中客户端实现无需特殊开发,实现容易,但是代理服务节点仍存有单点
故障和性能瓶颈问题。比如:豌豆荚开发的 codis
Redis 3.0 版本之后推出无中心架构的 Redis Cluster ,支持多个master节点并行写入和故障的自动转移
动能.
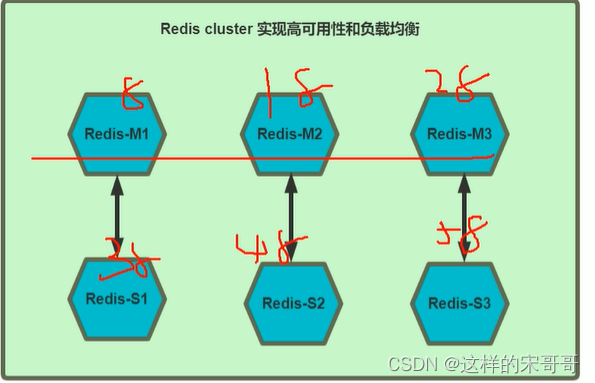
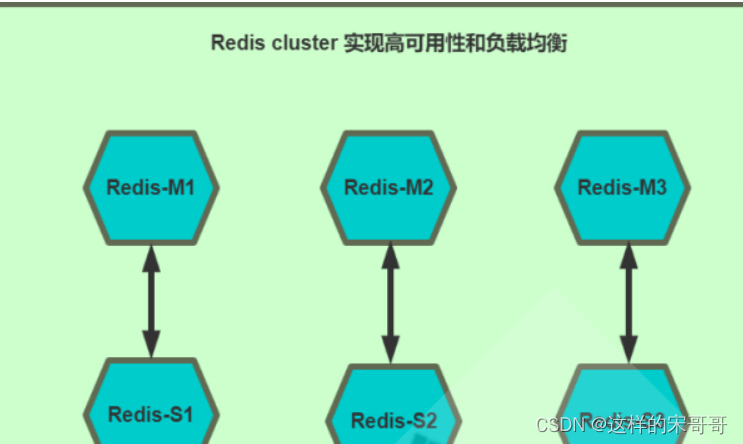
1.2.2 Redis cluster 架构
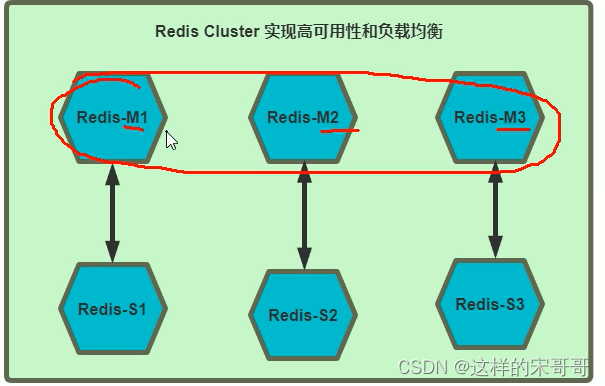
Redis cluster 需要至少 3个master节点才能实现,slave节点数量不限,当然一般每个master都至少对应的
有一个slave节点
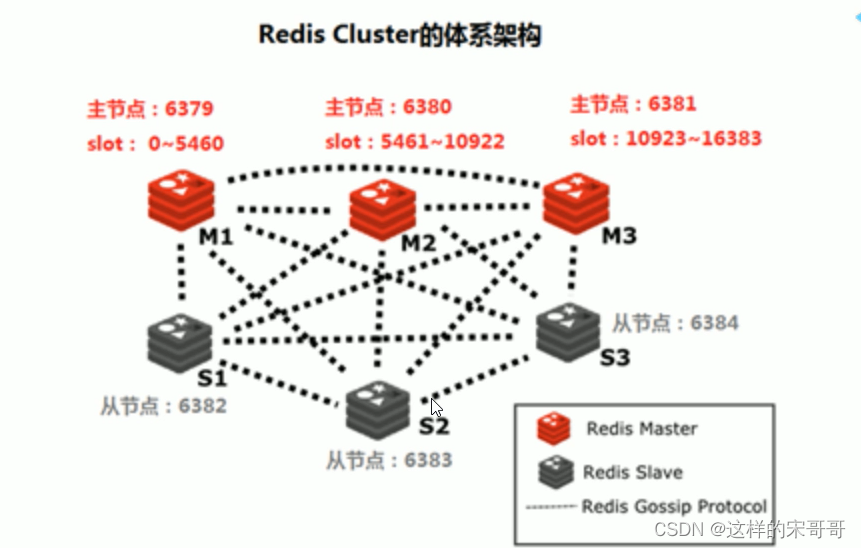
如果有三个主节点采用哈希槽 hash slot 的方式来分配16384个槽位 slot
此三个节点分别承担的slot 区间可以是如以下方式分配
节点M1 0-5460
节点M2 5461-10922
节点M3 10923-16383
1.2.3 Redis cluster的工作原理
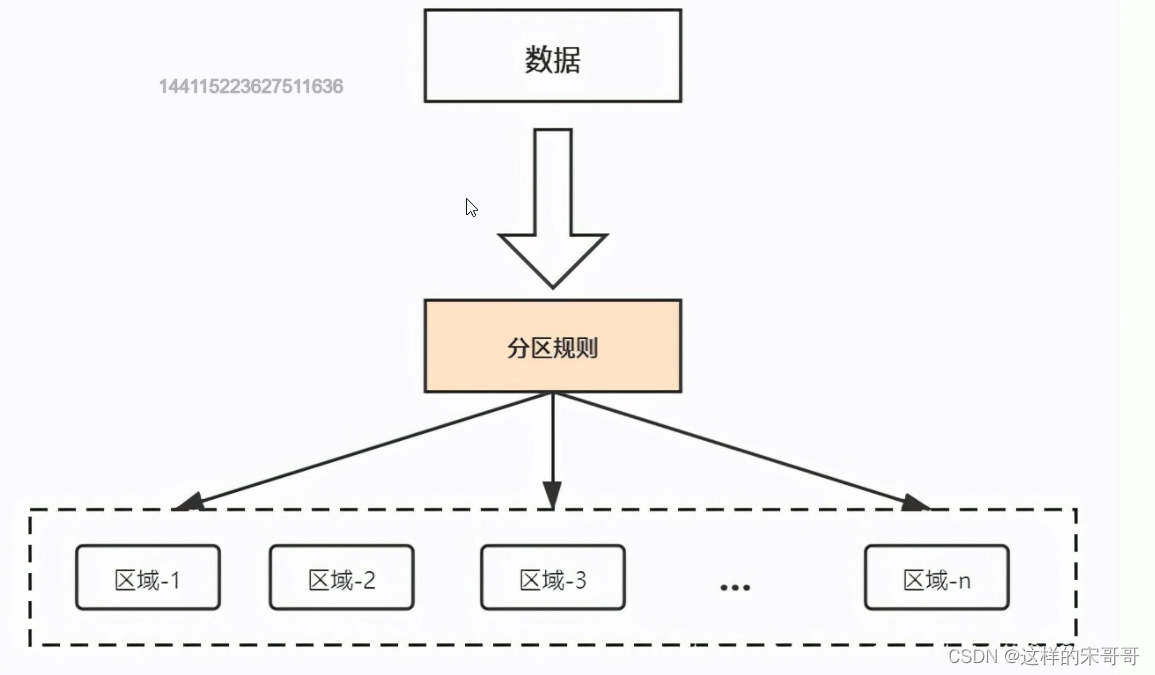
1.2.3.1 数据分区
如果是单机存储的话,直接将数据存放在单机redis就行了。但是如果是集群存储,就需要考虑到数据分
区了。

顺序分布保障了数据的有序性,但是离散性低,可能导致某个分区的数据热度高,其他分区数据的热度
低,分区访问不均衡。(偏斜)
哈希分布也分为多种分布方式,比如区域哈希分区,一致性哈希分区等。而redis cluster采用的是虚拟
槽分区的方式。
虚拟槽分区
redis cluster设置有0~16383的槽,每个槽映射一个数据子集,通过hash函数,将数据存放在不同的槽
位中,每个集群的节点保存一部分的槽。
每个key存储时,先经过哈希函数CRC16(key)得到一个整数,然后整数与16384取余,得到槽的数值,
然后找到对应的节点,将数据存放入对应的槽中。

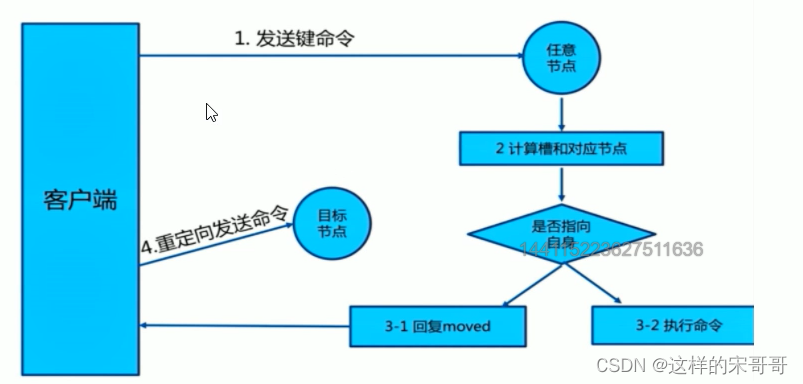
1.2.3.2 集群通信
但是寻找槽的过程并不是一次就命中的,比如上图key将要存放在14396槽中,但是并不是一下就锁定了
node3节点,可能先去询问node1,然后才访问node3。
而集群中节点之间的通信,保证了最多两次就能命中对应槽所在的节点。因为在每个节点中,都保存了
其他节点的信息,知道哪个槽由哪个节点负责。这样即使第一次访问没有命中槽,但是会通知客户端,
该槽在哪个节点,这样访问对应节点就能精准命中。
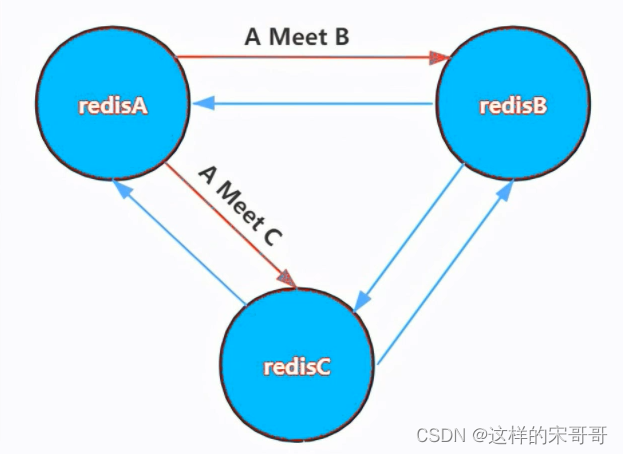
- 节点A对节点B发送一个meet操作,B返回后表示A和B之间能够进行沟通。
- 节点A对节点C发送meet操作,C返回后,A和C之间也能进行沟通。
- 然后B根据对A的了解,就能找到C,B和C之间也建立了联系。
- 直到所有节点都能建立联系。
这样每个节点都能互相知道对方负责哪些槽。
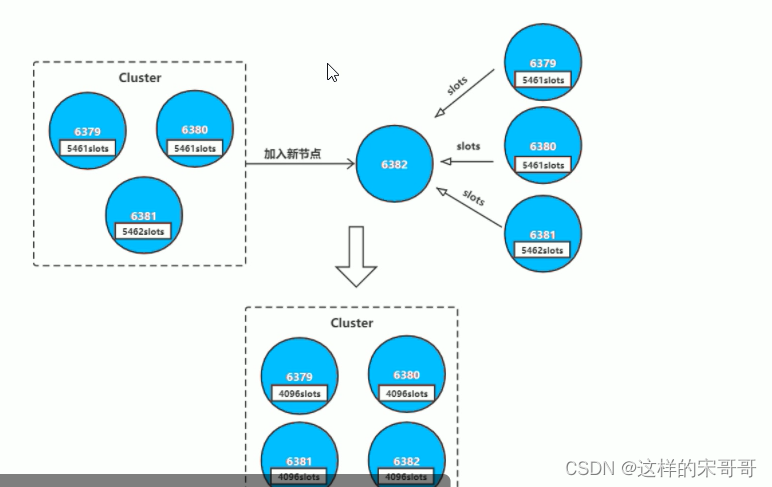
1.2.3.3 集群伸缩
集群并不是建立之后,节点数就固定不变的,也会有新的节点加入集群或者集群中的节点下线,这就是
集群的扩容和缩容。但是由于集群节点和槽息息相关,所以集群的伸缩也对应了槽和数据的迁移
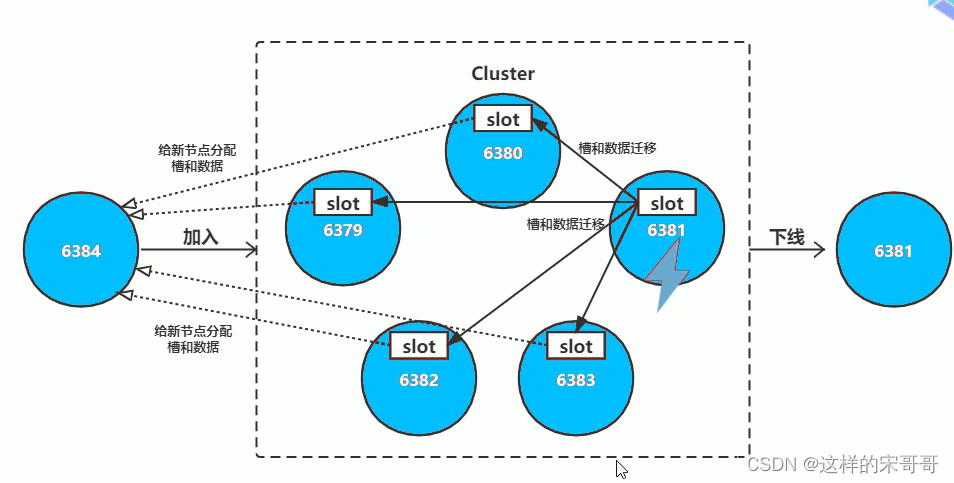
集群扩容
当有新的节点准备好加入集群时,这个新的节点还是孤立节点,加入有两种方式。一个是通过集群节点
执行命令来和孤立节点握手,另一个则是使用脚本来添加节点。
- cluster_node_ip:port: cluster meet ip port new_node_ip:port
- redis-trib.rb add-node new_node_ip:port cluster_node_ip:port
通常这个新的节点有两种身份,要么作为主节点,要么作为从节点:
- 主节点:分摊槽和数据
- 从节点:作故障转移备份
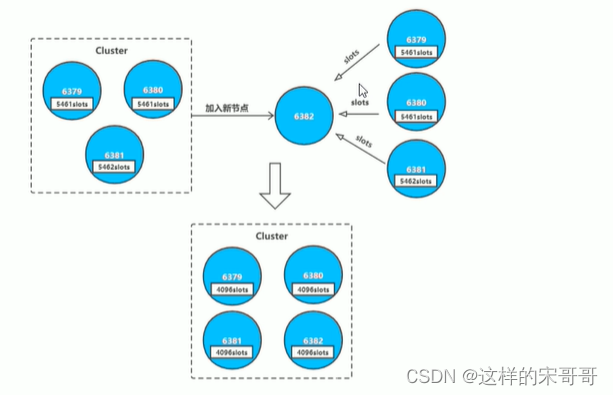
其中槽的迁移有以下步骤:

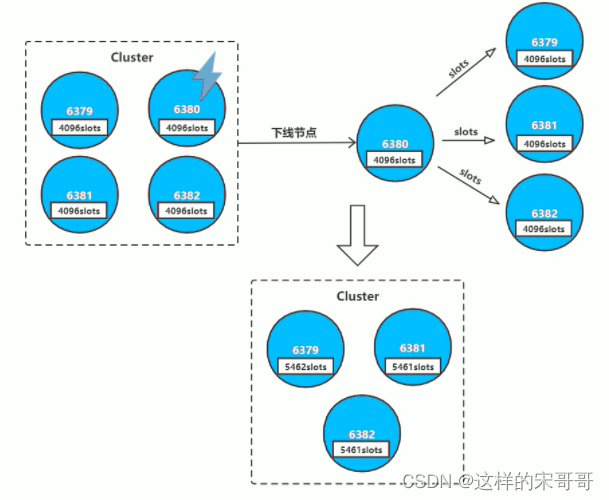
集群缩容
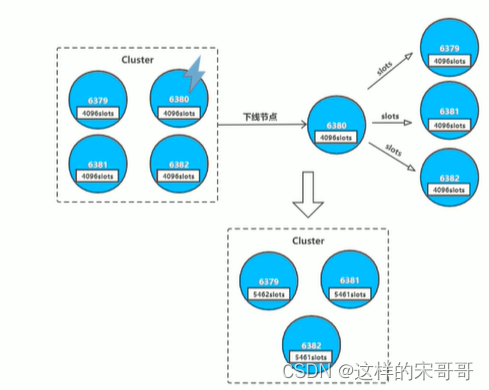
下线节点的流程如下:
- 判断该节点是否持有槽,如果未持有槽就跳转到下一步,持有槽则先迁移槽到其他节点
- 通知其他节点(cluster forget)忘记该下线节点
- 关闭下线节点的服务
需要注意的是如果先下线主节点,再下线从节点,会进行故障转移,所以要先下线从节点。
1.2.3.4 故障转移
除了手动下线节点外,也会面对突发故障。下面提到的主要是主节点的故障,因为从节点的故障并不影
响主节点工作,对应的主节点只会记住自己哪个从节点下线了,并将信息发送给其他节点。故障的从节
点重连后,继续官复原职,复制主节点的数据。
只有主节点才需要进行故障转移。在之前学习主从复制时,我们需要使用redis sentinel来实现故障转
移。而redis cluster则不需要redis sentinel,其自身就具备了故障转移功能。
根据前面我们了解到,节点之间是会进行通信的,节点之间通过ping/pong交互消息,所以借此就能发
现故障。集群节点发现故障同样是有主观下线和客观下线的
主观下线
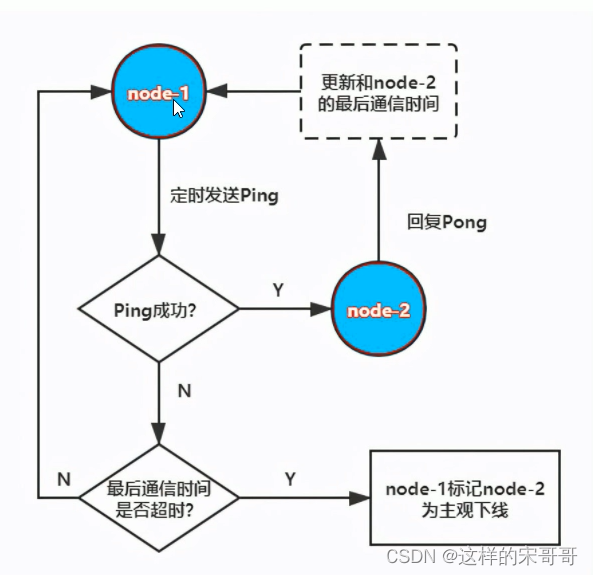
对于每个节点有一个故障列表,故障列表维护了当前节点接收到的其他所有节点的信息。当半数以上的
持有槽的主节点都标记某个节点主观下线,就会尝试客观下线。
客观下线
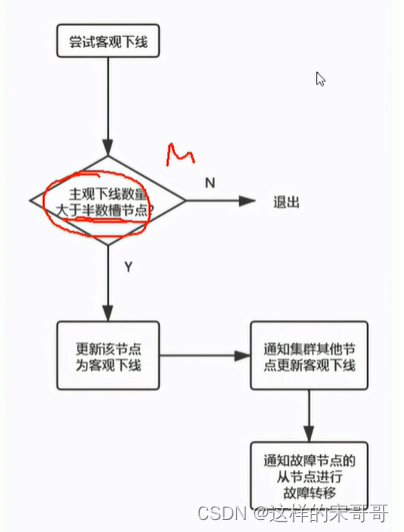
故障转移
集群同样具备了自动转移故障的功能,和哨兵有些类似,在进行客观下线之后,就开始准备让故障节点
的从节点“上任”了。
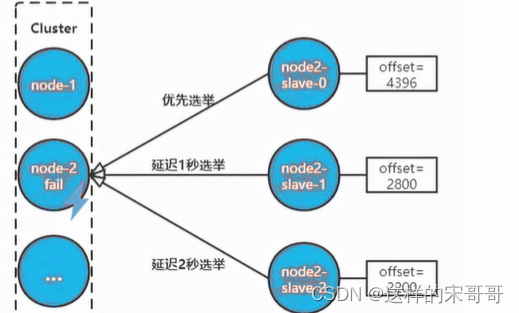
首先是进行资格检查,只有具备资格的从节点才能参加选举:
- 故障节点的所有从节点检查和故障主节点之间的断线时间
- 超过cluster-node-timeout * cluster-slave-validati-factor(默认10)则取消选举资格
然后是准备选举顺序,不同偏移量的节点,参与选举的顺位不同。offset最大的slave节点,选举顺位最
高,最优先选举。而offset较低的slave节点,要延迟选举。
当有从节点参加选举后,主节点收到信息就开始投票。偏移量最大的节点,优先参与选举就更大可能获
得最多的票数,称为主节点。
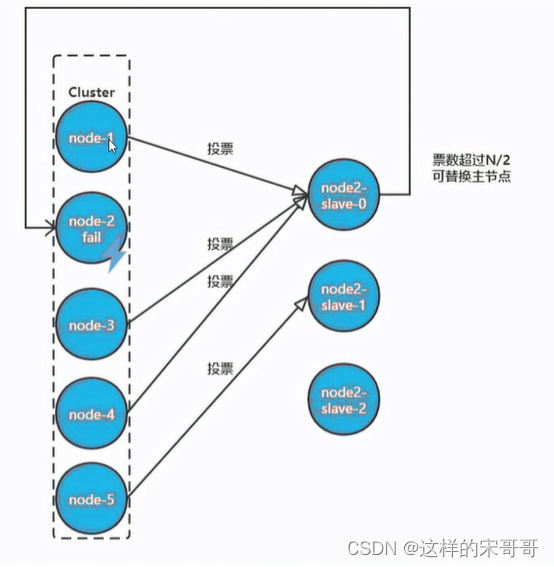
当从节点走马上任变成主节点之后,就要开始进行替换主节点:
- 让该slave节点执行slaveof no one变为master节点
- 将故障节点负责的槽分配给该节点
- 向集群中其他节点广播Pong消息,表明已完成故障转移
- 故障节点重启后,会成为new_master的slave节点
1.2.3.4 Redis Cluster 部署架构说明
测试环境:3台服务器,每台服务器启动6379和6380两个redis 服务实例,适用于测试环境
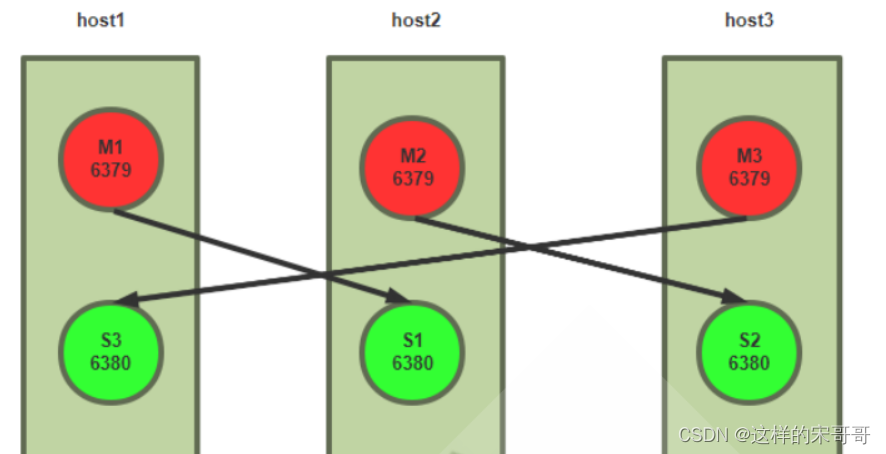
生产环境:6台服务器,分别是三组master/slave,适用于生产环境
#集群节点
10.0.0.8
10.0.0.18
10.0.0.28
10.0.0.38
10.0.0.48
10.0.0.58
#预留服务器扩展使用
10.0.0.68
10.0.0.78
说明:Redis 5.X 和之前版本相比有较大变化,以下分别介绍两个版本5.X和4.X的配置
1.2.3.5 部署方式介绍
redis cluster 有多种部署方法
原生命令安装
理解Redis Cluster架构
生产环境不使用
官方工具安装
高效、准确
生产环境可以使用
自主研发
可以实现可视化的自动化部署
1.2.4 实战案例:基于Redis 5 以上版本的 redis cluster 部署
官方文档:https://redis.io/topics/cluster-tutorial
redis cluster 相关命令
范例: 查看 --cluster 选项帮助
[root@centos8 ~]#redis-cli --cluster help
范例: 查看CLUSTER 指令的帮助
[root@centos8 ~]#redis-cli CLUSTER HELP
1.2.4.1 创建 redis cluster集群的环境准备
每个Redis 节点采用相同的相同的Redis版本、相同的密码、硬件配置
所有Redis服务器必须没有任何数据
准备六台主机,地址如下:
10.0.0.8
10.0.0.18
10.0.0.28
10.0.0.38
10.0.0.48
10.0.0.58
1.2.4.2 启用 redis cluster 配置
所有6台主机都执行以下配置
[root@centos8 ~]#dnf -y install redis
每个节点修改redis配置,必须开启cluster功能的参数
#手动修改配置文件
[root@redis-node1 ~]vim /etc/redis.conf
bind 0.0.0.0
masterauth 123456   #建议配置,否则后期的master和slave主从复制无法成功,还需再配置
requirepass 123456
cluster-enabled yes #取消此行注释,必须开启集群,开启后 redis 进程会有cluster标识
cluster-config-file nodes-6379.conf #取消此行注释,此为集群状态数据文件,记录主从关系
及slot范围信息,由redis cluster 集群自动创建和维护
cluster-require-full-coverage no   #默认值为yes,设为no可以防止一个节点不可用导致整
个cluster不可用
#或者执行下面命令,批量修改
[root@redis-node1 ~]#sed -i.bak -e 's/bind 127.0.0.1/bind 0.0.0.0/' -e
'/masterauth/a masterauth 123456' -e '/# requirepass/a requirepass 123456' -
e '/# cluster-enabled yes/a cluster-enabled yes' -e '/# cluster-config-file
nodes-6379.conf/a cluster-config-file nodes-6379.conf' -e '/cluster-require
full-coverage yes/c cluster-require-full-coverage no' /etc/redis.conf
#如果是编译安装可以执行下面操作
[root@redis-node1 ~]#sed -i.bak -e '/masterauth/a masterauth 123456' -e
'/# cluster-enabled yes/a cluster-enabled yes' -e '/# cluster-config-file
nodes-6379.conf/a cluster-config-file nodes-6379.conf' -e '/cluster-require
full-coverage yes/c cluster-require-full-coverage no'
/apps/redis/etc/redis.conf
[root@redis-node1 ~]#systemctl enable --now redis
验证当前Redis服务状态:
#开启了16379的cluster的端口,实际的端口=redis port + 10000
[root@centos8 ~]#ss -ntl
State       Recv-Q       Send-Q Local Address:Port     Peer Address:Port

LISTEN       0             128           0.0.0.0:22            0.0.0.0:*

LISTEN       0             100         127.0.0.1:25            0.0.0.0:*

LISTEN       0             128           0.0.0.0:16379         0.0.0.0:*

LISTEN       0             128           0.0.0.0:6379          0.0.0.0:*

LISTEN       0             128             [::]:22               [::]:*

LISTEN       0             100             [::1]:25               [::]:*

#注意进程有[cluster]状态
[root@centos8 ~]#ps -ef|grep redis
redis   1939    1  0 10:54 ?    00:00:00 /usr/bin/redis-server 0.0.0.0:6379
[cluster]
root    1955   1335  0 10:57 pts/0    00:00:00 grep --color=auto redis
1.2.4.3 创建集群
#命令redis-cli的选项 --cluster-replicas 1 表示每个master对应一个slave节点
[root@redis-node1 ~]#redis-cli -a 123456 --cluster create 10.0.0.8:6379
10.0.0.18:6379   10.0.0.28:6379   10.0.0.38:6379   10.0.0.48:6379
10.0.0.58:6379 --cluster-replicas 1
Warning: Using a password with '-a' or '-u' option on the command line interface
may not be safe.
>>> Performing hash slots allocation on 6 nodes...
Master[0] -> Slots 0 - 5460
Master[1] -> Slots 5461 - 10922
Master[2] -> Slots 10923 - 16383
Adding replica 10.0.0.38:6379 to 10.0.0.8:6379
Adding replica 10.0.0.48:6379 to 10.0.0.18:6379
Adding replica 10.0.0.58:6379 to 10.0.0.28:6379
M: cb028b83f9dc463d732f6e76ca6bbcd469d948a7 10.0.0.8:6379 #带M的为master
   slots:[0-5460] (5461 slots) master #当前master的槽位起始
和结束位
M: 99720241248ff0e4c6fa65c2385e92468b3b5993 10.0.0.18:6379
   slots:[5461-10922] (5462 slots) master
M: d34da8666a6f587283a1c2fca5d13691407f9462 10.0.0.28:6379
   slots:[10923-16383] (5461 slots) master
S: f9adcfb8f5a037b257af35fa548a26ffbadc852d 10.0.0.38:6379  #带S的slave
   replicates cb028b83f9dc463d732f6e76ca6bbcd469d948a7
S: d04e524daec4d8e22bdada7f21a9487c2d3e1057 10.0.0.48:6379
   replicates 99720241248ff0e4c6fa65c2385e92468b3b5993
S: 9875b50925b4e4f29598e6072e5937f90df9fc71 10.0.0.58:6379
   replicates d34da8666a6f587283a1c2fca5d13691407f9462
Can I set the above configuration? (type 'yes' to accept): yes #输入yes自动创建集群
>>> Nodes configuration updated
>>> Assign a different config epoch to each node
>>> Sending CLUSTER MEET messages to join the cluster
Waiting for the cluster to join
....
>>> Performing Cluster Check (using node 10.0.0.8:6379)
M: cb028b83f9dc463d732f6e76ca6bbcd469d948a7 10.0.0.8:6379
   slots:[0-5460] (5461 slots) master #已经分配的槽位
   1 additional replica(s)   #分配了一个slave
S: 9875b50925b4e4f29598e6072e5937f90df9fc71 10.0.0.58:6379
   slots: (0 slots) slave   #slave没有分配槽位
   replicates d34da8666a6f587283a1c2fca5d13691407f9462  #对应的master的10.0.0.28的
ID
S: f9adcfb8f5a037b257af35fa548a26ffbadc852d 10.0.0.38:6379
   slots: (0 slots) slave
   replicates cb028b83f9dc463d732f6e76ca6bbcd469d948a7 #对应的master的10.0.0.8的ID
S: d04e524daec4d8e22bdada7f21a9487c2d3e1057 10.0.0.48:6379
   slots: (0 slots) slave
   replicates 99720241248ff0e4c6fa65c2385e92468b3b5993 #对应的master的10.0.0.18的
ID
M: 99720241248ff0e4c6fa65c2385e92468b3b5993 10.0.0.18:6379
   slots:[5461-10922] (5462 slots) master
   1 additional replica(s)
M: d34da8666a6f587283a1c2fca5d13691407f9462 10.0.0.28:6379
   slots:[10923-16383] (5461 slots) master
   1 additional replica(s)
[OK] All nodes agree about slots configuration.  #所有节点槽位分配完成
>>> Check for open slots... #检查打开的槽位
>>> Check slots coverage... #检查插槽覆盖范围
[OK] All 16384 slots covered. #所有槽位(16384个)分配完成
#观察以上结果,可以看到3组master/slave
master:10.0.0.8---slave:10.0.0.38
master:10.0.0.18---slave:10.0.0.48
master:10.0.0.28---slave:10.0.0.58
#如果节点少于3个会出下面提示错误
[root@node1 ~]#redis-cli -a 123456 --cluster create 10.0.0.8:6379
10.0.0.18:6379
Warning: Using a password with '-a' or '-u' option on the command line interface
may not be safe.
*** ERROR: Invalid configuration for cluster creation.
*** Redis Cluster requires at least 3 master nodes.
*** This is not possible with 2 nodes and 0 replicas per node.
*** At least 3 nodes are required.
1.2.4.4 验证集群
查看主从状态
[root@redis-node1 ~]#redis-cli -a 123456 -c INFO replication
Warning: Using a password with '-a' or '-u' option on the command line interface
may not be safe.
# Replication
role:master
connected_slaves:1
slave0:ip=10.0.0.38,port=6379,state=online,offset=896,lag=1
master_replid:3a388865080d779180ff240cb75766e7e57877da
master_replid2:0000000000000000000000000000000000000000
master_repl_offset:896
second_repl_offset:-1
repl_backlog_active:1
repl_backlog_size:1048576
repl_backlog_first_byte_offset:1
repl_backlog_histlen:896
[root@redis-node2 ~]#redis-cli -a 123456 INFO replication
Warning: Using a password with '-a' or '-u' option on the command line interface
may not be safe.
# Replication
role:master
connected_slaves:1
slave0:ip=10.0.0.48,port=6379,state=online,offset=980,lag=1
master_replid:b9066d3cbf0c5fecc7f4d1d5cb2433999783fa3f
master_replid2:0000000000000000000000000000000000000000
master_repl_offset:980
second_repl_offset:-1
repl_backlog_active:1
repl_backlog_size:1048576
repl_backlog_first_byte_offset:1
repl_backlog_histlen:980
[root@redis-node3 ~]#redis-cli -a 123456 INFO replication
Warning: Using a password with '-a' or '-u' option on the command line interface
may not be safe.
# Replication
role:master
connected_slaves:1
slave0:ip=10.0.0.58,port=6379,state=online,offset=980,lag=0
master_replid:53208e0ed9305d721e2fb4b3180f75c689217902
master_replid2:0000000000000000000000000000000000000000
master_repl_offset:980
second_repl_offset:-1
repl_backlog_active:1
repl_backlog_size:1048576
repl_backlog_first_byte_offset:1
repl_backlog_histlen:980
[root@redis-node4 ~]#redis-cli -a 123456 INFO replication
Warning: Using a password with '-a' or '-u' option on the command line interface
may not be safe.
# Replication
role:slave
master_host:10.0.0.8
master_port:6379
master_link_status:up
master_last_io_seconds_ago:1
master_sync_in_progress:0
slave_repl_offset:1036
slave_priority:100
slave_read_only:1
connected_slaves:0
master_replid:3a388865080d779180ff240cb75766e7e57877da
master_replid2:0000000000000000000000000000000000000000
master_repl_offset:1036
second_repl_offset:-1
repl_backlog_active:1
repl_backlog_size:1048576
repl_backlog_first_byte_offset:1
repl_backlog_histlen:1036
[root@redis-node5 ~]#redis-cli -a 123456 INFO replication
Warning: Using a password with '-a' or '-u' option on the command line interface
may not be safe.
# Replication
role:slave
master_host:10.0.0.18
master_port:6379
master_link_status:up
master_last_io_seconds_ago:2
master_sync_in_progress:0
slave_repl_offset:1064
slave_priority:100
slave_read_only:1
connected_slaves:0
master_replid:b9066d3cbf0c5fecc7f4d1d5cb2433999783fa3f
master_replid2:0000000000000000000000000000000000000000
master_repl_offset:1064
second_repl_offset:-1
repl_backlog_active:1
repl_backlog_size:1048576
repl_backlog_first_byte_offset:1
repl_backlog_histlen:1064
[root@redis-node6 ~]#redis-cli -a 123456 INFO replication
Warning: Using a password with '-a' or '-u' option on the command line interface
may not be safe.
# Replication
role:slave
master_host:10.0.0.28
master_port:6379
master_link_status:up
master_last_io_seconds_ago:7
master_sync_in_progress:0
slave_repl_offset:1078
slave_priority:100
slave_read_only:1
connected_slaves:0
master_replid:53208e0ed9305d721e2fb4b3180f75c689217902
master_replid2:0000000000000000000000000000000000000000
master_repl_offset:1078
second_repl_offset:-1
repl_backlog_active:1
repl_backlog_size:1048576
repl_backlog_first_byte_offset:1
repl_backlog_histlen:1078
范例: 查看指定master节点的slave节点信息
[root@centos8 ~]#redis-cli -a 123456 cluster nodes
4f146b1ac51549469036a272c60ea97f065ef832 10.0.0.28:6379@16379 master - 0
1602571565772 12 connected 10923-16383
779a24884dbe1ceb848a685c669ec5326e6c8944 10.0.0.48:6379@16379 slave
97c5dcc3f33c2fc75c7fdded25d05d2930a312c0 0 1602571565000 11 connected
97c5dcc3f33c2fc75c7fdded25d05d2930a312c0 10.0.0.18:6379@16379 master - 0
1602571564000 11 connected 5462-10922
07231a50043d010426c83f3b0788e6b92e62050f 10.0.0.58:6379@16379 slave
4f146b1ac51549469036a272c60ea97f065ef832 0 1602571565000 12 connected
a177c5cbc2407ebb6230ea7e2a7de914bf8c2dab 10.0.0.8:6379@16379 myself,master - 0
1602571566000 10 connected 0-5461
cb20d58870fe05de8462787cf9947239f4bc5629 10.0.0.38:6379@16379 slave
a177c5cbc2407ebb6230ea7e2a7de914bf8c2dab 0 1602571566780 10 connected
#以下命令查看指定master节点的slave节点信息,其中
#a177c5cbc2407ebb6230ea7e2a7de914bf8c2dab 为master节点的ID
[root@centos8 ~]#redis-cli -a 123456 cluster slaves
a177c5cbc2407ebb6230ea7e2a7de914bf8c2dab
1) "cb20d58870fe05de8462787cf9947239f4bc5629 10.0.0.38:6379@16379 slave
a177c5cbc2407ebb6230ea7e2a7de914bf8c2dab 0 1602571574844 10 connected"
验证集群状态
[root@redis-node1 ~]#redis-cli -a 123456 CLUSTER INFO
Warning: Using a password with '-a' or '-u' option on the command line interface
may not be safe.
cluster_state:ok
cluster_slots_assigned:16384
cluster_slots_ok:16384
cluster_slots_pfail:0
cluster_slots_fail:0
cluster_known_nodes:6  #节点数
cluster_size:3                        #三个集群
cluster_current_epoch:6
cluster_my_epoch:1
cluster_stats_messages_ping_sent:837
cluster_stats_messages_pong_sent:811
cluster_stats_messages_sent:1648
cluster_stats_messages_ping_received:806
cluster_stats_messages_pong_received:837
cluster_stats_messages_meet_received:5
cluster_stats_messages_received:1648
#查看任意节点的集群状态
[root@redis-node1 ~]#redis-cli -a 123456 --cluster info 10.0.0.38:6379
Warning: Using a password with '-a' or '-u' option on the command line interface
may not be safe.
10.0.0.18:6379 (99720241...) -> 0 keys | 5462 slots | 1 slaves.
10.0.0.28:6379 (d34da866...) -> 0 keys | 5461 slots | 1 slaves.
10.0.0.8:6379 (cb028b83...) -> 0 keys | 5461 slots | 1 slaves.
[OK] 0 keys in 3 masters.
0.00 keys per slot on average.
查看对应关系
[root@redis-node1 ~]#redis-cli -a 123456 CLUSTER NODES
Warning: Using a password with '-a' or '-u' option on the command line interface
may not be safe.
9875b50925b4e4f29598e6072e5937f90df9fc71 10.0.0.58:6379@16379 slave
d34da8666a6f587283a1c2fca5d13691407f9462 0 1582344815790 6 connected
f9adcfb8f5a037b257af35fa548a26ffbadc852d 10.0.0.38:6379@16379 slave
cb028b83f9dc463d732f6e76ca6bbcd469d948a7 0 1582344811000 4 connected
d04e524daec4d8e22bdada7f21a9487c2d3e1057 10.0.0.48:6379@16379 slave
99720241248ff0e4c6fa65c2385e92468b3b5993 0 1582344815000 5 connected
99720241248ff0e4c6fa65c2385e92468b3b5993 10.0.0.18:6379@16379 master - 0
1582344813000 2 connected 5461-10922
d34da8666a6f587283a1c2fca5d13691407f9462 10.0.0.28:6379@16379 master - 0
1582344814780 3 connected 10923-16383
cb028b83f9dc463d732f6e76ca6bbcd469d948a7 10.0.0.8:6379@16379 myself,master - 0
1582344813000 1 connected 0-5460
[root@redis-node1 ~]#redis-cli -a 123456 --cluster check 10.0.0.38:6379
Warning: Using a password with '-a' or '-u' option on the command line interface
may not be safe.
10.0.0.18:6379 (99720241...) -> 0 keys | 5462 slots | 1 slaves.
10.0.0.28:6379 (d34da866...) -> 0 keys | 5461 slots | 1 slaves.
10.0.0.8:6379 (cb028b83...) -> 0 keys | 5461 slots | 1 slaves.
[OK] 0 keys in 3 masters.
0.00 keys per slot on average.
>>> Performing Cluster Check (using node 10.0.0.38:6379)
S: f9adcfb8f5a037b257af35fa548a26ffbadc852d 10.0.0.38:6379
   slots: (0 slots) slave
   replicates cb028b83f9dc463d732f6e76ca6bbcd469d948a7
S: d04e524daec4d8e22bdada7f21a9487c2d3e1057 10.0.0.48:6379
   slots: (0 slots) slave
   replicates 99720241248ff0e4c6fa65c2385e92468b3b5993
M: 99720241248ff0e4c6fa65c2385e92468b3b5993 10.0.0.18:6379
   slots:[5461-10922] (5462 slots) master
   1 additional replica(s)
S: 9875b50925b4e4f29598e6072e5937f90df9fc71 10.0.0.58:6379
   slots: (0 slots) slave
   replicates d34da8666a6f587283a1c2fca5d13691407f9462
M: d34da8666a6f587283a1c2fca5d13691407f9462 10.0.0.28:6379
   slots:[10923-16383] (5461 slots) master
   1 additional replica(s)
M: cb028b83f9dc463d732f6e76ca6bbcd469d948a7 10.0.0.8:6379
   slots:[0-5460] (5461 slots) master
   1 additional replica(s)
[OK] All nodes agree about slots configuration.
>>> Check for open slots...
>>> Check slots coverage...
[OK] All 16384 slots covered.
1.2.4.5 测试集群写入数据
redis cluster 写入key
#经过算法计算,当前key的槽位需要写入指定的node
[root@redis-node1 ~]#redis-cli -a 123456 -h 10.0.0.8 SET key1 values1
Warning: Using a password with '-a' or '-u' option on the command line interface
may not be safe.
(error) MOVED 9189 10.0.0.18:6379    #槽位不在当前node所以无法写入
#指定槽位对应node可写入
[root@redis-node1 ~]#redis-cli -a 123456 -h 10.0.0.18 SET key1 values1
Warning: Using a password with '-a' or '-u' option on the command line interface
may not be safe.
OK
[root@redis-node1 ~]#redis-cli -a 123456 -h 10.0.0.18 GET key1
Warning: Using a password with '-a' or '-u' option on the command line interface
may not be safe.
"values1"
#对应的slave节点可以KEYS *,但GET key1失败,可以到master上执行GET key1
[root@redis-node1 ~]#redis-cli -a 123456 -h 10.0.0.48 KEYS "*"
Warning: Using a password with '-a' or '-u' option on the command line interface
may not be safe.
1) "key1"
[root@redis-node1 ~]#redis-cli -a 123456 -h 10.0.0.48 GET key1
Warning: Using a password with '-a' or '-u' option on the command line interface
may not be safe.
(error) MOVED 9189 10.0.0.18:6379
redis cluster 计算key所属的slot
[root@centos8 ~]#redis-cli -h 10.0.0.8 -a 123456 --no-auth-warning cluster
nodes
4f146b1ac51549469036a272c60ea97f065ef832 10.0.0.28:6379@16379 master - 0
1602561649000 12 connected 10923-16383
779a24884dbe1ceb848a685c669ec5326e6c8944 10.0.0.48:6379@16379 slave
97c5dcc3f33c2fc75c7fdded25d05d2930a312c0 0 1602561648000 11 connected
97c5dcc3f33c2fc75c7fdded25d05d2930a312c0 10.0.0.18:6379@16379 master - 0
1602561650000 11 connected 5462-10922
07231a50043d010426c83f3b0788e6b92e62050f 10.0.0.58:6379@16379 slave
4f146b1ac51549469036a272c60ea97f065ef832 0 1602561650229 12 connected
a177c5cbc2407ebb6230ea7e2a7de914bf8c2dab 10.0.0.8:6379@16379 myself,master - 0
1602561650000 10 connected 0-5461
cb20d58870fe05de8462787cf9947239f4bc5629 10.0.0.38:6379@16379 slave
a177c5cbc2407ebb6230ea7e2a7de914bf8c2dab 0 1602561651238 10 connected
#计算得到hello对应的slot
[root@centos8 ~]#redis-cli -h 10.0.0.8 -a 123456 --no-auth-warning cluster
keyslot hello
(integer) 866
[root@centos8 ~]#redis-cli -h 10.0.0.8 -a 123456 --no-auth-warning set hello
magedu
OK
[root@centos8 ~]#redis-cli -h 10.0.0.8 -a 123456 --no-auth-warning cluster
keyslot name
(integer) 5798
[root@centos8 ~]#redis-cli -h 10.0.0.8 -a 123456 --no-auth-warning set name
wang
(error) MOVED 5798 10.0.0.18:6379
[root@centos8 ~]#redis-cli -h 10.0.0.18 -a 123456 --no-auth-warning set name
wang
OK
[root@centos8 ~]#redis-cli -h 10.0.0.18 -a 123456 --no-auth-warning get name
"wang"
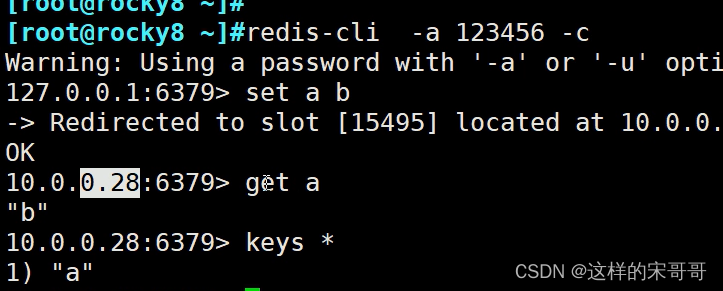
#使用选项-c 以集群模式连接
[root@centos8 ~]#redis-cli -c -h 10.0.0.8 -a 123456 --no-auth-warning
10.0.0.8:6379> cluster keyslot linux
(integer) 12299
10.0.0.8:6379> set linux love
-> Redirected to slot [12299] located at 10.0.0.28:6379
OK
10.0.0.28:6379> get linux
"love"
10.0.0.28:6379> exit
[root@centos8 ~]#redis-cli -h 10.0.0.28 -a 123456 --no-auth-warning get linux
"love"
1.2.4.6 模拟故障实现故障转移
#模拟node2节点出故障,需要相应的数秒故障转移时间
[root@redis-node2 ~]#tail -f /var/log/redis/redis.log
[root@redis-node2 ~]#redis-cli -a 123456
Warning: Using a password with '-a' or '-u' option on the command line interface
may not be safe.
127.0.0.1:6379> shutdown
not connected> exit
[root@redis-node2 ~]#ss -ntl
State       Recv-Q       Send-Q Local Address:Port Peer Address:Port
LISTEN       0             128           0.0.0.0:22         0.0.0.0:*
LISTEN       0             100         127.0.0.1:25         0.0.0.0:*
LISTEN       0             128             [::]:22           [::]:*
LISTEN       0             100             [::1]:25           [::]:*
[root@redis-node2 ~]# redis-cli -a 123456 --cluster info 10.0.0.8:6379
Warning: Using a password with '-a' or '-u' option on the command line interface
may not be safe.
Could not connect to Redis at 10.0.0.18:6379: Connection refused
10.0.0.8:6379 (cb028b83...) -> 3331 keys | 5461 slots | 1 slaves.
10.0.0.48:6379 (d04e524d...) -> 3340 keys | 5462 slots | 0 slaves. #10.0.0.48为新
的master
10.0.0.28:6379 (d34da866...) -> 3329 keys | 5461 slots | 1 slaves.
[OK] 10000 keys in 3 masters.
0.61 keys per slot on average.
[root@redis-node2 ~]# redis-cli -a 123456 --cluster check 10.0.0.8:6379
Warning: Using a password with '-a' or '-u' option on the command line interface
may not be safe.
Could not connect to Redis at 10.0.0.18:6379: Connection refused
10.0.0.8:6379 (cb028b83...) -> 3331 keys | 5461 slots | 1 slaves.
10.0.0.48:6379 (d04e524d...) -> 3340 keys | 5462 slots | 0 slaves.
10.0.0.28:6379 (d34da866...) -> 3329 keys | 5461 slots | 1 slaves.
[OK] 10000 keys in 3 masters.
0.61 keys per slot on average.
>>> Performing Cluster Check (using node 10.0.0.8:6379)
M: cb028b83f9dc463d732f6e76ca6bbcd469d948a7 10.0.0.8:6379
   slots:[0-5460] (5461 slots) master
   1 additional replica(s)
S: 9875b50925b4e4f29598e6072e5937f90df9fc71 10.0.0.58:6379
   slots: (0 slots) slave
   replicates d34da8666a6f587283a1c2fca5d13691407f9462
S: f9adcfb8f5a037b257af35fa548a26ffbadc852d 10.0.0.38:6379
   slots: (0 slots) slave
   replicates cb028b83f9dc463d732f6e76ca6bbcd469d948a7
M: d04e524daec4d8e22bdada7f21a9487c2d3e1057 10.0.0.48:6379
   slots:[5461-10922] (5462 slots) master
M: d34da8666a6f587283a1c2fca5d13691407f9462 10.0.0.28:6379
   slots:[10923-16383] (5461 slots) master
   1 additional replica(s)
[OK] All nodes agree about slots configuration.
>>> Check for open slots...
>>> Check slots coverage...
[OK] All 16384 slots covered.
[root@redis-node2 ~]#redis-cli -a 123456 -h 10.0.0.48
Warning: Using a password with '-a' or '-u' option on the command line interface
may not be safe.
10.0.0.48:6379> INFO replication
# Replication
role:master
connected_slaves:0
master_replid:0000698bc2c6452d8bfba68246350662ae41d8fd
master_replid2:b9066d3cbf0c5fecc7f4d1d5cb2433999783fa3f
master_repl_offset:2912424
second_repl_offset:2912425
repl_backlog_active:1
repl_backlog_size:1048576
repl_backlog_first_byte_offset:1863849
repl_backlog_histlen:1048576
10.0.0.48:6379>
#恢复故障节点node2自动成为slave节点
[root@redis-node2 ~]#systemctl start redis
#查看自动生成的配置文件,可以查看node2自动成为slave节点
[root@redis-node2 ~]#cat /var/lib/redis/nodes-6379.conf
99720241248ff0e4c6fa65c2385e92468b3b5993 10.0.0.18:6379@16379 myself,slave
d04e524daec4d8e22bdada7f21a9487c2d3e1057 0 1582352081847 2 connected
f9adcfb8f5a037b257af35fa548a26ffbadc852d 10.0.0.38:6379@16379 slave
cb028b83f9dc463d732f6e76ca6bbcd469d948a7 1582352081868 1582352081847 4 connected
cb028b83f9dc463d732f6e76ca6bbcd469d948a7 10.0.0.8:6379@16379 master -
1582352081868 1582352081847 1 connected 0-5460
9875b50925b4e4f29598e6072e5937f90df9fc71 10.0.0.58:6379@16379 slave
d34da8666a6f587283a1c2fca5d13691407f9462 1582352081869 1582352081847 3 connected
d04e524daec4d8e22bdada7f21a9487c2d3e1057 10.0.0.48:6379@16379 master -
1582352081869 1582352081847 7 connected 5461-10922
d34da8666a6f587283a1c2fca5d13691407f9462 10.0.0.28:6379@16379 master -
1582352081869 1582352081847 3 connected 10923-16383
vars currentEpoch 7 lastVoteEpoch 0
[root@redis-node2 ~]#redis-cli -a 123456 -h 10.0.0.48
Warning: Using a password with '-a' or '-u' option on the command line interface
may not be safe.
10.0.0.48:6379> INFO replication
# Replication
role:master
connected_slaves:1
slave0:ip=10.0.0.18,port=6379,state=online,offset=2912564,lag=1
master_replid:0000698bc2c6452d8bfba68246350662ae41d8fd
master_replid2:b9066d3cbf0c5fecc7f4d1d5cb2433999783fa3f
master_repl_offset:2912564
second_repl_offset:2912425
repl_backlog_active:1
repl_backlog_size:1048576
repl_backlog_first_byte_offset:1863989
repl_backlog_histlen:1048576
10.0.0.48:6379>
1.2.5 Redis cluster 管理
1.2.5.1 集群扩容(不支持多数据库了)
扩容适用场景:
当前客户量激增,现有的Redis cluster架构已经无法满足越来越高的并发访问请求,为解决此问题,新购
置两台服务器,要求将其动态添加到现有集群,但不能影响业务的正常访问。
注意: 生产环境一般建议master节点为奇数个,比如:3,5,7,以防止脑裂现象
添加节点准备
增加Redis 新节点,需要与之前的Redis node版本和配置一致,然后分别再启动两台Redis node,应为
一主一从。
#配置node7节点
[root@redis-node7 ~]#dnf -y install redis
[root@redis-node7 ~]#sed -i.bak -e 's/bind 127.0.0.1/bind 0.0.0.0/' -e
'/masterauth/a masterauth 123456' -e '/# requirepass/a requirepass 123456' -e '/#
cluster-enabled yes/a cluster-enabled yes' -e '/# cluster-config-file nodes-
6379.conf/a cluster-config-file nodes-6379.conf' -e '/cluster-require-full
coverage yes/c cluster-require-full-coverage no' /etc/redis.conf
#编译安装执行下面操作
[root@redis-node7 ~]#sed -i.bak -e '/masterauth/a masterauth 123456' -e '/#
cluster-enabled yes/a cluster-enabled yes' -e '/# cluster-config-file nodes-
6379.conf/a cluster-config-file nodes-6379.conf' -e '/cluster-require-full
coverage yes/c cluster-require-full-coverage no'
/apps/redis/etc/redis.conf;systemctl restart redis
[root@redis-node7 ~]#systemctl enable --now redis
#配置node8节点
[root@redis-node8 ~]#dnf -y install redis
[root@redis-node8 ~]#sed -i.bak -e 's/bind 127.0.0.1/bind 0.0.0.0/' -e
'/masterauth/a masterauth 123456' -e '/# requirepass/a requirepass 123456' -e '/#
cluster-enabled yes/a cluster-enabled yes' -e '/# cluster-config-file nodes-
6379.conf/a cluster-config-file nodes-6379.conf' -e '/cluster-require-full
coverage yes/c cluster-require-full-coverage no' /etc/redis.conf
#编译安装执行下面操作
[root@redis-node8 ~]#sed -i.bak -e '/masterauth/a masterauth 123456' -e '/#
cluster-enabled yes/a cluster-enabled yes' -e '/# cluster-config-file nodes-
6379.conf/a cluster-config-file nodes-6379.conf' -e '/cluster-require-full
coverage yes/c cluster-require-full-coverage no'
/apps/redis/etc/redis.conf;systemctl restart redis
[root@redis-node8 ~]#systemctl enable --now redis
添加新的master节点到集群
使用以下命令添加新节点,要添加的新redis节点IP和端口添加到的已有的集群中任意节点的IP:端口
add-node new_host:new_port existing_host:existing_port [--slave --master-id
<arg>]
#说明:
new_host:new_port #指定新添加的主机的IP和端口
existing_host:existing_port #指定已有的集群中任意节点的IP和端口
Redis 5 以上版本的添加命令:
#将一台新的主机10.0.0.68加入集群,以下示例中10.0.0.58可以是任意存在的集群节点
[root@redis-node1 ~]#redis-cli -a 123456 --cluster add-node 10.0.0.68:6379 <当前
任意集群节点>:6379
#观察到该节点已经加入成功,但此节点上没有slot位,也无从节点,而且新的节点是master
[root@redis-node1 ~]#redis-cli -a 123456 --cluster info 10.0.0.8:6379
Warning: Using a password with '-a' or '-u' option on the command line interface
may not be safe.
10.0.0.8:6379 (cb028b83...) -> 6672 keys | 5461 slots | 1 slaves.
10.0.0.68:6379 (d6e2eca6...) -> 0 keys | 0 slots | 0 slaves.
10.0.0.48:6379 (d04e524d...) -> 6679 keys | 5462 slots | 1 slaves.
10.0.0.28:6379 (d34da866...) -> 6649 keys | 5461 slots | 1 slaves.
[OK] 20000 keys in 5 masters.
1.22 keys per slot on average.
[root@redis-node1 ~]#redis-cli -a 123456 --cluster check 10.0.0.8:6379
Warning: Using a password with '-a' or '-u' option on the command line interface

[root@redis-node1 ~]#cat /var/lib/redis/nodes-6379.conf

#和上面显示结果一样
[root@redis-node1 ~]#redis-cli -a 123456 CLUSTER NODES
Warning: Using a password with '-a' or '-u' option on the command line interface
may not be safe.

#查看集群状态
[root@redis-node1 ~]#redis-cli -a 123456 CLUSTER INFO
Warning: Using a password with '-a' or '-u' option on the command line interface
在新的master上重新分配槽位
新的node节点加到集群之后,默认是master节点,但是没有slots,需要重新分配,否则没有槽位将无法访
问
注意: 重新分配槽位需要清空数据,所以需要先备份数据,扩展后再恢复数据
Redis 5以上版本命令:(计算16384/总节点数槽位、新的masterID、从原有哪几个节点分担槽点)
[root@redis-node1 ~]#redis-cli -a 123456 --cluster reshard <当前任意集群节点>:6379
Warning: Using a password with ‘-a’ or ‘-u’ option on the command line interface
may not be safe.Performing Cluster Check (using node 10.0.0.68:6379)
M: d6e2eca6b338b717923f64866bd31d42e52edc98 10.0.0.68:6379
slots: (0 slots) master
M: d34da8666a6f587283a1c2fca5d13691407f9462 10.0.0.28:6379
slots:[10923-16383] (5461 slots) master
1 additional replica(s)
M: d04e524daec4d8e22bdada7f21a9487c2d3e1057 10.0.0.48:6379
slots:[5461-10922] (5462 slots) master
1 additional replica(s)
M: cb028b83f9dc463d732f6e76ca6bbcd469d948a7 10.0.0.8:6379
slots:[0-5460] (5461 slots) master
1 additional replica(s)
S: 99720241248ff0e4c6fa65c2385e92468b3b5993 10.0.0.18:6379
slots: (0 slots) slave
replicates d04e524daec4d8e22bdada7f21a9487c2d3e1057
M: f67f1c02c742cd48d3f48d8c362f9f1b9aa31549 10.0.0.78:6379
slots: (0 slots) master
S: f9adcfb8f5a037b257af35fa548a26ffbadc852d 10.0.0.38:6379
slots: (0 slots) slave
replicates cb028b83f9dc463d732f6e76ca6bbcd469d948a7
S: 9875b50925b4e4f29598e6072e5937f90df9fc71 10.0.0.58:6379
slots: (0 slots) slave
replicates d34da8666a6f587283a1c2fca5d13691407f9462
[OK] All nodes agree about slots configuration.
Check for open slots…
Check slots coverage…
[OK] All 16384 slots covered.
How many slots do you want to move (from 1 to 16384)? 4096 #新分配多少个槽位=16384/master个数
What is the receiving nodeIDd6e2eca6b338b717923f64866bd31d42e52edc98 #新的
master的ID
Please enter all the source node IDs.
Type ‘all’ to use all the nodes as source nodes for the hash slots.
Type ‘done’ once you entered all the source nodes IDs.
Source node #1: all #输入all,将哪些源主机的槽位分配给新的节点,all是自动在所有的redis node选择划分,如果是从redis cluster删除某个主机可以使用此方式将指定主机上的槽位全部移动到别的redis主机
…
Do you want to proceed with the proposed reshard plan (yes/no)? yes #确认分配
…
Moving slot 12280 from 10.0.0.28:6379 to 10.0.0.68:6379: .
Moving slot 12281 from 10.0.0.28:6379 to 10.0.0.68:6379: .
Moving slot 12282 from 10.0.0.28:6379 to 10.0.0.68:6379:
Moving slot 12283 from 10.0.0.28:6379 to 10.0.0.68:6379: …
Moving slot 12284 from 10.0.0.28:6379 to 10.0.0.68:6379:
Moving slot 12285 from 10.0.0.28:6379 to 10.0.0.68:6379: .
Moving slot 12286 from 10.0.0.28:6379 to 10.0.0.68:6379:
Moving slot 12287 from 10.0.0.28:6379 to 10.0.0.68:6379: …
[root@redis-node1 ~]#
#确定slot分配成功
[root@redis-node1 ~]#redis-cli -a 123456 --cluster check 10.0.0.8:6379
Warning: Using a password with ‘-a’ or ‘-u’ option on the command line interface
may not be safe.
为新的master指定新的slave节点
当前Redis集群中新的master节点存单点问题,还需要给其添加一个对应slave节点,实现高可用功能
有两种方式:
方法1:在新加节点到集群时,直接将之设置为slave
redis-cli -a 123456 --cluster add-node 10.0.0.78:6379 <任意集群节点>:6379 --
cluster-slave --cluster-master-id d6e2eca6b338b717923f64866bd31d42e52edc98
#范例:
#查看当前状态
[root@redis-node1 ~]#redis-cli -a 123456 --cluster check 10.0.0.8:6379
Warning: Using a password with '-a' or '-u' option on the command line interface
may not be safe.
10.0.0.8:6379 (cb028b83...) -> 5019 keys | 4096 slots | 1 slaves.
10.0.0.68:6379 (d6e2eca6...) -> 4948 keys | 4096 slots | 0 slaves.
10.0.0.48:6379 (d04e524d...) -> 5033 keys | 4096 slots | 1 slaves.
10.0.0.28:6379 (d34da866...) -> 5000 keys | 4096 slots | 1 slaves.
[OK] 20000 keys in 4 masters.
1.22 keys per slot on average.
>>> Performing Cluster Check (using node 10.0.0.8:6379)
M: cb028b83f9dc463d732f6e76ca6bbcd469d948a7 10.0.0.8:6379
   slots:[1365-5460] (4096 slots) master
   1 additional replica(s)
M: d6e2eca6b338b717923f64866bd31d42e52edc98 10.0.0.68:6379
   slots:[0-1364],[5461-6826],[10923-12287] (4096 slots) master
S: 9875b50925b4e4f29598e6072e5937f90df9fc71 10.0.0.58:6379
   slots: (0 slots) slave
   replicates d34da8666a6f587283a1c2fca5d13691407f9462
S: f9adcfb8f5a037b257af35fa548a26ffbadc852d 10.0.0.38:6379
   slots: (0 slots) slave
   replicates cb028b83f9dc463d732f6e76ca6bbcd469d948a7
M: d04e524daec4d8e22bdada7f21a9487c2d3e1057 10.0.0.48:6379
   slots:[6827-10922] (4096 slots) master
   1 additional replica(s)
S: 99720241248ff0e4c6fa65c2385e92468b3b5993 10.0.0.18:6379
   slots: (0 slots) slave
   replicates d04e524daec4d8e22bdada7f21a9487c2d3e1057
M: d34da8666a6f587283a1c2fca5d13691407f9462 10.0.0.28:6379
   slots:[12288-16383] (4096 slots) master
   1 additional replica(s)
[OK] All nodes agree about slots configuration.
>>> Check for open slots...
>>> Check slots coverage...
[OK] All 16384 slots covered.
#直接加为slave节点
[root@redis-node1 ~]#redis-cli -a 123456 --cluster add-node 10.0.0.78:6379
10.0.0.8:6379 --cluster-slave --cluster-master-id
d6e2eca6b338b717923f64866bd31d42e52edc98
#验证是否成功
[root@redis-node1 ~]#redis-cli -a 123456 --cluster check 10.0.0.8:6379
Warning: Using a password with '-a' or '-u' option on the command line interface
may not be safe.
10.0.0.8:6379 (cb028b83...) -> 5019 keys | 4096 slots | 1 slaves.
10.0.0.68:6379 (d6e2eca6...) -> 4948 keys | 4096 slots | 1 slaves.
10.0.0.48:6379 (d04e524d...) -> 5033 keys | 4096 slots | 1 slaves.
10.0.0.28:6379 (d34da866...) -> 5000 keys | 4096 slots | 1 slaves.
[OK] 20000 keys in 4 masters.
1.22 keys per slot on average.
>>> Performing Cluster Check (using node 10.0.0.8:6379)
M: cb028b83f9dc463d732f6e76ca6bbcd469d948a7 10.0.0.8:6379
   slots:[1365-5460] (4096 slots) master
   1 additional replica(s)
M: d6e2eca6b338b717923f64866bd31d42e52edc98 10.0.0.68:6379
   slots:[0-1364],[5461-6826],[10923-12287] (4096 slots) master
   1 additional replica(s)
S: 36840d7eea5835ba540d9b64ec018aa3f8de6747 10.0.0.78:6379
   slots: (0 slots) slave
   replicates d6e2eca6b338b717923f64866bd31d42e52edc98
S: 9875b50925b4e4f29598e6072e5937f90df9fc71 10.0.0.58:6379
   slots: (0 slots) slave
   replicates d34da8666a6f587283a1c2fca5d13691407f9462
S: f9adcfb8f5a037b257af35fa548a26ffbadc852d 10.0.0.38:6379
   slots: (0 slots) slave
   replicates cb028b83f9dc463d732f6e76ca6bbcd469d948a7
M: d04e524daec4d8e22bdada7f21a9487c2d3e1057 10.0.0.48:6379
   slots:[6827-10922] (4096 slots) master
   1 additional replica(s)
S: 99720241248ff0e4c6fa65c2385e92468b3b5993 10.0.0.18:6379
   slots: (0 slots) slave
   replicates d04e524daec4d8e22bdada7f21a9487c2d3e1057
M: d34da8666a6f587283a1c2fca5d13691407f9462 10.0.0.28:6379
   slots:[12288-16383] (4096 slots) master
   1 additional replica(s)
[OK] All nodes agree about slots configuration.
>>> Check for open slots...
>>> Check slots coverage...
[OK] All 16384 slots covered.
[root@centos8 ~]#redis-cli -a 123456 -h 10.0.0.8 --no-auth-warning cluster info
cluster_state:ok
cluster_slots_assigned:16384
cluster_slots_ok:16384
cluster_slots_pfail:0
cluster_slots_fail:0
cluster_known_nodes:8   #8个节点
cluster_size:4          #4组主从
cluster_current_epoch:11
cluster_my_epoch:10
cluster_stats_messages_ping_sent:1810
cluster_stats_messages_pong_sent:1423
cluster_stats_messages_auth-req_sent:5
cluster_stats_messages_update_sent:14
cluster_stats_messages_sent:3252
cluster_stats_messages_ping_received:1417
cluster_stats_messages_pong_received:1368
cluster_stats_messages_meet_received:2
cluster_stats_messages_fail_received:2
cluster_stats_messages_auth-ack_received:2
cluster_stats_messages_update_received:4
cluster_stats_messages_received:2795
方法2:先将新节点加入集群,再修改为slave
为新的master添加slave节点
Redis 5 以上版本命令:
#把10.0.0.78:6379添加到集群中:
[root@redis-node1 ~]#redis-cli -a 123456 --cluster add-node 10.0.0.78:6379
10.0.0.8:6379

更改新节点更改状态为slave:
需要手动将其指定为某个master的slave,否则其默认角色为master。
[root@redis-node1 ~]#redis-cli -h 10.0.0.78 -p 6379 -a 123456 #登录到新添加节点
10.0.0.78:6380> CLUSTER NODES #查看当前集群节点,找到目标master 的ID
10.0.0.78:6380> CLUSTER REPLICATE 886338acd50c3015be68a760502b239f4509881c #将其设
置slave,命令格式为cluster replicate MASTERID
10.0.0.78:6380> CLUSTER NODES #再次查看集群节点状态,验证节点是否已经更改为指定master 的
slave
1.2.5.2 集群缩容
缩容适用场景:
随着业务萎缩用户量下降明显,和领导商量决定将现有Redis集群的8台主机中下线两台主机挪做它用,缩容
后性能仍能满足当前业务需求
删除节点过程:
扩容时是先添加node到集群,然后再分配槽位,而缩容时的操作相反,是先将被要删除的node上的槽位迁移到集群中的其他node上,然后 才能再将其从集群中删除,如果一个node上的槽位没有被完全迁移空,删除该node时也会提示有数据出错导致无法删除。
迁移要删除的master节点上面的槽位到其它master
注意: 被迁移Redis master源服务器必须保证没有数据,否则迁移报错并会被强制中断。
Redis 5版本以上命令–取之于民,还之于民(多出来的4096不能直接写,因为移动目标只能操作对象只能是一个,所以移3次每次移到不同对象,槽位为多出来4096\原主节点)
#查看当前状态
[root@redis-node1 ~]#redis-cli -a 123456 --cluster check 10.0.0.8:6379
Warning: Using a password with '-a' or '-u' option on the command line interface
may not be safe.
10.0.0.8:6379 (cb028b83...) -> 5019 keys | 4096 slots | 1 slaves.
10.0.0.68:6379 (d6e2eca6...) -> 4948 keys | 4096 slots | 1 slaves.
10.0.0.48:6379 (d04e524d...) -> 5033 keys | 4096 slots | 1 slaves.
10.0.0.28:6379 (d34da866...) -> 5000 keys | 4096 slots | 1 slaves.
[OK] 20000 keys in 4 masters.
1.22 keys per slot on average.
>>> Performing Cluster Check (using node 10.0.0.8:6379)
M: cb028b83f9dc463d732f6e76ca6bbcd469d948a7 10.0.0.8:6379
   slots:[1365-5460] (4096 slots) master
   1 additional replica(s)
M: d6e2eca6b338b717923f64866bd31d42e52edc98 10.0.0.68:6379
   slots:[0-1364],[5461-6826],[10923-12287] (4096 slots) master
   1 additional replica(s)
S: 36840d7eea5835ba540d9b64ec018aa3f8de6747 10.0.0.78:6379
   slots: (0 slots) slave
   replicates d6e2eca6b338b717923f64866bd31d42e52edc98
S: 9875b50925b4e4f29598e6072e5937f90df9fc71 10.0.0.58:6379
   slots: (0 slots) slave
   replicates d34da8666a6f587283a1c2fca5d13691407f9462
S: f9adcfb8f5a037b257af35fa548a26ffbadc852d 10.0.0.38:6379
   slots: (0 slots) slave
   replicates cb028b83f9dc463d732f6e76ca6bbcd469d948a7
M: d04e524daec4d8e22bdada7f21a9487c2d3e1057 10.0.0.48:6379
   slots:[6827-10922] (4096 slots) master
   1 additional replica(s)
S: 99720241248ff0e4c6fa65c2385e92468b3b5993 10.0.0.18:6379
   slots: (0 slots) slave
   replicates d04e524daec4d8e22bdada7f21a9487c2d3e1057
M: d34da8666a6f587283a1c2fca5d13691407f9462 10.0.0.28:6379
   slots:[12288-16383] (4096 slots) master
   1 additional replica(s)
[OK] All nodes agree about slots configuration.
>>> Check for open slots...
>>> Check slots coverage...
[OK] All 16384 slots covered.
#连接到任意集群节点,#最后1365个slot从10.0.0.8移动到第一个master节点10.0.0.28上
[root@redis-node1 ~]#redis-cli -a 123456 --cluster reshard 10.0.0.18:6379
Warning: Using a password with '-a' or '-u' option on the command line interface
may not be safe.
>>> Performing Cluster Check (using node 10.0.0.18:6379)
S: 99720241248ff0e4c6fa65c2385e92468b3b5993 10.0.0.18:6379
   slots: (0 slots) slave
   replicates d04e524daec4d8e22bdada7f21a9487c2d3e1057
S: f9adcfb8f5a037b257af35fa548a26ffbadc852d 10.0.0.38:6379
   slots: (0 slots) slave
   replicates cb028b83f9dc463d732f6e76ca6bbcd469d948a7
S: 36840d7eea5835ba540d9b64ec018aa3f8de6747 10.0.0.78:6379
   slots: (0 slots) slave
   replicates d6e2eca6b338b717923f64866bd31d42e52edc98
M: cb028b83f9dc463d732f6e76ca6bbcd469d948a7 10.0.0.8:6379
   slots:[1365-5460] (4096 slots) master
   1 additional replica(s)
M: d6e2eca6b338b717923f64866bd31d42e52edc98 10.0.0.68:6379
   slots:[0-1364],[5461-6826],[10923-12287] (4096 slots) master
   1 additional replica(s)
S: 9875b50925b4e4f29598e6072e5937f90df9fc71 10.0.0.58:6379
   slots: (0 slots) slave
   replicates d34da8666a6f587283a1c2fca5d13691407f9462
M: d04e524daec4d8e22bdada7f21a9487c2d3e1057 10.0.0.48:6379
   slots:[6827-10922] (4096 slots) master
   1 additional replica(s)
M: d34da8666a6f587283a1c2fca5d13691407f9462 10.0.0.28:6379
   slots:[12288-16383] (4096 slots) master
   1 additional replica(s)
[OK] All nodes agree about slots configuration.
>>> Check for open slots...
>>> Check slots coverage...
[OK] All 16384 slots covered.
How many slots do you want to move (from 1 to 16384)? 1356 #共4096/3分别给其它三个
master节点
What is the receiving node ID? d34da8666a6f587283a1c2fca5d13691407f9462 #master
10.0.0.28
Please enter all the source node IDs.
 Type 'all' to use all the nodes as source nodes for the hash slots.
 Type 'done' once you entered all the source nodes IDs.
Source node #1: cb028b83f9dc463d732f6e76ca6bbcd469d948a7 #输入要删除节点10.0.0.8的
ID
Source node #2: done
Ready to move 1356 slots.
 Source nodes:
   M: cb028b83f9dc463d732f6e76ca6bbcd469d948a7 10.0.0.8:6379
       slots:[1365-5460] (4096 slots) master
       1 additional replica(s)
 Destination node:
   M: d34da8666a6f587283a1c2fca5d13691407f9462 10.0.0.28:6379
       slots:[12288-16383] (4096 slots) master
       1 additional replica(s)
 Resharding plan:
   Moving slot 1365 from cb028b83f9dc463d732f6e76ca6bbcd469d948a7
......
 Moving slot 2719 from cb028b83f9dc463d732f6e76ca6bbcd469d948a7
   Moving slot 2720 from cb028b83f9dc463d732f6e76ca6bbcd469d948a7
Do you want to proceed with the proposed reshard plan (yes/no)? yes #确定
......
Moving slot 2718 from 10.0.0.8:6379 to 10.0.0.28:6379: ..
Moving slot 2719 from 10.0.0.8:6379 to 10.0.0.28:6379: .
Moving slot 2720 from 10.0.0.8:6379 to 10.0.0.28:6379: ..
#非交互式方式
#再将1365个slot从10.0.0.8移动到第二个master节点10.0.0.48上
[root@redis-node1 ~]#redis-cli -a 123456 --cluster reshard 10.0.0.18:6379 --
cluster-slots 1365 --cluster-from cb028b83f9dc463d732f6e76ca6bbcd469d948a7 --
cluster-to d04e524daec4d8e22bdada7f21a9487c2d3e1057 --cluster-yes
#最后的slot从10.0.0.8移动到第三个master节点10.0.0.68上
[root@redis-node1 ~]#redis-cli -a 123456 --cluster reshard 10.0.0.18:6379 --
cluster-slots 1375 --cluster-from cb028b83f9dc463d732f6e76ca6bbcd469d948a7 --
cluster-to d6e2eca6b338b717923f64866bd31d42e52edc98 --cluster-yes
#确认10.0.0.8的所有slot都移走了,上面的slave也自动删除,成为其它master的slave
[root@redis-node1 ~]#redis-cli -a 123456 --cluster check 10.0.0.8:6379
Warning: Using a password with '-a' or '-u' option on the command line interface
may not be safe.
10.0.0.8:6379 (cb028b83...) -> 0 keys | 0 slots | 0 slaves.
10.0.0.68:6379 (d6e2eca6...) -> 6631 keys | 5471 slots | 2 slaves.
10.0.0.48:6379 (d04e524d...) -> 6694 keys | 5461 slots | 1 slaves.
10.0.0.28:6379 (d34da866...) -> 6675 keys | 5452 slots | 1 slaves.
[OK] 20000 keys in 4 masters.
1.22 keys per slot on average.
>>> Performing Cluster Check (using node 10.0.0.8:6379)
M: cb028b83f9dc463d732f6e76ca6bbcd469d948a7 10.0.0.8:6379
   slots: (0 slots) master
M: d6e2eca6b338b717923f64866bd31d42e52edc98 10.0.0.68:6379
   slots:[0-1364],[4086-6826],[10923-12287] (5471 slots) master
   2 additional replica(s)
S: 36840d7eea5835ba540d9b64ec018aa3f8de6747 10.0.0.78:6379
   slots: (0 slots) slave
 replicates d6e2eca6b338b717923f64866bd31d42e52edc98
S: 9875b50925b4e4f29598e6072e5937f90df9fc71 10.0.0.58:6379
   slots: (0 slots) slave
   replicates d34da8666a6f587283a1c2fca5d13691407f9462
S: f9adcfb8f5a037b257af35fa548a26ffbadc852d 10.0.0.38:6379
   slots: (0 slots) slave
   replicates d6e2eca6b338b717923f64866bd31d42e52edc98
M: d04e524daec4d8e22bdada7f21a9487c2d3e1057 10.0.0.48:6379
   slots:[2721-4085],[6827-10922] (5461 slots) master
   1 additional replica(s)
S: 99720241248ff0e4c6fa65c2385e92468b3b5993 10.0.0.18:6379
   slots: (0 slots) slave
   replicates d04e524daec4d8e22bdada7f21a9487c2d3e1057
M: d34da8666a6f587283a1c2fca5d13691407f9462 10.0.0.28:6379
   slots:[1365-2720],[12288-16383] (5452 slots) master
   1 additional replica(s)
[OK] All nodes agree about slots configuration.
>>> Check for open slots...
>>> Check slots coverage...
[OK] All 16384 slots covered.
#原有的10.0.0.38自动成为10.0.0.68的slave
[root@redis-node1 ~]#redis-cli -a 123456 -h 10.0.0.68 INFO replication
Warning: Using a password with '-a' or '-u' option on the command line interface
may not be safe.
# Replication
role:master
connected_slaves:2
slave0:ip=10.0.0.78,port=6379,state=online,offset=129390,lag=0
slave1:ip=10.0.0.38,port=6379,state=online,offset=129390,lag=0
master_replid:43e3e107a0acb1fd5a97240fc4b2bd8fc85b113f
master_replid2:0000000000000000000000000000000000000000
master_repl_offset:129404
second_repl_offset:-1
repl_backlog_active:1
repl_backlog_size:1048576
repl_backlog_first_byte_offset:1
repl_backlog_histlen:129404
[root@centos8 ~]#redis-cli -a 123456 -h 10.0.0.8 --no-auth-warning cluster info
cluster_state:ok
cluster_slots_assigned:16384
cluster_slots_ok:16384
cluster_slots_pfail:0
cluster_slots_fail:0
cluster_known_nodes:8  #集群中8个节点
cluster_size:3         #少了一个主从的slot
cluster_current_epoch:16
cluster_my_epoch:13
cluster_stats_messages_ping_sent:3165
cluster_stats_messages_pong_sent:2489
cluster_stats_messages_fail_sent:6
cluster_stats_messages_auth-req_sent:5
cluster_stats_messages_auth-ack_sent:1
cluster_stats_messages_update_sent:27
cluster_stats_messages_sent:5693
cluster_stats_messages_ping_received:2483
cluster_stats_messages_pong_received:2400
cluster_stats_messages_meet_received:2
cluster_stats_messages_fail_received:2
cluster_stats_messages_auth-req_received:1
cluster_stats_messages_auth-ack_received:2
cluster_stats_messages_update_received:4
cluster_stats_messages_received:4894
从集群中删除服务器
上面步骤完成后,槽位已经迁移走,但是节点仍然还属于集群成员,因此还需从集群删除该节点
注意: 删除服务器前,必须清除主机上面的槽位,否则会删除主机失败
Redis 5以上版本命令:
[root@redis-node1 ~]#redis-cli -a 123456 --cluster del-node <任意集群节点的IP>:6379
cb028b83f9dc463d732f6e76ca6bbcd469d948a7
#cb028b83f9dc463d732f6e76ca6bbcd469d948a7是删除节点的ID
Warning: Using a password with '-a' or '-u' option on the command line interface
may not be safe.
>>> Removing node cb028b83f9dc463d732f6e76ca6bbcd469d948a7 from cluster
10.0.0.8:6379
>>> Sending CLUSTER FORGET messages to the cluster...
>>> SHUTDOWN the node.
#删除节点后,redis进程自动关闭
#删除节点信息
[root@redis-node1 ~]#rm -f /var/lib/redis/nodes-6379.conf
删除多余的slave节点验证结果
#验证删除成功
[root@redis-node1 ~]#ss -ntl
State       Recv-Q       Send-Q   Local Address:Port     Peer Address:Port

LISTEN       0             128            0.0.0.0:22             0.0.0.0:*

LISTEN       0             128               [::]:22               [::]:*
[root@redis-node1 ~]#redis-cli -a 123456 --cluster check 10.0.0.18:6379
Warning: Using a password with '-a' or '-u' option on the command line interface
may not be safe.
10.0.0.68:6379 (d6e2eca6...) -> 6631 keys | 5471 slots | 2 slaves.
10.0.0.48:6379 (d04e524d...) -> 6694 keys | 5461 slots | 1 slaves.
10.0.0.28:6379 (d34da866...) -> 6675 keys | 5452 slots | 1 slaves.
[OK] 20000 keys in 3 masters.
1.22 keys per slot on average.
>>> Performing Cluster Check (using node 10.0.0.18:6379)
S: 99720241248ff0e4c6fa65c2385e92468b3b5993 10.0.0.18:6379
   slots: (0 slots) slave
   replicates d04e524daec4d8e22bdada7f21a9487c2d3e1057
S: f9adcfb8f5a037b257af35fa548a26ffbadc852d 10.0.0.38:6379
   slots: (0 slots) slave
   replicates d6e2eca6b338b717923f64866bd31d42e52edc98
S: 36840d7eea5835ba540d9b64ec018aa3f8de6747 10.0.0.78:6379
   slots: (0 slots) slave
   replicates d6e2eca6b338b717923f64866bd31d42e52edc98
M: d6e2eca6b338b717923f64866bd31d42e52edc98 10.0.0.68:6379
   slots:[0-1364],[4086-6826],[10923-12287] (5471 slots) master
   2 additional replica(s)
S: 9875b50925b4e4f29598e6072e5937f90df9fc71 10.0.0.58:6379
   slots: (0 slots) slave
   replicates d34da8666a6f587283a1c2fca5d13691407f9462
M: d04e524daec4d8e22bdada7f21a9487c2d3e1057 10.0.0.48:6379
   slots:[2721-4085],[6827-10922] (5461 slots) master
   1 additional replica(s)
M: d34da8666a6f587283a1c2fca5d13691407f9462 10.0.0.28:6379
   slots:[1365-2720],[12288-16383] (5452 slots) master
   1 additional replica(s)
[OK] All nodes agree about slots configuration.
>>> Check for open slots...
>>> Check slots coverage...
[OK] All 16384 slots covered.
#删除多余的slave从节点
[root@redis-node1 ~]#redis-cli -a 123456 --cluster del-node 10.0.0.18:6379
f9adcfb8f5a037b257af35fa548a26ffbadc852d
Warning: Using a password with '-a' or '-u' option on the command line interface
may not be safe.
>>> Removing node f9adcfb8f5a037b257af35fa548a26ffbadc852d from cluster
10.0.0.18:6379
>>> Sending CLUSTER FORGET messages to the cluster...
>>> SHUTDOWN the node.
#删除集群文件
[root@redis-node4 ~]#rm -f /var/lib/redis/nodes-6379.conf
[root@redis-node1 ~]#redis-cli -a 123456 --cluster check 10.0.0.18:6379
Warning: Using a password with '-a' or '-u' option on the command line interface
may not be safe.
10.0.0.68:6379 (d6e2eca6...) -> 6631 keys | 5471 slots | 1 slaves.
10.0.0.48:6379 (d04e524d...) -> 6694 keys | 5461 slots | 1 slaves.
10.0.0.28:6379 (d34da866...) -> 6675 keys | 5452 slots | 1 slaves.
[OK] 20000 keys in 3 masters.
1.22 keys per slot on average.
>>> Performing Cluster Check (using node 10.0.0.18:6379)
S: 99720241248ff0e4c6fa65c2385e92468b3b5993 10.0.0.18:6379
   slots: (0 slots) slave
   replicates d04e524daec4d8e22bdada7f21a9487c2d3e1057
S: 36840d7eea5835ba540d9b64ec018aa3f8de6747 10.0.0.78:6379
   slots: (0 slots) slave
   replicates d6e2eca6b338b717923f64866bd31d42e52edc98
M: d6e2eca6b338b717923f64866bd31d42e52edc98 10.0.0.68:6379
 slots:[0-1364],[4086-6826],[10923-12287] (5471 slots) master
   1 additional replica(s)
S: 9875b50925b4e4f29598e6072e5937f90df9fc71 10.0.0.58:6379
   slots: (0 slots) slave
   replicates d34da8666a6f587283a1c2fca5d13691407f9462
M: d04e524daec4d8e22bdada7f21a9487c2d3e1057 10.0.0.48:6379
   slots:[2721-4085],[6827-10922] (5461 slots) master
   1 additional replica(s)
M: d34da8666a6f587283a1c2fca5d13691407f9462 10.0.0.28:6379
   slots:[1365-2720],[12288-16383] (5452 slots) master
   1 additional replica(s)
[OK] All nodes agree about slots configuration.
>>> Check for open slots...
>>> Check slots coverage...
[OK] All 16384 slots covered.
[root@redis-node1 ~]#redis-cli -a 123456 --cluster info 10.0.0.18:6379
Warning: Using a password with '-a' or '-u' option on the command line interface
may not be safe.
10.0.0.68:6379 (d6e2eca6...) -> 6631 keys | 5471 slots | 1 slaves.
10.0.0.48:6379 (d04e524d...) -> 6694 keys | 5461 slots | 1 slaves.
10.0.0.28:6379 (d34da866...) -> 6675 keys | 5452 slots | 1 slaves.
[OK] 20000 keys in 3 masters.
1.22 keys per slot on average.
#查看集群信息
[root@redis-node1 ~]#redis-cli -a 123456 -h 10.0.0.18 CLUSTER INFO
Warning: Using a password with '-a' or '-u' option on the command line interface
may not be safe.
cluster_state:ok
cluster_slots_assigned:16384
cluster_slots_ok:16384
cluster_slots_pfail:0
cluster_slots_fail:0
cluster_known_nodes:6  #只有6个节点
cluster_size:3
cluster_current_epoch:11
cluster_my_epoch:10
cluster_stats_messages_ping_sent:12147
cluster_stats_messages_pong_sent:12274
cluster_stats_messages_update_sent:14
cluster_stats_messages_sent:24435
cluster_stats_messages_ping_received:12271
cluster_stats_messages_pong_received:12147
cluster_stats_messages_meet_received:3
cluster_stats_messages_update_received:28
cluster_stats_messages_received:24449
1.2.5.3 集群偏斜
redis cluster 多个节点运行一段时间后,可能会出现倾斜现象,某个节点数据偏多,内存消耗更大,或者接受
用户请求访问更多
发生倾斜的原因可能如下:
- 节点和槽分配不均
- 不同槽对应键值数量差异较大
- 包含bigkey,建议少用
- 内存相关配置不一致
- 热点数据不均衡 : 一致性不高时,可以使用本缓存和MQ
获取指定槽位中对应键key值的个数
#redis-cli cluster countkeysinslot {slot的值}
范例: 获取指定slot对应的key个数
[root@centos8 ~]#redis-cli -a 123456 cluster countkeysinslot 1
(integer) 0
[root@centos8 ~]#redis-cli -a 123456 cluster countkeysinslot 2
(integer) 0
[root@centos8 ~]#redis-cli -a 123456 cluster countkeysinslot 3
(integer) 1
执行自动的槽位重新平衡分布,但会影响客户端的访问,此方法慎用
[root@centos8 ~]#redis-cli -a 123456 --cluster rebalance 10.0.0.8:6379
>>> Performing Cluster Check (using node 10.0.0.8:6379)
[OK] All nodes agree about slots configuration.
>>> Check for open slots...
>>> Check slots coverage...
[OK] All 16384 slots covered.
*** No rebalancing needed! All nodes are within the 2.00% threshold.
获取bigkey ,建议在slave节点执行
#redis-cli --bigkeys
范例: 查找 bigkey
[root@centos8 ~]#redis-cli -a 123456 --bigkeys
# Scanning the entire keyspace to find biggest keys as well as
# average sizes per key type. You can use -i 0.1 to sleep 0.1 sec
# per 100 SCAN commands (not usually needed).
[00.00%] Biggest string found so far 'key8811' with 9 bytes
[26.42%] Biggest string found so far 'testkey1' with 10 bytes
-------- summary -------
Sampled 3335 keys in the keyspace!
Total key length in bytes is 22979 (avg len 6.89)
Biggest string found 'testkey1' has 10 bytes
3335 strings with 29649 bytes (100.00% of keys, avg size 8.89)
0 lists with 0 items (00.00% of keys, avg size 0.00)
0 sets with 0 members (00.00% of keys, avg size 0.00)
0 hashs with 0 fields (00.00% of keys, avg size 0.00)
0 zsets with 0 members (00.00% of keys, avg size 0.00)
0 streams with 0 entries (00.00% of keys, avg size 0.00)
1.2.5.4 Redis cluster 的局限性
在集群模式下的从节点是只读连接的,也就是说集群模式中的从节点是拒绝任何读写请求的。当有命令
尝试从slave节点获取数据时,slave节点会重定向命令到负责该数据所在槽的节点。
为什么说是只读连接呢?因为slave可以执行命令:readonly,这样从节点就能读取请求,但是这只是在
这次连接中生效。也就是说,当客户端断开连接重启后,再次请求又变成重定向了。
集群模式下的读写分离更加复杂,需要维护不同主节点的从节点和对于槽的关系。
通常是不建议在集群模式下构建读写分离,而是添加节点来解决需求。不过考虑到节点之间信息交流带
来的带宽问题,官方建议节点数不超过1000个。
1.2.5.5 单机,哨兵和集群的选择
- 大多数时客户端性能会”降低”
- 命令无法跨节点使用:mget、keys、scan、flush、sinter等
- 客户端维护更复杂:SDK和应用本身消耗(例如更多的连接池)
- 不支持多个数据库︰集群模式下只有一个db 0
- 复制只支持一层∶不支持树形复制结构,不支持级联复制
- Key事务和Lua支持有限∶操作的key必须在一个节点,Lua和事务无法跨节点使用
所以集群搭建还要考虑单机redis是否已经不能满足业务的并发量,在redis sentinel同样能够满足高可 用,且并发并未饱和的前提下,搭建集群反而是画蛇添足了。
范例: 跨slot的局限性
[root@centos8 ~]#redis-cli -a 123456 mget key1 key2 key3
Warning: Using a password with '-a' or '-u' option on the command line interface
may not be safe.
(error) CROSSSLOT Keys in request don't hash to the same slot
二. LVS常用模型工作原理,及实现。
2.1 LVS工作原理
LVS根据请求报文的目标IP和目标协议及端口将其调度转发至某RS,根据调度算法来挑选RS。LVS是内核
级功能,工作在INPUT链的位置,将发往INPUT的流量进行“处理”
范例:查看内核支持LVS
[root@centos8 ~]#grep -i -C 10 ipvs /boot/config-4.18.0-147.el8.x86_64
...(省略部分内容)...
CONFIG_NETFILTER_XT_MATCH_IPVS=m
CONFIG_NETFILTER_XT_MATCH_POLICY=m
...(省略部分内容)...
#
# IPVS transport protocol load balancing support
#
CONFIG_IP_VS_PROTO_TCP=y
CONFIG_IP_VS_PROTO_UDP=y
CONFIG_IP_VS_PROTO_AH_ESP=y
CONFIG_IP_VS_PROTO_ESP=y
CONFIG_IP_VS_PROTO_AH=y
CONFIG_IP_VS_PROTO_SCTP=y
#
# IPVS scheduler
#
CONFIG_IP_VS_RR=m
CONFIG_IP_VS_WRR=m
CONFIG_IP_VS_LC=m
CONFIG_IP_VS_WLC=m
CONFIG_IP_VS_FO=m  #新增
CONFIG_IP_VS_OVF=m  #新增
CONFIG_IP_VS_LBLC=m
CONFIG_IP_VS_LBLCR=m
CONFIG_IP_VS_DH=m
CONFIG_IP_VS_SH=m
# CONFIG_IP_VS_MH is not set
CONFIG_IP_VS_SED=m
CONFIG_IP_VS_NQ=m
...(省略部分内容)...
2.2 LVS集群类型中的术语
VS:Virtual Server,Director Server(DS), Dispatcher(调度器),Load Balancer
RS:Real Server(lvs), upstream server(nginx), backend server(haproxy)
CIP:Client IP
VIP:Virtual serve IP VS外网的IP
DIP:Director IP VS内网的IP
RIP:Real server IP
访问流程:CIP <–> VIP == DIP <–> RIP
2.3 LVS集群的工作模式
2.3.1 LVS的NAT模式
lvs-nat:修改请求报文的目标IP,多目标IP的DNAT
lvs-dr:操纵封装新的MAC地址
lvs-tun:在原请求IP报文之外新加一个IP首部
lvs-fullnat:修改请求报文的源和目标IP,默认内核不支持
LVS的NAT模式
(其实dnat原来也有多目标的功能,但是他们都是基于netfilter内核功能实现的,只不过lvs做的更好)
dnat没有多目标功能只能设一个
优点:支持端口映射
缺点:后端服务器多ds压力越来越大
官方链接
http://www.linuxvirtualserver.org/VS-NAT.html
lvs-nat:本质是多目标IP的DNAT,通过将请求报文中的目标地址和目标端口修改为某挑出的RS的RIP和PORT实现转发
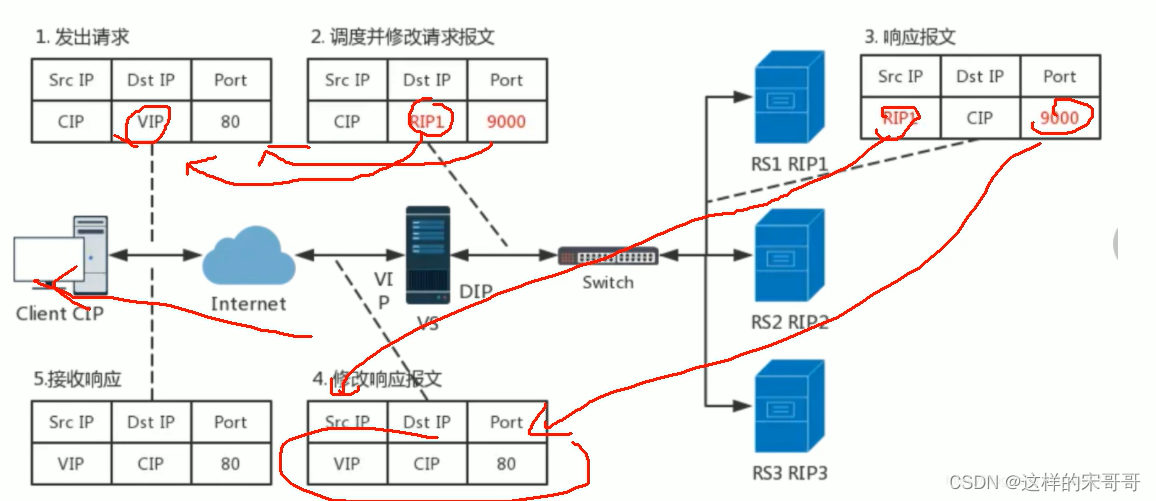
到达input链的时候lvs模块劫持了用户的请求,回来经过forward
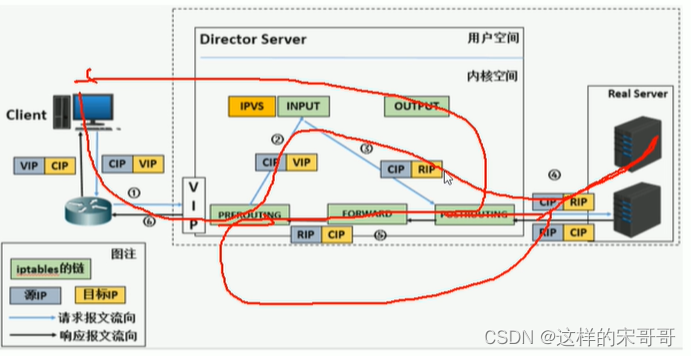
2.3.2 LVS的DR模式
官方链接
http://www.linuxvirtualserver.org/VS-DRouting.html
例子:我想跟张三说话结果李四回答我了,可以让李四冒充张三(最大的问题一个地址vip不能配载多个机器上)
LVS-DR:Direct Routing,直接路由,LVS默认模式,应用最广泛,通过为请求报文重新封装一个MAC首部进行转发,源MAC是DIP所在的接口的MAC,目标MAC是某挑选出的RS的RIP所在接口的MAC地址;源IP/PORT,以及目标IP/PORT均保持不变
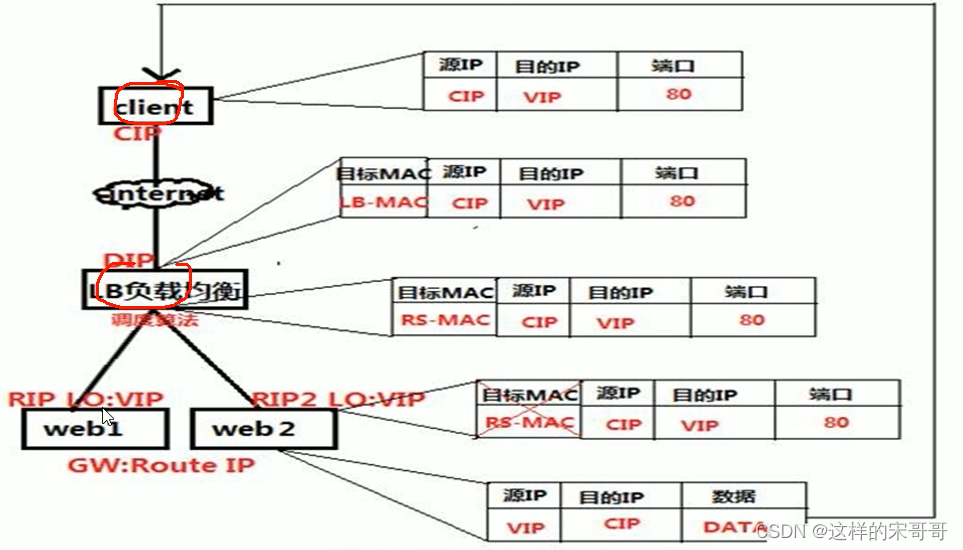
rs虽然配了vip但是不能让路由器知道否则他会转到ds
DR模式的特点:
- Director和各RS都配置有VIP
- 确保前端路由器将目标IP为VIP的请求报文发往Director
- 在前端网关做静态绑定VIP和Director的MAC地址
- 在RS上使用arptables工具
arptables -A IN -d $VIP -j DROP
arptables -A OUT -s $VIP -j mangle --mangle-ip-s $RIP
- 在RS上修改内核参数以限制arp通告及应答级别
例子:假如家里有很多钱,你怕别人惦记你,问你的时候你就不理他
/proc/sys/net/ipv4/conf/all/arp_ignore #我不说话,我不理你
#免费arp当网卡启动的时候会主动向外发出一个消息,我拥有这个地址
/proc/sys/net/ipv4/conf/all/arp_announce
#别人问你,我不主动理你,我也不主动往说,这样谁也不知道你永远这个地址了
- RS的RIP可以使用私网地址,也可以是公网地址;RIP与DIP在同一IP网络;RIP的网关不能指向
DIP,以确保响应报文不会经由Director - RS和Director要在同一个物理网络(ds不知道rs的mac地址,但是知道rs的ip,arp靠广播完成,路由器会隔离广播的,中间是不能加路由器)
- 请求报文要经由Director,但响应报文不经由Director,而由RS直接发往Client
- 不支持端口映射(端口不能修改)
- 无需开启 ip_forward
- RS可使用大多数OS系统
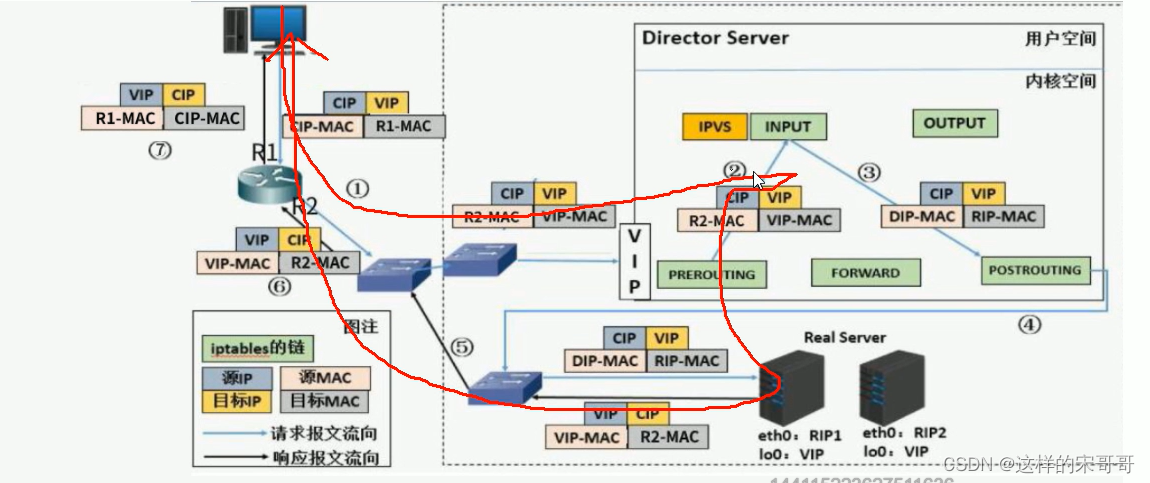
2.3.3 LVS的TUN模式
中间可以放路由器
官方链接
http://www.linuxvirtualserver.org/VS-IPTunneling.html
转发方式:不修改请求报文的IP首部(源IP为CIP,目标IP为VIP),而在原IP报文之外再封装一个IP首部
(源IP是DIP,目标IP是RIP),将报文发往挑选出的目标RS;RS直接响应给客户端(源IP是VIP,目标IP是CIP)

例子:openvpn ,客户端公网ip103,vpn内网ip10.8.0.5,后端172.16.x.x
发过来源地址从10.8.0.5发,目标172,这是他原来报文由于后端是私网地址发不过去。
在报文头加个公网地址,这样经过路由器就能到达后端然后再把他拆了,看见172就进来了
除了加头还要加密
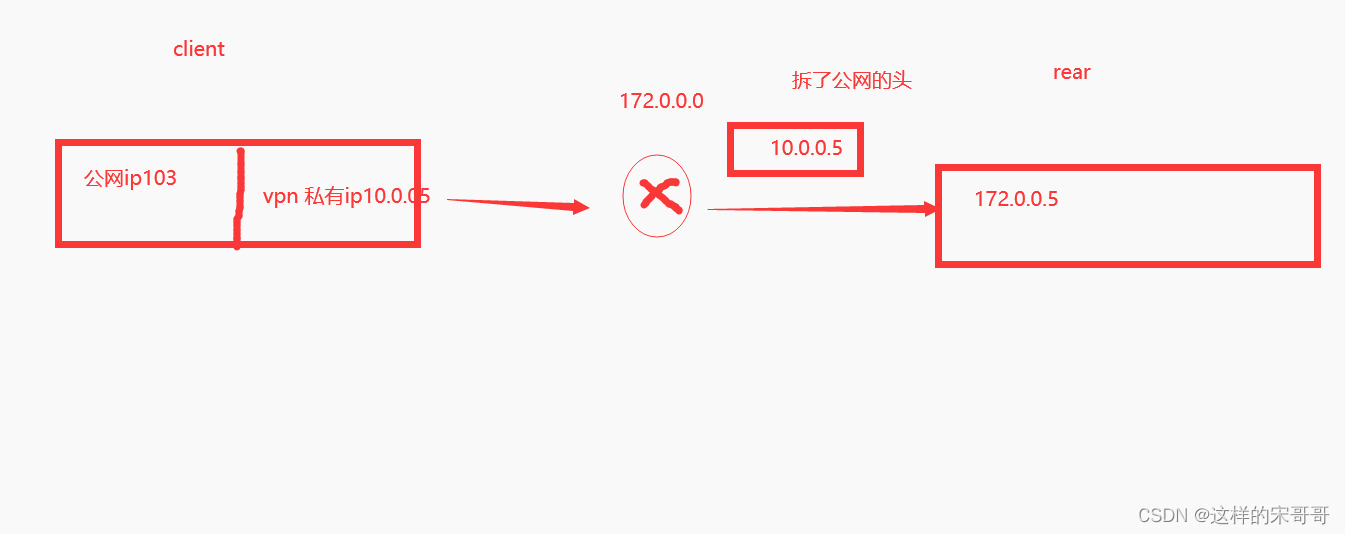
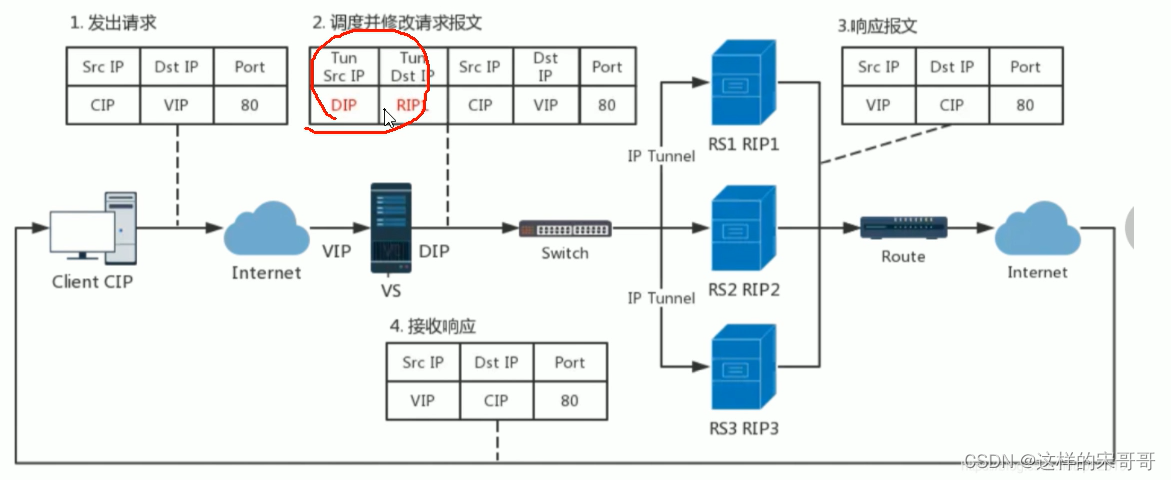
TUN模式特点:
- RIP和DIP可以不处于同一物理网络中,RS的网关一般不能指向DIP,且RIP可以和公网通信。也就是
说集群节点可以跨互联网实现。DIP, VIP, RIP可以是公网地址 - RealServer的tun接口上需要配置VIP地址,以便接收director转发过来的数据包,以及作为响应的
报文源IP - Director转发给RealServer时需要借助隧道,隧道外层的IP头部的源IP是DIP,目标IP是RIP,而
RealServer响应给客户端的IP头部是根据隧道内层的IP头分析得到的,源IP是VIP,目标IP是CIP - 请求报文要经由Director,但响应不经由Director,响应由RealServer自己完成
- 不支持端口映射
- RS的OS须支持隧道功能
应用场景:
一般来说,TUN模式常会用来负载调度缓存服务器组,这些缓存服务器一般放置在不同的网络环境,可以就近折返给客户端。在请求对象不在Cache服务器本地命中的情况下,Cache服务器要向源服务器发送请求,将结果取回,最后将结果返回给用户。
LAN环境一般多采用DR模式,WAN环境虽然可以用TUN模式,但是一般在WAN环境下,请求转发更多的被haproxy/nginx/DNS等实现。因此,TUN模式实际应用的很少,跨机房的应用一般专线光纤连接或DNS调度
2.3.4 LVS的FULLNAT模式
类似于nat,但是nat只改目标ip、源ip不改,要求原路返回但是不能确保原路返回,就会导致网络通讯失败。
好处rs看不到客户端发送的真实的ip地址,它认为是ds发过来的请求,保证回去包原路返回
例如在云服务器上有自己的网关,走网关导致走网关不原路返回,避免这样的事情发生阿里二次开发了fullant。
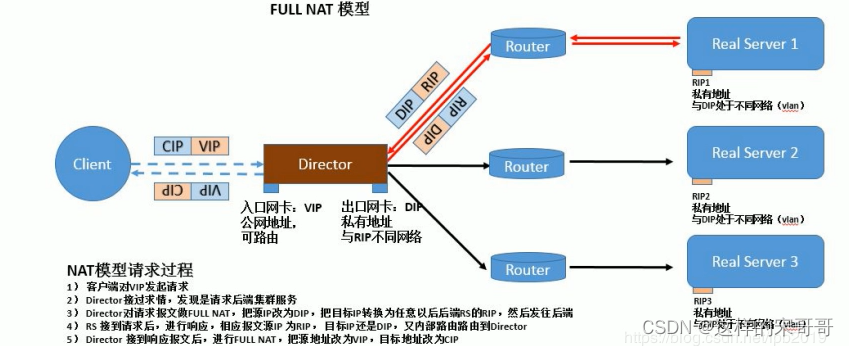
通过同时修改请求报文的源IP地址和目标IP地址进行转发(必须原路返回,DNAT中间加了路由器有可能不是原路返回)
CIP --> DIP
VIP --> RIP
fullnat模式特点:
- VIP是公网地址,RIP和DIP是私网地址,且通常不在同一IP网络;因此,RIP的网关一般不会指向
DIP - RS收到的请求报文源地址是DIP,因此,只需响应给DIP;但Director还要将其发往Client
- 请求和响应报文都经由Director
- 相对NAT模式,可以更好的实现LVS-RealServer间跨VLAN通讯
- 支持端口映射
注意:此类型kernel默认不支持
2.3.6 LVS工作模式总结和比较
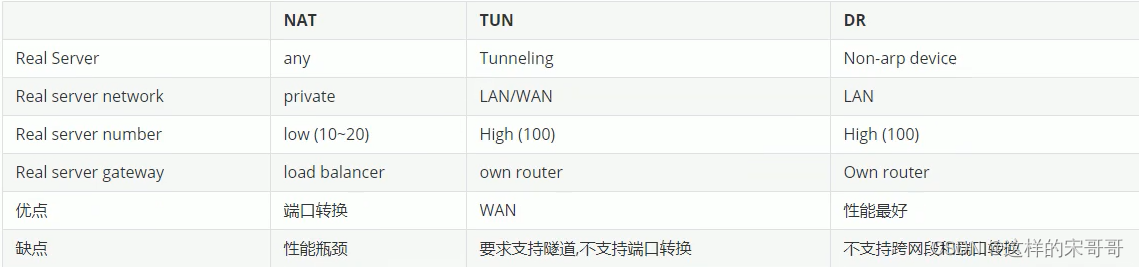
lvs-nat与lvs-fullnat:
- 请求和响应报文都经由Director
- lvs-nat:RIP的网关要指向DIP
- lvs-fullnat:RIP和DIP未必在同一IP网络,但要能通信
lvs-dr与lvs-tun: - 请求报文要经由Director,但响应报文由RS直接发往Client
- lvs-dr:通过封装新的MAC首部实现,通过MAC网络转发
- lvs-tun:通过在原IP报文外封装新IP头实现转发,支持远距离通信
2.3.5 LVS-DR模式单网段案例
LVS-DR模式单网段案例
DR模型中各主机上均需要配置VIP,解决地址冲突的方式有三种:
(1) 在前端网关做静态绑定
(2) 在各RS使用arptables
(3) 在各RS修改内核参数,来限制arp响应和通告的级别
限制响应级别:arp_ignore
- 0:默认值,表示可使用本地任意接口上配置的任意地址进行响应
- 1:仅在请求的目标IP配置在本地主机的接收到请求报文的接口上时,才给予响应
限制通告级别:arp_announce - 0:默认值,把本机所有接口的所有信息向每个接口的网络进行通告
- 1:尽量避免将接口信息向非直接连接网络进行通告
- 2:必须避免将接口信息向非本网络进行通告
配置要点
- Director 服务器采用双IP桥接网络,一个是VIP,一个DIP
- Web服务器采用和DIP相同的网段和Director连接
- 每个Web服务器配置VIP
- 每个web服务器可以出外网
范例:
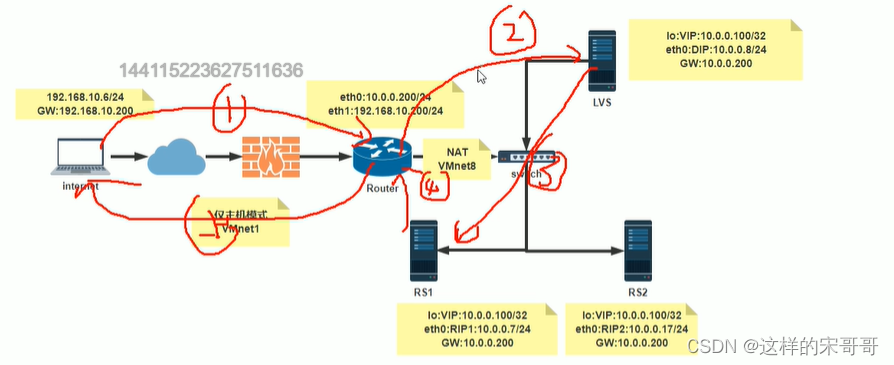
环境:五台主机
一台:客户端 eth0:仅主机 192.168.10.6/24 GW:192.168.10.200
一台:ROUTER
eth0 :NAT 10.0.0.200/24
eth1: 仅主机 192.168.10.200/24
启用 IP_FORWARD
一台:LVS
eth0:NAT:DIP:10.0.0.8/24 GW:10.0.0.200
两台RS:
RS1:eth0:NAT:10.0.0.7/24 GW:10.0.0.200
RS2:eth0:NAT:10.0.0.17/24 GW:10.0.0.200
2.3.5.1 LVS的网络配置
#所有主机禁用iptables和SELinux
#internet主机环境
[root@internet ~]#hostname
internet
[root@internet ~]#hostname -I
192.168.10.6
[root@internet ~]#route -n
Kernel IP routing table
Destination     Gateway         Genmask         Flags Metric Ref   Use Iface
192.168.10.0     0.0.0.0         255.255.255.0   U     1      0        0 eth0
0.0.0.0         192.168.10.200   0.0.0.0         UG    0      0        0 eth0
[root@internet ~]#ping 10.0.0.7 -c1
PING 10.0.0.7 (10.0.0.7) 56(84) bytes of data.
64 bytes from 10.0.0.7: icmp_seq=1 ttl=63 time=0.565 ms
[root@internet ~]#ping 10.0.0.17 -c1
PING 10.0.0.7 (10.0.0.17) 56(84) bytes of data.
64 bytes from 10.0.0.17: icmp_seq=1 ttl=63 time=0.565 ms
################################################################################
######
#路由器的网络配置
[root@router ~]#echo 'net.ipv4.ip_forward=1' >> /etc/sysctl.conf
[root@router ~]#sysctl -p
[root@router network-scripts]#pwd
/etc/sysconfig/network-scripts
[root@router network-scripts]#cat ifcfg-eth0
DEVICE=eth0
NAME=eth0
BOOTPROTO=static
IPADDR=10.0.0.200
PREFIX=24
ONBOOT=yes
[root@router network-scripts]#cat ifcfg-eth1
DEVICE=eth1
NAME=eth1
BOOTPROTO=static
IPADDR=192.168.10.200
PREFIX=24
ONBOOT=yes
################################################################################
######
#RS1的网络配置
[root@rs1 ~]#hostname
rs1.magedu.org
[root@rs1 ~]#hostname -I
10.0.0.7
[root@rs1 ~]#cat /etc/sysconfig/network-scripts/ifcfg-eth0
DEVICE=eth0
NAME=eth0
BOOTPROTO=static
IPADDR=10.0.0.7
PREFIX=24
GATEWAY=10.0.0.200
ONBOOT=yes
[root@rs1 ~]#route -n
Kernel IP routing table
Destination     Gateway         Genmask         Flags Metric Ref   Use Iface
0.0.0.0         10.0.0.200      0.0.0.0         UG    100    0        0 eth0
10.0.0.0        0.0.0.0         255.255.255.0   U     100    0        0 eth0
[root@rs1 ~]#yum -y install httpd
[root@rs1 ~]#systemctl enable --now httpd
[root@rs1 ~]#hostname -I > /var/www/html/index.html
[root@rs1 ~]#ping 192.168.10.6 -c1
PING 192.168.10.6 (192.168.10.6) 56(84) bytes of data.
64 bytes from 192.168.10.6: icmp_seq=1 ttl=63 time=1.14 ms
[root@rs1 ~]#curl 10.0.0.7
10.0.0.7
################################################################################
######
#RS2 的网络配置
[root@rs2 ~]#cat /etc/sysconfig/network-scripts/ifcfg-eth0
DEVICE=eth0
NAME=eth0
BOOTPROTO=static
IPADDR=10.0.0.17
PREFIX=24
GATEWAY=10.0.0.200
ONBOOT=yes
[root@rs2 ~]#route -n
Kernel IP routing table
Destination     Gateway         Genmask         Flags Metric Ref   Use Iface
0.0.0.0         10.0.0.200      0.0.0.0         UG    100    0        0 eth0
10.0.0.0        0.0.0.0         255.255.255.0   U     100    0        0 eth0
[root@rs2 ~]#yum -y install httpd
[root@rs2 ~]#systemctl enable --now httpd
[root@rs2 ~]#hostname -I > /var/www/html/index.html
[root@rs2 ~]#curl 10.0.0.17
10.0.0.17
[root@rs1 ~]#ping 192.168.10.6 -c1
PING 192.168.10.6 (192.168.10.6) 56(84) bytes of data.
64 bytes from 192.168.10.6: icmp_seq=1 ttl=63 time=1.14 ms
[root@rs2 ~]#curl 10.0.0.17
10.0.0.17
################################################################################
######
#LVS的网络配置
[root@lvs ~]#hostname
lvs.magedu.org
[root@lvs ~]#hostname -I
10.0.0.8
[root@lvs ~]#cat /etc/sysconfig/network-scripts/ifcfg-eth0
DEVICE=eth0
NAME=eth0
BOOTPROTO=static
IPADDR=10.0.0.8
PREFIX=24
GATEWAY=10.0.0.200
ONBOOT=yes
[root@lvs ~]#route -n
Kernel IP routing table
Destination     Gateway         Genmask         Flags Metric Ref   Use Iface
0.0.0.0         10.0.0.200      0.0.0.0         UG    100    0        0 eth0
10.0.0.0        0.0.0.0         255.255.255.0   U     100    0        0 eth0
[root@lvs ~]#ping 192.168.10.6 -c1
PING 192.168.10.6 (192.168.10.6) 56(84) bytes of data.
64 bytes from 192.168.10.6: icmp_seq=1 ttl=63 time=2.32 ms
2.3.5.2 后端RS的IPVS配置
#RS1的IPVS配置
[root@rs1 ~]#echo 1 >   /proc/sys/net/ipv4/conf/all/arp_ignore
[root@rs1 ~]#echo 2 >   /proc/sys/net/ipv4/conf/all/arp_announce
[root@rs1 ~]#echo 1 >   /proc/sys/net/ipv4/conf/lo/arp_ignore
[root@rs1 ~]#echo 2 >   /proc/sys/net/ipv4/conf/lo/arp_announce
[root@rs1 ~]#ifconfig lo:1 10.0.0.100/32
[root@rs1 ~]#ip a
1: lo: <LOOPBACK,UP,LOWER_UP> mtu 65536 qdisc noqueue state UNKNOWN group
default qlen 1000
   link/loopback 00:00:00:00:00:00 brd 00:00:00:00:00:00
   inet 127.0.0.1/8 scope host lo
       valid_lft forever preferred_lft forever
   inet 10.0.0.100/0 scope global lo:1
       valid_lft forever preferred_lft forever
   inet6 ::1/128 scope host
       valid_lft forever preferred_lft forever
2: eth0: <BROADCAST,MULTICAST,UP,LOWER_UP> mtu 1500 qdisc pfifo_fast state UP
group default qlen 1000
   link/ether 00:0c:29:01:f9:48 brd ff:ff:ff:ff:ff:ff
   inet 10.0.0.7/24 brd 10.0.0.255 scope global noprefixroute eth0
       valid_lft forever preferred_lft forever
   inet6 fe80::20c:29ff:fe01:f948/64 scope link
       valid_lft forever preferred_lft forever

#RS2的IPVS配置
[root@rs2 ~]#echo 1 >   /proc/sys/net/ipv4/conf/all/arp_ignore
[root@rs2 ~]#echo 1 >   /proc/sys/net/ipv4/conf/lo/arp_ignore
[root@rs2 ~]#echo 2 >   /proc/sys/net/ipv4/conf/all/arp_announce
[root@rs2 ~]#echo 2 >   /proc/sys/net/ipv4/conf/lo/arp_announce
[root@rs2 ~]#ifconfig lo:1 10.0.0.100/32
[root@rs2 ~]#ip a
1: lo: <LOOPBACK,UP,LOWER_UP> mtu 65536 qdisc noqueue state UNKNOWN group
default qlen 1000
   link/loopback 00:00:00:00:00:00 brd 00:00:00:00:00:00
   inet 127.0.0.1/8 scope host lo
       valid_lft forever preferred_lft forever
   inet 10.0.0.100/0 scope global lo:1
       valid_lft forever preferred_lft forever
   inet6 ::1/128 scope host
       valid_lft forever preferred_lft forever
2: eth0: <BROADCAST,MULTICAST,UP,LOWER_UP> mtu 1500 qdisc pfifo_fast state UP
group default qlen 1000
   link/ether 00:0c:29:94:1a:f6 brd ff:ff:ff:ff:ff:ff
   inet 10.0.0.17/24 brd 10.0.0.255 scope global noprefixroute eth0
       valid_lft forever preferred_lft forever
   inet6 fe80::20c:29ff:fe94:1af6/64 scope link
       valid_lft forever preferred_lft forever
2.3.5.3 LVS主机的配置
#在LVS上添加VIP
[root@lvs ~]#ifconfig lo:1 10.0.0.100/32
[root@lvs ~]#ip a
1: lo: <LOOPBACK,UP,LOWER_UP> mtu 65536 qdisc noqueue state UNKNOWN group
default qlen 1000
   link/loopback 00:00:00:00:00:00 brd 00:00:00:00:00:00
   inet 127.0.0.1/8 scope host lo
       valid_lft forever preferred_lft forever
   inet 10.0.0.100/0 scope global lo:1
       valid_lft forever preferred_lft forever
   inet6 ::1/128 scope host
       valid_lft forever preferred_lft forever
2: eth0: <BROADCAST,MULTICAST,UP,LOWER_UP> mtu 1500 qdisc fq_codel state UP
group default qlen 1000
   link/ether 00:0c:29:8a:51:21 brd ff:ff:ff:ff:ff:ff
   inet 10.0.0.8/24 brd 10.0.0.255 scope global noprefixroute eth0
       valid_lft forever preferred_lft forever
#实现LVS 规则
[root@lvs ~]#dnf -y install ipvsadm
[root@lvs ~]#ipvsadm -A -t 10.0.0.100:80 -s rr
[root@lvs ~]#ipvsadm -a -t 10.0.0.100:80 -r 10.0.0.7:80 -g
[root@lvs ~]#ipvsadm -a -t 10.0.0.100:80 -r 10.0.0.17:80 -g
[root@lvs ~]#ipvsadm -Ln
IP Virtual Server version 1.2.1 (size=4096)
Prot LocalAddress:Port Scheduler Flags
  -> RemoteAddress:Port           Forward Weight ActiveConn InActConn
TCP  10.0.0.100:80 rr
  -> 10.0.0.7:80                 Route   1      0          0
  -> 10.0.0.17:80                 Route   1      0          0
2.3.5.4 测试访问
[root@internet ~]#curl 10.0.0.100
10.0.0.17
[root@internet ~]#curl 10.0.0.100
10.0.0.7
[root@rs1 ~]#tail -f /var/log/httpd/access_log -n0
192.168.10.6 - - [12/Jul/2020:10:36:21 +0800] "GET / HTTP/1.1" 200 10 "-"
"curl/7.19.7 (x86_64-redhat-linux-gnu) libcurl/7.19.7 NSS/3.27.1 zlib/1.2.3
libidn/1.18 libssh2/1.4.2"
src是路由器mac,dest是ds的mac
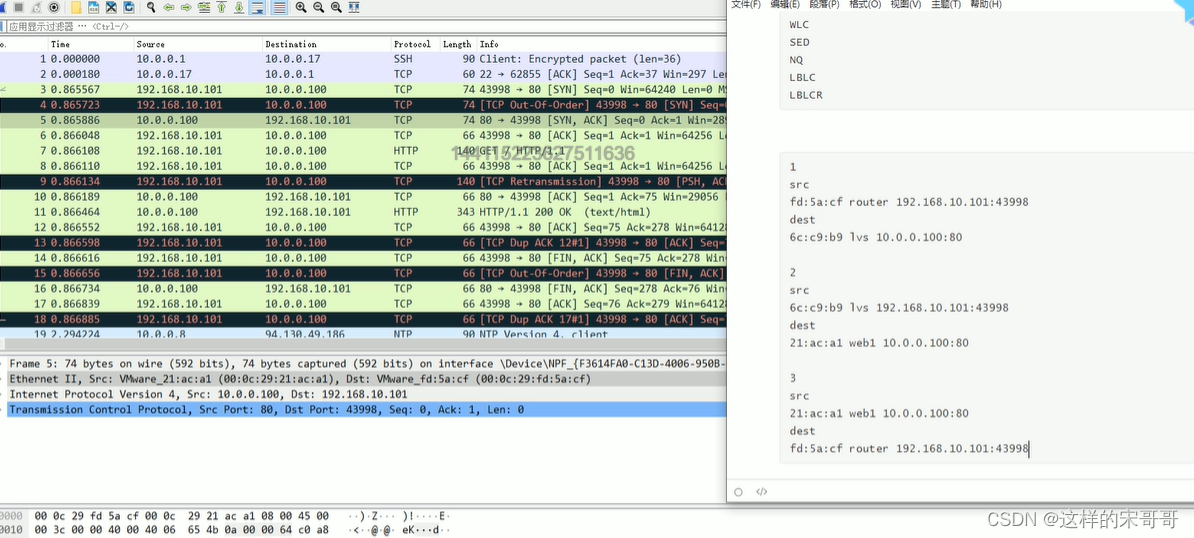
思考
LVS的eth0的网关可否不配置?如果随便配置,发现什么问题?如果不配
置,怎么解决?(但是ds最好还是要配路由器的网关,因为它有可能主动上网安装包之类)
#默认值为1
[root@centos8 ~]#cat /proc/sys/net/ipv4/conf/all/rp_filter
1
#修改内核参数为0
[root@lvs ~]#echo "0" > /proc/sys/net/ipv4/conf/all/rp_filter
#说明:参数rp_filter用来控制系统是否开启对数据包源地址的校验。
#0标示不开启地址校验
#1表开启严格的反向路径校验。对每一个收到的数据包,校验其反向路径是否是最佳路径。如果反向路径不是
最佳路径,则直接丢弃该数据包;
#2表示开启松散的反向路径校验,对每个收到的数据包,校验其源地址是否可以到达,即反向路径是否可以
ping通,如反向路径不通,则直接丢弃该数据包。
2.3.6 LVS-DR模式多网段案例
单网段的DR模式容易暴露后端RS服务器地址信息,可以使用跨网面的DR模型,实现更高的安全性
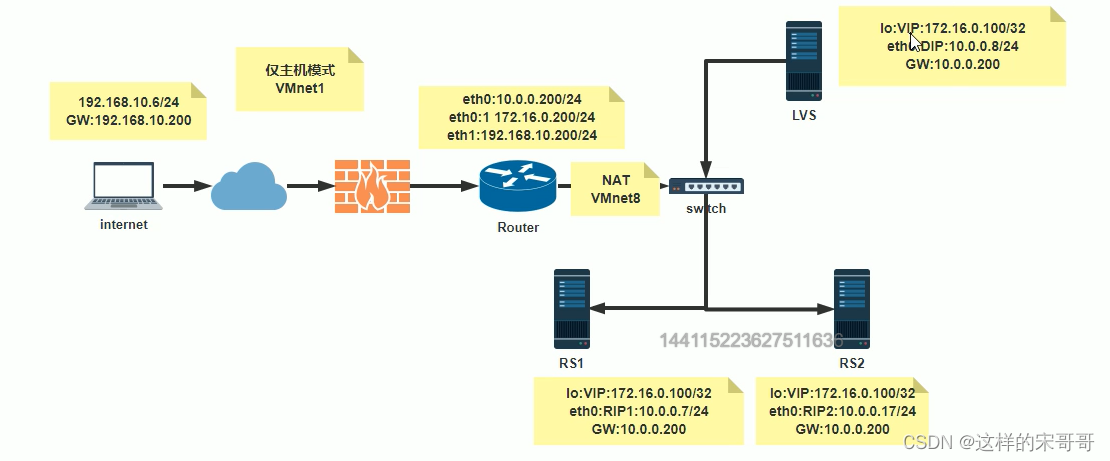
范例:
#internet主机的网络配置和4.2一样
[root@internet ~]#hostname -I
192.168.10.6
#router的网络配置在4.2基础上添加172.16.0.200/24的地址
[root@router ~]#ip addr add 172.16.0.200/24 dev eth0
[root@router ~]#ip a
1: lo: <LOOPBACK,UP,LOWER_UP> mtu 65536 qdisc noqueue state UNKNOWN group
default qlen 1000
   link/loopback 00:00:00:00:00:00 brd 00:00:00:00:00:00
   inet 127.0.0.1/8 scope host lo
       valid_lft forever preferred_lft forever
   inet6 ::1/128 scope host
       valid_lft forever preferred_lft forever
2: eth0: <BROADCAST,MULTICAST,UP,LOWER_UP> mtu 1500 qdisc fq_codel state UP
group default qlen 1000
   link/ether 00:0c:29:ab:8f:2b brd ff:ff:ff:ff:ff:ff
   inet 10.0.0.200/24 brd 10.0.0.255 scope global noprefixroute eth0
       valid_lft forever preferred_lft forever
   inet 172.16.0.200/24 brd 172.16.0.255 scope global noprefixroute eth0
       valid_lft forever preferred_lft forever
   inet6 fe80::20c:29ff:feab:8f2b/64 scope link tentative
       valid_lft forever preferred_lft forever
3: eth1: <BROADCAST,MULTICAST,UP,LOWER_UP> mtu 1500 qdisc fq_codel state UP
group default qlen 1000
   link/ether 00:0c:29:ab:8f:35 brd ff:ff:ff:ff:ff:ff
   inet 192.168.10200/24 brd 192.168.10255 scope global noprefixroute eth1
       valid_lft forever preferred_lft forever
   inet6 fe80::20c:29ff:feab:8f35/64 scope link
       valid_lft forever preferred_lft forever
[root@router ~]#hostname -I
10.0.0.200 172.16.0.200 192.168.10200
#LVS主机的网络配置和4.2一样
[root@lvs ~]#hostname -I
10.0.0.8
[root@lvs ~]#route -n
Kernel IP routing table
Destination     Gateway         Genmask         Flags Metric Ref   Use Iface
0.0.0.0         10.0.0.200      0.0.0.0         UG    0      0        0 eth0
10.0.0.0        0.0.0.0         255.255.255.0   U     100    0        0 eth0
[root@rs1 ~]#hostname -I
10.0.0.7
[root@rs1 ~]#route -n
Kernel IP routing table
Destination     Gateway         Genmask         Flags Metric Ref   Use Iface
0.0.0.0         10.0.0.200      0.0.0.0         UG    100    0        0 eth0
10.0.0.0        0.0.0.0         255.255.255.0   U     100    0        0 eth0
#RS主机的网络配置和4.2一样
[root@rs2 ~]#hostname -I
10.0.0.17
[root@rs2 ~]#route -n
Kernel IP routing table
Destination     Gateway         Genmask         Flags Metric Ref   Use Iface
0.0.0.0         10.0.0.200      0.0.0.0         UG    100    0        0 eth0
10.0.0.0        0.0.0.0         255.255.255.0   U     100    0        0 eth0
#在LVS主机运行的脚本
#注意:VIP如果配置在LO网卡上,必须使用32bit子网掩码,如果VIP绑定在eth0上,可以是其它netmask
[root@lvs ~]#cat lvs_dr_vs.sh
#!/bin/bash
#Author:wangxiaochun
#Date:2017-08-13
vip='172.16.0.100'
iface='lo:1'
mask='255.255.255.255'
port='80'
rs1='10.0.0.7'
rs2='10.0.0.17'
scheduler='wrr'
type='-g'
rpm -q ipvsadm &> /dev/null || yum -y install ipvsadm &> /dev/null
case $1 in
start)
   ifconfig $iface $vip netmask $mask #broadcast $vip up
   iptables -F
   ipvsadm -A -t ${vip}:${port} -s $scheduler
   ipvsadm -a -t ${vip}:${port} -r ${rs1} $type -w 1
   ipvsadm -a -t ${vip}:${port} -r ${rs2} $type -w 1
    echo "The VS Server is Ready!"
   ;;
stop)
   ipvsadm -C
   ifconfig $iface down
    echo "The VS Server is Canceled!"
   ;;
*)
    echo "Usage: $(basename $0) start|stop"
    exit 1
   ;;
esac
[root@lvs ~]#bash lvs_dr_vs.sh start
The VS Server is Ready!
#在RS后端服务器运行的脚本
[root@rs1 ~]#cat lvs_dr_rs.sh
#!/bin/bash
#Author:wangxiaochun
#Date:2017-08-13
vip=172.16.0.100
mask='255.255.255.255'
dev=lo:1
rpm -q httpd &> /dev/null || yum -y install httpd &>/dev/null
service httpd start &> /dev/null && echo "The httpd Server is Ready!"
echo "`hostname -I`" > /var/www/html/index.html
case $1 in
start)
    echo 1 > /proc/sys/net/ipv4/conf/all/arp_ignore
    echo 1 > /proc/sys/net/ipv4/conf/lo/arp_ignore
    echo 2 > /proc/sys/net/ipv4/conf/all/arp_announce
    echo 2 > /proc/sys/net/ipv4/conf/lo/arp_announce
   ifconfig $dev $vip netmask $mask #broadcast $vip up
    echo "The RS Server is Ready!"
   ;;
stop)
   ifconfig $dev down
    echo 0 > /proc/sys/net/ipv4/conf/all/arp_ignore
    echo 0 > /proc/sys/net/ipv4/conf/lo/arp_ignore
    echo 0 > /proc/sys/net/ipv4/conf/all/arp_announce
    echo 0 > /proc/sys/net/ipv4/conf/lo/arp_announce
    echo "The RS Server is Canceled!"
   ;;
*)
    echo "Usage: $(basename $0) start|stop"
    exit 1
   ;;
esac
[root@rs1 ~]#bash lvs_dr_rs.sh start
The RS Server is Ready!
#在RS后端服务器运行的脚本和RS1是一样的
[root@rs2 ~]#bash lvs_dr_rs.sh start
The RS Server is Ready!
#测试访问
[root@internet ~]#curl 172.16.0.100
10.0.0.7
[root@internet ~]#curl 172.16.0.100
10.0.0.17
范例2:
RS 的配置脚本
#!/bin/bash
vip=10.0.0.100
mask='255.255.255.255'
dev=lo:1
case $1 in
start)
     echo 1 > /proc/sys/net/ipv4/conf/all/arp_ignore
     echo 1 > /proc/sys/net/ipv4/conf/lo/arp_ignore
     echo 2 > /proc/sys/net/ipv4/conf/all/arp_announce
     echo 2 > /proc/sys/net/ipv4/conf/lo/arp_announce
     ifconfig $dev $vip netmask $You can't use 'macro parameter character #' in
math modemask #broadcast $vip up
     #route add -host $vip dev $dev
     ;;
stop)
     ifconfig $dev down
     echo 0 > /proc/sys/net/ipv4/conf/all/arp_ignore
     echo 0 > /proc/sys/net/ipv4/conf/lo/arp_ignore
     echo 0 > /proc/sys/net/ipv4/conf/all/arp_announce
     echo 0 > /proc/sys/net/ipv4/conf/lo/arp_announce
     ;;
*)
     echo "Usage: $(basename $0) start|stop"
     exit 1
     ;;
esac
VS的配置脚本
#!/bin/bash
vip='10.0.0.100'
iface='lo:1'
mask='255.255.255.255'
port='80'
rs1='192.168.8.101'
rs2='192.168.8.102'
scheduler='wrr'
type='-g'
case $1 in
start)
 ifconfig $iface $vip netmask $mask #broadcast $vip up
 iptables -F
 ipvsadm -A -t ${vip}:${port} -s $scheduler
 ipvsadm -a -t ${vip}:${port} -r ${rs1} $type -w 1
 ipvsadm -a -t ${vip}:${port} -r ${rs2} $type -w 1
 ;;
stop)
 ipvsadm -C
 ifconfig $iface down
 ;;
*)
 echo "Usage $(basename $0) start|stop“
 exit 1
esac
范例3: 跨网段DR模型案例
配置:
[root@rs1 ~]#cat lvs_dr_rs.sh
#!/bin/bash
#Author:wangxiaochun
#Date:2017-08-13
vip=192.168.10100
mask='255.255.255.255'
dev=lo:1
#rpm -q httpd &> /dev/null || yum -y install httpd &>/dev/null
#service httpd start &> /dev/null && echo "The httpd Server is Ready!"
#echo "<h1>`hostname`</h1>" > /var/www/html/index.html
case $1 in
start)
    echo 1 > /proc/sys/net/ipv4/conf/all/arp_ignore
 echo 1 > /proc/sys/net/ipv4/conf/lo/arp_ignore
    echo 2 > /proc/sys/net/ipv4/conf/all/arp_announce
    echo 2 > /proc/sys/net/ipv4/conf/lo/arp_announce
   ifconfig $dev $vip netmask $mask #broadcast $vip up
    #route add -host $vip dev $dev
    echo "The RS Server is Ready!"
   ;;
stop)
   ifconfig $dev down
    echo 0 > /proc/sys/net/ipv4/conf/all/arp_ignore
    echo 0 > /proc/sys/net/ipv4/conf/lo/arp_ignore
    echo 0 > /proc/sys/net/ipv4/conf/all/arp_announce
    echo 0 > /proc/sys/net/ipv4/conf/lo/arp_announce
    echo "The RS Server is Canceled!"
   ;;
*)
    echo "Usage: $(basename $0) start|stop"
    exit 1
   ;;
esac
[root@rs1 ~]#bash lvs_dr_rs.sh start
[root@rs2 ~]#bash lvs_dr_rs.sh start
[root@LVS ~]#cat lvs_dr_vs.sh
#!/bin/bash
#Author:wangxiaochun
#Date:2017-08-13
vip='192.168.10100'
iface='lo:1'
mask='255.255.255.255'
port='80'
rs1='10.0.0.7'
rs2='10.0.0.17'
scheduler='wrr'
type='-g'
rpm -q ipvsadm &> /dev/null || yum -y install ipvsadm &> /dev/null
case $1 in
start)
   ifconfig $iface $vip netmask $mask #broadcast $vip up
   iptables -F
   ipvsadm -A -t ${vip}:${port} -s $scheduler
   ipvsadm -a -t ${vip}:${port} -r ${rs1} $type -w 1
   ipvsadm -a -t ${vip}:${port} -r ${rs2} $type -w 1
    echo "The VS Server is Ready!"
   ;;
stop)
   ipvsadm -C
   ifconfig $iface down
    echo "The VS Server is Canceled!"
   ;;
*)
    echo "Usage: $(basename $0) start|stop"
    exit 1
   ;;
esac
[root@LVS ~]#bash lvs_dr_vs.sh start
[root@Router ~]#nmcli connection modify eth0 +ipv4.addresses 192.168.10200/24
[root@Router ~]#nmcli connection reload
[root@Router ~]#nmcli connection up eth0
[root@Router ~]#ip a
1: lo: <LOOPBACK,UP,LOWER_UP> mtu 65536 qdisc noqueue state UNKNOWN group
default qlen 1000
   link/loopback 00:00:00:00:00:00 brd 00:00:00:00:00:00
   inet 127.0.0.1/8 scope host lo
       valid_lft forever preferred_lft forever
   inet6 ::1/128 scope host
       valid_lft forever preferred_lft forever
2: eth0: <BROADCAST,MULTICAST,UP,LOWER_UP> mtu 1500 qdisc fq_codel state UP
group default qlen 1000
   link/ether 00:0c:29:4d:ef:3e brd ff:ff:ff:ff:ff:ff
   inet 10.0.0.200/24 brd 10.0.0.255 scope global noprefixroute eth0
       valid_lft forever preferred_lft forever
   inet 192.168.10200/24 brd 192.168.10255 scope global noprefixroute eth0
       valid_lft forever preferred_lft forever
   inet6 fe80::20c:29ff:fe4d:ef3e/64 scope link
       valid_lft forever preferred_lft forever
3: eth1: <BROADCAST,MULTICAST,UP,LOWER_UP> mtu 1500 qdisc fq_codel state UP
group default qlen 1000
   link/ether 00:0c:29:4d:ef:48 brd ff:ff:ff:ff:ff:ff
   inet 172.20.200.200/16 brd 172.20.255.255 scope global noprefixroute eth1
       valid_lft forever preferred_lft forever
   inet6 fe80::20c:29ff:fe4d:ef48/64 scope link
       valid_lft forever preferred_lft forever
三. LVS的负载策略有哪些,各应用在什么场景,通过LVS DR任意实现1-2种场景。
3.1 LVS 调度算法
ipvs scheduler:根据其调度时是否考虑各RS当前的负载状态
分为两种:静态方法和动态方法
3.1.1 静态方法
仅根据算法本身进行调度
1、RR:roundrobin,轮询,较常用,雨露均沾,大锅饭
2、WRR:Weighted RR,加权轮询,较常用
3、SH:Source Hashing,实现session sticky,源IP地址hash;将来自于同一个IP地址的请求始终发往第一次挑中的RS,从而实现会话绑定(局域网SAT公网地址,收到报文都是一个地址都往一个地方调度)
4、DH:Destination Hashing;目标地址哈希,第一次轮询调度至RS,后续将发往同一个目标地址的请求始终转发至第一次挑中的RS,典型使用场景是正向代理缓存场景中的负载均衡,如: Web缓存
3.1.2 动态方法
主要根据每RS当前的负载状态及调度算法进行调度Overhead=value 较小的RS将被调度
1、LC:least connections 适用于长连接应用
Overhead=activeconns256+inactiveconns
2、WLC:Weighted LC,默认调度方法,较常用
Overhead=(activeconns256+inactiveconns)/weight
3、SED:Shortest Expection Delay,初始连接高权重优先,只检查活动连接,而不考虑非活动连接
Overhead=(activeconns+1)*256/weight
4、NQ:Never Queue,第一轮均匀分配,后续SED
5、LBLC:Locality-Based LC,动态的DH算法,使用场景:根据负载状态实现正向代理,实现Web
Cache等
6、LBLCR:LBLC with Replication,带复制功能的LBLC,解决LBLC负载不均衡问题,从负载重的复制
到负载轻的RS,实现Web Cache等
3.1.3 内核版本 4.15 版本后新增调度算法:FO和OVF
FO(Weighted Fail Over)调度算法,在此FO算法中,遍历虚拟服务所关联的真实服务器链表,找到还未
过载(未设置IP_VS_DEST_F_OVERLOAD标志)的且权重最高的真实服务器,进行调度,属于静态算法
OVF(Overflow-connection)调度算法,基于真实服务器的活动连接数量和权重值实现。将新连接调度到权重值最高的真实服务器,直到其活动连接数量超过权重值,之后调度到下一个权重值最高的真实服
务器,在此OVF算法中,遍历虚拟服务相关联的真实服务器链表,找到权重值最高的可用真实服务器。,属于动态算法
一个可用的真实服务器需要同时满足以下条件:
- 未过载(未设置IP_VS_DEST_F_OVERLOAD标志)
- 真实服务器当前的活动连接数量小于其权重值
- 其权重值不为零
四. web http协议通信过程,相关技术术语总结。
4.1 web http协议通信过程
1 DNS
2 CDN
3 TCP
4 Web服务器处理
1)建立连接
2)接收清求
3)处理请求 GET、POST等方法
4)获取资源
5)构建响应报文
6)发送响应
7)记录日志
5 浏览器接收响应报文,进行页面渲染
4.2 cookie和session比较
cookie和session的相同和不同:
cookie通常是在服务器生成,但也可以在客户端生成,session是在服务器端生成的
session 将数据信息保存在服务器端,可以是内存,文件,数据库等多种形式,cookie 将数据保存在客户端的内存或文件中
单个cookie保存的数据不能超过4K,每个站点cookie个数有限制,比如IE8为50个、Firefox为50个、Opera为30个;session存储在服务器,没有容量限制
cookie存放在用户本地,可以被轻松访问和修改,安全性不高;session存储于服务器,比较安全cookie有会话cookie和持久cookie,生命周期为浏览器会话期的会话cookie保存在缓存,关闭浏览器窗口就消失,持久cookie被保存在硬盘,知道超过设定的过期时间;随着服务端session存储压力增大,会根据需要定期清理session数据
session中有众多数据,只将sessionID这一项可以通过cookie发送至客户端进行保留,客户端下次访问时,在请求报文中的cookie会自动携带sessionID,从而和服务器上的的session进行关联
cookie缺点:
1、使用cookie来传递信息,随着cookie个数的增多和访问量的增加,它占用的网络带宽也很大,试想假如cookie占用200字节,如果一天的PV有几个亿,那么它要占用多少带宽?
2、cookie并不安全,因为cookie是存放在客户端的,所以这些cookie可以被访问到,设置可以通过插件添加、修改cookie。所以从这个角度来说,我们要使用sesssion,session是将数据保存在服务端的,只是通过cookie传递一个sessionId而已,所以session更适合存储用户隐私和重要的数据
session 缺点:
1、不容易在多台服务器之间共享,可以使用session绑定,session复制,session共享解决
2、session存放在服务器中,所以session如果太多会非常消耗服务器的性能
cookie和session各有优缺点,在大型互联网系统中,单独使用cookie和session都是不可行的
4.3 HTTP1.0和HTTP1.1的区别
- 缓存处理,在HTTP1.0中主要使用header里的If-Modified-Since,Expires来做为缓存判断的标准,HTTP1.1则引入了更多的缓存控制策略例如Entity tag,If-Unmodified-Since, If-Match, If-NoneMatch等更多可供选择的缓存头来控制缓存策略
- 带宽优化及网络连接的使用,HTTP1.0中,存在一些浪费带宽的现象,例如:客户端只是需要某个对象的一部分,而服务器却将整个对象送过来了,并且不支持断点续传功能,HTTP1.1则在请求头引入了range头域,它允许只请求资源的某个部分,即返回码是206(Partial Content),方便了开发者自由的选择以便于充分利用带宽和连接
错误通知的管理,在HTTP1.1中新增24个状态响应码,如409(Conflict)表示请求的资源与资源当前状态冲突;410(Gone)表示服务器上的某个资源被永久性的删除 - Host 头处理,在HTTP1.0中认为每台服务器都绑定一个唯一的IP地址,因此,请求消息中的URL并没有传递主机名(hostname)。但随着虚拟主机技术的发展,**在一台物理服务器上可以存在多个虚拟主机(Multi-homed Web Servers),并且它们共享一个IP地址。**HTTP1.1的请求消息和响应
消息都应支持Host头域,且请求消息中如果没有Host头域会报告一个错误(400 Bad Request) - 长连接,HTTP 1.1支持持久连接(PersistentConnection)和请求的流水线(Pipelining)处理,在一个TCP连接上可以传送多个HTTP请求和响应,减少了建立和关闭连接的消耗和延迟,在HTTP1.1中默认开启Connection: keep-alive,弥补了HTTP1.0每次请求都要创建连接的缺点
HTTP1.0和1.1的问题
- HTTP1.x在传输数据时,每次都需要重新建立连接,无疑增加了大量的延迟时间,特别是在移动端更为突出
- HTTP1.x在传输数据时,所有传输的内容都是明文,客户端和服务器端都无法验证对方的身份,无法保证数据的安全性
- HTTP1.x在使用时,header里携带的内容过大,增加了传输的成本,并且每次请求header基本不怎么变化,尤其在移动端增加用户流量
- 虽然HTTP1.x支持了keep-alive,来弥补多次创建连接产生的延迟,但是keep-alive使用多了同样会给服务端带来大量的性能压力,并且对于单个文件被不断请求的服务(例如图片存放网站),keepalive可能会极大的影响性能,因为它在文件被请求之后还保持了不必要的连接很长时间
HTTPS协议:
五. 总结网络IO模型和nginx架构。
5.1 网络IO模型
5.1.1 模型相关概念
同步/异步:关注的是消息通信机制,即调用者在等待一件事情的处理结果时,被调用者是否提供完成状态的通知。
- 同步:synchronous,被调用者并不提供事件的处理结果相关的通知消息,需要调用者主动询问事情是否处理完成 (经理给员工安排活案例,老式洗衣机案例)
- 异步:asynchronous,被调用者通过状态、通知或回调机制主动通知调用者被调用者的运行状态阻塞/非阻塞:关注调用者在等待结果返回之前所处的状态 (新式洗衣机会提醒)
- 阻塞:blocking,指IO操作需要彻底完成后才返回到用户空间,调用结果返回之前,调用者被挂起,干不了别的事情。(坐着等洗衣机洗好衣服)
- 非阻塞:nonblocking,指IO操作被调用后立即返回给用户一个状态值,而无需等到IO操作彻底完成,在最终的调用结果返回之前,调用者不会被挂起,可以去做别的事情。(洗衣服的时候可以干别的事情)
最好的组合就是异步加非阻塞(洗衣机洗衣服的同时还能干别的事情,洗好了还会通知我)
5.1.2 网络 I/O 模型
阻塞型、非阻塞型、复用型、信号驱动型、异步
参看:《UNIX网络编程 卷1:套接字联网API 》(美)W. Richard Stevens 著
5.1.2.1 阻塞型 I/O 模型(blocking IO)
下面图第一阶段client到内核buffer最慢,因为中间要经过网络,第二阶段则较快虽然区域不同但是都是在内存当中拷贝
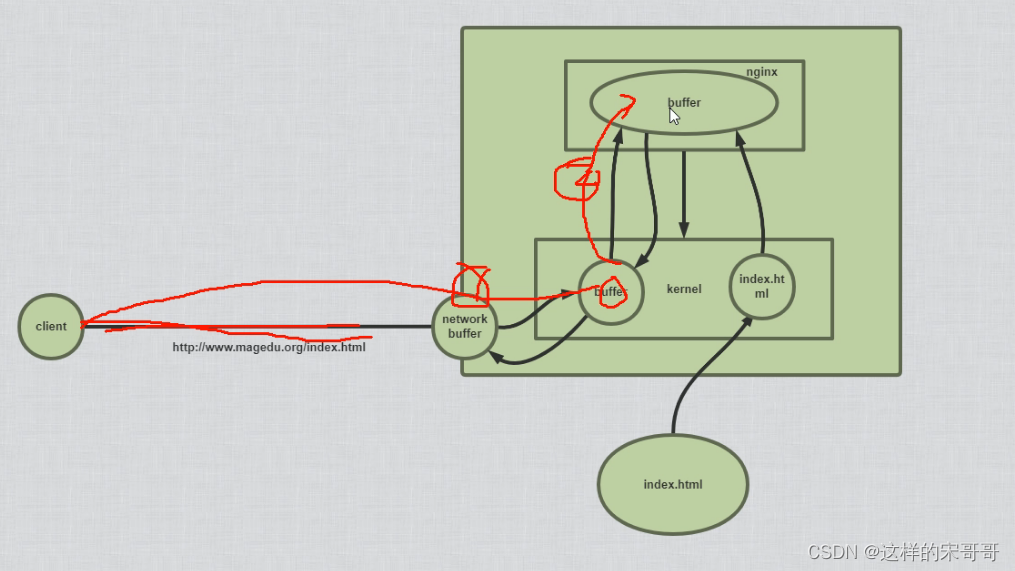

阻塞IO模型是最简单的I/O模型,用户线程在内核进行IO操作时被阻塞
用户线程通过系统调用read发起I/O读操作,由用户空间转到内核空间。内核等到数据包到达后,然后将接收的数据拷贝到用户空间,完成read操作
用户需要等待read将数据读取到buffer后,才继续处理接收的数据。整个I/O请求的过程中,用户线程是被阻塞的,这导致用户在发起IO请求时,不能做任何事情,对CPU的资源利用率不够
优点:程序简单,在阻塞等待数据期间进程/线程挂起,基本不会占用 CPU 资源
缺点:每个连接需要独立的进程/线程单独处理,当并发请求量大时为了维护程序,内存、线程切换开销较大,apache 的prefork使用的是这种模式。
5.1.2.2 非阻塞型 I/O 模型 (nonblocking IO)
用户线程发起IO请求时立即返回。但并未读取到任何数据,用户线程需要不断地发起IO请求,直到数据到达后,才真正读取到数据,继续执行。即 “轮询”机制存在两个问题:如果有大量文件描述符都要等,那么就得一个一个的read。这会带来大量的Context Switch(read是系统调用,每调用一次就得在用户态和核心态切换一次)。轮询的时间不好把握。这里是要猜多久之后数据才能到。等待时间设的太长,程序响应延迟就过大;设的太短,就会造成过于频繁的重试,干耗CPU而已,是比较浪费CPU的方式,一般很少直接使用这种模型,而是在其他IO模型中使用非阻塞IO这一特性。
5.1.2.3 多路复用型 (I/O multiplexing)
上面的模型中,每一个文件描述符对应的IO是由一个线程监控和处理
多路复用IO指一个线程可以同时(实际是交替实现,即并发完成)监控和处理多个文件描述符对应各自的IO,即复用同一个线程
一个线程之所以能实现同时处理多个IO,是因为这个线程调用了内核中的SELECT,POLL或EPOLL等系统调用,从而实现多路复用IO
- select(轮训–IO数量越多速度越慢)
- epoll(IO完成内核立刻主动发生主动地通报)
I/O multiplexing 主要包括:select,poll,epoll三种系统调用,select/poll/epoll的好处就在于单个process就可以同时处理多个网络连接的IO。
它的基本原理就是select/poll/epoll这个function会不断的轮询所负责的所有socket,当某个socket有数据到达了,就通知用户进程。
当用户进程调用了select,那么整个进程会被block,而同时,kernel会“监视”所有select负责的socket,当任何一个socket中的数据准备好了,select就会返回。这个时候用户进程再调用read操作,将数据从kernel拷贝到用户进程。
Apache prefork是此模式的select,worker是poll模式。
5.1.2.4 信号驱动式 I/O 模型 (signal-driven IO)
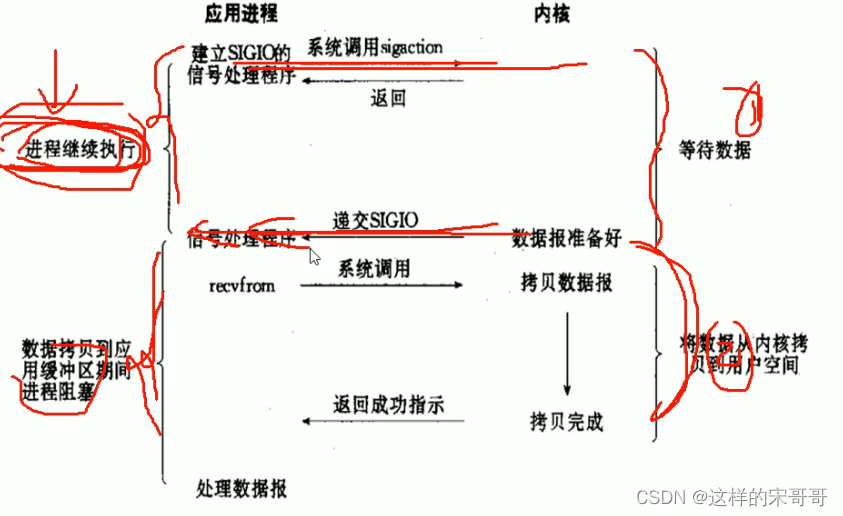
信号驱动I/O的意思就是进程现在不用傻等着,也不用去轮询。而是让内核在数据就绪时,发送信号通知进程。
调用的步骤是,通过系统调用 sigaction ,并注册一个信号处理的回调函数,该调用会立即返回,然后主程序可以继续向下执行,当有I/O操作准备就绪,即内核数据就绪时,内核会为该进程产生一个 SIGIO信号,并回调注册的信号回调函数,这样就可以在信号回调函数中系统调用 recvfrom 获取数据,将用户进程所需要的数据从内核空间拷贝到用户空间
此模型的优势在于等待数据报到达期间进程不被阻塞。用户主程序可以继续执行,只要等待来自信号处理函数的通知。
在信号驱动式 I/O 模型中,应用程序使用套接口进行信号驱动 I/O,并安装一个信号处理函数,进程继续运行并不阻塞
当数据准备好时,进程会收到一个 SIGIO 信号,可以在信号处理函数中调用 I/O 操作函数处理数据。优点:线程并没有在等待数据时被阻塞,内核直接返回调用接收信号,不影响进程继续处理其他请求因此可以提高资源的利用率
缺点:信号 I/O 在大量 IO 操作时可能会因为信号队列溢出导致没法通知
异步阻塞:程序进程向内核发送IO调用后,不用等待内核响应,可以继续接受其他请求,内核收到进程请求后进行的IO如果不能立即返回,就由内核等待结果,直到IO完成后内核再通知进程。
5.1.2.5 异步 I/O 模型 (asynchronous IO)
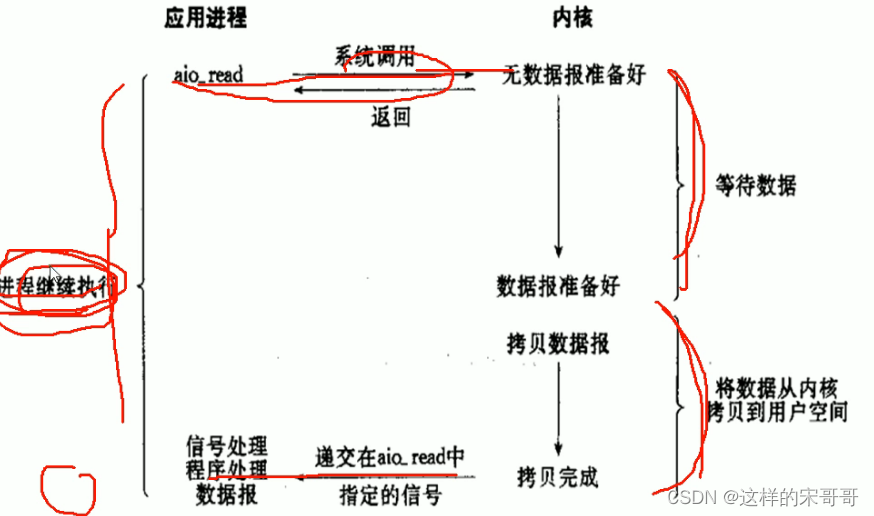
Linux提供了AIO库函数实现异步,但是用的很少。目前有很多开源的异步IO库,例如libevent、libev、libuv。
5.1.3 五种 IO 对比
这五种 I/O 模型中,越往后,阻塞越少,理论上效率也是最优前四种属于同步 I/O,因为其中真正的 I/O
操作(recvfrom)将阻塞进程/线程,只有异步 I/O 模型才与 POSIX 定义的异步 I/O 相匹配
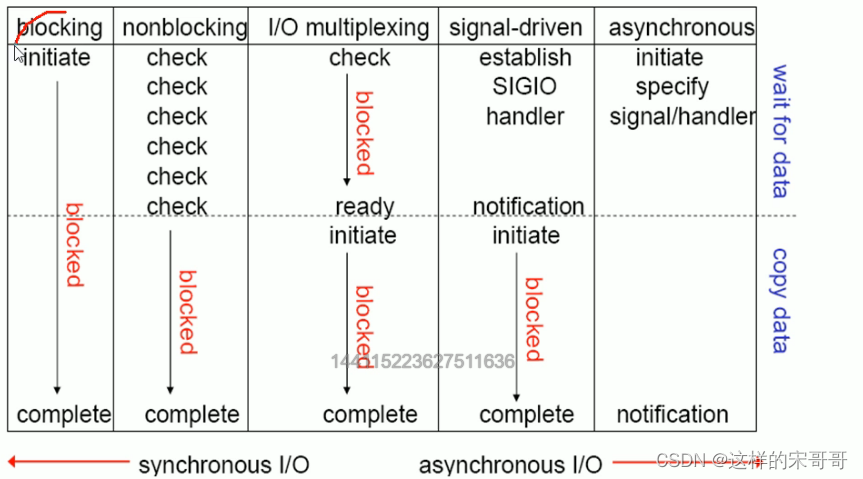
5.1.4 I/O常见实现
Nginx支持在多种不同的操作系统实现不同的事件驱动模型,但是其在不同的操作系统甚至是不同的系
统版本上面的实现方式不尽相同,主要有以下实现方式:
1、select:
select库是在linux和windows平台都基本支持的 事件驱动模型库,并且在接口的定义也基本相同,只是部分参数的含义略有差异,最大并发限制1024,是最早期的事件驱动模型。
2、poll:
在Linux 的基本驱动模型,windows不支持此驱动模型,是select的升级版,取消了最大的并发限制,在编译nginx的时候可以使用–with-poll_module和–without-poll_module这两个指定是否编译select
库。
3、epoll:
epoll是库是Nginx服务器支持的最高性能的事件驱动库之一,是公认的非常优秀的事件驱动模型,它和select和poll有很大的区别,epoll是poll的升级版,但是与poll有很大的区别.
epoll的处理方式是创建一个待处理的事件列表,然后把这个列表发给内核,返回的时候在去轮询检查这个表,以判断事件是否发生,epoll支持一个进程打开的最大事件描述符的上限是系统可以打开的文件的最大数,同时epoll库的I/O效率不随描述符数目增加而线性下降,因为它只会对内核上报的“活跃”的描述符进行
操作。
4、kqueue:
用于支持BSD系列平台的高校事件驱动模型,主要用在FreeBSD 4.1及以上版本、OpenBSD 2.0级以上版本,NetBSD级以上版本及Mac OS X 平台上,该模型也是poll库的变种,因此和epoll没有本质上的区别,效效率和epoll相似
5、IOCP:
Windows系统上的实现方式,对应第5种(异步I/O)模型。
6、/dev/poll:
用于支持unix衍生平台的高效事件驱动模型,主要在Solaris 平台、HP/UX,该模型是sun公司在开发Solaris系列平台的时候提出的用于完成事件驱动机制的方案,它使用了虚拟的/dev/poll设备,开发人员将
要见识的文件描述符加入这个设备,然后通过ioctl()调用来获取事件通知,因此运行在以上系列平台的时候
请使用/dev/poll事件驱动机制。效率和epoll相似
7、rtsig:
不是一个常用事件驱动,最大队列1024,不是很常用
8、eventport:
该方案也是sun公司在开发Solaris的时候提出的事件驱动库,只是Solaris 10以上的版本,该驱动库可防止内核崩溃等情况的发生。
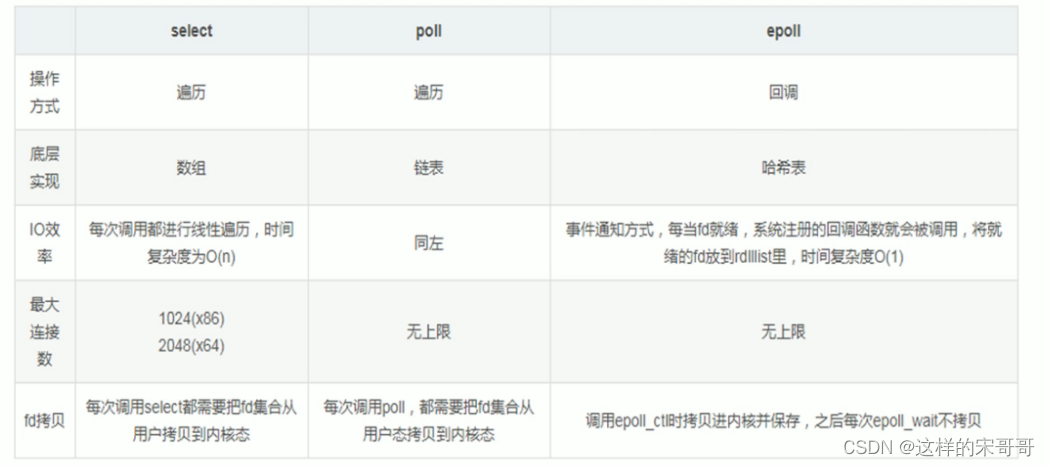
5.1.5 开发的选择
跨系统说起来很好,但是会牺牲性能,所以有的时候会只针对一个系统进行开发
- 完全跨平台,可以使用select、poll。但是性能较差
- 针对不同操作系统自行选择支持的最优技术,比如: Linux选用epoll,Mac选用kqueue,Windows 选
用IOCP,提高IO处理的性能
5.2 nginx架构
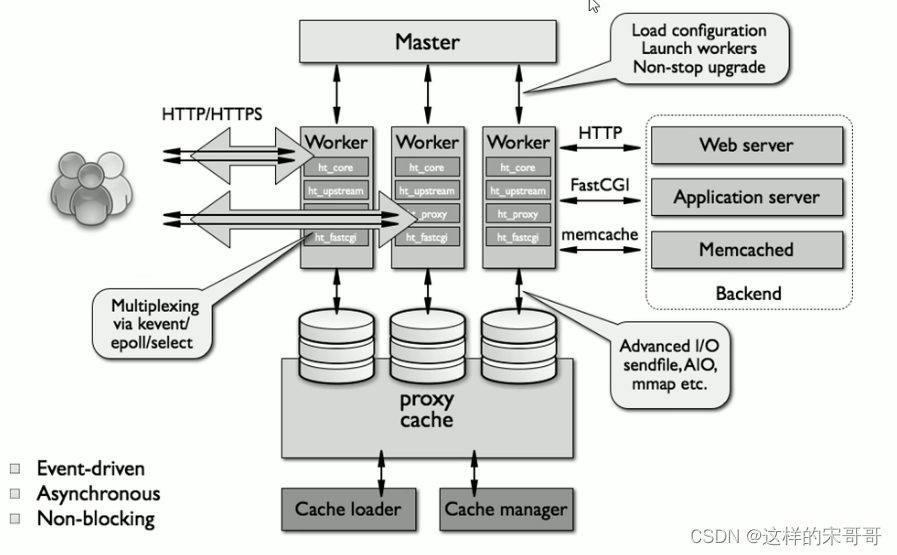
5.2.1 Nginx 进程结构
web请求处理机制
多进程方式:服务器每接收到一个客户端请求就有服务器的主进程生成一个子进程响应客户端,直到用户关闭连接,这样的优势是处理速度快,子进程之间相互独立,但是如果访问过大会导致服务器资源耗尽而无法提供请求。
多线程方式:与多进程方式类似,但是每收到一个客户端请求会有服务进程派生出一个线程和此客户端进行交互,一个线程的开销远远小于一个进程,因此多线程方式在很大程度减轻了web服务器对系统资源的要求,但是多线程也有自己的缺点,即当多个线程位于同一个进程内工作的时候,可以相互访问同样的内存地址空间,所以他们相互影响,一旦主进程挂掉则所有子线程都不能工作了,IIS服务器使用了多线程的方式,需要间隔一段时间就重启一次才能稳定。Nginx是多进程组织模型,而且是一个由Master主进程和Worker工作进程组成。
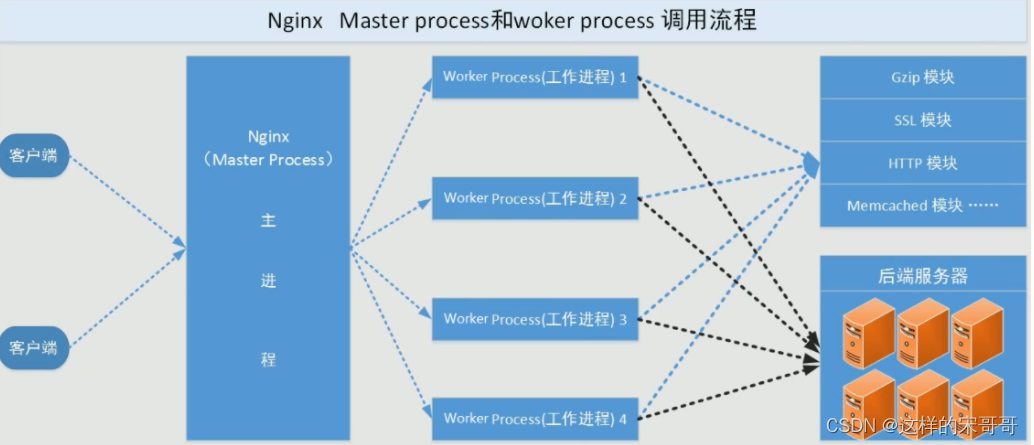
主进程(master process)的功能
对外接口:接收外部的操作(信号)
对内转发:根据外部的操作的不同,通过信号管理 Worker
监控:监控 worker 进程的运行状态,worker 进程异常终止后,自动重启 worker 进程
读取Nginx 配置文件并验证其有效性和正确性
建立、绑定和关闭socket连接
按照配置生成、管理和结束工作进程
接受外界指令,比如重启、升级及退出服务器等指令
不中断服务,实现平滑升级,重启服务并应用新的配置
开启日志文件,获取文件描述符
不中断服务,实现平滑升级,升级失败进行回滚处理
编译和处理perl脚本
工作进程(worker process)的功能:
所有 Worker 进程都是平等的
实际处理:网络请求,由 Worker 进程处理
Worker进程数量:一般设置为核心数,充分利用CPU资源,同时避免进程数量过多,导致进程竞争CPU资源,
增加上下文切换的损耗
接受处理客户的请求
将请求依次送入各个功能模块进行处理
I/O调用,获取响应数据
与后端服务器通信,接收后端服务器的处理结果
缓存数据,访问缓存索引,查询和调用缓存数据
发送请求结果,响应客户的请求
接收主程序指令,比如重启、升级和退出等
六. nginx总结核心配置和优化。
6.1 配置文件说明
nginx 官方帮助文档
http://nginx.org/en/docs/
tengine 帮助文档
http://tengine.taobao.org/nginx_docs/cn/docs/

Nginx的配置文件的组成部分:
- 主配置文件:nginx.conf
- 子配置文件: include conf.d/*.conf
- fastcgi, uwsgi,scgi 等协议相关的配置文件
- mime.types:支持的mime类型,MIME(Multipurpose Internet Mail Extensions)多用途互联网邮
件扩展类型,MIME消息能包含文本、图像、音频、视频以及其他应用程序专用的数据,是设定某
种扩展名的文件用一种应用程序来打开的方式类型,当该扩展名文件被访问的时候,浏览器会自动
使用指定应用程序来打开。多用于指定一些客户端自定义的文件名,以及一些媒体文件打开方式。
MIME参考文档:https://developer.mozilla.org/zh-CN/docs/Web/HTTP/Basics_of_HTTP/MIME_Types
nginx 配置文件格式说明
配置文件由指令与指令块构成
每条指令以;分号结尾,指令与值之间以空格符号分隔
可以将多条指令放在同一行,用分号分隔即可,但可读性差,不推荐
指令块以{ }大括号将多条指令组织在一起,且可以嵌套指令块
include语句允许组合多个配置文件以提升可维护性
使用#符号添加注释,提高可读性
使用$符号使用变量
部分指令的参数支持正则表达式
全局配置说明:
问题:Nginx主进程为什么用root用户,原因是Nginx主进程监听的端口是80特权端口不可以用普通用户直接监听
可以用nc命令去监听测试
user nginx nginx; #启动Nginx工作进程的用户和组
worker_processes [number | auto]; #启动Nginx工作进程的数量,一般设为和CPU核心数相同
worker_cpu_affinity 00000001 00000010 00000100 00001000 | auto ; #将Nginx工作进程绑
定到指定的CPU核心,默认Nginx是不进行进程绑定的,绑定并不是意味着当前nginx进程独占以一核心CPU,
但是可以保证此进程不会运行在其他核心上,这就极大减少了nginx的工作进程在不同的cpu核心上的来回跳
转,减少了CPU对进程的资源分配与回收以及内存管理等,因此可以有效的提升nginx服务器的性能。
CPU MASK: 00000001:0号CPU
          00000010:1号CPU
  10000000:7号CPU
#示例:
worker_cpu_affinity 0001 0010 0100 1000;第0号---第3号CPU
worker_cpu_affinity 0101 1010;
#示例
worker_processes  4;
worker_cpu_affinity 00000010 00001000 00100000 10000000;
[root@centos8 ~]# ps axo pid,cmd,psr | grep nginx
31093 nginx: master process /apps   1
34474 nginx: worker process         1
34475 nginx: worker process         3
34476 nginx: worker process         5
34477 nginx: worker process         7
35751 grep nginx
#auto 绑定CPU
#The special value auto (1.9.10) allows binding worker processes automatically to
available CPUs:
worker_processes auto;
worker_cpu_affinity auto;
#The optional mask parameter can be used to limit the CPUs available for
automatic binding:
worker_cpu_affinity auto 01010101;
#错误日志记录配置,语法:error_log file [debug | info | notice | warn | error | crit
| alert | emerg]
#error_log logs/error.log;
#error_log logs/error.log notice;
error_log /apps/nginx/logs/error.log error;
#pid文件保存路径
pid       /apps/nginx/logs/nginx.pid;
worker_priority 0; #工作进程优先级,-20~20(19)
worker_rlimit_nofile 65536; #所有worker进程能打开的文件数量上限,包括:Nginx的所有连接(例
如与代理服务器的连接等),而不仅仅是与客户端的连接,另一个考虑因素是实际的并发连接数不能超过系统级
别的最大打开文件数的限制.最好与ulimit -n 或者limits.conf的值保持一致,
daemon off;  #前台运行Nginx服务用于测试、或者以容器运行时,需要设为off
master_process off|on; #是否开启Nginx的master-worker工作模式,仅用于开发调试场景,默认为
on
events {


   worker_connections  65536;  #设置单个工作进程的最大并发连接数
   use epoll; #使用epoll事件驱动,Nginx支持众多的事件驱动,比如:select、poll、epoll,只
能设置在events模块中设置。
   accept_mutex on; #on为同一时刻一个请求轮流由worker进程处理,而防止被同时唤醒所有
worker,避免多个睡眠进程被唤醒的设置,默认为off,新请求会唤醒所有worker进程,此过程也称为"惊
群",因此nginx刚安装完以后要进行适当的优化。建议设置为on
   multi_accept on; #on时Nginx服务器的每个工作进程可以同时接受多个新的网络连接,此指令默认
为off,即默认为一个工作进程只能一次接受一个新的网络连接,打开后几个同时接受多个。建议设置为on
}
http 协议配置说明
http {


   include       mime.types; #导入支持的文件类型,是相对于/apps/nginx/conf的目录
   default_type application/octet-stream; #除mime.types中文件类型外,设置其它文件默认
类型,访问其它类型时会提示下载不匹配的类型文件
#日志配置部分
    #log_format main '$remote_addr - $remote_user [$time_local] "$request" '
    #                 '$status $body_bytes_sent "$http_referer" '
    #                 '"$http_user_agent" "$http_x_forwarded_for"';
    #access_log logs/access.log main;
#自定义优化参数
   sendfile       on;
    #tcp_nopush     on; #在开启了sendfile的情况下,合并请求后统一发送给客户端,必须开启
sendfile
    #tcp_nodelay   off; #在开启了keepalived模式下的连接是否启用TCP_NODELAY选项,当为
off时,延迟0.2s发送,默认On时,不延迟发送,立即发送用户响应报文。
    #keepalive_timeout 0;
   keepalive_timeout  65 65; #设置会话保持时间,第二个值为响应首部:keep
Alived:timeout=65,可以和第一个值不同
    #gzip on; #开启文件压缩
   server {


       listen       80; #设置监听地址和端口
       server_name localhost; #设置server name,可以以空格隔开写多个并支持正则表达式,
如:*.magedu.com www.magedu.* ~^www\d+\.magedu\.com$ default_server
        #charset koi8-r; #设置编码格式,默认是俄语格式,建议改为utf-8
        #access_log logs/host.access.log main;
       location / {


           root   html;
           index index.html index.htm;
       }
        #error_page 404             /404.html;
        # redirect server error pages to the static page /50x.html
        #
       error_page   500 502 503 504 /50x.html; #定义错误页面
       location = /50x.html {


           root   html;
       }
        # proxy the PHP scripts to Apache listening on 127.0.0.1:80
        #
        #location ~ \.php$ { #以http的方式转发php请求到指定web服务器
        #   proxy_pass   http://127.0.0.1;
        #}
        # pass the PHP scripts to FastCGI server listening on 127.0.0.1:9000
        #
        #location ~ \.php$ { #以fastcgi的方式转发php请求到php处理
        #   root           html;
        #   fastcgi_pass   127.0.0.1:9000;
        #   fastcgi_index index.php;
        #   fastcgi_param SCRIPT_FILENAME /scripts$fastcgi_script_name;
        #   include       fastcgi_params;
        #}
        # deny access to .htaccess files, if Apache's document root
        # concurs with nginx's one
        #
        #location ~ /\.ht { #拒绝web形式访问指定文件,如很多的网站都是通过.htaccess文件来
改变自己的重定向等功能。
        #   deny all;
        #}
       location ~ /passwd.html {


           deny all;
       }
   }
    # another virtual host using mix of IP-, name-, and port-based configuration
    #
    #server { #自定义虚拟server
    #   listen       8000;
    #   listen       somename:8080;
    #   server_name somename alias another.alias;
    #   location / {
    #       root   html;
    #       index index.html index.htm; #指定默认网页文件,此指令由
ngx_http_index_module模块提供
    #   }
    #}
    # HTTPS server
    #
    #server { #https服务器配置
    #   listen       443 ssl;
    #   server_name localhost;
    #   ssl_certificate     cert.pem;
    #   ssl_certificate_key cert.key;
    #   ssl_session_cache   shared:SSL:1m;
    #   ssl_session_timeout 5m;
    #   ssl_ciphers HIGH:!aNULL:!MD5;
    #   ssl_prefer_server_ciphers on;
    #   location / {


    #       root   html;
    #       index index.html index.htm;
    #   }
    #}
MIME
#在响应报文中将指定的文件扩展名映射至MIME对应的类型
include           /etc/nginx/mime.types;
default_type     application/octet-stream;#除mime.types中的类型外,指定其它文件的默认
MIME类型,浏览器一般会提示下载
types {


   text/html html;
   image/gif gif;
   image/jpeg jpg;
}
#MIME参考文档:
https://developer.mozilla.org/zh-CN/docs/Web/HTTP/Basics_of_HTTP/MIME_Types
6.2 优化
6.2.1 优化内核参数
修改/etc/sysctl.conf
fs.file-max = 1000000
#表示单个进程较大可以打开的句柄数
net.ipv4.tcp_tw_reuse = 1
#参数设置为 1 ,表示允许将TIME_WAIT状态的socket重新用于新的TCP链接,这对于服务器来说意义重
大,因为总有大量TIME_WAIT状态的链接存在
net.ipv4.tcp_keepalive_time = 600
#当keepalive启动时,TCP发送keepalive消息的频度;默认是2小时,将其设置为10分钟,可更快的清理无
效链接
net.ipv4.tcp_fin_timeout = 30
#当服务器主动关闭链接时,socket保持在FIN_WAIT_2状态的较大时间
net.ipv4.tcp_max_tw_buckets = 5000
#表示操作系统允许TIME_WAIT套接字数量的较大值,如超过此值,TIME_WAIT套接字将立刻被清除并打印警
告信息,默认为8000,过多的TIME_WAIT套接字会使Web服务器变慢
net.ipv4.ip_local_port_range = 1024 65000
#定义UDP和TCP链接的本地端口的取值范围
net.ipv4.tcp_rmem = 10240 87380 12582912
#定义了TCP接受缓存的最小值、默认值、较大值
net.ipv4.tcp_wmem = 10240 87380 12582912
#定义TCP发送缓存的最小值、默认值、较大值
net.core.netdev_max_backlog = 8096
#当网卡接收数据包的速度大于内核处理速度时,会有一个列队保存这些数据包。这个参数表示该列队的较大值
net.core.rmem_default = 6291456
#表示内核套接字接受缓存区默认大小
net.core.wmem_default = 6291456
#表示内核套接字发送缓存区默认大小
net.core.rmem_max = 12582912
#表示内核套接字接受缓存区较大大小
net.core.wmem_max = 12582912
#表示内核套接字发送缓存区较大大小
注意:以上的四个参数,需要根据业务逻辑和实际的硬件成本来综合考虑
net.ipv4.tcp_syncookies = 1
#与性能无关。用于解决TCP的SYN攻击
net.ipv4.tcp_max_syn_backlog = 8192
#这个参数表示TCP三次握手建立阶段接受SYN请求列队的较大长度,默认1024,将其设置的大一些可使出现
Nginx繁忙来不及accept新连接时,Linux不至于丢失客户端发起的链接请求
net.ipv4.tcp_tw_recycle = 1
#这个参数用于设置启用timewait快速回收
net.core.somaxconn=262114
#选项默认值是128,这个参数用于调节系统同时发起的TCP连接数,在高并发的请求中,默认的值可能会导致
链接超时或者重传,因此需要结合高并发请求数来调节此值。
net.ipv4.tcp_max_orphans=262114
#选项用于设定系统中最多有多少个TCP套接字不被关联到任何一个用户文件句柄上。如果超过这个数字,孤立
链接将立即被复位并输出警告信息。这个限制指示为了防止简单的DOS攻击,不用过分依靠这个限制甚至认为
的减小这个值,更多的情况是增加这个值
6.2.2 PAM 资源限制优化
在/etc/security/limits.conf 最后增加:
* soft nofile 65535
* hard nofile 65535
* soft nproc 65535
* hard nproc 65535
七. 使用脚本完成一键编译安装nginx任意版本。
#!/bin/bash

NGINX_FILE=nginx-1.20.2
#NGINX_FILE=nginx-1.18.0
NGINX_URL=http://nginx.org/download/
TAR=.tar.gz
SRC_DIR=/usr/local/src
NGINX_INSTALL_DIR=/apps/nginx
CPUS=`lscpu |awk '/^CPU\(s\)/{print $2}'`
. /etc/os-release
color () {


    RES_COL=60
    MOVE_TO_COL="echo -en \\033[${RES_COL}G"
    SETCOLOR_SUCCESS="echo -en \\033[1;32m"
    SETCOLOR_FAILURE="echo -en \\033[1;31m"
    SETCOLOR_WARNING="echo -en \\033[1;33m"
    SETCOLOR_NORMAL="echo -en \E[0m"
    echo -n "$1" && $MOVE_TO_COL
    echo -n "["
    if [ $2 = "success" -o $2 = "0" ] ;then
        ${SETCOLOR_SUCCESS}
        echo -n $" OK "
    elif [ $2 = "failure" -o $2 = "1" ] ;then
        ${SETCOLOR_FAILURE}
        echo -n $"FAILED"
    else
        ${SETCOLOR_WARNING}
        echo -n $"WARNING"
    fi
    ${SETCOLOR_NORMAL}
    echo -n "]"
    echo
}
check () {


   [ -e ${NGINX_INSTALL_DIR} ] && {

     color "nginx 已安装,请卸载后再安装" 1; exit; }
    cd  ${SRC_DIR}
    if [  -e ${NGINX_FILE}${TAR} ];then
       color "相关文件已准备好" 0
    else
       color '开始下载 nginx 源码包' 0
        wget ${NGINX_URL}${NGINX_FILE}${TAR}
       [ $? -ne 0 ] && {

     color "下载 ${NGINX_FILE}${TAR}文件失败" 1; exit; }
    fi
}
install () {


   color "开始安装 nginx" 0
    if id nginx &> /dev/null;then
       color "nginx 用户已存在" 1
    else
       useradd -s /sbin/nologin -r nginx
       color "创建 nginx 用户" 0
    fi
   color "开始安装 nginx 依赖包" 0
    if [ $ID == "centos" ] ;then
    if [[ $VERSION_ID =~ ^7 ]];then
           yum -y -q install make gcc pcre-devel openssl-devel zlib-devel
perl-ExtUtils-Embed
 elif [[ $VERSION_ID =~ ^8 ]];then
           yum -y -q install make gcc-c++ libtool pcre pcre-devel zlib zlib
devel openssl openssl-devel perl-ExtUtils-Embed
 else
 color '不支持此系统!'  1
            exit
        fi
    elif [ $ID == "rocky" ];then
   yum -y -q install make gcc-c++ libtool pcre pcre-devel zlib zlib-devel
openssl openssl-devel perl-ExtUtils-Embed
 else
       apt update &> /dev/null
       apt -y install make gcc libpcre3 libpcre3-dev openssl libssl-dev zlib1g
dev &> /dev/null
    fi
    cd $SRC_DIR
   tar xf ${NGINX_FILE}${TAR}
    NGINX_DIR=`echo ${

     NGINX_FILE}${

     TAR}| sed -nr 's/^(.*[0-9]).*/\1/p'`
    cd ${NGINX_DIR}
   ./configure --prefix=${NGINX_INSTALL_DIR} --user=nginx --group=nginx --with
http_ssl_module --with-http_v2_module --with-http_realip_module --with
http_stub_status_module --with-http_gzip_static_module --with-pcre --with-stream
--with-stream_ssl_module --with-stream_realip_module
    make -j $CPUS && make install
   [ $? -eq 0 ] && color "nginx 编译安装成功" 0 || {

     color "nginx 编译安装失败,退
出!" 1 ;exit; }
    echo "PATH=${NGINX_INSTALL_DIR}/sbin:${

     PATH}" > /etc/profile.d/nginx.sh
    cat > /lib/systemd/system/nginx.service <<EOF
[Unit]
Description=The nginx HTTP and reverse proxy server
After=network.target remote-fs.target nss-lookup.target
[Service]
Type=forking
PIDFile=${NGINX_INSTALL_DIR}/logs/nginx.pid
ExecStartPre=/bin/rm -f ${NGINX_INSTALL_DIR}/logs/nginx.pid
ExecStartPre=${NGINX_INSTALL_DIR}/sbin/nginx -t
ExecStart=${NGINX_INSTALL_DIR}/sbin/nginx
ExecReload=/bin/kill -s HUP \$MAINPID
KillSignal=SIGQUIT
TimeoutStopSec=5
KillMode=process
PrivateTmp=true
LimitNOFILE=100000
[Install]
WantedBy=multi-user.target
EOF
   systemctl daemon-reload
   systemctl enable --now nginx &> /dev/null
   systemctl is-active nginx &> /dev/null || {

     color "nginx 启动失败,退出!" 1 ;
exit; }
   color "nginx 安装完成" 0
}
check
install
八. 任意编译一个第3方nginx模块,并使用。
第三模块是对nginx 的功能扩展,第三方模块需要在编译安装Nginx 的时候使用参数–add-
module=PATH指定路径添加,有的模块是由公司的开发人员针对业务需求定制开发的,有的模块是开
源爱好者开发好之后上传到github进行开源的模块,nginx的第三方模块需要从源码重新编译进行支持
8.1 nginx-module-vts 模块实现流量监控
https://github.com/vozlt/nginx-module-vts
[root@centos8 ~]#cd /usr/local/src
[root@centos8 src]#git clone git://github.com/vozlt/nginx-module-vts.git
[root@centos8 src]#cd nginx-1.18.0/
[root@centos8 nginx-1.18.0]#./configure --prefix=/apps/nginx --add
module=/usr/local/src/nginx-module-vts
[root@centos8 nginx-1.18.0]#make && make install
[root@centos8 ~]#vim /apps/nginx/conf/nginx.conf
http {


 ......
 vhost_traffic_status_zone;
 ......
 server {


 ......
 location /status {


   vhost_traffic_status_display;
 vhost_traffic_status_display_format html;
 }
 ......
 }
}
[root@centos8 ~]#systemctl restart nginx
#浏览器访问:http://<nginx_ip>/status 可以看到下面显示
8.2 echo 模块实现信息显示
开源的echo模块可以用来打印信息,变量等
https://github.com/openresty/echo-nginx-module
[root@centos8 ~]# systemctl stop nginx
[root@centos8 ~]# vim /apps/nginx/conf/conf.d/pc.conf
 location /main {


     index index.html;
     default_type text/html;
     echo "hello world,main-->";
     echo $remote_addr ;
     echo_reset_timer;   #将计时器开始时间重置为当前时间
     echo_location /sub1;
     echo_location /sub2;
     echo "took $echo_timer_elapsed sec for total.";
 }
 location /sub1 {


     echo_sleep 1;
     echo sub1;
 }
 location /sub2 {


     echo_sleep 1;
     echo sub2;
 }
[root@centos8 ~]# /apps/nginx/sbin/nginx -t
nginx: [emerg] unknown directive "echo_reset_timer" in
/apps/nginx/conf/conf.d/pc.conf:86
nginx: configuration file /apps/nginx/conf/nginx.conf test failed
#解决以上报错问题
[root@centos8 ~]# cd /usr/local/src
[root@centos8 src]# yum install git -y
#github网站国内访问不稳定,可能无法下载
[root@centos8 src]# git clone https://github.com/openresty/echo-nginx-module.git
#如果上面链接无法下载,可以用下面链接
[root@centos8 src]# git clone https://github.com.cnpmjs.org/openresty/echo
nginx-module.git
[root@centos8 src]# cd nginx-1.18.0/
[root@centos8 src]# ./configure \
--prefix=/apps/nginx \
--user=nginx --group=nginx \
--with-http_ssl_module \
--with-http_v2_module \
--with-http_realip_module \
--with-http_stub_status_module \
--with-http_gzip_static_module \
--with-pcre \
--with-stream \
--with-stream_ssl_module \
--with-stream_realip_module \
--with-http_perl_module \
--add-module=/usr/local/src/echo-nginx-module  #指定模块源代码路径
[root@centos8 src]# make && make install
#确认语法检测通过
[root@centos8 ~]# /apps/nginx/sbin/nginx -t
nginx: the configuration file /apps/nginx/conf/nginx.conf syntax is ok
nginx: configuration file /apps/nginx/conf/nginx.conf test is successful
#编译新模块需要重启nginx才能访问测试,不支持reload
[root@centos8 ~]#systemctl restart nginx
[root@centos8 ~]#nginx -V
nginx version: wanginx/1.68.9
built by gcc 8.3.1 20191121 (Red Hat 8.3.1-5) (GCC)
built with OpenSSL 1.1.1c FIPS  28 May 2019
TLS SNI support enabled
configure arguments: --prefix=/apps/nginx --user=nginx --group=nginx --with
http_ssl_module --with-http_v2_module --with-http_realip_module --with
http_stub_status_module --with-http_gzip_static_module --with-pcre --with-stream
--with-stream_ssl_module --with-stream_realip_module --add
module=/usr/local/src/echo-nginx-module
#测试查看结果
[root@centos7 ~]#curl http://www.magedu.org/main
hello world,main-->
10.0.0.7
sub1
sub2
took 2.003 sec for total.