haproxy、nginx、lvs负责均衡相关的话题
一. nginx和haproxy的异同点
haproxy定位跟lvs类似,仅仅作为反向代理没有别的功能,nginx擅长做web服务也有反向代理的功能但是作为web服务性能还是不错的,但是作为反向代理性能上没有lvs那么强,lvs工作在内核级,并发可以达到百万级,但是lvs跟nginx相比较它有缺点:功能上没有nginx丰富,web先不说,反向代理可以提供四层也可以提供七层,它还有一些健康检查的功能,haproxy介于两者之间,反向代理性能比nginx好一些比lvs功能更加丰富,他是一个专业级的反向代理,定位是专业级反向代理所以甚至比nginx更加丰富,重点调度算法跟lvs、nginx对比
二. 实现haproxy四层地址透传,并且做基于cookie的会话保持
2.1 haproxy四层地址透传
https://www.haproxy.com/de/blog/using-haproxy-with-the-proxy-protocol-to-better-secure-your-database/
#haproxy 配置:
listen web_http_nodes
   bind  172.16.0.100:80 #因下面wangxiaochun.com的站点建立在阿里云有防火墙,此处必须用80
端口,如无防火墙可以使用其它端口
   mode tcp            #不支持http协议
   balance roundrobin
   server web1 www.wangxiaochun.com:80 send-proxy check inter 3000 fall 3
rise 5 #添加send-proxy
#nginx 配置:在访问日志中通过变量$proxy_protocol_addr 记录透传过来的客户端IP
http {


 log_format main  '$remote_addr - $remote_user [$time_local] "$request"
"$proxy_protocol_addr"'
   server {


       listen       80 proxy_protocol; #启用此项,将无法直接访问此网站,只能通过四层代理
访问
       server_name www.wangxiaochun.com;
抓包可以看到 continuation 信息中带有客户端的源IP

范例: nginx 开启四层日志功能
#nginx在开启proxy_protocol前
[root@internet ~]#curl 172.16.0.100
<html>
<head><title>400 Bad Request</title></head>
<body>
<center><h1>400 Bad Request</h1></center>
<hr><center>nginx</center>
</body>
</html>
[root@VM_0_10_centos ~]# tail -f /apps/nginx/logs/nginx.access.log
111.199.187.69 - - [09/Apr/2020:20:48:51 +0800] "PROXY TCP4 10.0.0.7 58.87.87.99
35948 80" sendfileon
111.199.187.69 - - [09/Apr/2020:20:48:54 +0800] "PROXY TCP4 10.0.0.7 58.87.87.99
35952 80" sendfileon
111.199.187.69 - - [09/Apr/2020:20:48:57 +0800] "PROXY TCP4 10.0.0.7 58.87.87.99
35954 80" sendfileon
#在nginx服务器上开启日志格式和proxy_protocal
[root@VM_0_10_centos ~]# vim /apps/nginx/conf/nginx.conf
http {


.......
 log_format main  '$remote_addr - $remote_user [$time_local] "$request"
"$proxy_protocol_addr"'
   sendfile       on;
   keepalive_timeout  65;
   client_max_body_size 100m;
   server {


       listen       80 default_server proxy_protocol ;
......
#nginx在开启proxy_protocol后,可以看客户端真实源IP
[root@VM_0_10_centos ~]# tail -f /apps/nginx/logs/nginx.access.log
111.199.187.69 - - [09/Apr/2020:20:52:52 +0800] "GET / HTTP/1.1"
"172.16.0.200"sendfileon
2.2 基于cookie的会话保持
cookie value:为当前server指定cookie值,实现基于cookie的会话黏性,相对于基于 source 地址
hash 调度算法对客户端的粒度更精准,但同时也加重了haproxy负载,目前此模式使用较少, 已经被session共享服务器代替
注意:不支持 tcp mode,使用 http mode
2.2.1 配置选项
cookie name [ rewrite | insert | prefix ][ indirect ] [ nocache ][ postonly ] [
preserve ][ httponly ] [ secure ][ domain ]* [ maxidle <idle> ][ maxlife ]
name: #cookie 的 key名称,用于实现持久连接
insert: #插入新的cookie,默认不插入cookie
indirect: #如果客户端已经有cookie,则不会再发送cookie信息
nocache: #当client和hapoxy之间有缓存服务器(如:CDN)时,不允许中间缓存器缓存cookie,
因为这会导致很多经过同一个CDN的请求都发送到同一台后端服务器
2.2.2 配置示例
listen web_port
 bind 10.0.0.7:80
 balance roundrobin
 mode http #不支持 tcp mode
 log global
 cookie WEBSRV insert nocache indirect
 server web1  10.0.0.17:80 check inter 3000 fall 2 rise 5 cookie web1
 server web2  10.0.0.27:80 check inter 3000 fall 2 rise 5 cookie web2
2.2.3 验证 Cookie 信息
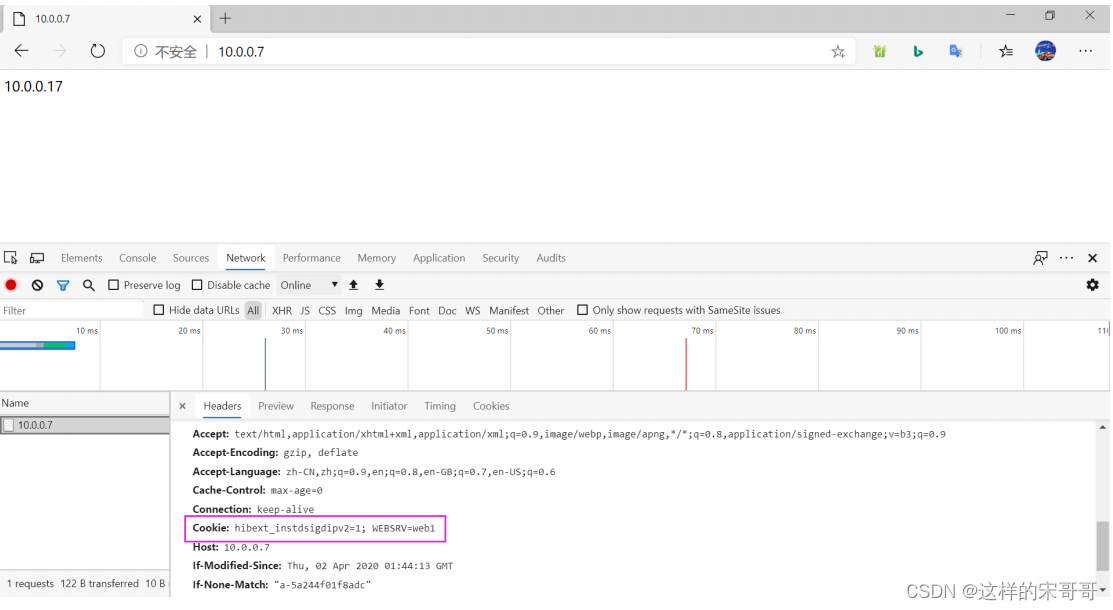
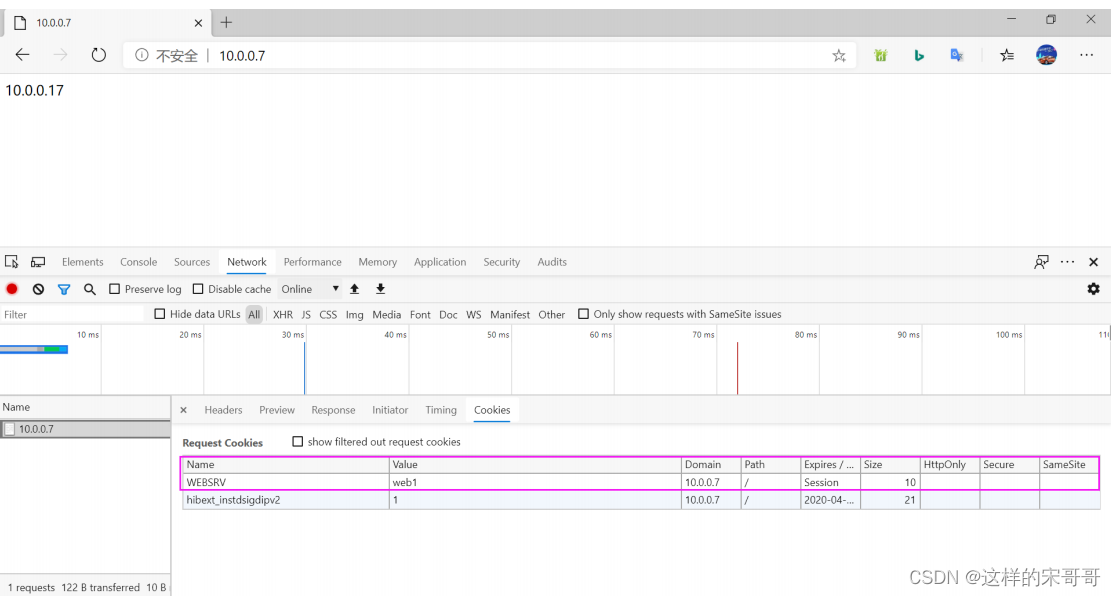
通过命令行验证
[root@centos6 ~]#curl -i 10.0.0.7
HTTP/1.1 200 OK
date: Thu, 02 Apr 2020 02:26:08 GMT
server: Apache/2.4.6 (CentOS)
last-modified: Thu, 02 Apr 2020 01:44:28 GMT
etag: "a-5a244f0fd5175"
accept-ranges: bytes
content-length: 10
content-type: text/html; charset=UTF-8
set-cookie: WEBSRV=web2; path=/
cache-control: private
10.0.0.27
[root@centos6 ~]#curl -i 10.0.0.7
HTTP/1.1 200 OK
date: Thu, 02 Apr 2020 02:26:15 GMT
server: Apache/2.4.6 (CentOS)
last-modified: Thu, 02 Apr 2020 01:44:13 GMT
etag: "a-5a244f01f8adc"
accept-ranges: bytes
content-length: 10
content-type: text/html; charset=UTF-8
set-cookie: WEBSRV=web1; path=/
cache-control: private
10.0.0.17
[root@centos6 ~]#curl -b WEBSRV=web1 10.0.0.7
10.0.0.17
[root@centos6 ~]#curl -b WEBSRV=web2 10.0.0.7
10.0.0.27
[root@centos6 ~]#curl -vb WEBSRV=web1 10.0.0.7
* About to connect() to 10.0.0.7 port 80 (#0)
*   Trying 10.0.0.7... connected
* Connected to 10.0.0.7 (10.0.0.7) port 80 (#0)
> GET / HTTP/1.1
> User-Agent: curl/7.19.7 (x86_64-redhat-linux-gnu) libcurl/7.19.7 NSS/3.27.1
zlib/1.2.3 libidn/1.18 libssh2/1.4.2
> Host: 10.0.0.7
> Accept: */*
> Cookie: WEBSRV=web1
>
< HTTP/1.1 200 OK
< date: Thu, 02 Apr 2020 02:27:54 GMT
< server: Apache/2.4.6 (CentOS)
< last-modified: Thu, 02 Apr 2020 01:44:13 GMT
< etag: "a-5a244f01f8adc"
< accept-ranges: bytes
< content-length: 10
< content-type: text/html; charset=UTF-8
<
10.0.0.17
* Connection #0 to host 10.0.0.7 left intact
* Closing connection #0
[root@centos6 ~]#curl -vb WEBSRV=web2 10.0.0.7
* About to connect() to 10.0.0.7 port 80 (#0)
*   Trying 10.0.0.7... connected
* Connected to 10.0.0.7 (10.0.0.7) port 80 (#0)
> GET / HTTP/1.1
> User-Agent: curl/7.19.7 (x86_64-redhat-linux-gnu) libcurl/7.19.7 NSS/3.27.1
zlib/1.2.3 libidn/1.18 libssh2/1.4.2
> Host: 10.0.0.7
> Accept: */*
> Cookie: WEBSRV=web2
>
< HTTP/1.1 200 OK
< date: Thu, 02 Apr 2020 02:27:57 GMT
< server: Apache/2.4.6 (CentOS)
< last-modified: Thu, 02 Apr 2020 01:44:28 GMT
< etag: "a-5a244f0fd5175"
< accept-ranges: bytes
< content-length: 10
< content-type: text/html; charset=UTF-8
<
10.0.0.27
* Connection #0 to host 10.0.0.7 left intact
* Closing connection #0
三. 实现自定义错误页面和https的实验
3.1 自定义错误页面
对指定的报错进行重定向,进行优雅的显示错误页面
使用errorfile和errorloc指令的两种方法,可以实现自定义各种错误页面
3.1.1 基于自定义的错误页面文件
#自定义错误页
errorfile <code> <file>
<code> #HTTP status code.支持200, 400, 403, 405, 408, 425, 429, 500, 502,503,504
<file> #包含完整HTTP响应头的错误页文件的绝对路径。 建议后缀为".http",以和一般的html文件相区
分
#示例:
errorfile 400 /etc/haproxy/errorfiles/400badreq.http
errorfile 403 /etc/haproxy/errorfiles/403forbid.http
errorfile 503 /etc/haproxy/errorfiles/503sorry.http
范例:
defaults
#option forwardfor
#no option http-use-htx 支持html文件,此设置和版本有关,2.1不支持
#......
#加下面行
errorfile 500 /usr/local/haproxy/html/500.http
errorfile 502 /usr/local/haproxy/html/502.http
errorfile 503 /usr/local/haproxy/html/503.http
范例:
[root@centos7 ~]#vim /etc/haproxy/haproxy.cfg
defaults
option http-keep-alive
option forwardfor
maxconn 100000
mode http
timeout connect 300000ms
timeout client 300000ms
timeout server 300000ms
errorfile 503 /apps/haproxy/html/503.http
listen
.......
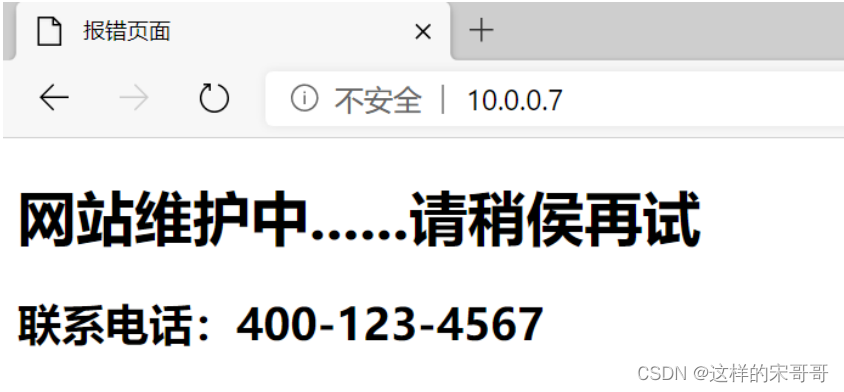
[root@centos7 ~]#vim /apps/haproxy/html/503.http
HTTP/1.1 503 Service Unavailable
Content-Type:text/html;charset=utf-8
<!DOCTYPE html>
<html lang="en">
<head>
<meta charset="UTF-8">
<title>报错页面</title>
</head>
<body>
<center><h1>网站维护中......请稍候再试</h1></center>
<center><h2>联系电话:400-123-4567</h2></center>
<center><h3>503 Service Unavailable</h3></center>
</body>
[root@centos7 ~]#systemctl restart haproxy
#将后端服务器down,可以观察到以下页面
范例:启用 no option http-use-htx
[root@haproxy ~]#vi /etc/haproxy/haproxy.cfg
defaults
   option http-keep-alive
   no option http-use-htx  #在defaults 块中添加
   errorfile 503 /apps/haproxy/errorfiles/503.html
[root@haproxy ~]#cat /apps/haproxy/errorfiles/503.html
<!DOCTYPE html>
<html lang="en">
<head>
<meta charset="UTF-8">
<title>报错页面</title>
</head>
<body>
<center><h1>网站维护中......请稍侯再试</h1></center>
<center><h2>联系电话:400-123-8888</h2></center>
<center><h3>503 Service Unavailable</h3></center>
</body>
#注意没有响应头信息
[root@internet ~]#curl -I 172.16.0.100
<!DOCTYPE html>
<html lang="en">
<head>
<meta charset="UTF-8">
<title>报错页面</title>
</head>
<body>
<center><h1>网站维护中......请稍侯再试</h1></center>
<center><h2>联系电话:400-123-8888</h2></center>
<center><h3>503 Service Unavailable</h3></center>
</body>
#ubuntu的客户端提示错误
root@ubuntu2004:~# curl   172.16.0.100
curl: (1) Received HTTP/0.9 when not allowed
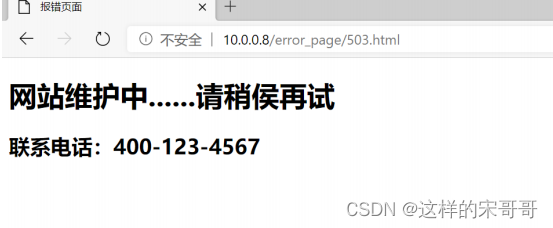
3.1.2 基于http重定向错误页面
#错误页面重定向
errorloc <code> <url>
#相当于errorloc302 <code> <url>,利用302重定向至指URL
#示例:
errorloc 503 http://www.wang.com/error_pages/503.html
errorloc 503 http://www.wang.com/
范例:
[root@centos7 ~]#vim /etc/haproxy/haproxy.cfg
defaults
#option http-keep-alive
#option forwardfor
#no option http-use-htx
#...... 加以下一行
#errorfile 503 /apps/haproxy/html/503.http
errorloc 503 http://10.0.0.8/error_page/503.html
[root@centos8 ~]#cat /var/www/html/error_page/503.html
<!DOCTYPE html>
<html lang="en">
<head>
<title>报错页面</title>
</head>
<body>
<center><h1>网站维护中......请稍侯再试</h1></center>
<center><h2>联系电话:400-123-4567</h2></center>
<center><h3>503 Service Unavailable</h3></center>
</body>
#浏览器访问http://haproxy/ 302自动跳转至下面页面
3.2 https的实验
haproxy支持https,基于性能考虑,证书是在后端服务器比如nginx上实现,即用户到haproxy利用tcp模式再到后端服务器
范例: 基于tcp 模式实现
listen web_http

     bind 192.168.10.100:80
     redirect scheme https if !{

     ssl_fc }
     mode http
     log global
     server web1  10.0.0.8:80 check
     server web2  10.0.0.18:80 check
listen web_https
     bind 192.168.10.100:443
     mode tcp
     log global
     server web1  10.0.0.8:443 check
     server web2  10.0.0.18:443 check
Haproxy 可以实现 Https 的证书安全,即从用户到haproxy为https,从haproxy到后端服务器用http通信
#配置HAProxy支持https协议,支持ssl会话;
 bind *:443 ssl crt /PATH/TO/SOME_PEM_FILE
#指令 crt 后证书文件为PEM格式,需要同时包含证书和所有私钥
 cat demo.key demo.crt > demo.pem
#把80端口的请求利用302重向定443
 bind *:80
 redirect scheme https if !{

     ssl_fc }
#向后端传递用户请求的协议和端口(frontend或backend)
 http_request set-header X-Forwarded-Port %[dst_port]
 http_request add-header X-Forwared-Proto https if {

     ssl_fc }
3.2.1 证书制作
#方法1
[root@centos7 ~]mkdir /etc/haproxy/certs/
[root@centos7 ~]cd /etc/haproxy/certs/
[root@centos7 certs]#openssl genrsa -out haproxy.key 2048
[root@centos7 certs]#openssl req -new -x509 -key haproxy.key -out haproxy.crt
-subj "/CN=www.wang.org"
#或者用下一条命令实现
[root@centos7 certs]#openssl req -x509 -newkey rsa:2048 -subj
"/CN=www.wang.org" -keyout haproxy.key -nodes -days 365 -out haproxy.crt
[root@centos7 certs]#cat haproxy.key haproxy.crt > haproxy.pem
[root@centos7 certs]#openssl x509 -in haproxy.pem -noout -text #查看证书
#方法2
[root@centos7 ~]#mkdir /etc/haproxy/certs/
[root@centos7 ~]#cd /etc/pki/tls/certs
[root@centos7 certs]#make /etc/haproxy/certs/haproxy.pem
umask 77 ; \
PEM1=`/bin/mktemp /tmp/openssl.XXXXXX` ; \
PEM2=`/bin/mktemp /tmp/openssl.XXXXXX` ; \
/usr/bin/openssl req -utf8 -newkey rsa:2048 -keyout $PEM1 -nodes -x509 -days 365
-out $PEM2 ; \
cat $PEM1 > /etc/haproxy/certs/haproxy.pem ; \
echo ""   >> /etc/haproxy/certs/haproxy.pem ; \
cat $PEM2 >> /etc/haproxy/certs/haproxy.pem ; \
rm -f $PEM1 $PEM2
Generating a 2048 bit RSA private key
.+++
..............................................+++
writing new private key to '/tmp/openssl.x8hOA8'
-----
You are about to be asked to enter information that will be incorporated
into your certificate request.
What you are about to enter is what is called a Distinguished Name or a DN.
There are quite a few fields but you can leave some blank
For some fields there will be a default value,
If you enter '.', the field will be left blank.
-----
Country Name (2 letter code) [XX]:CN
State or Province Name (full name) []:beijing
Locality Name (eg, city) [Default City]:beijing
Organization Name (eg, company) [Default Company Ltd]:wang
Organizational Unit Name (eg, section) []:it
Common Name (eg, your name or your server's hostname) []:www.wang.org
Email Address []:
[root@centos7 certs]#ll /etc/haproxy/certs/
total 4
-rw------- 1 root root 3027 Apr  4 10:35 haproxy.pem
3.2.2 Https 配置示例
[root@centos7 ~]#cat /etc/haproxy/conf.d/test.cfg
frontend wang_http_port
 bind 10.0.0.7:80
###################### https setting ##############################
 bind 10.0.0.7:443 ssl crt /etc/haproxy/certs/haproxy.pem
 redirect scheme https if !{

     ssl_fc }        # 注意{ }内的空格
 http-request set-header X-forwarded-Port   %[dst_port]
 http-request add-header X-forwarded-Proto https if {

     ssl_fc }

 mode http
 balance roundrobin
 log global
 option httplog
###################### acl setting ###############################
 acl mobile_domain hdr_dom(host)   -i mobile.wang.org
###################### acl hosts #################################
 default_backend pc_hosts
################### backend hosts #################################
backend mobile_hosts
 mode http
 server web1 10.0.0.17:80 check inter 2000 fall 3 rise 5
backend pc_hosts
 mode http
  #http-request set-header X-forwarded-Port   %[dst_port] 也可加在此处
  #http-request add-header X-forwarded-Proto https if { ssl_fc }
 server web2 10.0.0.27:80 check inter 2000 fall 3 rise 5

[root@centos7 ~]#ss -ntl
State     Recv-Q Send-Q         Local Address:Port   Peer Address:Port

LISTEN     0      100                 127.0.0.1:25                 *:*

LISTEN     0      128                  10.0.0.7:443               *:*

LISTEN     0      128                         *:9999               *:*

LISTEN     0      128                  10.0.0.7:80                 *:*

LISTEN     0      128                         *:22                 *:*

LISTEN     0      128                     [::]:22                 [::]:*
3.2.3 修改后端服务器的日志格式
[root@centos27 ~]#vim /etc/httpd/conf/httpd.conf
LogFormat "%h %l %u %t \"%r\" %>s %b \"%{Referer}i\" \"%{User-Agent}i\" \"%{X
Forwarded-Port}i\" \"%{X-Forwarded-Proto}i\"" combined
6.11.4 验证 Https
3.2.4 验证 Https
[root@centos6 ~]#curl -IkL http://www.wang.org
HTTP/1.1 302 Found
content-length: 0
location: https://www.wang.org/
cache-control: no-cache
HTTP/1.1 200 OK
date: Sat, 04 Apr 2020 02:31:31 GMT
server: Apache/2.4.6 (CentOS) PHP/5.4.16
last-modified: Thu, 02 Apr 2020 01:44:13 GMT
etag: "a-5a244f01f8adc"
accept-ranges: bytes
content-length: 10
content-type: text/html; charset=UTF-8
[root@centos6 ~]#curl -Ik https://www.wang.org
HTTP/1.1 200 OK
date: Sat, 04 Apr 2020 02:31:50 GMT
server: Apache/2.4.6 (CentOS) PHP/5.4.16
last-modified: Thu, 02 Apr 2020 01:44:28 GMT
etag: "a-5a244f0fd5175"
accept-ranges: bytes
content-length: 10
content-type: text/html; charset=UTF-8
#查看后端服务器的访问日志
[root@centos27 ~]#tail /var/log/httpd/access_log
10.0.0.7 - - [04/Apr/2020:10:40:17 +0800] "HEAD / HTTP/1.1" 200 - "-"
"curl/7.19.7 (x86_64-redhat-linux-gnu) libcurl/7.19.7 NSS/3.27.1 zlib/1.2.3
libidn/1.18 libssh2/1.4.2" "443" "https"
四. 画出2出架构图,写出3的关键点(重点配置)
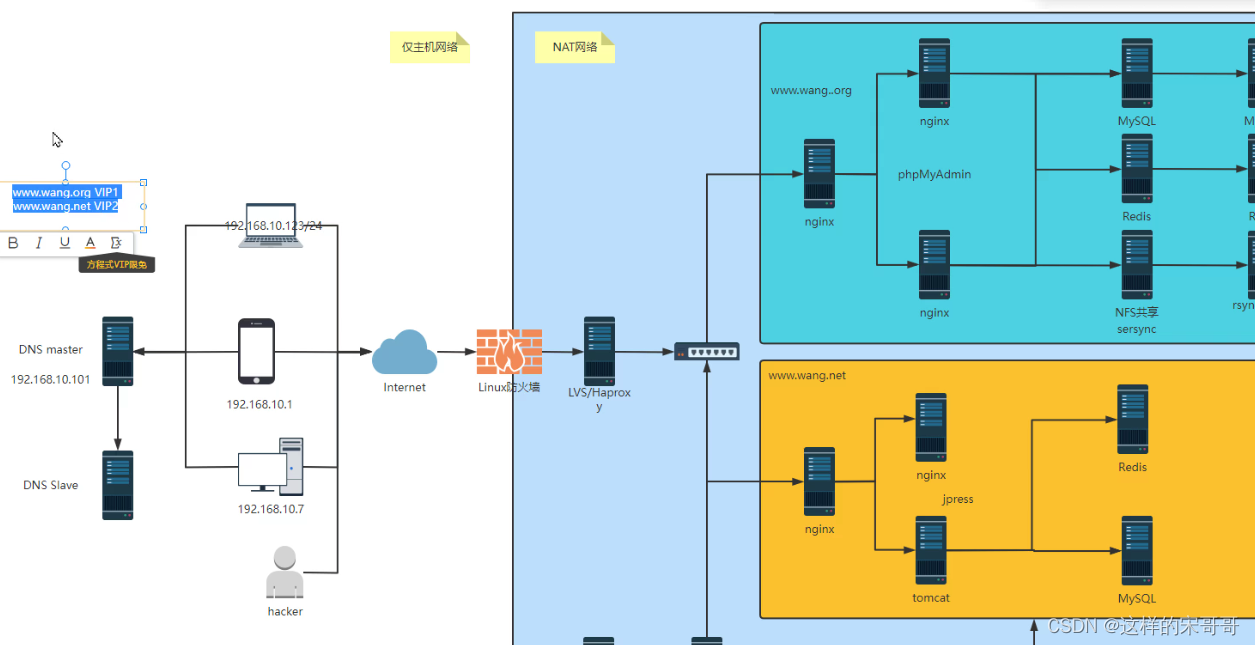
五. 做题要求,每题首先使用脑图工具(亿图)画出原理架构图。

六. 完成keepalived的单播非抢占多主机高可用IP, 抢占邮件通知。
默认keepalived主机之间利用多播相互通告消息,会造成网络拥塞,可以替换成单播,减少网络流量
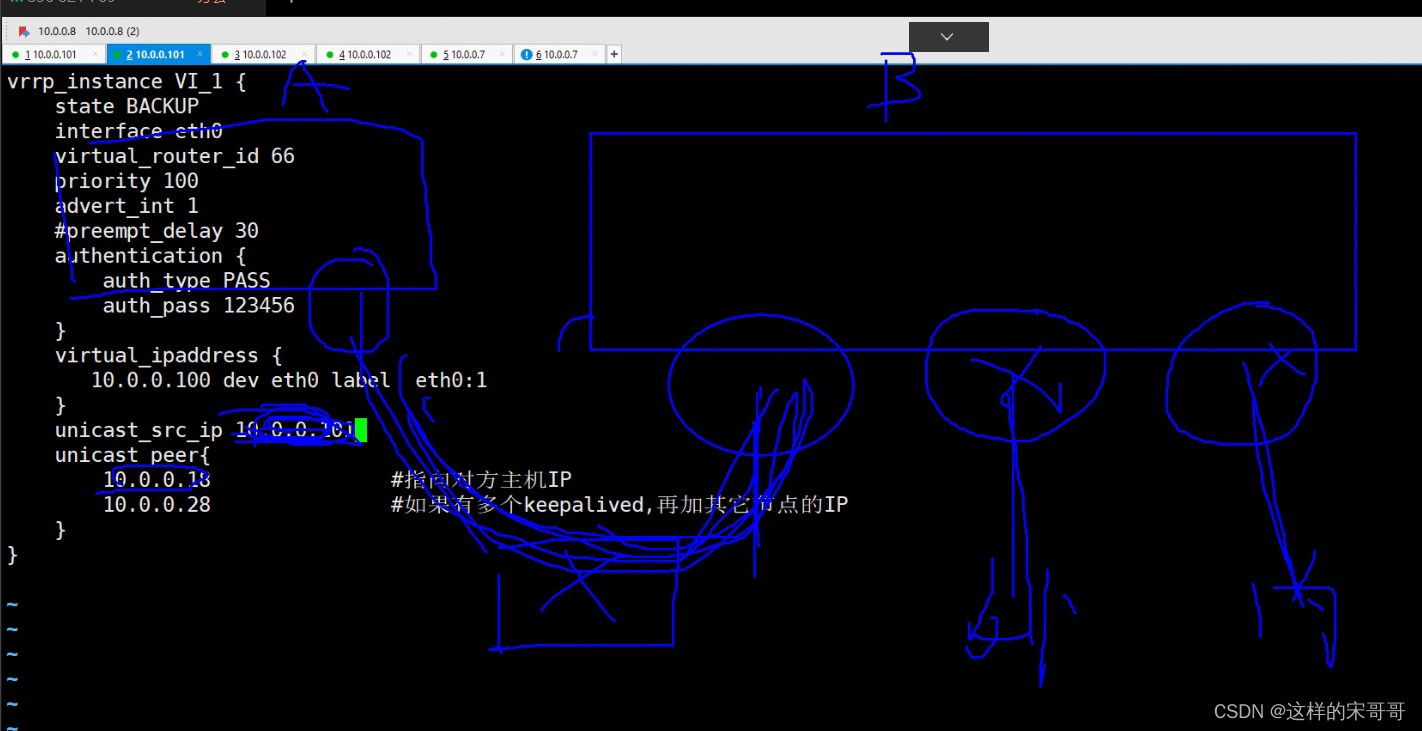
6.1 vip单播配置
注意:启用 vrrp_strict 时,不能启用单播
#在所有节点vrrp_instance语句块中设置对方主机的IP,建议设置为专用于对应心跳线网络的地址,而非使
用业务网络
unicast_src_ip <IPADDR>  #指定发送单播的源IP
unicast_peer {


   <IPADDR>     #指定接收单播的对方目标主机IP
   ......
}
范例:
#master 主机配置
[root@ka1-centos8 ~]#cat /etc/keepalived/keepalived.conf
! Configuration File for keepalived
global_defs {


   notification_email {


     [email protected]
     [email protected]
     [email protected]
   }
   notification_email_from [email protected]
   smtp_server 192.168.200.1
   smtp_connect_timeout 30
   router_id ka1.wang.org
   vrrp_skip_check_adv_addr
   #vrrp_strict
   vrrp_garp_interval 0
   vrrp_gna_interval 0
}
vrrp_instance VI_1 {


   state MASTER
   interface eth0
   virtual_router_id 66
   priority 100
   advert_int 1
   authentication {


       auth_type PASS
       auth_pass 123456
   }
   virtual_ipaddress {


        10.0.0.10/24 dev eth0 label eth0:1
   }
   unicast_src_ip 10.0.0.8     #本机IP
   unicast_peer{


   10.0.0.18 #指向对方主机IP
   10.0.0.28 #如果有多个keepalived,再加其它节点的IP
   }
}
[root@ha1-centos8 ~]#hostname -I
10.0.0.8 10.0.0.10
#slave 主机配置
[root@ka2-centos8 ~]#cat /etc/keepalived/keepalived.conf
! Configuration File for keepalived
global_defs {


   notification_email {


     [email protected]
     [email protected]
     [email protected]
   }
   notification_email_from [email protected]
   smtp_server 192.168.200.1
   smtp_connect_timeout 30
   router_id ka2.wang.org
   vrrp_skip_check_adv_addr
   #vrrp_strict
   vrrp_garp_interval 0
   vrrp_gna_interval 0
}
vrrp_instance VI_1 {


   state SLAVE
   interface eth0
   virtual_router_id 66
   priority 80
   advert_int 1
   authentication {


       auth_type PASS
       auth_pass 123456
   }
   virtual_ipaddress {


        10.0.0.10/24 dev eth0 label eth0:1
   }
   unicast_src_ip 10.0.0.18       #本机IP
   unicast_peer {


   10.0.0.8 #指向对方主机IP
   }
}
[root@ka2-centos8 ~]#hostname -I
10.0.0.18
范例:抓包观察
root@centos6 ~]#tcpdump -i eth0 -nn src host 10.0.0.8 and dst host 10.0.0.18
tcpdump: verbose output suppressed, use -v or -vv for full protocol decode
listening on eth0, link-type EN10MB (Ethernet), capture size 65535 bytes
23:37:48.069158 IP 10.0.0.8 > 10.0.0.18: VRRPv2, Advertisement, vrid 66, prio
100, authtype simple, intvl 1s, length 20
23:37:49.070013 IP 10.0.0.8 > 10.0.0.18: VRRPv2, Advertisement, vrid 66, prio
100, authtype simple, intvl 1s, length 20
23:37:50.071144 IP 10.0.0.8 > 10.0.0.18: VRRPv2, Advertisement, vrid 66, prio
100, authtype simple, intvl 1s, length 20
6.2 Keepalived 通知脚本配置
当keepalived的状态变化时,可以自动触发脚本的执行,比如:发邮件通知用户
默认以用户keepalived_script身份执行脚本,如果此用户不存在,以root执行脚本可以用下面指令指定脚本执行用户的身份
global_defs {


 ......
 script_user <USER>
 ......
}
6.2.1 通知脚本类型
- 当前节点成为主节点时触发的脚本
notify_master <STRING>|<QUOTED-STRING>
- 当前节点转为备节点时触发的脚本
notify_backup |
- 当前节点转为“失败”状态时触发的脚本
notify_fault |
- 通用格式的通知触发机制,一个脚本可完成以上三种状态的转换时的通知
notify |
- 当停止VRRP时触发的脚本
notify_stop |
6.2.2 脚本的调用方法
在 vrrp_instance VI_1 语句块的末尾加下面行
notify_master "/etc/keepalived/notify.sh master"
notify_backup "/etc/keepalived/notify.sh backup"
notify_fault "/etc/keepalived/notify.sh fault"
6.2.3 实战案例1:实现 Keepalived 状态切换的通知脚本
以下脚本支持RHEL和Ubuntu系统
#在所有 keepalived节点配置如下
[root@ka1 ~]#cat /etc/keepalived/notify.sh
#!/bin/bash
#
#********************************************************************
#Author:           wangxiaochun
#QQ:               29308620
#Date:             2020-02-31
#FileName:         notify.sh
#URL:               http://www.wangxiaochun.com
#Description:       The test script
#Copyright (C):     2020 All rights reserved
#********************************************************************
contact='[email protected]'
email_send='[email protected]'
email_passwd='dgezyimkdswwbhea'
email_smtp_server='smtp.qq.com'
. /etc/os-release
msg_error() {


  echo -e "\033[1;31m$1\033[0m"
}
msg_info() {


  echo -e "\033[1;32m$1\033[0m"
}
msg_warn() {


  echo -e "\033[1;33m$1\033[0m"
}
color () {


    RES_COL=60
    MOVE_TO_COL="echo -en \\033[${RES_COL}G"
    SETCOLOR_SUCCESS="echo -en \\033[1;32m"
    SETCOLOR_FAILURE="echo -en \\033[1;31m"
    SETCOLOR_WARNING="echo -en \\033[1;33m"
    SETCOLOR_NORMAL="echo -en \E[0m"
    echo -n "$1" && $MOVE_TO_COL
    echo -n "["
    if [ $2 = "success" -o $2 = "0" ] ;then
        ${SETCOLOR_SUCCESS}
        echo -n $" OK "
    elif [ $2 = "failure" -o $2 = "1" ] ;then
        ${SETCOLOR_FAILURE}
        echo -n $"FAILED"
    else
        ${SETCOLOR_WARNING}
        echo -n $"WARNING"
    fi
    ${SETCOLOR_NORMAL}
    echo -n "]"
    echo
}
install_sendemail () {


    if [[ $ID =~ rhel|centos|rocky ]];then
       rpm -q sendemail &> /dev/null || yum install -y sendemail
    elif [ $ID = 'ubuntu' ];then
       dpkg -l |grep -q sendemail || {

     apt update; apt install -y libio
socket-ssl-perl libnet-ssleay-perl sendemail ; }
    else
       color "不支持此操作系统,退出!" 1
        exit
    fi
}
send_email () {


   local email_receive="$1"
   local email_subject="$2"
   local email_message="$3"
   sendemail -f $email_send -t $email_receive -u $email_subject -m
$email_message -s $email_smtp_server -o message-charset=utf-8 -o tls=yes -xu
$email_send -xp $email_passwd
   [ $? -eq 0 ] && color "邮件发送成功!" 0 || color "邮件发送失败!" 1
}
notify() {


    if [[ $1 =~ ^(master|backup|fault)$ ]];then
        mailsubject="$(hostname) to be $1, vip floating"
        mailbody="$(date +'%F %T'): vrrp transition, $(hostname) changed to be
$1"
       send_email "$contact" "$mailsubject" "$mailbody"
   else
        echo "Usage: $(basename $0) {master|backup|fault}"
        exit 1
   fi
}
install_sendemail
notify $1
[root@ka1 ~]#chmod a+x /etc/keepalived/notify.sh
[root@ka1 ~]#vim /etc/keepalived/keepalived.conf
vrrp_instance VI_1 {


 ......
 virtual_ipaddress {


   10.0.0.10 dev eth0 label eth0:1
 }
 notify_master "/etc/keepalived/notify.sh master"
 notify_backup "/etc/keepalived/notify.sh backup"
 notify_fault "/etc/keepalived/notify.sh fault"
}
#模拟master故障
[root@ka1-centos8 ~]#killall keepalived
6.2.4 实战案例2:实现 Keepalived 状态切换的通知脚本
下面仅支持RHEL系统
6.2.4.1 邮件配置
案例:QQ邮箱配置
[root@centos8 ~]# vim /etc/mail.rc
#在最后面添加下面行
set from=29308620@qq.com
set smtp=smtp.qq.com
set smtp-auth-user=29308620@qq.com
set smtp-auth-password=xxx
set smtp-auth=login
set ssl-verify=ignore
范例:163 邮箱配置
[root@centos8 ~]#vi /etc/mail.rc
set from=[email protected] #之前设置好的邮箱地址
set smtp=smtp.163.com #邮件服务器
set smtp-auth-user=[email protected] #之前设置好的邮箱地址
set smtp-auth-password=QXFIOQXEJNSVSDM #授权码
set smtp-auth=login #默认login即可
范例:发送测试邮件
[root@centos8 ~]# yum -y install mailx
[root@centos8 ~]# echo "Test Mail"| mail -s Warning [email protected]
6.2.4.2 创建通知脚本
#在所有 keepalived节点配置如下
[root@ka1-centos8 ~]#cat /etc/keepalived/notify.sh
#!/bin/bash
#
contact='[email protected]'
notify() {


 mailsubject="$(hostname) to be $1, vip floating"
 mailbody="$(date +'%F %T'): vrrp transition, $(hostname) changed to be $1"
 echo "$mailbody" | mail -s "$mailsubject" $contact
}
case $1 in
master)
 notify master
 ;;
backup)
 notify backup
 ;;
fault)
 notify fault
 ;;
*)
 echo "Usage: $(basename $0) {master|backup|fault}"
 exit 1
 ;;
esac
[root@ka1-centos8 ~]#chmod a+x /etc/keepalived/notify.sh
[root@ka1-centos8 ~]#vim /etc/keepalived/keepalived.conf
vrrp_instance VI_1 {


 ......
 virtual_ipaddress {


   10.0.0.10 dev eth0 label eth0:1
 }
 notify_master "/etc/keepalived/notify.sh master"
 notify_backup "/etc/keepalived/notify.sh backup"
 notify_fault "/etc/keepalived/notify.sh fault"
}
#模拟master故障
[root@ka1-centos8 ~]#killall keepalived
查看邮箱收到邮件如下:
七. 完成lvs + keepalived 高可用配置
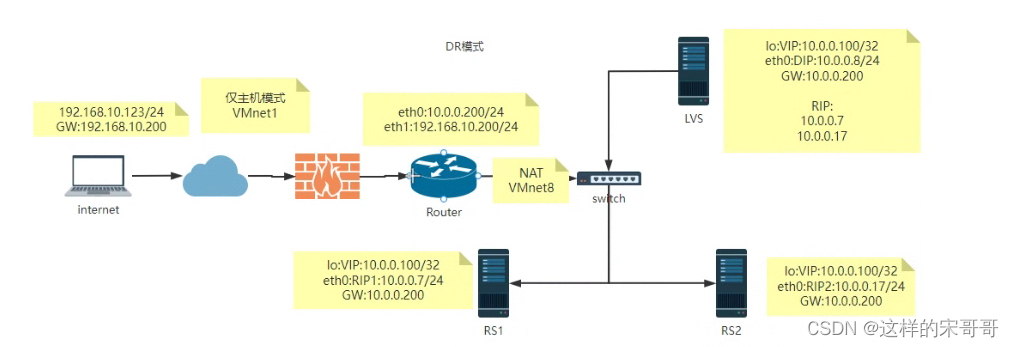
7.1 实战案例:实现单主的 LVS-DR 模式
准备web服务器并使用脚本绑定VIP至web服务器lo网卡
#准备两台后端RS主机
[root@rs1 ~]#cat lvs_dr_rs.sh
#!/bin/bash
#Author:wangxiaochun
#Date:2017-08-13
vip=10.0.0.10
mask='255.255.255.255'
dev=lo:1
rpm -q httpd &> /dev/null || yum -y install httpd &>/dev/null
service httpd start &> /dev/null && echo "The httpd Server is Ready!"
echo "<h1>`hostname`</h1>" > /var/www/html/index.html
case $1 in
start)
    echo 1 > /proc/sys/net/ipv4/conf/all/arp_ignore
    echo 1 > /proc/sys/net/ipv4/conf/lo/arp_ignore
    echo 2 > /proc/sys/net/ipv4/conf/all/arp_announce
    echo 2 > /proc/sys/net/ipv4/conf/lo/arp_announce
   ifconfig $dev $vip netmask $mask #broadcast $vip up
    #route add -host $vip dev $dev
    echo "The RS Server is Ready!"
   ;;
stop)
   ifconfig $dev down
    echo 0 > /proc/sys/net/ipv4/conf/all/arp_ignore
    echo 0 > /proc/sys/net/ipv4/conf/lo/arp_ignore
    echo 0 > /proc/sys/net/ipv4/conf/all/arp_announce
    echo 0 > /proc/sys/net/ipv4/conf/lo/arp_announce
    echo "The RS Server is Canceled!"
   ;;
*)
    echo "Usage: $(basename $0) start|stop"
    exit 1
   ;;
esac
[root@rs1 ~]#bash lvs_dr_rs.sh start
The httpd Server is Ready!
The RS Server is Ready!
[root@rs1 ~]#ip a
1: lo: <LOOPBACK,UP,LOWER_UP> mtu 65536 qdisc noqueue state UNKNOWN group
default qlen 1000
   link/loopback 00:00:00:00:00:00 brd 00:00:00:00:00:00
   inet 127.0.0.1/8 scope host lo
       valid_lft forever preferred_lft forever
   inet 10.0.0.10/32 scope global lo:1
       valid_lft forever preferred_lft forever
   inet6 ::1/128 scope host
       valid_lft forever preferred_lft forever
2: eth0: <BROADCAST,MULTICAST,UP,LOWER_UP> mtu 1500 qdisc pfifo_fast state UP
group default qlen 1000
   link/ether 00:0c:29:32:80:38 brd ff:ff:ff:ff:ff:ff
   inet 10.0.0.7/24 brd 10.0.0.255 scope global noprefixroute eth0
       valid_lft forever preferred_lft forever
   inet6 fe80::20c:29ff:fe32:8038/64 scope link
       valid_lft forever preferred_lft forever
[root@rs2 ~]#bash lvs_dr_rs.sh start
The httpd Server is Ready!
The RS Server is Ready!
[root@rs2 ~]#ip a
1: lo: <LOOPBACK,UP,LOWER_UP> mtu 65536 qdisc noqueue state UNKNOWN group
default qlen 1000
   link/loopback 00:00:00:00:00:00 brd 00:00:00:00:00:00
   inet 127.0.0.1/8 scope host lo
       valid_lft forever preferred_lft forever
   inet 10.0.0.10/32 scope global lo:1
       valid_lft forever preferred_lft forever
   inet6 ::1/128 scope host
       valid_lft forever preferred_lft forever
2: eth0: <BROADCAST,MULTICAST,UP,LOWER_UP> mtu 1500 qdisc pfifo_fast state UP
group default qlen 1000
   link/ether 00:0c:29:33:b4:1a brd ff:ff:ff:ff:ff:ff
   inet 10.0.0.17/24 brd 10.0.0.255 scope global noprefixroute eth0
       valid_lft forever preferred_lft forever
   inet6 fe80::20c:29ff:fe33:b41a/64 scope link
       valid_lft forever preferred_lft forever
#测试直接访问两台RS
[root@centos6 ~]#curl 10.0.0.7
<h1>rs1.wang.org</h1>
[root@centos6 ~]#curl 10.0.0.17
<h1>rs2.wang.org</h1>
配置keepalived
#ka1节点的配置
[root@ka1-centos8 ~]#cat   /etc/keepalived/keepalived.conf
! Configuration File for keepalived
 global_defs {


 notification_email {


 root@localhost
 }
 notification_email_from keepalived@localhost
 smtp_server 127.0.0.1
 smtp_connect_timeout 30
 router_id ka1.wang.org
 vrrp_mcast_group4 224.0.100.10
 }
vrrp_instance VI_1 {


 state MASTER
 interface eth0
 virtual_router_id 66
 priority 100
 advert_int 1
 authentication {


 auth_type PASS
 auth_pass 123456
 }
 virtual_ipaddress {


 10.0.0.10/24 dev eth0 label eth0:1
 }
 notify_master "/etc/keepalived/notify.sh master"
 notify_backup "/etc/keepalived/notify.sh backup"
 notify_fault "/etc/keepalived/notify.sh fault"
   }
virtual_server 10.0.0.10 80 {


 delay_loop 3
 lb_algo rr
 lb_kind DR
 protocol TCP
 sorry_server 127.0.0.1 80
 real_server 10.0.0.7 80 {


 weight 1
 HTTP_GET {

                   #应用层检测
 url {


 path /
 status_code 200
 }
 connect_timeout 1
 nb_get_retry 3
 delay_before_retry 1
 }
 }
 real_server 10.0.0.17 80 {


 weight 1
       TCP_CHECK {

                  #另一台主机使用TCP检测
       connect_timeout 5
       nb_get_retry 3
       delay_before_retry 3
             connect_port 80
 }
   }
}
#ka2节点的配置,配置和ka1基本相同,只需修改三行
[root@ka2-centos8 ~]#cat /etc/keepalived/keepalived.conf
! Configuration File for keepalived
 global_defs {


 notification_email {


 root@localhost
 }
 notification_email_from keepalived@localhost
 smtp_server 127.0.0.1
 smtp_connect_timeout 30
 router_id ka1.wang.org             #修改此行
 vrrp_mcast_group4 224.0.100.10
 }
vrrp_instance VI_1 {


 state BACKUP #修改此行
 interface eth0
 virtual_router_id 66
 priority 80 #修改此行
 advert_int 1
 authentication {


 auth_type PASS
 auth_pass 123456
 }
 virtual_ipaddress {


 10.0.0.10/24 dev eth0 label eth0:1
 }
 notify_master "/etc/keepalived/notify.sh master"
 notify_backup "/etc/keepalived/notify.sh backup"
 notify_fault "/etc/keepalived/notify.sh fault"
   }
virtual_server 10.0.0.10 80 {


 delay_loop 3
 lb_algo rr
 lb_kind DR
 protocol TCP
 sorry_server 127.0.0.1 80
 real_server 10.0.0.7 80 {


 weight 1
 HTTP_GET {


 url {


 path /
 status_code 200
 }
 connect_timeout 1
 nb_get_retry 3
 delay_before_retry 1
 }
 }
 real_server 10.0.0.17 80 {


 weight 1
       TCP_CHECK {


       connect_timeout 5
       nb_get_retry 3
       delay_before_retry 3
             connect_port 80
 }
   }
}
访问测试结果
[root@centos6 ~]#curl 10.0.0.10
<h1>rs1.wang.org</h1>
[root@centos6 ~]#curl 10.0.0.10
<h1>rs2.wang.org</h1>
[root@ka1-centos8 ~]#dnf -y install ipvsadm
[root@ka1-centos8 ~]#ipvsadm -Ln
IP Virtual Server version 1.2.1 (size=4096)
Prot LocalAddress:Port Scheduler Flags
  -> RemoteAddress:Port           Forward Weight ActiveConn InActConn
TCP  10.0.0.10:80 rr
  -> 10.0.0.7:80                 Route   1      0          0
  -> 10.0.0.17:80                 Route   1      0          0
模拟故障
#第一台RS1故障,自动切换至RS2
[root@rs1 ~]#chmod 0 /var/www/html/index.html
[root@centos6 ~]#curl 10.0.0.10
<h1>rs2.wang.org</h1>
[root@centos6 ~]#curl 10.0.0.10
<h1>rs2.wang.org</h1>
[root@ka1-centos8 ~]#dnf -y install ipvsadm
[root@ka1-centos8 ~]#ipvsadm -Ln
IP Virtual Server version 1.2.1 (size=4096)
Prot LocalAddress:Port Scheduler Flags
  -> RemoteAddress:Port           Forward Weight ActiveConn InActConn
TCP  10.0.0.10:80 rr
  -> 10.0.0.17:80                 Route   1      0          3
#后端RS服务器都故障,启动Sorry Server
[root@rs2 ~]#systemctl stop httpd
[root@centos6 ~]#curl 10.0.0.10
Sorry Server on ka1
[root@ka1-centos8 ~]#ipvsadm -Ln
IP Virtual Server version 1.2.1 (size=4096)
Prot LocalAddress:Port Scheduler Flags
  -> RemoteAddress:Port           Forward Weight ActiveConn InActConn
TCP  10.0.0.10:80 rr
  -> 127.0.0.1:80                 Route   1      0          0
#ka1故障,自动切换至ka2
[root@ka1-centos8 ~]#killall keepalived
[root@centos6 ~]#curl 10.0.0.10
Sorry Server on ka2
#恢复都有后端 RS
[root@rs1 ~]#chmod 644 /var/www/html/index.html
[root@rs2 ~]#systemctl start httpd
[root@centos6 ~]#curl 10.0.0.10
<h1>rs1.wang.org</h1>
[root@centos6 ~]#curl 10.0.0.10
<h1>rs2.wang.org</h1>
[root@ka1-centos8 ~]#hostname -I
10.0.0.8
[root@ka2-centos8 ~]#hostname -I
10.0.0.18 10.0.0.10
#恢复ka1服务器,又抢占回原来的VIP
[root@ka1-centos8 ~]#systemctl start keepalived.service
[root@ka1-centos8 ~]#hostname -I
10.0.0.8 10.0.0.10
[root@ka2-centos8 ~]#hostname -I
10.0.0.18
[root@centos6 ~]#curl 10.0.0.10
<h1>rs1.wang.org</h1>
[root@centos6 ~]#curl 10.0.0.10
<h1>rs2.wang.org</h1>
7.2 实战案例:实现双主的 LVS-DR 模式
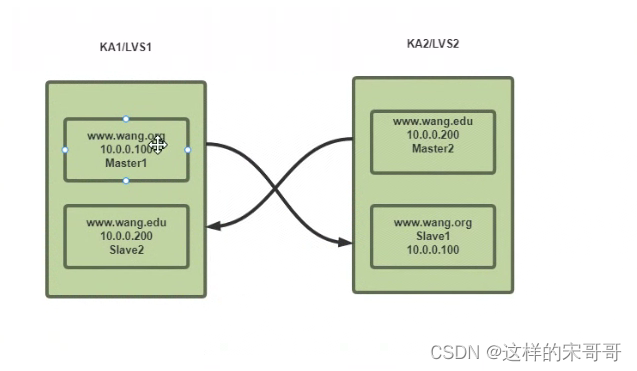
[root@ka1-centos8 ~]#vim /etc/keepalived/keepalived.conf
! Configuration File for keepalived
 global_defs {


 notification_email {


 root@localhost
 }
 notification_email_from keepalived@localhost
 smtp_server 127.0.0.1
 smtp_connect_timeout 30
 router_id ka1.wang.org   #另一个节点为ka2.wang.org
 vrrp_mcast_group4 224.0.100.10
 }

vrrp_instance VI_1 {


 state MASTER     #在另一个结点上为BACKUP
 interface eth0
 virtual_router_id 66
 priority 100         #在另一个结点上为80
 advert_int 1
 authentication {


 auth_type PASS
 auth_pass 123456
 }
 virtual_ipaddress {


 10.0.0.10/24 dev eth0 label eth0:1 #指定VIP
 }
}
vrrp_instance VI_2 {


 state BACKUP     #在另一个结点上为MASTER
 interface eth0
 virtual_router_id  88
 priority 80         #在另一个结点上为100
 advert_int 1
 authentication {


 auth_type PASS
 auth_pass 123456
 }
 virtual_ipaddress {


 10.0.0.20/24 dev eth0 label eth0:2 #指定VIP2
 }
}
virtual_server 10.0.0.10 80 {


 delay_loop 6
 lb_algo rr
 lb_kind DR
 protocol TCP
 sorry_server 127.0.0.1 80
 real_server 10.0.0.7 80 {

      #指定RS1地址
 weight 1
 HTTP_GET {


 url {


 path /
 status_code 200
 }
 connect_timeout 3
 nb_get_retry 3
 delay_before_retry 3
 }
 }
 real_server 10.0.0.17 80 {

       #指定RS2地址
 weight 1
 HTTP_GET {


 url {


 path /
 status_code 200
 }
 connect_timeout 3
 nb_get_retry 3
 delay_before_retry 3
 }
 }
}
virtual_server 10.0.0.20 80 {

     #指定VIP2
 delay_loop 6
 lb_algo rr
 lb_kind DR
 protocol TCP
 sorry_server 127.0.0.1 80
 real_server 10.0.0.27 80 {

     #指定RS3地址
 weight 1
 HTTP_GET {


 url {


 path /
 status_code 200
 }
 connect_timeout 3
 nb_get_retry 3
 delay_before_retry 3
 }
 }
 real_server 10.0.0.37 80 {

       #指定RS4地址
 weight 1
 HTTP_GET {


 url {


 path /
 status_code 200
 }
 connect_timeout 3
 nb_get_retry 3
 delay_before_retry 3
 }
 }
}
范例: 双主分别实现httpd和mysql服务的调度
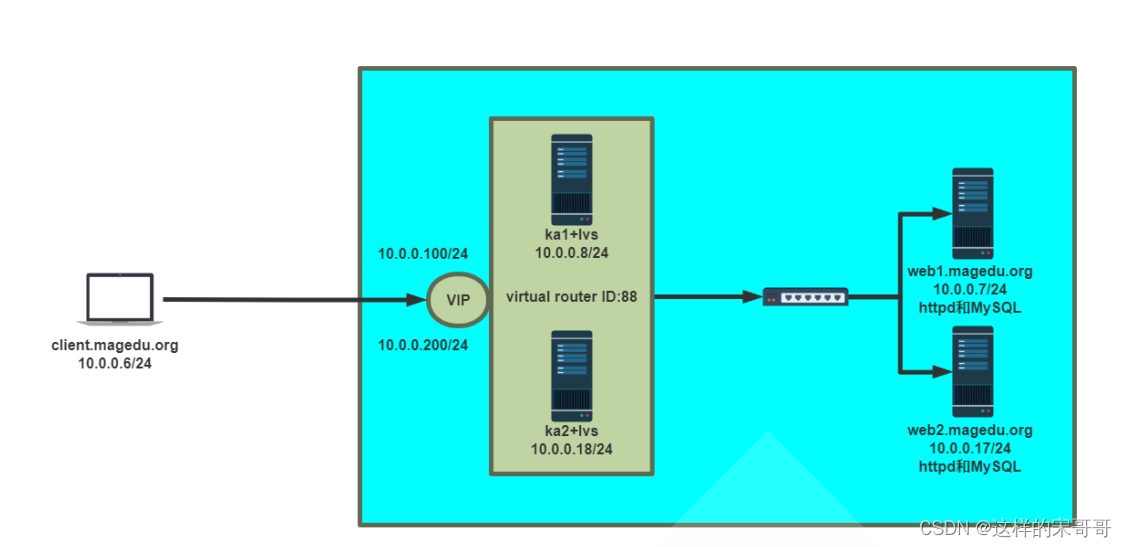
[root@ka1 conf.d]#cat web1.conf
vrrp_instance web1 {


   state MASTER
   interface eth0
   virtual_router_id 66
   priority 100
   advert_int 1
   authentication {


       auth_type PASS
       auth_pass 123456
   }
   virtual_ipaddress {


 10.0.0.100/24 dev eth0 label eth0:100
   }
 notify_master "/etc/keepalived/notify.sh master"

   notify_backup "/etc/keepalived/notify.sh backup"
   notify_fault "/etc/keepalived/notify.sh fault"
}
[root@ka1 conf.d]#cat lvs_.conf
lvs_mysql.conf lvs_web1.conf
[root@ka1 conf.d]#cat lvs_web1.conf
virtual_server 10.0.0.100 80 {


 delay_loop 3
 lb_algo rr
 lb_kind DR
 protocol TCP
 sorry_server 127.0.0.1 80
 real_server 10.0.0.7 80 {


 weight 1
 HTTP_GET {


 url {


 path /monitor.html
 status_code 200
 }
 connect_timeout 1
 nb_get_retry 3
 delay_before_retry 1
 }
 }
 real_server 10.0.0.17 80 {


 weight 1
       TCP_CHECK {


       connect_timeout 5
       nb_get_retry 3
       delay_before_retry 3
             connect_port 80
 }
   }
}
[root@ka1 conf.d]#cat mysql_vip.conf
vrrp_instance mysql{


   state BACKUP
   interface eth0
   virtual_router_id 88
   priority 80
   advert_int 1
   authentication {


       auth_type PASS
       auth_pass 123456
   }
   virtual_ipaddress {


 10.0.0.200/24 dev eth0 label eth0:200
   }
}
[root@ka1 conf.d]#cat lvs_mysql.conf
virtual_server 10.0.0.200 3306 {


 delay_loop 3
 lb_algo rr
 lb_kind DR
 protocol TCP
 real_server 10.0.0.7 3306 {


 weight 1
 TCP_CHECK {


 connect_timeout 5
 nb_get_retry 3
 delay_before_retry 3
             connect_port 3306
 }
 }
 real_server 10.0.0.17 3306 {


 weight 1
       TCP_CHECK {


       connect_timeout 5
       nb_get_retry 3
       delay_before_retry 3
             connect_port 3306
 }
   }
}
#注意:在后端服务器要实现两个VIP的配置
[root@web1 ~]#ip a show lo
1: lo: <LOOPBACK,UP,LOWER_UP> mtu 65536 qdisc noqueue state UNKNOWN group
default qlen 1000
   link/loopback 00:00:00:00:00:00 brd 00:00:00:00:00:00
   inet 127.0.0.1/8 scope host lo
       valid_lft forever preferred_lft forever
   inet 10.0.0.100/32 scope global lo:1
       valid_lft forever preferred_lft forever
   inet 10.0.0.200/32 scope global lo:2
       valid_lft forever preferred_lft forever
   inet6 ::1/128 scope host
       valid_lft forever preferred_lft forever


[root@ka1 ~]#ipvsadm -Ln
IP Virtual Server version 1.2.1 (size=4096)
Prot LocalAddress:Port Scheduler Flags
  -> RemoteAddress:Port           Forward Weight ActiveConn InActConn
TCP  10.0.0.100:80 rr
  -> 10.0.0.7:80                 Route   1      0          0
  -> 10.0.0.17:80                 Route   1      0          0
TCP  10.0.0.200:3306 rr
  -> 10.0.0.7:3306               Route   1      0          0
  -> 10.0.0.17:3306               Route   1      0          0


#测试
[root@client ~]#while true;do mysql -utest -p123456 -h10.0.0.200 -e 'show
variables like "%hostname%"';curl 10.0.0.100;sleep 0.5;done
+---------------+-----------------+
| Variable_name | Value           |
+---------------+-----------------+
| hostname     | web1.wang.org |
+---------------+-----------------+
10.0.0.17
+---------------+-----------------+
| Variable_name | Value           |
+---------------+-----------------+
| hostname     | web2.wang.org |
+---------------+-----------------+
10.0.0.7
7.3 实战案例:实现单主的 LVS-DR 模式,利用FWM绑定成多个服务为一个集群服务
参考文档: 注意有bug
/usr/share/doc/keepalived/keepalived.conf.fwmark
范例:
#两个节点都执行以下操作
[root@ka1-centos8 ~]#iptables -t mangle -A PREROUTING -d 10.0.0.10   -p tcp -m
multiport --dports 80,443 -j MARK --set-mark 6
[root@ka1-centos8 ~]#vim /etc/keepalived/keepalived.conf
! Configuration File for keepalived
 global_defs {


 notification_email {


 root@localhost
 }
 notification_email_from kaadmin@localhost
 smtp_server 127.0.0.1
 smtp_connect_timeout 30
 router_id ka1.wang.org #在另一个节点为ka2.wang.org
 vrrp_mcast_group4 224.100.100.100
 }

vrrp_instance VI_1 {


 state MASTER #在另一个节点为BACKUP
 interface eth0
 virtual_router_id 66
 priority 100 #在另一个节点为80
 advert_int 1
 authentication {


 auth_type PASS
 auth_pass 123456
 }
 virtual_ipaddress {


 10.0.0.10/24 dev eth0 label eth0:1
 }
 track_interface {


 eth0
 }
 notify_master "/etc/keepalived/notify.sh master"
 notify_backup "/etc/keepalived/notify.sh backup"
 notify_fault "/etc/keepalived/notify.sh fault"
}
virtual_server fwmark 6 {

       #指定FWM为6
 delay_loop 2
 lb_algo rr
 lb_kind DR
 sorry_server 127.0.0.1 80  #注意端口必须指定
 real_server 10.0.0.7 80 {

      #注意端口必须指定
 weight 1
 HTTP_GET {


 url {


 path /
 status_code 200
 }
 connect_timeout 2
 nb_get_retry 3
 delay_before_retry 3
 }
 }
 real_server 10.0.0.17 80 {

     #注意端口必须指定
 weight 1
 HTTP_GET {


 url {


 path /
 status_code 200
 }
 connect_timeout 2
 nb_get_retry 3
 delay_before_retry 3
 }
 }
}
#在RS1和RS2运行下面脚本
[root@rs1 ~]#cat lvs_dr_rs.sh
#!/bin/bash
#Author:wangxiaochun
#Date:2017-08-13
vip=10.0.0.10
vip2=10.0.0.20
mask='255.255.255.255'
dev=lo:1
dev2=lo:2
rpm -q httpd &> /dev/null || yum -y install httpd &>/dev/null
service httpd start &> /dev/null && echo "The httpd Server is Ready!"
echo "<h1>`hostname`</h1>" > /var/www/html/index.html
case $1 in
start)
    echo 1 > /proc/sys/net/ipv4/conf/all/arp_ignore
    echo 1 > /proc/sys/net/ipv4/conf/lo/arp_ignore
    echo 2 > /proc/sys/net/ipv4/conf/all/arp_announce
    echo 2 > /proc/sys/net/ipv4/conf/lo/arp_announce
   ifconfig $dev $vip netmask $mask #broadcast $vip up
   ifconfig $dev2 $vip2 netmask $mask #broadcast $vip up
    #route add -host $vip dev $dev
    echo "The RS Server is Ready!"
   ;;
stop)
   ifconfig $dev down
   ifconfig $dev2 down
    echo 0 > /proc/sys/net/ipv4/conf/all/arp_ignore
    echo 0 > /proc/sys/net/ipv4/conf/lo/arp_ignore
    echo 0 > /proc/sys/net/ipv4/conf/all/arp_announce
    echo 0 > /proc/sys/net/ipv4/conf/lo/arp_announce
    echo "The RS Server is Canceled!"
   ;;
*)
    echo "Usage: $(basename $0) start|stop"
    exit 1
   ;;
esac
[root@rs1 ~]#bash lvs_dr_rs.sh start
[root@rs2 ~]#bash lvs_dr_rs.sh start
#访问测试
[root@centos6 ~]#curl 10.0.0.10;curl -k https://10.0.0.20
<h1>rs1.wang.org</h1>
<h1>rs2.wang.org</h1>
八. 完成lvs + nginx 高可用配置

#!/bin/bash
VIP=172.20.36.222
case "$1" in
start)
       /sbin/ifconfig lo:0 $VIP netmask 255.255.255.255 broadcast $VIP
       /sbin/route add -host $VIP dev lo:0
       echo "1" >/proc/sys/net/ipv4/conf/lo/arp_ignore
       echo "2" >/proc/sys/net/ipv4/conf/lo/arp_announce
       echo "1" >/proc/sys/net/ipv4/conf/all/arp_ignore
       echo "2" >/proc/sys/net/ipv4/conf/all/arp_announce
       sysctl -p >/dev/null 2>&1
       echo "RealServer Start OK"
       ;;
stop)
       /sbin/ifconfig lo:0 down
       /sbin/route del $VIP >/dev/null 2>&1
       echo "0" >/proc/sys/net/ipv4/conf/lo/arp_ignore
       echo "0" >/proc/sys/net/ipv4/conf/lo/arp_announce
       echo "0" >/proc/sys/net/ipv4/conf/all/arp_ignore
       echo "0" >/proc/sys/net/ipv4/conf/all/arp_announce
       echo "RealServer Stoped"
       ;;
*)
       echo "Usage: $0 {start|stop}"
       exit 1
esac
exit 0