docker应用
- 一. docker常用命令博客
-
- 1.1 Docker安装及基础命令介绍
- 1.2 docker 命令帮助
- 1.3 容器操作基础命令
- 二. 基于alpine基础镜像构建常见的系统服务,任选三个完成[nginx/jdk/apache/haproxy/tomcat等等]。
- 三. 将构建的镜像放在阿里云仓库。
- 四. 将构建的镜像,放在自建的harbor中,并且单独可以提供相应的服务
- 五. docker的常见网络模式
- 六. 用docker-compose 将2中构建的镜像组合起来提供服务。
- 七 自己总结面试可能问的难回答的问题
一. docker常用命令博客
1.1 Docker安装及基础命令介绍
1.1.1 Docker 安装准备
官方网址: https://www.docker.com/
OS系统版本选择:
Docker 目前已经支持多种操作系统的安装运行,比如Ubuntu、CentOS、Redhat、Debian、Fedora,甚至是还支持了Mac和Windows,在linux系统上需要内核版本在3.10或以上
Docker版本选择:
docker版本号之前一直是0.X版本或1.X版本,但是从2017年3月1号开始改为每个季度发布一次稳定版,其版本号规则也统一变更为YY.MM,例如17.09表示是2017年9月份发布的Docker之前没有区分版本,但是2017年推出(将docker更名为)新的项目Moby,github地址: https://github.com/moby/moby,Moby项目属于Docker项目的全新上游,Docker将是一个隶属于的Moby的子
产品,而且之后的版本之后开始区分为 CE(Docker Community Edition,社区版本)和 EE(Docker Enterprise Edition,企业收费版),CE社区版本和EE企业版本都是每个季度发布一个新版本,但是EE版本提供后期安全维护1年,而CE版本是4个月,以下为官方原文:
https://blog.docker.com/2017/03/docker-enterprise-edition/
Docker CE and EE are released quarterly, and CE also has a monthly “Edge” option.
Each Docker EE release is supported and maintained for one year and receives
security and critical bugfixes during that period. We are also improving Docker
CE maintainability by maintaining each quarterly CE release for 4 months. That
gets Docker CE users a new 1-month window to update from one version to the
next.
如果要布署到 kubernetes上,需要查看相关kubernetes对docker版本要求的说明,比如:
https://github.com/kubernetes/kubernetes/blob/v1.17.2/CHANGELOG-1.17.md
1.1.2 安装和删除方法
官方文档 : https://docs.docker.com/engine/install/
阿里云文档: https://developer.aliyun.com/mirror/docker-cespm=a2c6h.13651102.0.0.3e221b11guHCWE
1.1.2.1 Ubuntu 安装和删除Docker
官方文档: https://docs.docker.com/install/linux/docker-ce/ubuntu/
Ubuntu 14.04/16.04/18.04/20.04 安装docker
# step 1: 安装必要的一些系统工具
sudo apt-get update
sudo apt-get -y install apt-transport-https ca-certificates curl softwareproperties-common
# step 2: 安装GPG证书
curl -fsSL https://mirrors.aliyun.com/docker-ce/linux/ubuntu/gpg | sudo apt-key
add -
# Step 3: 写入软件源信息
sudo add-apt-repository "deb [arch=amd64] https://mirrors.aliyun.com/dockerce/linux/ubuntu $(lsb_release -cs) stable"
# Step 4: 更新并安装Docker-CE
sudo apt-get -y update
sudo apt-get -y install docker-ce
# 安装指定版本的Docker-CE:
# Step 1: 查找Docker-CE的版本:
apt-cache madison docker-ce
 docker-ce | 5:19.03.5~3-0~ubuntu-bionic | https://mirrors.aliyun.com/dockerce/linux/ubuntu bionic/stable amd64 Packages
 docker-ce | 5:19.03.4~3-0~ubuntu-bionic | https://mirrors.aliyun.com/dockerce/linux/ubuntu bionic/stable amd64 Packages
 docker-ce | 5:19.03.3~3-0~ubuntu-bionic | https://mirrors.aliyun.com/dockerce/linux/ubuntu bionic/stable amd64 Packages
 docker-ce | 5:19.03.2~3-0~ubuntu-bionic | https://mirrors.aliyun.com/dockerce/linux/ubuntu bionic/stable amd64 Packages
 docker-ce | 5:19.03.1~3-0~ubuntu-bionic | https://mirrors.aliyun.com/dockerce/linux/ubuntu bionic/stable amd64 Packages
 docker-ce | 5:19.03.0~3-0~ubuntu-bionic | https://mirrors.aliyun.com/dockerce/linux/ubuntu bionic/stable amd64 Packages
 docker-ce | 5:18.09.9~3-0~ubuntu-bionic | https://mirrors.aliyun.com/dockerce/linux/ubuntu bionic/stable amd64 Packages
 docker-ce | 5:18.09.8~3-0~ubuntu-bionic | https://mirrors.aliyun.com/dockerce/linux/ubuntu bionic/stable amd64 Packages
 ....
 # Step 2: 安装指定版本的Docker-CE: (VERSION例如上面的5:17.03.1~ce-0~ubuntu-xenial)
sudo apt-get -y install docker-ce=[VERSION] docker-ce-cli=[VERSION]
#示例:指定版本安装
apt-get -y install docker-ce=5:18.09.9~3-0~ubuntu-bionic  docker-cecli=5:18.09.9~3-0~ubuntu-bionic
删除docker
[root@ubuntu ~]#apt purge docker-ce
[root@ubuntu ~]#rm -rf /var/lib/docker
范例: 内置仓库安装docker
[root@ubuntu2004 ~]#apt -y install docker.io
[root@ubuntu2004 ~]#docker version
Client:
 Version:           20.10.12
 API version:       1.41
 Go version:       go1.16.2
 Git commit:       20.10.12-0ubuntu2~20.04.1
 Built:             Wed Apr 6 02:14:38 2022
 OS/Arch:           linux/amd64
 Context:           default
 Experimental:     true
Server:
 Engine:
 Version:         20.10.12
  API version:     1.41 (minimum version 1.12)
 Go version:       go1.16.2
 Git commit:       20.10.12-0ubuntu2~20.04.1
 Built:           Thu Feb 10 15:03:35 2022
 OS/Arch:         linux/amd64
 Experimental:     false
 containerd:
 Version:         1.5.9-0ubuntu1~20.04.4
 GitCommit:
 runc:
 Version:         1.1.0-0ubuntu1~20.04.1
 GitCommit:
 docker-init:
 Version:         0.19.0
 GitCommit:
[root@ubuntu2004 ~]#docker info
Client:
 Context:   default
 Debug Mode: false
Server:
 Containers: 0
 Running: 0
 Paused: 0
 Stopped: 0
 Images: 0
 Server Version: 20.10.12
 Storage Driver: overlay2
 Backing Filesystem: extfs
 Supports d_type: true
 Native Overlay Diff: true
 userxattr: false
 Logging Driver: json-file
 Cgroup Driver: cgroupfs
 Cgroup Version: 1
 Plugins:
 Volume: local
 Network: bridge host ipvlan macvlan null overlay
 Log: awslogs fluentd gcplogs gelf journald json-file local logentries splunk
syslog
 Swarm: inactive
 Runtimes: io.containerd.runtime.v1.linux runc io.containerd.runc.v2
 Default Runtime: runc
 Init Binary: docker-init
 containerd version:
 runc version:
 init version:
 Security Options:
 apparmor
 seccomp
   Profile: default
 Kernel Version: 5.4.0-89-generic
 Operating System: Ubuntu 20.04.3 LTS
 OSType: linux
 Architecture: x86_64
 CPUs: 2
 Total Memory: 1.913GiB
 Name: ubuntu2004.wang.org
  ID: UF2A:GX7G:OIWE:W35O:EFSB:5WBH:AYCZ:N37P:YCIF:4AXD:D3IL:NCI4
 Docker Root Dir: /var/lib/docker
 Debug Mode: false
 Registry: https://index.docker.io/v1/
 Labels:
 Experimental: false
 Insecure Registries:
 127.0.0.0/8
 Live Restore Enabled: false
WARNING: No swap limit support
范例: 安装指定版本
# step 1: 安装必要的一些系统工具
[root@ubuntu2004 ~]#sudo apt-get update
[root@ubuntu2004 ~]#sudo apt-get -y install apt-transport-https ca-certificates
curl software-properties-common
# step 2: 安装GPG证书
[root@ubuntu2004 ~]#curl -fsSL https://mirrors.aliyun.com/dockerce/linux/ubuntu/gpg | sudo apt-key add -
# Step 3: 写入软件源信息
[root@ubuntu2004 ~]#sudo add-apt-repository "deb [arch=amd64]
https://mirrors.aliyun.com/docker-ce/linux/ubuntu $(lsb_release -cs) stable"
# Step 4: 更新并安装Docker-CE
[root@ubuntu2004 ~]#sudo apt-get -y update
# 安装指定版本的Docker-CE:
# Step 1: 查找Docker-CE的版本:
[root@ubuntu2004 ~]#apt-cache madison docker-ce
#   docker-ce | 17.03.1~ce-0~ubuntu-xenial | https://mirrors.aliyun.com/dockerce/linux/ubuntu xenial/stable amd64 Packages
#   docker-ce | 17.03.0~ce-0~ubuntu-xenial | https://mirrors.aliyun.com/dockerce/linux/ubuntu xenial/stable amd64 Packages
# Step 2: 安装指定版本的Docker-CE: (VERSION例如上面的17.03.1~ce-0~ubuntu-xenial)
# sudo apt-get -y install docker-ce=[VERSION]
[root@ubuntu2004 ~]#apt-cache madison docker-ce
 docker-ce | 5:20.10.17~3-0~ubuntu-focal | https://mirrors.aliyun.com/dockerce/linux/ubuntu focal/stable amd64 Packages
 docker-ce | 5:20.10.16~3-0~ubuntu-focal | https://mirrors.aliyun.com/dockerce/linux/ubuntu focal/stable amd64 Packages
 docker-ce | 5:20.10.15~3-0~ubuntu-focal | https://mirrors.aliyun.com/dockerce/linux/ubuntu focal/stable amd64 Packages
 docker-ce | 5:20.10.14~3-0~ubuntu-focal | https://mirrors.aliyun.com/dockerce/linux/ubuntu focal/stable amd64 Packages
 docker-ce | 5:20.10.13~3-0~ubuntu-focal | https://mirrors.aliyun.com/dockerce/linux/ubuntu focal/stable amd64 Packages
 docker-ce | 5:20.10.12~3-0~ubuntu-focal | https://mirrors.aliyun.com/dockerce/linux/ubuntu focal/stable amd64 Packages
 docker-ce | 5:20.10.11~3-0~ubuntu-focal | https://mirrors.aliyun.com/dockerce/linux/ubuntu focal/stable amd64 Packages
[root@ubuntu2004 ~]#apt install docker-ce=5:20.10.10~3-0~ubuntu-focal docker-cecli=5:20.10.10~3-0~ubuntu-focal
[root@ubuntu2004 ~]#docker version
Client: Docker Engine - Community
 Version:           20.10.10
 API version:       1.41
 Go version:       go1.16.9
 Git commit:       b485636
 Built:             Mon Oct 25 07:42:59 2021
 OS/Arch:           linux/amd64
 Context:           default
 Experimental:     true
Server: Docker Engine - Community
 Engine:
 Version:         20.10.10
 API version:     1.41 (minimum version 1.12)
 Go version:       go1.16.9
 Git commit:       e2f740d
 Built:           Mon Oct 25 07:41:08 2021
 OS/Arch:         linux/amd64
 Experimental:     false
 containerd:
 Version:         1.6.6
 GitCommit:       10c12954828e7c7c9b6e0ea9b0c02b01407d3ae1
 runc:
 Version:         1.1.2
 GitCommit:       v1.1.2-0-ga916309
 docker-init:
 Version:         0.19.0
 GitCommit:       de40ad0
1.1.2.2 CentOS 安装和删除Docker
官方文档: https://docs.docker.com/install/linux/docker-ce/centos/
CentOS 6 因内核太旧,即使支持安装docker,但会有各种问题,不建议安装
CentOS 7 的 extras 源虽然可以安装docker,但包比较旧,建议从官方源或镜像源站点下载安装docker
CentOS 8 有新技术 podman 代替 docker
因此建议在CentOS 7 上安装 docker
#extras 源中包名为docker
[root@centos7 ~]#yum list docker
Loaded plugins: fastestmirror
Repository base is listed more than once in the configuration
Repository extras is listed more than once in the configuration
Loading mirror speeds from cached hostfile
 * base: mirrors.tuna.tsinghua.edu.cn
 * extras: mirrors.tuna.tsinghua.edu.cn
 * updates: mirrors.tuna.tsinghua.edu.cn
Available Packages
docker.x86_64      2:1.13.1-103.git7f2769b.el7.centos
extras
下载rpm包安装:
官方rpm包下载地址:
https://download.docker.com/linux/centos/7/x86_64/stable/Packages/
阿里镜像下载地址:
https://mirrors.aliyun.com/docker-ce/linux/centos/7/x86_64/stable/Packages/
通过yum源安装:
由于官网的yum源太慢,下面使用阿里云的Yum源进行安装
rm -rf /etc/yum.repos.d/*
#CentOS 7 安装docker依赖三个yum源:Base,Extras,docker-ce
wget -O /etc/yum.repos.d/CentOS-Base.repo http://mirrors.aliyun.com/repo/Centos-
7.repo
wget -O /etc/yum.repos.d/epel.repo http://mirrors.aliyun.com/repo/epel-7.repo
wget -O /etc/yum.repos.d/docker-ce.repo https://mirrors.aliyun.com/dockerce/linux/centos/docker-ce.repo
yum clean all
yum -y install docker-ce
systemctl enable --now docker
删除docker
[root@centos7 ~]#yum remove docker-ce
#删除docker资源存放的相关文件
[root@centos7 ~]#rm -rf /var/lib/docker
范例: 安装指定版本
[root@rocky8 ~]#cat /etc/yum.repos.d/docker.repo
[docker-ce]
name=docker-ce
baseurl=https://mirrors.aliyun.com/docker-ce/linux/centos/8/x86_64/stable/
gpgcheck=0
[root@rocky8 ~]#yum list docker-ce --showduplicates
Last metadata expiration check: 0:07:05 ago on Fri 01 Jul 2022 11:11:54 AM CST.
Installed Packages
docker-ce.x86_64                                             3:20.10.10-3.el8
                                            @docker-ce
Available Packages
docker-ce.x86_64                                             3:19.03.13-3.el8
                                            docker-ce
docker-ce.x86_64                                             3:19.03.14-3.el8
                                            docker-ce
docker-ce.x86_64                                             3:19.03.15-3.el8
                                            docker-ce
docker-ce.x86_64                                             3:20.10.0-3.el8
                                          docker-ce
docker-ce.x86_64                                             3:20.10.1-3.el8

....
[root@rocky8 ~]#yum install docker-ce-3:20.10.10-3.el8 docker-ce-cli-1:20.10.10-
3.el8
[root@rocky8 ~]#docker version
Client: Docker Engine - Community
 Version:           20.10.10
 API version:       1.41
 Go version:       go1.16.9
 Git commit:       b485636
 Built:             Mon Oct 25 07:42:56 2021
 OS/Arch:           linux/amd64
 Context:           default
 Experimental:     true
Cannot connect to the Docker daemon at unix:///var/run/docker.sock. Is the docker
daemon running?
[root@rocky8 ~]#systemctl enable --now docker.service
Created symlink /etc/systemd/system/multi-user.target.wants/docker.service →
/usr/lib/systemd/system/docker.service.
范例: CentOS 7 基于阿里云的安装docker方法
阿里云说明: https://developer.aliyun.com/mirror/docker-ce?spm=a2c6h.13651102.0.0.3e221b11sUMKNV
# step 1: 安装必要的一些系统工具
yum install -y yum-utils device-mapper-persistent-data lvm2
# Step 2: 添加软件源信息
yum-config-manager --add-repo https://mirrors.aliyun.com/dockerce/linux/centos/docker-ce.repo
# Step 3: 更新并安装Docker-CE
yum makecache fast
yum -y install docker-ce
# Step 4: 开启Docker服务
service docker start
# 注意:
# 官方软件源默认启用了最新的软件,您可以通过编辑软件源的方式获取各个版本的软件包。例如官方并没有
将测试版本的软件源置为可用,您可以通过以下方式开启。同理可以开启各种测试版本等。
# vim /etc/yum.repos.d/docker-ee.repo
#   将[docker-ce-test]下方的enabled=0修改为enabled=1
#
# 安装指定版本的Docker-CE:
# Step 1: 查找Docker-CE的版本:
# yum list docker-ce.x86_64 --showduplicates | sort -r
#   Loading mirror speeds from cached hostfile
#   Loaded plugins: branch, fastestmirror, langpacks
#   docker-ce.x86_64           17.03.1.ce-1.el7.centos           docker-cestable
#   docker-ce.x86_64           17.03.1.ce-1.el7.centos           @docker-cestable
#   docker-ce.x86_64           17.03.0.ce-1.el7.centos           docker-cestable
#   Available Packages
# Step2: 安装指定版本的Docker-CE: (VERSION例如上面的17.03.0.ce.1-1.el7.centos)
yum -y install docker-ce-[VERSION]
#示例
[root@centos7 ~]#yum -y install docker-ce-19.03.12-3.el7
范例: 在CentOS 7上安装指定版本的docker
[root@centos7 ~]#cat /etc/redhat-release
CentOS Linux release 7.6.1810 (Core)
[root@centos7 ~]#ls /etc/yum.repos.d/
backup base.repo
[root@centos7 ~]#wget -P /etc/yum.repos.d/ https://mirrors.aliyun.com/dockerce/linux/centos/docker-ce.repo
Saving to: ‘/etc/yum.repos.d/docker-ce.repo’
100%[====================================================================>]
2,640       --.-K/s   in 0s
2020-01-23 21:56:21 (505 MB/s) - ‘/etc/yum.repos.d/docker-ce.repo’ saved
[2640/2640]
[root@centos7 ~]#ls /etc/yum.repos.d/
backup base.repo docker-ce.repo
[root@centos7 ~]#yum clean all
1.1.2.3 Linux 二进制安装
本方法适用于无法上网或无法通过包安装方式安装的主机上安装docker
安装文档: https://docs.docker.com/install/linux/docker-ce/binaries/
二进制安装下载路径
https://download.docker.com/linux/
https://mirrors.aliyun.com/docker-ce/linux/static/stable/x86_64/
范例: 在CentOS8上实现二进制安装docker
[root@centos8 ~]#wget
https://download.docker.com/linux/static/stable/x86_64/docker-19.03.5.tgz
[root@centos8 ~]#tar xvf docker-19.03.5.tgz
docker/
docker/docker-init
docker/docker
docker/dockerd
docker/runc
docker/ctr
docker/docker-proxy
docker/containerd
docker/containerd-shim
[root@centos8 ~]#cp docker/* /usr/bin/
#启动dockerd服务
[root@centos8 ~]#dockerd &>/dev/null &
[root@centos8 ~]#docker version
Client: Docker Engine - Community
 Version:           19.03.5
 API version:       1.40
 Go version:       go1.12.12
 Git commit:       633a0ea838
 Built:             Wed Nov 13 07:22:05 2019
 OS/Arch:           linux/amd64
 Experimental:      false
Server: Docker Engine - Community
 Engine:
 Version:          19.03.5
 API version:      1.40 (minimum version 1.12)
 Go version:       go1.12.12
 Git commit:       633a0ea838
 Built:           Wed Nov 13 07:28:45 2019
 OS/Arch:         linux/amd64
 Experimental:     false
 containerd:
 Version:         v1.2.10
 GitCommit:       b34a5c8af56e510852c35414db4c1f4fa6172339
 runc:
  Version:          1.0.0-rc8+dev
 GitCommit:       3e425f80a8c931f88e6d94a8c831b9d5aa481657
 docker-init:
 Version:          0.18.0
 GitCommit:       fec3683
[root@centos8 ~]#docker run hello-world
Unable to find image 'hello-world:latest' locally
latest: Pulling from library/hello-world
1b930d010525: Pull complete
Digest: sha256:9572f7cdcee8591948c2963463447a53466950b3fc15a247fcad1917ca215a2f
Status: Downloaded newer image for hello-world:latest
Hello from Docker!
This message shows that your installation appears to be working correctly.
To generate this message, Docker took the following steps:
1. The Docker client contacted the Docker daemon.
2. The Docker daemon pulled the "hello-world" image from the Docker Hub.
   (amd64)
3. The Docker daemon created a new container from that image which runs the
   executable that produces the output you are currently reading.
4. The Docker daemon streamed that output to the Docker client, which sent it
   to your terminal.
To try something more ambitious, you can run an Ubuntu container with:
$ docker run -it ubuntu bash
Share images, automate workflows, and more with a free Docker ID:
 https://hub.docker.com/
For more examples and ideas, visit:
 https://docs.docker.com/get-started/
[root@centos8 ~]#pstree -p
systemd(1)─┬─NetworkManager(660)─┬─{

    NetworkManager}(669)
           │                     └─{

    NetworkManager}(671)
           ├─VGAuthService(662)
           ├─agetty(718)
           ├─atd(712)
           ├─auditd(625)───{

    auditd}(627)
           ├─automount(905)─┬─{

    automount}(912)
           │               ├─{

    automount}(913)
           │               ├─{

    automount}(930)
           │               └─{

    automount}(937)
           ├─containerd(679)─┬─{

    containerd}(693)
           │                 ├─{

    containerd}(694)
           │                 ├─{

    containerd}(696)
           │                 ├─{

    containerd}(704)
           │                 ├─{

    containerd}(705)
           │                 ├─{

    containerd}(707)
           │                 └─{

    containerd}(708)
           ├─crond(713)
           ├─dbus-daemon(658)
           ├─dockerd(908)─┬─{

    dockerd}(922)
           │             ├─{

    dockerd}(923)
           │             ├─{

    dockerd}(925)
           │             ├─{

    dockerd}(944)
           │             ├─{

    dockerd}(1028)
           │             ├─{

    dockerd}(1100)
                      │             └─{

    dockerd}(1114)
           ├─polkitd(659)─┬─{

    polkitd}(670)
           │             ├─{

    polkitd}(672)
           │             ├─{

    polkitd}(677)
           │             ├─{

    polkitd}(678)
           │             └─{

    polkitd}(701)
           ├─rngd(664)───{

    rngd}(666)
           ├─rsyslogd(906)─┬─{

    rsyslogd}(911)
           │               └─{

    rsyslogd}(914)
           ├─sshd(675)───sshd(1370)───sshd(1382)───bash(1383)───pstree(1441)
           ├─sssd(661)─┬─sssd_be(688)
           │           └─sssd_nss(703)
           ├─systemd(1373)───(sd-pam)(1376)
           ├─systemd-journal(551)
           ├─systemd-logind(709)
           ├─systemd-udevd(580)
           ├─tuned(674)─┬─{

    tuned}(915)
           │           ├─{

    tuned}(934)
           │           └─{

    tuned}(948)
           └─vmtoolsd(663)
范例: 创建 service文件
[root@centos8 ~]#cat > /lib/systemd/system/docker.service <<-EOF
[Unit]
Description=Docker Application Container Engine
Documentation=https://docs.docker.com
After=network-online.target firewalld.service
Wants=network-online.target
[Service]
Type=notify
# the default is not to use systemd for cgroups because the delegate issues
still
# exists and systemd currently does not support the cgroup feature set required
# for containers run by docker
ExecStart=/usr/bin/dockerd -H unix://var/run/docker.sock
ExecReload=/bin/kill -s HUP \$MAINPID
# Having non-zero Limit*s causes performance problems due to accounting overhead
# in the kernel. We recommend using cgroups to do container-local accounting.
LimitNOFILE=infinity
LimitNPROC=infinity
LimitCORE=infinity
# Uncomment TasksMax if your systemd version supports it.
# Only systemd 226 and above support this version.
#TasksMax=infinity
TimeoutStartSec=0
# set delegate yes so that systemd does not reset the cgroups of docker
containers
Delegate=yes
# kill only the docker process, not all processes in the cgroup
KillMode=process
# restart the docker process if it exits prematurely
Restart=on-failure
StartLimitBurst=3
StartLimitInterval=60s
[Install]
WantedBy=multi-user.target
EOF
[root@centos8 ~]#systemctl daemon-reload
[root@centos8 ~]#systemctl enable --now docker
范例: 创建相关的service文件,此方式新版有问题
#创建相关的service文件,此方式新版有问题
[root@centos8 ~]#groupadd -r docker
#将Ubuntu1804或CentOS7基于包方式安装的相关文件复制到相应目录下
[root@ubuntu1804 ~]#ll /lib/systemd/system/docker.*
-rw-r--r-- 1 root root 1683 Jun 22 23:44 /lib/systemd/system/docker.service
-rw-r--r-- 1 root root  197 Jun 22 23:44 /lib/systemd/system/docker.socket
[root@ubuntu1804 ~]#ll /lib/systemd/system/containerd.service
-rw-r--r-- 1 root root 1085 May  2  2020 /lib/systemd/system/containerd.service
[root@ubuntu1804 ~]#cat /lib/systemd/system/docker.socket
[Unit]
Description=Docker Socket for the API
PartOf=docker.service
[Socket]
ListenStream=/var/run/docker.sock
SocketMode=0660
SocketUser=root
SocketGroup=docker
[Install]
WantedBy=sockets.target
[root@ubuntu1804 ~]#cat /lib/systemd/system/docker.service
[Unit]
Description=Docker Application Container Engine
Documentation=https://docs.docker.com
BindsTo=containerd.service
After=network-online.target firewalld.service containerd.service
Wants=network-online.target
Requires=docker.socket
[Service]
Type=notify
# the default is not to use systemd for cgroups because the delegate issues
still
# exists and systemd currently does not support the cgroup feature set required
# for containers run by docker
ExecStart=/usr/bin/dockerd -H fd:// --containerd=/run/containerd/containerd.sock
ExecReload=/bin/kill -s HUP $MAINPID
TimeoutSec=0
RestartSec=2
Restart=always
# Note that StartLimit* options were moved from "Service" to "Unit" in systemd
229.
# Both the old, and new location are accepted by systemd 229 and up, so using the
old location
# to make them work for either version of systemd.
StartLimitBurst=3
# Note that StartLimitInterval was renamed to StartLimitIntervalSec in systemd
230.
# Both the old, and new name are accepted by systemd 230 and up, so using the old
name to make
# this option work for either version of systemd.
StartLimitInterval=60s
# Having non-zero Limit*s causes performance problems due to accounting overhead
# in the kernel. We recommend using cgroups to do container-local accounting.
LimitNOFILE=infinity
LimitNPROC=infinity
LimitCORE=infinity
# Comment TasksMax if your systemd version does not support it.
# Only systemd 226 and above support this option.
TasksMax=infinity
# set delegate yes so that systemd does not reset the cgroups of docker
containers
Delegate=yes
# kill only the docker process, not all processes in the cgroup
KillMode=process
[Install]
WantedBy=multi-user.target
[root@ubuntu1804 ~]#cat /lib/systemd/system/containerd.service
#   Copyright 2018-2020 Docker Inc.
#   Licensed under the Apache License, Version 2.0 (the "License");
#   you may not use this file except in compliance with the License.
#   You may obtain a copy of the License at
#       http://www.apache.org/licenses/LICENSE-2.0
#   Unless required by applicable law or agreed to in writing, software
#   distributed under the License is distributed on an "AS IS" BASIS,
#   WITHOUT WARRANTIES OR CONDITIONS OF ANY KIND, either express or implied.
#   See the License for the specific language governing permissions and
#   limitations under the License.
[Unit]
Description=containerd container runtime
Documentation=https://containerd.io
After=network.target
[Service]
ExecStartPre=-/sbin/modprobe overlay
ExecStart=/usr/bin/containerd
KillMode=process
Delegate=yes
LimitNOFILE=1048576
# Having non-zero Limit*s causes performance problems due to accounting overhead
# in the kernel. We recommend using cgroups to do container-local accounting.
LimitNPROC=infinity
LimitCORE=infinity
TasksMax=infinity
[Install]
WantedBy=multi-user.target
[root@ubuntu1804 ~]#scp /lib/systemd/system/docker.*
/lib/systemd/system/containerd.service 10.0.0.8:/lib/systemd/system/
The authenticity of host '10.0.0.8 (10.0.0.8)' can't be established.
ECDSA key fingerprint is SHA256:8mUO3Wy13Ktt5pRBKaOU40avmw1x0gH5XTPK48CEWoM.
Are you sure you want to continue connecting (yes/no)? yes
Warning: Permanently added '10.0.0.8' (ECDSA) to the list of known hosts.
[email protected]'s password:
docker.service                                             100% 1683   650.8KB/s
  00:00 docker.socket                                             100%  197
303.3KB/s   00:00
containerd.service                                         100%  487   516.6KB/s
  00:00
[root@centos8 ~]#systemctl daemon-reload
[root@centos8 ~]#systemctl enable --now docker
范例: 一键离线安装二进制 docker
#!/bin/bash
#
#********************************************************************
#Author: wangxiaochun
#QQ: 29308620
#Date: 2022-07-01
#FileName: offline_install_docker.sh
#URL: http://www.wangxiaochun.com
#Description: The test script
#Copyright (C): 2022 All rights reserved
#********************************************************************
DOCKER_VERSION=20.10.10
URL=https://mirrors.aliyun.com
prepare () {


    if [ ! -e docker-${DOCKER_VERSION}.tgz ];then
        wget ${URL}/dockerce/linux/static/stable/x86_64/docker-${DOCKER_VERSION}.tgz
    fi
   [ $? -ne 0 ] && {

     echo "文件下载失败"; exit; }
}
install_docker () {


   tar xf docker-${DOCKER_VERSION}.tgz -C /usr/local/
    cp /usr/local/docker/* /usr/bin/
    cat > /lib/systemd/system/docker.service <<-EOF
[Unit]
Description=Docker Application Container Engine
Documentation=https://docs.docker.com
After=network-online.target firewalld.service
Wants=network-online.target
[Service]
Type=notify
# the default is not to use systemd for cgroups because the delegate issues
still
# exists and systemd currently does not support the cgroup feature set required
# for containers run by docker
ExecStart=/usr/bin/dockerd -H unix://var/run/docker.sock
ExecReload=/bin/kill -s HUP \$MAINPID
# Having non-zero Limit*s causes performance problems due to accounting overhead
# in the kernel. We recommend using cgroups to do container-local accounting.
LimitNOFILE=infinity
LimitNPROC=infinity
LimitCORE=infinity
# Uncomment TasksMax if your systemd version supports it.
# Only systemd 226 and above support this version.
#TasksMax=infinity
TimeoutStartSec=0
# set delegate yes so that systemd does not reset the cgroups of docker
containers
Delegate=yes
# kill only the docker process, not all processes in the cgroup
KillMode=process
# restart the docker process if it exits prematurely
Restart=on-failure
StartLimitBurst=3
StartLimitInterval=60s
[Install]
WantedBy=multi-user.target
EOF
   systemctl daemon-reload
}
start_docker (){


   systemctl enable --now docker
   docker version
}
prepare
install_docker
start_docker
1.1.2.4 安装 podman
范例: 在CentOS8上安装podman
#在CentOS8上安装docker会自动安装podman,docker工具只是一个脚本,调用了Podman
[root@centos8 ~]#dnf install docker
[root@centos8 ~]#rpm -ql podman-docker
/usr/bin/docker
[root@centos8 ~]#cat /usr/bin/docker
#!/bin/sh
[ -f /etc/containers/nodocker ] || \
echo "Emulate Docker CLI using podman. Create /etc/containers/nodocker to quiet
msg." >&2
exec /usr/bin/podman "$@"
[root@centos8 ~]#podman version
Version:            1.4.2-stable2
RemoteAPI Version:  1
Go Version:         go1.12.8
OS/Arch:           linux/amd64
#修改拉取镜像的地址的顺序,提高速度
[root@centos8 ~]#vim /etc/containers/registries.conf
[registries.search]
registries = ['docker.io','quay.io','registry.redhat.io',
'registry.access.redhat.com']
1.1.2.5 在不同系统上实现一键安装 docker 脚本
1.1.2.5.1 基于 ubuntu 18.04和20.04 的 一键安装 docker 脚本
[root@ubuntu1804 ~]#cat install_docker_ubuntu.sh
#!/bin/bash
#Description: Install docker on Ubuntu18.04 and 20.04
#Version:1.0
#Date:2020-01-22
COLOR="echo -e \\033[1;31m"
END="\033[m"
DOCKER_VERSION="5:19.03.5~3-0~ubuntu-bionic"
install_docker(){


dpkg -s docker-ce &> /dev/null && ${COLOR}"Docker已安装,退出"${END} && exit
apt update
apt  -y install apt-transport-https ca-certificates curl software-propertiescommon
#curl -fsSL https://mirrors.aliyun.com/docker-ce/linux/ubuntu/gpg | sudo apt-key
add -
#add-apt-repository "deb [arch=amd64] https://mirrors.aliyun.com/dockerce/linux/ubuntu $(lsb_release -cs) stable"
curl -fsSL https://mirrors.tuna.tsinghua.edu.cn/docker-ce/linux/ubuntu/gpg |
sudo apt-key add -
add-apt-repository "deb [arch=amd64]
https://mirrors.tuna.tsinghua.edu.cn/docker-ce/linux/ubuntu $(lsb_release -cs)
stable"
apt update
${COLOR}"Docker有以下版本"${END}
apt-cache madison docker-ce
${COLOR}"5秒后即将安装: docker-"${DOCKER_VERSION}" 版本....."${END}
${COLOR}"如果想安装其它Docker版本,请按ctrl+c键退出,修改版本再执行"${END}
sleep 5
apt -y install docker-ce=${DOCKER_VERSION} docker-ce-cli=${DOCKER_VERSION}
mkdir -p /etc/docker
tee /etc/docker/daemon.json <<-'EOF'
{
  "registry-mirrors": ["https://si7y70hh.mirror.aliyuncs.com"]
}
EOF
systemctl daemon-reload
systemctl enable --now docker
docker version && ${COLOR}"Docker 安装成功"${END} ||  ${COLOR}"Docker 安装失
败"${END}
}
install_docker
1.1.2.5.2 基于 CentOS 8 实现一键安装 docker 脚本
利用阿里云的基于CentOS8的docker yum源实现
#!/bin/bash
#
#********************************************************************
#Author: wangxiaochun
#QQ: 29308620
#Date: 2020-11-13
#FileName: install_docker_for_centos8.sh
#URL: http://www.wangxiaochun.com
#Description: The test script
#Copyright (C): 2020 All rights reserved
#********************************************************************
. /etc/init.d/functions
COLOR="echo -e \\E[1;32m"
END="\\E[0m"
DOCKER_VERSION="-19.03.13-3.el8"
install_docker() {


   rpm -q docker-ce &> /dev/null && action "Docker已安装" && exit
    ${COLOR}"开始安装 Docker....."${END}
    sleep 1
 cat > /etc/yum.repos.d/docker.repo <<EOF
[docker]
name=docker
gpgcheck=0
baseurl=https://mirrors.tuna.tsinghua.edu.cn/dockerce/linux/centos/8/x86_64/stable/
#baseurl=https://mirrors.aliyun.com/docker-ce/linux/centos/8/x86_64/stable/
EOF

   yum clean all
   yum -y install docker-ce$DOCKER_VERSION docker-ce-cli$DOCKER_VERSION \
       || {

     ${COLOR}"Base,Extras的yum源失败,请检查yum源配置"${END};exit; }
    mkdir -p /etc/docker
        cat > /etc/docker/daemon.json <<EOF
{
"registry-mirrors": ["https://si7y70hh.mirror.aliyuncs.com"]
 }
EOF
   systemctl enable --now docker
   docker version && ${COLOR}"Docker安装成功"${END} || ${COLOR}"Docker安装失
败"${END}
}
install_docker
早期CentOS8无yum仓库,可以利用下面脚本安装docker
#!/bin/bash
#
#********************************************************************
#Author: wangxiaochun
#QQ: 29308620
#Date: 2020-02-27
#FileName: install_docker_for_centos8.sh
#URL: http://www.magedu.com
#Description: The test script
#Copyright (C): 2020 All rights reserved
#********************************************************************
. /etc/init.d/functions
COLOR="echo -e \\E[1;32m"
END="\\E[0m"
DOCKER_VERSION="-19.03.8-3.el7"
install_docker() {


    ${COLOR}"开始安装 Docker....."${END}
    sleep 1
    #wget -P /etc/yum.repos.d/ https://mirrors.aliyun.com/dockerce/linux/centos/docker-ce.repo || { ${COLOR}"互联网连接失败,请检查网络配
置!"${END};exit; }
    wget -P /etc/yum.repos.d/ https://mirrors.tuna.tsinghua.edu.cn/dockerce/linux/centos/docker-ce.repo || { ${COLOR}"互联网连接失败,请检查网络配
置!"${END};exit; }
   yum clean all
   dnf -y install https://mirrors.aliyun.com/dockerce/linux/centos/7/x86_64/stable/Packages/containerd.io-1.2.13-3.1.el7.x86_64.rpm
   yum -y install docker-ce$DOCKER_VERSION docker-ce-cli$DOCKER_VERSION \
       || { ${COLOR}"Base,Extras的yum源失败,请检查yum源配置"${END};exit; }
    mkdir -p /etc/docker
    cat > /etc/docker/daemon.json <<EOF
{
"registry-mirrors": ["https://si7y70hh.mirror.aliyuncs.com"]
 }
EOF
   systemctl enable --now docker
   docker version && ${COLOR}"Docker安装成功"${END} || ${COLOR}"Docker安装失
败"${END}
}
rpm -q docker &> /dev/null && action "Docker已安装" || install_docker
1.1.2.5.3 基于 CentOS 7 实现一键安装docker 脚本
[root@centos7 ~]#cat install_docker_for_centos7.sh
#!/bin/bash
#
#********************************************************************
#Author: wangxiaochun
#QQ: 29308620
#Date: 2020-01-26
#FileName: install_docker_for_centos7.sh
#URL: http://www.magedu.com
#Description: The test script
#Copyright (C): 2020 All rights reserved
#********************************************************************
. /etc/init.d/functions
COLOR="echo -e \\033[1;31m"
END="\033[m"
VERSION="19.03.5-3.el7"
rpm -q docker-ce &> /dev/null && action "Docker已安装" && exit
wget -P /etc/yum.repos.d/ https://mirrors.tuna.tsinghua.edu.cn/dockerce/linux/centos/docker-ce.repo || {

     ${COLOR}"互联网连接失败,请检查网络配
置!"${END};exit; }
#wget -P /etc/yum.repos.d/ https://mirrors.aliyun.com/dockerce/linux/centos/docker-ce.repo || { ${COLOR}"互联网连接失败,请检查网络配
置!"${END};exit; }
yum clean all
yum -y install docker-ce-$VERSION docker-ce-cli-$VERSION || {
${COLOR}"Base,Extras的yum源失败,请检查yum源配置"${END};exit; }
#使用阿里做镜像加速
mkdir -p /etc/docker
cat > /etc/docker/daemon.json <<EOF
{
"registry-mirrors": ["https://si7y70hh.mirror.aliyuncs.com"]
 }
EOF
systemctl enable --now docker
docker version && ${COLOR}"Docker安装成功"${END} || ${COLOR}"Docker安装失败"${END}
1.1.2.5.4 通用安装docker脚本
[root@ubuntu1804 ~]#curl -fsSL get.docker.com -o get-docker.sh
[root@ubuntu1804 ~]#sh get-docker.sh --mirror Aliyun
1.2 docker 命令帮助
docker 命令是最常使用的docker 客户端命令,其后面可以加不同的参数以实现不同的功能
docker 命令格式
docker [OPTIONS] COMMAND
COMMAND分为
Management Commands  #指定管理的资源对象类型,较新的命令用法,将命令按资源类型进行分类,方便使
用
Commands #对不同资源操作的命令不分类,使用容易产生混乱
docker 命令有很多子命令,可以用下面方法查看帮助
#docker 命令帮助
man docker
docker
docker  --help
#docker 子命令帮助
man docker-COMMAND
docker COMMAND --help
官方文档:
https://docs.docker.com/reference/
https://docs.docker.com/engine/reference/commandline/cli/
范例: 查看docker命令帮助
[root@ubuntu1804 ~]#docker --help
Usage: docker [OPTIONS] COMMAND
A self-sufficient runtime for containers
Options:
      --config string     Location of client config files (default
"/root/.docker")
  -c, --context string     Name of the context to use to connect to the daemon
(overrides DOCKER_HOST env var and default
                           context set with "docker context use")
  -D, --debug             Enable debug mode
  -H, --host list         Daemon socket(s) to connect to
  -l, --log-level string   Set the logging level
("debug"|"info"|"warn"|"error"|"fatal") (default "info")
      --tls               Use TLS; implied by --tlsverify
      --tlscacert string   Trust certs signed only by this CA (default
"/root/.docker/ca.pem")
      --tlscert string     Path to TLS certificate file (default
"/root/.docker/cert.pem")
      --tlskey string     Path to TLS key file (default
"/root/.docker/key.pem")
      --tlsverify         Use TLS and verify the remote
  -v, --version           Print version information and quit
Management Commands:
 builder     Manage builds
 config     Manage Docker configs
 container   Manage containers
 context     Manage contexts
 engine     Manage the docker engine
 image       Manage images
 network     Manage networks
  node       Manage Swarm nodes
 plugin     Manage plugins
 secret     Manage Docker secrets
  service     Manage services
 stack       Manage Docker stacks
 swarm       Manage Swarm
 system     Manage Docker
 trust       Manage trust on Docker images
 volume     Manage volumes
Commands:
 attach     Attach local standard input, output, and error streams to a running
container
 build       Build an image from a Dockerfile
 commit     Create a new image from a container's changes
  cp         Copy files/folders between a container and the local filesystem
 create     Create a new container
  diff       Inspect changes to files or directories on a container's
filesystem
 events     Get real time events from the server
 exec       Run a command in a running container
  export     Export a container's filesystem as a tar archive
 history     Show the history of an image
 images     List images
 import     Import the contents from a tarball to create a filesystem image
 info       Display system-wide information
 inspect     Return low-level information on Docker objects
  kill       Kill one or more running containers
 load       Load an image from a tar archive or STDIN
 login       Log in to a Docker registry
 logout     Log out from a Docker registry
 logs       Fetch the logs of a container
 pause       Pause all processes within one or more containers
 port       List port mappings or a specific mapping for the container
  ps         List containers
 pull       Pull an image or a repository from a registry
 push       Push an image or a repository to a registry
 rename     Rename a container
  restart     Restart one or more containers
  rm         Remove one or more containers
 rmi         Remove one or more images
 run         Run a command in a new container
 save       Save one or more images to a tar archive (streamed to STDOUT by
default)
 search     Search the Docker Hub for images
   start       Start one or more stopped containers
 stats       Display a live stream of container(s) resource usage statistics
  stop       Stop one or more running containers
 tag         Create a tag TARGET_IMAGE that refers to SOURCE_IMAGE
  top         Display the running processes of a container
 unpause     Unpause all processes within one or more containers
 update     Update configuration of one or more containers
 version     Show the Docker version information
 wait       Block until one or more containers stop, then print their exit
codes
Run 'docker COMMAND --help' for more information on a command.
1.2.1 重要命令演示
1.2.1.1 执行docker search命令进行搜索
格式如下:
Usage: docker search [OPTIONS] TERM
Options:
  -f, --filter filter   Filter output based on conditions provided
      --format string   Pretty-print search using a Go template
      --limit int       Max number of search results (default 25)
      --no-trunc       Don't truncate output
说明:
OFFICIAL: 官方
AUTOMATED: 使用第三方docker服务来帮助编译镜像,可以在互联网上面直接拉取到镜像,减少了繁琐的
编译过程
范例:
[root@ubuntu1804 ~]#docker search centos
NAME                               DESCRIPTION
  STARS               OFFICIAL           AUTOMATED
centos                             The official build of CentOS.
  5786               [OK]
ansible/centos7-ansible           Ansible on Centos7
126                                     [OK]
jdeathe/centos-ssh                 OpenSSH / Supervisor / EPEL/IUS/SCL Repos - …
  114                                     [OK]
consol/centos-xfce-vnc             Centos container with "headless" VNC session…
  108                                     [OK]
centos/mysql-57-centos7           MySQL 5.7 SQL database server
  67
imagine10255/centos6-lnmp-php56   centos6-lnmp-php56
57                                     [OK]
tutum/centos                       Simple CentOS docker image with SSH access
44
centos/postgresql-96-centos7       PostgreSQL is an advanced Object-Relational …
  40
centos/httpd-24-centos7           Platform for running Apache httpd 2.4 or bui…
  29
kinogmt/centos-ssh                 CentOS with SSH
  29                                     [OK]
pivotaldata/centos-gpdb-dev       CentOS image for GPDB development. Tag names…
  10
drecom/centos-ruby                 centos ruby
  6                                       [OK]
  ....
范例: 选择性的查找镜像
#搜索点赞100个以上的镜像
#旧语法
[root@ubuntu1804 ~]#docker search -s 100 centos
Flag --stars has been deprecated, use --filter=stars=3 instead
......
#新语法
[root@ubuntu1804 ~]#docker search --filter=stars=100 centos
NAME                     DESCRIPTION                                     STARS
            OFFICIAL           AUTOMATED
centos                   The official build of CentOS.                   6096
            [OK]
ansible/centos7-ansible   Ansible on Centos7                              132
                                  [OK]
consol/centos-xfce-vnc   Centos container with "headless" VNC session…   117
                                  [OK]
jdeathe/centos-ssh       OpenSSH / Supervisor / EPEL/IUS/SCL Repos - …   115
                                  [OK]
1.2.1.2 查看本地镜像
docker images 可以查看下载至本地的镜像
格式:
docker images [OPTIONS] [REPOSITORY[:TAG]]
docker image ls [OPTIONS] [REPOSITORY[:TAG]]
#常用选项:
-q, --quiet     Only show numeric IDs
-a, --all Show all images (default hides intermediate images)
    --digests       Show digests
    --no-trunc     Don't truncate output
-f, --filter filter   Filter output based on conditions provided
    --format string   Pretty-print images using a Go template
执行结果的显示信息说明:
REPOSITORY      #镜像所属的仓库名称
TAG         #镜像版本号(标识符),默认为latest
IMAGE ID       #镜像唯一ID标识,如果ID相同,说明是同一个镜像有多个名称
CREATED       #镜像在仓库中被创建时间
VIRTUAL SIZE    #镜像的大小
Repository仓库
- 由某特定的docker镜像的所有迭代版本组成的镜像仓库
- 一个Registry中可以存在多个Repository
- Repository可分为“顶层仓库”和“用户仓库”
- Repository用户仓库名称一般格式为“用户名/仓库名”
- 每个Repository仓库可以包含多个Tag(标签),每个标签对应一个镜像
范例:
[root@ubuntu1804 ~]#docker images
REPOSITORY         TAG                 IMAGE ID           CREATED
SIZE
alpine              3.11.3             e7d92cdc71fe        7 days ago
5.59MB
centos             centos8.1.1911     470671670cac        7 days ago
237MB
busybox             latest             6d5fcfe5ff17        4 weeks ago
1.22MB
hello-world         latest             fce289e99eb9        12 months ago
1.84kB
[root@ubuntu1804 ~]#docker images -q
e7d92cdc71fe
470671670cac
6d5fcfe5ff17
fce289e99eb9
#显示完整的ImageID
[root@ubuntu1804 ~]#docker images --no-trunc
REPOSITORY         TAG                 IMAGE ID
                                CREATED             SIZE
tomcat              9.0.37-v1
sha256:b8d669ebf99e65d5ed69378d0d53f054e7de4865d335ab7aa0a7a5508e1369f7   47
hours ago       652MB
tomcat             latest
sha256:df72227b40e1985fa5ad529b9ca6582612a41d8f1ddf3a1bea1aa2cfcfa8fb07   5 days
ago         647MB
nginx               latest
sha256:0901fa9da894a8e9de5cb26d6749eaffb67b373dc1ff8a26c46b23b1175c913a   11
days ago         132MB
ubuntu             latest
sha256:adafef2e596ef06ec2112bc5a9663c6a4f59a3dfd4243c9cabe06c8748e7f288   2
weeks ago         73.9MB
busybox             latest
sha256:c7c37e472d31c1685b48f7004fd6a64361c95965587a951692c5f298c6685998   3
weeks ago         1.22MB
alpine             latest
sha256:a24bb4013296f61e89ba57005a7b3e52274d8edd3ae2077d04395f806b63d83e   7
weeks ago         5.57MB
redis               5.0.9-alpine3.11
sha256:3661c84ee9d0f6312a076b69eb2bd112674cadb70ef7e1594c4f00193f8df08e   2
months ago        29.8MB
#只查看指定REPOSITORY的镜像
[root@ubuntu1804 ~]#docker images tomcat
REPOSITORY         TAG                 IMAGE ID           CREATED
SIZE
tomcat              9.0.37-v1           b8d669ebf99e        47 hours ago
652MB
tomcat             latest             df72227b40e1        5 days ago
647MB
范例: 查看指定镜像的详细信息
[root@centos8 ~]#podman image inspect alpine
[
   {


        "Id":
"e7d92cdc71feacf90708cb59182d0df1b911f8ae022d29e8e95d75ca6a99776a",
        "Digest":
"sha256:ddba4d27a7ffc3f86dd6c2f92041af252a1f23a8e742c90e6e1297bfa1bc0c45",
        "RepoTags": [
            "docker.io/library/alpine:latest"
       ],
        "RepoDigests": [

"docker.io/library/alpine@sha256:ddba4d27a7ffc3f86dd6c2f92041af252a1f23a8e742c9
0e6e1297bfa1bc0c45"
       ],
        "Parent": "",
        "Comment": "",
        "Created": "2020-01-18T01:19:37.187497623Z",
        "Config": {


            "Env": [

"PATH=/usr/local/sbin:/usr/local/bin:/usr/sbin:/usr/bin:/sbin:/bin"
           ],
            "Cmd": [
                "/bin/sh"
           ]
       },
        "Version": "18.06.1-ce",
        "Author": "",
        "Architecture": "amd64",
        "Os": "linux",
        "Size": 5859847,
        "VirtualSize": 5859847,
        "GraphDriver": {


            "Name": "overlay",
            "Data": {


                "MergedDir":
"/var/lib/containers/storage/overlay/5216338b40a7b96416b8b9858974bbe4acc3096ee60
acbc4dfb1ee02aecceb10/merged",
                "UpperDir":
"/var/lib/containers/storage/overlay/5216338b40a7b96416b8b9858974bbe4acc3096ee60
acbc4dfb1ee02aecceb10/diff",
                "WorkDir":
"/var/lib/containers/storage/overlay/5216338b40a7b96416b8b9858974bbe4acc3096ee60
acbc4dfb1ee02aecceb10/work"
           }
       },
        "RootFS": {


            "Type": "layers",
            "Layers": [

"sha256:5216338b40a7b96416b8b9858974bbe4acc3096ee60acbc4dfb1ee02aecceb10"
           ]
       },
        "Labels": null,
        "Annotations": {

    },
        "ManifestType": "application/vnd.docker.distribution.manifest.v2+json",
        "User": "",
        "History": [
           {


                "created": "2020-01-18T01:19:37.02673981Z",
                "created_by": "/bin/sh -c #(nop) ADD
file:e69d441d729412d24675dcd33e04580885df99981cec43de8c9b24015313ff8e in / "
           },
           {


                "created": "2020-01-18T01:19:37.187497623Z",
                "created_by": "/bin/sh -c #(nop) CMD [\"/bin/sh\"]",
                "empty_layer": true
           }
                  ]
   }
]
1.2.1.3 镜像导出
利用docker save命令可以将从本地镜像导出为一个打包 tar文件,然后复制到其他服务器进行导入使用
格式:
docker save [OPTIONS] IMAGE [IMAGE...]
选项:
-o, --output string   Write to a file, instead of STDOUT
#说明:
Docker save 使用IMAGE ID导出,在导入后的镜像没有REPOSITORY和TAG,显示为<none>
常见用法:
docker save -o /path/file.tar IMAGE1 IMAGE2 ...
docker save IMAGE1 IMAGE2 ... > /path/file.tar
范例: 导出指定镜像
[root@ubuntu1804 ~]#docker images
REPOSITORY         TAG                 IMAGE ID           CREATED
SIZE
nginx               latest             5ad3bd0e67a9        3 days ago
127MB
alpine              3.11.3             e7d92cdc71fe        7 days ago
5.59MB
centos             centos8.1.1911     470671670cac        7 days ago
237MB
centos             latest             470671670cac        7 days ago
237MB
mysql               5.6.47             742f7d5a4104        10 days ago
302MB
mysql               5.7.29             b598110d0fff        10 days ago
435MB
busybox             latest             6d5fcfe5ff17        4 weeks ago
1.22MB
hello-world         latest             fce289e99eb9        12 months ago
1.84kB
[root@ubuntu1804 ~]#docker save mysql:5.7.30 alpine:3.11.3 -o /data/myimages.tar
#或者
[root@ubuntu1804 ~]#docker save mysql:5.7.30 alpine:3.11.3 > /data/myimages.tar
[root@ubuntu1804 ~]#scp /data/myimages.tar   10.0.0.7:/data
范例: 导出所有镜像至不同的文件中
[root@centos8 ~]#docker images | awk 'NR!=1{print $1,$2}' | while read repo tag
;do docker save   $repo:$tag -o /opt/$repo-$tag.tar ;done
[root@centos8 ~]#ls /opt/*.tar
/opt/alpine-3.13.5.tar /opt/busybox-latest.tar /opt/centos-centos8.3.2011.tar
/opt/centos-latest.tar /opt/ubuntu-latest.tar
范例:导出所有镜像到一个打包文件
#方法1: 使用image ID导出镜像,在导入后的镜像没有REPOSITORY和TAG,显示为<none>
[root@ubuntu1804 ~]#docker save `docker images -qa` -o all.tar
#方法2:将所有镜像导入到一个文件中,此方法导入后可以看REPOSITORY和TAG
[root@ubuntu1804 ~]#docker save `docker images | awk 'NR!=1{print $1":"$2}'` -o
all.tar
#方法3:将所有镜像导入到一个文件中,此方法导入后可以看REPOSITORY和TAG
[root@centos8 ~]#docker image save `docker image ls --format "{

    {.Repository}}:
{

    {

    .Tag}}"` -o all.tar
1.2.1.4 镜像导入
利用docker load命令可以将镜像导出的打包或压缩文件再导入
格式:
docker load [OPTIONS]
#选项
-i, --input string   Read from tar archive file, instead of STDIN
-q, --quiet         Suppress the load output
常见用法:
docker load -i /path/file.tar
docker load < /path/file.tar
范例: 镜像导入
[root@centos7 ~]#docker images
REPOSITORY         TAG                 IMAGE ID           CREATED
SIZE
[root@centos7 ~]#docker load -i /data/myimages.tar
#或者
[root@centos7 ~]#docker load < /data/myimages.tar
[root@centos7 ~]#docker images
REPOSITORY         TAG                 IMAGE ID           CREATED
SIZE
alpine              3.11.3             e7d92cdc71fe        7 days ago
5.59MB
mysql               5.7.29             b598110d0fff        10 days ago
435MB
范例:一次导出多个镜像
[root@ubuntu1804 ~]#docker images
REPOSITORY         TAG                 IMAGE ID           CREATED
SIZE
alpine             latest             e7d92cdc71fe        7 days ago
5.59MB
busybox             latest             6d5fcfe5ff17        4 weeks ago
1.22MB
[root@ubuntu1804 ~]#docker save busybox alpine > /all.tar
[root@ubuntu1804 ~]#ll -h /opt/all.tar
-rw-r--r-- 1 root root 7.0M Jan 25 22:12 /opt/all.tar
[root@ubuntu1804 ~]#docker rmi -f `docker images -q`
Untagged: alpine:latest
Deleted: sha256:e7d92cdc71feacf90708cb59182d0df1b911f8ae022d29e8e95d75ca6a99776a
Deleted: sha256:5216338b40a7b96416b8b9858974bbe4acc3096ee60acbc4dfb1ee02aecceb10
Untagged: busybox:latest
Deleted: sha256:6d5fcfe5ff170471fcc3c8b47631d6d71202a1fd44cf3c147e50c8de21cf0648
Deleted: sha256:195be5f8be1df6709dafbba7ce48f2eee785ab7775b88e0c115d8205407265c5
[root@ubuntu1804 ~]#docker images
REPOSITORY         TAG                 IMAGE ID           CREATED
SIZE
[root@ubuntu1804 ~]#docker load -i /opt/all.tar
5216338b40a7: Loading layer
[==================================================>]  5.857MB/5.857MB
Loaded image: alpine:latest
195be5f8be1d: Loading layer
[==================================================>]  1.437MB/1.437MB
Loaded image: busybox:latest
[root@ubuntu1804 ~]#docker images
REPOSITORY         TAG                 IMAGE ID           CREATED
SIZE
alpine             latest             e7d92cdc71fe        7 days ago
5.59MB
busybox             latest             6d5fcfe5ff17        4 weeks ago
1.22MB
面试题: 将一台主机的所有镜像传到另一台主机
#方法1: 使用image ID导出镜像,在导入后的镜像没有REPOSITORY和TAG,显示为<none>
[root@ubuntu1804 ~]#docker save `docker images -qa` -o all.tar
[root@ubuntu1804 ~]#scp all.tar 10.0.0.7:
[root@centos7 ~]#docker load -i all.tar
[root@centos7 ~]#docker images
REPOSITORY         TAG                 IMAGE ID           CREATED
SIZE
<none>             <none>             a77dce18d0ec        10 days ago
1.24MB
<none>             <none>             389fef711851        3 weeks ago
5.58MB
<none>             <none>             300e315adb2f        4 weeks ago
209MB
<none>             <none>             f643c72bc252        6 weeks ago
72.9MB
#方法2:将所有镜像导入到一个文件中,此方法导入后可以看REPOSITORY和TAG
[root@ubuntu1804 ~]#docker save `docker images | awk 'NR!=1{print $1":"$2}'` -o
backup.tar
[root@ubuntu1804 ~]#scp backup.tar 10.0.0.200:
root@ubuntu2004:~# docker load -i backup.tar
root@ubuntu2004:~# docker images
REPOSITORY   TAG       IMAGE ID       CREATED       SIZE
busybox     uclibc   a77dce18d0ec   10 days ago   1.24MB
alpine       latest   389fef711851   3 weeks ago   5.58MB
centos       latest   300e315adb2f   4 weeks ago   209MB
ubuntu       latest   f643c72bc252   6 weeks ago   72.9MB
#方法3:将所有镜像导入到一个文件中,此方法导入后可以看REPOSITORY和TAG
[root@centos8 ~]#docker image save `docker image ls --format "{

    {.Repository}}:
{

    {

    .Tag}}"` -o all.tar
[root@centos8 ~]#scp all.tar 10.0.0.100:/data
[root@ubuntu1804 ~]#docker load -i /data/all.tar
[root@ubuntu1804 ~]#docker images
REPOSITORY   TAG       IMAGE ID       CREATED       SIZE
busybox     uclibc   a77dce18d0ec   10 days ago   1.24MB
alpine       latest   389fef711851   3 weeks ago   5.58MB
centos       latest   300e315adb2f   4 weeks ago   209MB
ubuntu       latest   f643c72bc252   6 weeks ago   72.9MB
1.2.1.5 删除镜像
docker rmi 命令可以删除本地镜像
格式
docker rmi [OPTIONS] IMAGE [IMAGE...]
docker image rm [OPTIONS] IMAGE [IMAGE...]
#选项:
-f, --force     Force removal of the image
    --no-prune   Do not delete untagged parents
范例:
[root@centos7 ~]#docker images
REPOSITORY         TAG                 IMAGE ID           CREATED
SIZE
alpine              3.11.3             e7d92cdc71fe        7 days ago
5.59MB
mysql               5.7.29             b598110d0fff        10 days ago
435MB
[root@centos7 ~]#docker rmi b59811
Untagged: mysql:5.7.30
Deleted: sha256:b598110d0fffc42862269a25d8767dd95764d0740f318fd6c0a097f8a22de5bf
Deleted: sha256:908aaab4c4b8d0cbbc68c96a0e3820aa74fd1dee5499e2ca326bc8fd7312f689
Deleted: sha256:e2f2e83f295186b00e3c0d119ef3204b509d552972694e34cee7c1675d157b8a
Deleted: sha256:99b4e48b1be76f50741db02a38c783bf698b1b76808cc6bb5e3fdd65ee2897c6
Deleted: sha256:79c1efa7bde3ac754af64779452ca913fa1f281b44c9dbad25cc322a51ac69b1
Deleted: sha256:5f7c68324b959d2c806db18d02f153bc810f9842722415e077351bc834cc8578
范例:删除多个镜像
[root@ubuntu1804 ~]#docker rmi nginx tomcat
范例: 强制删除正在使用的镜像,也会删除对应的容器
[root@ubuntu1804 ~]#docker ps -a
CONTAINER ID       IMAGE                   COMMAND                 CREATED
        STATUS                       PORTS                     NAMES
b5a0d2e1e1d0       centos:centos8.1.1911   "bash"                   41 minutes
ago     Up 41 minutes                                           jolly_burnell
[root@ubuntu1804 ~]#docker rmi centos:centos8.1.1911
Error response from daemon: conflict: unable to remove repository reference
"centos:centos8.1.1911" (must force) - container b5a0d2e1e1d0 is using its
referenced image 470671670cac
[root@ubuntu1804 ~]#docker rmi -f centos:centos8.1.1911
Untagged: centos:centos8.1.1911
Untagged:
centos@sha256:fe8d824220415eed5477b63addf40fb06c3b049404242b31982106ac204f6700
[root@ubuntu1804 ~]#docker ps -a
CONTAINER ID       IMAGE               COMMAND                 CREATED
    STATUS                       PORTS                     NAMES
[root@ubuntu1804 ~]#
范例: 删除所有镜像
[root@ubuntu1804 ~]#docker images
REPOSITORY         TAG                 IMAGE ID           CREATED
SIZE
<none>             <none>             470671670cac        7 days ago
237MB
mysql               5.6.47             742f7d5a4104        10 days ago
302MB
[root@ubuntu1804 ~]#docker rmi -f `docker images -q`
Deleted: sha256:470671670cac686c7cf0081e0b37da2e9f4f768ddc5f6a26102ccd1c6954c1ee
Deleted: sha256:0683de2821778aa9546bf3d3e6944df779daba1582631b7ea3517bb36f9e4007
Untagged: mysql:5.6.47
Untagged:
mysql@sha256:9527bae58991a173ad7d41c8309887a69cb8bd178234386acb28b51169d0b30e
Deleted: sha256:742f7d5a4104969fcac8054cf9201f5656096f0a58d10947a4a41a8e1d7d9f91
Deleted: sha256:62530ddc9fe5f85609da4397d9e0a88b422d15dbc42664d7477d1deccb51a0d9
Deleted: sha256:41309d62590858b6375bd3c4e9d07bd73e4ea5062343a81641453033424e7aba
1.2.1.6 镜像打标签
docker tag 可以给镜像打标签,类似于起别名,但通常要遵守一定的命名规范,才可以上传到指定的仓库
格式
docker tag SOURCE_IMAGE[:TAG] TARGET_IMAGE[:TAG]
#TARGET_IMAGE[:TAG]格式一般形式
仓库主机FQDN或IP[:端口]/项目名(或用户名)/image名字:版本
TAG默认为latest
范例:
[root@ubuntu1804 ~]#docker images
REPOSITORY         TAG                 IMAGE ID           CREATED
SIZE
alpine             latest             e7d92cdc71fe        11 days ago
5.59MB
centos             centos7.7.1908     08d05d1d5859        2 months ago
204MB
[root@ubuntu1804 ~]#docker tag alpine alpine:3.11
[root@ubuntu1804 ~]#docker images
REPOSITORY         TAG                 IMAGE ID           CREATED
SIZE
alpine              3.11               e7d92cdc71fe        11 days ago
5.59MB
alpine             latest             e7d92cdc71fe        11 days ago
5.59MB
centos             centos7.7.1908     08d05d1d5859        2 months ago
204MB
总结: 企业使用镜像及常见操作: 搜索、下载、导出、导入、删除
命令总结:
docker search centos
docker pull alpine
docker images
docker save > /opt/centos.tar #centos #导出镜像
docker load -i /opt/centos.tar  #导入本地镜像
docker rmi 镜像ID/镜像名称  #删除指定ID的镜像,此镜像对应容器正启动镜像不能被删除,除非将容器
全部关闭
1.3 容器操作基础命令
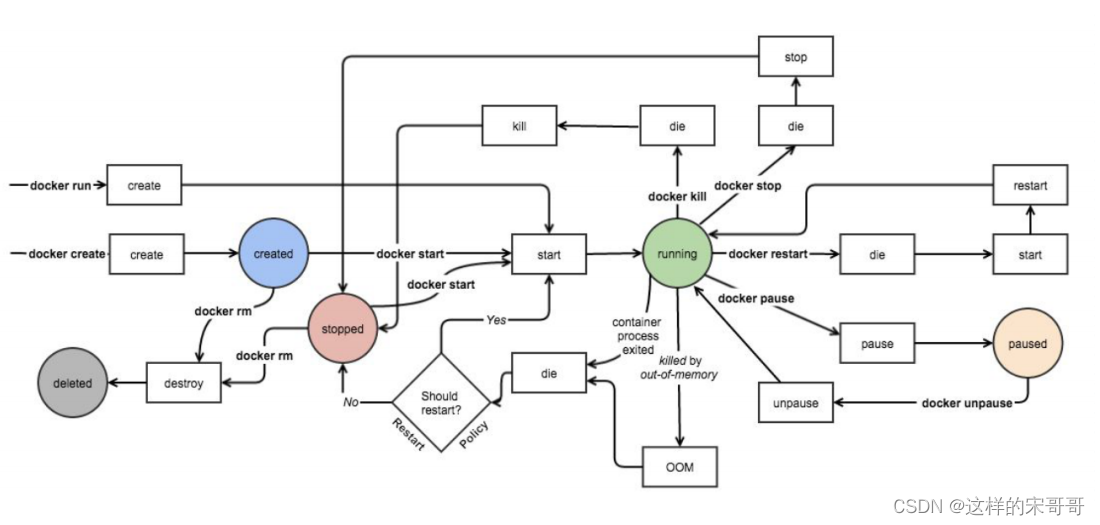
容器生命周期
- created:初建状态
- running:运行状态
- stopped:停止状态
- paused: 暂停状态
- deleted:删除状态
容器相关命令
[root@ubuntu1804 ~]#docker container
Usage: docker container COMMAND
Manage containers
Commands:
 attach     Attach local standard input, output, and error streams to a running
container
 commit     Create a new image from a container's changes
  cp         Copy files/folders between a container and the local filesystem
 create     Create a new container
  diff       Inspect changes to files or directories on a container's
filesystem
 exec       Run a command in a running container
  export     Export a container's filesystem as a tar archive
 inspect     Display detailed information on one or more containers
  kill       Kill one or more running containers
 logs       Fetch the logs of a container
  ls         List containers
 pause       Pause all processes within one or more containers
 port       List port mappings or a specific mapping for the container
 prune       Remove all stopped containers
 rename     Rename a container
  restart     Restart one or more containers
  rm         Remove one or more containers
 run         Run a command in a new container
  start       Start one or more stopped containers
 stats       Display a live stream of container(s) resource usage statistics
  stop       Stop one or more running containers
  top         Display the running processes of a container
 unpause     Unpause all processes within one or more containers
 update     Update configuration of one or more containers
 wait       Block until one or more containers stop, then print their exit
codes
Run 'docker container COMMAND --help' for more information on a command.
1.3.1 启动容器
docker run 可以启动容器,进入到容器,并随机生成容器ID和名称
1.3.1.1 启动第一个容器
范例: 运行docker 的 hello world
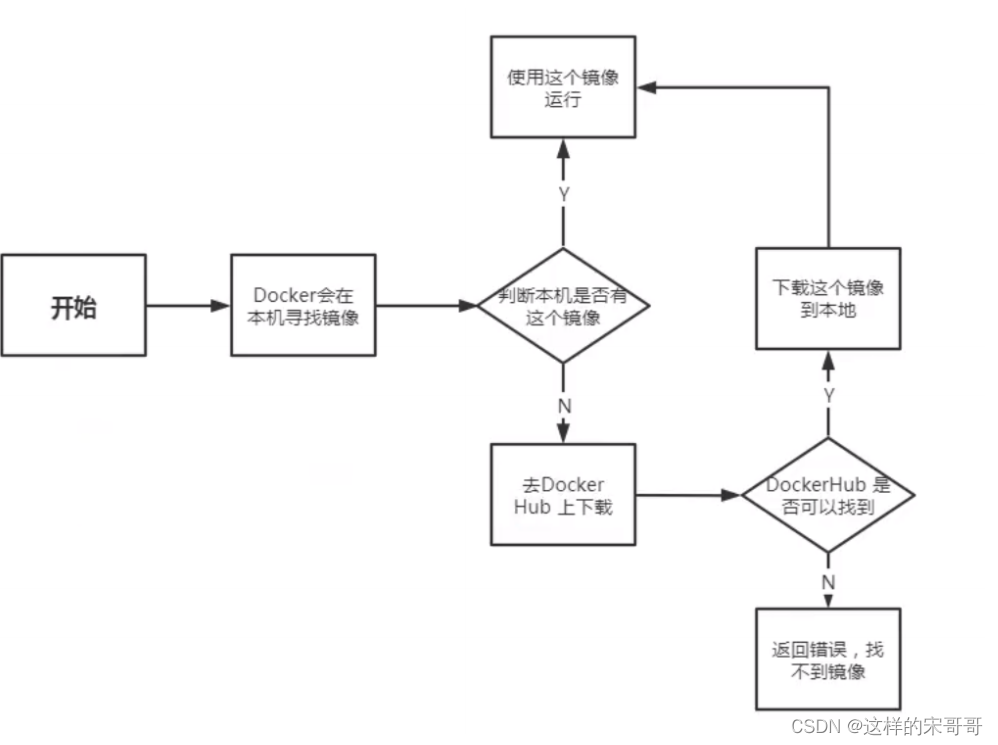
[root@centos8 ~]# docker run hello-world
Unable to find image 'hello-world:latest' locally
latest: Pulling from library/hello-world
1b930d010525: Pull complete
Digest: sha256:9572f7cdcee8591948c2963463447a53466950b3fc15a247fcad1917ca215a2f
Status: Downloaded newer image for hello-world:latest
Hello from Docker!
This message shows that your installation appears to be working correctly.
To generate this message, Docker took the following steps:
1. The Docker client contacted the Docker daemon.
2. The Docker daemon pulled the "hello-world" image from the Docker Hub.
   (amd64)
3. The Docker daemon created a new container from that image which runs the
   executable that produces the output you are currently reading.
4. The Docker daemon streamed that output to the Docker client, which sent it
   to your terminal.
To try something more ambitious, you can run an Ubuntu container with:
$ docker run -it ubuntu bash
Share images, automate workflows, and more with a free Docker ID:
 https://hub.docker.com/
For more examples and ideas, visit:
 https://docs.docker.com/get-started/
[root@centos8 ~]#docker images
REPOSITORY         TAG                 IMAGE ID           CREATED
SIZE
hello-world         latest             fce289e99eb9        12 months ago
1.84kB
[root@centos8 ~]#docker ps -a
CONTAINER ID       IMAGE               COMMAND             CREATED
STATUS                     PORTS               NAMES
7f53a2a74edc       hello-world         "/hello"            21 seconds ago
Exited (0) 19 seconds ago                     nifty_yalow
1.3.1.2 启动容器的流程
1.3.1.3 启动容器用法
帮助: man docker-run
命令格式:
docker run [选项] [镜像名] [shell命令] [参数]
#选项:
-i, --interactive Keep STDIN open even if not attached,通常和-t一起使用
-t, --tty 分配pseudo-TTY,通常和-i一起使用,注意对应的容器必须运行shell才支持进
入
-d, --detach Run container in background and print container ID,台后运行,
默认前台
--name string Assign a name to the container
--h, --hostname string Container host name
--rm Automatically remove the container when it exits
-p, --publish list Publish a container's port(s) to the host
-P, --publish-all Publish all exposed ports to random ports
--dns list Set custom DNS servers
--entrypoint string Overwrite the default ENTRYPOINT of the image
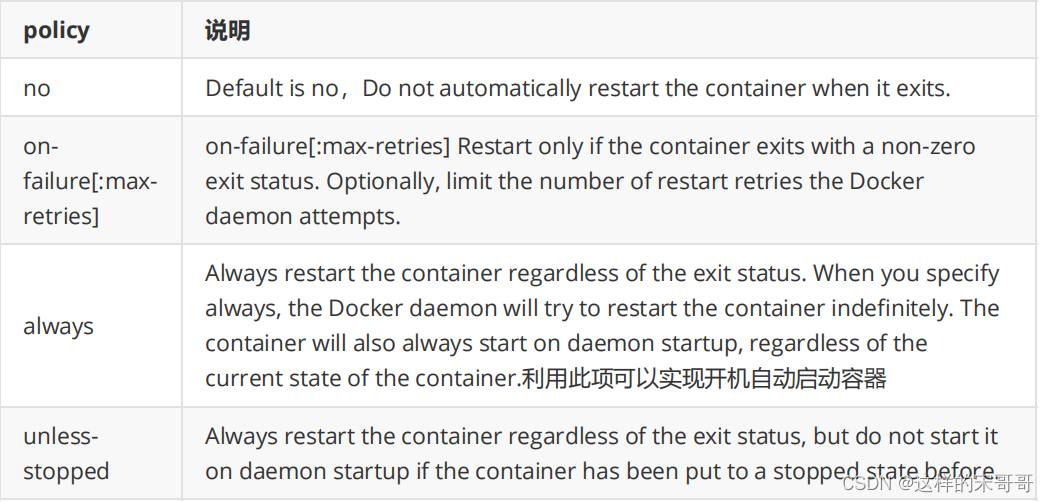
--restart policy
--privileged Give extended privileges to container
-e, --env=[] Set environment variables
--env-file=[] Read in a line delimited file of environment variables
–restart 可以指定四种不同的policy
注意: 容器启动后,如果容器内没有前台运行的进程,将自动退出停止
从容器内退出,并停止容器
exit
从容器内退出,且容器不停止
同时按三个键,ctrl+p+q
范例: 运行容器
#启动容器时会自动随机字符作为容器名
[root@ubuntu1804 ~]#docker run alpine
[root@ubuntu1804 ~]#docker ps -a
CONTAINER ID       IMAGE               COMMAND             CREATED
STATUS                     PORTS               NAMES
95967eaefd6a       alpine              "/bin/sh"           8 seconds ago
Exited (0) 6 seconds ago                       confident_elion
范例: 一次性运行容器中命令
#启动的容器在执行完shell命令就退出,用于测试
[root@ubuntu1804 ~]#docker run busybox echo "Hello laowang"
Unable to find image 'busybox:latest' locally
latest: Pulling from library/busybox
91f30d776fb2: Pull complete
Digest: sha256:9ddee63a712cea977267342e8750ecbc60d3aab25f04ceacfa795e6fce341793
Status: Downloaded newer image for busybox:latest
Hello laowang
[root@ubuntu1804 ~]#docker ps
CONTAINER ID       IMAGE               COMMAND             CREATED
STATUS             PORTS               NAMES
[root@ubuntu1804 ~]#docker ps -a
CONTAINER ID       IMAGE               COMMAND                 CREATED
    STATUS                     PORTS               NAMES
7873aed1b5dd       busybox             "echo 'Hello laowang'"   19 seconds ago
    Exited (0) 18 seconds ago                       pedantic_varahamihira
范例: 指定容器名称
#注意每个容器的名称要唯一
[root@ubuntu1804 ~]#docker run --name a1 alpine
[root@ubuntu1804 ~]#docker ps -a
CONTAINER ID       IMAGE               COMMAND             CREATED
STATUS                     PORTS               NAMES
dd06368a4f56       alpine              "/bin/sh"           2 minutes ago
Exited (0) 8 seconds ago                       a1
范例: 运行交互式容器并退出
[root@ubuntu1804 ~]#docker run -it docker.io/busybox sh
Unable to find image 'busybox:latest' locally
latest: Pulling from library/busybox
bdbbaa22dec6: Pull complete
Digest: sha256:6915be4043561d64e0ab0f8f098dc2ac48e077fe23f488ac24b665166898115a
Status: Downloaded newer image for busybox:latest
/ # exit
#用exit退出后容器也停止
[root@ubuntu1804 ~]#docker ps -l
CONTAINER ID       IMAGE               COMMAND             CREATED
STATUS                   PORTS               NAMES
cd8c2a7f39d5       busybox             "sh"                8 seconds ago
Exited (0) 1 second ago                       vigorous_leakey
[root@ubuntu1804 ~]#docker run -it docker.io/busybox sh
Unable to find image 'busybox:latest' locally
latest: Pulling from library/busybox
bdbbaa22dec6: Pull complete
Digest: sha256:6915be4043561d64e0ab0f8f098dc2ac48e077fe23f488ac24b665166898115a
Status: Downloaded newer image for busybox:latest
/ #同时按三个键:ctrl+p+q
#用同时按三个键ctrl+p+q退出后容器不会停止
[root@ubuntu1804 ~]#docker ps -l
CONTAINER ID       IMAGE               COMMAND             CREATED
STATUS                   PORTS               NAMES
cd8c2a7f39d5       busybox             "sh"                8 seconds ago
Up 10 seconds       silly_villani
范例: 设置容器内的主机名
[root@ubuntu1804 ~]#docker run -it --name a1 -h a1.wang.org alpine
/ # hostname
a1.wang.org
/ # cat /etc/hosts
127.0.0.1 localhost
::1 localhost ip6-localhost ip6-loopback
fe00::0 ip6-localnet
ff00::0 ip6-mcastprefix
ff02::1 ip6-allnodes
ff02::2 ip6-allrouters
172.17.0.2 a1.wang.org a1
/ # cat /etc/resolv.conf
# This file is managed by man:systemd-resolved(8). Do not edit.
#
# This is a dynamic resolv.conf file for connecting local clients directly to
# all known uplink DNS servers. This file lists all configured search domains.
#
# Third party programs must not access this file directly, but only through the
# symlink at /etc/resolv.conf. To manage man:resolv.conf(5) in a different way,
# replace this symlink by a static file or a different symlink.
#
# See man:systemd-resolved.service(8) for details about the supported modes of
# operation for /etc/resolv.conf.
nameserver 180.76.76.76
nameserver 223.6.6.6
search magedu.com wang.org
范例: 一次性运行容器,退出后立即删除,用于测试
[root@ubuntu1804 ~]#docker run --rm alpine cat /etc/issue
Welcome to Alpine Linux 3.11
Kernel \r on an \m (\l)
[root@ubuntu1804 ~]#docker ps -a
CONTAINER ID       IMAGE               COMMAND             CREATED
STATUS             PORTS               NAMES
范例: 创建容器后直接进入并退出
退出两种方式:
- exit 容器也停止
- 按ctrl+p+q 容器不停止
#,执行exit退出后容器关闭
[root@ubuntu1804 ~]#docker run -it --name alpine2 alpine
/ # cat /etc/issue
Welcome to Alpine Linux 3.11
Kernel \r on an \m (\l)
/ # exit #退出容器,容器也停止运行
[root@ubuntu1804 ~]#docker ps -a
CONTAINER ID       IMAGE               COMMAND             CREATED
STATUS                     PORTS               NAMES
6d64f47a83e6       alpine              "/bin/sh"           13 seconds ago
Exited (0) 6 seconds ago                       alpine2
edd2ac2690e6       alpine              "/bin/sh"           52 seconds ago
Exited (0) 51 seconds ago                       alpine1
[root@ubuntu1804 ~]#docker run -it --name alpine3 alpine
#同时按ctrl+p+q 三个键退出后,容器不停止
/ # [root@ubuntu1804 ~]#docker ps -a
CONTAINER ID       IMAGE               COMMAND             CREATED
STATUS                         PORTS               NAMES
df428caf7128       alpine              "/bin/sh"           8 seconds ago
Up 7 seconds                                       alpine3
6d64f47a83e6       alpine              "/bin/sh"           26 seconds ago
Exited (0) 20 seconds ago                           alpine2
edd2ac2690e6       alpine              "/bin/sh"           About a minute ago
Exited (0) About a minute ago                       alpine1
什么是守护式容器:
- 能够长期运行
- 无需交互式会话
- 适合运行应用程序和服务
范例: 启动前台守护式容器
[root@ubuntu1804 ~]#docker run nginx
Unable to find image 'nginx:latest' locally
latest: Pulling from library/nginx
6ec8c9369e08: Pull complete
d3cb09a117e5: Pull complete
7ef2f1459687: Pull complete
e4d1bf8c9482: Pull complete
[root@ubuntu1804 ~]#docker run --rm --name b1 busybox wget -qO - 172.17.0.3
<!DOCTYPE html>
<html>
<head>
<title>Welcome to nginx!</title>
<style>
   body {


       width: 35em;
       margin: 0 auto;
       font-family: Tahoma, Verdana, Arial, sans-serif;
   }
</style>
</head>
<body>
<h1>Welcome to nginx!</h1>
<p>If you see this page, the nginx web server is successfully installed and
working. Further configuration is required.</p>
<p>For online documentation and support please refer to
<a href="http://nginx.org/">nginx.org</a>.<br/>
Commercial support is available at
<a href="http://nginx.com/">nginx.com</a>.</p>
<p><em>Thank you for using nginx.</em></p>
</body>
</html>
范例: 启动后台守护式容器
[root@ubuntu1804 ~]#docker run -d nginx
888685a2487cf8150d264cb3086f78d0c3bddeb07b8ea9786aa3a564157a4cb8
[root@ubuntu1804 ~]#docker ps -l
CONTAINER ID       IMAGE               COMMAND                 CREATED
    STATUS             PORTS               NAMES
    888685a2487c       nginx               "/docker-entrypoint.…"   8 seconds ago
    Up 6 seconds        80/tcp             busy_goodall
#有些容器后台启动不会持续运行
[root@ubuntu1804 ~]#docker run -d --name alpine4 alpine
3a05bbf66dac8a6ac9829c876bdb5fcb70832bf4a2898d68f6979cd8e8c517cb
[root@ubuntu1804 ~]#docker ps -a
CONTAINER ID       IMAGE               COMMAND             CREATED
STATUS                         PORTS               NAMES
3a05bbf66dac       alpine              "/bin/sh"           3 seconds ago
Exited (0) 2 seconds ago                           alpine4
df428caf7128       alpine              "/bin/sh"           30 seconds ago
Up 28 seconds                                       alpine3
6d64f47a83e6       alpine              "/bin/sh"           48 seconds ago
Exited (0) 41 seconds ago                           alpine2
edd2ac2690e6       alpine              "/bin/sh"           About a minute ago
Exited (0) About a minute ago                       alpine1
[root@ubuntu1804 ~]#docker run -td --name alpine5 alpine
868b33da850cfcc7db8b84150fb9c7686b577889f10425bb4c5e17f28cf68a29
[root@ubuntu1804 ~]#docker ps -a
CONTAINER ID       IMAGE               COMMAND             CREATED
STATUS                         PORTS               NAMES
868b33da850c       alpine              "/bin/sh"           2 seconds ago
Up 1 second                                         alpine5
3a05bbf66dac       alpine              "/bin/sh"           23 seconds ago
Exited (0) 23 seconds ago                           alpine4
df428caf7128       alpine              "/bin/sh"           50 seconds ago
Up 49 seconds                                       alpine3
6d64f47a83e6       alpine              "/bin/sh"           About a minute ago
Exited (0) About a minute ago                       alpine2
edd2ac2690e6       alpine              "/bin/sh"           About a minute ago
Exited (0) About a minute ago                       alpine1
[root@ubuntu1804 ~]#
范例: 开机自动运行容器
#默认容器不会自动启动
[root@ubuntu1804 ~]#docker run -d --name nginx -p 80:80 nginx
bce473b8b1d2f728847cdc32b664cca1bd7578bf7bdac850b501e2e5557a718a
[root@ubuntu1804 ~]#docker ps
CONTAINER ID       IMAGE                 COMMAND                 CREATED
      STATUS             PORTS                                           NAMES
bce473b8b1d2       nginx                 "nginx -g 'daemon of…"   3 seconds ago
      Up 2 seconds        0.0.0.0:80->80/tcp
[root@ubuntu1804 ~]#reboot
[root@ubuntu1804 ~]#docker ps
CONTAINER ID       IMAGE       COMMAND     CREATED   STATUS       PORTS
NAMES
#设置容器总是运行
[root@ubuntu1804 ~]#docker run -d --name nginx --restart=always -p 80:80 nginx
[root@ubuntu1804 ~]#reboot
[root@ubuntu1804 ~]#docker ps
CONTAINER ID   IMAGE       COMMAND     CREATED       STATUS     PORTS
NAMES
dbdba90076e1 nginx"nginx -g 'daemon of…" About a minute agoUp 49
seconds0.0.0.0:80->80/tcp   nginx
–privileged 选项
大约在0.6版,–privileged 选项被引入docker。使用该参数,container内的root拥有真正的root权限。否则,container内的root只是外部的一个普通用户权限。privileged启动的容器,可以看到很多host上的设备,并且可以执行mount。甚至允许你在docker容器中启动docker容器。
范例: 使用–privileged 让容器获取 root 权限
[root@centos8 ~]#podman run -it   centos
[root@382ab09932a7 /]#cat /etc/redhat-release
CentOS Linux release 8.1.1911 (Core)
[root@382ab09932a7 /]# lsblk
NAME   MAJ:MIN RM SIZE RO TYPE MOUNTPOINT
sda      8:0    0 200G  0 disk
|-sda1   8:1    0   1G  0 part
|-sda2   8:2    0 100G  0 part
|-sda3   8:3    0   50G  0 part
|-sda4   8:4    0   1K  0 part
`-sda5   8:5   0   2G 0 part [SWAP]
sr0     11:0    1   7G  0 rom
[root@382ab09932a7 /]# mount /dev/sda3 /mnt
mount: /mnt: permission denied.
[root@382ab09932a7 /]# exit
exit
#利用--privileged 选项运行容器
[root@centos8 ~]#podman run -it --privileged   centos
#可以看到宿主机的设备
[root@a6391a8f82e3 /]# lsblk
NAME   MAJ:MIN RM SIZE RO TYPE MOUNTPOINT
sda      8:0    0 200G  0 disk
|-sda1   8:1    0   1G  0 part
|-sda2   8:2    0 100G  0 part
|-sda3   8:3    0   50G  0 part
|-sda4   8:4    0   1K  0 part
`-sda5   8:5   0   2G 0 part [SWAP]
sr0     11:0    1   7G  0 rom
[root@a6391a8f82e3 /]# df
Filesystem     1K-blocks   Used Available Use% Mounted on
overlay        104806400 2754832 102051568   3% /
tmpfs              65536       0     65536   0% /dev
tmpfs             408092    5892    402200   2% /etc/hosts
shm                64000       0     64000   0% /dev/shm
tmpfs             408092       0    408092   0% /sys/fs/cgroup
[root@a6391a8f82e3 /]# mount /dev/sda3 /mnt
[root@a6391a8f82e3 /]# df
Filesystem     1K-blocks   Used Available Use% Mounted on
overlay        104806400 2754632 102051768   3% /
tmpfs              65536       0     65536   0% /dev
tmpfs             408092    5892    402200   2% /etc/hosts
shm                64000       0     64000   0% /dev/shm
tmpfs             408092       0    408092   0% /sys/fs/cgroup
/dev/sda3       52403200  619068  51784132   2% /mnt
[root@a6391a8f82e3 /]# touch /mnt/containter.txt
[root@a6391a8f82e3 /]# echo container data > /mnt/containter.txt
[root@a6391a8f82e3 /]# cat /mnt/containter.txt
container data
[root@a6391a8f82e3 /]#
#在宿主机查看是否生成文件
[root@centos8 ~]#lsblk
NAME   MAJ:MIN RM SIZE RO TYPE MOUNTPOINT
sda      8:0    0 200G  0 disk
├─sda1   8:1    0   1G  0 part /boot
├─sda2   8:2    0 100G  0 part /
├─sda3   8:3    0   50G  0 part /data
├─sda4   8:4    0   1K  0 part
└─sda5   8:5    0   2G  0 part [SWAP]
sr0     11:0    1   7G  0 rom
[root@centos8 ~]#ll /data/containter.txt
-rw-r--r-- 1 root root 25 Feb 29 12:26 /data/containter.txt
[root@centos8 ~]#cat /data/containter.txt
container data
[root@centos8 ~]#echo host data >> /data/containter.txt
[root@centos8 ~]#cat /data/containter.txt
container data
host data
#在容器内可看文件是否发生变化
[root@a6391a8f82e3 /]# cat /mnt/containter.txt
container data
host data
范例: 运行docker官方文档容器
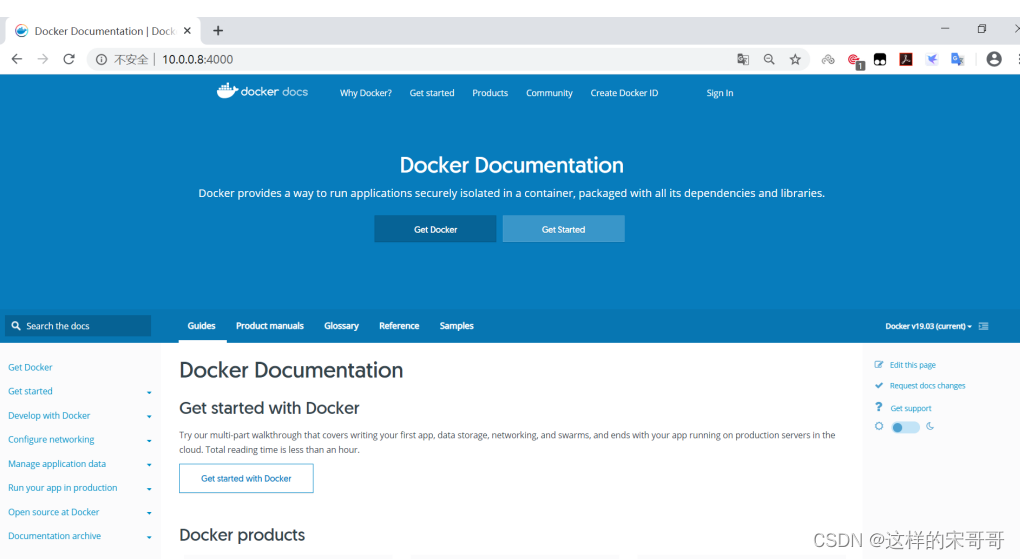
[root@centos8 ~]#podman run -it -d -p 4000:4000 docs/docker.github.io:latest
[root@centos8 ~]#podman images docs/docker.github.io
REPOSITORY                       TAG     IMAGE ID       CREATED     SIZE
docker.io/docs/docker.github.io   latest   ffd9131eeee7   2 days ago   1.99 GB
#用浏览器访问http://localhost:4000/可以看到下面docker文档资料
1.3.2 查看容器信息
1.3.2.1 显示当前存在容器
格式
docker ps [OPTIONS]
docker container ls [OPTIONS]
选项:
-a, --all             Show all containers (default shows just running)
-q, --quiet           Only display numeric IDs
-s, --size           Display total file sizes
-f, --filter filter   Filter output based on conditions provided
-l, --latest         Show the latest created container (includes all states)
-n, --last int       Show n last created containers (includes all states)
(default -1)
#显示运行的容器
[root@ubuntu1804 ~]#docker ps
CONTAINER ID       IMAGE               COMMAND             CREATED
STATUS             PORTS               NAMES
d7ece7f62532       centos              "/bin/bash"         23 seconds ago
Up 22 seconds                           ecstatic_franklin
#显示全部容器,包括退出状态的容器
[root@ubuntu1804 ~]#docker ps -a
CONTAINER ID       IMAGE               COMMAND                 CREATED
    STATUS                     PORTS               NAMES
d7ece7f62532       centos              "/bin/bash"              27 seconds ago
    Up 26 seconds                                 ecstatic_franklin
dcdf71d17177       busybox             "/bin/echo 'hello wo…"   8 minutes ago
    Exited (0) 8 minutes ago                       cool_jepsen
#只显示容器ID
[root@ubuntu1804 ~]#docker ps -a -q
d7ece7f62532
dcdf71d17177
#显示容器大小
[root@ubuntu1804 ~]#docker ps -a -s
CONTAINER ID       IMAGE               COMMAND                 CREATED
    STATUS                     PORTS               NAMES               SIZE
d7ece7f62532       centos              "/bin/bash"              51 seconds ago
    Up 50 seconds                                 ecstatic_franklin   0B
(virtual 237MB)
dcdf71d17177       busybox             "/bin/echo 'hello wo…"   8 minutes ago
    Exited (0) 8 minutes ago                       cool_jepsen         0B
(virtual 1.22MB)
[root@ubuntu1804 ~]
#显示最新创建的容器(停止的容器也能显示)
[root@ubuntu1804 ~]#docker ps -l
范例: 显示指定状态的容器
[root@ubuntu1804 ~]#docker ps -a
CONTAINER ID       IMAGE               COMMAND                 CREATED
    STATUS                       PORTS               NAMES
dd002f947cbe       nginx               "nginx -g 'daemon of…"   19 minutes ago
    Exited (137) 11 minutes ago                       nginx2
1f3f82995e05       nginx               "nginx -g 'daemon of…"   19 minutes ago
    Up 2 minutes                  80/tcp             nginx1
[root@ubuntu1804 ~]#docker ps
CONTAINER ID       IMAGE               COMMAND                 CREATED
    STATUS             PORTS               NAMES
1f3f82995e05       nginx               "nginx -g 'daemon of…"   19 minutes ago
    Up 2 minutes        80/tcp             nginx1
#查看退出状态的容器
[root@ubuntu1804 ~]#docker ps -f 'status=exited'
CONTAINER ID       IMAGE               COMMAND                 CREATED
    STATUS                       PORTS               NAMES
dd002f947cbe       nginx               "nginx -g 'daemon of…"   19 minutes ago
    Exited (137) 11 minutes ago                       nginx2
[root@ubuntu1804 ~]#
1.3.2.2 查看容器内的进程
docker top CONTAINER [ps OPTIONS]
范例:
[root@ubuntu1804 ~]#docker run -d httpd
db144f1978148242dc20bd0be951628f1c00371b2c69dee53d84469c52995d8f
[root@ubuntu1804 ~]#docker top db144f19
UID       PID   PPID C   STIME TTY   TIME     CMD
root      9821  9797  3   22:02 ?     00:00:00 httpd -DFOREGROUND
daemon    9872  9821  0   22:02 ?     00:00:00 httpd -DFOREGROUND
daemon    9873  9821  0   22:02 ?     00:00:00 httpd -DFOREGROUND
daemon    9874  9821  0   22:02 ?     00:00:00 httpd -DFOREGROUND
[root@ubuntu1804 ~]#docker run -d alpine /bin/sh -c 'i=1;while true;do echo
hello$i;let i++;sleep 1;done'
9997053f9766d4adf709d46161d7ec6739eacafbe8d4721133874b89112ad1a6
[root@ubuntu1804 ~]#docker top 9997
UID                 PID                 PPID               C
STIME               TTY                 TIME               CMD
root                10023               9997                3
22:03               ?                   00:00:00           /bin/sh -c i=1;while
true;do echo hello$i;let i++;sleep 1;done
root                10074               10023               0
22:03               ?                   00:00:00            sleep 1
[root@ubuntu1804 ~]#
1.3.2.3 查看容器资源使用情况
docker stats [OPTIONS] [CONTAINER...]
Display a live stream of container(s) resource usage statistics
Options:
-a, --all             Show all containers (default shows just running)
    --format string   Pretty-print images using a Go template
    --no-stream       Disable streaming stats and only pull the first result
    --no-trunc       Do not truncate output
范例:
[root@ubuntu1804 ~]#docker stats 251c7c7cf2aa
CONTAINER ID NAME CPU % MEM USAGE / LIMIT     MEM % NET I/O   BLOCK I/O
PIDS
251c7c7cf2aa busy_l0.00%  3.742MiB / 1.924GiB   0.19%  1.29kB / 0B0B / 8.19kB
2
CONTAINER ID NAME CPU % MEM USAGE / LIMIT     MEM % NET I/O   BLOCK I/O
PIDS
251c7c7cf2aa busy_l0.00%  3.742MiB / 1.924GiB   0.19%  1.29kB / 0B0B / 8.19kB
2
#默认启动elasticsearch会使用较多的内存
[root@ubuntu1804 ~]#docker run -d --name elasticsearch -p 9200:9200 -p 9300:9300
-e "discovery.type=single-node" elasticsearch:7.6.2
[root@ubuntu1804 ~]#curl 10.0.0.100:9200
{


  "name" : "29282e91d773",
  "cluster_name" : "docker-cluster",
  "cluster_uuid" : "w5lp_XmITliWa2Yc-XwJFw",
  "version" : {


    "number" : "7.6.2",
    "build_flavor" : "default",
    "build_type" : "docker",
    "build_hash" : "ef48eb35cf30adf4db14086e8aabd07ef6fb113f",
    "build_date" : "2020-03-26T06:34:37.794943Z",
    "build_snapshot" : false,
    "lucene_version" : "8.4.0",
    "minimum_wire_compatibility_version" : "6.8.0",
    "minimum_index_compatibility_version" : "6.0.0-beta1"
 },
  "tagline" : "You Know, for Search"
}
#查看所有容器
[root@ubuntu1804 ~]#docker stats
CONTAINER ID NAME   CPU %   MEM USAGE / LIMIT MEM % NET I/O BLOCK I/O     PIDS
5e470e7970f6 suspi  0.00%   3.992MiB / 1.924Gi0.20% 656B / 0B9.2MB / 8.19kB    2
829bcebbc9f6 elast  0.58%   1.24GiB / 1.924GiB64.43%2.97kB / 512kB / 729kB    47
#限制内存使用大小
[root@ubuntu1804 ~]#docker run -d --name elasticsearch -p 9200:9200 -p 9300:9300
-e "discovery.type=single-node" -e ES_JAVA_OPTS="-Xms64m -Xmx128m"
elasticsearch:7.6.2
[root@ubuntu1804 ~]#docker stats
CONTAINER ID NAME CPU % MEM USAGE / LIMIT     MEM % NET I/O   BLOCK     PIDS
29282e91d773 elasti254.23310.5MiB / 1.924GiB   15.76% 766B / 0B 766kB /46kB 22
1.3.2.4 查看容器的详细信息(go模板format)
docker inspect 可以查看docker各种对象的详细信息,包括:镜像,容器,网络等
docker inspect [OPTIONS] NAME|ID [NAME|ID...]
Options:
-f, --format string   Format the output using the given Go template
-s, --size           Display total file sizes if the type is container
范例:
[root@ubuntu1804 ~]#docker inspect 9997
[
   {


        "Id":
"9997053f9766d4adf709d46161d7ec6739eacafbe8d4721133874b89112ad1a6",
        "Created": "2020-02-25T14:03:00.790597711Z",
        "Path": "/bin/sh",
        "Args": [
            "-c",
            "i=1;while true;do echo hello$i;let i++;sleep 1;done"
       ],
        "State": {


            "Status": "running",
            "Running": true,
            "Paused": false,
            "Restarting": false,
            "OOMKilled": false,
            "Dead": false,
            "Pid": 10023,
            "ExitCode": 0,
            "Error": "",
            "StartedAt": "2020-02-25T14:03:01.407282144Z",
            "FinishedAt": "0001-01-01T00:00:00Z"
       },
        "Image":
"sha256:e7d92cdc71feacf90708cb59182d0df1b911f8ae022d29e8e95d75ca6a99776a",
        "ResolvConfPath":
"/var/lib/docker/containers/9997053f9766d4adf709d46161d7ec6739eacafbe8d472113387
4b89112ad1a6/resolv.conf",
        "HostnamePath":
"/var/lib/docker/containers/9997053f9766d4adf709d46161d7ec6739eacafbe8d472113387
4b89112ad1a6/hostname",
        "HostsPath":
"/var/lib/docker/containers/9997053f9766d4adf709d46161d7ec6739eacafbe8d472113387
4b89112ad1a6/hosts",
        "LogPath":
"/var/lib/docker/containers/9997053f9766d4adf709d46161d7ec6739eacafbe8d472113387
4b89112ad1a6/9997053f9766d4adf709d46161d7ec6739eacafbe8d4721133874b89112ad1a6-
json.log",
        "Name": "/gracious_wescoff",
        "RestartCount": 0,
        "Driver": "overlay2",
        "Platform": "linux",
        "MountLabel": "",
        "ProcessLabel": "",
        "AppArmorProfile": "docker-default",
        "ExecIDs": null,
        "HostConfig": {


            "Binds": null,
            "ContainerIDFile": "",
            "LogConfig": {


                "Type": "json-file",
                "Config": {

    }
           },
            "NetworkMode": "default",
            "PortBindings": {

    },
            "RestartPolicy": {


                "Name": "no",
                "MaximumRetryCount": 0
           },
            "AutoRemove": false,
            "VolumeDriver": "",
            "VolumesFrom": null,
            "CapAdd": null,
            "CapDrop": null,
            "Capabilities": null,
            "Dns": [],
            "DnsOptions": [],
            "DnsSearch": [],
            "ExtraHosts": null,
            "GroupAdd": null,
            "IpcMode": "private",
            "Cgroup": "",
            "Links": null,
            "OomScoreAdj": 0,
            "PidMode": "",
            "Privileged": false,
            "PublishAllPorts": false,
            "ReadonlyRootfs": false,
            "SecurityOpt": null,
            "UTSMode": "",
            "UsernsMode": "",
            "ShmSize": 67108864,
            "Runtime": "runc",
            "ConsoleSize": [
                0,
                0
           ],
            "Isolation": "",
            "CpuShares": 0,
            "Memory": 0,
            "NanoCpus": 0,
            "CgroupParent": "",
....
#选择性查看
[root@ubuntu1804 ~]#docker inspect -f "{

    {.Metadata}}" test:v1.0
{

    2020-07-24 21:56:42.247448035 +0800 CST}
[root@ubuntu1804 ~]#docker inspect -f "{

    {.Created}}" c1
2020-07-24T13:37:11.006574248Z
[root@ubuntu1804 ~]#docker inspect --format "{

    {.Created}}" c1
2020-07-24T13:37:11.006574248Z
[root@ubuntu1804 ~]#docker inspect --format="{

    {.Created}}" c1
2020-07-24T13:37:11.006574248Z
案例:
#可以通过级联调用直接读取子对象 State 的 Status 属性,以获取容器的状态信息:
$ docker inspect --format '{

    {/*读取容器状态*/}}{

    {.State.Status}}' $INSTANCE_ID

注意: 如果需要获取的属性名称包含点号(比如下列示例数据)或者以数字开头,则不能直接通过级联调用获取信息。因为属性名称中的点号会被解析成级联信息,进而导致返回错误结果。即便使用引号将其包含也会提示语法格式错误。此时,需要通过 index 来读取指定属性信息。
"Options": {


            "com.docker.network.bridge.default_bridge": "true",
            "com.docker.network.bridge.enable_icc": "true",
            "com.docker.network.bridge.enable_ip_masquerade": "true",
            "com.docker.network.bridge.host_binding_ipv4": "0.0.0.0",
            "com.docker.network.bridge.name": "docker0",
            "com.docker.network.driver.mtu": "1500"
        },
# 直接级联调用会提示找不到数据:
$ docker inspect --format '{

    {.Options.com.docker.network.driver.mtu}}' bridge
<no value>

# 用引号括起来会提示语法错误:
$ docker inspect --format '{

    {.Options."com.docker.network.driver.mtu"}}' bridge
Template parsing error: template: :1: bad character U+0022 '"'

# 正确的用法,必须用 index 读取指定属性名称的属性值:
$ docker inspect --format '{

    {/*读取网络在hosts上的名称*/}}{

    {index .Options "com.docker.network.bridge.name"}}' bridge
docker0
- 获取容器ID
$  docker inspect -f '{

    {.Id}}' prometheus
9094fdeb64edf75d52189e1b985d0926cf4e6d53880a8f09ab30fc2d6c8a0908
- 获取容器Name
$ docker inspect --format='{

    {.Name}}' cadvisor
/cadvisor

$ docker inspect --format='{

    {.Name}}' cadvisor |cut -d"/" -f2
cadvisor

$ docker inspect --format='{

    {.Name}}' $(docker ps -aq)  |cut -d"/" -f2
cadvisor
node_exporter
qingscan
mysqlser
- 获取容器Hostname
$ docker inspect --format '{

    { .Config.Hostname }}' cadvisor
681a3c5206b1
- 获取容器的log path
$ docker inspect --format='{

    {.LogPath}}' `docker ps -a -q`
/data/docker/containers/681a3c5206b106463a3f4f65a2c44e6ecfe14ff0bc22ee76a153ebdf5e3d4084/681a3c5206b106463a3f4f65a2c44e6ecfe14ff0bc22ee76a153ebdf5e3d4084-json.log
/data/docker/containers/ac80df13976f7cb17ce54768adafdea14a6845c0f7d127b7d146adf52c50c788/ac80df13976f7cb17ce54768adafdea14a6845c0f7d127b7d146adf52c50c788-json.log
/data/docker/containers/6cac92ad7938c33f67f94524ca27caa7c670cb9a19871dcab7af8c6435b557d4/6cac92ad7938c33f67f94524ca27caa7c670cb9a19871dcab7af8c6435b557d4-json.log
/data/docker/containers/e311bdc95cf25fa80962a86e8047b60ec09eabb9db02cbdfa51efd444b3382d2/e311bdc95cf25fa80962a86e8047b60ec09eabb9db02cbdfa51efd444b3382d2-json.log
1.3.2.4.1 自定义变量
可以在处理过程中设置自定义变量,然后结合自定义变量做更复杂的处理。 如果自定义变量的返回值是对象,则可以通过点号进一步级联访问其属性。比如 { {$Myvar.Field1}}。
# 结合变量的使用,对输出结果进行组装展现,以输出容器的所有绑定端口列表:
$ docker inspect --format '{

    {/*通过变量组合展示容器绑定端口列表*/}}已绑定端口列表:{

    {println}}{

    {range $p,$conf := .NetworkSettings.Ports}}{

    {$p}} -> {

    {(index $conf 0).HostPort}}{

    {println}}{

    {end}}' Web_web_1

# 示例输出信息
已绑定端口列表:
80/tcp -> 32770
8081/tcp -> 8081
1.3.2.4.2 遍历(循环):range
格式:
{

    {

    range pipeline}}{

    {

    .}}{

    {

    end}}
{

    {

    range pipeline}}{

    {

    .}}{

    {

    else}}{

    {

    .}}{

    {

    end}}
range 用于遍历结构内返回值的所有数据。支持的类型包括 array, slice, map 和 channel。使用要点:
- 对应的值长度为 0 时,range 不会执行。
- 结构内部如要使用外部的变量,需要在前面加 引用,比如Var2。
- range 也支持 else 操作。效果是:当返回值为空或长度为 0 时执行 else 内的内容。
查看容器网络下已挂载的所有容器名称,如果没有挂载任何容器,则输出 “With No Containers”
        "NetworkSettings": {


            "Bridge": "",
            "SandboxID": "a4ae52dfb055599b4b582d4c91f5a38d297bbed30f3e1d698f1c199be572c1e3",
            "HairpinMode": false,
            "LinkLocalIPv6Address": "",
            "LinkLocalIPv6PrefixLen": 0,
            "Ports": {


                "9090/tcp": [
                    {


                        "HostIp": "0.0.0.0",
                        "HostPort": "9090"
                    }
                ]
            },
            "SandboxKey": "/var/run/docker/netns/a4ae52dfb055",
            "SecondaryIPAddresses": null,
            "SecondaryIPv6Addresses": null,
            "EndpointID": "16dbaea3aef149379a83673284c9adb843dab363246e6eb3255e40b149003580",
            "Gateway": "172.17.0.1",
            "GlobalIPv6Address": "",
            "GlobalIPv6PrefixLen": 0,
            "IPAddress": "172.17.0.2",
            "IPPrefixLen": 16,
            "IPv6Gateway": "",
            "MacAddress": "02:42:ac:11:00:02",
            "Networks": {


                "bridge": {


                    "IPAMConfig": null,
                    "Links": null,
                    "Aliases": null,
                    "NetworkID": "2045baaf0ce3f404298a1a57035b6cc6c91ebd4ee05ce219b818f255c198b44b",
                    "EndpointID": "16dbaea3aef149379a83673284c9adb843dab363246e6eb3255e40b149003580",
                    "Gateway": "172.17.0.1",
                    "IPAddress": "172.17.0.2",
                    "IPPrefixLen": 16,
                    "IPv6Gateway": "",
                    "GlobalIPv6Address": "",
                    "GlobalIPv6PrefixLen": 0,
                    "MacAddress": "02:42:ac:11:00:02"
                }
            }
        }
    }
]
实例:
- 获取容器IP地址
$ docker inspect --format='{

    {range .NetworkSettings.Networks}}{

    {.IPAddress}}{

    {end}}' prometheus
172.17.0.2

$ docker inspect --format='{

    {range .NetworkSettings.Networks}}{

    {.IPAddress}}{

    {end}}' $(docker ps -q)
172.17.0.3
172.17.0.2
- 获取容器端口映射
$ docker inspect --format='{

    {range $p, $conf := .NetworkSettings.Ports}} {

    {$p}} -> {

    {(index $conf 0).HostPort}} {

    {end}}' prometheus
 9090/tcp -> 9090
- 获取容器MacAddress
$ docker inspect --format='{

    {range .NetworkSettings.Networks}}{

    {.MacAddress}}{

    {end}}' $(docker ps -a -q)
02:42:ac:11:00:03
02:42:ac:11:00:02
02:42:ac:14:00:02
- 获取Hostname Name IP
$ docker inspect --format 'Hostname:{

    { .Config.Hostname }}  Name:{

    {.Name}} IP:{

    {range .NetworkSettings.Networks}}{

    {.IPAddress}}{

    {end}}' $(docker ps -q)
Hostname:681a3c5206b1  Name:/cadvisor IP:172.17.0.3
Hostname:ac80df13976f  Name:/node_exporter IP:172.17.0.2
1.3.2.4.3 index
如果返回结果是一个 map, slice, array 或 string,则可以使用 index 加索引序号(从零开始计数)来读取属性值。
$ docker inspect --format='{

    {(index (index .NetworkSettings.Ports "9090/tcp") 0).HostPort}}'  prometheus
9090
1.3.2.4.4 判断
not
返回单一参数的布尔否定值,即返回输入参数的否定值。
# 如果容器的 restarting 设置为 false,则返回信息“容器没有配置重启策略”
$ docker inspect --format '{

    {if not .State.Restarting}}容器没有配置重启策略{

    {end}}' $(docker ps -q)
容器没有配置重启策略
or
- { {or x y}}: 表示如果 x 为真返回 x,否则返回 y。
- { {or x y z}}:后面跟多个参数时会逐一判断每个参数,并返回第一个非空的参数。如果都为 false,则返回最后一个参数。
- 除了 null(空)和 false 被识别为 false,其它值(字符串、数字、对象等)均被识别为 true。
示例:
$ docker inspect --format '{

    {or .State.Status .State.Restarting}}' $(docker ps -q)
running
判断条件
判断语句通常需要结合判断条件一起使用,使用格式基本相同:
{

    {

    if 判断条件 .Var1 .Var2}}{

    {

    end}}
go模板支持如下判断方式:
- eq: 相等,即 arg1 == arg2。比较特殊的是,它支持多个参数进行与比较,此时,它会将第一个参数和其余参数依次比较,返回下式的结果:
{

    {

    if eq true .Var1 .Var2 .Var3}}{

    {

    end}}
效果等同于:
arg1==arg2 || arg1==arg3 || arg1==arg4 ...
2) ne: 不等,即 arg1 != arg2。
3) lt: 小于,即 arg1 < arg2。
4) le: 小于等于,即 arg1 <= arg2。
5) gt: 大于,即 arg1 > arg2。
6) ge: 大于等于,即 arg1 >= arg2。
判断示例
{

    {

    if pipeline}}{

    {

    end}}
{

    {

    if pipeline}}{

    {

    else}}{

    {

    if pipeline}}{

    {

    end}}{

    {

    end}}
{

    {

    if pipeline}}{

    {

    else if pipeline}}{

    {

    else}}{

    {

    end}}
# 输出所有已停止的容器名称:
$ docker inspect --format '{

    {if ne 0.0 .State.ExitCode}}{

    {.Name}}{

    {end}}' $(docker ps -aq)
$ docker inspect --format '{

    {if ne 0.0 .State.ExitCode}}{

    {.Name}}{

    {else}}该容器还在运行{

    {end}}' $(docker ps -aq)
$ docker inspect --format '{

    {if ne 0.0 .State.ExitCode}}{

    {.Name}}{

    {else if .}}该容器还在运行{

    {end}}' $(docker ps -aq)

# 输出所有已停止或配置了 Restarting 策略的容器名称
$ docker inspect --format '{

    {if ne 0.0 .State.ExitCode}}{

    {.Name}}{

    {else if eq .State.Restarting true}}容器{

    {.Name}}配置了Restarting策略.{

    {else}}{

    {end}}' $(docker ps -aq)
1.3.2.4.5 打印信息
docker --format 默认调用 go语言的 print 函数对模板中的字符串进行输出。而 go语言还有另外 2 种相似的内置函数,对比说明如下:
- print: 将传入的对象转换为字符串并写入到标准输出中。如果后跟多个参数,输出结果之间会自动填充空格进行分隔。
- println: 功能和 print 类似,但会在结尾添加一个换行符。也可以直接使用 { {println}} 来换行。
- printf: 与 shell 等环境一致,可配合占位符用于格式化输出。
$ docker inspect --format '{

    {.State.Pid}}{

    {.State.ExitCode}}' $INSTANCE_ID
240390

$ docker inspect --format '{

    {print .State.Pid .State.ExitCode}}' $INSTANCE_ID
24039 0

$ docker inspect --format '{

    {.State.Pid}}{

    {println " 从这换行"}}{

    {.State.ExitCode}}' $INSTANCE_ID
24039 从这换行
0

$ docker inspect --format '{

    {printf "Pid:%d ExitCode:%d" .State.Pid .State.ExitCode}}' $INSTANCE_ID
Pid:24039 ExitCode:0
1.3.2.4.6 管道
管道 即 pipeline ,与 shell 中类似,可以是上下文的变量输出,也可以是函数通过管道传递的返回值。
{

    {

    .Con | markdown | addlinks}}
{

    {

    .Name | printf "%s"}}
1.3.2.4.7 内置函数 len
内置函数 len 返回相应对象的长度
$ docker inspect --format '{

    {len .Name}}' prometheus
11
1.3.2.4.8 Docker 增强模板及函数
Docker 基于 go模板的基础上,构建了一些内置函数。
json
Docker 默认以字符串显示返回结果。而该函数可以将结果格式化为压缩后的 json 格式数据。
示例:
$ docker inspect nginx -f '{

    {json .State}}' | jq
{


  "Status": "running",
  "Running": true,
  "Paused": false,
  "Restarting": false,
  "OOMKilled": false,
  "Dead": false,
  "Pid": 23773,
  "ExitCode": 0,
  "Error": "",
  "StartedAt": "2021-08-04T09:27:06.018089509Z",
  "FinishedAt": "0001-01-01T00:00:00Z"
}
join
用指定的字符串将返回结果连接后一起展示。操作对象必须是字符串数组。
# 查看容器的Entrypoint命令
$ docker ps --no-trunc
CONTAINER ID                                                       IMAGE                              COMMAND                                                                                                                                           CREATED      STATUS      PORTS                                       NAMES
681a3c5206b106463a3f4f65a2c44e6ecfe14ff0bc22ee76a153ebdf5e3d4084   google/cadvisor:latest             "/usr/bin/cadvisor -logtostderr"                                                                                                                  9 days ago   Up 9 days   0.0.0.0:8080->8080/tcp, :::8080->8080/tcp   cadvisor


# 输出容器配置的所有 Entrypoint 参数,以 " , " 分隔:
$ docker inspect --format '{

    {join .Config.Entrypoint ","}}' cadvisor
/usr/bin/cadvisor,-logtostderr

$ docker inspect --format '{

    {join .Config.Entrypoint " "}}' cadvisor
/usr/bin/cadvisor -logtostderr
lower
将返回结果中的字母全部转换为小写。操作对象必须是字符串。
$ docker inspect --format "{

    {lower .Name}}" cadvisor
/cadvisor
upper
将返回结果中的字母全部转换为大写。操作对象必须是字符串。
$ docker inspect --format "{

    {upper .Name}}" cadvisor
/CADVISOR
title
将返回结果的首字母转换为大写。操作对象必须是字符串,而且不能是纯数字。
$ docker inspect --format "{

    {title .State.Status}}"  cadvisor
Running
split
使用指定分隔符将返回结果拆分为字符串列表。操作对象必须是字符串且不能是纯数字。同时,字符串中必须包含相应的分隔符,否则会直接忽略操作。
$ docker inspect --format '{

    {split .HostsPath "/"}}' cadvisor
[ data docker containers 681a3c5206b106463a3f4f65a2c44e6ecfe14ff0bc22ee76a153ebdf5e3d4084 hosts]
参考:
What to Inspect When You’re Inspecting
Docker格式化输出命令:“docker inspect --format” 学习笔记
1.3.3 删除容器
docker rm 可以删除容器,即使容器正在运行当中,也可以被强制删除掉
格式
docker rm [OPTIONS] CONTAINER [CONTAINER...]
docker container rm [OPTIONS] CONTAINER [CONTAINER...]
#选项:
-f, --force     Force the removal of a running container (uses SIGKILL)
-v, --volumes   Remove the volumes associated with the container
#删除停止的容器
docker container prune [OPTIONS]
Options:
      --filter filter   Provide filter values (e.g. 'until=<timestamp>')
  -f, --force           Do not prompt for confirmation
范例:
[root@ubuntu1804 ~]#docker ps -a
CONTAINER ID       IMAGE               COMMAND             CREATED
STATUS                     PORTS               NAMES
868b33da850c       alpine              "/bin/sh"           2 minutes ago
Up 2 minutes                                   alpine5
3a05bbf66dac       alpine              "/bin/sh"           3 minutes ago
Exited (0) 3 minutes ago                       alpine4
df428caf7128       alpine              "/bin/sh"           3 minutes ago
Up 3 minutes                                   alpine3
6d64f47a83e6       alpine              "/bin/sh"           3 minutes ago
Exited (0) 3 minutes ago                       alpine2
edd2ac2690e6       alpine              "/bin/sh"           4 minutes ago
Exited (0) 4 minutes ago                       alpine1
[root@ubuntu1804 ~]#docker rm 3a05bbf66dac
3a05bbf66dac
[root@ubuntu1804 ~]#docker rm alpine5
Error response from daemon: You cannot remove a running container
868b33da850cfcc7db8b84150fb9c7686b577889f10425bb4c5e17f28cf68a29. Stop the
container before attempting removal or force remove
[root@ubuntu1804 ~]#docker rm -f alpine5
alpine5
范例: 删除所有容器
[root@ubuntu1804 ~]#docker ps -a
CONTAINER ID       IMAGE               COMMAND             CREATED
STATUS                     PORTS               NAMES
df428caf7128       alpine              "/bin/sh"           4 minutes ago
Up 4 minutes                                   alpine3
6d64f47a83e6       alpine              "/bin/sh"           4 minutes ago
Exited (0) 4 minutes ago                       alpine2
edd2ac2690e6       alpine              "/bin/sh"           5 minutes ago
Exited (0) 5 minutes ago                       alpine1
[root@ubuntu1804 ~]#docker rm -f `docker ps -a -q`
df428caf7128
6d64f47a83e6
edd2ac2690e6
[root@ubuntu1804 ~]#docker ps -a
CONTAINER ID       IMAGE               COMMAND             CREATED
STATUS             PORTS               NAMES
[root@ubuntu1804 ~]#docker ps -a -q | xargs docker rm -f
范例: 删除指定状态的容器
[root@ubuntu1804 ~]#docker ps -a
CONTAINER ID       IMAGE               COMMAND                 CREATED
    STATUS                       PORTS               NAMES
dd002f947cbe       nginx               "nginx -g 'daemon of…"   22 minutes ago
    Exited (137) 14 minutes ago                       nginx2
1f3f82995e05       nginx               "nginx -g 'daemon of…"   22 minutes ago
    Up 4 minutes                  80/tcp             nginx1
[root@ubuntu1804 ~]#docker rm `docker ps -qf status=exited`
dd002f947cbe
[root@ubuntu1804 ~]#docker ps -a
CONTAINER ID       IMAGE               COMMAND                 CREATED
    STATUS             PORTS               NAMES
1f3f82995e05       nginx               "nginx -g 'daemon of…"   22 minutes ago
    Up 4 minutes        80/tcp             nginx1
[root@ubuntu1804 ~]#
范例: 删除所有停止的容器
[root@ubuntu1804 ~]#docker container prune -f
Deleted Containers:
37ba6ef81e33102a9cf4547ed10095d2298e29c8d67991b31390d5db8001dbcf
6c674c7ced422c7c29f218118c8b5da734ccebb9da31cdd3f64e7c658d2882a4
Total reclaimed space: 0B
1.3.4 容器的启动和停止
格式
docker start|stop|restart|pause|unpause 容器ID
批量正常启动或关闭所有容器
docker start $(docker ps -a -q)
docker stop $(docker ps -a -q)
范例: 启动并进入容器
[root@ubuntu1804 ~]#docker run --name=c1 -it ubuntu bash
root@539722b55b76:/# exit
exit
[root@ubuntu1804 ~]#docker ps -l
CONTAINER ID       IMAGE               COMMAND             CREATED
STATUS                   PORTS               NAMES
539722b55b76       ubuntu              "bash"              4 seconds ago
Exited (0) 1 second ago                       c1
[root@ubuntu1804 ~]#docker start c1
c1
[root@ubuntu1804 ~]#docker ps -l
CONTAINER ID       IMAGE               COMMAND                 CREATED
    STATUS                         PORTS               NAMES
539722b55b76       ubuntu              "bash"                   18 seconds ago
    Up 2 seconds                                       c1
[root@ubuntu1804 ~]#docker stop c1
c1
[root@ubuntu1804 ~]#docker ps -l
CONTAINER ID       IMAGE               COMMAND                 CREATED
    STATUS                     PORTS               NAMES
539722b55b76       ubuntu              "bash"                   43 seconds ago
    Exited (0) 1 second ago                       c1
#启动并进入容器
[root@ubuntu1804 ~]#docker start -i c1
root@539722b55b76:/# exit
exit
[root@ubuntu1804 ~]#docker ps -l
CONTAINER ID       IMAGE               COMMAND             CREATED
STATUS                     PORTS               NAMES
539722b55b76       ubuntu              "bash"              4 minutes ago
Exited (0) 5 seconds ago                       c1
范例: 启动和停止所有容器
[root@ubuntu1804 ~]#docker rm -f `docker ps -a -q`
b722c745406c
8d9342b35589
[root@ubuntu1804 ~]#docker run -d --name nginx1 nginx
1f3f82995e052647678fd27bfa27a5b5615efc129270698cbaac3120544d6609
[root@ubuntu1804 ~]#docker run -d --name nginx2 nginx
dd002f947cbe786ac0e834e06744337556f82d5850f4b16e01f12b9b3759f83e
[root@ubuntu1804 ~]#docker ps -a
CONTAINER ID       IMAGE               COMMAND                 CREATED
    STATUS             PORTS               NAMES
dd002f947cbe       nginx               "nginx -g 'daemon of…"   4 seconds ago
    Up 3 seconds        80/tcp             nginx2
1f3f82995e05       nginx               "nginx -g 'daemon of…"   7 seconds ago
    Up 6 seconds        80/tcp             nginx1
[root@ubuntu1804 ~]#docker stop `docker ps -a -q`
dd002f947cbe
1f3f82995e05
[root@ubuntu1804 ~]#docker ps -a
CONTAINER ID       IMAGE               COMMAND                 CREATED
    STATUS                     PORTS               NAMES
dd002f947cbe       nginx               "nginx -g 'daemon of…"   22 seconds ago
    Exited (0) 2 seconds ago                       nginx2
1f3f82995e05       nginx               "nginx -g 'daemon of…"   25 seconds ago
    Exited (0) 2 seconds ago                       nginx1
[root@ubuntu1804 ~]#docker start `docker ps -a -q`
dd002f947cbe
1f3f82995e05
[root@ubuntu1804 ~]#docker ps -a
CONTAINER ID       IMAGE               COMMAND                 CREATED
    STATUS             PORTS               NAMES
dd002f947cbe       nginx               "nginx -g 'daemon of…"   2 minutes ago
    Up 1 second         80/tcp             nginx2
1f3f82995e05       nginx               "nginx -g 'daemon of…"   2 minutes ago
    Up 1 second         80/tcp             nginx1
范例: 暂停和恢复容器
[root@ubuntu1804 ~]#docker run -d --name n1 nginx
48a8278f5df1d0b0c2c42c01d4e53d335df7e3e866fc7b68563cc2ac545fc07d
[root@ubuntu1804 ~]#docker top n1
UID                 PID                 PPID               C
STIME               TTY                 TIME               CMD
root                2104                2076                0
22:51               ?                   00:00:00           nginx: master
process nginx -g daemon off;
systemd+            2168                2104                0
22:51               ?                   00:00:00           nginx: worker
process
[root@ubuntu1804 ~]#ps aux|grep nginx
root       2104  0.3  0.2  10628  5324 ?       Ss   22:51   0:00 nginx: master
process nginx -g daemon off;
systemd+   2168  0.0  0.1  11056  2580 ?       S    22:51   0:00 nginx: worker
process
root       2188  0.0  0.0  14428  1040 pts/0   S+   22:51   0:00 grep --
color=auto nginx
[root@ubuntu1804 ~]#docker pause n1
n1
[root@ubuntu1804 ~]#docker ps
CONTAINER ID       IMAGE               COMMAND                 CREATED
    STATUS                 PORTS               NAMES
48a8278f5df1       nginx               "/docker-entrypoint.…"   3 minutes ago
    Up 3 minutes (Paused)   80/tcp             n1
[root@ubuntu1804 ~]#ps aux|grep nginx
root       2104  0.0  0.2  10628  5324 ?       Ds   22:51   0:00 nginx: master
process nginx -g daemon off;
systemd+   2168  0.0  0.1  11056  2580 ?       D    22:51   0:00 nginx: worker
process
root       2494  0.0  0.0  14428  1004 pts/0   R+   22:54   0:00 grep --
color=auto nginx
[root@ubuntu1804 ~]#docker unpause n1
n1
[root@ubuntu1804 ~]#ps aux|grep nginx
root       2104  0.0  0.2  10628  5324 ?       Ss   22:51   0:00 nginx: master
process nginx -g daemon off;
systemd+   2168  0.0  0.1  11056  2580 ?       S    22:51   0:00 nginx: worker
process
root       2521  0.0  0.0  14428  1028 pts/0   S+   22:55   0:00 grep --
color=auto nginx
范例: 容器的暂停和恢复
[root@ubuntu1804 ~]#docker run -itd centos
708bedcbd31be0ecac11aa21a7d15718d440e4bf65e3e6a8670f7391de21f301
[root@ubuntu1804 ~]#docker ps -a
CONTAINER ID       IMAGE               COMMAND             CREATED
STATUS             PORTS               NAMES
708bedcbd31b       centos              "/bin/bash"         4 seconds ago
Up 1 second                             blissful_payne
[root@ubuntu1804 ~]#docker pause   blissful_payne
blissful_payne
[root@ubuntu1804 ~]#docker ps -a
CONTAINER ID       IMAGE               COMMAND             CREATED
STATUS                   PORTS               NAMES
708bedcbd31b       centos              "/bin/bash"         19 seconds ago
Up 17 seconds (Paused)                       blissful_payne
[root@ubuntu1804 ~]#docker unpause blissful_payne
blissful_payne
[root@ubuntu1804 ~]#docker ps -a
CONTAINER ID       IMAGE               COMMAND             CREATED
STATUS             PORTS               NAMES
708bedcbd31b       centos              "/bin/bash"         33 seconds ago
Up 31 seconds                           blissful_payne
1.3.5 给正在运行的容器发信号
docker kill 可以给容器发信号,默认号SIGKILL,即9信号
格式
docker kill [OPTIONS] CONTAINER [CONTAINER...]
#选项:
-s, --signal string   Signal to send to the container (default "KILL")
[root@ubuntu1804 ~]#docker ps -a
CONTAINER ID       IMAGE               COMMAND                 CREATED
    STATUS             PORTS               NAMES
dd002f947cbe       nginx               "nginx -g 'daemon of…"   2 minutes ago
    Up 1 second         80/tcp             nginx2
1f3f82995e05       nginx               "nginx -g 'daemon of…"   2 minutes ago
    Up 1 second         80/tcp             nginx1
[root@ubuntu1804 ~]#docker kill nginx1
nginx1
[root@ubuntu1804 ~]#docker ps -a
CONTAINER ID       IMAGE               COMMAND                 CREATED
    STATUS                       PORTS               NAMES
dd002f947cbe       nginx               "nginx -g 'daemon of…"   5 minutes ago
    Up 3 minutes                 80/tcp             nginx2
1f3f82995e05       nginx               "nginx -g 'daemon of…"   5 minutes ago
    Exited (137) 2 seconds ago                       nginx1
[root@ubuntu1804 ~]#
范例: 关闭所有容器
[root@ubuntu1804 ~]#docker ps -a
CONTAINER ID       IMAGE               COMMAND                 CREATED
    STATUS             PORTS               NAMES
dd002f947cbe       nginx               "nginx -g 'daemon of…"   7 minutes ago
    Up 2 seconds        80/tcp             nginx2
1f3f82995e05       nginx               "nginx -g 'daemon of…"   7 minutes ago
    Up 3 seconds        80/tcp             nginx1
#强制关闭所有运行中的容器
[root@ubuntu1804 ~]#docker kill `docker ps -a -q`
dd002f947cbe
1f3f82995e05
1.3.6 进入正在运行的容器
1.3.6.1 使用attach命令
docker attach 容器名,attach 类似于vnc,操作会在同一个容器的多个会话界面同步显示,所有使用此方式进入容器的操作都是同步显示的,且使用exit退出后容器自动关闭,不推荐使用,需要进入到有
shell环境的容器
格式:
docker attach [OPTIONS] CONTAINER
范例:
[root@ubuntu1804 ~]#docker run -it centos
[root@94a5c5c69b14 /]# cat /etc/redhat-release
CentOS Linux release 8.1.1911 (Core) #ctrl+p+q 退出
[root@94a5c5c69b14 /]# [root@ubuntu1804 ~]#docker ps
CONTAINER ID       IMAGE               COMMAND             CREATED
STATUS             PORTS               NAMES
94a5c5c69b14       centos              "/bin/bash"         14 seconds ago
Up 14 seconds                           unruffled_ellis
[root@ubuntu1804 ~]#docker attach 94a5
[root@94a5c5c69b14 /]#cat /etc/redhat-release
#同时在第二个终端attach到同一个容器,执行命令,可以在前一终端看到显示图面是同步的
[root@ubuntu1804 ~]#docker attach 94a5
[root@94a5c5c69b14 /]#cat /etc/redhat-release
CentOS Linux release 8.1.1911 (Core)
[root@92a8279611a9 /]# exit #两个终端都同时退出
exit
[root@ubuntu1804 ~]#docker ps -a
CONTAINER ID       IMAGE               COMMAND             CREATED
STATUS                     PORTS               NAMES
92a8279611a9       centos              "/bin/bash"         4 minutes ago
Exited (0) 39 seconds ago                       agitated_tesla
1.3.6.2 使用exec命令
在运行中的容器启动新进程,可以执行单次命令,以及进入容器
测试环境使用此方式,使用exit退出,但容器还在运行,此为推荐方式
格式:
docker exec [OPTIONS] CONTAINER COMMAND [ARG...]
常用选项:
-d, --detach               Detached mode: run command in the background
-e, --env list             Set environment variables
-i, --interactive         Keep STDIN open even if not attached
-t, --tty                 Allocate a pseudo-TTY
#常见用法
docker exec -it 容器ID sh|bash
范例:
[root@ubuntu1804 ~]#docker run -itd centos
24788f69cec65e1f511387c1bae354a66e5b7ae29261e68957bc6dcc4818af6b
[root@ubuntu1804 ~]#docker ps
CONTAINER ID       IMAGE               COMMAND             CREATED
STATUS             PORTS               NAMES
24788f69cec6       centos              "/bin/bash"         3 seconds ago
Up 1 second                             keen_jennings
#执行一次性命令
[root@ubuntu1804 ~]#docker exec 2478 cat /etc/redhat-release
CentOS Linux release 8.1.1911 (Core)
#进入容器,执行命令,exit退出但容器不停止
[root@ubuntu1804 ~]#docker exec -it 2478 bash
[root@24788f69cec6 /]# cat /etc/redhat-release
CentOS Linux release 8.1.1911 (Core)
[root@24788f69cec6 /]# exit
exit
[root@ubuntu1804 ~]#docker ps
CONTAINER ID       IMAGE               COMMAND             CREATED
STATUS             PORTS               NAMES
24788f69cec6       centos              "/bin/bash"         4 minutes ago
Up 4 minutes                           keen_jennings
[root@ubuntu1804 ~]#
1.3.7 暴露所有容器端口
容器启动后,默认处于预定义的NAT网络中,所以外部网络的主机无法直接访问容器中网络服务docker run -P 可以将事先容器预定义的所有端口映射宿主机的网卡的随机端口,默认从32768开始
使用随机端口 时,当停止容器后再启动可能会导致端口发生变化
-P , --publish-all= true | false默认为false
#示例:
docker run -P docker.io/nginx  #映射容器所有暴露端口至随机本地端口
docker port 可以查看容器的端口映射关系
格式
docker port CONTAINER [PRIVATE_PORT[/PROTO]]
范例:
[root@centos7 ~]#docker port nginx-c1
443/tcp -> 0.0.0.0:8443
53/udp -> 0.0.0.0:8053
80/tcp -> 0.0.0.0:8080
[root@centos7 ~]#docker port nginx-c1 53/udp
0.0.0.0:8053
范例:
#前台启动的会话窗口无法进行其他操作,除非退出,但是退出后容器也会退出
[root@centos7 ~]#docker run -P nginx
172.17.0.1 - - [26/Jan/2020:06:44:56 +0000] "GET / HTTP/1.1" 200 612 "-"
"curl/7.29.0" "-"
#另开一个窗口执行下面命令
[root@centos7 ~]#ss -ntl
State     Recv-Q Send-Q         Local Address:Port                         Peer
Address:Port
LISTEN     0      128                         *:22
      *:*
LISTEN     0      100                 127.0.0.1:25
      *:*
LISTEN     0      128                       :::22
      :::*
LISTEN     0      100                       ::1:25
      :::*
LISTEN     0      128                       :::32768
      :::*
[root@centos7 ~]#docker ps
CONTAINER ID       IMAGE               COMMAND                 CREATED
    STATUS             PORTS                   NAMES
78086069642b       nginx               "nginx -g 'daemon of…"   23 seconds ago
    Up 21 seconds       0.0.0.0:32768->80/tcp   gallant_austin
[root@centos7 ~]#curl 127.0.0.1:32768
<!DOCTYPE html>
<html>
<head>
<title>Welcome to nginx!</title>
<style>
   body {


       width: 35em;
       margin: 0 auto;
       font-family: Tahoma, Verdana, Arial, sans-serif;
   }
</style>
</head>
<body>
<h1>Welcome to nginx!</h1>
<p>If you see this page, the nginx web server is successfully installed and
working. Further configuration is required.</p>
<p>For online documentation and support please refer to
<a href="http://nginx.org/">nginx.org</a>.<br/>
Commercial support is available at
<a href="http://nginx.com/">nginx.com</a>.</p>
<p><em>Thank you for using nginx.</em></p>
</body>
</html>
[root@centos7 ~]#
#自动生成Iptables规则
[root@centos7 ~]#iptables -vnL -t nat
Chain PREROUTING (policy ACCEPT 0 packets, 0 bytes)
 pkts bytes target     prot opt in     out     source               destination

   19  1012 DOCKER     all  -- *     *       0.0.0.0/0            0.0.0.0/0
        ADDRTYPE match dst-type LOCAL
Chain INPUT (policy ACCEPT 0 packets, 0 bytes)
 pkts bytes target     prot opt in     out     source               destination

Chain OUTPUT (policy ACCEPT 1 packets, 76 bytes)
 pkts bytes target     prot opt in     out     source               destination

    0     0 DOCKER     all  -- *     *       0.0.0.0/0           !127.0.0.0/8
        ADDRTYPE match dst-type LOCAL
Chain POSTROUTING (policy ACCEPT 1 packets, 76 bytes)
 pkts bytes target     prot opt in     out     source               destination

    0     0 MASQUERADE all  -- *     !docker0  172.17.0.0/16        0.0.0.0/0

    0     0 MASQUERADE tcp  -- *     *       172.17.0.2           172.17.0.2
          tcp dpt:80
    0     0 MASQUERADE tcp  -- *     *       172.17.0.4           172.17.0.4
          tcp dpt:80
Chain DOCKER (2 references)
 pkts bytes target     prot opt in     out     source               destination

    0     0 RETURN     all  -- docker0 *       0.0.0.0/0            0.0.0.0/0

    0     0 DNAT       tcp  -- !docker0 *       0.0.0.0/0            10.0.0.7
          tcp dpt:32768 to:172.17.0.2:80
#回到之前的会话窗口,同时按两个键 ctrl+c 退出容器
[root@centos7 ~]#docker run -P nginx
172.17.0.1 - - [26/Jan/2020:06:44:56 +0000] "GET / HTTP/1.1" 200 612 "-"
"curl/7.29.0" "-"
^C[root@centos7 ~]#docker ps -a
CONTAINER ID       IMAGE               COMMAND                 CREATED
    STATUS                     PORTS               NAMES
78086069642b       nginx               "nginx -g 'daemon of…"   3 minutes ago
    Exited (0) 5 seconds ago                       gallant_austin
[root@centos7 ~]#
端口映射的本质就是利用NAT技术实现的
范例: 端口映射和iptables
#端口映射前的iptables规则
[root@ubuntu1804 ~]#iptables -S
-P INPUT ACCEPT
-P FORWARD DROP
-P OUTPUT ACCEPT
-N DOCKER
-N DOCKER-ISOLATION-STAGE-1
-N DOCKER-ISOLATION-STAGE-2
-N DOCKER-USER
-A FORWARD -j DOCKER-USER
-A FORWARD -j DOCKER-ISOLATION-STAGE-1
-A FORWARD -o docker0 -m conntrack --ctstate RELATED,ESTABLISHED -j ACCEPT
-A FORWARD -o docker0 -j DOCKER
-A FORWARD -i docker0 ! -o docker0 -j ACCEPT
-A FORWARD -i docker0 -o docker0 -j ACCEPT
-A DOCKER-ISOLATION-STAGE-1 -i docker0 ! -o docker0 -j DOCKER-ISOLATION-STAGE-2
-A DOCKER-ISOLATION-STAGE-1 -j RETURN
-A DOCKER-ISOLATION-STAGE-2 -o docker0 -j DROP
-A DOCKER-ISOLATION-STAGE-2 -j RETURN
-A DOCKER-USER -j RETURN
[root@ubuntu1804 ~]#iptables -S -t nat
-P PREROUTING ACCEPT
-P INPUT ACCEPT
-P OUTPUT ACCEPT
-P POSTROUTING ACCEPT
-N DOCKER
-A PREROUTING -m addrtype --dst-type LOCAL -j DOCKER
-A OUTPUT ! -d 127.0.0.0/8 -m addrtype --dst-type LOCAL -j DOCKER
-A POSTROUTING -s 172.17.0.0/16 ! -o docker0 -j MASQUERADE
-A DOCKER -i docker0 -j RETURN
[root@ubuntu1804 ~]#iptables -S > pre.filter
[root@ubuntu1804 ~]#iptables -S -t nat > pre.nat
#实现端口映射
[root@ubuntu1804 ~]#docker run -d -P --name nginx1 nginx
286a3dedf159fbf0a4b895741a9d95562c87b44782ea85c8d172474da8860c36
[root@ubuntu1804 ~]#docker exec -it nginx1 hostname -i
172.17.0.2
[root@ubuntu1804 ~]#docker port nginx1
80/tcp -> 0.0.0.0:32769
#端口映射后的iptables规则
[root@ubuntu1804 ~]#iptables -S
-P INPUT ACCEPT
-P FORWARD DROP
-P OUTPUT ACCEPT
-N DOCKER
-N DOCKER-ISOLATION-STAGE-1
-N DOCKER-ISOLATION-STAGE-2
-N DOCKER-USER
-A FORWARD -j DOCKER-USER
-A FORWARD -j DOCKER-ISOLATION-STAGE-1
-A FORWARD -o docker0 -m conntrack --ctstate RELATED,ESTABLISHED -j ACCEPT
-A FORWARD -o docker0 -j DOCKER
-A FORWARD -i docker0 ! -o docker0 -j ACCEPT
-A FORWARD -i docker0 -o docker0 -j ACCEPT
-A DOCKER -d 172.17.0.2/32 ! -i docker0 -o docker0 -p tcp -m tcp --dport 80 -j
ACCEPT
-A DOCKER-ISOLATION-STAGE-1 -i docker0 ! -o docker0 -j DOCKER-ISOLATION-STAGE-2
-A DOCKER-ISOLATION-STAGE-1 -j RETURN
-A DOCKER-ISOLATION-STAGE-2 -o docker0 -j DROP
-A DOCKER-ISOLATION-STAGE-2 -j RETURN
-A DOCKER-USER -j RETURN
[root@ubuntu1804 ~]#iptables -S -t nat
-P PREROUTING ACCEPT
-P INPUT ACCEPT
-P OUTPUT ACCEPT
-P POSTROUTING ACCEPT
-N DOCKER
-A PREROUTING -m addrtype --dst-type LOCAL -j DOCKER
-A OUTPUT ! -d 127.0.0.0/8 -m addrtype --dst-type LOCAL -j DOCKER
-A POSTROUTING -s 172.17.0.0/16 ! -o docker0 -j MASQUERADE
-A POSTROUTING -s 172.17.0.2/32 -d 172.17.0.2/32 -p tcp -m tcp --dport 80 -j
MASQUERADE
-A DOCKER -i docker0 -j RETURN
-A DOCKER ! -i docker0 -p tcp -m tcp --dport 32769 -j DNAT --to-destination
172.17.0.2:80
#对比端口映射前后的变化
[root@ubuntu1804 ~]#iptables -S > post.filter
[root@ubuntu1804 ~]#iptables -S -t nat > post.nat
[root@ubuntu1804 ~]#diff pre.filter post.filter
13a14
> -A DOCKER -d 172.17.0.2/32 ! -i docker0 -o docker0 -p tcp -m tcp --dport 80 -j
ACCEPT
[root@ubuntu1804 ~]#diff pre.nat post.nat
8a9
> -A POSTROUTING -s 172.17.0.2/32 -d 172.17.0.2/32 -p tcp -m tcp --dport 80 -j
MASQUERADE
9a11
> -A DOCKER ! -i docker0 -p tcp -m tcp --dport 32769 -j DNAT --to-destination
172.17.0.2:80
#本地和选程都可以访问
[root@ubuntu1804 ~]#curl 127.0.0.1:32769
<!DOCTYPE html>
<html>
<head>
<title>Welcome to nginx!</title>
<style>
   body {


       width: 35em;
       margin: 0 auto;
       font-family: Tahoma, Verdana, Arial, sans-serif;
          }
</style>
</head>
<body>
<h1>Welcome to nginx!</h1>
<p>If you see this page, the nginx web server is successfully installed and
working. Further configuration is required.</p>
<p>For online documentation and support please refer to
<a href="http://nginx.org/">nginx.org</a>.<br/>
Commercial support is available at
<a href="http://nginx.com/">nginx.com</a>.</p>
<p><em>Thank you for using nginx.</em></p>
</body>
</html>
[root@centos8 ~]#curl 10.0.0.100:32769
<!DOCTYPE html>
<html>
<head>
<title>Welcome to nginx!</title>
<style>
   body {


       width: 35em;
       margin: 0 auto;
       font-family: Tahoma, Verdana, Arial, sans-serif;
   }
</style>
</head>
<body>
<h1>Welcome to nginx!</h1>
<p>If you see this page, the nginx web server is successfully installed and
working. Further configuration is required.</p>
<p>For online documentation and support please refer to
<a href="http://nginx.org/">nginx.org</a>.<br/>
Commercial support is available at
<a href="http://nginx.com/">nginx.com</a>.</p>
<p><em>Thank you for using nginx.</em></p>
</body>
</html>
#利用iptables 阻止同一个宿主机的其它容器CentOS8的访问
[root@ubuntu1804 ~]#iptables -I DOCKER -s 10.0.0.8 -d 172.17.0.2 -p tcp --dport
80 -j REJECT
[root@ubuntu1804 ~]#iptables -S
-P INPUT ACCEPT
-P FORWARD DROP
-P OUTPUT ACCEPT
-N DOCKER
-N DOCKER-ISOLATION-STAGE-1
-N DOCKER-ISOLATION-STAGE-2
-N DOCKER-USER
-A FORWARD -j DOCKER-USER
-A FORWARD -j DOCKER-ISOLATION-STAGE-1
-A FORWARD -o docker0 -m conntrack --ctstate RELATED,ESTABLISHED -j ACCEPT
-A FORWARD -o docker0 -j DOCKER
-A FORWARD -i docker0 ! -o docker0 -j ACCEPT
-A FORWARD -i docker0 -o docker0 -j ACCEPT
-A DOCKER -s 10.0.0.8/32 -d 172.17.0.2/32 -p tcp -m tcp --dport 80 -j REJECT --
reject-with icmp-port-unreachable
-A DOCKER -d 172.17.0.2/32 ! -i docker0 -o docker0 -p tcp -m tcp --dport 80 -j
ACCEPT
-A DOCKER-ISOLATION-STAGE-1 -i docker0 ! -o docker0 -j DOCKER-ISOLATION-STAGE-2
-A DOCKER-ISOLATION-STAGE-1 -j RETURN
-A DOCKER-ISOLATION-STAGE-2 -o docker0 -j DROP
-A DOCKER-ISOLATION-STAGE-2 -j RETURN
-A DOCKER-USER -j RETURN
#测试访问
[root@centos8 ~]#curl 10.0.0.100:32769
curl: (7) Failed to connect to 10.0.0.100 port 32769: Connection refused
[root@centos7 ~]#curl -I 10.0.0.100:32769
HTTP/1.1 200 OK
Server: nginx/1.19.1
Date: Thu, 23 Jul 2020 05:14:01 GMT
Content-Type: text/html
Content-Length: 612
Last-Modified: Tue, 07 Jul 2020 15:52:25 GMT
Connection: keep-alive
ETag: "5f049a39-264"
Accept-Ranges: bytes
1.3.8 指定端口映射
docker run -p 可以将容器的预定义的指定端口映射到宿主机的相应端口
注意: 多个容器映射到宿主机的端口不能冲突,但容器内使用的端口可以相同
方式1: 容器80端口映射宿主机本地随机端口
docker run -p 80 --name nginx-test-port1 nginx
方式2: 容器80端口映射到宿主机本地端口81
docker run -p 81:80 --name nginx-test-port2 nginx
方式3: 宿主机本地IP:宿主机本地端口:容器端口
docker run -p 10.0.0.100:82:80 --name nginx-test-port3 docker.io/nginx
方式4: 宿主机本地IP:宿主机本地随机端口:容器端口,默认从32768开始
docker run -p 10.0.0.100::80 --name nginx-test-port4 docker.io/nginx
方式5: 宿主机本机ip:宿主机本地端口:容器端口/协议,默认为tcp协议
docker run -p 10.0.0.100:83:80/udp --name nginx-test-port5 docker.io/nginx
方式6: 一次性映射多个端口+协议
docker run  -p 8080:80/tcp -p 8443:443/tcp -p 53:53/udp --name nginx-test-port6
nginx
范例:
[root@centos7 ~]#docker run -d -p 8080:80 -p 8443:443 -p 8053:53/udp nginx
a902b177bb7135ad8a8a179dbf8ce02dcc4806a1136475e59c2310833d7434ab
[root@centos7 ~]#docker ps
CONTAINER ID       IMAGE               COMMAND                 CREATED
    STATUS             PORTS
          NAMES
a902b177bb71       nginx               "nginx -g 'daemon of…"   5 seconds ago
    Up 4 seconds        0.0.0.0:8053->53/udp, 0.0.0.0:8080->80/tcp,
0.0.0.0:8443->443/tcp   affectionate_aryabhata
[root@centos7 ~]#ss -ntpul
Netid State     Recv-Q Send-Q       Local Address:Port
Peer Address:Port
udp   UNCONN     0      0                127.0.0.1:323
        *:*                   users:(("chronyd",pid=6292,fd=1))
udp   UNCONN     0      0                     ::1:323
        :::*                   users:(("chronyd",pid=6292,fd=2))
udp   UNCONN     0      0                       :::8053
      :::*                   users:(("docker-proxy",pid=32671,fd=4))
tcp   LISTEN     0      128                     *:22
        *:*                   users:(("sshd",pid=6623,fd=3))
tcp   LISTEN     0      100              127.0.0.1:25
        *:*                   users:(("master",pid=6748,fd=13))
tcp   LISTEN     0      128                     :::8080
      :::*                   users:(("docker-proxy",pid=32659,fd=4))
tcp   LISTEN     0      128                     :::22
      :::*                   users:(("sshd",pid=6623,fd=4))
tcp   LISTEN     0      100                   ::1:25
      :::*                   users:(("master",pid=6748,fd=14))
tcp   LISTEN     0      128                     :::8443
      :::*                   users:(("docker-proxy",pid=32646,fd=4))
[root@centos7 ~]#iptables -vnL -t nat
Chain PREROUTING (policy ACCEPT 0 packets, 0 bytes)
 pkts bytes target     prot opt in     out     source               destination

   19  1012 DOCKER     all  -- *     *       0.0.0.0/0            0.0.0.0/0
        ADDRTYPE match dst-type LOCAL
Chain INPUT (policy ACCEPT 0 packets, 0 bytes)
 pkts bytes target     prot opt in     out     source               destination

Chain OUTPUT (policy ACCEPT 0 packets, 0 bytes)
 pkts bytes target     prot opt in     out     source               destination

    0     0 DOCKER     all  -- *     *       0.0.0.0/0           !127.0.0.0/8
        ADDRTYPE match dst-type LOCAL
        Chain POSTROUTING (policy ACCEPT 0 packets, 0 bytes)
 pkts bytes target     prot opt in     out     source               destination

    0     0 MASQUERADE all  -- *     !docker0  172.17.0.0/16        0.0.0.0/0

    0     0 MASQUERADE tcp  -- *     *       172.17.0.2           172.17.0.2
          tcp dpt:443
    0     0 MASQUERADE tcp  -- *     *       172.17.0.2           172.17.0.2
          tcp dpt:80
    0     0 MASQUERADE udp  -- *     *       172.17.0.2           172.17.0.2
          udp dpt:53
Chain DOCKER (2 references)
 pkts bytes target     prot opt in     out     source               destination

    0     0 RETURN     all  -- docker0 *       0.0.0.0/0            0.0.0.0/0

    0     0 DNAT       tcp  -- !docker0 *       0.0.0.0/0            0.0.0.0/0
          tcp dpt:8443 to:172.17.0.2:443
    0     0 DNAT       tcp  -- !docker0 *       0.0.0.0/0            0.0.0.0/0
          tcp dpt:8080 to:172.17.0.2:80
    0     0 DNAT       udp  -- !docker0 *       0.0.0.0/0            0.0.0.0/0
          udp dpt:8053 to:172.17.0.2:53

#杀死nginx进程,nginx将关闭,相应端口也会关闭
[root@centos7 ~]#kill <NGINXPID>
1.3.8.1 实战案例: 修改已经创建的容器的端口映射关系
[root@ubuntu1804 ~]#docker run -d -p 80:80 --name nginx01 nginx
dc5d7c1029e582a3e05890fd18565367482232c151bba09ca27e195d39dbcc24
[root@ubuntu1804 ~]#docker port nginx01
80/tcp -> 0.0.0.0:80
[root@ubuntu1804 ~]#lsof -i:80
COMMAND   PID USER   FD   TYPE DEVICE SIZE/OFF NODE NAME
docker-pr 2364 root   4u IPv6  35929     0t0 TCP *:http (LISTEN)
[root@ubuntu1804 ~]#ls
/var/lib/docker/containers/dc5d7c1029e582a3e05890fd18565367482232c151bba09ca27e1
95d39dbcc24/
checkpoints
hostconfig.json mounts
config.v2.json
hostname         resolv.conf
dc5d7c1029e582a3e05890fd18565367482232c151bba09ca27e195d39dbcc24-json.log hosts
          resolv.conf.hash
[root@ubuntu1804 ~]#systemctl stop docker
[root@ubuntu1804 ~]#vim
/var/lib/docker/containers/dc5d7c1029e582a3e05890fd18565367482232c151bba09ca27e1
95d39dbcc24/hostconfig.json
"PortBindings":{

    "80/tcp":[{

    "HostIp":"","HostPort":"80"}]}
#PortBindings后80/tcp对应的是容器内部的80端口,HostPort对应的是映射到宿主机的端口80 修改此
处为8000
"PortBindings":{

    "80/tcp":[{

    "HostIp":"","HostPort":"8000"}]}
[root@ubuntu1804 ~]#systemctl start docker
[root@ubuntu1804 ~]#docker start nginx01
[root@ubuntu1804 ~]#docker port nginx01
80/tcp -> 0.0.0.0:8000
范例: 实现 wordpress 应用
docker run -p 3306:3306 -e MYSQL_ROOT_PASSWORD=123456 -e MYSQL_DATABASE=wordpress
-e MYSQL_USER=wordpress -e MYSQL_PASSWORD=123456 --name mysql -d mysql:8.0.29-
oracle
docker run -d -p 8080:80 --name wordpress wordpress:php7.4-apache
1.3.9 查看容器的日志
docker logs 可以查看容器中运行的进程在控制台输出的日志信息
格式
docker logs [OPTIONS] CONTAINER
选项:
--details       Show extra details provided to logs
-f, --follow     Follow log output
--since string   Show logs since timestamp (e.g. 2013-01-02T13:23:37) or
relative (e.g. 42m for   42 minutes)
--tail string   Number of lines to show from the end of the logs (default
"all")
-t, --timestamps     Show timestamps
--until string   Show logs before a timestamp (e.g. 2013-01-02T13:23:37) or
relative (e.g. 42m     for 42 minutes)
范例: 查看容器日志
[root@ubuntu1804 ~]#docker run alpine /bin/sh -c 'i=1;while true;do echo
hello$i;let i++;sleep 2;done'
Unable to find image 'alpine:latest' locally
latest: Pulling from library/alpine
188c0c94c7c5: Pull complete
Digest: sha256:c0e9560cda118f9ec63ddefb4a173a2b2a0347082d7dff7dc14272e7841a5b5a
Status: Downloaded newer image for alpine:latest
hello1
hello2
hello3
hello4
hello5
^C[root@ubuntu1804 ~]#
[root@ubuntu1804 ~]#docker run -d alpine /bin/sh -c 'i=1;while true;do echo
hello$i;let i++;sleep 2;done'
512622b006c05673630eb04f081f8475400b1cda786b0a8a5d1c1c2fd6dc56a7
[root@ubuntu1804 ~]#docker logs 5126
hello1
hello2
hello3
hello4
hello5
hello6
[root@ubuntu1804 ~]#docker logs --tail 3 5126
hello8
hello9
hello10
#显示时间
[root@ubuntu1804 ~]#docker logs --tail 0 -t 5126
2020-02-25T13:30:07.321390731Z hello17
#持续跟踪
[root@ubuntu1804 ~]#docker logs -f 5126
hello1
hello2
hello3
hello4
hello5
hello6
hello7
hello8
hello9

.....
范例: 查看httpd服务日志
[root@ubuntu1804 ~]#docker pull httpd
Using default tag: latest
latest: Pulling from library/httpd
bb79b6b2107f: Pull complete
26694ef5449a: Pull complete
7b85101950dd: Pull complete
da919f2696f2: Pull complete
3ae86ea9f1b9: Pull complete
Digest: sha256:b82fb56847fcbcca9f8f162a3232acb4a302af96b1b2af1c4c3ac45ef0c9b968
Status: Downloaded newer image for httpd:latest
docker.io/library/httpd:latest
[root@ubuntu1804 ~]#docker run -d -p 80:80 --name web1 httpd
9f55b2216f0d65fe010166a78f07f45a47379bb0efa38c4f81f2034a7401907b
[root@ubuntu1804 ~]#docker logs web1
AH00558: httpd: Could not reliably determine the server's fully qualified domain
name, using 172.17.0.3. Set the 'ServerName' directive globally to suppress this
message
AH00558: httpd: Could not reliably determine the server's fully qualified domain
name, using 172.17.0.3. Set the 'ServerName' directive globally to suppress this
message
[Mon Nov 16 01:07:53.780025 2020] [mpm_event:notice] [pid 1:tid 140363582039168]
AH00489: Apache/2.4.46 (Unix) configured -- resuming normal operations
[Mon Nov 16 01:07:53.780218 2020] [core:notice] [pid 1:tid 140363582039168]
AH00094: Command line: 'httpd -D FOREGROUND'
[root@ubuntu1804 ~]#docker logs -f web1
AH00558: httpd: Could not reliably determine the server's fully qualified domain
name, using 172.17.0.3. Set the 'ServerName' directive globally to suppress this
message
AH00558: httpd: Could not reliably determine the server's fully qualified domain
name, using 172.17.0.3. Set the 'ServerName' directive globally to suppress this
message
[Mon Nov 16 01:07:53.780025 2020] [mpm_event:notice] [pid 1:tid 140363582039168]
AH00489: Apache/2.4.46 (Unix) configured -- resuming normal operations
[Mon Nov 16 01:07:53.780218 2020] [core:notice] [pid 1:tid 140363582039168]
AH00094: Command line: 'httpd -D FOREGROUND'
10.0.0.8 - - [16/Nov/2020:01:08:23 +0000] "GET / HTTP/1.1" 200 45
范例: 查看nginx服务访问日志
#查看一次
[root@centos7 ~]#docker logs nginx-test-port1
10.0.0.1 - - [26/Jan/2020:07:17:16 +0000] "GET /favicon.ico HTTP/1.1" 404 555 "-
" "Mozilla/5.0 (Windows NT 10.0; WOW64) AppleWebKit/537.36 (KHTML, like Gecko)
Chrome/63.0.3239.132 Safari/537.36" "-"
2020/01/26 07:17:16 [error] 6#6: *1 open() "/usr/share/nginx/html/favicon.ico"
failed (2: No such file or directory), client: 10.0.0.1, server: localhost,
request: "GET /favicon.ico HTTP/1.1", host: "10.0.0.7:32769"
10.0.0.1 - - [26/Jan/2020:07:17:17 +0000] "GET / HTTP/1.1" 200 612 "-"
"Mozilla/5.0 (Windows NT 10.0; WOW64; Trident/7.0; rv:11.0) like Gecko" "-"
#持续查看
[root@centos7 ~]#docker logs -f nginx-test-port1
10.0.0.1 - - [26/Jan/2020:07:17:16 +0000] "GET /favicon.ico HTTP/1.1" 404 555 "-
" "Mozilla/5.0 (Windows NT 10.0; WOW64) AppleWebKit/537.36 (KHTML, like Gecko)
Chrome/63.0.3239.132 Safari/537.36" "-"
2020/01/26 07:17:16 [error] 6#6: *1 open() "/usr/share/nginx/html/favicon.ico"
failed (2: No such file or directory), client: 10.0.0.1, server: localhost,
request: "GET /favicon.ico HTTP/1.1", host: "10.0.0.7:32769"
10.0.0.1 - - [26/Jan/2020:07:17:17 +0000] "GET / HTTP/1.1" 200 612 "-"
"Mozilla/5.0 (Windows NT 10.0; WOW64; Trident/7.0; rv:11.0) like Gecko" "-"
1.3.10 传递运行命令
容器需要有一个前台运行的进程才能保持容器的运行,通过传递运行参数是一种方式,另外也可以在构
建镜像的时候指定容器启动时运行的前台命令
容器里的PID为1的守护进程的实现方式
- 服务类: 如: Nginx,Tomcat,Apache ,但服务不能停
- 命令类: 如: tail -f /etc/hosts ,主要用于测试环境,注意: 不要tail -f <服务访问日志> 会产生不必要的磁盘IO
案例:
[root@ubuntu1804 ~]#docker run -d alpine
6ec8989f572a41d2d0c7d2cb12ac31de14de38af0a01af405f81dbfcf534b716
[root@ubuntu1804 ~]#docker ps -a
CONTAINER ID       IMAGE               COMMAND             CREATED
STATUS                     PORTS               NAMES
6ec8989f572a       alpine              "/bin/sh"           3 seconds ago
Exited (0) 2 seconds ago                       gallant_albattani
[root@ubuntu1804 ~]#docker run -d alpine tail -f /etc/hosts
2bc9fa486769a2335f7e9aa67c7d3e7f091ba9b76d38dff868b8fd648251b576
[root@ubuntu1804 ~]#docker ps -a
CONTAINER ID       IMAGE               COMMAND               CREATED
  STATUS                     PORTS               NAMES
2bc9fa486769       alpine              "tail -f /etc/hosts"   3 seconds ago
  Up 2 seconds                                   stupefied_keldysh
6ec8989f572a       alpine              "/bin/sh"              23 seconds ago
  Exited (0) 22 seconds ago                       gallant_albattani
[root@ubuntu1804 ~]#docker exec -it 2bc9fa486769 sh
/ # ps aux
PID   USER     TIME COMMAND
    1 root      0:00 tail -f /etc/hosts
   11 root      0:00 sh
   17 root      0:00 ps aux
/ # exit
[root@ubuntu1804 ~]#docker ps -a
CONTAINER ID       IMAGE               COMMAND               CREATED
  STATUS             PORTS               NAMES
1e30dfc283da       alpine              "tail -f /etc/hosts"   About a minute
ago   Up About a minute                       kind_mcclintock
1.3.11 容器内部的hosts文件
容器会自动将容器的ID加入自已的/etc/hosts文件中,并解析成容器的IP
[root@ubuntu1804 ~]#docker run -it centos /bin/bash
[root@598262a87c46 /]# cat /etc/hosts
127.0.0.1 localhost
::1 localhost ip6-localhost ip6-loopback
fe00::0 ip6-localnet
ff00::0 ip6-mcastprefix
ff02::1 ip6-allnodes
ff02::2 ip6-allrouters
172.17.0.2 598262a87c46  #默认会将实例的ID 添加到自己的hosts文件
[root@598262a87c46 /]# hostname
598262a87c46
[root@598262a87c46 /]# ping 598262a87c46
PING 598262a87c46 (172.17.0.2) 56(84) bytes of data.
64 bytes from 598262a87c46 (172.17.0.2): icmp_seq=1 ttl=64 time=0.118 ms
64 bytes from 598262a87c46 (172.17.0.2): icmp_seq=2 ttl=64 time=0.085 ms
^C
--- 598262a87c46 ping statistics ---
2 packets transmitted, 2 received, 0% packet loss, time 3ms
#在另一个会话执行
[root@ubuntu1804 ~]#docker ps
CONTAINER ID       IMAGE               COMMAND             CREATED
STATUS             PORTS               NAMES
598262a87c46       centos              "/bin/bash"         14 seconds ago
Up 12 seconds                           optimistic_wiles
范例: 修改容器的 hosts文件
[root@ubuntu1804 ~]#docker run -it --rm --add-host www.wangxiaochun.com:6.6.6.6
--add-host www.wang.org:8.8.8.8   busybox
/ # cat /etc/hosts
127.0.0.1 localhost
::1 localhost ip6-localhost ip6-loopback
fe00::0 ip6-localnet
ff00::0 ip6-mcastprefix
ff02::1 ip6-allnodes
ff02::2 ip6-allrouters
6.6.6.6 www.wangxiaochun.com
8.8.8.8 www.wang.org
172.17.0.2 449bf0468efd
1.3.12 指定容器DNS
容器的dns服务器,默认采用宿主机的dns 地址,可以用下面方式指定其它的DNS地址
- 将dns地址配置在宿主机
- 在容器启动时加选项 --dns=x.x.x.x
- 在/etc/docker/daemon.json 文件中指定
范例: 容器的DNS默认从宿主机的DNS获取
[root@ubuntu1804 ~]#systemd-resolve --status|grep -A1 -i "DNS Servers"
         DNS Servers: 180.76.76.76
                      223.6.6.6
[root@ubuntu1804 ~]#docker run -it --rm   centos bash
[root@1364f98c4227 /]# cat /etc/resolv.conf
nameserver 180.76.76.76
nameserver 223.6.6.6
search magedu.com wang.org
[root@1364f98c4227 /]# exit
exit
[root@ubuntu1804 ~]#
范例: 指定DNS地址
[root@ubuntu1804 ~]#docker run -it --rm --dns 1.1.1.1 --dns 8.8.8.8 centos bash
[root@ef9cacc74b58 /]# cat /etc/resolv.conf
search magedu.com wang.org
nameserver 1.1.1.1
nameserver 8.8.8.8
[root@ef9cacc74b58 /]# exit
exit
[root@ubuntu1804 ~]#
范例: 指定domain名
[root@ubuntu1804 ~]#docker run -it --rm --dns 1.1.1.1 --dns 8.8.8.8 --dns-search
a.com --dns-search b.com busybox
/ # cat /etc/resolv.conf
search a.com b.com
nameserver 1.1.1.1
nameserver 8.8.8.8
/ #
范例: 配置文件指定DNS和搜索domain名
[root@ubuntu1804 ~]#vim /etc/docker/daemon.json
[root@ubuntu1804 ~]#cat /etc/docker/daemon.json
{


  "storage-driver": "overlay2",
  "registry-mirrors": ["https://si7y70hh.mirror.aliyuncs.com"],
   "dns" : [  "114.114.114.114", "119.29.29.29"],
   "dns-search": [ "magedu.com", "wang.org"]
}
[root@ubuntu1804 ~]#systemctl restart docker
[root@ubuntu1804 ~]#docker run -it --rm   centos bash
[root@7a2d8fac6f6b /]# cat /etc/resolv.conf
search magedu.com wang.org
nameserver 114.114.114.114
nameserver 119.29.29.29
[root@7a2d8fac6f6b /]# exit
exit
#用--dns指定优先级更高
[root@ubuntu1804 ~]#docker run -it --rm --dns 8.8.8.8 --dns 8.8.4.4 centos bash
[root@80ffe3547b87 /]# cat /etc/resolv.conf
search magedu.com wang.org
nameserver 8.8.8.8
nameserver 8.8.4.4
[root@80ffe3547b87 /]# exit
exit
1.3.13 容器内和宿主机之间复制文件
docker cp [OPTIONS] CONTAINER:SRC_PATH DEST_PATH|-
docker cp [OPTIONS] SRC_PATH|- CONTAINER:DEST_PATH
Options:
  -a, --archive       Archive mode (copy all uid/gid information)
  -L, --follow-link   Always follow symbol link in SRC_PATH
范例:
[root@ubuntu1804 ~]#docker run -itd centos
1311fe67e6708dac71c01f7d1752a6dcb5e85c2f1fa4ac2efcef9edfe4fb6bb5
[root@ubuntu1804 ~]#docker ps
CONTAINER ID       IMAGE               COMMAND             CREATED
STATUS             PORTS               NAMES
1311fe67e670       centos              "/bin/bash"         2 seconds ago
Up 2 seconds                           elegant_khorana
#将容器内文件复制到宿主机
[root@ubuntu1804 ~]#docker cp -a 1311:/etc/centos-release .
[root@ubuntu1804 ~]#cat centos-release
CentOS Linux release 8.1.1911 (Core)
#将宿主机文件复制到容器内
[root@ubuntu1804 ~]#docker cp /etc/issue 1311:/root/
[root@ubuntu1804 ~]#docker exec 1311 cat /root/issue
Ubuntu 18.04.1 LTS \n \l
[root@ubuntu1804 ~]#
1.3.14 使用 systemd 控制容器运行
[root@ubuntu1804 ~]#cat /lib/systemd/system/hello.service
[Unit]
Description=Hello World
After=docker.service
Requires=docker.service
[Service]
TimeoutStartSec=0
ExecStartPre=-/usr/bin/docker kill busybox-hello
ExecStartPre=-/usr/bin/docker rm busybox-hello
ExecStartPre=/usr/bin/docker pull busybox
ExecStart=/usr/bin/docker run --name busybox-hello busybox /bin/sh -c "while
true; do echo Hello World; sleep 1; done"
ExecStop=/usr/bin/docker kill busybox-hello
[Install]
WantedBy=multi-user.target
[root@ubuntu1804 ~]#systemctl daemon-reload
[root@ubuntu1804 ~]#systemctl enable --now hello.service
1.3.15 传递环境变量
有些容器运行时,需要传递变量,可以使用 -e <参数> 或 --env-file <参数文件> 实现
范例: 传递变量创建MySQL
变量参考链接: https://hub.docker.com/_/mysql
#MySQL容器运行时需要指定root的口令
[root@ubuntu1804 ~]#docker run --name mysql01 mysql:5.7.32
2020-11-16 01:43:13+00:00 [Note] [Entrypoint]: Entrypoint script for MySQL
Server 5.7.32-1debian10 started.
2020-11-16 01:43:13+00:00 [Note] [Entrypoint]: Switching to dedicated user
'mysql'
2020-11-16 01:43:13+00:00 [Note] [Entrypoint]: Entrypoint script for MySQL
Server 5.7.32-1debian10 started.
2020-11-16 01:43:13+00:00 [ERROR] [Entrypoint]: Database is uninitialized and
password option is not specified
 You need to specify one of MYSQL_ROOT_PASSWORD, MYSQL_ALLOW_EMPTY_PASSWORD
and MYSQL_RANDOM_ROOT_PASSWORD
[root@ubuntu1804 ~]#docker run --name mysql-test1 -v /data/mysql:/var/lib/mysql
-e MYSQL_ROOT_PASSWORD=123456 -e MYSQL_DATABASE=wordpress -e MYSQL_USER=wpuser -e
MYSQL_PASSWORD=123456 -d -p 3306:3306 mysql:5.7.30
[root@ubuntu1804 ~]#docker run --name mysql-test2 -v
/root/mysql/:/etc/mysql/conf.d -v /data/mysql2:/var/lib/mysql --env-file=env.list
-d -p 3307:3306 mysql:5.7.30
[root@ubuntu1804 ~]#cat mysql/mysql-test.cnf
[mysqld]
server-id=100
log-bin=mysql-bin
[root@ubuntu1804 ~]#cat env.list
MYSQL_ROOT_PASSWORD=123456
MYSQL_DATABASE=wordpress
MYSQL_USER=wpuser
MYSQL_PASSWORD=wppass
二. 基于alpine基础镜像构建常见的系统服务,任选三个完成[nginx/jdk/apache/haproxy/tomcat等等]。
2.1 准备目录结构,下载镜像并初始化系统
#按照业务类型或系统类型等方式划分创建目录环境,方便后期镜像比较多的时候进行分类
[root@ubuntu1804 ~]#mkdir
/data/dockerfile/{

    web/{

    nginx,apache,tomcat,jdk},system/{

    centos,ubuntu,alpine,deb
ian}} -p
[root@ubuntu1804 ~]#tree /data/dockerfile/
/data/dockerfile/
├── system
│   ├── alpine
│   ├── centos
│   ├── debian
│   └── ubuntu
└── web
   ├── apache
   ├── jdk
   ├── nginx
   └── tomcat
10 directories, 0 files
2.1.1 nginx 镜像制作
2.1.1.1 制作alpine的自定义系统镜像
#下载alpine镜像,打新标签
[root@ubuntu1804 ~]#docker pull alpine
[root@ubuntu1804 ~]#docker tag alpine alpine:3.11
[root@ubuntu1804 ~]#docker images
[root@ubuntu1804 ~]#docker images
REPOSITORY         TAG                 IMAGE ID           CREATED
SIZE
alpine              3.11               e7d92cdc71fe        11 days ago
5.59MB
alpine             latest             e7d92cdc71fe        11 days ago
5.59MB
#准备相关文件
[root@ubuntu1804 ~]#cd /data/dockerfile/system/alpine
[root@ubuntu1804 alpine]#cat repositories
http://mirrors.aliyun.com/alpine/v3.11/main
http://mirrors.aliyun.com/alpine/v3.11/community
#准备Dockerfile文件
[root@ubuntu1804 alpine]#cat Dockerfile
FROM alpine:3.11
LABEL maintainer="wangxiaochun <[email protected]>"
COPY repositories /etc/apk/repositories
RUN apk update && apk --no-cache add iotop  gcc libgcc libc-dev libcurl libcutils pcre-dev zlib-dev libnfs make pcre pcre2 zip unzip net-tools pstree wget
libevent libevent-dev iproute2
#准备构建脚本
[root@ubuntu1804 alpine]#cat build.sh
#!/bin/bash
docker build -t alpine-base:3.11 .
[root@ubuntu1804 alpine]#bash build.sh
[root@ubuntu1804 alpine]#docker images alp*
REPOSITORY         TAG                 IMAGE ID           CREATED
SIZE
alpine-base         3.11               b162eecf4da9        5 minutes ago
182MB
alpine              3.11               e7d92cdc71fe        11 days ago
5.59MB
alpine             latest             e7d92cdc71fe        11 days ago
5.59MB
2.1.1.2 制作基于alpine自定义镜像的nginx镜像
#准备相关文件
[root@ubuntu1804 ~]#mkdir /data/dockerfile/web/nginx/1.16.1-alpine/
[root@ubuntu1804 ~]#cd /data/dockerfile/web/nginx/1.16.1-alpine/
[root@ubuntu1804 1.16.1-alpine]#wget http://nginx.org/download/nginx-
1.16.1.tar.gz
[root@ubuntu1804 1.16.1-alpine]#echo Test Page based nginx-alpine > index.html
[root@ubuntu1804 1.16.1-alpine]#cp ../1.16.1-centos7/nginx.conf .
[root@ubuntu1804 1.16.1-alpine]#cat nginx.conf
user nginx;
worker_processes  1;
daemon off;
...
location / {


           root   /data/nginx/html;
...
#编写Dockerfile文件
[root@ubuntu1804 1.16.1-alpine]#vim Dockerfile
[root@ubuntu1804 1.16.1-alpine]#cat Dockerfile
FROM alpine-base:3.11
LABEL maintainer="wangxiaochun <[email protected]>"
ADD nginx-1.16.1.tar.gz /usr/local/src
RUN cd /usr/local/src/nginx-1.16.1 && ./configure  --prefix=/apps/nginx && make
&& make install && ln -s /apps/nginx/sbin/nginx /usr/bin/
RUN addgroup  -g 2019 -S nginx && adduser  -s /sbin/nologin -S -D  -u 2019 -G
nginx nginx
COPY nginx.conf /apps/nginx/conf/nginx.conf
ADD index.html /data/nginx/html/index.html
RUN chown  -R nginx.nginx /data/nginx/ /apps/nginx/
EXPOSE 80 443
CMD ["nginx"]
#构建镜像
[root@ubuntu1804 1.16.1-alpine]#vim build.sh
[root@ubuntu1804 1.16.1-alpine]#cat build.sh
#!/bin/bash
#********************************************************************
docker build -t nginx-alpine:1.16.1 .
[root@ubuntu1804 1.16.1-alpine]#ls
build.sh Dockerfile index.html nginx-1.16.1.tar.gz nginx.conf
[root@ubuntu1804 1.16.1-alpine]#docker images “*alpine*”
REPOSITORY         TAG                 IMAGE ID           CREATED
SIZE
nginx-alpine        1.16.1             344ff9acf58b        13 seconds ago
211MB
alpine-base         3.11               b162eecf4da9       About an hour ago
182MB
alpine              3.11               e7d92cdc71fe        11 days ago
5.59MB
#生成容器测试镜像
[root@ubuntu1804 1.16.1-alpine]#docker run -d -p 80:80 nginx-alpine:1.16.1
1cb16e9fe6cd8e583a61c2718a92ce3031313bbf3656c2f85ac84d34ccfe7e0d
[root@ubuntu1804 1.16.1-alpine]#curl 127.0.0.1
Test Page based nginx-alpine
[root@ubuntu1804 1.16.1-alpine]#docker exec -it 1cb16e9fe6cd sh
/ # ps aux
PID   USER     TIME COMMAND
    1 root      0:00 nginx: master process nginx
    6 nginx     0:00 nginx: worker process
    7 root      0:00 sh
   12 root      0:00 ps aux
/ # ls /data/nginx/html/ -l
total 4
-rw-r--r--    1 nginx   nginx           29 Jan 29 11:08 index.html
/ # exit
[root@ubuntu1804 1.16.1-alpine]#
2.1.2 apache 镜像制作
##上传源码包
[root@localhost apache]# cd files/
[root@localhost files]# ls
apr-1.7.0.tar.gz  apr-util-1.6.1.tar.gz  httpd-2.4.48.tar.gz

##编写dockerfile文件
[root@localhost apache]# vim Dockerfile
FROM centos
LABEL WAINTAINER='luochuran [email protected]'
ADD files/* /usr/local/
WORKDIR /usr/local
RUN yum -y install openssl-devel pcre-devel pcre expat-devel libtool gcc gcc-c++ make which && \
    sed -i '/$RM "$cfgfile"/d' apr-1.7.0/configure && \
    ./apr-1.7.0/configure --prefix=/usr/local/apr && make && make install && \
    ./apr-util-1.6.1/configure --prefix=/usr/local/apr-util --with-apr=/usr/local/apr && make && make install && \
    ./httpd-2.4.48/configure --prefix=/usr/local/apache \
      --enable-so \
      --enable-ssl \
      --enable-cgi \
      --enable-rewrite \
      --with-zlib \
      --with-pcre \
      --with-apr=/usr/local/apr \
      --with-apr-util=/usr/local/apr-util/ \
      --enable-modules=most \
      --enable-mpms-shared=all \
      --with-mpm=prefork && make && make install
EXPOSE 80
CMD ["/usr/local/apache/bin/apachectl","-D","FOREGROUND"]


##构建镜像
[root@localhost ~]# docker build -t 1225514226/apache apache/
Sending build context to Docker daemon  11.07MB
Step 1/7 : FROM centos
 ---> 5d0da3dc9764
Step 2/7 : LABEL WAINTAINER='luochuran [email protected]'
 ---> Using cache
 ---> b07711e6377c
Step 3/7 : ADD files/* /usr/local/
 ---> f60a20330abb
Step 4/7 : WORKDIR /usr/local
 ---> Running in 5fe38b9fb88a
Removing intermediate container 5fe38b9fb88a
 ---> 7bb082e4fcbf
Step 5/7 : RUN yum -y install openssl-devel pcre-devel pcre expat-devel libtool gcc gcc-c++ make which &&     sed -i '/$RM "$cfgfile"/d' apr-1.7.0/configure &&     ./apr-1.7.0/configure --prefix=/usr/local/apr && make && make install &&     ./apr-util-1.6.1/configure --prefix=/usr/local/apr-util --with-apr=/usr/local/apr && make && make install &&     ./httpd-2.4.48/configure --prefix=/usr/local/apache       --enable-so       --enable-ssl       --enable-cgi       --enable-rewrite       --with-zlib       --with-pcre       --with-apr=/usr/local/apr       --with-apr-util=/usr/local/apr-util/       --enable-modules=most       --enable-mpms-shared=all       --with-mpm=prefork && make && make install
 ---> Running in 296174a923e0
·····省略部分·····
make[1]: Leaving directory '/usr/local'
Removing intermediate container 296174a923e0
 ---> 6e3f6cd4ee37
Step 6/7 : EXPOSE 80
 ---> Running in 251a17db3ede
Removing intermediate container 251a17db3ede
 ---> 4f03dd8f2b86
Step 7/7 : CMD ["/usr/local/apache/bin/apachectl","-D","FOREGROUND"]
 ---> Running in 702625fb4748
Removing intermediate container 702625fb4748
 ---> 5eb3dd8e7d66
Successfully built 5eb3dd8e7d66
Successfully tagged 1225514226/apache:latest
[root@localhost ~]#

##查看镜像
[root@localhost ~]# docker images
REPOSITORY          TAG       IMAGE ID       CREATED         SIZE
1225514226/apache   latest    5eb3dd8e7d66   2 minutes ago   700MB
1225514226/nginx    v2.0      779333eb1a39   5 days ago      601MB
centos              latest    5d0da3dc9764   2 months ago    231MB
[root@localhost ~]#

##使用新的镜像创建容器
[root@localhost ~]# docker run -d -p 80:80 --name apache 1225514226/apache
2719c466e8317ed87aa71c2a92ef5e2ebf0663d746d1cc21dec70c3202c74ea1
[root@localhost ~]# docker ps
CONTAINER ID   IMAGE               COMMAND                  CREATED         STATUS         PORTS                               NAMES
2719c466e831   1225514226/apache   "/usr/local/apache/b…"   3 seconds ago   Up 3 seconds   0.0.0.0:80->80/tcp, :::80->80/tcp   apache
访问测试
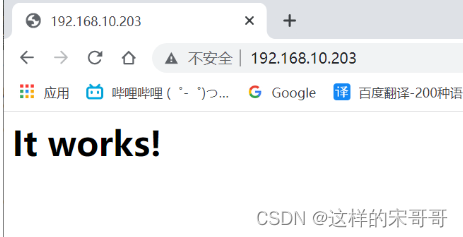
##上传镜像到网站##登录docker
[root@localhost ~]# docker login
Authenticating with existing credentials...
WARNING! Your password will be stored unencrypted in /root/.docker/config.json.
Configure a credential helper to remove this warning. See
https://docs.docker.com/engine/reference/commandline/login/#credentials-store

Login Succeeded
**上传到官方仓库**
##上传镜像到网站
[root@localhost ~]# docker push xxxx/apache
The push refers to repository [docker.io/1225514226/apache]
e1152074ce5a: Layer already exists
63da29d0dfbc: Layer already exists
2ece98c51a08: Layer already exists
74ddd0ec08fa: Layer already exists
latest: digest: sha256:bc0c20092b38575c79adb1ad8fce9f7736ffe07e6677609ae26cc4efeb646441 size: 1161
2.1.3 制作自定义tomcat业务镜像
基于官方提供的centos、debian、ubuntu、alpine等基础 镜像构建 JDK (Java环 境),然后再基于自定义的 JDK 镜像构建出业务需要的tomcat 镜像
2.1.3.1 自定义 CentOS 系统基础镜像
先基于官方提供的基础镜像,制作出安装了常用命令的自定义基础镜像
[root@ubuntu1804 ~]#docker pull centos:centos7.7.1908
[root@ubuntu1804 ~]#mkdir -p
/data/dockerfile/{

    web/{

    nginx,tomcat,jdk},system/{

    centos,ubuntu,alpine,debian}}
[root@ubuntu1804 ~]#cd /data/dockerfile/system/centos/
[root@ubuntu1804 centos]#vim Dockerfile
[root@ubuntu1804 centos]#cat Dockerfile
# Centos Base Image
FROM centos:centos7.7.1908
LABEL maintainer="wangxiaochun <[email protected]>"
RUN yum -y install wget && rm -f /etc/yum.repos.d/* && wget -P /etc/yum.repos.d/
http://mirrors.aliyun.com/repo/Centos-7.repo \
   && wget -P /etc/yum.repos.d/ http://mirrors.aliyun.com/repo/epel-7.repo \
   && yum -y install vim-enhanced tcpdump lrzsz tree telnet bash-completion
net-tools wget bzip2 lsof zip unzip nfs-utils gcc make gcc-c++ glibc glibcdevel pcre pcre-devel openssl openssl-devel systemd-devel zlib-devel \
   && yum clean all \
   && rm -f /etc/localtime \
   && ln -s ../usr/share/zoneinfo/Asia/Shanghai /etc/localtime
#添加系统账户
RUN groupadd www -g 2019 && useradd www -u 2019 -g www
[root@ubuntu1804 centos]#vim build.sh
#通过脚本构建镜像
[root@ubuntu1804 centos]#cat build.sh
#!/bin/bash
docker build -t centos7-base:v1 .
[root@ubuntu1804 centos]#bash build.sh
[root@ubuntu1804 centos]#docker images
REPOSITORY         TAG                 IMAGE ID           CREATED
SIZE
centos7-base       v1                 34ab3afcd3b3        4 seconds ago
403MB
centos             centos7.7.1908     08d05d1d5859        2 months ago
204MB
2.1.3.2 构建JDK 镜像
2.1.3.2.1 上传JDK压缩包和profile文件上传到Dockerfile当前目录
#将CentOS7主机上的/etc/profile文件传到 Dockerfile 所在目录下
[root@ubuntu1804 ~]#scp centos7:/etc/profile 10.0.0.100:/data/dockerfile/web/jdk
#修改profile文件,加下面四行相关变量
[root@ubuntu1804 ~]#vim /data/dockerfile/web/jdk/profile
[root@ubuntu1804 ~]#tail -n 5 /data/dockerfile/web/jdk/profile
export JAVA_HOME=/usr/local/jdk
export TOMCAT_HOME=/apps/tomcat
export PATH=$JAVA_HOME/bin:$JAVA_HOME/jre/bin:$TOMCAT_HOME/bin:$PATH
export
CLASSPATH=.$CLASSPATH:$JAVA_HOME/lib:$JAVA_HOME/jre/lib:$JAVA_HOME/lib/tools.jar
#下载jdk文件传到Dockfile目录下
#https://www.oracle.com/technetwork/java/javase/downloads/jdk8-downloads-
2133151.html
[root@ubuntu1804 ~]#tree /data/dockerfile/web/jdk
/data/dockerfile/web/jdk
├── jdk-8u212-linux-x64.tar.gz
└── profile
0 directories, 2 files
2.1.3.2.2 准备Dockerfile文件
[root@ubuntu1804 ~]#vim /data/dockerfile/web/jdk/Dockerfile
[root@ubuntu1804 ~]#cat /data/dockerfile/web/jdk/Dockerfile
#JDK Base Image
FROM centos7-base:v1
LABEL maintainer="wangxiaochun <[email protected]>"
ADD jdk-8u212-linux-x64.tar.gz /usr/local/src/
RUN ln -s /usr/local/src/jdk1.8.0_212 /usr/local/jdk
ADD profile /etc/profile
ENV JAVA_HOME /usr/local/jdk
ENV JRE_HOME $JAVA_HOME/jre
ENV CLASSPATH $JAVA_HOME/lib/:$JRE_HOME/lib/
ENV PATH $PATH:$JAVA_HOME/bin
2.1.3.2.3 执行构建脚本制作镜像
[root@ubuntu1804 ~]#vim /data/dockerfile/web/jdk/build.sh
[root@ubuntu1804 ~]#cat /data/dockerfile/web/jdk/build.sh
#!/bin/bash
docker build -t centos7-jdk:8u212 .
[root@ubuntu1804 ~]#tree /data/dockerfile/web/jdk/
/data/dockerfile/web/jdk/
├── build.sh
├── Dockerfile
├── jdk-8u212-linux-x64.tar.gz
└── profile
0 directories, 4 files
[root@ubuntu1804 ~]#cd /data/dockerfile/web/jdk/
[root@ubuntu1804 jdk]#bash build.sh
[root@ubuntu1804 jdk]#docker images
REPOSITORY         TAG                 IMAGE ID           CREATED
SIZE
centos7-jdk         8u212               fdbeb8a49ea6        59 seconds ago
809MB
centos7-base       v1                 34ab3afcd3b3        44 minutes ago
403MB
centos             centos7.7.1908     08d05d1d5859        2 months ago
204MB
2.1.3.2.4 从镜像启动容器测试
[root@ubuntu1804 jdk]#docker run -it --rm centos7-jdk:8u212 bash
[root@25c9c0266bd2 /]# java -version
java version "1.8.0_212"
Java(TM) SE Runtime Environment (build 1.8.0_212-b10)
Java HotSpot(TM) 64-Bit Server VM (build 25.212-b10, mixed mode)
2.1.3.3 从JDK镜像构建tomcat 8 Base镜像
基于自定义的 JDK 基础镜像,构建出通用的自定义 Tomcat 基础镜像,此镜像后期会被多个业务的多个服务共同引用(相同的JDK 版本和Tomcat 版本)
2.1.3.3.1 上传tomcat 压缩包
[root@ubuntu1804 ~]#mkdir -p /data/dockerfile/web/tomcat/tomcat-base-8.5.50
[root@ubuntu1804 ~]#cd /data/dockerfile/web/tomcat/tomcat-base-8.5.50
[root@ubuntu1804 tomcat-base-8.5.50]#
wget http://mirrors.tuna.tsinghua.edu.cn/apache/tomcat/tomcat-
8/v8.5.50/bin/apache-tomcat-8.5.50.tar.gz
2.1.3.3.2 编辑Dockerfile
[root@ubuntu1804 ~]#cat /data/dockerfile/web/tomcat/tomcat-base-
8.5.50/Dockerfile
#Tomcat Base Image
FROM centos7-jdk:8u212
LABEL maintainer="wangxiaochun <[email protected]>"
#env
ENV TZ "Asia/Shanghai"
ENV LANG en_US.UTF-8
ENV TERM xterm
ENV TOMCAT_MAJOR_VERSION 8
ENV TOMCAT_MINOR_VERSION 8.5.50
ENV CATALINA_HOME /apps/tomcat
ENV APP_DIR ${CATALINA_HOME}/webapps
RUN mkdir /apps
ADD apache-tomcat-8.5.50.tar.gz /apps
RUN ln -s /apps/apache-tomcat-8.5.50 /apps/tomcat
2.1.3.3.3 通过脚本构建tomcat 基础镜像
[root@ubuntu1804 tomcat-base-8.5.50]#vim build.sh
[root@ubuntu1804 tomcat-base-8.5.50]#cat build.sh
#!/bin/bash
docker build -t tomcat-base:v8.5.50 .
[root@ubuntu1804 tomcat-base-8.5.50]#tree
.
├── apache-tomcat-8.5.50.tar.gz
├── build.sh
└── Dockerfile
0 directories, 3 files
[root@ubuntu1804 tomcat-base-8.5.50]#docker images
REPOSITORY         TAG                 IMAGE ID           CREATED
SIZE
tomcat-base         v8.5.50             8d5395cb72c4        3 seconds ago
824MB
centos7-jdk         8u212               e0fe770a7ccd        22 minutes ago
809MB
centos7-base       v1                 34ab3afcd3b3        2 hours ago
403MB
centos             centos7.7.1908     08d05d1d5859        2 months ago
204MB
2.1.3.3.4 验证镜像构建完成
[root@ubuntu1804 tomcat-base-8.5.50]#docker run -it --rm -p 8080:8080 tomcatbase:v8.5.50 bash
[root@d0a387e0ccc9 /]# /apps/tomcat/bin/catalina.sh start
Using CATALINA_BASE:   /apps/tomcat
Using CATALINA_HOME:   /apps/tomcat
Using CATALINA_TMPDIR: /apps/tomcat/temp
Using JRE_HOME:       /usr/local/jdk/jre
Using CLASSPATH:       /apps/tomcat/bin/bootstrap.jar:/apps/tomcat/bin/tomcatjuli.jar
Tomcat started.
[root@d0a387e0ccc9 /]# netstat -ntl
Active Internet connections (only servers)
Proto Recv-Q Send-Q Local Address           Foreign Address         State
tcp        0      0 0.0.0.0:8009            0.0.0.0:*               LISTEN
tcp        0      0 0.0.0.0:8080            0.0.0.0:*               LISTEN
[root@d0a387e0ccc9 /]#
2.1.3.4 构建业务镜像1
创建tomcat-app1和tomcat-app2两个目录,代表不同的两个基于tomcat的业务。
2.1.3.4.1 准备tomcat的配置文件
[root@ubuntu1804 ~]#mkdir -p /data/dockerfile/web/tomcat/tomcat-app{1,2}
[root@ubuntu1804 ~]#tree /data/dockerfile/web/tomcat/
/data/dockerfile/web/tomcat/
├── tomcat-app1
├── tomcat-app2
└── tomcat-base-8.5.50
   ├── apache-tomcat-8.5.50.tar.gz
   ├── build.sh
   └── Dockerfile
3 directories, 3 files
#上传和修改server.xml
[root@ubuntu1804 ~]#cd /data/dockerfile/web/tomcat/tomcat-base-8.5.50
[root@ubuntu1804 tomcat-base-8.5.50]#tar xf apache-tomcat-8.5.50.tar.gz
[root@ubuntu1804 tomcat-base-8.5.50]#cp apache-tomcat-8.5.50/conf/server.xml
/data/dockerfile/web/tomcat/tomcat-app1/
[root@ubuntu1804 tomcat-base-8.5.50]#cd /data/dockerfile/web/tomcat/tomcat-app1/
[root@ubuntu1804 tomcat-app1]#vim server.xml
......
 <Host name="localhost"  appBase="/data/tomcat/webapps"

            unpackWARs="true" autoDeploy="true">
.....

2.1.3.4.2 准备自定义页面
[root@ubuntu1804 tomcat-app1]#mkdir app
[root@ubuntu1804 tomcat-app1]#echo "Tomcat Page in app1" > app/index.jsp
[root@ubuntu1804 tomcat-app1]#tar zcf app.tar.gz app
2.1.3.4.3 准备容器启动执行脚本
[root@ubuntu1804 tomcat-app1]#vim run_tomcat.sh
[root@ubuntu1804 tomcat-app1]#cat run_tomcat.sh
#!/bin/bash
echo "nameserver 180.76.76.76" > /etc/resolv.conf
su - www -c "/apps/tomcat/bin/catalina.sh start"
su - www -c "tail -f /etc/hosts"
[root@ubuntu1804 tomcat-app1]#chmod a+x run_tomcat.sh
2.1.3.4.4 准备Dockerfile
[root@ubuntu1804 tomcat-app1]#vim Dockerfile
[root@ubuntu1804 tomcat-app1]#cat Dockerfile
#Tomcat Web Image
FROM tomcat-base:v8.5.50
LABEL maintainer="wangxiaochun <[email protected]>"
ADD server.xml /apps/tomcat/conf/server.xml
ADD run_tomcat.sh /apps/tomcat/bin/run_tomcat.sh
ADD app.tar.gz /data/tomcat/webapps/
RUN chown -R www.www /apps/   /data/tomcat/
EXPOSE 8080  8009
CMD ["/apps/tomcat/bin/run_tomcat.sh"]
2.1.3.4.5 执行构建脚本制作镜像
[root@ubuntu1804 tomcat-app1]#vim build.sh
[root@ubuntu1804 tomcat-app1]#cat build.sh
#!/bin/bash
docker build -t tomcat-web:app1 .
[root@ubuntu1804 tomcat-app1]#pwd
/data/dockerfile/web/tomcat/tomcat-app1
[root@ubuntu1804 tomcat-app1]#tree
.
├── app
│   └── index.jsp
├── app.tar.gz
├── build.sh
├── Dockerfile
├── run_tomcat.sh
└── server.xml
1 directory, 6 files
[root@ubuntu1804 tomcat-app1]#bash build.sh
[root@ubuntu1804 tomcat-app1]#docker images
REPOSITORY         TAG                 IMAGE ID           CREATED
SIZE
tomcat-web         app1               3e9eacc5ef86        4 seconds ago
824MB
tomcat-base         v8.5.50             8d5395cb72c4        35 minutes ago
824MB
centos7-jdk         8u212               e0fe770a7ccd        57 minutes ago
809MB
centos7-base       v1                 34ab3afcd3b3        2 hours ago
403MB
centos             centos7.7.1908     08d05d1d5859        2 months ago
204MB
2.1.3.4.6 从镜像启动测试容器
[root@ubuntu1804 tomcat-app1]#docker run -d -p 8080:8080 tomcat-web:app1
82e6690e36c3a6faf2dae62bd706a89cbba490d567c841c37501f0fba670ea25
2.1.3.4.8 访问测试
[root@ubuntu1804 ~]#curl 127.0.0.1:8080/app/
Tomcat Page in app1
[root@ubuntu1804 ~]#docker exec -it 82e6690e36c3 bash
[root@82e6690e36c3 /]# ps aux
USER       PID %CPU %MEM   VSZ   RSS TTY     STAT START   TIME COMMAND
root          1  0.0  0.2  15136  2248 ?       Ss   22:14   0:00 /bin/bash
/apps/tomcat/bin/run_tomcat.sh
www          25  0.8  9.7 2241656 95924 ?       Sl   22:14   0:04
/usr/local/jdk/bin/java -Djava.util.logging.config.file=/apps/tomcat
root         26  0.0  0.4  85428  4472 ?       S    22:14   0:00 su - www -c
tail -f /etc/hosts
www          27  0.0  0.0   4416   720 ?       Ss   22:14   0:00 tail -f
/etc/hosts
root         82 25.0  0.3  15800  3820 pts/0   Ss   22:22   0:00 bash
root        101  0.0  0.3  55196  3836 pts/0   R+   22:22   0:00 ps aux
[root@82e6690e36c3 /]# vim /data/tomcat/webapps/app/index.jsp
[root@82e6690e36c3 /]# cat /data/tomcat/webapps/app/index.jsp
Tomcat Page in app1 v2
[root@82e6690e36c3 /]# /apps/tomcat/bin/catalina.sh stop
Using CATALINA_BASE:   /apps/tomcat
Using CATALINA_HOME:   /apps/tomcat
Using CATALINA_TMPDIR: /apps/tomcat/temp
Using JRE_HOME:       /usr/local/jdk/jre
Using CLASSPATH:       /apps/tomcat/bin/bootstrap.jar:/apps/tomcat/bin/tomcatjuli.jar
[root@82e6690e36c3 /]# /apps/tomcat/bin/catalina.sh start
Using CATALINA_BASE:   /apps/tomcat
Using CATALINA_HOME:   /apps/tomcat
Using CATALINA_TMPDIR: /apps/tomcat/temp
Using JRE_HOME:       /usr/local/jdk/jre
Using CLASSPATH:       /apps/tomcat/bin/bootstrap.jar:/apps/tomcat/bin/tomcatjuli.jar
Tomcat started.
[root@ubuntu1804 tomcat-app1]#curl 127.0.0.1:8080/app/
Tomcat Page in app1 v2
2.1.3.5 构建业务镜像2
2.1.3.5.1 准备自定义页面和其它数据
[root@ubuntu1804 tomcat]#pwd
/data/dockerfile/web/tomcat
[root@ubuntu1804 tomcat]#cp -a tomcat-app1/* tomcat-app2/
[root@ubuntu1804 tomcat]#tree tomcat-app2/
tomcat-app2/
├── app
│   └── index.jsp
├── app.tar.gz
├── build.sh
├── Dockerfile
├── run_tomcat.sh
└── server.xml
1 directory, 6 files
[root@ubuntu1804 tomcat]#cd tomcat-app2
[root@ubuntu1804 tomcat-app2]#echo "Tomcat Page in app2" > app/index.html
[root@ubuntu1804 tomcat-app2]#rm -f app.tar.gz
[root@ubuntu1804 tomcat-app2]#tar zcf app.tar.gz app
2.1.3.5.2 准备容器启动脚本run_tomcat.sh
和业务1一样不变
2.1.3.5.3 准备Dockerfile
和业务1一样不变
2.1.3.5.4 执行构建脚本制作镜像
[root@ubuntu1804 tomcat-app2]#vim build.sh
[root@ubuntu1804 tomcat-app2]#cat build.sh
#!/bin/bash
docker build -t tomcat-web:app2 .
[root@ubuntu1804 tomcat-app2]#bash build.sh
[root@ubuntu1804 tomcat-app2]#docker images
REPOSITORY         TAG                 IMAGE ID           CREATED
SIZE
tomcat-web         app2               0e1760fe79a6        37 seconds ago
838MB
tomcat-web         app1               76016219a0ca        27 minutes ago
838MB
tomcat-base         v8.5.50             8d5395cb72c4        2 hours ago
824MB
centos7-jdk         8u212               e0fe770a7ccd        2 hours ago
809MB
centos7-base       v1                 34ab3afcd3b3        3 hours ago
403MB
centos             centos7.7.1908     08d05d1d5859        2 months ago
204MB
2.1.3.5.5 从镜像启动容器测试
[root@ubuntu1804 tomcat-app2]#docker run -d -p 8082:8080 tomcat-web:app2
3fc9437e42099e92f88e8e09bac0507f2d837ac8a6dba8cb1e4efc934bcf81ff
2.1.3.5.6 访问测试
[root@ubuntu1804 tomcat-app2]#curl 127.0.0.1:8082/app/
Tomcat Page in app2
2.1.4 构建haproxy镜像
2.1.4.1 准备相关文件
#准备haproxy源码文件
[root@ubuntu1804 ~]#mkdir -p /data/dockerfile/web/haproxy/2.1.2-centos7
[root@ubuntu1804 ~]#cd /data/dockerfile/web/haproxy/2.1.2-centos7
[root@ubuntu1804 2.1.2-centos7]#wget
http://www.haproxy.org/download/2.1/src/haproxy-2.1.2.tar.gz
#准备haproxy启动脚本
[root@ubuntu1804 2.1.2-centos7]#vim run_haproxy.sh
[root@ubuntu1804 2.1.2-centos7]#cat run_haproxy.sh
#!/bin/bash
haproxy -f /etc/haproxy/haproxy.cfg
tail -f /etc/hosts
2.1.4.2 准备haproxy配置文件
#准备haproxy配置文件
[root@ubuntu1804 2.1.2-centos7]#cat haproxy.cfg
global
chroot /apps/haproxy
#stats socket /var/lib/haproxy/haproxy.sock mode 600 level admin
uid 99
gid 99
daemon
nbproc 1
pidfile /apps/haproxy/run/haproxy.pid
log 127.0.0.1 local3 info
defaults
option http-keep-alive
option forwardfor
mode http
timeout connect 300000ms
timeout client 300000ms
timeout server 300000ms
listen stats
 mode http
 bind 0.0.0.0:9999
  stats enable
 log global
 stats uri   /haproxy-status
 stats auth haadmin:123456
listen web_port
 bind 0.0.0.0:80
 mode http
 log global
 balance roundrobin
 server web1 10.0.0.101:8080 check inter 3000 fall 2 rise 5
 server web2 10.0.0.102:8080 check inter 3000 fall 2 rise 5
2.1.4.3 准备Dockerfile
[root@ubuntu1804 2.1.2-centos7]#pwd
/data/dockerfile/web/haproxy/2.1.2-centos7
[root@ubuntu1804 haproxy]# cat Dockerfile
#Haproxy Base Image
FROM centos7-base:v1
LABEL maintainer="wangxiaochun <[email protected]>"
ADD haproxy-2.1.2.tar.gz /usr/local/src/
RUN cd /usr/local/src/haproxy-2.1.2 \
   && make ARCH=x86_64 TARGET=linux-glibc USE_PCRE=1 USE_OPENSSL=1 USE_ZLIB=1
USE_SYSTEMD=1 USE_CPU_AFFINITY=1 PREFIX=/apps/haproxy \
   && make install PREFIX=/apps/haproxy \
   && ln -s /apps/haproxy/sbin/haproxy /usr/sbin/ \
   && mkdir /apps/haproxy/run \
   && rm -rf /usr/local/src/haproxy*
ADD haproxy.cfg /etc/haproxy/
ADD run_haproxy.sh /usr/bin
EXPOSE 80 9999
CMD ["run_haproxy.sh"]
2.1.4.4 准备构建脚本构建haproxy镜像
[root@ubuntu1804 2.1.2-centos7]#vim build.sh
[root@ubuntu1804 2.1.2-centos7]#cat build.sh
#!/bin/bash
docker build -t haproxy-centos7:2.1.2 .
[root@ubuntu1804 2.1.2-centos7]#ls
build.sh Dockerfile haproxy-2.1.2.tar.gz haproxy.cfg run_haproxy.sh
[root@ubuntu1804 2.1.2-centos7]#bash build.sh
[root@ubuntu1804 2.1.2-centos7]#docker images
REPOSITORY         TAG                 IMAGE ID           CREATED
SIZE
haproxy-centos7     2.1.2               5eccdb29a058        26 minutes ago
428MB
nginx-ubuntu1804    1.16.1             19efdd23ac87        15 hours ago
378MB
alpine-nginx        1.16.1             978a43bbb61d        16 hours ago
211MB
nginx-alpine        1.16.1             978a43bbb61d        16 hours ago
211MB
alpine-base         3.11               b162eecf4da9        17 hours ago
182MB
tomcat-web         app2               0e1760fe79a6        37 hours ago
838MB
tomcat-web         app1               76016219a0ca        37 hours ago
838MB
tomcat-base         v8.5.50             8d5395cb72c4        38 hours ago
824MB
centos7-jdk         8u212               e0fe770a7ccd        39 hours ago
809MB
centos7-base       v1                 34ab3afcd3b3        40 hours ago
403MB
alpine              3.11               e7d92cdc71fe        12 days ago
5.59MB
alpine             latest             e7d92cdc71fe        12 days ago
5.59MB
ubuntu              18.04               ccc6e87d482b        2 weeks ago
64.2MB
ubuntu             bionic             ccc6e87d482b        2 weeks ago
64.2MB
centos             centos7.7.1908     08d05d1d5859        2 months ago
204MB
2.1.4.5 从镜像启动容器
[root@ubuntu1804 2.1.2-centos7]#docker run -d -p 80:80 -p 9999:9999 haproxycentos7:2.1.2
e0a7c827cb5fdd5a630f7dfe58b1f60822da18929a4dfeccb7490fb78403e3df
2.1.4.6 在另外两台主机启动容器
#导出本地相关镜像
[root@ubuntu1804 ~]#docker save centos7-base:v1 > /data/centos7-base.tar.gz
[root@ubuntu1804 ~]#docker save centos7-jdk:8u212 > /data/centos7-jdk.tar.gz
[root@ubuntu1804 ~]#docker save tomcat-base:v8.5.50 > /data/tomcat-base.tar.gz
[root@ubuntu1804 ~]#docker save tomcat-web:app1 > /data/tomcat-web-app1.tar.gz
[root@ubuntu1804 ~]#docker save tomcat-web:app2 > /data/tomcat-web-app2.tar.gz
[root@ubuntu1804 ~]#ls /data
centos7-base.tar.gz centos7-jdk.tar.gz dockerfile tomcat-base.tar.gz tomcatweb-app1.tar.gz tomcat-web-app2.tar.gz
#将镜像复制到另外两台主机
[root@ubuntu1804 ~]#scp /data/*.gz 10.0.0.101:/data/
[root@ubuntu1804 ~]#scp /data/*.gz 10.0.0.102:/data/
#在另外两台主机上执行下面操作导入镜像
[root@ubuntu1804 ~]#ls /data
centos7-base.tar.gz lost+found         tomcat-web-app1.tar.gz
centos7-jdk.tar.gz   tomcat-base.tar.gz tomcat-web-app2.tar.gz
[root@ubuntu1804 ~]#for i in /data/*.gz;do docker load -i $i;done
#在另外两台主机上创建相关容器
[root@ubuntu1804 ~]#docker run -d -p 8080:8080 tomcat-web:app1
781681e73333396b23f404e70d0c781ab464a8e9b578f41c153583d23bd76a46
[root@ubuntu1804 ~]#docker run -d -p 8080:8080 tomcat-web:app2
81fa01a688cb72cf397a5da46acc89a51f2a2f8de3a0072565d701625c43540a
2.1.4.7 web访问验证
[root@ubuntu1804 2.1.2-centos7]#curl http://10.0.0.100/app/
Tomcat Page in app1
[root@ubuntu1804 2.1.2-centos7]#curl http://10.0.0.100/app/
Tomcat Page in app2
[root@ubuntu1804 2.1.2-centos7]#docker exec -it e0a7c827cb5 bash
[root@e0a7c827cb5f /]# netstat -ntl
Active Internet connections (only servers)
Proto Recv-Q Send-Q Local Address           Foreign Address         State
tcp        0      0 0.0.0.0:9999            0.0.0.0:*               LISTEN
tcp        0      0 0.0.0.0:80              0.0.0.0:*               LISTEN
[root@e0a7c827cb5f /]# vim /etc/haproxy/haproxy.cfg
[root@e0a7c827cb5f /]# ps aux
USER       PID %CPU %MEM   VSZ   RSS TTY     STAT START   TIME COMMAND
root          1  0.0  0.2  11700  2428 ?       Ss   11:01   0:00 /bin/bash
/usr/bin/run_haproxy.sh
nobody        7  0.0  7.1 181076 70324 ?       Ss   11:01   0:00 haproxy -f
/etc/haproxy/haproxy.cfg
root          8  0.0  0.0   4416   772 ?       S    11:01   0:00 tail -f
/etc/hosts
root          9  0.1  0.3  12488  3696 pts/0   Ss   11:02   0:00 bash
root         54  0.0  0.3  51764  3448 pts/0   R+   11:06   0:00 ps aux
#在第二台主机上停止容器
[root@ubuntu1804 ~]#docker stop 81fa01a688cb
[root@ubuntu1804 ~]#docker ps -a
CONTAINER ID       IMAGE               COMMAND                 CREATED
    STATUS                       PORTS               NAMES
81fa01a688cb       tomcat-web:app2     "/apps/tomcat/bin/ru…"   28 minutes ago
    Exited (137) 39 seconds ago
#观察状态页,发现后端服务器down
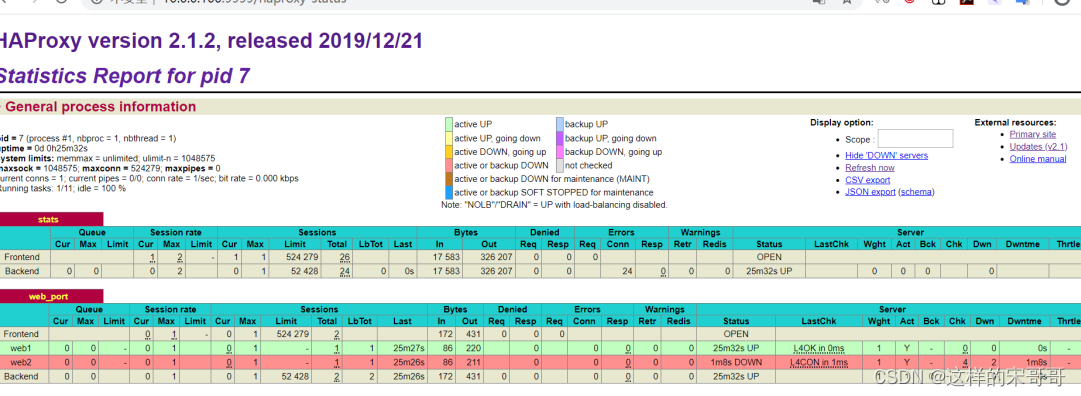
#在第二台主机上恢复启动容器
[root@ubuntu1804 ~]#docker start 81fa01a688cb
81fa01a688cb
[root@ubuntu1804 ~]#docker ps -a
CONTAINER ID       IMAGE               COMMAND                 CREATED
    STATUS             PORTS                             NAMES
81fa01a688cb       tomcat-web:app2     "/apps/tomcat/bin/ru…"   30 minutes ago
    Up 14 seconds       8009/tcp, 0.0.0.0:8080->8080/tcp   optimistic_shirley
#再次观察状态页,发现后端服务器上线

三. 将构建的镜像放在阿里云仓库。
3.1 阿里云创建镜像仓库
登录到阿里云。在容器镜像服务/实例列表/镜像仓库。创建镜像仓库
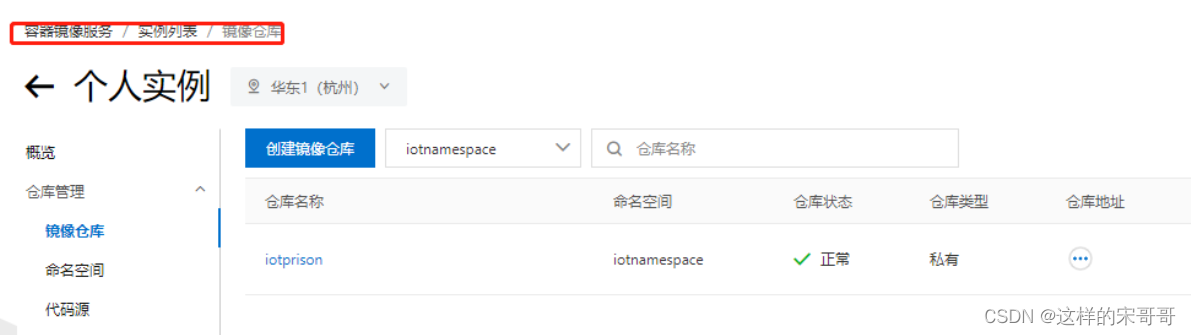
创建的镜像仓库,可以查看明细。有操作指南。教你如何推送和拉取等步骤
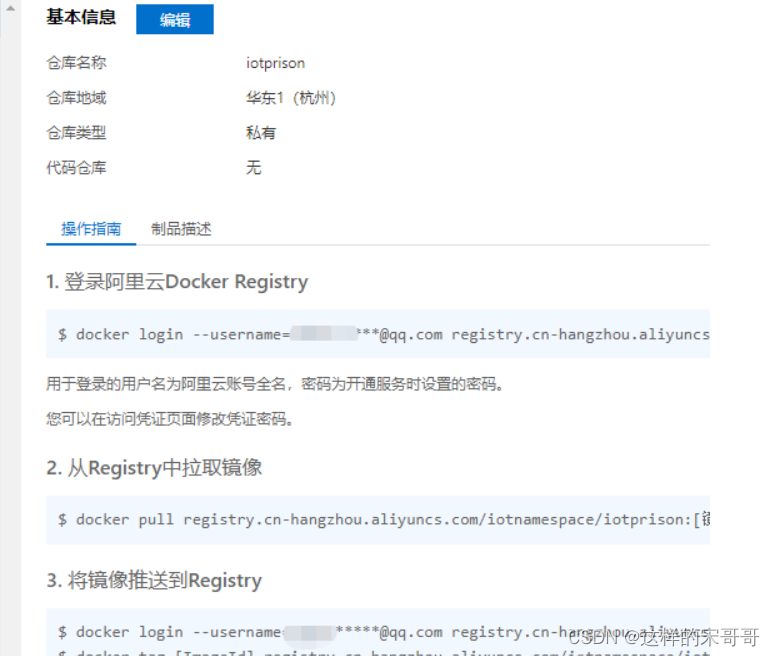
3.2 本地制作镜像文件
在阿里云创建完仓库后。我们就可以在本地制作镜像文件了。
FROM openjdk:8
ENV workdir=/home/changfa/imagedir
COPY ./ ${workdir}
EXPOSE 8686
WORKDIR ${workdir}
ENTRYPOINT ["java","-jar","chfatech-system-1.0.jar"]

/home/changfa/imagedir 目录下应该要有Dockerfile和chfatech-system-1.0.jar

因为我们是把imagedir目录下制作成镜像文件

进入到imagedir上级目录。也就是在/home/changfa下,执行如下命令

docker build -t system:1.0 ./imagedir/

-t:镜像的名字及标签,通常 name:tag 或者 name 格式;可以在一次构建中为一个镜像设置多个标签。
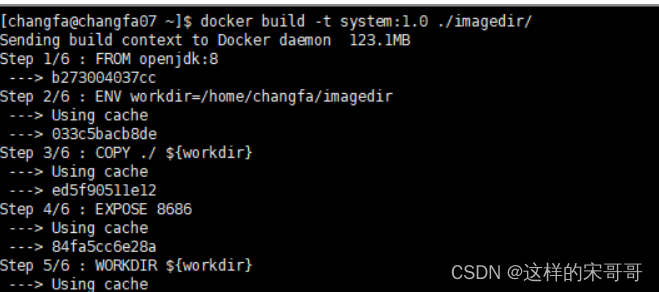
执行成功后,docker images查看镜像

3.3 把本地镜像文件推送到阿里云镜像仓库
然后就可以进行推送了,按照如下步骤,镜像版本号就是上图的TAG 1.0

执行上图推送后。就可以从阿里云镜像版本中查到此版本

3.4其他云服务器进行阿里云镜像仓库拉取
然后其他服务器就可以拉取此镜像信息。命令如下
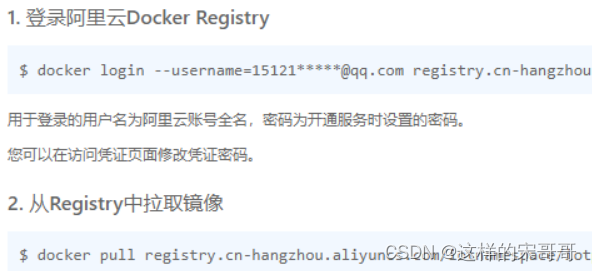
3.5 启动容器
拉取的镜像文件。可以执行 docker run --name system-service -p 0.0.0.0:8686:8686 -itd chfatech-system:1.1 。进行启动。这样启动默认是桥接网络模式。这样操作docker启动的容器无法与外部服务器进行通信

可以利用--network host设置成和宿主机公用一个网络。这样就解决上面无法通信问题

docker run --name system-service --network host -itd chfatech-system:1.1

小记:使用了--network ,-p参数会失效。--network  会使用服务暴漏的端口

docker run 参数详解如下:

docker run  -e  JAVA_OPTS='-Xmx1344M -Xms1344M -Xmn448M -XX:MaxMetaspaceSize=192M -XX:MetaspaceSize=192M' 设置JVM内存大小
四. 将构建的镜像,放在自建的harbor中,并且单独可以提供相应的服务
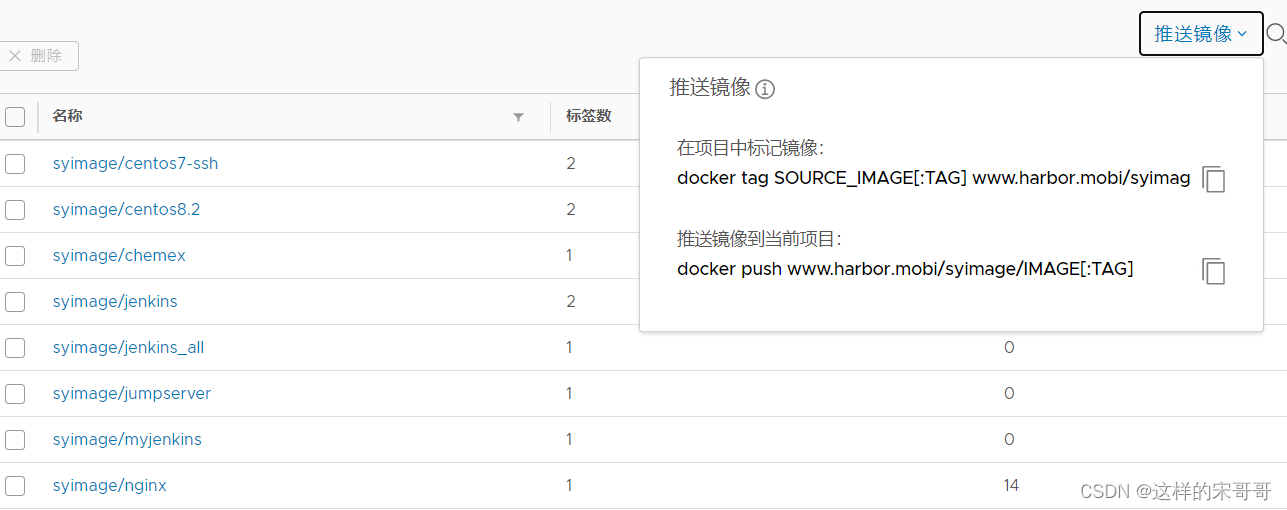
五. docker的常见网络模式
5.1 网络模式介绍

Docker 的网络支持5种网络模式:
- none
- bridge
- host
- container
- network-name
范例: 查看默认的网络模式有三个
[root@ubuntu1804 ~]#docker network ls
NETWORK ID         NAME               DRIVER             SCOPE
fe08e6d23c4c       bridge             bridge             local
cb64aa83626c       host               host               local
10619d45dcd4       none               null               local
5.2 网络模式指定
默认新建的容器使用Bridge模式,创建容器时,docker run 命令使用以下选项指定网络模式
格式
docker run --network <mode>
docker run --net=<mode>
<mode>: 可是以下值
none
bridge
host
container:<容器名或容器ID>
<自定义网络名称>
5.3 bridge网络模式
5.3.1 bridge 网络模式架构

本模式是docker的默认模式,即不指定任何模式就是bridge模式,也是使用比较多的模式,此模式创建的容器会为每一个容器分配自己的网络 IP 等信息,并将容器连接到一个虚拟网桥与外界通信
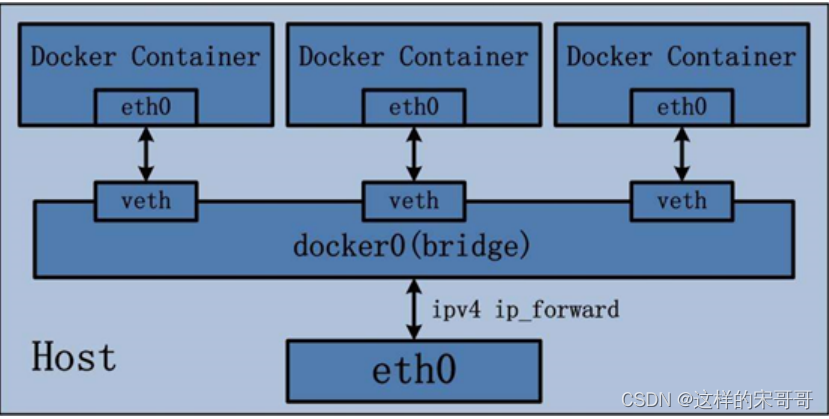
可以和外部网络之间进行通信,通过SNAT访问外网,使用DNAT可以让容器被外部主机访问,所以此模式也称为NAT模式
此模式宿主机需要启动ip_forward功能
bridge网络模式特点
- 网络资源隔离: 不同宿主机的容器无法直接通信,各自使用独立网络
- 无需手动配置: 容器默认自动获取172.17.0.0/16的IP地址,此地址可以修改
- 可访问外网: 利用宿主机的物理网卡,SNAT连接外网
- 外部主机无法直接访问容器: 可以通过配置DNAT接受外网的访问
- 低性能较低: 因为可通过NAT,网络转换带来更的损耗
端口管理繁琐: 每个容器必须手动指定唯一的端口,容器产生端口冲容
5.3.2 bridge 模式的默认设置
范例: 查看bridge模式信息
[root@ubuntu1804 ~]#docker network inspect bridge
[
   {


        "Name": "bridge",
        "Id":
"fe08e6d23c4c9de00bdab479446f136c09537a1551aa62ff2c95f8cfcabd6357",
        "Created": "2020-01-31T16:11:32.718471804+08:00",
        "Scope": "local",
        "Driver": "bridge",
        "EnableIPv6": false,
        "IPAM": {


            "Driver": "default",
            "Options": null,
            "Config": [
               {


                    "Subnet": "172.17.0.0/16",
                    "Gateway": "172.17.0.1"
               }
           ]
       },
        "Internal": false,
        "Attachable": false,
        "Ingress": false,
        "ConfigFrom": {


            "Network": ""
       },
        "ConfigOnly": false,
        "Containers": {


            "cdb5173003f52033c7c8183994cf763d2a64ff39c431431402fd8dedf4727393":
{


                "Name": "server1",
                "EndpointID":
"6977fb6f74b75014513c34296f1e23ff0197f81f3209bbf7fcd39ba8e9f54c0d",
                "MacAddress": "02:42:ac:11:00:02",
                "IPv4Address": "172.17.0.2/16",
                "IPv6Address": ""
           }
       },
        "Options": {


            "com.docker.network.bridge.default_bridge": "true",
            "com.docker.network.bridge.enable_icc": "true",
            "com.docker.network.bridge.enable_ip_masquerade": "true",
            "com.docker.network.bridge.host_binding_ipv4": "0.0.0.0",
            "com.docker.network.bridge.name": "docker0",
            "com.docker.network.driver.mtu": "1500"
       },
        "Labels": {

    }
   }
]
[root@ubuntu1804 ~]#
范例: 宿主机的网络状态
#安装docker后.默认启用ip_forward
[root@ubuntu1804 ~]#cat /proc/sys/net/ipv4/ip_forward
1
[root@ubuntu1804 ~]#iptables -vnL -t nat
Chain PREROUTING (policy ACCEPT 245 packets, 29850 bytes)
 pkts bytes target     prot opt in     out     source               destination

   11   636 DOCKER     all  -- *     *       0.0.0.0/0            0.0.0.0/0
        ADDRTYPE match dst-type LOCAL
Chain INPUT (policy ACCEPT 103 packets, 20705 bytes)
 pkts bytes target     prot opt in     out     source               destination

Chain OUTPUT (policy ACCEPT 144 packets, 10324 bytes)
 pkts bytes target     prot opt in     out     source               destination

    0     0 DOCKER     all  -- *     *       0.0.0.0/0           !127.0.0.0/8
        ADDRTYPE match dst-type LOCAL
Chain POSTROUTING (policy ACCEPT 158 packets, 11500 bytes)
 pkts bytes target     prot opt in     out     source               destination

  125  7831 MASQUERADE all  -- *     !docker0  172.17.0.0/16        0.0.0.0/0

Chain DOCKER (2 references)
 pkts bytes target     prot opt in     out     source               destination

    2   168 RETURN     all  -- docker0 *       0.0.0.0/0            0.0.0.0/0
范例: 通过宿主机的物理网卡利用SNAT访问外部网络
#在另一台主机上建立httpd服务器
[root@centos7 ~]#systemctl is-active httpd
active
#启动容器,默认是bridge网络模式
[root@ubuntu1804 ~]#docker run -it --rm alpine:3.11 sh
/ # ip a
1: lo: <LOOPBACK,UP,LOWER_UP> mtu 65536 qdisc noqueue state UNKNOWN qlen 1000
   link/loopback 00:00:00:00:00:00 brd 00:00:00:00:00:00
   inet 127.0.0.1/8 scope host lo
       valid_lft forever preferred_lft forever
166: eth0@if167: <BROADCAST,MULTICAST,UP,LOWER_UP,M-DOWN> mtu 1500 qdisc noqueue
state UP
   link/ether 02:42:ac:11:00:02 brd ff:ff:ff:ff:ff:ff
   inet 172.17.0.2/16 brd 172.17.255.255 scope global eth0
       valid_lft forever preferred_lft forever
#可能访问其它宿主机
/ # ping 10.0.0.7
PING 10.0.0.7 (10.0.0.7): 56 data bytes
64 bytes from 10.0.0.7: seq=0 ttl=63 time=0.764 ms
64 bytes from 10.0.0.7: seq=1 ttl=63 time=1.147 ms
--- 10.0.0.7 ping statistics ---
2 packets transmitted, 2 packets received, 0% packet loss
round-trip min/avg/max = 0.764/0.955/1.147 ms
/ # ping www.baidu.com
PING www.baidu.com (61.135.169.125): 56 data bytes
64 bytes from 61.135.169.125: seq=0 ttl=127 time=5.182 ms
^C
--- www.baidu.com ping statistics ---
1 packets transmitted, 1 packets received, 0% packet loss
round-trip min/avg/max = 5.182/5.182/5.182 ms
/ # traceroute 10.0.0.7
traceroute to 10.0.0.7 (10.0.0.7), 30 hops max, 46 byte packets
1  172.17.0.1 (172.17.0.1)  0.008 ms  0.008 ms  0.007 ms
2  10.0.0.7 (10.0.0.7)  0.255 ms  0.510 ms  0.798 ms
/ # wget -qO - 10.0.0.7
Website on 10.0.0.7
/ # route -n
Kernel IP routing table
Destination     Gateway         Genmask         Flags Metric Ref   Use Iface
0.0.0.0         172.17.0.1      0.0.0.0         UG    0      0        0 eth0
172.17.0.0      0.0.0.0         255.255.0.0     U     0      0        0 eth0
[root@centos7 ~]#curl 127.0.0.1
Website on 10.0.0.7
[root@centos7 ~]#tail /var/log/httpd/access_log
127.0.0.1 - - [01/Feb/2020:19:31:16 +0800] "GET / HTTP/1.1" 200 20 "-"
"curl/7.29.0"
10.0.0.100 - - [01/Feb/2020:19:31:21 +0800] "GET / HTTP/1.1" 200 20 "-" "Wget"
5.3.3 修改默认的 bridge 模式网络配置
有两种方法修改默认的bridge 模式的网络配置,但两种方式只能选一种,否则会导致冲容,docker服务无法启动
范例: 修改bridge模式默认的网段方法1
[root@ubuntu1804 ~]#ip a
1: lo: <LOOPBACK,UP,LOWER_UP> mtu 65536 qdisc noqueue state UNKNOWN group
default qlen 1000
   link/loopback 00:00:00:00:00:00 brd 00:00:00:00:00:00
   inet 127.0.0.1/8 scope host lo
       valid_lft forever preferred_lft forever
   inet6 ::1/128 scope host
       valid_lft forever preferred_lft forever
2: eth0: <BROADCAST,MULTICAST,UP,LOWER_UP> mtu 1500 qdisc fq_codel state UP
group default qlen 1000
   link/ether 00:0c:29:6b:54:d3 brd ff:ff:ff:ff:ff:ff
   inet 10.0.0.100/24 brd 10.0.0.255 scope global eth0
       valid_lft forever preferred_lft forever
   inet6 fe80::20c:29ff:fe6b:54d3/64 scope link
       valid_lft forever preferred_lft forever
3: docker0: <NO-CARRIER,BROADCAST,MULTICAST,UP> mtu 1500 qdisc noqueue state
DOWN group default
   link/ether 02:42:e0:ef:72:05 brd ff:ff:ff:ff:ff:ff
   inet 172.17.0.1/16 brd 172.17.255.255 scope global docker0

vim /lib/systemd/system/docker.service
ExecStart=/usr/bin/dockerd -H fd:// --containerd=/run/containerd/containerd.sock
--bip=10.100.0.1/24
范例: 修改bridge网络配置方法2
[root@ubuntu1804 ~]#vim /etc/docker/daemon.json
{


  "hosts": ["tcp://0.0.0.0:2375", "fd://"],
  "bip": "192.168.100.100/24",         #分配docker0网卡的IP,24是容器IP的netmask
  "fixed-cidr": "192.168.100.128/26", #分配容器IP范围,26不是容器IP的子网掩码,只表示地址
范围
  "fixed-cidr-v6": "2001:db8::/64",
  "mtu": 1500,
  "default-gateway": "192.168.100.200",  #网关必须和bip在同一个网段
  "default-gateway-v6": "2001:db8:abcd::89",
  "dns": [ "1.1.1.1", "8.8.8.8"]
}
[root@ubuntu1804 ~]#systemctl restart docker
[root@ubuntu1804 ~]#ip a show docker0
3: docker0: <BROADCAST,MULTICAST,UP,LOWER_UP> mtu 1500 qdisc noqueue state UP
group default
   link/ether 02:42:23:be:97:75 brd ff:ff:ff:ff:ff:ff
   inet 192.168.100.100/24 brd 192.168.100.255 scope global docker0
       valid_lft forever preferred_lft forever
   inet6 fe80::42:23ff:febe:9775/64 scope link
       valid_lft forever preferred_lft forever
[root@ubuntu1804 ~]#docker run -it --name b1 busybox
/ # ip a
1: lo: <LOOPBACK,UP,LOWER_UP> mtu 65536 qdisc noqueue qlen 1000
   link/loopback 00:00:00:00:00:00 brd 00:00:00:00:00:00
   inet 127.0.0.1/8 scope host lo
       valid_lft forever preferred_lft forever
36: eth0@if37: <BROADCAST,MULTICAST,UP,LOWER_UP,M-DOWN> mtu 1500 qdisc noqueue
   link/ether 02:42:c0:a8:64:80 brd ff:ff:ff:ff:ff:ff
   inet 192.168.100.128/24 brd 192.168.100.255 scope global eth0
       valid_lft forever preferred_lft forever
/ # cat /etc/resolv.conf
search magedu.com wang.org
nameserver 1.1.1.1
nameserver 8.8.8.8
/ # route -n
Kernel IP routing table
Destination     Gateway         Genmask         Flags Metric Ref   Use Iface
0.0.0.0         192.168.100.200 0.0.0.0         UG    0      0        0 eth0
192.168.100.0   0.0.0.0         255.255.255.0   U     0      0        0 eth0
5.4 Host 模式
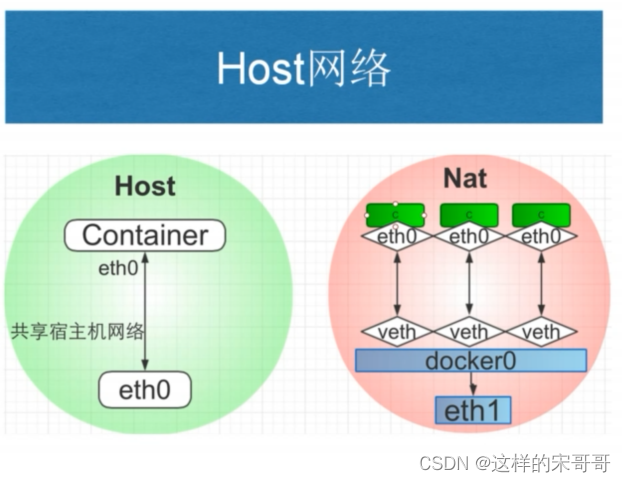
如果指定host模式启动的容器,那么新创建的容器不会创建自己的虚拟网卡,而是直接使用宿主机的网卡和IP地址,因此在容器里面查看到的IP信息就是宿主机的信息,访问容器的时候直接使用宿主机IP+容器端口即可,不过容器内除网络以外的其它资源,如: 文件系统、系统进程等仍然和宿主机保持隔离
此模式由于直接使用宿主机的网络无需转换,网络性能最高,但是各容器内使用的端口不能相同,适用于运行容器端口比较固定的业务
Host 网络模式特点:
- 使用参数 --network host 指定
- 共享宿主机网络
- 网络性能无损耗
- 网络故障排除相对简单
- 各容器网络无隔离
- 网络资源无法分别统计
- 端口管理困难: 容易产生端口冲突
- 不支持端口映射
范例:
#查看宿主机的网络设置
[root@ubuntu1804 ~]#ifconfig
docker0: flags=4099<UP,BROADCAST,MULTICAST> mtu 1500
       inet 172.17.0.1 netmask 255.255.0.0 broadcast 172.17.255.255
       inet6 fe80::42:2ff:fe7f:a8c6 prefixlen 64 scopeid 0x20<link>
       ether 02:42:02:7f:a8:c6 txqueuelen 0 (Ethernet)
       RX packets 63072 bytes 152573158 (152.5 MB)
       RX errors 0 dropped 0 overruns 0 frame 0
       TX packets 56611 bytes 310696704 (310.6 MB)
       TX errors 0 dropped 0 overruns 0 carrier 0 collisions 0
eth0: flags=4163<UP,BROADCAST,RUNNING,MULTICAST> mtu 1500
       inet 10.0.0.100 netmask 255.255.255.0 broadcast 10.0.0.255
       inet6 fe80::20c:29ff:fe34:df91 prefixlen 64 scopeid 0x20<link>
       ether 00:0c:29:34:df:91 txqueuelen 1000 (Ethernet)
       RX packets 2029082 bytes 1200597401 (1.2 GB)
       RX errors 0 dropped 0 overruns 0 frame 0
       TX packets 7272209 bytes 11576969391 (11.5 GB)
       TX errors 0 dropped 0 overruns 0 carrier 0 collisions 0
lo: flags=73<UP,LOOPBACK,RUNNING> mtu 65536
       inet 127.0.0.1 netmask 255.0.0.0
       inet6 ::1 prefixlen 128 scopeid 0x10<host>
       loop txqueuelen 1000 (Local Loopback)
       RX packets 3533 bytes 320128 (320.1 KB)
       RX errors 0 dropped 0 overruns 0 frame 0
       TX packets 3533 bytes 320128 (320.1 KB)
       TX errors 0 dropped 0 overruns 0 carrier 0 collisions 0
[root@ubuntu1804 ~]#route -n
Kernel IP routing table
Destination     Gateway         Genmask         Flags Metric Ref   Use Iface
0.0.0.0         10.0.0.2        0.0.0.0         UG    0      0        0 eth0
10.0.0.0        0.0.0.0         255.255.255.0   U     0      0        0 eth0
172.17.0.0      0.0.0.0         255.255.0.0     U     0      0        0 docker0
#打开容器前确认宿主机的80/tcp端口没有打开
[root@ubuntu1804 ~]#ss -ntl|grep :80
#创建host模式的容器
[root@ubuntu1804 ~]#docker run -d --network host --name web1 nginx-centos7-
base:1.6.1
41fb5b8e41db26e63579a424df643d1f02e272dc75e76c11f4e313a443187ed1
#创建容器后,宿主机的80/tcp端口打开
[root@ubuntu1804 ~]#ss -ntlp|grep :80
LISTEN   0         128                 0.0.0.0:80               0.0.0.0:*
users:(("nginx",pid=43762,fd=6),("nginx",pid=43737,fd=6))
#进入容器
[root@ubuntu1804 ~]#docker exec -it web1 bash
#进入容器后仍显示宿主机的主机名提示符信息
[root@ubuntu1804 /]# hostname
ubuntu1804.wang.org
[root@ubuntu1804 /]# ifconfig
docker0: flags=4099<UP,BROADCAST,MULTICAST> mtu 1500
       inet 172.17.0.1 netmask 255.255.0.0 broadcast 172.17.255.255
       inet6 fe80::42:2ff:fe7f:a8c6 prefixlen 64 scopeid 0x20<link>
       ether 02:42:02:7f:a8:c6 txqueuelen 0 (Ethernet)
       RX packets 63072 bytes 152573158 (145.5 MiB)
       RX errors 0 dropped 0 overruns 0 frame 0
       TX packets 56611 bytes 310696704 (296.3 MiB)
       TX errors 0 dropped 0 overruns 0 carrier 0 collisions 0
eth0: flags=4163<UP,BROADCAST,RUNNING,MULTICAST> mtu 1500
       inet 10.0.0.100 netmask 255.255.255.0 broadcast 10.0.0.255
       inet6 fe80::20c:29ff:fe34:df91 prefixlen 64 scopeid 0x20<link>
       ether 00:0c:29:34:df:91 txqueuelen 1000 (Ethernet)
       RX packets 2028984 bytes 1200589212 (1.1 GiB)
       RX errors 0 dropped 0 overruns 0 frame 0
       TX packets 7272137 bytes 11576960933 (10.7 GiB)
       TX errors 0 dropped 0 overruns 0 carrier 0 collisions 0
lo: flags=73<UP,LOOPBACK,RUNNING> mtu 65536
       inet 127.0.0.1 netmask 255.0.0.0
       inet6 ::1 prefixlen 128 scopeid 0x10<host>
       loop txqueuelen 1000 (Local Loopback)
       RX packets 3533 bytes 320128 (312.6 KiB)
       RX errors 0 dropped 0 overruns 0 frame 0
       TX packets 3533 bytes 320128 (312.6 KiB)
       TX errors 0 dropped 0 overruns 0 carrier 0 collisions 0
[root@ubuntu1804 /]# route -n
Kernel IP routing table
Destination     Gateway         Genmask         Flags Metric Ref   Use Iface
0.0.0.0         10.0.0.2        0.0.0.0         UG    0      0        0 eth0
10.0.0.0        0.0.0.0         255.255.255.0   U     0      0        0 eth0
172.17.0.0      0.0.0.0         255.255.0.0     U     0      0        0 docker0
#从容器访问远程主机
[root@ubuntu1804 /]# curl 10.0.0.7
Website on 10.0.0.7
#查看远程主机的访问日志
[root@centos7 ~]#tail -n1 /var/log/httpd/access_log
10.0.0.100 - - [01/Feb/2020:19:58:06 +0800] "GET / HTTP/1.1" 200 20 "-"
"curl/7.29.0"
#远程主机可以访问容器的web服务
[root@centos7 ~]#curl 10.0.0.100/app/
Test Page in app
范例: host模式下端口映射无法实现
[root@ubuntu1804 ~]#ss -ntl|grep :81
[root@ubuntu1804 ~]#docker run -d --network host --name web2 -p 81:80 nginxcentos7-base:1.6.1
WARNING: Published ports are discarded when using host network mode
6b6a910d79d94b188f719bc6ad00c274acd76a4a2929212157cd49b5219d44ae
#host模块下端口映射不成功,但是容器可以启动
[root@ubuntu1804 ~]#docker ps -a
CONTAINER ID       IMAGE                     COMMAND                 CREATED
          STATUS                     PORTS               NAMES
6b6a910d79d9       nginx-centos7-base:1.6.1   "/apps/nginx/sbin/ng…"   6
seconds ago       Exited (1) 2 seconds ago                       web2
b27c0fd28b40       nginx-centos7-base:1.6.1   "/apps/nginx/sbin/ng…"   About a
minute ago   Up About a minute                             web1
范例: 对比前面host模式的容器和bridge模式的端口映射
[root@ubuntu1804 ~]#docker port web1
[root@ubuntu1804 ~]#docker port web2
[root@ubuntu1804 ~]#docker run -d --network bridge -p 8001:80 --name web3 nginxcentos7-base:1.6.1
4095372b9a561704eac98ccef8041a80a2cdc2aa7b57d2798dec1a8dcb00c377
[root@ubuntu1804 ~]#docker port web3
80/tcp -> 0.0.0.0:8001
5.5 none 模式
在使用none 模式后,Docker 容器不会进行任何网络配置,没有网卡、没有IP也没有路由,因此默认无法与外界通信,需要手动添加网卡配置IP等,所以极少使用
none模式特点
- 使用参数 --network none 指定
- 默认无网络功能,无法和外部通信
- 无法实现端口映射
- 适用于测试环境
范例: 启动none模式的容器
[root@ubuntu1804 ~]#docker run -d --network none -p 8001:80 --name web1-none
nginx-centos7-base:1.6.1
5207dcbd0aeea88548819267d3751135e337035475cf3cd63a5e1be6599c0208
[root@ubuntu1804 ~]#docker ps
CONTAINER ID       IMAGE                     COMMAND                 CREATED
          STATUS             PORTS               NAMES
5207dcbd0aee       nginx-centos7-base:1.6.1   "/apps/nginx/sbin/ng…"   About a
minute ago   Up About a minute                       web1-none
[root@ubuntu1804 ~]#docker port web1-none
[root@ubuntu1804 ~]#docker exec -it web1-none bash
[root@5207dcbd0aee /]# ifconfig -a
lo: flags=73<UP,LOOPBACK,RUNNING> mtu 65536
       inet 127.0.0.1 netmask 255.0.0.0
       loop txqueuelen 1000 (Local Loopback)
       RX packets 0 bytes 0 (0.0 B)
       RX errors 0 dropped 0 overruns 0 frame 0
       TX packets 0 bytes 0 (0.0 B)
       TX errors 0 dropped 0 overruns 0 carrier 0 collisions 0
[root@5207dcbd0aee /]# route -n
Kernel IP routing table
Destination     Gateway         Genmask         Flags Metric Ref   Use Iface
[root@5207dcbd0aee /]# netstat -ntl
Active Internet connections (only servers)
Proto Recv-Q Send-Q Local Address           Foreign Address         State
tcp        0      0 0.0.0.0:80              0.0.0.0:*               LISTEN
[root@5207dcbd0aee /]# ping www.baidu.com
ping: www.baidu.com: Name or service not known
[root@5207dcbd0aee /]# ping 172.17.0.1
connect: Network is unreachable
[root@5207dcbd0aee /]#
5.6 Container 模式
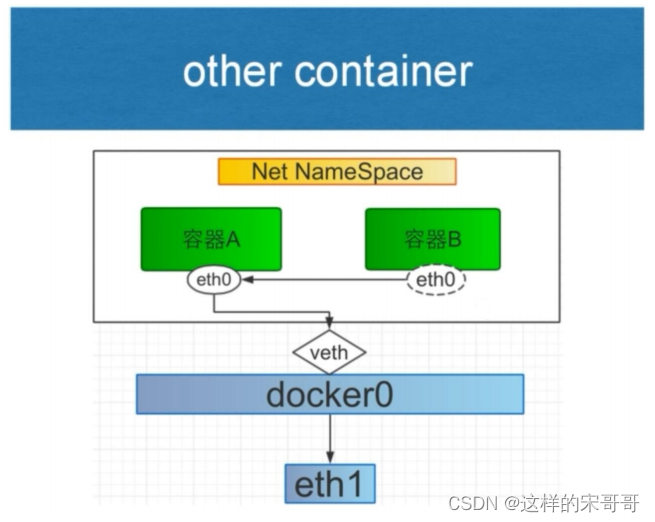
使用此模式创建的容器需指定和一个已经存在的容器共享一个网络,而不是和宿主机共享网络,新创建的容器不会创建自己的网卡也不会配置自己的IP,而是和一个被指定的已经存在的容器共享IP和端口范
围,因此这个容器的端口不能和被指定容器的端口冲突,除了网络之外的文件系统、进程信息等仍然保持相互隔离,两个容器的进程可以通过lo网卡进行通信
Container 模式特点
- 使用参数 –-network container:名称或ID 指定
- 与宿主机网络空间隔离
- 空器间共享网络空间
- 适合频繁的容器间的网络通信
- 直接使用对方的网络,较少使用
范例:
#创建第一个容器
[root@ubuntu1804 ~]#docker run -it --name server1 -p 80:80 alpine:3.11 sh
/ # ifconfig
eth0     Link encap:Ethernet HWaddr 02:42:AC:11:00:02
         inet addr:172.17.0.2 Bcast:172.17.255.255 Mask:255.255.0.0
         UP BROADCAST RUNNING MULTICAST MTU:1500 Metric:1
         RX packets:9 errors:0 dropped:0 overruns:0 frame:0
         TX packets:0 errors:0 dropped:0 overruns:0 carrier:0
         collisions:0 txqueuelen:0
         RX bytes:766 (766.0 B) TX bytes:0 (0.0 B)
lo       Link encap:Local Loopback
         inet addr:127.0.0.1 Mask:255.0.0.0
         UP LOOPBACK RUNNING MTU:65536 Metric:1
         RX packets:0 errors:0 dropped:0 overruns:0 frame:0
         TX packets:0 errors:0 dropped:0 overruns:0 carrier:0
         collisions:0 txqueuelen:1000
         RX bytes:0 (0.0 B) TX bytes:0 (0.0 B)
/ # netstat -ntl
Active Internet connections (only servers)
Proto Recv-Q Send-Q Local Address           Foreign Address         State
/ #
#在另一个终端执行下面操作
[root@ubuntu1804 ~]#docker ps
CONTAINER ID       IMAGE               COMMAND             CREATED
STATUS             PORTS               NAMES
4d342fac169f       alpine:3.11         "sh"                29 seconds ago
Up 28 seconds       0.0.0.0:80->80/tcp   server1
[root@ubuntu1804 ~]#docker port server1
80/tcp -> 0.0.0.0:80
#无法访问web服务
[root@ubuntu1804 ~]#curl 127.0.0.1/app/
curl: (52) Empty reply from server
#创建第二个容器,基于第一个容器的container的网络模式
[root@ubuntu1804 ~]#docker run -d --name server2 --network container:server1
nginx-centos7-base:1.6.1
7db90f38590ade11e1c833a8b2175810c71b3f222753c5177bb8b05952f08a7b
#可以访问web服务
[root@ubuntu1804 ~]#curl 127.0.0.1/app/
Test Page in app
[root@ubuntu1804 ~]#docker exec -it server2 bash
#和第一个容器共享相同的网络
[root@4d342fac169f /]# ifconfig
eth0: flags=4163<UP,BROADCAST,RUNNING,MULTICAST> mtu 1500
       inet 172.17.0.2 netmask 255.255.0.0 broadcast 172.17.255.255
       ether 02:42:ac:11:00:02 txqueuelen 0 (Ethernet)
       RX packets 29 bytes 2231 (2.1 KiB)
       RX errors 0 dropped 0 overruns 0 frame 0
       TX packets 12 bytes 1366 (1.3 KiB)
       TX errors 0 dropped 0 overruns 0 carrier 0 collisions 0
lo: flags=73<UP,LOOPBACK,RUNNING> mtu 65536
       inet 127.0.0.1 netmask 255.0.0.0
       loop txqueuelen 1000 (Local Loopback)
       RX packets 10 bytes 860 (860.0 B)
       RX errors 0 dropped 0 overruns 0 frame 0
       TX packets 10 bytes 860 (860.0 B)
       TX errors 0 dropped 0 overruns 0 carrier 0 collisions 0
[root@4d342fac169f /]# netstat -ntl
Active Internet connections (only servers)
Proto Recv-Q Send-Q Local Address           Foreign Address         State
tcp        0      0 0.0.0.0:80              0.0.0.0:*               LISTEN
#可访问外网
[root@4d342fac169f /]# ping www.baidu.com
PING www.a.shifen.com (61.135.169.121) 56(84) bytes of data.
64 bytes from 61.135.169.121 (61.135.169.121): icmp_seq=1 ttl=127 time=3.99 ms
64 bytes from 61.135.169.121 (61.135.169.121): icmp_seq=2 ttl=127 time=5.03 ms
^C
--- www.a.shifen.com ping statistics ---
2 packets transmitted, 2 received, 0% packet loss, time 1002ms
rtt min/avg/max/mdev = 3.999/4.514/5.030/0.519 ms
[root@4d342fac169f /]#
范例: 第一个容器使用host网络模式,第二个容器与之共享网络
[root@ubuntu1804 ~]#docker run -d --name c1 --network host nginxcentos7.8:v5.0-1.18.0
5a60804f3917d82dfe32db140411cf475f20acce0fe4674d94e4557e1003d8e0
[root@ubuntu1804 ~]#docker run -it --name c2 --network container:c1
centos7.8:v1.0
[root@ubuntu1804 /]# ip a
1: lo: <LOOPBACK,UP,LOWER_UP> mtu 65536 qdisc noqueue state UNKNOWN group
default qlen 1000
   link/loopback 00:00:00:00:00:00 brd 00:00:00:00:00:00
   inet 127.0.0.1/8 scope host lo
       valid_lft forever preferred_lft forever
   inet6 ::1/128 scope host
       valid_lft forever preferred_lft forever
2: eth0: <BROADCAST,MULTICAST,UP,LOWER_UP> mtu 1500 qdisc fq_codel state UP
group default qlen 1000
   link/ether 00:0c:29:63:8b:ac brd ff:ff:ff:ff:ff:ff
      inet 10.0.0.100/24 brd 10.0.0.255 scope global eth0
       valid_lft forever preferred_lft forever
   inet6 fe80::20c:29ff:fe63:8bac/64 scope link
       valid_lft forever preferred_lft forever
3: docker0: <NO-CARRIER,BROADCAST,MULTICAST,UP> mtu 1500 qdisc noqueue state
DOWN group default
   link/ether 02:42:24:86:98:fb brd ff:ff:ff:ff:ff:ff
   inet 172.17.0.1/16 brd 172.17.255.255 scope global docker0
       valid_lft forever preferred_lft forever
   inet6 fe80::42:24ff:fe86:98fb/64 scope link
       valid_lft forever preferred_lft forever
[root@ubuntu1804 ~]#docker exec -it c1 bash
[root@ubuntu1804 /]# ip a
1: lo: <LOOPBACK,UP,LOWER_UP> mtu 65536 qdisc noqueue state UNKNOWN group
default qlen 1000
   link/loopback 00:00:00:00:00:00 brd 00:00:00:00:00:00
   inet 127.0.0.1/8 scope host lo
       valid_lft forever preferred_lft forever
   inet6 ::1/128 scope host
       valid_lft forever preferred_lft forever
2: eth0: <BROADCAST,MULTICAST,UP,LOWER_UP> mtu 1500 qdisc fq_codel state UP
group default qlen 1000
   link/ether 00:0c:29:63:8b:ac brd ff:ff:ff:ff:ff:ff
   inet 10.0.0.100/24 brd 10.0.0.255 scope global eth0
       valid_lft forever preferred_lft forever
   inet6 fe80::20c:29ff:fe63:8bac/64 scope link
       valid_lft forever preferred_lft forever
3: docker0: <NO-CARRIER,BROADCAST,MULTICAST,UP> mtu 1500 qdisc noqueue state
DOWN group default
   link/ether 02:42:24:86:98:fb brd ff:ff:ff:ff:ff:ff
   inet 172.17.0.1/16 brd 172.17.255.255 scope global docker0
       valid_lft forever preferred_lft forever
   inet6 fe80::42:24ff:fe86:98fb/64 scope link
       valid_lft forever preferred_lft forever
[root@ubuntu1804 /]#
范例:第一个容器使用none网络模式,第二个容器与之共享网络
[root@ubuntu1804 ~]#docker run -d --name c1 --network none nginxcentos7.8:v5.0-1.18.0
caf5b57299c8359f21f30b8894c5f8496ff39b44ead6a732056000689cb0c91c
[root@ubuntu1804 ~]#docker run -it --name c2 --network container:c1
centos7.8:v1.0
[root@caf5b57299c8 /]# ip a
1: lo: <LOOPBACK,UP,LOWER_UP> mtu 65536 qdisc noqueue state UNKNOWN group
default qlen 1000
   link/loopback 00:00:00:00:00:00 brd 00:00:00:00:00:00
   inet 127.0.0.1/8 scope host lo
       valid_lft forever preferred_lft forever
[root@caf5b57299c8 /]#
5.7 自定义网络模式
除了以上的网络模式,也可以自定义网络,使用自定义的网段地址,网关等信息
注意: 自定义网络内的容器可以直接通过容器名进行相互的访问,而无需使用 --link可以使用自定义网络模式,实现不同集群应用的独立网络管理,而互不影响,而且在网一个网络内,可以直接
利用容器名相互访问,非常便利
5.7.1 自定义网络实现
[root@ubuntu1804 ~]#docker network --help
Usage: docker network COMMAND
Manage networks
Commands:
 connect     Connect a container to a network
 create     Create a network
 disconnect Disconnect a container from a network
 inspect     Display detailed information on one or more networks
  ls         List networks
 prune       Remove all unused networks
  rm         Remove one or more networks
创建自定义网络:
docker network create -d <mode> --subnet <CIDR> --gateway <网关> <自定义网络名称>
#注意mode不支持host和none,默认是bridge模式
查看自定义网络信息
docker network inspect <自定义网络名称或网络ID>
引用自定义网络
docker run --network <自定义网络名称> <镜像名称>
删除自定义网络
doccker network rm <自定义网络名称或网络ID>
范例:内置的三个网络无法删除
[root@ubuntu1804 ~]#docker network rm test-net
test-net
[root@ubuntu1804 ~]#docker network rm none
Error response from daemon: none is a pre-defined network and cannot be removed
[root@ubuntu1804 ~]#docker network rm bridge
Error response from daemon: bridge is a pre-defined network and cannot be
removed
[root@ubuntu1804 ~]#docker network rm host
Error response from daemon: host is a pre-defined network and cannot be removed
5.7.2 实战案例: 自定义网络
5.7.2.1 创建自定义的网络
[root@ubuntu1804 ~]#docker network create -d bridge --subnet 172.27.0.0/16 --
gateway 172.27.0.1 test-net
c90dee3b7937e007ed31a8d016a9e54c0174d0d26487b154db0aff04d9016d5b
[root@ubuntu1804 ~]#docker network ls
NETWORK ID         NAME               DRIVER             SCOPE
cabde0b33c94       bridge             bridge             local
cb64aa83626c       host               host               local
10619d45dcd4       none               null               local
c90dee3b7937       test-net           bridge             local
[root@ubuntu1804 ~]#docker inspect test-net
[
   {


        "Name": "test-net",
        "Id":
"00ab0f2d29e82d387755e1bea19532dc279fa134a565e496d308ec62f7edf434",
        "Created": "2020-07-22T09:59:09.431393706+08:00",
        "Scope": "local",
        "Driver": "bridge",
        "EnableIPv6": false,
        "IPAM": {


            "Driver": "default",
            "Options": {

    },
            "Config": [
               {


                    "Subnet": "172.27.0.0/16",
                    "Gateway": "172.27.0.1"
               }
           ]
       },
        "Internal": false,
        "Attachable": false,
        "Ingress": false,
        "ConfigFrom": {


            "Network": ""
       },
        "ConfigOnly": false,
        "Containers": {

    },
        "Options": {

    },
        "Labels": {

    }
   }
   ]
[root@ubuntu1804 ~]#ip a
1: lo: <LOOPBACK,UP,LOWER_UP> mtu 65536 qdisc noqueue state UNKNOWN group
default qlen 1000
   link/loopback 00:00:00:00:00:00 brd 00:00:00:00:00:00
   inet 127.0.0.1/8 scope host lo
       valid_lft forever preferred_lft forever
   inet6 ::1/128 scope host
       valid_lft forever preferred_lft forever
2: eth0: <BROADCAST,MULTICAST,UP,LOWER_UP> mtu 1500 qdisc fq_codel state UP
group default qlen 1000
   link/ether 00:0c:29:34:df:91 brd ff:ff:ff:ff:ff:ff
   inet 10.0.0.100/24 brd 10.0.0.255 scope global eth0
       valid_lft forever preferred_lft forever
   inet6 fe80::20c:29ff:fe34:df91/64 scope link
       valid_lft forever preferred_lft forever
3: docker0: <NO-CARRIER,BROADCAST,MULTICAST,UP> mtu 1500 qdisc noqueue state
DOWN group default
   link/ether 02:42:9b:31:73:2b brd ff:ff:ff:ff:ff:ff
   inet 172.17.0.1/16 brd 172.17.255.255 scope global docker0
       valid_lft forever preferred_lft forever
   inet6 fe80::42:9bff:fe31:732b/64 scope link
       valid_lft forever preferred_lft forever
#新添加了一个虚拟网卡
14: br-c90dee3b7937: <NO-CARRIER,BROADCAST,MULTICAST,UP> mtu 1500 qdisc noqueue
state DOWN group default
   link/ether 02:42:58:7c:f0:93 brd ff:ff:ff:ff:ff:ff
   inet 172.27.0.1/16 brd 172.27.255.255 scope global br-c90dee3b7937
       valid_lft forever preferred_lft forever
   inet6 fe80::42:58ff:fe7c:f093/64 scope link
       valid_lft forever preferred_lft forever
#新加了一个网桥
[root@ubuntu1804 ~]#brctl show
bridge name bridge id STP enabled interfaces
br-00ab0f2d29e8 8000.024245e647ec no
docker0 8000.0242cfd26f0a no
[root@ubuntu1804 ~]#route -n
Kernel IP routing table
Destination     Gateway         Genmask         Flags Metric Ref   Use Iface
0.0.0.0         10.0.0.2        0.0.0.0         UG    0      0        0 eth0
10.0.0.0        0.0.0.0         255.255.255.0   U     0      0        0 eth0
172.17.0.0      0.0.0.0         255.255.0.0     U     0      0        0 docker0
172.27.0.0      0.0.0.0         255.255.0.0     U     0      0        0 brc90dee3b7937
5.7.2.2 利用自定义的网络创建容器
[root@ubuntu1804 ~]#docker run -it --rm --network test-net alpine sh
/ # ip a
1: lo: <LOOPBACK,UP,LOWER_UP> mtu 65536 qdisc noqueue state UNKNOWN qlen 1000
   link/loopback 00:00:00:00:00:00 brd 00:00:00:00:00:00
   inet 127.0.0.1/8 scope host lo
       valid_lft forever preferred_lft forever
       15: eth0@if16: <BROADCAST,MULTICAST,UP,LOWER_UP,M-DOWN> mtu 1500 qdisc noqueue
state UP
   link/ether 02:42:ac:1b:00:02 brd ff:ff:ff:ff:ff:ff
   inet 172.27.0.2/16 brd 172.27.255.255 scope global eth0
       valid_lft forever preferred_lft forever
/ # / # route -n
Kernel IP routing table
Destination     Gateway         Genmask         Flags Metric Ref   Use Iface
0.0.0.0         172.27.0.1      0.0.0.0         UG    0      0        0 eth0
172.27.0.0      0.0.0.0         255.255.0.0     U     0      0        0 eth0
/ # cat /etc/resolv.conf
search magedu.com wang.org
nameserver 127.0.0.11
options ndots:0
/ # ping -c1 www.baidu.com
PING www.baidu.com (111.206.223.172): 56 data bytes
64 bytes from 111.206.223.172: seq=0 ttl=127 time=5.053 ms
#再开一个新终端窗口查看网络
[root@ubuntu1804 ~]#docker inspect test-net
[
   {


        "Name": "test-net",
        "Id":
"00ab0f2d29e82d387755e1bea19532dc279fa134a565e496d308ec62f7edf434",
        "Created": "2020-07-22T09:59:09.431393706+08:00",
        "Scope": "local",
        "Driver": "bridge",
        "EnableIPv6": false,
        "IPAM": {


            "Driver": "default",
            "Options": {

    },
            "Config": [
               {


                    "Subnet": "172.27.0.0/16",
                    "Gateway": "172.27.0.1"
               }
           ]
       },
        "Internal": false,
        "Attachable": false,
        "Ingress": false,
        "ConfigFrom": {


            "Network": ""
       },
        "ConfigOnly": false,
        #出现此网络中容器的网络信息
        "Containers": {


            "89e54ed71c111ac7b41a62ce20191707cf53a3a234ba3e25ac11c1a4a6bed7ef":
{


                "Name": "frosty_ellis",
                "EndpointID":
"cf72bf192df73a8b290d8b18dd8507fef64a1f9480d4d65f74c23258d20dbafb",
                "MacAddress": "02:42:ac:1b:00:02",
                                "IPv4Address": "172.27.0.2/16",
                "IPv6Address": ""
           }
       },
        "Options": {

    },
        "Labels": {

    }
   }
]
5.7.2.3 实战案例: 自定义网络中的容器之间通信
[root@ubuntu1804 ~]#docker network ls
NETWORK ID         NAME               DRIVER             SCOPE
c2f770f19400       bridge             bridge             local
220d4008a6a0       host               host               local
adb6f338ff6d       none               null               local
00ab0f2d29e8       test-net           bridge             local
[root@ubuntu1804 ~]#docker run -it --rm --network test-net --name test1 alpine
sh
/ # ip a
1: lo: <LOOPBACK,UP,LOWER_UP> mtu 65536 qdisc noqueue state UNKNOWN qlen 1000
   link/loopback 00:00:00:00:00:00 brd 00:00:00:00:00:00
   inet 127.0.0.1/8 scope host lo
       valid_lft forever preferred_lft forever
23: eth0@if24: <BROADCAST,MULTICAST,UP,LOWER_UP,M-DOWN> mtu 1500 qdisc noqueue
state UP
   link/ether 02:42:ac:1b:00:02 brd ff:ff:ff:ff:ff:ff
   inet 172.27.0.2/16 brd 172.27.255.255 scope global eth0
       valid_lft forever preferred_lft forever
/ # cat /etc/hosts
127.0.0.1 localhost
::1 localhost ip6-localhost ip6-loopback
fe00::0 ip6-localnet
ff00::0 ip6-mcastprefix
ff02::1 ip6-allnodes
ff02::2 ip6-allrouters
172.27.0.2 c3446876a38b
#等后面步骤中容器test2创建好可以再访问
/ # ping -c1 test2
PING test2 (172.27.0.3): 56 data bytes
64 bytes from 172.27.0.3: seq=0 ttl=64 time=0.072 ms
--- test2 ping statistics ---
1 packets transmitted, 1 packets received, 0% packet loss
round-trip min/avg/max = 0.072/0.072/0.072 ms
[root@ubuntu1804 ~]#docker run -it --rm --network test-net --name test2 alpine
/ # ip a
1: lo: <LOOPBACK,UP,LOWER_UP> mtu 65536 qdisc noqueue state UNKNOWN qlen 1000
   link/loopback 00:00:00:00:00:00 brd 00:00:00:00:00:00
   inet 127.0.0.1/8 scope host lo
          valid_lft forever preferred_lft forever
25: eth0@if26: <BROADCAST,MULTICAST,UP,LOWER_UP,M-DOWN> mtu 1500 qdisc noqueue
state UP
   link/ether 02:42:ac:1b:00:03 brd ff:ff:ff:ff:ff:ff
   inet 172.27.0.3/16 brd 172.27.255.255 scope global eth0
       valid_lft forever preferred_lft forever
/ # cat /etc/hosts
127.0.0.1 localhost
::1 localhost ip6-localhost ip6-loopback
fe00::0 ip6-localnet
ff00::0 ip6-mcastprefix
ff02::1 ip6-allnodes
ff02::2 ip6-allrouters
172.27.0.3 305fd14a4b70
/ # ping -c1 test1
PING test1 (172.27.0.2): 56 data bytes
64 bytes from 172.27.0.2: seq=0 ttl=64 time=0.074 ms
--- test1 ping statistics ---
1 packets transmitted, 1 packets received, 0% packet loss
round-trip min/avg/max = 0.074/0.074/0.074 ms
结论: 自定义网络中的容器之间可以直接利用容器名进行通信
5.7.2.4 实战案例: 利用自定义网络实现 Redis Cluster
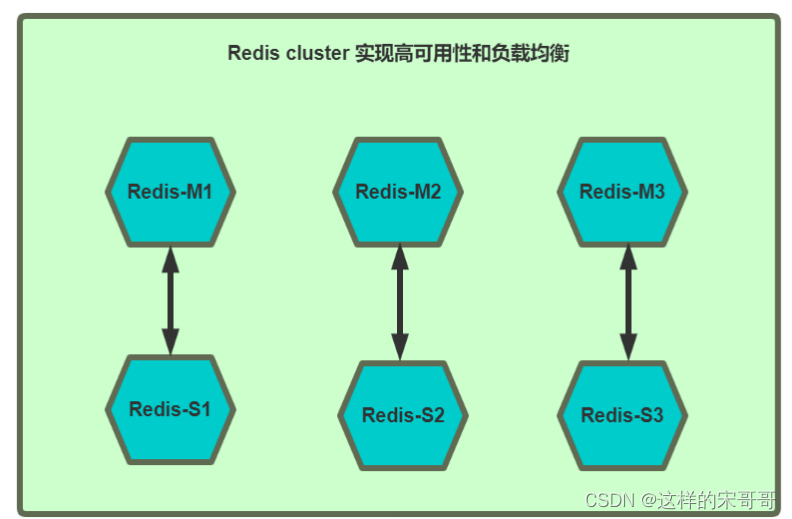
5.7.2.4.1 创建自定义网络
[root@ubuntu1804 ~]#docker network create net-redis --subnet 172.18.0.0/16
09b9dded99787835dccc029e16fa2782292d22c3e258f60a1db15d44e7a3bd93
[root@ubuntu1804 ~]#docker inspect net-redis
[
   {


           "Name": "net-redis",
        "Id":
"09b9dded99787835dccc029e16fa2782292d22c3e258f60a1db15d44e7a3bd93",
        "Created": "2020-07-22T14:16:43.295465692+08:00",
        "Scope": "local",
        "Driver": "bridge",
        "EnableIPv6": false,
        "IPAM": {


            "Driver": "default",
            "Options": {

    },
            "Config": [
               {


                    "Subnet": "172.18.0.0/16"
               }
           ]
       },
        "Internal": false,
        "Attachable": false,
        "Ingress": false,
        "ConfigFrom": {


            "Network": ""
       },
        "ConfigOnly": false,
        "Containers": {

    },
        "Options": {

    },
        "Labels": {

    }
   }
]
5.7.2.4.2 创建6个redis容器配置
# 通过脚本创建六个redis容器配置
[root@ubuntu1804 ~]#for port in {1..6};do
 mkdir -p /data/redis/node-${port}/conf
 cat >> /data/redis/node-${port}/conf/redis.conf << EOF
port 6379
bind 0.0.0.0
masterauth 123456
requirepass 123456
cluster-enabled yes
cluster-config-file nodes.conf
cluster-node-timeout 5000
cluster-announce-ip 172.18.0.1${port}
cluster-announce-port 6379
cluster-announce-bus-port 16379
appendonly yes
EOF
done
[root@ubuntu1804 ~]#tree /data/redis/
/data/redis/
├── node-1
│   └── conf
│       └── redis.conf
├── node-2
│   └── conf
│       └── redis.conf
── node-3
│   └── conf
│       └── redis.conf
├── node-4
│   └── conf
│       └── redis.conf
├── node-5
│   └── conf
│       └── redis.conf
└── node-6
   └── conf
       └── redis.conf
12 directories, 6 files
[root@ubuntu1804 ~]#cat /data/redis/node-1/conf/redis.conf
port 6379
bind 0.0.0.0
masterauth 123456
requirepass 123456
cluster-enabled yes
cluster-config-file nodes.conf
cluster-node-timeout 5000
cluster-announce-ip 172.18.0.11
cluster-announce-port 6379
cluster-announce-bus-port 16379
appendonly yes
5.7.2.4.3 创建6个 redis 容器
# 通过脚本运行六个redis容器
[root@ubuntu1804 ~]#for port in {1..6};do
 docker run -p 637${port}:6379 -p 1667${port}:16379 --name redis-${port} \
 -v /data/redis/node-${port}/data:/data \
 -v /data/redis/node-${port}/conf/redis.conf:/etc/redis/redis.conf \
 -d --net net-redis --ip 172.18.0.1${port} redis:5.0.9-alpine3.11 redisserver /etc/redis/redis.conf
done
[root@ubuntu1804 ~]#docker ps
CONTAINER ID       IMAGE                   COMMAND                 CREATED
        STATUS             PORTS
NAMES
2525235efae6       redis:5.0.9-alpine3.11   "docker-entrypoint.s…"   23 seconds
ago     Up 21 seconds       0.0.0.0:6376->6379/tcp, 0.0.0.0:16676->16379/tcp
redis-6
bd89dbb445ae       redis:5.0.9-alpine3.11   "docker-entrypoint.s…"   24 seconds
ago     Up 22 seconds       0.0.0.0:6375->6379/tcp, 0.0.0.0:16675->16379/tcp
redis-5
51cb6244d34d       redis:5.0.9-alpine3.11   "docker-entrypoint.s…"   26 seconds
ago     Up 23 seconds       0.0.0.0:6374->6379/tcp, 0.0.0.0:16674->16379/tcp
redis-4
1a49a47eb72d       redis:5.0.9-alpine3.11   "docker-entrypoint.s…"   27 seconds
ago     Up 25 seconds       0.0.0.0:6373->6379/tcp, 0.0.0.0:16673->16379/tcp
redis-3
a03e957680f0       redis:5.0.9-alpine3.11   "docker-entrypoint.s…"   28 seconds
ago     Up 26 seconds       0.0.0.0:6372->6379/tcp, 0.0.0.0:16672->16379/tcp
redis-2
b5332c0cba81       redis:5.0.9-alpine3.11   "docker-entrypoint.s…"   31 seconds
ago     Up 28 seconds       0.0.0.0:6371->6379/tcp, 0.0.0.0:16671->16379/tcp
redis-1
5.7.2.4.4 创建 redis cluster
#连接redis cluster
[root@ubuntu1804 ~]#docker exec -it redis-1 /bin/sh
/data # redis-cli -a 123456
Warning: Using a password with '-a' or '-u' option on the command line interface
may not be safe.
127.0.0.1:6379> exit
#不支持 { } 扩展
/data # echo {1..10}
{

    1..10}
/data # echo $-
smi
# 创建集群
/data # redis-cli -a 123456 --cluster create 172.18.0.11:6379 172.18.0.12:6379
172.18.0.13:6379 172.18.0.14:6379 172.18.0.15:6379 172.18.0.16:6379 --clusterreplicas 1
Warning: Using a password with '-a' or '-u' option on the command line interface
may not be safe.
>>> Performing hash slots allocation on 6 nodes...
Master[0] -> Slots 0 - 5460
Master[1] -> Slots 5461 - 10922
Master[2] -> Slots 10923 - 16383
Adding replica 172.18.0.15:6379 to 172.18.0.11:6379
Adding replica 172.18.0.16:6379 to 172.18.0.12:6379
Adding replica 172.18.0.14:6379 to 172.18.0.13:6379
M: 0f9bd0d24495f826702a030703896f7690bebdee 172.18.0.11:6379
   slots:[0-5460] (5461 slots) master
M: 9b6ab0b8f75516d6acd9d566d0d349f1fdd29540 172.18.0.12:6379
   slots:[5461-10922] (5462 slots) master
M: 599f69b43a3579ec064b1854680c77997c809470 172.18.0.13:6379
   slots:[10923-16383] (5461 slots) master
S: c64dfd1bd6c964a3c6425a28f6ab0f0e1bcea1ba 172.18.0.14:6379
   replicates 599f69b43a3579ec064b1854680c77997c809470
S: 2f69287f52ec7243a0b894491814d2afe28a46d2 172.18.0.15:6379
   replicates 0f9bd0d24495f826702a030703896f7690bebdee
S: 06295ce4884948858cf60243629a595afa461b21 172.18.0.16:6379
   replicates 9b6ab0b8f75516d6acd9d566d0d349f1fdd29540
Can I set the above configuration? (type 'yes' to accept): #输入yes
>>> Nodes configuration updated
>>> Assign a different config epoch to each node
>>> Sending CLUSTER MEET messages to join the cluster
Waiting for the cluster to join
....
>>> Performing Cluster Check (using node 172.18.0.11:6379)
M: 0f9bd0d24495f826702a030703896f7690bebdee 172.18.0.11:6379
   slots:[0-5460] (5461 slots) master
   1 additional replica(s)
   S: 2f69287f52ec7243a0b894491814d2afe28a46d2 172.18.0.15:6379
   slots: (0 slots) slave
   replicates 0f9bd0d24495f826702a030703896f7690bebdee
S: c64dfd1bd6c964a3c6425a28f6ab0f0e1bcea1ba 172.18.0.14:6379
   slots: (0 slots) slave
   replicates 599f69b43a3579ec064b1854680c77997c809470
M: 9b6ab0b8f75516d6acd9d566d0d349f1fdd29540 172.18.0.12:6379
   slots:[5461-10922] (5462 slots) master
   1 additional replica(s)
M: 599f69b43a3579ec064b1854680c77997c809470 172.18.0.13:6379
   slots:[10923-16383] (5461 slots) master
   1 additional replica(s)
S: 06295ce4884948858cf60243629a595afa461b21 172.18.0.16:6379
   slots: (0 slots) slave
   replicates 9b6ab0b8f75516d6acd9d566d0d349f1fdd29540
[OK] All nodes agree about slots configuration.
>>> Check for open slots...
>>> Check slots coverage...
[OK] All 16384 slots covered.
5.7.2.4.5 测试访问 redis cluster
#连接redis cluster
/data # redis-cli -a 123456 -c
Warning: Using a password with '-a' or '-u' option on the command line interface
may not be safe.
127.0.0.1:6379> cluster info
cluster_state:ok
cluster_slots_assigned:16384
cluster_slots_ok:16384
cluster_slots_pfail:0
cluster_slots_fail:0
cluster_known_nodes:6
cluster_size:3
cluster_current_epoch:6
cluster_my_epoch:1
cluster_stats_messages_ping_sent:267
cluster_stats_messages_pong_sent:278
cluster_stats_messages_sent:545
cluster_stats_messages_ping_received:273
cluster_stats_messages_pong_received:267
cluster_stats_messages_meet_received:5
cluster_stats_messages_received:545
127.0.0.1:6379> cluster nodes
#看到172.18.0.{11,12,13}为master,172.18.0.{14,15,16}为slave
#以下为master/slave关系
#172.18.0.11<--->172.18.0.15
#172.18.0.12<--->172.18.0.16
#172.18.0.13<--->172.18.0.14
2f69287f52ec7243a0b894491814d2afe28a46d2 172.18.0.15:6379@16379 slave
0f9bd0d24495f826702a030703896f7690bebdee 0 1595404269581 5 connected
0f9bd0d24495f826702a030703896f7690bebdee 172.18.0.11:6379@16379 myself,master -
0 1595404269000 1 connected 0-5460
c64dfd1bd6c964a3c6425a28f6ab0f0e1bcea1ba 172.18.0.14:6379@16379 slave
599f69b43a3579ec064b1854680c77997c809470 0 1595404268000 4 connected
9b6ab0b8f75516d6acd9d566d0d349f1fdd29540 172.18.0.12:6379@16379 master - 0
1595404268976 2 connected 5461-10922
599f69b43a3579ec064b1854680c77997c809470 172.18.0.13:6379@16379 master - 0
1595404269481 3 connected 10923-16383
06295ce4884948858cf60243629a595afa461b21 172.18.0.16:6379@16379 slave
9b6ab0b8f75516d6acd9d566d0d349f1fdd29540 0 1595404268000 6 connected
#添加key到redis-2上
127.0.0.1:6379> set name wang
-> Redirected to slot [5798] located at 172.18.0.12:6379
OK
#添加key到redis-1上
172.18.0.12:6379> set title cto
-> Redirected to slot [2217] located at 172.18.0.11:6379
OK
172.18.0.11:6379> get name
-> Redirected to slot [5798] located at 172.18.0.12:6379
"wang"
172.18.0.12:6379> get title
-> Redirected to slot [2217] located at 172.18.0.11:6379
"cto"
5.7.2.4.6 测试故障实现 redis cluster 高可用性
#模拟redis-2故障
[root@ubuntu1804 ~]#docker stop redis-2
redis-2
#再次查看cluster状态,可以看到redis-2出错
[root@ubuntu1804 ~]#docker exec -it redis-1 /bin/sh
/data # redis-cli -a 123456 --cluster check 127.0.0.1:6379
Warning: Using a password with '-a' or '-u' option on the command line interface
may not be safe.
Could not connect to Redis at 172.18.0.12:6379: Host is unreachable
#查看到 172.18.0.16提升为新的master
172.18.0.16:6379 (06295ce4...) -> 1 keys | 5462 slots | 0 slaves.
172.18.0.13:6379 (599f69b4...) -> 0 keys | 5461 slots | 1 slaves.
172.18.0.15:6379 (2f69287f...) -> 1 keys | 5461 slots | 1 slaves.
[OK] 2 keys in 3 masters.
0.00 keys per slot on average.
>>> Performing Cluster Check (using node 127.0.0.1:6379)
S: 0f9bd0d24495f826702a030703896f7690bebdee 127.0.0.1:6379
   slots: (0 slots) slave
   replicates 2f69287f52ec7243a0b894491814d2afe28a46d2
M: 06295ce4884948858cf60243629a595afa461b21 172.18.0.16:6379
   slots:[5461-10922] (5462 slots) master
M: 599f69b43a3579ec064b1854680c77997c809470 172.18.0.13:6379
   slots:[10923-16383] (5461 slots) master
   1 additional replica(s)
M: 2f69287f52ec7243a0b894491814d2afe28a46d2 172.18.0.15:6379
   slots:[0-5460] (5461 slots) master
   1 additional replica(s)
S: c64dfd1bd6c964a3c6425a28f6ab0f0e1bcea1ba 172.18.0.14:6379
   slots: (0 slots) slave
   replicates 599f69b43a3579ec064b1854680c77997c809470
[OK] All nodes agree about slots configuration.
>>> Check for open slots...
>>> Check slots coverage...
[OK] All 16384 slots covered.
/data # redis-cli -a 123456 -c
Warning: Using a password with '-a' or '-u' option on the command line interface
may not be safe.
127.0.0.1:6379> cluster nodes
06295ce4884948858cf60243629a595afa461b21 172.18.0.16:6379@16379 master - 0
1595406573128 8 connected 5461-10922
599f69b43a3579ec064b1854680c77997c809470 172.18.0.13:6379@16379 master - 0
1595406572623 3 connected 10923-16383
0f9bd0d24495f826702a030703896f7690bebdee 172.18.0.11:6379@16379 myself,slave
2f69287f52ec7243a0b894491814d2afe28a46d2 0 1595406571000 1 connected
2f69287f52ec7243a0b894491814d2afe28a46d2 172.18.0.15:6379@16379 master - 0
1595406571614 7 connected 0-5460
9b6ab0b8f75516d6acd9d566d0d349f1fdd29540 172.18.0.12:6379@16379 master,fail -
1595404533839 1595404532528 2 connected
c64dfd1bd6c964a3c6425a28f6ab0f0e1bcea1ba 172.18.0.14:6379@16379 slave
599f69b43a3579ec064b1854680c77997c809470 0 1595406572118 4 connected
127.0.0.1:6379> get name
-> Redirected to slot [5798] located at 172.18.0.16:6379
"wang"
172.18.0.16:6379> get title
-> Redirected to slot [2217] located at 172.18.0.15:6379
"cto"
5.7.3 同一个宿主机之间不同网络的容器通信
开两个容器,一个使用自定义网络容器,一个使用默认brideg网络的容器,默认因iptables规则导致无法通信

[root@ubuntu1804 ~]#docker run -it --rm --name test1 alpine sh
/ # ip a
1: lo: <LOOPBACK,UP,LOWER_UP> mtu 65536 qdisc noqueue state UNKNOWN qlen 1000
link/loopback 00:00:00:00:00:00 brd 00:00:00:00:00:00
inet 127.0.0.1/8 scope host lo
valid_lft forever preferred_lft forever
23: eth0@if24: <BROADCAST,MULTICAST,UP,LOWER_UP,M-DOWN> mtu 1500 qdisc noqueue
state UP
link/ether 02:42:ac:11:00:02 brd ff:ff:ff:ff:ff:ff
inet 172.17.0.2/16 brd 172.17.255.255 scope global eth0
valid_lft forever preferred_lft forever
/ # ping 172.27.0.2 #无法ping通自定义网络容器
PING 172.27.0.2 (172.27.0.2): 56 data bytes
[root@ubuntu1804 ~]#docker run -it --rm --network test-net --name test2 alpine
sh
/ # ip a
1: lo: <LOOPBACK,UP,LOWER_UP> mtu 65536 qdisc noqueue state UNKNOWN qlen 1000
link/loopback 00:00:00:00:00:00 brd 00:00:00:00:00:00
inet 127.0.0.1/8 scope host lo
valid_lft forever preferred_lft forever
21: eth0@if22: <BROADCAST,MULTICAST,UP,LOWER_UP,M-DOWN> mtu 1500 qdisc noqueue
state UP
link/ether 02:42:ac:1b:00:02 brd ff:ff:ff:ff:ff:ff
inet 172.27.0.2/16 brd 172.27.255.255 scope global eth0
valid_lft forever preferred_lft forever
/ # ping 172.17.0.2 #无法ping 通默认的网络容器
PING 172.27.0.2 (172.17.0.2): 56 data bytes
5.7.3.1 实战案例 1: 修改iptables实现同一宿主机上的不同网络的容器间通信
#确认开启ip_forward
[root@ubuntu1804 ~]#cat /proc/sys/net/ipv4/ip_forward
1
#默认网络和自定义网络是两个不同的网桥
[root@ubuntu1804 ~]#brctl show
bridge name bridge id STP enabled interfaces
br-c90dee3b7937 8000.0242587cf093 no veth984a5b4
docker0 8000.02429b31732b no veth1a20128
[root@ubuntu1804 ~]#iptables -vnL
Chain INPUT (policy ACCEPT 1241 packets, 87490 bytes)
pkts bytes target prot opt in out source destination
Chain FORWARD (policy DROP 0 packets, 0 bytes)
pkts bytes target prot opt in out source destination
859 72156 DOCKER-USER all -- * * 0.0.0.0/0 0.0.0.0/0
859 72156 DOCKER-ISOLATION-STAGE-1 all -- * * 0.0.0.0/0
0.0.0.0/0
0 0 ACCEPT all -- * br-c90dee3b7937 0.0.0.0/0
0.0.0.0/0 ctstate RELATED,ESTABLISHED
0 0 DOCKER all -- * br-c90dee3b7937 0.0.0.0/0
0.0.0.0/0
0 0 ACCEPT all -- br-c90dee3b7937 !br-c90dee3b7937 0.0.0.0/0
0.0.0.0/0
0 0 ACCEPT all -- br-c90dee3b7937 br-c90dee3b7937 0.0.0.0/0
0.0.0.0/0
0 0 ACCEPT all -- * docker0 0.0.0.0/0 0.0.0.0/0
ctstate RELATED,ESTABLISHED
0 0 DOCKER all -- * docker0 0.0.0.0/0 0.0.0.0/0
0 0 ACCEPT all -- docker0 !docker0 0.0.0.0/0 0.0.0.0/0
0 0 ACCEPT all -- docker0 docker0 0.0.0.0/0 0.0.0.0/0
Chain OUTPUT (policy ACCEPT 1456 packets, 209K bytes)
pkts bytes target prot opt in out source destination
Chain DOCKER (2 references)
pkts bytes target prot opt in out source destination
Chain DOCKER-ISOLATION-STAGE-1 (1 references)
pkts bytes target prot opt in out source destination
289 24276 DOCKER-ISOLATION-STAGE-2 all -- br-c90dee3b7937 !br-c90dee3b7937
0.0.0.0/0 0.0.0.0/0
570 47880 DOCKER-ISOLATION-STAGE-2 all -- docker0 !docker0 0.0.0.0/0
0.0.0.0/0
0 0 RETURN all -- * * 0.0.0.0/0 0.0.0.0/0
Chain DOCKER-ISOLATION-STAGE-2 (2 references)
pkts bytes target prot opt in out source destination
570 47880 DROP all -- * br-c90dee3b7937 0.0.0.0/0
0.0.0.0/0
289 24276 DROP all -- * docker0 0.0.0.0/0 0.0.0.0/0
0 0 RETURN all -- * * 0.0.0.0/0 0.0.0.0/0
Chain DOCKER-USER (1 references)
pkts bytes target prot opt in out source destination
859 72156 RETURN all -- * * 0.0.0.0/0 0.0.0.0/0
[root@ubuntu1804 ~]#
[root@ubuntu1804 ~]#iptables-save
# Generated by iptables-save v1.6.1 on Sun Feb 2 14:33:19 2020
*filter
:INPUT ACCEPT [1283:90246]
:FORWARD DROP [0:0]
:OUTPUT ACCEPT [1489:217126]
:DOCKER - [0:0]
:DOCKER-ISOLATION-STAGE-1 - [0:0]
:DOCKER-ISOLATION-STAGE-2 - [0:0]
:DOCKER-USER - [0:0]
-A FORWARD -j DOCKER-USER
-A FORWARD -j DOCKER-ISOLATION-STAGE-1
-A FORWARD -o br-c90dee3b7937 -m conntrack --ctstate RELATED,ESTABLISHED -j
ACCEPT
-A FORWARD -o br-c90dee3b7937 -j DOCKER
-A FORWARD -i br-c90dee3b7937 ! -o br-c90dee3b7937 -j ACCEPT
-A FORWARD -i br-c90dee3b7937 -o br-c90dee3b7937 -j ACCEPT
-A FORWARD -o docker0 -m conntrack --ctstate RELATED,ESTABLISHED -j ACCEPT
-A FORWARD -o docker0 -j DOCKER
-A FORWARD -i docker0 ! -o docker0 -j ACCEPT
-A FORWARD -i docker0 -o docker0 -j ACCEPT
-A DOCKER-ISOLATION-STAGE-1 -i br-c90dee3b7937 ! -o br-c90dee3b7937 -j DOCKERISOLATION-STAGE-2
-A DOCKER-ISOLATION-STAGE-1 -i docker0 ! -o docker0 -j DOCKER-ISOLATION-STAGE-2
-A DOCKER-ISOLATION-STAGE-1 -j RETURN
-A DOCKER-ISOLATION-STAGE-2 -o br-c90dee3b7937 -j DROP #注意此行规则
-A DOCKER-ISOLATION-STAGE-2 -o docker0 -j DROP #注意此行规则
-A DOCKER-ISOLATION-STAGE-2 -j RETURN
-A DOCKER-USER -j RETURN
COMMIT
# Completed on Sun Feb 2 14:33:19 2020
# Generated by iptables-save v1.6.1 on Sun Feb 2 14:33:19 2020
*nat
:PREROUTING ACCEPT [887:75032]
:INPUT ACCEPT [6:1028]
:OUTPUT ACCEPT [19:1444]
:POSTROUTING ACCEPT [19:1444]
:DOCKER - [0:0]
-A PREROUTING -m addrtype --dst-type LOCAL -j DOCKER
-A OUTPUT ! -d 127.0.0.0/8 -m addrtype --dst-type LOCAL -j DOCKER
-A POSTROUTING -s 172.27.0.0/16 ! -o br-c90dee3b7937 -j MASQUERADE
-A POSTROUTING -s 172.17.0.0/16 ! -o docker0 -j MASQUERADE
-A DOCKER -i br-c90dee3b7937 -j RETURN
-A DOCKER -i docker0 -j RETURN
COMMIT
# Completed on Sun Feb 2 14:33:19 2020
[root@ubuntu1804 ~]#iptables-save > iptables.rule
[root@ubuntu1804 ~]#vim iptables.rule
#修改下面两行的规则
-A DOCKER-ISOLATION-STAGE-2 -o br-c90dee3b7937 -j ACCEPT
-A DOCKER-ISOLATION-STAGE-2 -o docker0 -j ACCEPT
#或者执行下面命令
[root@ubuntu1804 ~]#iptables -I DOCKER-ISOLATION-STAGE-2 -j ACCEPT
[root@ubuntu1804 ~]#iptables-restore < iptables.rule
#再次两个容器之间可以相互通信
/ # ping 172.27.0.2
PING 172.27.0.2 (172.27.0.2): 56 data bytes
64 bytes from 172.27.0.2: seq=896 ttl=63 time=0.502 ms
64 bytes from 172.27.0.2: seq=897 ttl=63 time=0.467 ms
64 bytes from 172.27.0.2: seq=898 ttl=63 time=0.227 ms
/ # ping 172.17.0.2
PING 172.17.0.2 (172.17.0.2): 56 data bytes
64 bytes from 172.17.0.2: seq=0 ttl=63 time=0.163 ms
64 bytes from 172.17.0.2: seq=1 ttl=63 time=0.232 ms
5.7.3.2 实战案例 2: 通过解决docker network connect 实现同一个宿主机不同网络的容器间通信
可以使用docker network connect命令实现同一个宿主机不同网络的容器间相互通信
#将CONTAINER连入指定的NETWORK中,使此CONTAINER可以与NETWORK中的其它容器进行通信
docker network connect [OPTIONS] NETWORK CONTAINER
Connect a container to a network
Options:
--alias strings Add network-scoped alias for the container
--driver-opt strings driver options for the network
--ip string IPv4 address (e.g., 172.30.100.104)
--ip6 string IPv6 address (e.g., 2001:db8::33)
--link list Add link to another container
--link-local-ip strings Add a link-local address for the container
#将CONTAINER与指定的NETWORK断开连接,使此CONTAINER可以与CONTAINER中的其它容器进行无法通信
#如果将容器从自定义的网络删除,将加入默认的网络,即docker0网桥中,获取172.17.0.0/16
#如果将容器从默认的网络docker0删除,将加入none网络
docker network disconnect [OPTIONS] NETWORK CONTAINER
Disconnect a container from a network
Options:
-f, --force Force the container to disconnect from a network
5.7.3.2.1 上面案例中test1和test2的容器间默认无法通信
#每个网络中有属于此网络的容器信息
[root@ubuntu1804 ~]#docker network inspect bridge
[
{
"Name": "bridge",
"Id":
"c2f770f19400aa482054a92f2ff6ce54cae2ed45a15c7d98e0959c64dfefd58d",
"Created": "2020-07-22T09:23:20.265208248+08:00",
"Scope": "local",
"Driver": "bridge",
"EnableIPv6": false,
"IPAM": {
"Driver": "default",
"Options": null,
"Config": [
{
"Subnet": "172.17.0.0/16",
"Gateway": "172.17.0.1"
}
]
},
"Internal": false,
"Attachable": false,
"Ingress": false,
"ConfigFrom": {
"Network": ""
},
"ConfigOnly": false,
"Containers": {
"9bc707b1a810c4bab39a4c0ed3ff5867cc45b21fe8ae6737f2a9d0163ed2c7a9":
{
"Name": "test1",
"EndpointID":
"475bba6925c426158b3c523e07b6773c884d404d82e6c19d5e4a41f54f8856c2",
"MacAddress": "02:42:ac:11:00:02",
"IPv4Address": "172.17.0.2/16",
"IPv6Address": ""
}
},
"Options": {
"com.docker.network.bridge.default_bridge": "true",
"com.docker.network.bridge.enable_icc": "true",
"com.docker.network.bridge.enable_ip_masquerade": "true",
"com.docker.network.bridge.host_binding_ipv4": "0.0.0.0",
"com.docker.network.bridge.name": "docker0",
"com.docker.network.driver.mtu": "1500"
},
"Labels": {
}
}
]
#每个网络中有属于此网络的容器信息
[root@ubuntu1804 ~]#docker network inspect test-net
[
{
"Name": "test-net",
"Id":
"00ab0f2d29e82d387755e1bea19532dc279fa134a565e496d308ec62f7edf434",
"Created": "2020-07-22T09:59:09.431393706+08:00",
"Scope": "local",
"Driver": "bridge",
"EnableIPv6": false,
"IPAM": {
"Driver": "default",
"Options": {
},
"Config": [
{
"Subnet": "172.27.0.0/16",
"Gateway": "172.27.0.1"
}
]
},
"Internal": false,
"Attachable": false,
"Ingress": false,
"ConfigFrom": {
"Network": ""
},
"ConfigOnly": false,
"Containers": {
"c3446876a38b3d7e70ca35429051dea7373643a95689d22f252faedc31f3c427":
{
"Name": "test2",
"EndpointID":
"13fb11baeca7e90abdc9183334315e95df4a55367d3add1472d741a556cb662c",
"MacAddress": "02:42:ac:1b:00:02",
"IPv4Address": "172.27.0.2/16",
"IPv6Address": ""
}
},
"Options": {
},
"Labels": {
}
}
]
5.7.3.2.2 让默认网络中容器test1可以连通自定义网络test-net的容器test2
[root@ubuntu1804 ~]#docker network connect test-net test1
[root@ubuntu1804 ~]#docker network inspect test-net
[
{
"Name": "test-net",
"Id":
"00ab0f2d29e82d387755e1bea19532dc279fa134a565e496d308ec62f7edf434",
"Created": "2020-07-22T09:59:09.431393706+08:00",
"Scope": "local",
"Driver": "bridge",
"EnableIPv6": false,
"IPAM": {
"Driver": "default",
"Options": {
},
"Config": [
{
"Subnet": "172.27.0.0/16",
"Gateway": "172.27.0.1"
}
]
},
"Internal": false,
"Attachable": false,
"Ingress": false,
"ConfigFrom": {
"Network": ""
},
"ConfigOnly": false,
"Containers": {
"9bc707b1a810c4bab39a4c0ed3ff5867cc45b21fe8ae6737f2a9d0163ed2c7a9":
{
"Name": "test1",
"EndpointID":
"600891a1f0727f0fddcb9c123540d02963a30a54d011554e0dfd1c108ecabdd2",
"MacAddress": "02:42:ac:1b:00:03",
"IPv4Address": "172.27.0.3/16",
"IPv6Address": ""
},
"c3446876a38b3d7e70ca35429051dea7373643a95689d22f252faedc31f3c427":
{
"Name": "test2",
"EndpointID":
"13fb11baeca7e90abdc9183334315e95df4a55367d3add1472d741a556cb662c",
"MacAddress": "02:42:ac:1b:00:02",
"IPv4Address": "172.27.0.2/16",
"IPv6Address": ""
}
},
"Options": {
},
"Labels": {
}
}
]
#在test1容器中可以看到新添加了一个网卡,并且分配了test-net网络的IP信息
/ # ip a
1: lo: <LOOPBACK,UP,LOWER_UP> mtu 65536 qdisc noqueue state UNKNOWN qlen 1000
link/loopback 00:00:00:00:00:00 brd 00:00:00:00:00:00
inet 127.0.0.1/8 scope host lo
valid_lft forever preferred_lft forever
27: eth0@if28: <BROADCAST,MULTICAST,UP,LOWER_UP,M-DOWN> mtu 1500 qdisc noqueue
state UP
link/ether 02:42:ac:11:00:02 brd ff:ff:ff:ff:ff:ff
inet 172.17.0.2/16 brd 172.17.255.255 scope global eth0
valid_lft forever preferred_lft forever
29: eth1@if30: <BROADCAST,MULTICAST,UP,LOWER_UP,M-DOWN> mtu 1500 qdisc noqueue
state UP
link/ether 02:42:ac:1b:00:03 brd ff:ff:ff:ff:ff:ff
inet 172.27.0.3/16 brd 172.27.255.255 scope global eth1
valid_lft forever preferred_lft forever
#test1可以连接test2容器
/ # ping -c1 172.27.0.2
PING 172.27.0.2 (172.27.0.2): 56 data bytes
64 bytes from 172.27.0.2: seq=0 ttl=64 time=0.100 ms
--- 172.27.0.2 ping statistics ---
1 packets transmitted, 1 packets received, 0% packet loss
round-trip min/avg/max = 0.100/0.100/0.100 ms
#在test2容器中没有变化,仍然无法连接test1
/ # ip a
1: lo: <LOOPBACK,UP,LOWER_UP> mtu 65536 qdisc noqueue state UNKNOWN qlen 1000
link/loopback 00:00:00:00:00:00 brd 00:00:00:00:00:00
inet 127.0.0.1/8 scope host lo
valid_lft forever preferred_lft forever
23: eth0@if24: <BROADCAST,MULTICAST,UP,LOWER_UP,M-DOWN> mtu 1500 qdisc noqueue
state UP
link/ether 02:42:ac:1b:00:02 brd ff:ff:ff:ff:ff:ff
inet 172.27.0.2/16 brd 172.27.255.255 scope global eth0
valid_lft forever preferred_lft forever
/ # ping -c1 172.17.0.2
PING 172.17.0.2 (172.17.0.2): 56 data bytes
^C
--- 172.17.0.2 ping statistics ---
5.7.3.2.3 让自定义网络中容器test2可以连通默认网络的容器test1
#将自定义网络中的容器test2也加入到默认网络中,使之和默认网络中的容器test1通信
[root@ubuntu1804 ~]#docker network connect bridge test2
[root@ubuntu1804 ~]#docker network inspect bridge
[
{
"Name": "bridge",
"Id":
"c2f770f19400aa482054a92f2ff6ce54cae2ed45a15c7d98e0959c64dfefd58d",
"Created": "2020-07-22T09:23:20.265208248+08:00",
"Scope": "local",
"Driver": "bridge",
"EnableIPv6": false,
"IPAM": {
"Driver": "default",
"Options": null,
"Config": [
{
"Subnet": "172.17.0.0/16",
"Gateway": "172.17.0.1"
}
]
},
"Internal": false,
"Attachable": false,
"Ingress": false,
"ConfigFrom": {
"Network": ""
},
"ConfigOnly": false,
"Containers": {
"9bc707b1a810c4bab39a4c0ed3ff5867cc45b21fe8ae6737f2a9d0163ed2c7a9":
{
"Name": "test1",
"EndpointID":
"475bba6925c426158b3c523e07b6773c884d404d82e6c19d5e4a41f54f8856c2",
"MacAddress": "02:42:ac:11:00:02",
"IPv4Address": "172.17.0.2/16",
"IPv6Address": ""
},
"c3446876a38b3d7e70ca35429051dea7373643a95689d22f252faedc31f3c427":
{
"Name": "test2",
"EndpointID":
"a049010b37dd5a40c1ff8e8d0b327b70727316dd86b2c69c05231bfd6c985af6",
"MacAddress": "02:42:ac:11:00:03",
"IPv4Address": "172.17.0.3/16",
"IPv6Address": ""
}
},
"Options": {
"com.docker.network.bridge.default_bridge": "true",
"com.docker.network.bridge.enable_icc": "true",
"com.docker.network.bridge.enable_ip_masquerade": "true",
"com.docker.network.bridge.host_binding_ipv4": "0.0.0.0",
"com.docker.network.bridge.name": "docker0",
"com.docker.network.driver.mtu": "1500"
},
"Labels": {
}
}
]
#确认自定义网络的容器test2中添加了新网卡,并设置默认网络的IP信息
/ # ip a
1: lo: <LOOPBACK,UP,LOWER_UP> mtu 65536 qdisc noqueue state UNKNOWN qlen 1000
link/loopback 00:00:00:00:00:00 brd 00:00:00:00:00:00
inet 127.0.0.1/8 scope host lo
valid_lft forever preferred_lft forever
23: eth0@if24: <BROADCAST,MULTICAST,UP,LOWER_UP,M-DOWN> mtu 1500 qdisc noqueue
state UP
link/ether 02:42:ac:1b:00:02 brd ff:ff:ff:ff:ff:ff
inet 172.27.0.2/16 brd 172.27.255.255 scope global eth0
valid_lft forever preferred_lft forever
31: eth1@if32: <BROADCAST,MULTICAST,UP,LOWER_UP,M-DOWN> mtu 1500 qdisc noqueue
state UP
link/ether 02:42:ac:11:00:03 brd ff:ff:ff:ff:ff:ff
inet 172.17.0.3/16 brd 172.17.255.255 scope global eth1
valid_lft forever preferred_lft forever
#test2可以连接test1容器
/ # ping -c1 172.17.0.2
PING 172.17.0.2 (172.17.0.2): 56 data bytes
64 bytes from 172.17.0.2: seq=0 ttl=64 time=0.128 ms
--- 172.17.0.2 ping statistics ---
1 packets transmitted, 1 packets received, 0% packet loss
round-trip min/avg/max = 0.128/0.128/0.128 ms
#在test1中可以利用test2容器名通信
/ # ping -c1 test2
PING test2 (172.27.0.2): 56 data bytes
64 bytes from 172.27.0.2: seq=0 ttl=64 time=0.076 ms
#在test2中可以利test1容器名通信
/ # ping -c1 test1
PING test1 (172.27.0.3): 56 data bytes
64 bytes from 172.27.0.3: seq=0 ttl=64 time=0.075 ms
5.7.3.2.4 断开不同网络中容器的通信
#将test1 断开和网络test-net中其它容器的通信
[root@ubuntu1804 ~]#docker network disconnect test-net test1
#在容器test1中无法和test2通信
/ # ip a
1: lo: <LOOPBACK,UP,LOWER_UP> mtu 65536 qdisc noqueue state UNKNOWN qlen 1000
link/loopback 00:00:00:00:00:00 brd 00:00:00:00:00:00
inet 127.0.0.1/8 scope host lo
valid_lft forever preferred_lft forever
27: eth0@if28: <BROADCAST,MULTICAST,UP,LOWER_UP,M-DOWN> mtu 1500 qdisc noqueue
state UP
link/ether 02:42:ac:11:00:02 brd ff:ff:ff:ff:ff:ff
inet 172.17.0.2/16 brd 172.17.255.255 scope global eth0
valid_lft forever preferred_lft forever
/ # ping -c1 172.27.0.2
PING 172.27.0.2 (172.27.0.2): 56 data bytes
--- 172.27.0.2 ping statistics ---
1 packets transmitted, 0 packets received, 100% packet loss
#在容器test2中仍能和test1通信
/ # ip a
1: lo: <LOOPBACK,UP,LOWER_UP> mtu 65536 qdisc noqueue state UNKNOWN qlen 1000
link/loopback 00:00:00:00:00:00 brd 00:00:00:00:00:00
inet 127.0.0.1/8 scope host lo
valid_lft forever preferred_lft forever
23: eth0@if24: <BROADCAST,MULTICAST,UP,LOWER_UP,M-DOWN> mtu 1500 qdisc noqueue
state UP
link/ether 02:42:ac:1b:00:02 brd ff:ff:ff:ff:ff:ff
inet 172.27.0.2/16 brd 172.27.255.255 scope global eth0
valid_lft forever preferred_lft forever
31: eth1@if32: <BROADCAST,MULTICAST,UP,LOWER_UP,M-DOWN> mtu 1500 qdisc noqueue
state UP
link/ether 02:42:ac:11:00:03 brd ff:ff:ff:ff:ff:ff
inet 172.17.0.3/16 brd 172.17.255.255 scope global eth1
valid_lft forever preferred_lft forever
/ # ping -c1 172.17.0.2
PING 172.17.0.2 (172.17.0.2): 56 data bytes
64 bytes from 172.17.0.2: seq=0 ttl=64 time=0.085 ms
#将test2 断开和默认网络中其它容器的通信
[root@ubuntu1804 ~]#docker network disconnect bridge test2
#在容器test2中无法和test1通信
/ # ip a
1: lo: <LOOPBACK,UP,LOWER_UP> mtu 65536 qdisc noqueue state UNKNOWN qlen 1000
link/loopback 00:00:00:00:00:00 brd 00:00:00:00:00:00
inet 127.0.0.1/8 scope host lo
valid_lft forever preferred_lft forever
23: eth0@if24: <BROADCAST,MULTICAST,UP,LOWER_UP,M-DOWN> mtu 1500 qdisc noqueue
state UP
link/ether 02:42:ac:1b:00:02 brd ff:ff:ff:ff:ff:ff
inet 172.27.0.2/16 brd 172.27.255.255 scope global eth0
valid_lft forever preferred_lft forever
/ # ping -c1 172.17.0.2
PING 172.17.0.2 (172.17.0.2): 56 data bytes
--- 172.17.0.2 ping statistics ---
1 packets transmitted, 0 packets received, 100% packet loss
六. 用docker-compose 将2中构建的镜像组合起来提供服务。
nextcloud公司内网网盘
cat /software/nextcloud-compose.yml
version: '2'
services:
db:
image: mysql
restart: always
volumes:
- /home/nextcloud/db:/var/lib/mysql
environment:
- MYSQL_ROOT_PASSWORD=shudun@123
- MYSQL_PASSWORD=shudun@123
- MYSQL_DATABASE=nextcloud
- MYSQL_USER=nextcloud
app:
image: nextcloud
restart: always
ports:
- 80:80
links:
- db
volumes:
- /home/nextcloud/www:/var/www/html
七 自己总结面试可能问的难回答的问题
7.1 ENTRYPOINT
功能类似于CMD,配置容器启动后执行的命令及参数
# 使用 exec 执行
ENTRYPOINT ["executable", "param1", "param2"...]
# shell中执行
ENTRYPOINT command param1 param2
- ENTRYPOINT 不能被 docker run 提供的参数覆盖,而是追加,即如果docker run 命令有参数,那么参数全部都会作为ENTRYPOINT的参数
- 如果docker run 后面没有额外参数,但是dockerfile中有CMD命令(即上面CMD的第三种用法),即Dockerfile中即有CMD也ENTRYPOINT,那么CMD的全部内容会作为ENTRYPOINT的参数
- 如果docker run 后面有额外参数,同时Dockerfile中即有CMD也有ENTRYPOINT,那么docker run后面的参数覆盖掉CMD参数内容,最终作为ENTRYPOINT的参数
- 可以通过docker run --entrypoint string 参数在运行时替换,注意string不要加空格
- 使用CMD要在运行时重新写命令本身,然后在后面才能追加运行参数,ENTRYPOINT则可以运行时无需重写命令就可以直接接受新参数
- 每个 Dockerfile 中只能有一个 ENTRYPOINT,当指定多个时,只有最后一个生效
- 通常会利用ENTRYPOINT指令配合脚本,可以为CMD指令提供环境配置


用tail替换bash
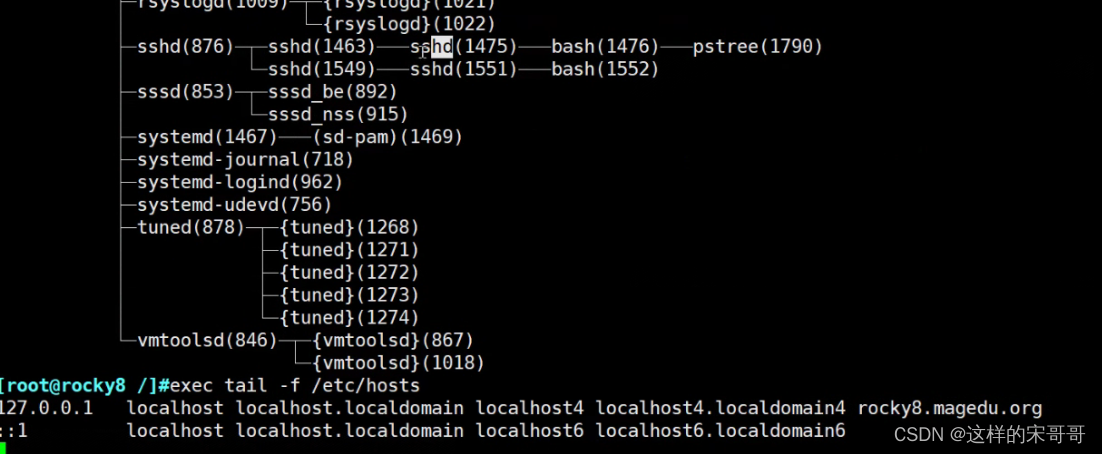
用cmd里的命令把entrypoint替换了最终执行的是cmd
这么做的目的是:entrypoint.sh里还有别的内容,比如生成配置文件,这样就可以动态生成配置文件了


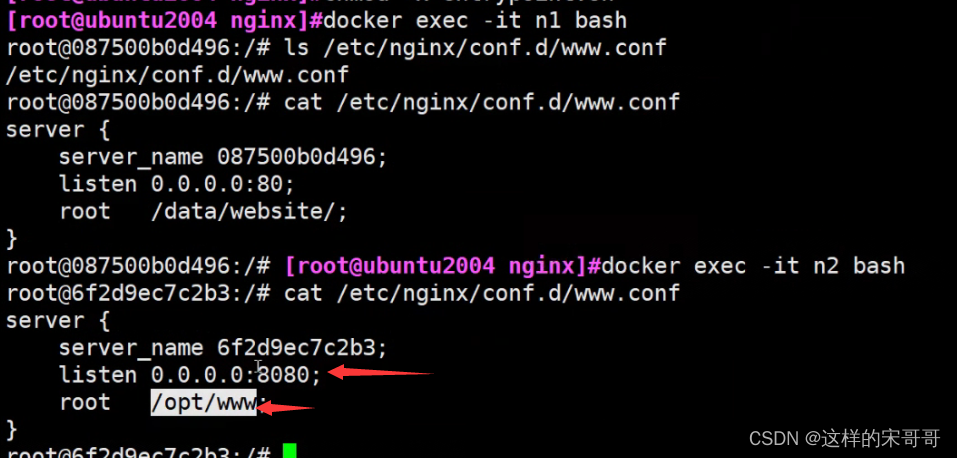
范例:
[root@centos8 ~]#cat /data/dockerfile/web/nginx/nginx-1.18/Dockerfile
FROM centos:centos7.9-v10.0
LABEL maintainer="wangxiaochun <[email protected]>"
ENV version=1.18.0
ADD nginx-$version.tar.gz /usr/local/
RUN cd /usr/local/nginx-$version && ./configure --prefix=/apps/nginx && make &&
make install && rm -rf /usr/local/nginx* && sed -i 's/.*nobody.*/user nginx;/'
/apps/nginx/conf/nginx.conf && useradd -r nginx
COPY index.html /apps/nginx/html
VOLUME ["/apps/nginx/html"]
EXPOSE 80 443
CMD ["-g","daemon off;"]
ENTRYPOINT ["/apps/nginx/sbin/nginx"]
#上面两条指令相当于ENTRYPOINT ["/apps/nginx/sbin/nginx","-g","daemon off;"]
HEALTHCHECK --interval=5s --timeout=3s CMD curl -fs http://127.0.0.1/
范例: 利用脚本实现指定环境变量动态生成配置文件内容
[root@ubuntu1804 ~]#echo 'Nginx Website in Dockerfile' > index.html
[root@ubuntu1804 ~]#cat Dockerfile
FROM nginx:1.16-alpine
LABEL maintainer="wangxiaochun <[email protected]>"
ENV DOC_ROOT='/data/website/'
ADD index.html ${DOC_ROOT}
ADD entrypoint.sh /bin/
EXPOSE 80/tcp 8080
#HEALTHCHECK --start-period=3s CMD wget -0 - -q http://${IP:-0.0.0.0}:
{
PORT:-80}/
CMD ["/usr/sbin/nginx","-g", "daemon off;"] #CMD指令的内容都成为了ENTRYPOINT的参数
ENTRYPOINT [ "/bin/entrypoint.sh"]
[root@ubuntu1804 ~]#cat entrypoint.sh
#!/bin/sh
cat > /etc/nginx/conf.d/www.conf <<EOF
server {
server_name ${
HOSTNAME};
listen ${IP:-0.0.0.0}:${PORT:-80};
root ${DOC_ROOT:-/usr/share/nginx/html};
}
EOF
exec "$@"
[root@ubuntu1804 ~]#chmod +x entrypoint.sh
[root@ubuntu1804 ~]#docker build -t nginx:v1.0 .
[root@ubuntu1804 ~]#docker run --name n1 --rm -P -e "PORT=8080" -e
"HOSTNAME=www.wang.org" nginx:v1.0
nginx entrypoint
mysql entrypoint
7.2 docker缺点,以及他的基石
7.2.1 docker缺点
- 多个容器共用宿主机的内核,各应用之间的隔离不如虚拟机彻底
- 由于和宿主机之间的进程也是隔离的,需要进入容器查看和调试容器内进程等资源,变得比较困难和繁琐
- 如果容器内进程需要查看和调试,需要在每个容器内都需要安装相应的工具,这也造成存储空间的重复浪费
pouch
项目网点: https://github.com/alibaba/pouch
Pouch (小袋子)起源于 2011 年,并于2017年11月19日上午,在中国开源年会现场,阿里巴巴正式开源了基于 Apache 2.0 协议的容器技术 Pouch。Pouch 是一款轻量级的容器技术,拥有快速高效、可移植性高、资源占用少等特性,主要帮助阿里更快的做到内部业务的交付,同时提高超大规模下数据中心的物理资源利用率
目前的容器方案大多基于 Linux 内核提供的 cgroup 和 namespace 来实现隔离,然后这样轻量级方案
存在弊端:
- 容器间,容器与宿主间,共享同一个内核
- 内核实现的隔离资源,维度不足
面对如此的内核现状,阿里巴巴采取了三个方面的工作,来解决容器的安全问题:
- 用户态增强容器的隔离维度,比如网络带宽、磁盘使用量等
- 给内核提交 patch,修复容器的资源可见性问题,cgroup 方面的 bug
- 实现基于 Hypervisor 的容器,通过创建新内核来实现容器隔离
7.2.2 基石
7.2.2.1 Chroot
就是我们常见的 chroot 命令的用法。它在 1979 年的时候就出现了,被认为是最早的容器化技术之一。它可以把一个进程的文件系统隔离起来。
7.2.2.2 Chroot Namespace
一个宿主机运行了N个容器,多个容器共用一个 OS,必然带来的以下问题:
- 怎么样保证每个容器都有不同的文件系统并且能互不影响?
- 一个docker主进程内的各个容器都是其子进程,那么如果实现同一个主进程下不同类型的子进程?
- 各个容器子进程间能相互通信(内存数据)吗?
- 每个容器怎么解决IP及端口分配的问题?
- 多个容器的主机名能一样吗?
- 每个容器都要不要有root用户?怎么解决账户重名问题?
namespace是Linux系统的底层概念,在内核层实现,即有一些不同类型的命名空间被部署在内核,各个docker容器运行在同一个docker主进程并且共用同一个宿主机系统内核,各docker容器运行在宿主机的用户空间,每个容器都要有类似于虚拟机一样的相互隔离的运行空间,但是容器技术是在一个进程内实现运行指定服务的运行环境,并且还可以保护宿主机内核不受其他进程的干扰和影响,如文件系统空间、网络空间、进程空间等,目前主要通过以下技术实现容器运行空间的相互隔离:
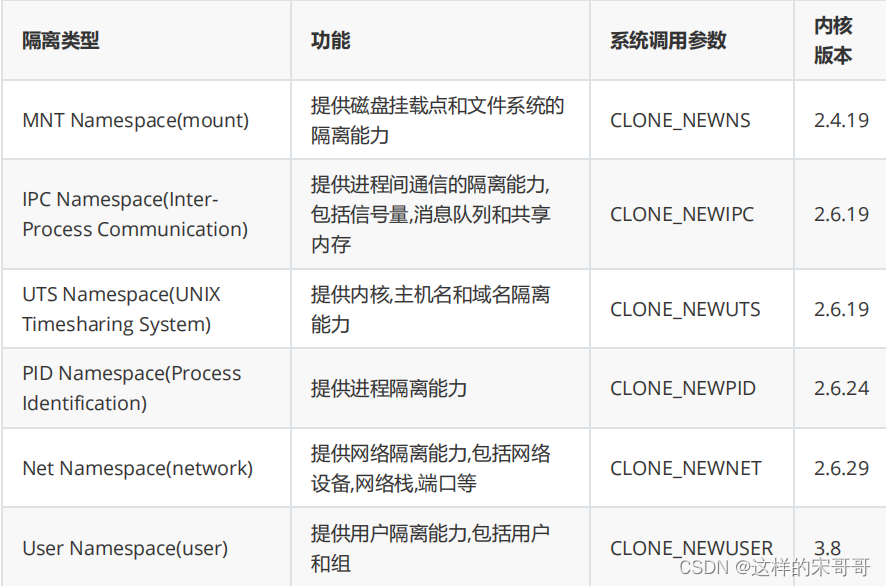
7.2.2.3 Control groups
Linux Cgroups的全称是Linux Control Groups,是Linux内核的一个功能.最早是由Google的工程师(主要是Paul Menage和Rohit Seth)在2006年发起,最早的名称为进程容器(process containers)。在2007年时,因为在Linux内核中,容器(container)这个名词有许多不同的意义,为避免混乱,被重命名为cgroup,并且被合并到2.6.24版的内核中去。自那以后,又添加了很多功能。
如果不对一个容器做任何资源限制,则宿主机会允许其占用无限大的内存空间,有时候会因为代码bug程序会一直申请内存,直到把宿主机内存占完,为了避免此类的问题出现,宿主机有必要对容器进行资源分配限制,比如CPU、内存等Cgroups 最主要的作用,就是限制一个进程组能够使用的资源上限,包括CPU、内存、磁盘、网络带宽等等。此外,还能够对进程进行优先级设置,资源的计量以及资源的控制(比如:将进程挂起和恢复等操
作)。
Cgroups在内核层默认已经开启,从CentOS 和 Ubuntu 不同版本对比,显然内核较新的支持的功能更多。
7.2.2.4 容器管理工具
有了以上的chroot、namespace、cgroups就具备了基础的容器运行环境,但是还需要有相应的容器创建与删除的管理工具、以及怎么样把容器运行起来、容器数据怎么处理、怎么进行启动与关闭等问题需要解决,于是容器管理技术出现了。目前主要是使用docker,早期使用 LXC
7.2.2.5 Podman
虽然目前 Docker 是管理 Linux 容器最好的工具,注意没有之一,但是podman的横空出现即将改变这一点
什么是Podman?
Podman即Pod Manager tool,从名称上可以看出和kubernets的pod的密切联系,不过就其功能来说,简而言之: alias docker = podman ,是CentOS 8 新集成的功能,或许不久的未来会代替docker
Podman是一个 为 Kubernetes 而生的开源的容器管理工具,原来是 CRI-O(即容器运行时接口CRI 和开放容器计划OCI) 项目的一部分,后来被分离成一个单独的项目叫 libpod。其可在大多数Linux平台上使用,它是一种无守护程序的容器引擎,用于在Linux系统上开发,管理和运行任何符合Open Container Initiative(OCI)标准的容器和容器镜像。
Podman 提供了一个与Docker兼容的命令行前端,Podman 里面87%的指令都和Docker CLI 相同,因此可以简单地为Docker CLI别名,即“ alias docker = podman”,事实上,podman使用的一些库也是docker的一部分。
CRI-O is an implementation of the Kubernetes CRI (Container Runtime Interface) to
enable using OCI (Open Container Initiative) compatible runtimes
官网地址: https://podman.io/
项目地址: https://github.com/containers/libpod
Podman 和docker不同之处
- docker 需要在系统上运行一个守护进程(docker daemon),这会产生一定的开销,而podman 不需要
启动容器的方式不同:
docker cli 命令通过API跟 Docker Engine(引擎) 交互告诉它我想创建一个container,然后
docker Engine 才会调用 OCI container runtime(runc) 来启动一个container。这代表
container的process(进程)不会是 Docker CLI 的 child process(子进程) ,而是 Docker
Engine 的 child process 。Podman 是直接给 OCI containner runtime(runc) 进行交互来创建container的,所以container process 直接是 podman 的 child process 。 - 因为docke有docker daemon,所以docker启动的容器支持 --restart 策略,但是podman不支持docker需要使用root用户来创建容器。 这可能会产生安全风险,尤其是当用户知道docker run命令的–privileged选项时。podman既可以由root用户运行,也可以由非特权用户运行
- docker在Linux上作为守护进程运行扼杀了容器社区的创新。 如果要更改容器的工作方式,则需要更改docker守护程序并将这些更改推送到上游。 没有守护进程,容器基础结构更加模块化,更容易进行更改。 podman的无守护进程架构更加灵活和安全。