一、介绍
在Android开发过程中,经常会有弹窗业务,在正常的弹窗业务中,常用到的是Dialog,Dialog的原理也是通过将view,添加到Dialog中。Dialog自身是一个独立的窗口,和Activity一样,有自己的window管理。如果简单的使用Dialog不方便管理,在后面Google提供了DialogFragment弹窗。
二、DialogFragment的介绍
看到DialogFragment,从单词可以看到是Dialog与Fragment组合而成,但是在DialogFragment中,DialogFragment其实是一个fragment,内部持有一个Dialog,这样方便了开发者的管理。fragment在碎片管理中其实就是一个View,最终view的显示是通过dialog来完成。
        class NamelessClass_1 implements Observer<LifecycleOwner> {
            NamelessClass_1() {
            }

            @SuppressLint({"SyntheticAccessor"})
            public void onChanged(LifecycleOwner lifecycleOwner) {
                if (lifecycleOwner != null && DialogFragment.this.mShowsDialog) {
                    View view = DialogFragment.this.requireView();
                    if (view.getParent() != null) {
                        throw new IllegalStateException("DialogFragment can not be attached to a container view");
                    }

                    if (DialogFragment.this.mDialog != null) {
                        if (FragmentManager.isLoggingEnabled(3)) {
                            Log.d("FragmentManager", "DialogFragment " + this + " setting the content view on " + DialogFragment.this.mDialog);
                        }

                        DialogFragment.this.mDialog.setContentView(view);
                    }
                }

            }
        }
同样,在类中也提供了丰富的方法
1、显示
    public void show(@NonNull FragmentManager manager, @Nullable String tag) {
        this.mDismissed = false;
        this.mShownByMe = true;
        FragmentTransaction ft = manager.beginTransaction();
        ft.add(this, tag);
        ft.commit();
    }
2、消失
    public void dismiss() {
        this.dismissInternal(false, false);
    }
3、获取dialog
    @Nullable
    public Dialog getDialog() {
        return this.mDialog;
    }
4、初始化内部资源
  @Nullable
    View onFindViewById(int id) {
        return this.mDialog != null ? this.mDialog.findViewById(id) : null;
    }
5.dialog创建
    @MainThread
    @NonNull
    public Dialog onCreateDialog(@Nullable Bundle savedInstanceState) {
        if (FragmentManager.isLoggingEnabled(3)) {
            Log.d("FragmentManager", "onCreateDialog called for DialogFragment " + this);
        }

        return new Dialog(this.requireContext(), this.getTheme());
    }
三、实战
通过以上介绍,我们大概熟悉了DialogFragment的大概工作方式,如果想仔细研究,可以查看源码。
在实战使用中
1、继承重写
基类:
abstract class BaseBindDialogFragment<V : ViewDataBinding> : DialogFragment() {

    val TAG=javaClass::class.java.name
    lateinit var bind: V

    override fun onCreateView(
        inflater: LayoutInflater,
        container: ViewGroup?,
        savedInstanceState: Bundle?
    ): View? {

        bind = DataBindingUtil.inflate(inflater, getLayoutId(), container, false)

        initView(bind.root)
        return bind.root
    }


    override fun onStart() {
        super.onStart()
        initConfig(dialog)
    }

    @LayoutRes
    abstract fun getLayoutId(): Int

    abstract fun initView(view: View)

    abstract fun initConfig(dialog:Dialog?)


}
class MyDialogFrgament : BaseBindDialogFragment<DialogFragmentbind>() {
override fun getLayoutId(): Int {
return R.layout.layout_dialog_view
}
override fun initView(view: View) {
bind.textInfo.text="我在测试"
}
override fun onResume() {
super.onResume()
MyLog.log(TAG,"onResume")
}
override fun onPause() {
super.onPause()
MyLog.log(TAG,"onPause")
}
override fun onStop() {
super.onStop()
MyLog.log(TAG,"onStop")
}
override fun initConfig(dialog: Dialog?) {
dialog?.let {
}
}
}<?xml version="1.0" encoding="utf-8"?>
<layout xmlns:android="http://schemas.android.com/apk/res/android">
<data class="DialogFragmentbind"></data>
<FrameLayout
android:layout_width="match_parent"
android:layout_height="match_parent">
<TextView
android:id="@+id/text_info"
android:layout_width="match_parent"
android:layout_height="wrap_content"/>
</FrameLayout>
</layout>执行:
    private fun dialogExport() {
        dialog = MyDialogFrgament()
        dialog.show(supportFragmentManager, "dialogExport")
    }
注意:
在开发过程中,好多新手会报错:
DialogFragment can not be attached to a container view

报错这个问题的原因是view的parent不为null,在消失后,又重新显示,这个时候会校验parent是否为null。
发生这个问题的核心是语法使用
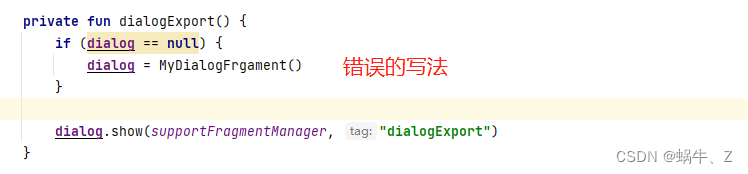
解决:
1.获取view的parent,通过remove自己
2.每次展示的时候重新new一个对象