需求一: 我们在项目中需要花如下一条虚线

步奏一 :创建shape<?xml version="1.0" encoding="utf-8"?> <shape xmlns:android="http://schemas.android.com/apk/res/android" android:shape="line"> <stroke android:width="0.2dp" android:color="#6bbbee" android:dashGap="5dp" android:dashWidth="2dp" /> </shape> 步奏二: 在.xml布局中使用<View android:layout_width="match_parent" android:layout_height="3dp" android:layout_marginTop="@dimen/marginTop_15" android:background="@drawable/dotted_line" android:layerType="software" android:layout_marginLeft="@dimen/marginLeft_10" android:layout_marginRight="@dimen/marginRight_10"/> |
需求二:实现圆角矩形效果

步奏一 :创建shape
<?xml version="1.0" encoding="utf-8"?>
<shape xmlns:android="http://schemas.android.com/apk/res/android"
       android:shape="rectangle">
    <solid android:color="#FBD415"/>
    <!-- 边缘线条颜色 -->
    <!--<stroke-->
    <!--android:width="1dp"-->
    <!--android:color="#FBD415"/>-->
    <!-- 圆角的幅度 -->
    <corners android:radius="5dp"/>
</shape>
步奏二: 在.xml布局中使用
<TextView
        android:id="@+id/tv_employeePosition"
        android:text=""
        android:layout_width="wrap_content"
        android:layout_height="wrap_content"
        android:textColor="@color/text_color_333333"
        android:textSize="@dimen/text_size_13"
        android:background="@drawable/solid_shape_yellow_gradient"
        android:gravity="center_vertical"
        android:paddingRight="5dp"
        android:paddingLeft="5dp"
        android:paddingBottom="3dp"
        android:paddingTop="3dp"/>
需求三: 实现带箭头的进度条效果(progrseeDrawable)
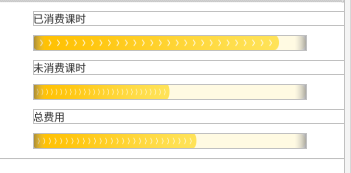
1.xml布局中引用控件 <ProgressBar style="?android:attr/progressBarStyleHorizontal" android:layout_width="match_parent" android:layout_height="wrap_content" android:id="@+id/progressBar" android:progress="80" android:max="100" android:secondaryProgress="90" android:progressDrawable="@drawable/progressdrawable"/> 2.我们需要定义的进度条: <?xml version="1.0" encoding="utf-8"?> <layer-list xmlns:android="http://schemas.android.com/apk/res/android"> <!--<item android:id="@android:id/progress">--> <!--<scale android:drawable="@drawable/progress_cool"--> <!--android:scaleWidth="100%"/>--> <!--</item>--> <!--背景--> <item android:id="@android:id/background"> <shape android:shape="rectangle"> <solid android:color="#FFFAE2"/> <stroke android:width="0dp"/> <corners android:radius="15dp"/> </shape> </item> <!--缓冲进度--> <!--<item android:id="@android:id/secondaryProgress">--> <!--<clip>--> <!--<shape android:shape="rectangle">--> <!--<solid android:color="#87877e"/>--> <!--<corners android:radius="15dp"/>--> <!--</shape>--> <!--</clip>--> <!--</item> --> <!--进度--> <!--<item android:id="@android:id/progress">--> <!--<clip>--> <!--<shape android:shape="rectangle">--> <!--<solid android:color="#FCEE12"/>--> <!--<corners android:radius="15dp"/>--> <!--</shape>--> <!--<nine-patch android:src="@drawable/already_consumed"--> <!--android:dither="true"/>--> <!--</clip>--> <!--</item>--> <item android:id="@android:id/progress"> <scale android:scaleWidth="100%" android:drawable="@drawable/already_consumed" /> </item> </layer-list> 注: android:drawable="@drawable/ 所引用的是.9图" |
扫描二维码关注公众号,回复:
1503837 查看本文章
