Matlab/OpenCV 实现稿子文字左右对称翻转 2021.9.6
1、为什么要对文字进行左右对称翻转?(需求)
在日常生活中,文字就是从左到右、从上到下的方式呈现在大家的视野当中,当然我们也都习以为然。然而,由于人们普遍认清了小孔成像、镜面反射、倒影等自然现象的机理并乐意接收,某些具体的生活应用场景则需要让文字以反序、颠倒的方式来展现,比如课程的现场录制。

|

|
举例来说,相信很多大学生都使用过中国大学慕课平台,里面的课程种类丰富,大多以提前录制的视频来讲解PPT为主,然而由于受现场人员、环境气氛、心理因素等影响,有工作人员在摄像、有工作人员在帮忙等等,总之有的老师在现场录制视频的过程当中,不可避免地需要查看提前准备的稿子以便忘记相关的流程及备课讲解顺序,从而按部就班地讲好所有该讲的知识点和方法,同时也能提高课程视频录制的效率。
以下是自己亲身经历课程录制过程中的四点细节(略微总结,可能并不通用):
- 稿子(提前准备好);
- 场地、服装和灯光;
- 工作人员积极配合摄像和提示;
- 为了让主讲人念稿子更加自然流畅,旁边工作人员负责将文字投影动态播放,本质上将稿子对应的文字左右翻转;
2、针对稿子的三种思路
为了实现文字左右翻转的效果,首先需要知道汉字本身也是一种编码,每个汉字在计算机系统都有唯一的字符编码(主要是Unicode统一码),具体了解可参考我的一篇博客:常用编码学习,当然这些编码早已形成了一种体系结构。

针对如下稿子内容:
    课改驱走旧陈俗,教育迎来艳阳春。遥望今后的课改之路,或许我们仍像刚走路的孩子一样步履蹒跚;或许我们
仍要付出比别人更多的意想不到的困难,但亲爱的老师们,请别忘记课改给我们带来的一份份惊喜与感动吧!他正和我
们一起奏响动听的乐章;它正和我们一道描绘多彩的画卷;它正和我一同谱写壮丽的诗篇。让我们再一次感谢课改,祝
福课改!我们满怀信心、满怀激情、满怀憧憬,将课改进行到底!

思路一(不可行):如果我们想要将汉字翻转(左右、上下)的结果保存到编码库中,那么每次使用直接将其插入到相应的位置不就可以了吗?但反过来讲,由于每个汉字经过上下或左右翻转后会出现好多个结果,每个结果都保存到编码库中有些不太现实,毕竟编码库的基本原则要求精简,就像线性代数里线性空间讲到的基,需要相互独立正交且无相关性最好;同时以我现在的能力还无法立刻做到,思虑再三,为了现实性,果断放弃这种想法;
思路二(可行):针对现有稿子中的文本,通过对文本进行旋转、对称、翻转等操作实现,可借助常用办公系列软件Office来实现;
思路三(可行):将稿子中的文本逐行添加到二维图像(矩阵)即图片中,然后文本和图片就是一个整体,这时可以采用计算机图像处理的方法来得到想要翻转后的文本效果。
3、具体实践(方式1、文本类;方式2、图片类)
3.1 文本类方式(使用Word)

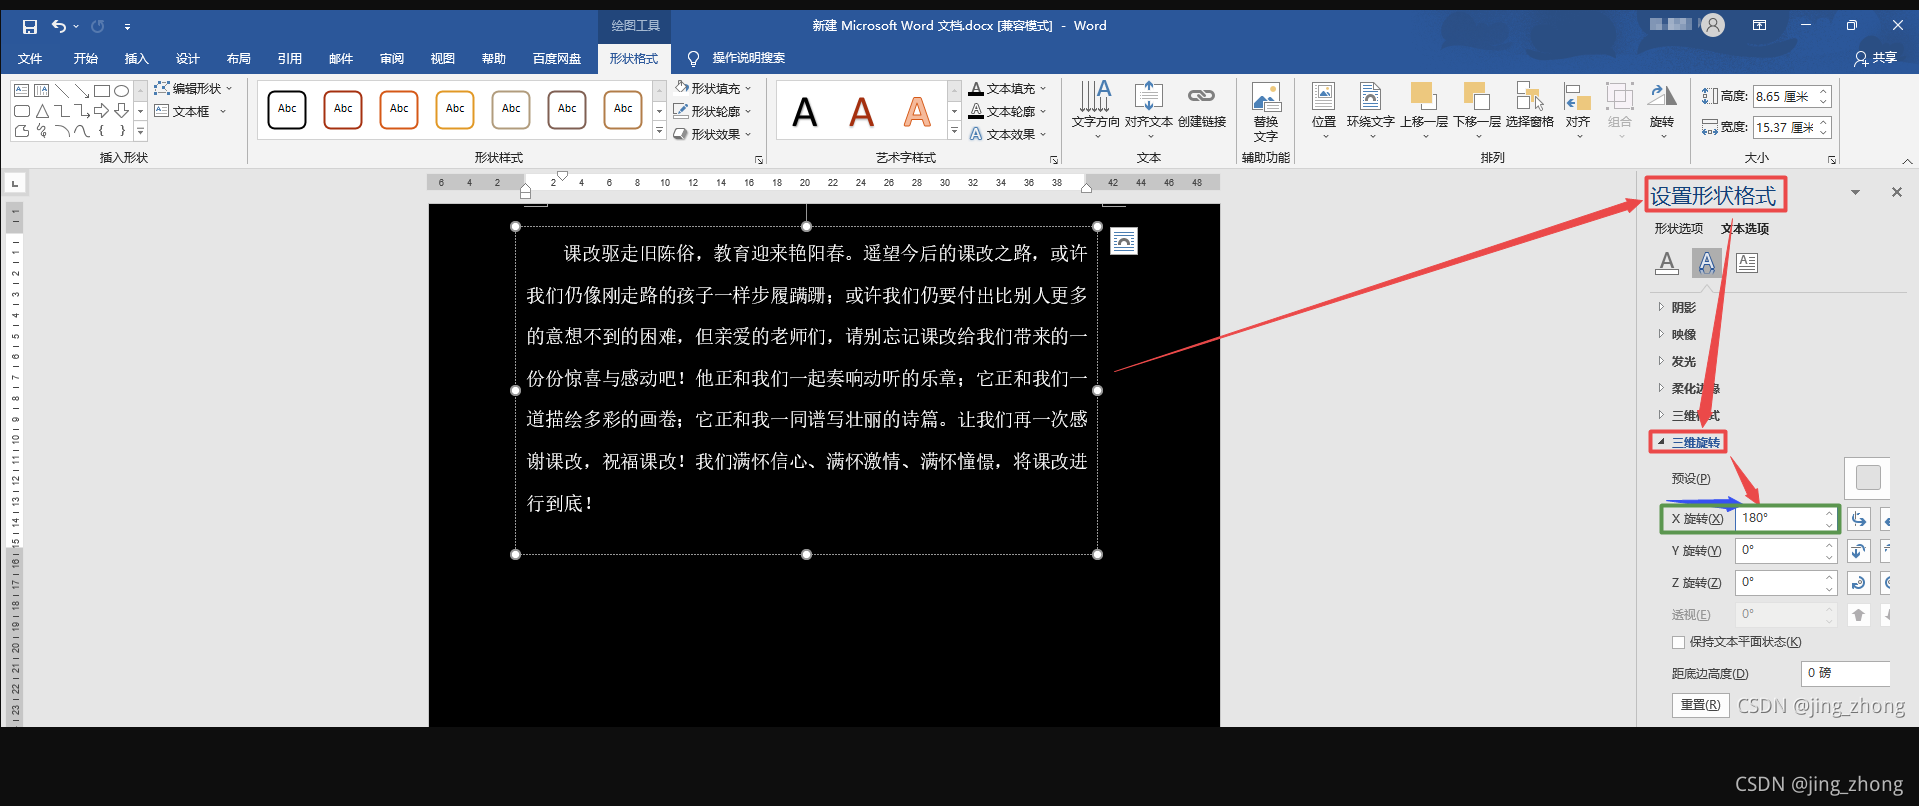
打开word,输入稿子内容,然后选择上方菜单栏下布局->文字方向,如上图所示,可以看到文字方向中的效果并没有我们想要的;因此考虑使用文本框的方式来实现:首先插入一个文本框,将稿子内容粘贴到文本框中,之后选中文本框后点击鼠标右键设置形状格式,找到三维旋转,设置X旋转180度即可,效果如下。

|

|
3.2 图片类方式(Matlab/OpenCV)
3.2.1 图片类代码实现
3.2.1.1 Matlab(图片类)

稿子.txt (ANSI格式)
       课改驱走旧陈俗,教育迎来艳阳春。遥望今后的课改之路,或许
我们仍像刚走路的孩子一样步履蹒跚;或许我们仍要付出比别人更多
的意想不到的困难,但亲爱的老师们,请别忘记课改给我们带来的一
份份惊喜与感动吧!他正和我们一起奏响动听的乐章;它正和我们一
道描绘多彩的画卷;它正和我一同谱写壮丽的诗篇。让我们再一次感
谢课改,祝福课改!我们满怀信心、满怀激情、满怀憧憬,将课改进
行到底!
首先新建一个记事本文件,将稿子内容粘贴其中,并控制每行文字的数量与word一致,然后记得一定要保存为ANSI格式。(注意:电脑可能默认保存为UTF-8格式,然后导致Matlab读取中文文本乱码,不信自己可以试试哦,然后最终另存为ANSI格式的记事本文件即可正常读取中文文本,亲测不乱码哦)。

|

|

|

|
完整的Matlab代码如下,直接运行即可实现稿子文本翻转效果。
%第一步,获取稿子.txt中文本的行数
fid = fopen('稿子.txt');  %打开文本文件
INDEX = 0;
while ~feof(fid)
   str = fgetl(fid);   % 读取一行, str是字符串
   INDEX = INDEX+1;
end
fontsize = 18;
rowdistance = 50;
%第二步,生成黑色背景图
m=zeros(100*INDEX,900);
x = 100;
y = 50;
figure;
imshow(m);
%第三步,读取稿子.txt中文本写到背景图上
fid = fopen('稿子.txt');  %打开文本文件
INDEX = 0;
while ~feof(fid)
   str = fgetl(fid);   % 读取一行, str是字符串
   disp(str);
   text(x,y,str,'horiz','left','color','w','FontSize',fontsize);
   INDEX = INDEX+1;
   y = y + rowdistance;
end
fclose(fid);
frame = getframe(gcf);%获取figure界面
im = frame2im(frame);% 转为图像
imshow(im);
imwrite(im,'Normalgaozi.jpg');% 保存
%第四步,对图像做水平垂直镜像即可
InputImage = imread('Normalgaozi.jpg');
J2=flipdim(InputImage,2);%原图像的垂直镜像
figure;
imshow(J2);
imwrite(J2,'Mirrorgaozi.jpg');% 保存
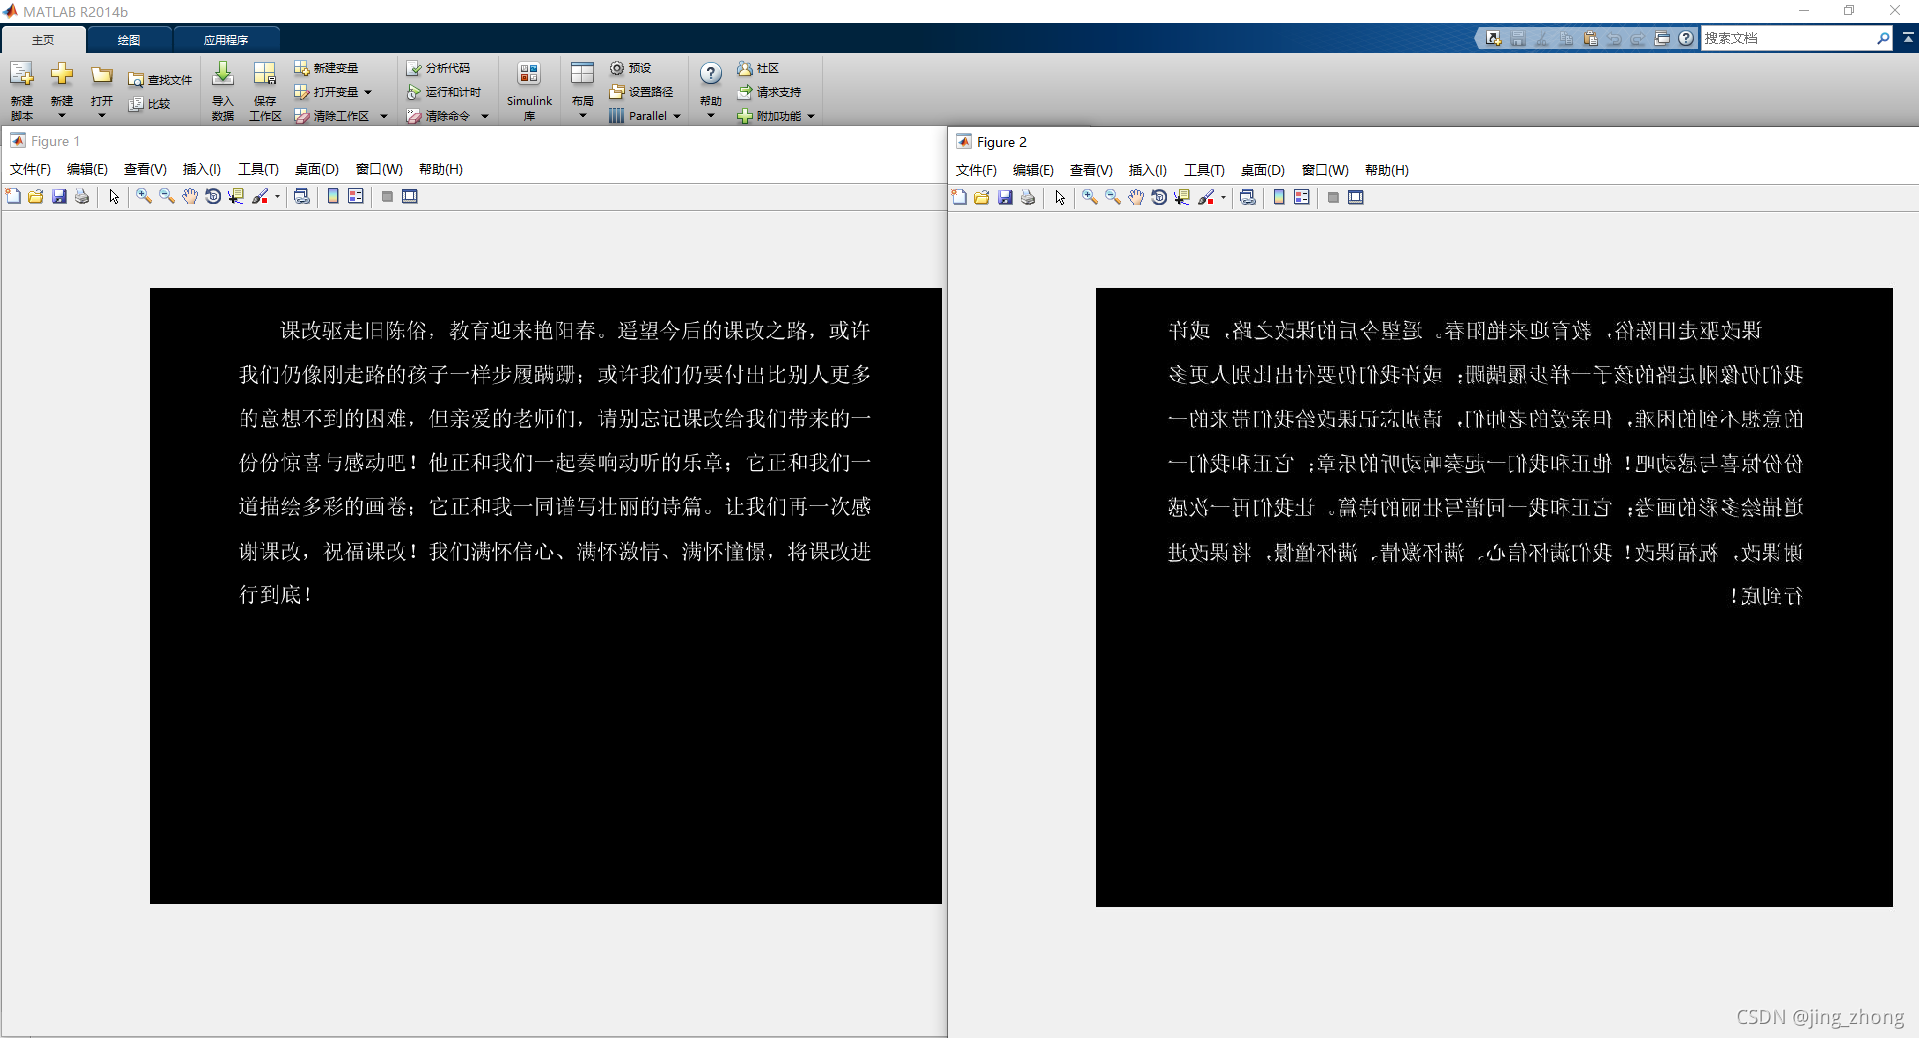
从Matlab运行结果可以看出,生成稿子文本图片并且水平垂直翻转成功。
3.2.1.2 OpenCV(图片类)

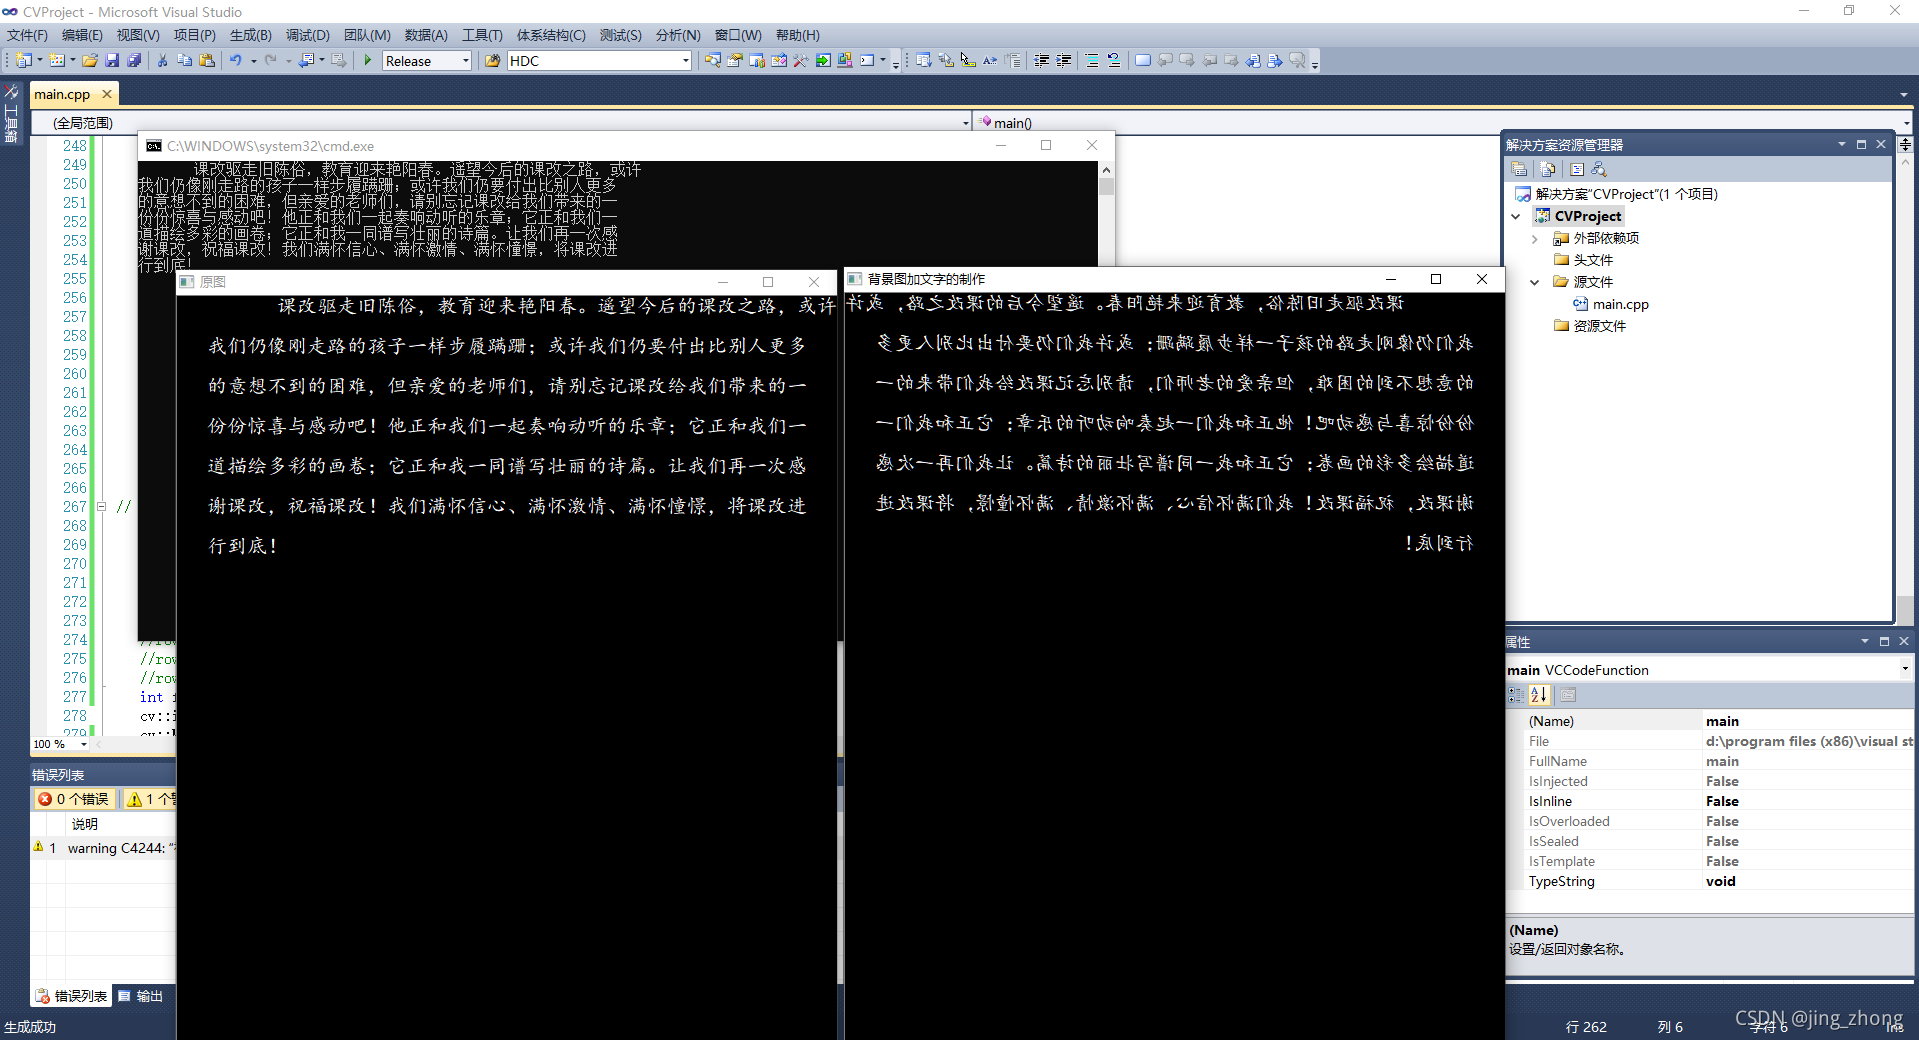
完整的OpenCV代码如下,直接运行解析稿子.txt中内容生成文本图片,之后上下反转,然后逆时针旋转180度即可实现文本翻转效果图片的生成。
#include <windows.h>
#include <iostream>
#include <fstream>
#include <string>
#include <opencv2/opencv.hpp>
#include <core/core.hpp>
#include <opencv2/imgproc/imgproc.hpp>
#include <opencv2/highgui/highgui.hpp>
using namespace cv;
using namespace std;

void GetStringSize(HDC hDC, const char* str, int* w, int* h)
{


    SIZE size;
    GetTextExtentPoint32A(hDC, str, strlen(str), &size);
    if (w != 0) *w = size.cx;
    if (h != 0) *h = size.cy;
}

void MyPutText(Mat &dst, std::string str, Point org, Scalar color, int fontSize, const char* fn, bool italic, bool underline)
{


    CV_Assert(dst.data != 0 && (dst.channels() == 1 || dst.channels() == 3));

    int x, y, r, b;
    if (org.x > dst.cols || org.y > dst.rows) return;
    x = org.x < 0 ? -org.x : 0;
    y = org.y < 0 ? -org.y : 0;

    LOGFONTA lf;
    lf.lfHeight = -fontSize;
    lf.lfWidth = 0;
    lf.lfEscapement = 0;
    lf.lfOrientation = 0;
    lf.lfWeight = 5;
    lf.lfItalic = italic;   //斜体
    lf.lfUnderline = underline; //下划线
    lf.lfStrikeOut = 0;
    lf.lfCharSet = DEFAULT_CHARSET;
    lf.lfOutPrecision = 0;
    lf.lfClipPrecision = 0;
    lf.lfQuality = PROOF_QUALITY;
    lf.lfPitchAndFamily = 0;
    strcpy_s(lf.lfFaceName, fn);

    HFONT hf = CreateFontIndirectA(&lf);
    HDC hDC = CreateCompatibleDC(0);
    HFONT hOldFont = (HFONT)SelectObject(hDC, hf);

    int strBaseW = 0, strBaseH = 0;
    int singleRow = 0;
    char buf[1 << 12];
	const char *Mystr = str.c_str();
    strcpy_s(buf, Mystr);
    char *bufT[1 << 12];  // 这个用于分隔字符串后剩余的字符,可能会超出。
    //处理多行
    {


        int nnh = 0;
        int cw, ch;

        const char* ln = strtok_s(buf, "\n",bufT);
        while (ln != 0)
        {


            GetStringSize(hDC, ln, &cw, &ch);
            strBaseW = max(strBaseW, cw);
            strBaseH = max(strBaseH, ch);

            ln = strtok_s(0, "\n",bufT);
            nnh++;
        }
        singleRow = strBaseH;
        strBaseH *= nnh;
    }

    if (org.x + strBaseW < 0 || org.y + strBaseH < 0)
    {


        SelectObject(hDC, hOldFont);
        DeleteObject(hf);
        DeleteObject(hDC);
        return;
    }

    r = org.x + strBaseW > dst.cols ? dst.cols - org.x - 1 : strBaseW - 1;
    b = org.y + strBaseH > dst.rows ? dst.rows - org.y - 1 : strBaseH - 1;
    org.x = org.x < 0 ? 0 : org.x;
    org.y = org.y < 0 ? 0 : org.y;

    BITMAPINFO bmp = {

     0 };
    BITMAPINFOHEADER& bih = bmp.bmiHeader;
    int strDrawLineStep = strBaseW * 3 % 4 == 0 ? strBaseW * 3 : (strBaseW * 3 + 4 - ((strBaseW * 3) % 4));

    bih.biSize = sizeof(BITMAPINFOHEADER);
    bih.biWidth = strBaseW;
    bih.biHeight = strBaseH;
    bih.biPlanes = 1;
    bih.biBitCount = 24;
    bih.biCompression = BI_RGB;
    bih.biSizeImage = strBaseH * strDrawLineStep;
    bih.biClrUsed = 0;
    bih.biClrImportant = 0;

    void* pDibData = 0;
    HBITMAP hBmp = CreateDIBSection(hDC, &bmp, DIB_RGB_COLORS, &pDibData, 0, 0);

    CV_Assert(pDibData != 0);
    HBITMAP hOldBmp = (HBITMAP)SelectObject(hDC, hBmp);

    //color.val[2], color.val[1], color.val[0]
    SetTextColor(hDC, RGB(255, 255, 255));
    SetBkColor(hDC, 0);
    //SetStretchBltMode(hDC, COLORONCOLOR);

	Mystr = str.c_str();
    strcpy_s(buf, Mystr);
    const char* ln = strtok_s(buf, "\n",bufT);
    int outTextY = 0;
    while (ln != 0)
    {


        TextOutA(hDC, 0, outTextY, ln, strlen(ln));
        outTextY += singleRow;
        ln = strtok_s(0, "\n",bufT);
    }
    uchar* dstData = (uchar*)dst.data;
    int dstStep = dst.step / sizeof(dstData[0]);
    unsigned char* pImg = (unsigned char*)dst.data + org.x * dst.channels() + org.y * dstStep;
    unsigned char* pStr = (unsigned char*)pDibData + x * 3;
    for (int tty = y; tty <= b; ++tty)
    {


        unsigned char* subImg = pImg + (tty - y) * dstStep;
        unsigned char* subStr = pStr + (strBaseH - tty - 1) * strDrawLineStep;
        for (int ttx = x; ttx <= r; ++ttx)
        {


            for (int n = 0; n < dst.channels(); ++n){


                double vtxt = subStr[n] / 255.0;
                int cvv = vtxt * color.val[n] + (1 - vtxt) * subImg[n];
                subImg[n] = cvv > 255 ? 255 : (cvv < 0 ? 0 : cvv);
            }

            subStr += 3;
            subImg += dst.channels();
        }
    }

    SelectObject(hDC, hOldBmp);
    SelectObject(hDC, hOldFont);
    DeleteObject(hf);
    DeleteObject(hBmp);
    DeleteDC(hDC);
}

void main()
{


	int rowdistance = 0;
	cv::Mat img2(800, 660, CV_8UC3, Scalar(0,0,0));//初始化图像
	ifstream in("E:\\稿子.txt");
    string filename;
    string line;
	int rowcount=0;
    if(in) // 有该文件
    {


        while (getline (in, line)) // line中不包括每行的换行符
        {


            cout << line << endl;
			MyPutText(img2, line, Point(30,rowdistance), CV_RGB(255,255,255), 20, "楷体", false, false);
			rowcount++;
			rowdistance +=40;
        }
    }
    else // 没有该文件
    {


        cout <<"no such file" << endl;
	}
	int flag = 0;//1表示顺时针旋转90度,0表示逆时针旋转90度
	cv::imshow("原图", img2);
	cv::imwrite("E:\\Origin Result.jpg",img2);
	cv::Mat temp1,temp2,img_right;
	cv::flip(img2, temp1,flag);//先上下垂直翻转
    cv::transpose(temp1, temp2); cv::flip(temp2, img_right,flag);//逆时针旋转90度
	cv::transpose(img_right, temp2); cv::flip(temp2, img_right,flag);//逆时针旋转90度
	cv::imshow("背景图加文字的制作", img_right);
	cv::imwrite("E:\\Merge Result.jpg",img_right);
	cv::waitKey(0);
	system("pause");
}
从OpenCV运行结果可以看出,生成稿子文本图片并且水平垂直翻转成功。
3.2.2 图片类结果C#打开滚动查看

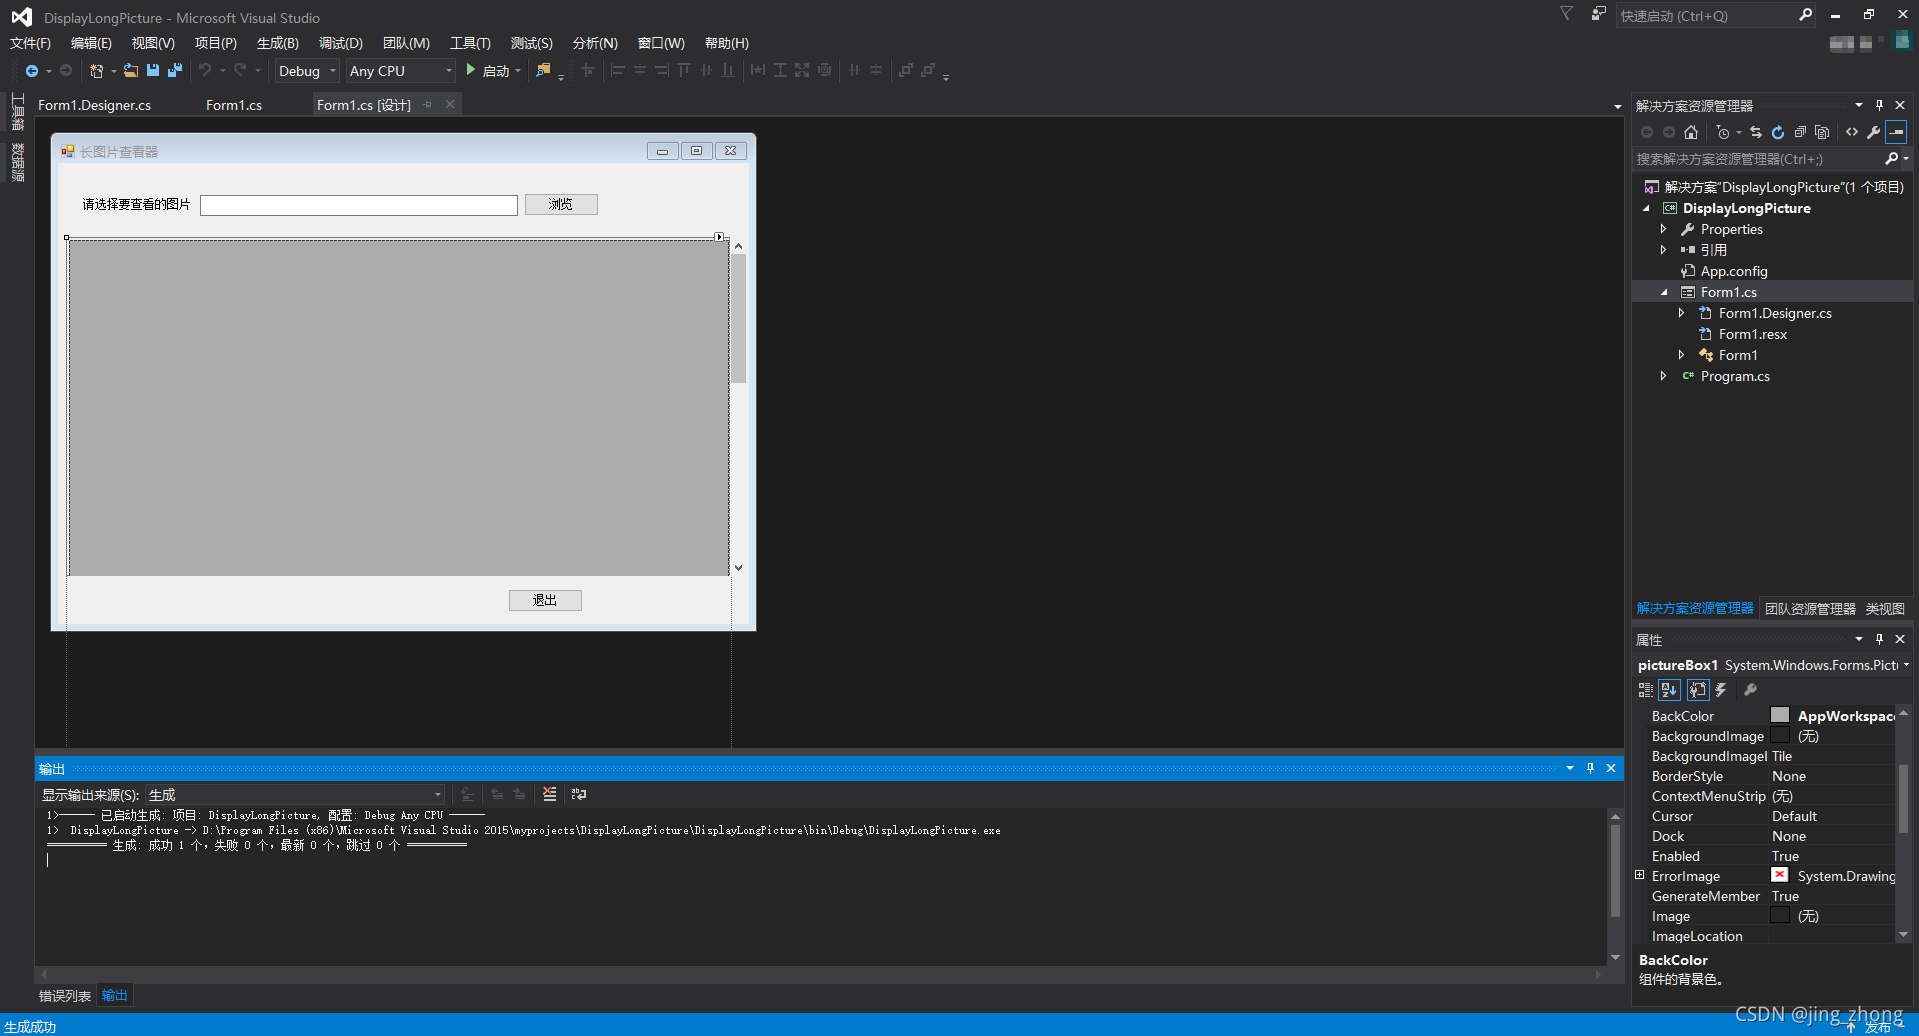
C#设置picturebox滚动条来实现查看大图片,打开Visual Studio 2015,新建C# Windows窗体应用项目,向Form1中添加一个Label控件、一个TextBox控件、两个Button控件、一个Panel控件和PictureBox控件。按照如下步骤设置控件属性:
(1)选中 picturebox 控件,将 picturebox 放在 panel 上;
(2)选中 panel 控件,在属性窗口中,将 panel 的 AutoScroll 属性设置为 ture;
(3)选中picturebox控件,将 picturebox 的 SizeMode 属性设置为 AutoSize;
(4)将 picturebox 的 Dock 属性设置为None(必须为None,设置为Fill不会出现滚动条)。
最终设置好的效果如下图所示。
3.2.2.1 C# 长图片滚动查看器代码
3.2.2.1.1 Form1.Designer.cs
namespace DisplayLongPicture
{


    partial class Form1
    {


        /// <summary>
        /// 必需的设计器变量。
        /// </summary>
        private System.ComponentModel.IContainer components = null;

        /// <summary>
        /// 清理所有正在使用的资源。
        /// </summary>
        /// <param name="disposing">如果应释放托管资源,为 true;否则为 false。</param>
        protected override void Dispose(bool disposing)
        {


            if (disposing && (components != null))
            {


                components.Dispose();
            }
            base.Dispose(disposing);
        }

        #region Windows 窗体设计器生成的代码

        /// <summary>
        /// 设计器支持所需的方法 - 不要修改
        /// 使用代码编辑器修改此方法的内容。
        /// </summary>
        private void InitializeComponent()
        {


            this.pictureBox1 = new System.Windows.Forms.PictureBox();
            this.panel1 = new System.Windows.Forms.Panel();
            this.button1 = new System.Windows.Forms.Button();
            this.button2 = new System.Windows.Forms.Button();
            this.textBox1 = new System.Windows.Forms.TextBox();
            this.label1 = new System.Windows.Forms.Label();
            ((System.ComponentModel.ISupportInitialize)(this.pictureBox1)).BeginInit();
            this.panel1.SuspendLayout();
            this.SuspendLayout();
            //
            // pictureBox1
            //
            this.pictureBox1.BackColor = System.Drawing.SystemColors.AppWorkspace;
            this.pictureBox1.Location = new System.Drawing.Point(3, 3);
            this.pictureBox1.Name = "pictureBox1";
            this.pictureBox1.Size = new System.Drawing.Size(660, 800);
            this.pictureBox1.SizeMode = System.Windows.Forms.PictureBoxSizeMode.AutoSize;
            this.pictureBox1.TabIndex = 0;
            this.pictureBox1.TabStop = false;
            //
            // panel1
            //
            this.panel1.AutoScroll = true;
            this.panel1.Controls.Add(this.pictureBox1);
            this.panel1.Location = new System.Drawing.Point(8, 74);
            this.panel1.Name = "panel1";
            this.panel1.Size = new System.Drawing.Size(681, 339);
            this.panel1.TabIndex = 1;
            //
            // button1
            //
            this.button1.Location = new System.Drawing.Point(450, 426);
            this.button1.Name = "button1";
            this.button1.Size = new System.Drawing.Size(75, 23);
            this.button1.TabIndex = 2;
            this.button1.Text = "退出";
            this.button1.UseVisualStyleBackColor = true;
            this.button1.Click += new System.EventHandler(this.button1_Click);
            //
            // button2
            //
            this.button2.Location = new System.Drawing.Point(466, 30);
            this.button2.Name = "button2";
            this.button2.Size = new System.Drawing.Size(75, 23);
            this.button2.TabIndex = 3;
            this.button2.Text = "浏览";
            this.button2.UseVisualStyleBackColor = true;
            this.button2.Click += new System.EventHandler(this.button2_Click);
            //
            // textBox1
            //
            this.textBox1.Location = new System.Drawing.Point(142, 32);
            this.textBox1.Name = "textBox1";
            this.textBox1.Size = new System.Drawing.Size(318, 21);
            this.textBox1.TabIndex = 4;
            //
            // label1
            //
            this.label1.AutoSize = true;
            this.label1.Location = new System.Drawing.Point(23, 35);
            this.label1.Name = "label1";
            this.label1.Size = new System.Drawing.Size(113, 12);
            this.label1.TabIndex = 5;
            this.label1.Text = "请选择要查看的图片";
            //
            // Form1
            //
            this.AutoScaleDimensions = new System.Drawing.SizeF(6F, 12F);
            this.AutoScaleMode = System.Windows.Forms.AutoScaleMode.Font;
            this.ClientSize = new System.Drawing.Size(691, 461);
            this.Controls.Add(this.label1);
            this.Controls.Add(this.textBox1);
            this.Controls.Add(this.button2);
            this.Controls.Add(this.button1);
            this.Controls.Add(this.panel1);
            this.Name = "Form1";
            this.Text = "长图片查看器";
            ((System.ComponentModel.ISupportInitialize)(this.pictureBox1)).EndInit();
            this.panel1.ResumeLayout(false);
            this.panel1.PerformLayout();
            this.ResumeLayout(false);
            this.PerformLayout();

        }

        #endregion

        private System.Windows.Forms.PictureBox pictureBox1;
        private System.Windows.Forms.Panel panel1;
        private System.Windows.Forms.Button button1;
        private System.Windows.Forms.Button button2;
        private System.Windows.Forms.TextBox textBox1;
        private System.Windows.Forms.Label label1;
    }
}
3.2.2.1.2 Form1.cs
using System;
using System.Collections.Generic;
using System.ComponentModel;
using System.Data;
using System.Drawing;
using System.Linq;
using System.Text;
using System.Threading.Tasks;
using System.Windows.Forms;

namespace DisplayLongPicture
{


    public partial class Form1 : Form
    {


        public Form1()
        {


            InitializeComponent();
            this.StartPosition = FormStartPosition.CenterScreen;
        }

        private void button2_Click(object sender, EventArgs e)
        {


            OpenFileDialog dialog = new OpenFileDialog();
            dialog.InitialDirectory = Application.StartupPath;
            dialog.RestoreDirectory = true;
            dialog.Multiselect = false;//该值确定是否可以选择多个文件
            dialog.Title = "请选择图片文件夹";
            dialog.Filter = "JPG文件|*.jpg|PNG文件|*.png|所有文件|*.*";
            if (dialog.ShowDialog() == System.Windows.Forms.DialogResult.OK)
            {


                string file = dialog.FileName;
                this.textBox1.Text = file;
                pictureBox1.ImageLocation = file;
            }
        }

        private void button1_Click(object sender, EventArgs e)
        {


            this.Close();
            Application.Exit();
        }
    }
}
3.2.2.1.3 Program.cs
using System;
using System.Collections.Generic;
using System.Linq;
using System.Threading.Tasks;
using System.Windows.Forms;

namespace DisplayLongPicture
{


    static class Program
    {


        /// <summary>
        /// 应用程序的主入口点。
        /// </summary>
        [STAThread]
        static void Main()
        {


            Application.EnableVisualStyles();
            Application.SetCompatibleTextRenderingDefault(false);
            Application.Run(new Form1());
        }
    }
}
3.2.2.2 C#运行界面查看文本反转图片结果(Matlab和OpenCV)
运行C#查看长图片查看器Windows窗体应用程序,分别打开Matlab结果图片和OpenCV结果图片进行浏览文本翻转效果,感觉很有趣,兴趣是最好的老师,希望学以致用,哈哈哈!