前言
目录
一、首页路由处理
修改首页路由的配置:这里需要添加 exact属性
如果是默认路由需要跳转到 /home
在src/App.js中添加如下代码:
{

    /* 配置默认路由 */}
<Route path="/" exact render={

    () => <Redirect to="/home"></Redirect>}></Route>
在src/pages/home/index.js中添加如下代码:
<Route exact path="/home" component={

    Index} />
二、轮播图
2.1 轮播图效果图

2.2 拷贝轮播图组件代码
1、打开antd-mobile组件库的Carousel组件文档
2、选择基本,点击 (</>) 显示源码
3、拷贝核心代码到Index的组件中
4、分析并且调整代码,让其能够在项目中运行
2.3 轮播图代码详解
导入组件:
import {

     Carousel, WingBlank } from 'antd-mobile';
状态:
state = {


    // 图片的名称
    data: ['1', '2', '3'],
    // 图片的高度
    imgHeight: 176,
}
声明周期钩子函数,修改状态,设置数据:
componentDidMount() {


    // simulate img loading
    setTimeout(() => {


        this.setState({


            data: ['AiyWuByWklrrUDlFignR', 'TekJlZRVCjLFexlOCuWn', 'IJOtIlfsYdTyaDTRVrLI'],
        });
    }, 100);
}
结构:
<div className="index">
    <Carousel
        {

    /* 自动播放 */}
        autoplay={

    false}
        {

    /* 无限循环 */}
        infinite
        {

    /* 轮播图切换前的回调函数 */}
        beforeChange={

    (from, to) => console.log(`slide from ${

      from} to ${

      to}`)}
        {

    /* 轮播图切换后的回调函数 */}
        afterChange={

    index => console.log('slide to', index)}
        {

    /* 自动切换的时间 */}
        autoplayInterval='2000'
    >
        {

    /* 遍历状态里面的数据,创建对应的a标签和img图片标签 */}
        {

    this.state.data.map(val => (
            <a
                key={

    val}
                href="http://www.alipay.com"
                style={

    {

     display: 'inline-block', width: '100%', height: this.state.imgHeight }}
            >
                <img
                    src={

    `https://zos.alipayobjects.com/rmsportal/${

      val}.png`}
                    alt=""
                    style={

    {

     width: '100%', verticalAlign: 'top' }}
                    {

    /* 图片加载完成的时候调用 */}
                    onLoad={

    () => {


                        window.dispatchEvent(new Event('resize'));
                        this.setState({

     imgHeight: 'auto' });
                    }}
                />
            </a>
        ))}
    </Carousel>
</div>
2.4 轮播图代码重构
先优化相应的结构,删除不必要的代码
然后通过axios获取轮播图数据,安装 axios: yarn add axios
在src/pages/index/Index.js中添加如下代码:
导入axios,新建一个方法 getSwipers 用来获取轮播图数据:
import axios from 'axios'

state = {


    // 轮播图状态
    swipers: [],
}

async getSwipers() {


    // 请求数据
    let {

    data: res} = await axios.get('http://localhost:8080/home/swiper')
    // 判断返回的状态是否是成功
    if(res.status!= 200){


        console.error(res.description)
        return
    }
    // 把获取到的值设置给state
    this.setState({


        swipers: res.body
    })
}
在componentDidMount钩子函数中调用这个方法:
componentDidMount() {


    // 调用请求轮播图的方法
   this.getSwipers()
}
使用获取到的数据渲染轮播图:
// 渲染轮播图的逻辑代码
renderSwipers(){


    return this.state.swipers.map(item => (
        <a
            key={

    item.id}
            href="http://www.itcast.cn"
            style={

    {

     display: 'inline-block', width: '100%', height: 212 }}
        >
            <img
                src={

    `http://localhost:8080${

      item.imgSrc}`}
                alt=""
                style={

    {

     width: '100%', verticalAlign: 'top' }}
            />
        </a>
    ))
}
render() {


    return (
        <div className="index">
            <Carousel
                autoplay={

    true}
                infinite
                autoplayInterval='2000'
            >
                {

    /* 调用渲染轮播图的方法 */}
                {

    this.renderSwipers()}
            </Carousel>
        </div>
    )
}
2.5 解决轮播图出现的BUG
我们测试发现,当页面跳转到首页时,轮播图不能自动播放以及高度不正确
这是因为轮播图的数据是动态加载的,切换页面时数据还没加载完,页面就渲染了,就会出现这个问题
解决办法:
在src/pages/index/index.js中修改如下代码:
在state中添加轮播图数据是否加载完成的状态:
state = {


    // 轮播图状态
    swipers: [],
    isSwiperLoaded: false
}
在轮播图数据加载完成时候,修改这个状态为true:
async getSwipers() {


    ...
    // 把获取到的值设置给state
    this.setState({


        swipers: res.body,
        isSwiperLoaded: true
    })
}
只有在轮播图数据加载完成的情况下,才渲染轮播图组件:
同时给轮播图的外层包裹一个div,给这个div设置高度:
<div className="swiper">
    {

    /* 轮播图 */}
    {

    this.state.isSwiperLoaded ? (<Carousel
        autoplay={

    true}
        infinite
        autoplayInterval='2000'
    >
        {

    /* 调用渲染轮播图的方法 */}
        {

    this.renderSwipers()}
    </Carousel>) : ('')}
</div>
三、导航菜单
3.1 导航菜单效果图:
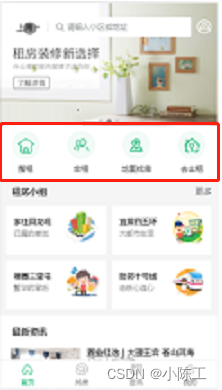
3.2 导航菜单实现
导航菜单的原理是使用antd-moblie的Flex组件进行布局
在src/pages/index/index.js中添加如下代码:
导入导航菜单图片:
import nav1 from '../../assets/images/nav-1.png'
import nav2 from '../../assets/images/nav-2.png'
import nav3 from '../../assets/images/nav-3.png'
import nav4 from '../../assets/images/nav-4.png'
编写页面布局:
<Flex className="nav">
    <Flex.Item>
        <img src={

    nav1} alt=""/>
        <h2>整租</h2>
    </Flex.Item>
    <Flex.Item>
        <img src={

    nav2} alt=""/>
        <h2>合租</h2>
    </Flex.Item>
    <Flex.Item>
        <img src={

    nav3} alt=""/>
        <h2>地图找房</h2>
    </Flex.Item>
    <Flex.Item>
        <img src={

    nav4} alt=""/>
        <h2>去出租</h2>
    </Flex.Item>
</Flex>
添加导航菜单样式(index.css):
.nav {


    padding: 10px 0;
}

.nav img {


    width: 48px;
}

.nav h2 {


    font-size: 13px;
    font-weight: 400;
}
/* 通过调试工具我们看到,后续被生成的这个父元素的类名叫am-flexbox-item */
.am-flexbox-item {


    text-align: center;
}

h2 {


    margin: 0;
    margin-top: 7px;
}
封装导航菜单数据:
// 导航菜单的数据
const navs = [{


    id: 0,
    img: nav1,
    title: '整租',
    path: '/home/list'
}, {


    id: 1,
    img: nav2,
    title: '合租',
    path: '/home/list'
}, {


    id: 2,
    img: nav3,
    title: '地图找房',
    path: '/home/map'
}, {


    id: 3,
    img: nav4,
    title: '去出租',
    path: '/home/list'
}]
创建对应的方法renderNavs,在方法中遍历navs:
// 渲染导航菜单的逻辑代码
renderNavs() {


    return navs.map(item => {


        return (
            <Flex.Item key={

    item.id} onClick={

    ()=>{

    this.props.history.push(item.path)}}>
                <img src={

    item.img} alt="" />
                <h2>{

    item.title}</h2>
            </Flex.Item>
        )
    })
}
最后在render方法中调用这个函数:
{

    /* 导航栏 */}
<Flex className="nav">
    {

    this.renderNavs()}
</Flex>
四、解决导航菜单跟TabBar不同步的问题
问题:当我们通过首页菜单导航跳转到相应页面的时候,底部的TabBar没有进行高亮显示
原因: 我们实现该功能的时候,只考虑了点击以及第一次加载Home组件的情况下,我们没有考虑不重新加载Home组件时路由的切换
解决:在路由发生切换的时候,再来处理TabBar的高亮显示
步骤:
1、添加componentDidUpDate 钩子函数
2、在钩子函数中判断路由地址是否切换
3、在路由地址切换的时候,让TabBar对应高亮
代码:
在src/pages/home/index.js中添加如下代码:
// 当Home组件的内容发生更新的时候调用
componentDidUpdate(prevProps) {


    // 在这里就能判断路由是否进行了切换,路由的信息保存在props属性里面
    // 如果当前的路由信息不等于上一次的,那么就代表发生了路由切换
    if(prevProps.location.pathname !== this.props.location.pathname){


        this.setState({


            selectedTab: this.props.location.pathname
        })
    }
}
五、使用Sass
安装Sass: yarn add node-sass
创建后缀名为.scss 或者.sass的样式文件
在组件中导入Sass样式
六、房源分组
6.1 房源分组效果图
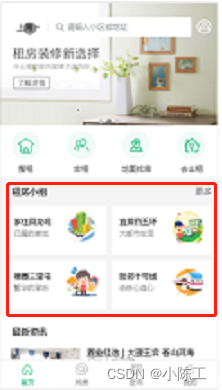
6.2 房源分组业务逻辑
需求:根据当前地理位置展示不同小组信息
实现逻辑:我们先获取到用户当前定位的信息,把信息发送给后台,后台根据定位信息获取对应的内容,前端只需要展示数据
6.3 房源分组实现
注意:这里只显示默认数据
在src/pages/index/index.js中添加如下代码:
在state中添加房源分组数据:
state = {


    // 租房小组状态
    groups: []
}
新建一个方法getGroups用来获取数据:
async getGroups() {


    let {

     data: res } = await axios.get('http://localhost:8080/home/groups', {


        params: {


            'area': 'AREA%7C88cff55c-aaa4-e2e0'
        }
    })
    // 判断返回的状态是否是成功
    if (res.status != 200) {


        console.error(res.description)
        return
    }
    // 把获取到的值设置给state
    this.setState({


        groups: res.body
    })
}
在componentDidMount钩子函数中调用该方法:
componentDidMount() {


    this.getGroups()
}
使用Grid宫格组件实现房源分组的结构和样式:
拷贝核心代码到Index组件中:
//自定布局单独抽取成方法
renderGroups(item) {


    return (
        <Flex className="group-item" justify="around">
            <div className="desc">
                <p className="title">{

    item.title}</p>
                <span className="info">{

    item.desc}</span>
            </div>
            <img src={

    `http://localhost:8080${

      item.imgSrc}`} alt="" />
        </Flex>
    )
}

{

    /* 房源分组 */}
<div className="group">
    <h3 className="group-title">
        租房小组 <span className="more">更多</span>
    </h3>
    <Grid data={

    this.state.groups}
        {

    /* 列数 */}
        columnNum={

    2}
        {

    /* 是否强制正方形 */}
        square={

    false}
        {

    /* 是否有边框 */}
        hasLine={

    false}
        {

    /* 自定义里面的布局 */}
        renderItem={

    item => this.renderGroups(item)} />
</div>
相应的样式属性(index.scss):
.group {


    background-color: #f6f5f6;
    overflow: hidden;
    padding: 0 10px;
    .group-title {


        position: relative;
        margin: 15px 0px 15px 10px;
        font-size: 15px;
        .more {


            color: #787d82;
            position: absolute;
            right: 0;
            font-size: 14px;
            font-weight: normal;
        }
    }
    // 覆盖默认背景色
    .am-grid .am-flexbox {


        background-color: inherit;
        .am-flexbox-item .am-grid-item-content {


            padding: 0;
            padding-bottom: 10px;
        }
    }
    .group-item {


        height: 75px;
        .desc {


            .title {


                font-weight: bold;
                font-size: 13px;
                margin-bottom: 5px;
            }
            .info {


                font-size: 12px;
                color: #999;
            }
        }
        img {


            width: 55px;
        }
    }
    .am-flexbox-align-stretch {


        margin-bottom: 10px;
        .am-grid-item {


            background-color: #fff;
            &:first-child {


                margin-right: 10px;
            }
        }
    }
}
七、最新资讯
7.1 最新资讯效果图

7.2 数据获取&页面渲染
在src/pages/index/index.js中添加如下代码:
    state = {


        // 最新资讯
        news: []
    }


async getNews() {


    let {

     data: res } = await axios.get('http://localhost:8080/home/news?area=AREA%7C88cff55c-aaa4-e2e0')
    // 判断返回的状态是否是成功
    if (res.status != 200) {


        console.error(res.description)
        return
    }
    // 把获取到的值设置给state
    this.setState({


        news: res.body
    })
}

  componentDidMount() {


    this.getNews()
  }

renderNews() {


  return this.state.news.map(item => {


     return (
         <div className="news-item" key={

    item.id}>
             <div className="imgwrap">
                 <img
                     className="img"
                     src={

    `http://localhost:8080${

      item.imgSrc}`}
                     alt=""
                 />
             </div>
             <Flex className="content" direction="column" justify="between">
                 <h3 className="title">{

    item.title}</h3>
                 <Flex className="info" justify="between">
                     <span>{

    item.from}</span>
                     <span>{

    item.date}</span>
                 </Flex>
             </Flex>
         </div>
     )
})
7.3 解决内容被TabBar压住的问题
我们在Home.js中找到包裹路由和底部导航栏的div盒子,给其添加 padding-bottom 属性即可