使用TensorFlow实现LSTM
数据集:mnist
# -*- coding: utf-8 -*-
__author__ = 'liudong'
__date__ = '2018/5/2 下午4:48'
import tensorflow as tf
import numpy as np
import matplotlib.pyplot as plt
from tensorflow.examples.tutorials.mnist import input_data
from PIL import Image
config = tf.ConfigProto()
sess = tf.Session(config=config)
mnist = input_data.read_data_sets ('/path/to/MNIST_data', one_hot=True)
print(mnist.train.images.shape)
# 设置用到的参数
lr = 1e-3
# 在训练和测试的时候 想使用不同的batch_size 所以采用占位符的方式
batch_size = tf.placeholder(tf.int32, [])
# 输入数据是28维 一行 有28个像素
input_size = 28
# 时序持续时长为28 每做一次预测,需要先输入28行
timestep_size = 28
# 每个隐含层的节点数
hidden_size = 64
# LSTM的层数
layer_num = 2
# 最后输出的分类类别数量,如果是回归预测的呼声应该是1
class_num = 10
_X = tf.placeholder(tf.float32, [None, 784])
y = tf.placeholder(tf.float32, [None, class_num])
keep_prob = tf.placeholder(tf.float32)
# 定义一个LSTM结构, 把784个点的字符信息还原成28*28的图片
X = tf.reshape(_X, [-1, 28, 28])
def unit_lstm():
# 定义一层LSTM_CELL hiddensize 会自动匹配输入的X的维度
lstm_cell = tf.nn.rnn_cell.BasicLSTMCell(num_units=hidden_size, forget_bias=1.0, state_is_tuple=True)
# 添加dropout layer, 一般只设置output_keep_prob
lstm_cell = tf.nn.rnn_cell.DropoutWrapper(cell=lstm_cell, input_keep_prob=1.0, output_keep_prob=keep_prob)
return lstm_cell
# 调用MultiRNNCell来实现多层 LSTM
mlstm_cell = tf.nn.rnn_cell.MultiRNNCell([unit_lstm() for i in range(3)], state_is_tuple=True)
# 使用全零来初始化state
init_state = mlstm_cell.zero_state(batch_size, dtype=tf.float32)
outputs, state = tf.nn.dynamic_rnn(mlstm_cell, inputs=X, initial_state=init_state,
time_major=False)
h_state = outputs[:, -1, :]
# 设置loss function 和优化器
W = tf.Variable(tf.truncated_normal([hidden_size, class_num], stddev=0.1), dtype=tf.float32)
bias = tf.Variable(tf.constant(0.1, shape=[class_num]), dtype=tf.float32)
y_pre = tf.nn.softmax(tf.matmul(h_state, W) + bias)
# 损失和评估函数
cross_entropy = -tf.reduce_mean(y * tf.log(y_pre))
train_op = tf.train.AdamOptimizer(lr).minimize(cross_entropy)
correct_prediction = tf.equal(tf.argmax(y_pre, 1), tf.argmax(y, 1))
accuracy = tf.reduce_mean(tf.cast(correct_prediction, "float"))
# 开始训练
sess = tf.Session()
sess.run(tf.global_variables_initializer())
for i in range(1000):
_batch_size = 128
batch = mnist.train.next_batch(_batch_size)
if (i+1)%200 == 0:
train_accuracy = sess.run(accuracy, feed_dict={
_X: batch[0], y: batch[1], keep_prob: 1.0, batch_size: _batch_size
})
print("step %d, training accuracy %g" % ((i+1), train_accuracy ))
sess.run(train_op, feed_dict={_X: batch[0], y: batch[1], keep_prob: 0.5,
batch_size: _batch_size})
images = mnist.test.images
labels = mnist.test.labels
print("test accuracy %g" % sess.run(accuracy,feed_dict={_X: images, y: labels, keep_prob: 1.0,
batch_size: mnist.test.images.shape[0]}))
current_y = mnist.train.labels[5]
current_x = mnist.train.images[5]
print(current_y)
plt.show(current_x)
# 将原始数据进行转换,变为模型能够识别
current_x.shape = [-1, 784]
current_y.shape = [-1, class_num]
current_outputs = np.array(sess.run(outputs, feed_dict={
_X: current_x, y: current_y, keep_prob: 1.0,batch_size: 1}))
current_outputs.shape = [28, hidden_size]
# 计算模型里边的变量
h_W = sess.run(W, feed_dict={_X: current_x,y: current_y, keep_prob: 1.0,batch_size: 1})
h_bias = sess.run(bias, feed_dict={_X: current_x,y: current_y, keep_prob: 1.0,batch_size: 1})
h_bias.shape = [-1, 10]
# 识别过程
bar_index = range(class_num)
for i in range(current_outputs.shape[0]):
plt.subplot(7, 4, i+1)
current_h_shate = current_outputs[i, :].reshape([-1, hidden_size])
current_formula = tf.nn.softmax(tf.matmul(current_h_shate, h_W) + h_bias)
pro = sess.run(current_formula)
plt.bar(bar_index, pro[0], width=0.2)
plt.axis('off')
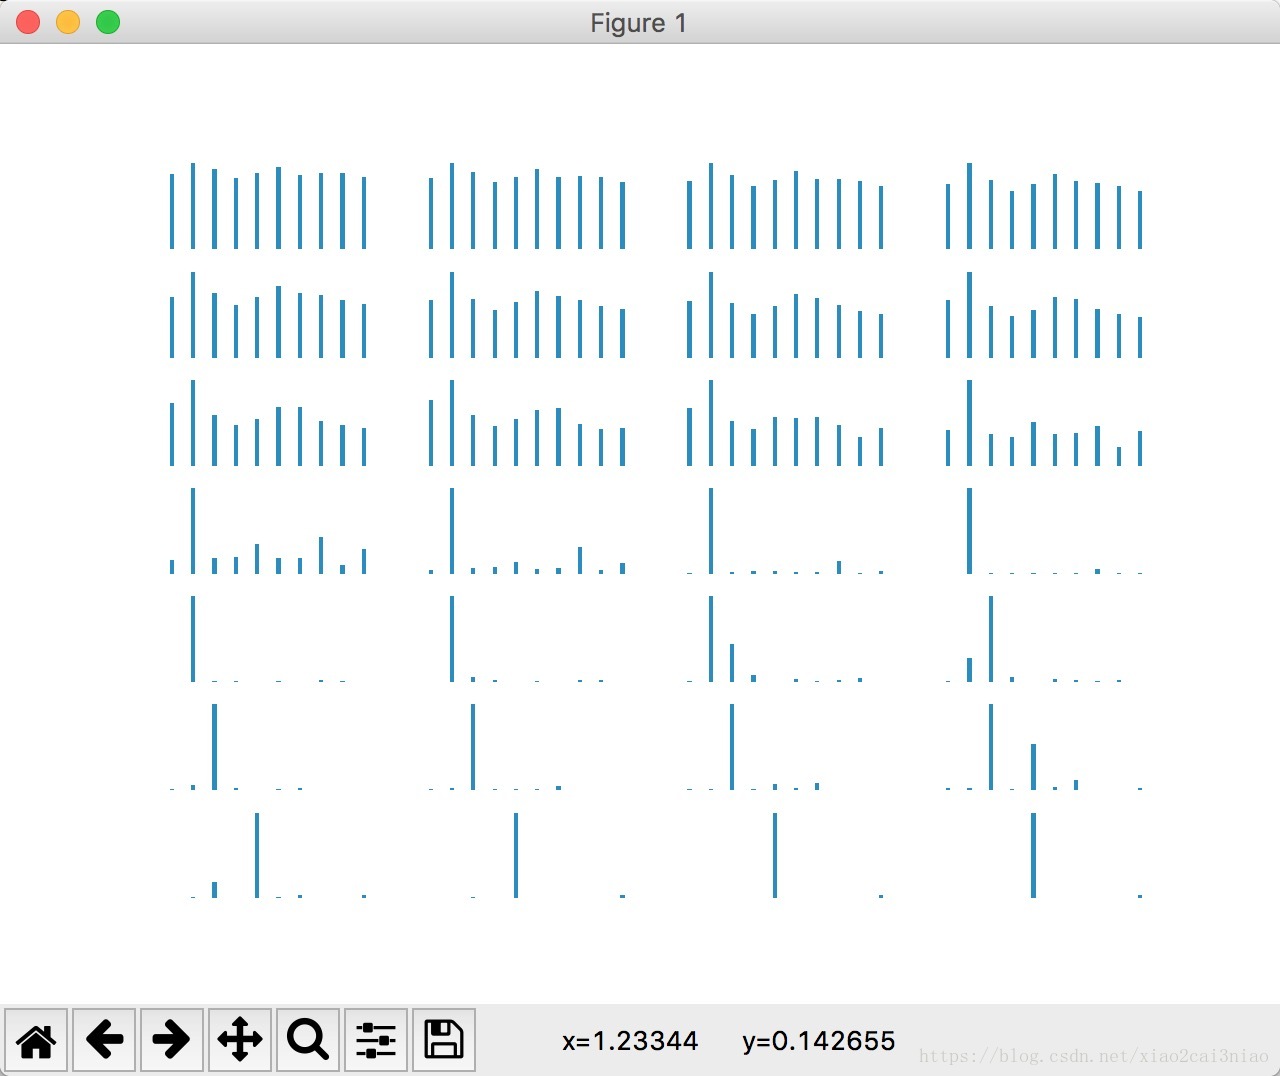
plt.show()输出的结果:
Extracting /path/to/MNIST_data/train-images-idx3-ubyte.gz
Extracting /path/to/MNIST_data/train-labels-idx1-ubyte.gz
Extracting /path/to/MNIST_data/t10k-images-idx3-ubyte.gz
Extracting /path/to/MNIST_data/t10k-labels-idx1-ubyte.gz
(55000, 784)
step 200, training accuracy 0.859375
step 400, training accuracy 0.890625
step 600, training accuracy 0.890625
step 800, training accuracy 0.9375
step 1000, training accuracy 0.96875
test accuracy 0.9611
图的含义:
一行四张图,一共七行,表示一行一行读取中,模型对字符的识别。
当读取的函数变多的时候,也就是像素越来越多的情况下,可以准确的识别我们要找的数字就是4.