目录
几何体顶点位置数据
本篇文章主要讲解几何体的顶点概念,相对偏底层一些,不过掌握之后会更加深入理解three.js的几何体和模型对象,在了解顶点数据之前我们要明白,three.js的长方体BoxGeometry、球体SphereGeometry等几何体都是基于BufferGeometry类构建的,BufferGeometry是一个没有任何形状的空几何体,我们可以通过BufferGeometry自定义任何几何形状,具体一点说就是定义顶点数据。
点线定义几何体顶点数据
通过JS类型化数组Float32Array创建一组xyz坐标数据用来表示几何体的顶点坐标。
// 创建一个空的几何体顶对象
const geometry = new THREE.BufferGeometry()
// 添加顶点数据
const vertices = new Float32Array([ // 数组里面编写顶点坐标数据
  0,0,0,   // 顶点1坐标
  50,0,0,  // 顶点2坐标
  0,100,0, // 顶点3坐标
  0,0,10,  // 顶点4坐标
  0,0,100, // 顶点5坐标
  50,0,10  // 顶点6坐标
])
通过three.js的属性缓冲区对象 BufferAttribute 表示threejs几何体顶点数据。
// BufferAttribute属性缓冲对象表示顶点数据
const attribute = new THREE.BufferAttribute(vertices,3) // 3个为一组
设置几何体顶点位置属性的值:
// 设置几何体attribute属性的位置属性
geometry.attributes.position = attribute设置点材质定义点模型:将点模型添加到场景当中:
// 设置点材质
const material = new THREE.PointsMaterial({
  color:0xffff00,
  size:0.2 ,
})
// 定义点模型
const points = new THREE.Points(geometry,material)
scene.add(points)
设置线材质定义线模型:将线模型添加到场景中(当然还有以下几种线条方式,可自行尝试):
// 设置线材质
const material = new THREE.LineBasicMaterial({
  color:0xffff00, // 黄色线条
})
const line = new THREE.Line(geometry,material) // 开放线条
// const line = new THREE.LineLoop(geometry,material) // 闭合线条
// const line = new THREE.LineSegments(geometry,material) // 非连续线条
scene.add(line)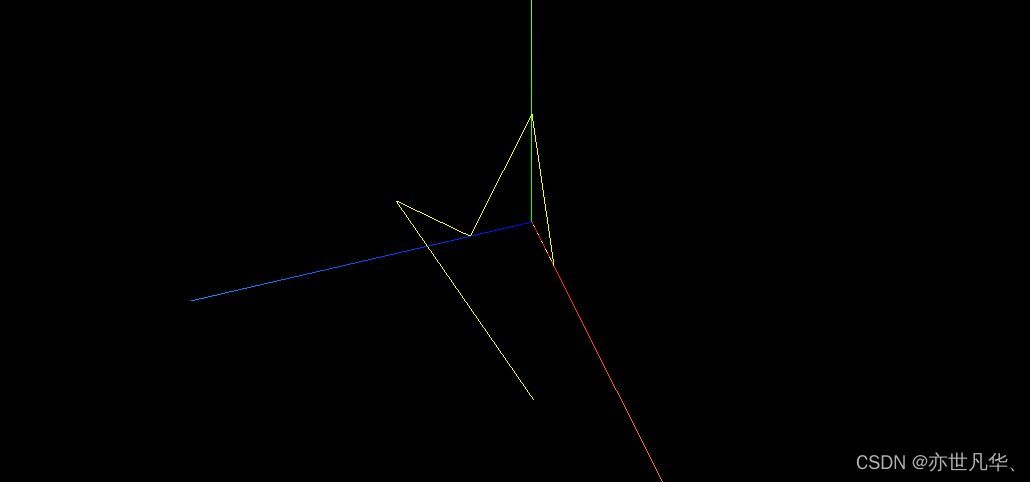
网格模型定义几何体顶点数据
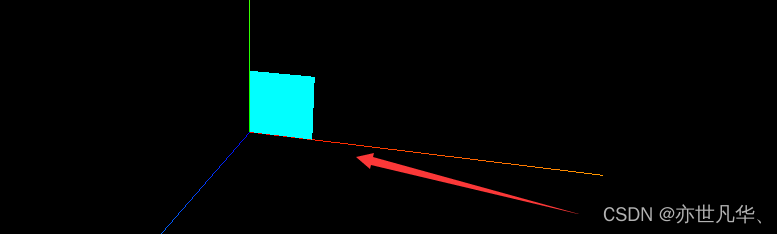
网格模型 Mesh 渲染自定义几何体 BufferGeometry 的顶点坐标,通过这个模型大家会理解三角形面的概念。网格模型Mesh其实就是一个一个三角形(面)拼接而成,使用网格模型渲染几何体,就是几何体的所有顶点坐标三个为一组,构成一个三角形,多组顶点构成多个三角形,就可以用来模拟表示物体的表面。
// 网格模型渲染几何体
const material = new THREE.MeshBasicMaterial({
  color:0x00ffff,
  // side:THREE.FrontSide, // 正面可见,反面不可见
  // side:THREE.BackSide, // 反面可见,正面不可见
  side:THREE.DoubleSide // 双面可看
})
const mesh = new THREE.Mesh(geometry,material)
scene.add(mesh)
比如我想弄一个矩形的平面。只要修改一下 顶点数据 即可:
几何顶点索引数据:网格模型Mesh对应的几何体BufferGeoMetry拆分多个三角之后,有可能很多三角形重合的顶点位置坐标是相同的,如果我们想减少顶点坐标数据量,可以借助几何体顶点索引 geometry.index 进行实现:
// 创建一个空的几何体顶对象
const geometry = new THREE.BufferGeometry()
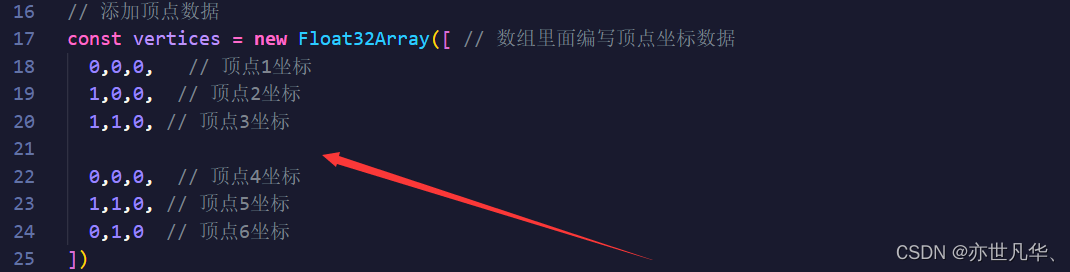
// 添加顶点数据
const vertices = new Float32Array([ // 数组里面编写顶点坐标数据
0,0,0, // 顶点1坐标
1,0,0, // 顶点2坐标
1,1,0, // 顶点3坐标
0,1,0, // 顶点4坐标
])
// BufferAttribute属性缓冲对象表示顶点数据
const attribute = new THREE.BufferAttribute(vertices,3) // 3个为一组
// 设置几何体attribute属性的位置属性
geometry.attributes.position = attribute
// 类型化数组创建顶点数据
const indexs = new Uint16Array([
0,1,2,0,2,3
])
// 几何体顶点索引的定义
geometry.index = new THREE.BufferAttribute(indexs,1)顶点法线数据
数学上法线的概念:比如一个平面,法线就是该平面的垂线,如果是光滑曲面,某一点的法线就是该点切面的法线。three.js中法线和数学中的法线概念类似,只是定义的时候更加灵活,会根据需要进行调整:
// 每个顶点的法线数据和顶点位置数据一一对应
const normals = new Float32Array([
  0,0,1, // 顶点1法线
  0,0,1,
  0,0,1,
  0,0,1,
])
// 设置几何体的顶点法线数学
geometry.attributes.normal = new THREE.BufferAttribute(normals,3)
实现阵列立方体与相机适配
通过for循环创建一列模型,接下来我通过双重for循环阵列立方体,代码如下:
// 添加物体,创建几何体
const cubeGeometry = new THREE.BoxGeometry(1,1,1) // 设置几何体大小
const cubeMaterial = new THREE.MeshLambertMaterial({color:0xff0000}) // 设置几何体材质
// 阵列多个立方体网格模型
for(let i = 0;i < 10;i++){
  for(let j = 0;j < 10;j++){
    // 根据几何体和材质创建物体
    const cube = new THREE.Mesh(cubeGeometry,cubeMaterial)
    cube.position.set(i*2,0,j*2) // 沿着xz轴阵列
    scene.add(cube)
    cube.position.y=2
  }
}
接下来我通过将相机的位置拉远,可以看到更大的观察范围,如下:


常见几何体简介
three.js提供了很多几何体API,如下:
const cubeGeometry = new THREE.BoxGeometry(1,1,1) // 正方体
const cubeGeometry = new THREE.SphereGeometry(1) // 球体
const cubeGeometry = new THREE.CylinderGeometry(1,1,1) // 圆柱
const cubeGeometry = new THREE.PlaneGeometry(2,1) // 矩形平面
const cubeGeometry = new THREE.CircleGeometry(1) // 圆形平面
当然当我们设置矩形平面和圆形平面的时候,默认情况下是只有正面才可以看得到的,反面是看不到的,如果想设置反面可见的话,需要对材质进行另外设置,如下:

当然也可以以网格形式进行展现:
const geometry = new THREE.SphereGeometry(1)
// 网格模型渲染几何体
const material = new THREE.MeshBasicMaterial({
  color:0x00ffff,
  wireframe:true, // 网格形式展现
  // side:THREE.FrontSide, // 正面可见,反面不可见
  // side:THREE.BackSide, // 反面可见,正面不可见
  side:THREE.DoubleSide // 双面可看
})
const mesh = new THREE.Mesh(geometry,material)
scene.add(mesh)
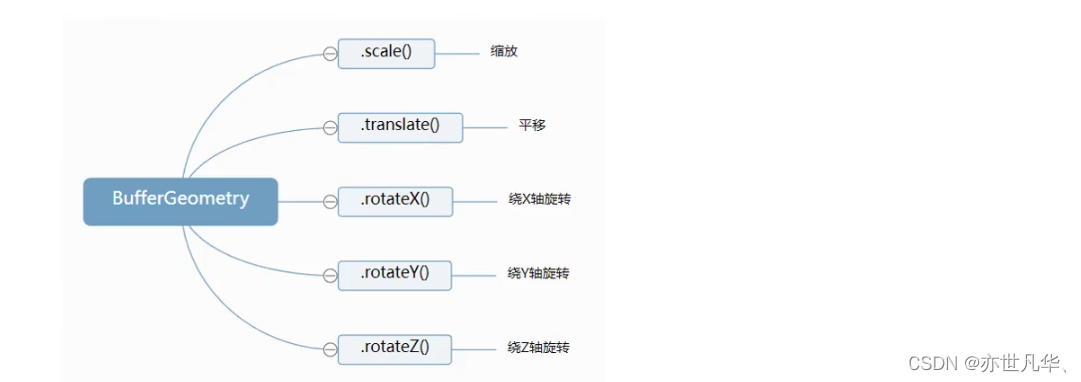
几何体的旋转、缩放、平移方法
BufferGeometry通过以下等方法可以对几何体本身进行缩放、平移、旋转,这些方法本质上都是改变几何体的顶点数据。
具体的实践操作,在之前的文章或多或少都提及了一点,想了解更多的可自行参考官方文档
相关知识就讲解到这,ok给出本文的笔记代码:
import * as THREE from 'three';
// 导入轨道控制器
import { OrbitControls } from 'three/examples/jsm/controls/OrbitControls'

// 1.创建场景
const scene = new THREE.Scene();
// 2.创建相机
const camera = new THREE.PerspectiveCamera(75,window.innerWidth/window.innerHeight,0.1,1000)
// 设置x、y、z轴坐标,即设置相机位置
camera.position.set(0,0,10)
// 将相机添加到场景之中
scene.add(camera)
// 3.添加物体,创建几何体
// // 创建一个空的几何体顶对象
// const geometry = new THREE.BufferGeometry()
// // 添加顶点数据
// const vertices = new Float32Array([ // 数组里面编写顶点坐标数据
//   0,0,0,   // 顶点1坐标
//   1,0,0,  // 顶点2坐标
//   1,1,0, // 顶点3坐标

//   0,1,0,  // 顶点4坐标
// ])
// // BufferAttribute属性缓冲对象表示顶点数据
// const attribute = new THREE.BufferAttribute(vertices,3) // 3个为一组
// // 设置几何体attribute属性的位置属性
// geometry.attributes.position = attribute

// // 类型化数组创建顶点数据
// const indexs = new Uint16Array([
//   0,1,2,0,2,3
// ])
// // 几何体顶点索引的定义
// geometry.index = new THREE.BufferAttribute(indexs,1)

// // 每个顶点的法线数据和顶点位置数据一一对应
// const normals = new Float32Array([
//   0,0,1, // 顶点1法线
//   0,0,1,
//   0,0,1,
//   0,0,1,
// ])
// // 设置几何体的顶点法线数学
// geometry.attributes.normal = new THREE.BufferAttribute(normals,3)

// // 设置点材质
// const material = new THREE.PointsMaterial({
//   color:0xffff00,
//   size:0.2 ,
// })
// // 定义点模型
// const points = new THREE.Points(geometry,material)
// scene.add(points)

// // 设置线材质
// const material = new THREE.LineBasicMaterial({
//   color:0xffff00, // 黄色线条
// })
// const line = new THREE.Line(geometry,material) // 开放线条
// // const line = new THREE.LineLoop(geometry,material) // 闭合线条
// // const line = new THREE.LineSegments(geometry,material) // 非连续线条
// scene.add(line)

const geometry = new THREE.SphereGeometry(1)
// 网格模型渲染几何体
const material = new THREE.MeshBasicMaterial({
  color:0x00ffff,
  wireframe:true, // 网格形式展现
  // side:THREE.FrontSide, // 正面可见,反面不可见
  // side:THREE.BackSide, // 反面可见,正面不可见
  side:THREE.DoubleSide // 双面可看
})
const mesh = new THREE.Mesh(geometry,material)
scene.add(mesh)

// 4.初始化渲染器
const renderer = new THREE.WebGLRenderer()
renderer.setSize(window.innerWidth,window.innerHeight)
document.body.appendChild(renderer.domElement)

// 添加一个环境光
const ambient = new THREE.AmbientLight(0xffffff,0.9)
scene.add(ambient)

// 添加坐标轴辅助器
const axesHelper = new THREE.AxesHelper(5) // 数值代表线的长度
scene.add(axesHelper) // 添加到场景之中

// 创建轨道控制器
const controls =  new OrbitControls(camera,renderer.domElement)
// 设置控制器阻尼,让控制器更有真实效果,但必须在动画循环里调用 .update()
controls.enableDamping = true

export function render(){
  // 每次循环渲染时调用stats更新方法,来刷新时间
  controls.update()
  renderer.render(scene,camera) // 周期性执行相机的渲染功能,更新canvas画布上的内容
  requestAnimationFrame(render) // 接下来渲染下一帧的时候就会调用render函数
}
// 先开始就渲染一下
render()