title: Spring Cloud 以及 Spring Cloud Alibaba 使用总结
date: 2023-01-13 11:54:15
tags:
- Spring
categories: - Spring
cover: https://cover.png
feature: false
1. 版本对应
官网版本说明:版本说明 · alibaba/spring-cloud-alibaba Wiki (github.com)
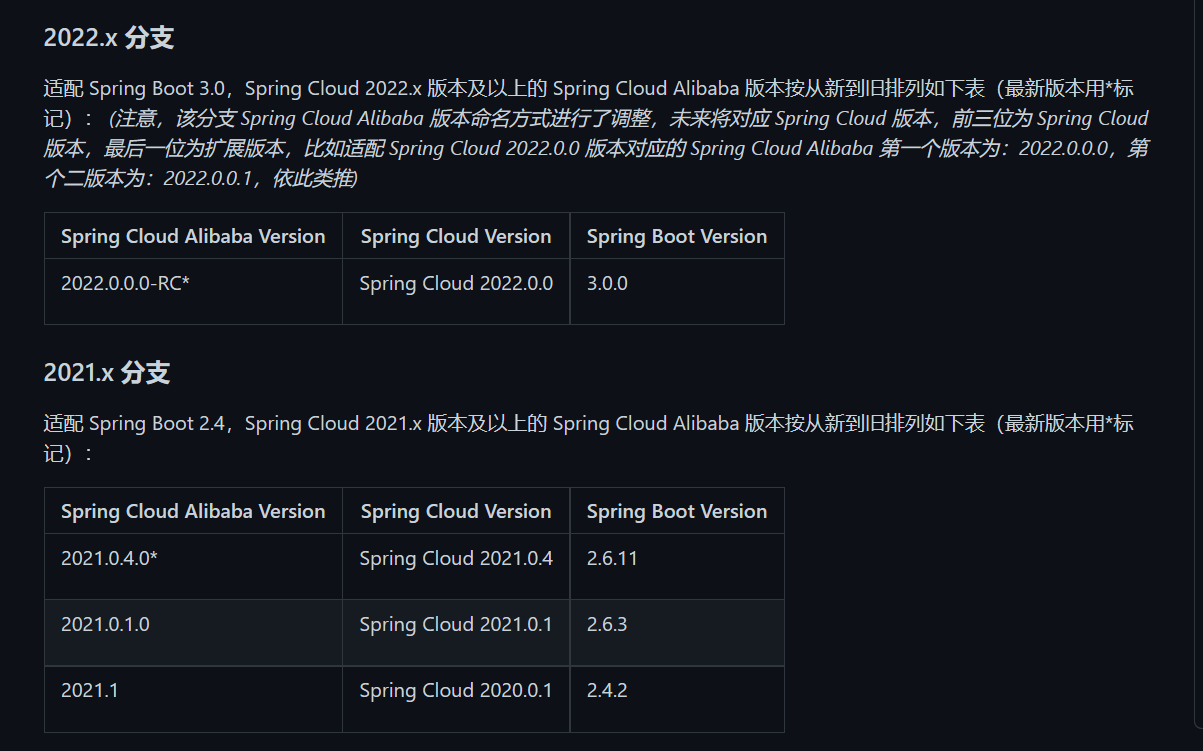
这里使用 Spring Boot 2.7.7、Spring Cloud 2021.0.4、Spring Cloud Alibaba 2021.0.4.0,搭配 JDK 8
<properties>
        <spring.cloud.version>2021.0.4</spring.cloud.version>
        <spring.cloud.alibaba.version>2021.0.4.0</spring.cloud.alibaba.version>
</properties>

<dependencyManagement>
            <!-- Spring Cloud Dependencies-->
            <dependency>
                <groupId>org.springframework.cloud</groupId>
                <artifactId>spring-cloud-dependencies</artifactId>
                <version>${spring.cloud.version}</version>
                <type>pom</type>
                <scope>import</scope>
            </dependency>

            <!-- Spring Cloud Alibaba Dependencies -->
            <dependency>
                <groupId>com.alibaba.cloud</groupId>
                <artifactId>spring-cloud-alibaba-dependencies</artifactId>
                <version>${spring.cloud.alibaba.version}</version>
                <type>pom</type>
                <scope>import</scope>
            </dependency>
</dependencyManagement>
2. Nacos
见另一篇:服务器 Nacos 集群搭建及使用总结_凡 223 的博客
3. Gateway
3.1 引入依赖
包括 Gateway 网关依赖和 Nacos 服务注册发现的依赖
<dependency>
    <groupId>com.alibaba.cloud</groupId>
    <artifactId>spring-cloud-starter-alibaba-nacos-discovery</artifactId>
</dependency>

<dependency>
    <groupId>org.springframework.cloud</groupId>
    <artifactId>spring-cloud-starter-gateway</artifactId>
</dependency>
3.2 配置
将 Gateway 注册进 Nacos,同时进行 Gateway 相关的配置
server:
  port: 9000
spring:
  application:
    name: gateway
  cloud:
    nacos:
      discovery:
        server-addr: 124.222.xxx.90:8848
    gateway:
      routes:
        - id: provider1 # 路由的ID,没有固定规则但要求唯一,建议配合服务名
          uri: http://localhost:8000  # 匹配提供服务的路由地址
          # 网关断言匹配
          predicates:
            - Path=/user/**    # 路径相匹配的进行路由
3.3 启动类
启动类添加 @EnableDiscoveryClient 注解
@SpringBootApplication
@EnableDiscoveryClient
public class GatewayApplication {


    public static void main(String[] args) {


        SpringApplication.run(GatewayApplication.class, args);
    }
}
3.4 服务 Provider-1
1、POM
<dependency>
    <groupId>com.alibaba.cloud</groupId>
    <artifactId>spring-cloud-starter-alibaba-nacos-discovery</artifactId>
</dependency>

<dependency>
    <groupId>org.springframework.boot</groupId>
    <artifactId>spring-boot-starter-web</artifactId>
</dependency>
2、YAML
这里的端口与前面 Gateway 的配置文件里的 uri 端口一致
server:
  port: 8000
spring:
  application:
    name: provider
  cloud:
    nacos:
      discovery:
        server-addr: 124.222.xxx.90:8848
3、启动类
@SpringBootApplication
@EnableDiscoveryClient
public class Service1Application {


    public static void main( String[] args ) {


        SpringApplication.run(Service1Application.class, args);
    }
}
4、Controller
@RestController
public class UserController {


    @GetMapping("/user/get")
    public String get() {


        return "provider-1 user get";
    }

    @GetMapping("/test")
    public String test() {


        return "provider-1 test";
    }
}
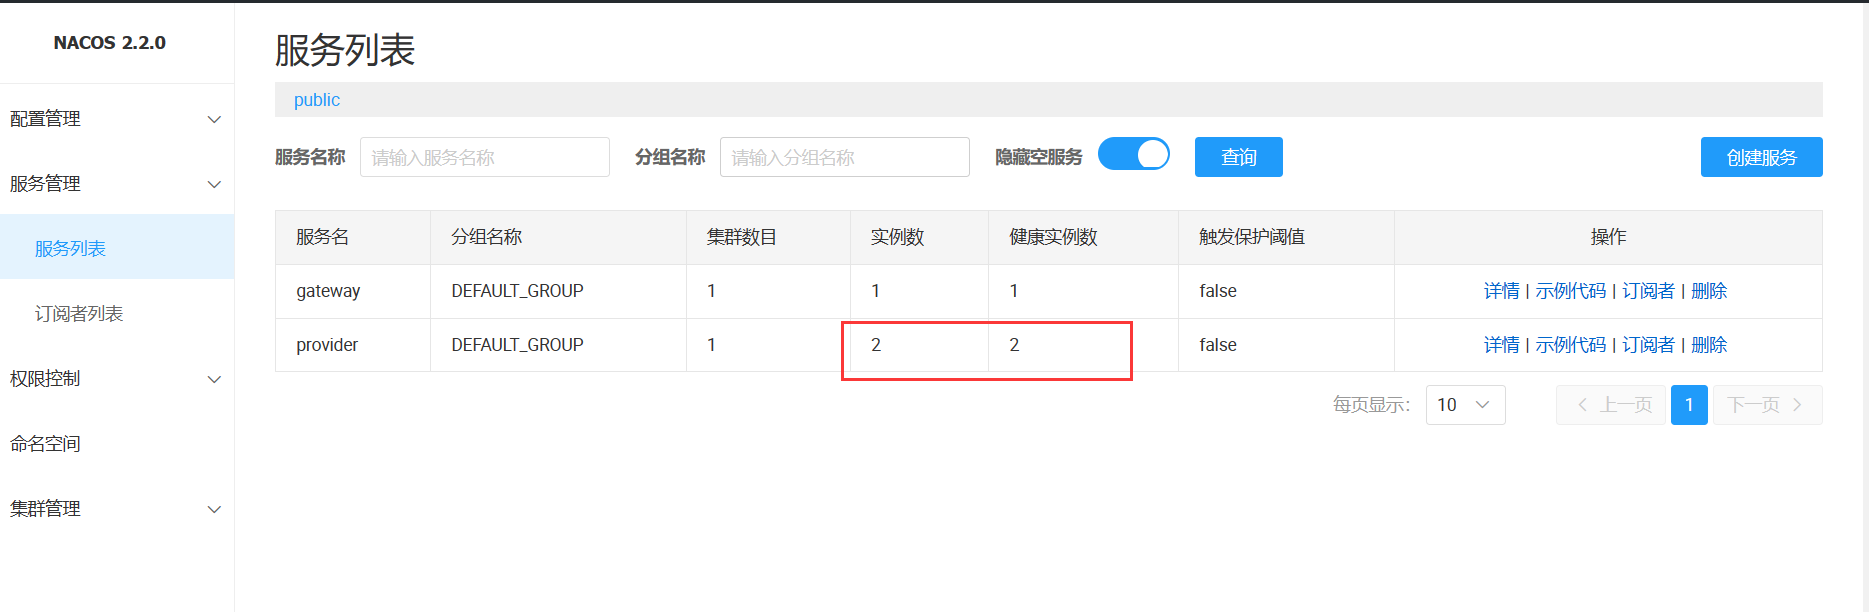
3.5 查看路由转发
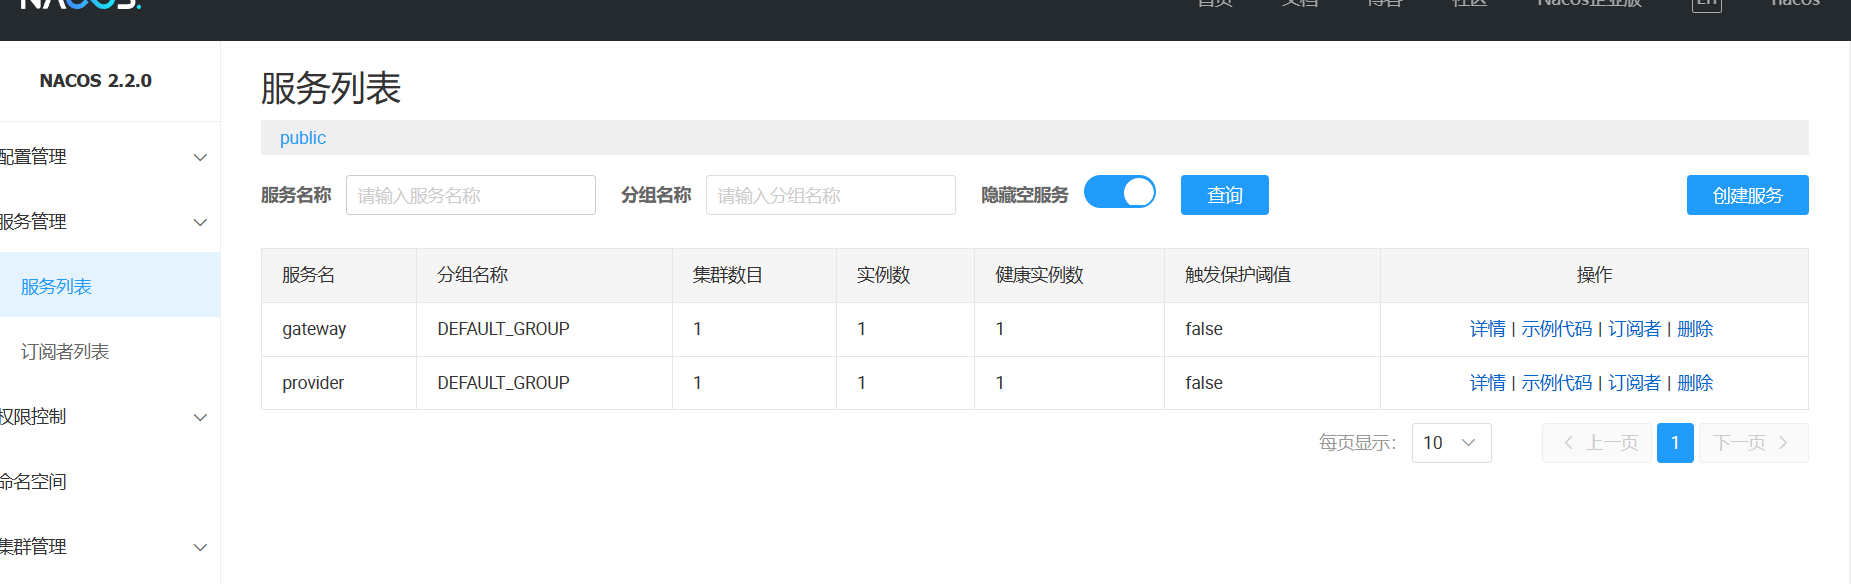
分别启动 Gateway 和 Service,可以看到两个服务都注册了进来
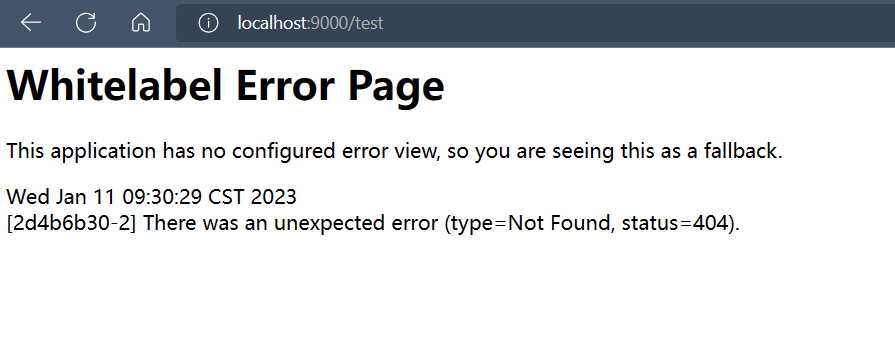
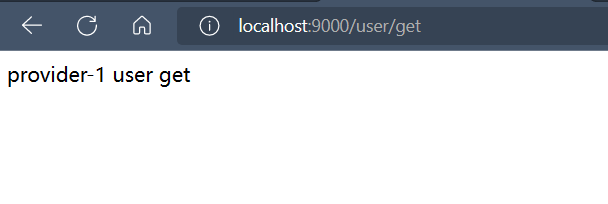
访问 localhost:9000/user/get,通过网关的端口成功调用到服务 Provider-1

测试一下 Predicates 的效果,访问 /test,访问失败,路径不匹配
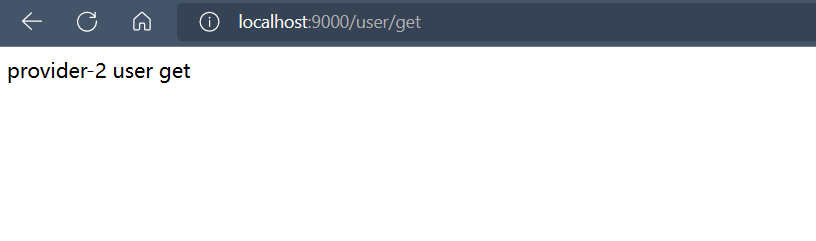
3.6 动态路由与负载均衡
将 3.4 的服务 Provider-1 再复制一份,为 Provider-2,这时就存在了两个服务

在 3.2 的配置中,uri 是固定的地址,那如何让 Gateway 转发两个服务或以上呢?
1、修改配置文件
开启动态路由,通过服务名来匹配服务
server:
  port: 9000
spring:
  application:
    name: gateway
  cloud:
    nacos:
      discovery:
        server-addr: 124.222.118.90:8848
    gateway:
      discovery:
        locator:
          enabled: true # 开启从注册中心动态创建路由的功能, 利用微服务名进行路由
      routes:
        - id: provider1 # 路由的ID, 没有固定规则但要求唯一, 建议配合服务名
          uri: lb://provider  # 匹配提供服务的路由地址
          # 网关断言匹配
          predicates:
            - Path=/user/**    # 路径相匹配的进行路由
        - id: provider2
          uri: lb://provider
          predicates:
            - Path=/user/**
2、配置中 uri 的协议为 lb,表示启用 Gateway 的负载均衡功能,此时需要引入 spring-cloud-starter-loadbalancer 依赖,版本在最开始已统一定义
<dependency>
    <groupId>org.springframework.cloud</groupId>
    <artifactId>spring-cloud-starter-loadbalancer</artifactId>
</dependency>
3、查看路由转发
4. OpenFeign
4.1 引入依赖
这里同样需要引入 spring-cloud-starter-loadbalancer 依赖来实现 OpenFeign 自带的负载均衡
<dependency>
    <groupId>org.springframework.boot</groupId>
    <artifactId>spring-boot-starter-web</artifactId>
</dependency>

<dependency>
    <groupId>com.alibaba.cloud</groupId>
    <artifactId>spring-cloud-starter-alibaba-nacos-discovery</artifactId>
</dependency>

<dependency>
    <groupId>org.springframework.cloud</groupId>
    <artifactId>spring-cloud-starter-openfeign</artifactId>
</dependency>

<dependency>
    <groupId>org.springframework.cloud</groupId>
    <artifactId>spring-cloud-starter-loadbalancer</artifactId>
</dependency>
4.2 配置
服务注册进 Nacos,同时进行 OpenFeign 的相关配置,断路器的配置可见 5.2.2 服务降级的服务调用方部分
server:
  port: 7000
spring:
  application:
    name: consumer
  cloud:
    nacos:
      discovery:
        server-addr: 124.222.xxx.90:8848
feign:
  client:
    config:
      default:
        # 日志等级
        logger-level: full
        # 超时时间
        connect-timeout: 1500
        read-timeout: 1500
  # 断路器
  circuitbreaker:
    enabled: true

4.3 启动类
添加 @EnableFeignClients 注解开启 OpenFeign
@SpringBootApplication
@EnableFeignClients
@EnableDiscoveryClient
public class Consumer1Application {


    public static void main( String[] args ) {


        SpringApplication.run(Consumer1Application.class, args);
    }
}
4.4 FeignService
新建一个接口,用于进行调用,在接口上添加 @FeignClient 注解,值为提供服务的服务名,在调用方法上添加对应的地址映射
@FeignClient("provider")
public interface FeignService {


    @GetMapping("/user/get")
    String get();
}
4.5 ConsumerController
将 FeignService 注入进来,然后调用方法
@RestController
public class ConsumerController {


    @Resource
    private FeignService consumerService;

    @GetMapping("/user/get")
    public String get() {


        return consumerService.get();
    }

    @GetMapping("/test")
    public String test() {


        return "consumer-1 test";
    }
}
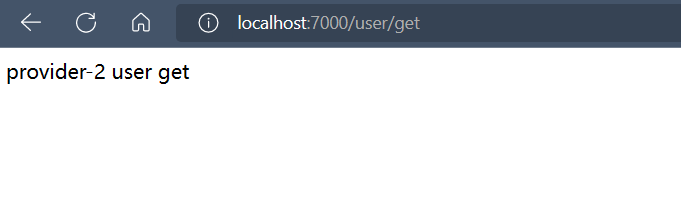
4.6 查看远程调用
自带负载均衡功能

5. Hystrix
Hystrix 已经停止更新进入维护阶段
5.1 前期准备
5.1.1 引入依赖
该版本为 Hystrix 的最后一个版本
<dependency>
    <groupId>org.springframework.cloud</groupId>
    <artifactId>spring-cloud-starter-netflix-hystrix</artifactId>
    <version>2.2.10.RELEASE</version>
</dependency>

<dependency>
    <groupId>com.alibaba.cloud</groupId>
    <artifactId>spring-cloud-starter-alibaba-nacos-discovery</artifactId>
</dependency>

<dependency>
    <groupId>org.springframework.boot</groupId>
    <artifactId>spring-boot-starter-web</artifactId>
</dependency>
5.1.2 配置
server:
  port: 8002

spring:
  application:
    name: provider-hystrix
  cloud:
    nacos:
      discovery:
        server-addr: 124.222.xxx.90:8848
5.1.3 启动类
@SpringBootApplication
@EnableDiscoveryClient
public class HystrixApplication {


    public static void main(String[] args) {


        SpringApplication.run(HystrixApplication.class, args);
    }
}
5.1.4 HystrixService
public interface HystrixService {


    String normal();

    String timeout();
}
@Service
public class HystrixServiceImpl implements HystrixService {


    @Override
    public String normal() {


        return "normal";
    }

    @Override
    public String timeout() {


        try {


            TimeUnit.SECONDS.sleep(5);
        } catch (InterruptedException e) {


            e.printStackTrace();
        }

        return "timeout";
    }
}
5.1.5 HystrixController
@RestController
public class HystrixController {


    @Resource
    private HystrixService hystrixService;

    @GetMapping("/normal")
    public String normal() {


        return hystrixService.normal();
    }

    @GetMapping("/timeout")
    public String timeout() {


        return hystrixService.timeout();
    }
}
5.1.6 访问
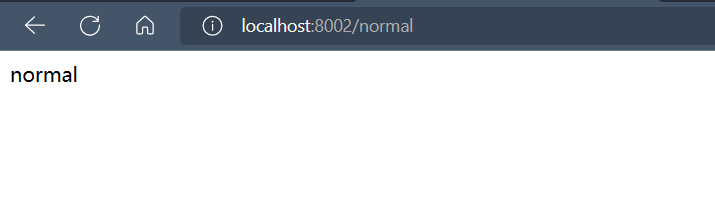
访问 localhost:8002/normal,正常显示
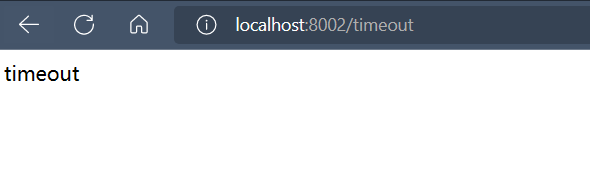
访问 localhost:8002/timeout,等待 5 秒后显示
5.2 服务降级
5.2.1 服务提供方
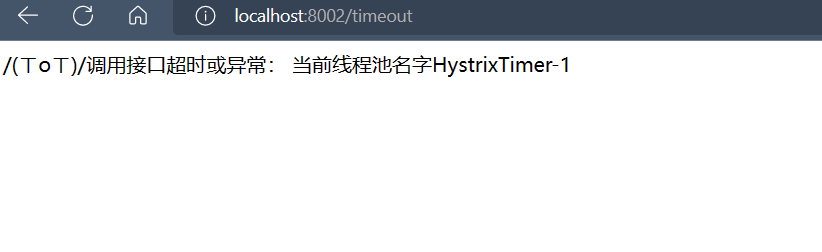
1、HystrixService 添加 @HystrixCommand 注解,参数 fallbackMethod 为定义的回调方法,参数 @HystrixProperty 为超时时间
@Service
public class HystrixServiceImpl implements HystrixService {


    @Override
    public String normal() {


        return "normal";
    }

    @HystrixCommand(fallbackMethod = "globalFallback",commandProperties = {


            @HystrixProperty(name="execution.isolation.thread.timeoutInMilliseconds", value="3000")
    })
    @Override
    public String timeout() {


        try {


            TimeUnit.SECONDS.sleep(5);
        } catch (InterruptedException e) {


            e.printStackTrace();
            Thread.currentThread().interrupt();
        }

        return "timeout";
    }


    public String globalFallback(){


        return "/(ㄒoㄒ)/调用接口超时或异常:\t"+ "\t当前线程池名字" + Thread.currentThread().getName();
    }
}
2、启动类添加 @EnableHystrix 注解
@SpringBootApplication
@EnableDiscoveryClient
@EnableHystrix
public class HystrixApplication {


    public static void main(String[] args) {


        SpringApplication.run(HystrixApplication.class, args);
    }
}
3、再次访问 timeout,触发服务降级
 4、统一配置,通过
 @DefaultProperties 来进行默认配置,不用每个方法都进行配置
@Service
@DefaultProperties(defaultFallback = "globalFallback", commandProperties = {


        @HystrixProperty(name="execution.isolation.thread.timeoutInMilliseconds", value="3000")
})
public class HystrixServiceImpl implements HystrixService {


    @Override
    public String normal() {


        return "normal";
    }

    @HystrixCommand
    @Override
    public String timeout() {


        try {


            TimeUnit.SECONDS.sleep(5);
        } catch (InterruptedException e) {


            e.printStackTrace();
            Thread.currentThread().interrupt();
        }

        return "timeout";
    }


    public String globalFallback(){


        return "/(ㄒoㄒ)/调用接口超时或异常:\t"+ "\t当前线程池名字" + Thread.currentThread().getName();
    }
}
这里是在服务提供方进行了服务降级的处理,假如有其他服务调用该服务,但是服务提供方宕机了,无法触发服务降级(这里首先需要 OpenFeign 的超时时间大于服务提供方返回响应的时间,否则会直接报超时异常),因此调用方也需要进行服务降级的处理,可以配合 OpenFeign 进行处理
5.2.2 服务调用方
1、在 OpenFeign 的配置里开启断路器,开启了断路器之后,会先判断 Hystrix 的超时时间然后再判断 OpenFeign 的超时时间,Hystrix 默认的超时时间是 1 秒,所以需要重新设置 Hystrix 的超时时间
feign:
  client:
    config:
      default:
        # 日志等级
        logger-level: full
        # 超时时间
        connect-timeout: 1500
        read-timeout: 1500
  # 断路器
  circuitbreaker:
    enabled: true
hystrix:
  command:
    default:
      execution:
        isolation:
          thread:
            timeoutInMilliseconds: 1500
2、添加依赖
<dependency>
    <groupId>org.springframework.cloud</groupId>
    <artifactId>spring-cloud-starter-netflix-hystrix</artifactId>
    <version>2.2.10.RELEASE</version>
</dependency>
3、@FeignClient 注解添加 fallback 参数,FallbackServiceImpl 为处理类
@FeignClient(value = "provider-hystrix", fallback = FallbackServiceImpl.class)
public interface FeignService {


    @GetMapping("/timeout")
    String get();
}
4、FallbackServiceImpl 实现 FeignService,统一为调用接口里的方法进行异常处理
@Service
public class FallbackServiceImpl implements FeignService {


    @Override
    public String get() {


        return "服务调用失败,提示来自:Consumer-OpenFeign";
    }
}
5、关闭服务提供方,调用接口,触发服务调用方的服务降级

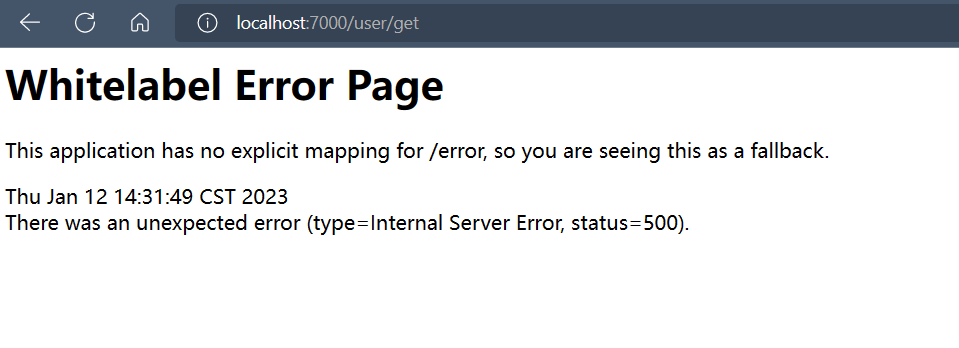
假如没有设置断路器,则会显示白页错误
5.3 服务熔断
修改 @HystrixCommand 注解的参数
@Service
public class HystrixServiceImpl implements HystrixService {


    @HystrixCommand(fallbackMethod = "circuitBreakerFallback", commandProperties = {


            @HystrixProperty(name = "circuitBreaker.enabled", value = "true"), // 是否开启断路器
            @HystrixProperty(name = "circuitBreaker.requestVolumeThreshold", value = "10"), // 设置请求次数
            @HystrixProperty(name = "circuitBreaker.sleepWindowInMilliseconds", value = "10000"), // 时间窗口期
            @HystrixProperty(name = "circuitBreaker.errorThresholdPercentage", value = "60"), // 失败率达到多少后跳闸
    })
    public String circuitBreaker(Integer id) {


        if (id < 0) {


            throw new RuntimeException("******id 不能负数");
        }
        String serialNumber = UUID.randomUUID().toString();

        return Thread.currentThread().getName() + "\t" + "调用成功,流水号: " + serialNumber;
    }

    public String circuitBreakerFallback(Integer id) {


        return "id 不能负数,请稍后再试,/(ㄒoㄒ)/~~   id: " + id;
    }
}
涉及到断路器的三个重要参数:快照时间窗、请求总数阀值、错误百分比阀值
- 快照时间窗:断路器确定是否打开需要统计一些请求和错误数据,而统计的时间范围就是快照时间窗,默认为最近的 10 秒
- 请求总数阀值:在快照时间窗内,必须满足请求总数阀值才有资格熔断。默认为 20,意味着在 10 秒内,如果该 Hystrix 命令的调用次数不足 20 次,即使所有的请求都超时或其他原因失败,断路器都不会打开
- 错误百分比阀值:当请求总数在快照时间窗内超过了阀值,比如发生了 30 次调用,如果在这 30 次调用中,有 15 次发生了超时异常,也就是超过 50% 的错误百分比,在默认设定 50% 阀值情况下,这时候就会将断路器打开
熔断类型:
- 打开:请求不再进行调用当前服务,内部设置时钟一般为 MTTR(平均故障处理时间),当打开时长达到所设时钟则进入半熔断状态
- 关闭:熔断关闭不会对服务进行熔断
- 半开:部分请求根据规则调用当前服务,如果请求成功且符合规则则认为当前服务恢复正常,关闭熔断
5.4 服务监控 HystrixDashboard
1、引入依赖
<dependency>
    <groupId>org.springframework.cloud</groupId>
    <artifactId>spring-cloud-starter-netflix-hystrix-dashboard</artifactId>
</dependency>
<dependency>
    <groupId>org.springframework.boot</groupId>
    <artifactId>spring-boot-starter-actuator</artifactId>
</dependency>
2、配置
这里需要配置允许 hostname,否则会报 Unable to connect to Command Metric Stream
server:
  port: 7001
hystrix:
  dashboard:
    proxy-stream-allow-list: "localhost"
3、启动类
添加 @EnableHystrixDashboard 注解
@SpringBootApplication
@EnableHystrixDashboard
public class HystrixDashboardApplication {


    public static void main(String[] args) {


        SpringApplication.run(HystrixDashboardApplication.class, args);
    }
}
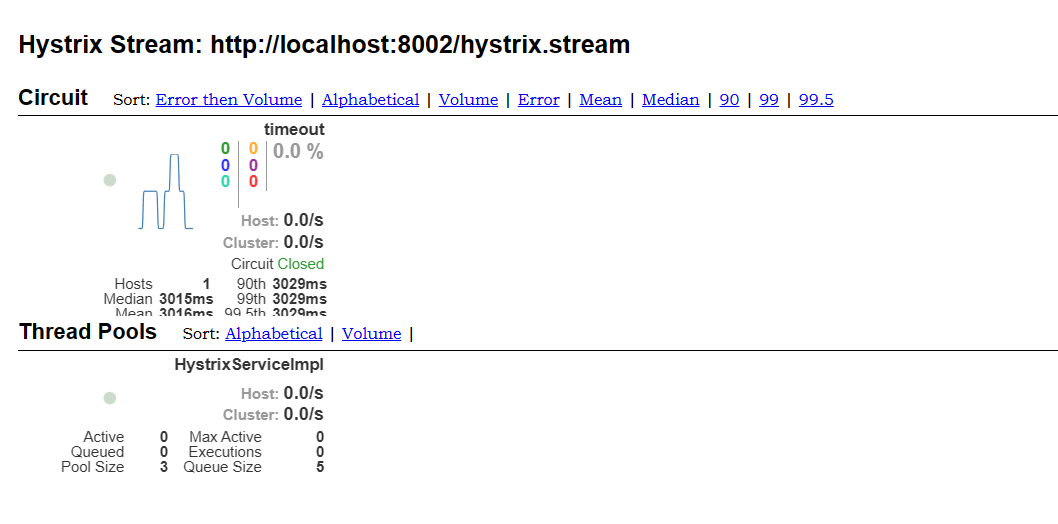
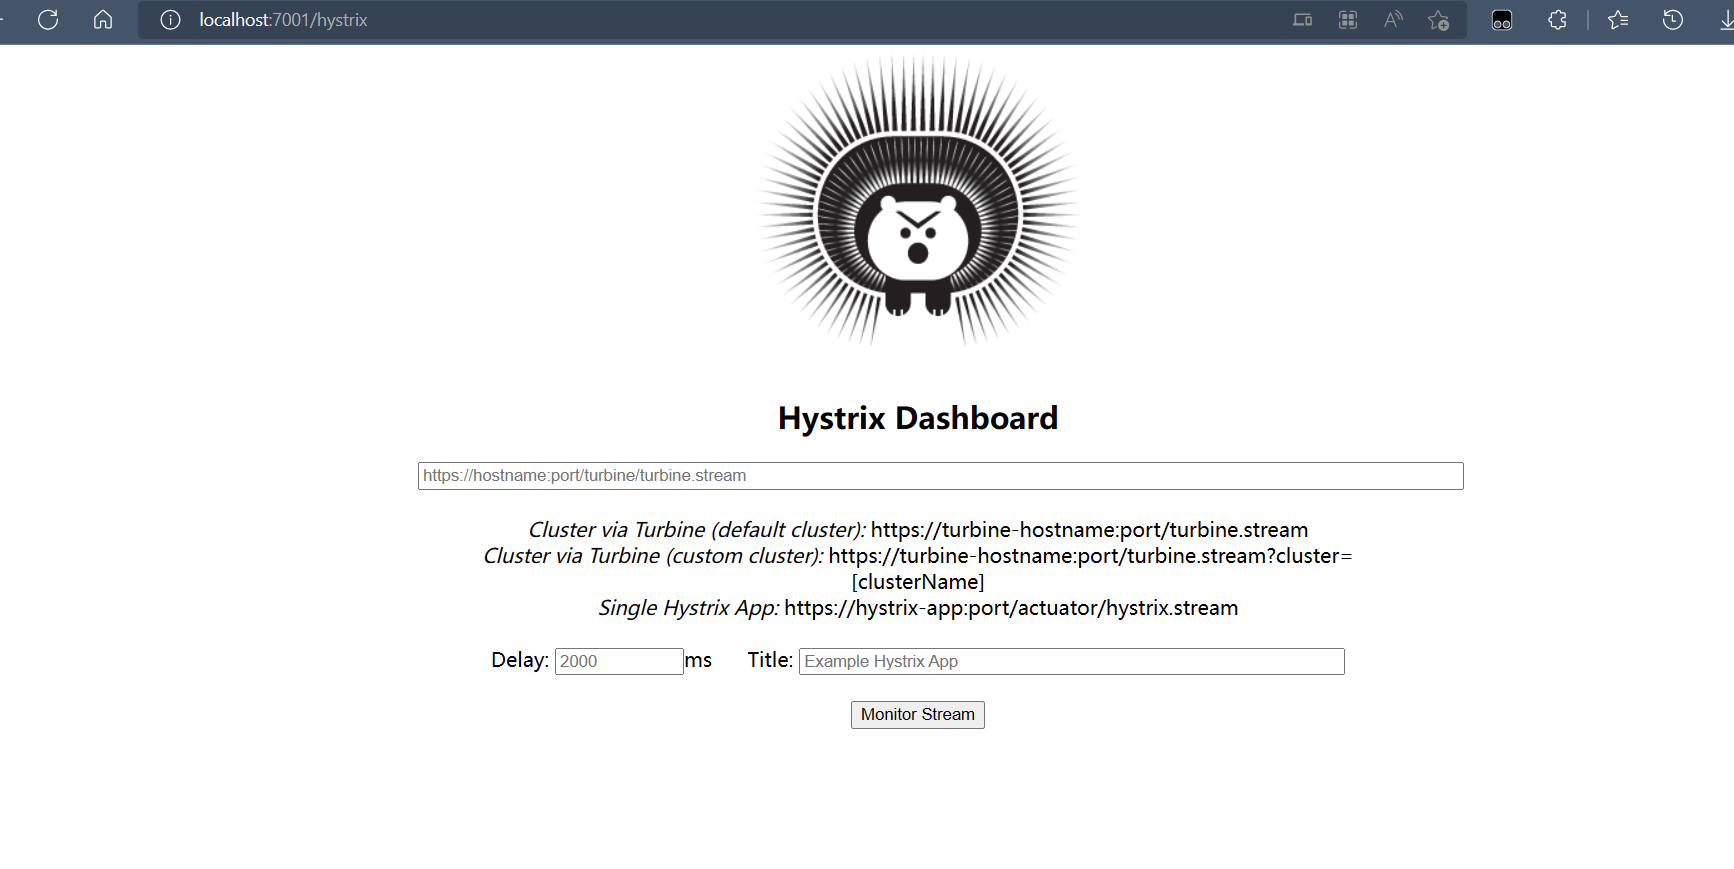
4、访问 http://localhost:7001/hystrix,已经可以看到仪表盘
5、在需要监控的服务,引入 spring-boot-starter-actuator 依赖
<dependency>
    <groupId>org.springframework.boot</groupId>
    <artifactId>spring-boot-starter-actuator</artifactId>
</dependency>
6、配置监控路径
@SpringBootApplication
@EnableDiscoveryClient
@EnableHystrix
public class HystrixApplication {


    public static void main(String[] args) {


        SpringApplication.run(HystrixApplication.class, args);
    }

    // 配置监控路径
    @Bean
    public ServletRegistrationBean getServlet() {


        HystrixMetricsStreamServlet streamServlet = new HystrixMetricsStreamServlet();
        ServletRegistrationBean registrationBean = new ServletRegistrationBean(streamServlet);
        registrationBean.setLoadOnStartup(1);
        registrationBean.addUrlMappings("/hystrix.stream");
        registrationBean.setName("HystrixMetricsStreamServlet");
        return registrationBean;
    }
}
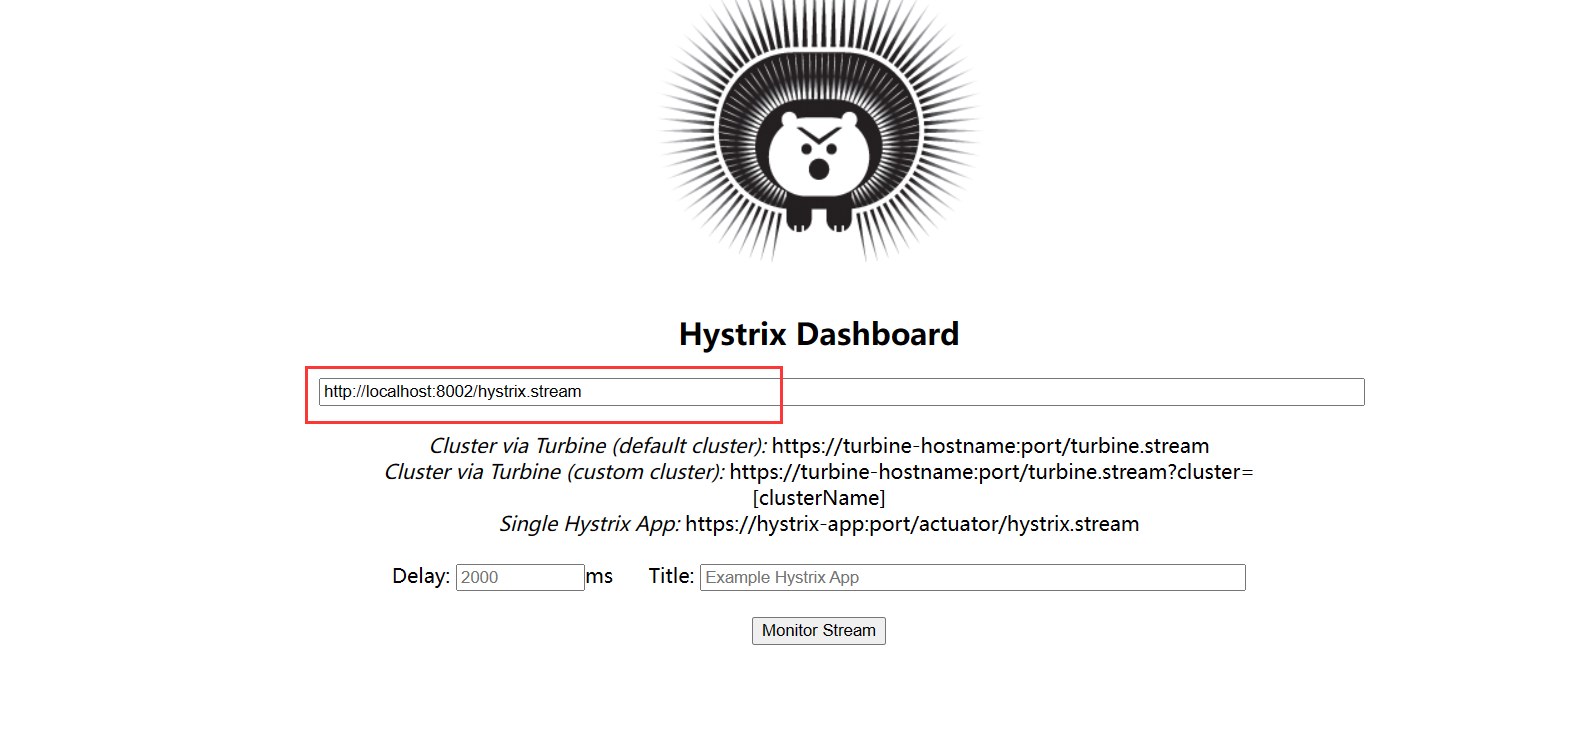
7、在仪表盘输入需要监控的服务路径
8、调用几次接口请求后,即可看到监控图