本文旨在为用户提供在图像上应用滤镜的必要工具。我们特别探索了四种滤镜:铅笔素描、暖色效果、冷色效果,以及卡通效果。
图像滤镜
铅笔素描
首先,我们定义铅笔素描的函数:
def PencilSketch(image):

    # Convert the image to Grayscale
    gray_image = cv2.cvtColor(image, cv2.COLOR_BGR2GRAY)
    # Remove Noise using Gaussian Blur
    blurred_image = cv2.GaussianBlur(gray_image, (21, 21), 0, 0)
    # Divide the image
    final_image = cv2.divide(gray_image, blurred_image, scale=256)
    # Thresholding
    ret, mask = cv2.threshold(final_image, 70, 255, cv2.THRESH_BINARY)
    # Bitwise operation
    sketched_image = cv2.bitwise_and(mask, final_image)
    return sketched_image
我们现在可以简单地调用该函数并将图像传递给它,并使用*cv2.imshow()*显示输出草图:
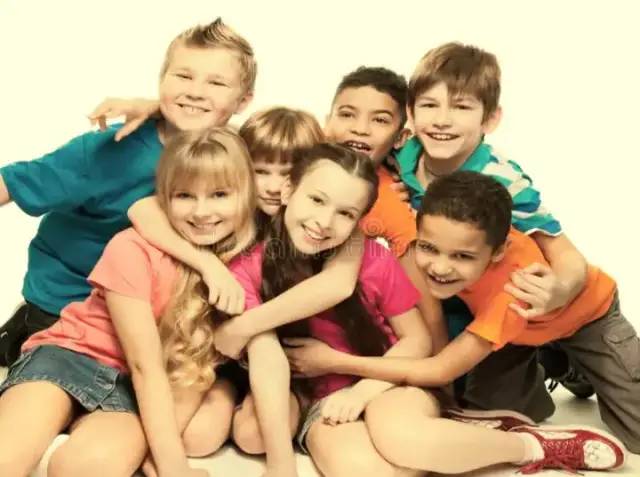
path = '../Images and Videos/Image01 - Kids.jpg'
image = cv2.imread(path)
cv2.imshow('Original Image', cv2.imread(path))
cv2.imshow('Pencil Sketch', PencilSketch(image))
cv2.waitKey()
cv2.destroyAllWindows()
这会产生以下输出:

原图
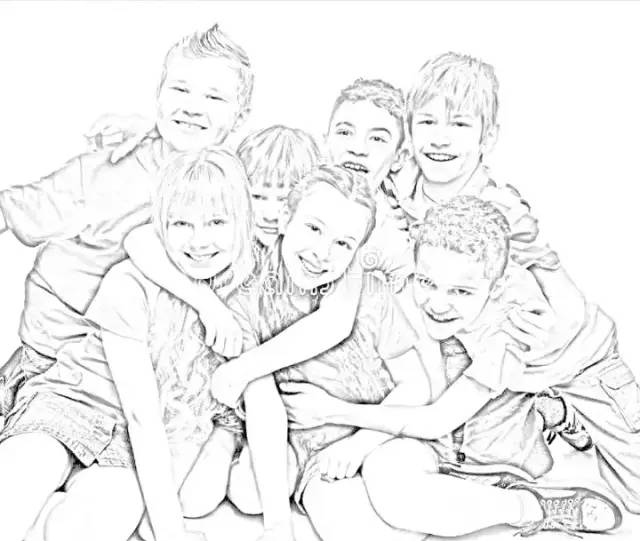
铅笔素描
以类似的方式,我们为其余三个滤镜定义函数。
暖色和冷色效果
通常,为了产生暖色,我们会增加图像中的红色阴影,降低蓝色的强度,并通过增加颜色饱和度使颜色显得鲜艳。这给观众一种印象,即照片是在炎热、晴朗的日子拍摄的。
相反,要实现冷色效果,我们应该增加蓝色通道中的像素值,减少红色通道中的像素值,同时降低颜色饱和度。冷色效果给人一种在寒冷、黑暗或下雪天拍摄的照片的印象。当我们说色彩饱和度时,我们的意思是利用 HSV 色彩空间。因此,还涉及从 RGB 到 HSV 的转换。
现在让我们开始吧。我们首先必须定义一个查找表来增加像素强度,从而创建两个通用曲线滤波器。你可以在上述书中阅读曲线滤波器背后的数学原理。
from scipy.interpolate import UnivariateSpline
def LUT_8UC1(x, y):
    spl = UnivariateSpline(x, y)
    return spl(range(256))

increase_pixel = LUT_8UC1([0, 64, 128, 192, 256], [0, 70, 140, 210, 256])
decrease_pixel = LUT_8UC1([0, 64, 128, 192, 256], [0, 30, 80, 120, 192])
你可以尝试使用这些值——这些值取自书中提供的示例。
接下来,我们定义暖色和冷色效果:
import numpy as np
import cv2

def warming_effect(image):
    # Split into RGB
    red, green, blue = cv2.split(image)
    # Increase the pixels' intensity in Red channel
    red = cv2.LUT(red, increase_pixel).astype(np.uint8)
    # Decrease the pixels' intensity in Blue channel
    blue = cv2.LUT(blue, decrease_pixel).astype(np.uint8)
    # Combine the RGB to yield the changes
    rgb_image = cv2.merge((red, green, blue))
    # Convert from RGB to HSV Color space for Saturation and split into HSV
    hue, saturation, value = cv2.split(cv2.cvtColor(rgb_image, cv2.COLOR_RGB2HSV))
    # Increase values of Saturation
    saturation = cv2.LUT(saturation, increase_pixel).astype(np.uint8)
    # Warming Effect on Image
    final_image = cv2.cvtColor(cv2.merge((hue, saturation, value)), cv2.COLOR_HSV2RGB)
    return final_image

# No comments - Infer from the Code!
def cooling_effect(image):
    red, green, blue = cv2.split(image)
    red = cv2.LUT(red, decrease_pixel).astype(np.uint8)
    blue = cv2.LUT(blue, increase_pixel).astype(np.uint8)
    rgb_image = cv2.merge((red, green, blue))
    hue, saturation, value = cv2.split(cv2.cvtColor(rgb_image, cv2.COLOR_RGB2HSV))
    saturation = cv2.LUT(saturation, decrease_pixel).astype(np.uint8)
    final_image = cv2.cvtColor(cv2.merge((hue, saturation, value)), cv2.COLOR_HSV2RGB)
    return final_image
对于与之前相同的图像,这里是暖色和冷色效果:

暖色效果
冷色效果
重要的是要注意,由于在各个函数中的定义方式,暖色和冷色效果在逻辑上可能与你的想法不符。即一张图片在蓝色通道中像素值高的图片,其蓝色通道的降温效果会更高(有待推敲)。
漫画效果
我不会详细介绍用于颜色量化的代码,但你可以从 Aditi Rastogi 的文章中了解该方法:
https://blog.devgenius.io/color-quantization-using-k-means-clustering-132300ca6864
def color_quantization(image, k):
    data = np.float32(image).reshape((-1, 3))
    criteria = (cv2.TERM_CRITERIA_EPS + cv2.TERM_CRITERIA_MAX_ITER, 20, 1.0)
    success, label, center = cv2.kmeans(data, k, None, criteria, 10, cv2.KMEANS_RANDOM_CENTERS)
    center = np.uint8(center)
    result = center[label.flatten()]
    result = result.reshape(image.shape)
    return result
现在我们实现卡通效果:
def cartoon_effect(image):
    # Color Quantization with 7 clusters
    quantized_image = color_quantization(image, 7)
    # Bilateral Filtering to remove noise
    bilateral_image = cv2.bilateralFilter(quantized_image, 8, 150, 150)
    # Grayscale Image Conversion
    gray_image = cv2.cvtColor(bilateral_image, cv2.COLOR_BGR2GRAY)
    # Preserve Edges - Can also use cv2.ADAPTIVE_THRESH_GAUSSIAN_C
    edge_image = cv2.adaptiveThreshold(gray_image, 255, cv2.ADAPTIVE_THRESH_MEAN_C, cv2.THRESH_BINARY, 9,9)
    # Integrate the filtered image with its edges
    cartoon_image = cv2.bitwise_and(bilateral_image, bilateral_image, mask=edge_image)
    return cartoon_image
对于我们目前使用的同一张图片,这里是“卡通化”效果:

漫画效果
结论
多亏了 OpenCV,滤镜可以无缝地应用到图像上。此外,使用 NumPy 和 SciPy 可以简化图像处理。在本文中,我们了解了如何实现各种样式的滤镜。
☆ END ☆
如果看到这里,说明你喜欢这篇文章,请转发、点赞。微信搜索「uncle_pn」,欢迎添加小编微信「 woshicver」,每日朋友圈更新一篇高质量博文。
↓扫描二维码添加小编↓
