上一篇文章我们对FFmpeg进行交叉编译,得到了编译产物:libffmpeg.so,然后创建了一个Android项目,对libffmpeg.so库实现了集成,还没阅读上一篇文章建议先阅读:Android FFmpeg开发(一),FFmpeg编译与集成
本文将利用FFmpeg对本地MP4视频文件进行视频流解码,然后使用FFmpeg中的libswscale模块将原始视频YUV帧转成RGB帧,最后将RGB帧数据刷到SurfaceView的surface中实现视频画面的渲染。
接下来,介绍下利用FFmpeg完成视频解码、渲染的流程。
一、FFmpeg解码视频流
利用FFmpeg API对视频进行解码,然后将解码数据转换成RGBA格式数据,最后将画面数据刷到surface上,涉及到FFmpeg核心API调用流程如下:
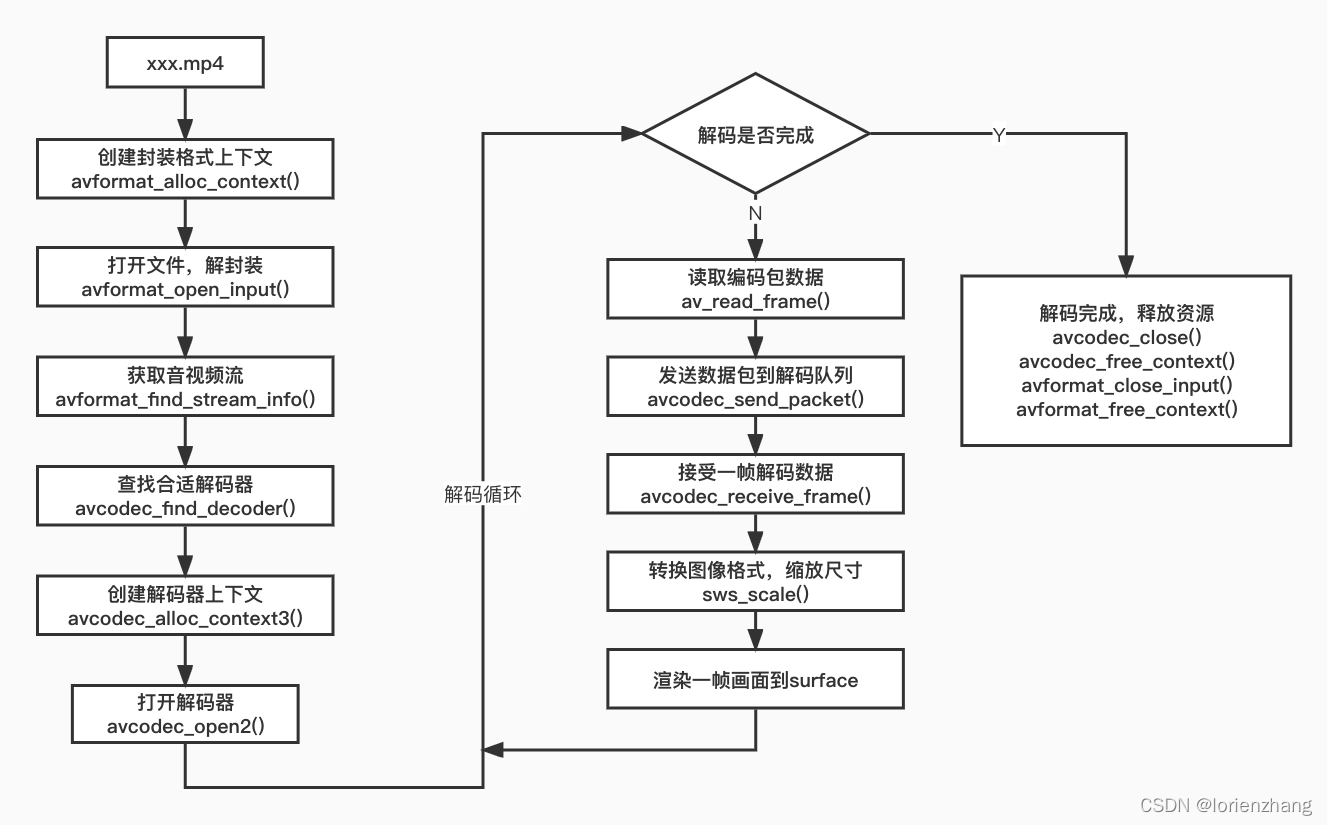
解码流程代码如下:
 // 1. 创建封装格式上下文
 mAVFormatContext = avformat_alloc_context();

 // 2. 打开文件
 if (avformat_open_input(&mAVFormatContext, mUrl, NULL, NULL) != 0) {


     LOGD("BaseDecoder::initFFDecoder, avformat_open_input fail\n");
     break;
 }

 // 3. 获取音视频信息流信息
 if (avformat_find_stream_info(mAVFormatContext, NULL) < 0) {


     LOGD("BaseDecoder::initFFDecoder, avformat_find_stream_info fail\n");
     break;
 }

 // 4. 获取音视频流的索引
 for (int i = 0; i < mAVFormatContext->nb_streams; i++) {


     if (mAVFormatContext->streams[i]->codecpar->codec_type == mMediaType) {


         mStreamIndex = i;
         break;
     }
 }

 if (mStreamIndex == -1) {


     LOGD("BaseDecoder::initFFDecoder, failed to find stream index\n");
     break;
 }

 // 5. 获取解码器参数
 AVCodecParameters *codecParameters = mAVFormatContext->streams[mStreamIndex]->codecpar;

 // 6. 获取解码器
 mAVCodec = avcodec_find_decoder(codecParameters->codec_id);
 if (mAVCodec == nullptr) {


     LOGD("BaseDecoder::initFFDecoder, avcodec_find_decoder fail\n");
     break;
 }

 // 7. 创建解码器上下文
 mAVCodecContext = avcodec_alloc_context3(mAVCodec);
 if (avcodec_parameters_to_context(mAVCodecContext, codecParameters) != 0) {


     LOGD("BaseDecoder::initFFDecoder, avcodec_parameters_to_context fail\n");
     break;
 }

 // 8. open 解码器
 AVDictionary *pAVDictionary = nullptr;
 av_dict_set(&pAVDictionary, "buffer_size", "1024000", 0);
 av_dict_set(&pAVDictionary, "stimeout", "20000000", 0);
 av_dict_set(&pAVDictionary, "max_delay", "30000000", 0);
 av_dict_set(&pAVDictionary, "rtsp_transport", "tcp", 0);
 res = avcodec_open2(mAVCodecContext, mAVCodec, &pAVDictionary);
 if (res < 0) {


     LOGD("BaseDecoder::initFFDecoder, avcodec_open2 fail, result=%d\n", res);
     break;
 }


// 9. 循环解码
for (;;) {


	if (解码结束) {


		break;
	}
	av_read_frame(mAVFormatContext, mAVPacket);
	avcodec_send_packet(mAVCodecContext, mAVPacket);
    while (avcodec_receive_frame(mAVCodecContext, mFrame) == 0) {


       // 渲染...
   }
}
二、ANativeWindow帧渲染
通过上一节,我们完成了视频流解码,拿到了每帧的原始数据(YUV帧),现在我们需要将每帧数据刷到Surface所对应的FrameBuffer中,实现帧渲染。思考下,我们需要解决哪些问题:
- 解码帧(AVFrame)的尺寸不一,我们需要按照SurfaceView的尺寸对解码帧进行scale
- 解码帧(AVFrame)的数据格式是YUV格式,但是SurfaceView所对应的本地窗口ANativeWindow只接受RGBA数据,所以需要格式转换
- 播放同步控制,子线程解码渲染帧的速度要和视频每帧的实际播放的时间要同步对应上。正常情况下,视频的帧率FPS为25左右,但子线程实际解码渲染帧的速度会远远大于25。
对于问题1和2,通过FFmpeg的libswscale模块可以解决。看下关键代码:
// 根据java层的surface获取ANativeWindow
mNativeWindow = ANativeWindow_fromSurface(env, surface);

// 获取window的宽高
int windowWidth = ANativeWindow_getWidth(mNativeWindow);
int windowHeight = ANativeWindow_getHeight(mNativeWindow);

// 获取视频的宽高
int videoWidth = mAVCodecContext->width;
int videoHeight = mAVCodecContext->height;

// 根据视频宽高比,调整window的宽高,最终宽高输出为mDstWidth和mDstHeight
if (windowWidth < windowHeight * videoWidth / videoHeight) {


    mDstWidth = windowWidth;
    mDstHeight = windowWidth * videoHeight / videoWidth;
} else {


    mDstHeight = windowHeight;
    mDstWidth = windowHeight * videoWidth / videoHeight;
}

// 调整window buffer的尺寸
ANativeWindow_setBuffersGeometry(mNativeWindow, mDstWidth, mDstHeight, WINDOW_FORMAT_RGBA_8888);

// 分配一个AVFrame,后面scale之后的视频帧会存储到mRGBAFrame中
mRGBAFrame = av_frame_alloc();
// 根据尺寸和图像格式,获取buffer大小
int bufferSize = av_image_get_buffer_size(AV_PIX_FMT_RGBA, mDstWidth, mDstHeight, 1);
// 根据不福尔size分配一块FrameBuffer内存
mFrameBuffer = (uint8_t *) av_malloc(bufferSize * sizeof(uint8_t));
// 利用mFrameBuffer的size和图像格式AV_PIX_FMT_RGBA,填充mRGBAFrame
av_image_fill_arrays(mRGBAFrame->data, mRGBAFrame->linesize,
                     mFrameBuffer, AV_PIX_FMT_RGBA,
                     mDstWidth, mDstHeight, 1);

// 根据目标尺寸和图片格式初始化SwsContext
mSwsContext = sws_getContext(videoWidth, videoHeight, getCodecContext()->pix_fmt,
                                     mDstWidth, mDstHeight, AV_PIX_FMT_RGBA,
                                     SWS_FAST_BILINEAR, NULL, NULL, NULL);

/**
 * 收到一个解码帧
 */
void VideoDecoder::onFrameAvailable(AVFrame *frame) {


    if (mVideoRender != nullptr && frame != nullptr) {


    	// 自定义结构体,用于存储最终转换后的帧数据
        NativeImage image;

        if (mVideoRender->getRenderType() == VIDEO_RENDER_ANWINDOW) {


        	// 帧缩放+格式转换(YUV to RGB)
            sws_scale(mSwsContext, frame->data, frame->linesize, 0, mVideoHeight,
                      mRGBAFrame->data, mRGBAFrame->linesize);
            // 构造NativeImage
            image.format = IMAGE_FORMAT_RGBA;
            image.width = mRenderWidth;
            image.height = mRenderHeight;
            image.ppPlane[0] = mRGBAFrame->data[0];
            image.pLineSize[0] = image.width * 4;
        }

        mVideoRender->renderVideoFrame(&image);
    }
}

/**
 * 最终渲染
 */
void NativeRender::renderVideoFrame(NativeImage *pImage) {


    if (mNativeWindow == nullptr || pImage == nullptr) {


        return;
    }
	// 获取window对应的buffer
    ANativeWindow_lock(mNativeWindow, &mNativeWindowBuffer, nullptr);
    uint8_t *dstBuffer = static_cast<uint8_t *>(mNativeWindowBuffer.bits);

    int srcLineSize = pImage->width * 4;
    int dstLineSize = mNativeWindowBuffer.stride * 4;

    for (int i = 0; i < mDstHeight; ++i) {


    	// 将RGB数据拷贝到window的buffer中
        memcpy(dstBuffer + i * dstLineSize, pImage->ppPlane[0] + i * srcLineSize, srcLineSize);
    }
	// 提交
    ANativeWindow_unlockAndPost(mNativeWindow);
}
接下来,看下同步功能的实现。这里我们向系统时间同步,整体实现方式:
- 记录下开始解码第一帧的时间,为起播时间:mStartTimeStamp = getSysCurrentTime();
- 每次新解码一帧时,记录当前流逝时间:long elapsedTime = curSysTime - mStartTimeStamp;
- 从当前帧AVFrame中获取本帧的播放时间:mCurrentTime = mFrame->pkt_dts;
- 如果当前解码帧的播放时间比已经流逝时间大,就sleep线程进行等待。
其实同步功能整体就是一个"你追我等"的过程。核心代码如下:
// 在第一次解码时设置mStartTimeStamp,定为开始播放的时间
if (mStartTimeStamp == -1) {


    // 设置起播时间
    mStartTimeStamp = getSysCurrentTime();
}
/**
 * 获取当前解码帧的播放时间
 */
if (mFrame->pkt_dts != AV_NOPTS_VALUE) {


    mCurTimeStamp = mFrame->pkt_dts;
} else if (mFrame->pts != AV_NOPTS_VALUE) {


    mCurTimeStamp = mFrame->pts;
} else {


    mCurTimeStamp = 0;
}

// 距离起播时间的流逝时间
long curSysTime = getSysCurrentTime();
long elapsedTime = curSysTime - mStartTimeStamp;

// 解码速度快于系统时间
if (mCurTimeStamp > elapsedTime) {


    auto sleepTime = static_cast<unsigned int >(mCurTimeStamp - elapsedTime);
    // 限制休眠时间
    sleepTime = sleepTime > DELAY_THRESHOLD ? DELAY_THRESHOLD : sleepTime;
	// 解码速度太快,等待...
    av_usleep(sleepTime * 1000);
}
三、总结
本文利用FFmpeg+ANativeWindow完成了视频的解码和渲染,并对解码速度向系统时钟实现了同步,下一篇文章我们将实现对音频流的解码和播放。
源码链接
git clone [email protected]:lorienzhang/HelloFFmpeg.git
# 检出 v2 tag 进行查看
git checkout v2