目录

一、介绍
论文地址:https://arxiv.org/abs/2302.05543
代码地址:GitHub - lllyasviel/ControlNet: Let us control diffusion models!
扩散模型(Diffusion Model)的主要思想是通过去噪的的方式生成图片,训练过程是每个时间步,将不同“浓度”的噪声掺到原图片,然后将时间步(timestep)和掺了噪声的图片作为输入,模型负责预测噪声,再用输入图像减去噪声然后得到原图。就像米开朗基罗说的:塑像本来就在石头里,我只是把不需要的部分去掉。这也是为什么在使用Stable Diffusion时Sampling steps不是越大越好的原因,这个值需要跟当前噪声图片所处的时间步相对应。
ControlNet在大型预训练扩散模型(Stable Diffusion)的基础上实现了更多的输入条件,如边缘映射、分割映射和关键点等图片加上文字作为Prompt生成新的图片,同时也是stable-diffusion-webui的重要插件。ControlNet因为使用了冻结参数的Stable Diffusion和零卷积,使得即使使用个人电脑在小的数据集上fine-tuning效果也不会下降,从而实现了以端到端方式学习特定任务的条件目的。
ControlNet主要有两点创新:
1.使用Stable Diffusion并冻结其参数,同时copy一份SDEncoder的副本,这个副本的参数是可训练的。这样做的好处有两个:
a.制作这样的副本而不是直接训练原始权重的目的是为了避免在数据集很小时的过拟合,同时保持了从数十亿张图像中学习到的大模型质量。
b.由于原始的权值被锁定了,所以不需要对原始的编码器进行梯度计算来进行训练。这可以加快训练速度;因为不用计算原始模型上参数的梯度,所以节省了GPU内存。
2.零卷积 :即初始权重和bias都是零的卷积。在副本中每层增加一个零卷积与原始网络的对应层相连。在第一步训练中,神经网络块的可训练副本和锁定副本的所有输入和输出都是一致的,就好像ControlNet不存在一样。换句话说,在任何优化之前,ControlNet都不会对深度神经特征造成任何影响,任何进一步的优化都会使模型性能提升,并且训练速度很快。
二、使用方法
项目中提供了很多功能比如:线图成图、分割图生图、pose生图等,使用方法大同小异,我们以线图成图为例。
下载预训练模型,地址:lllyasviel/ControlNet at main,下载control_sd15_canny.pth模型,放到models目录。
执行下面命令,即可启动项目,:
python gradio_canny2image.py启动后访问 http://127.0.0.1/7860,打开页面如下:
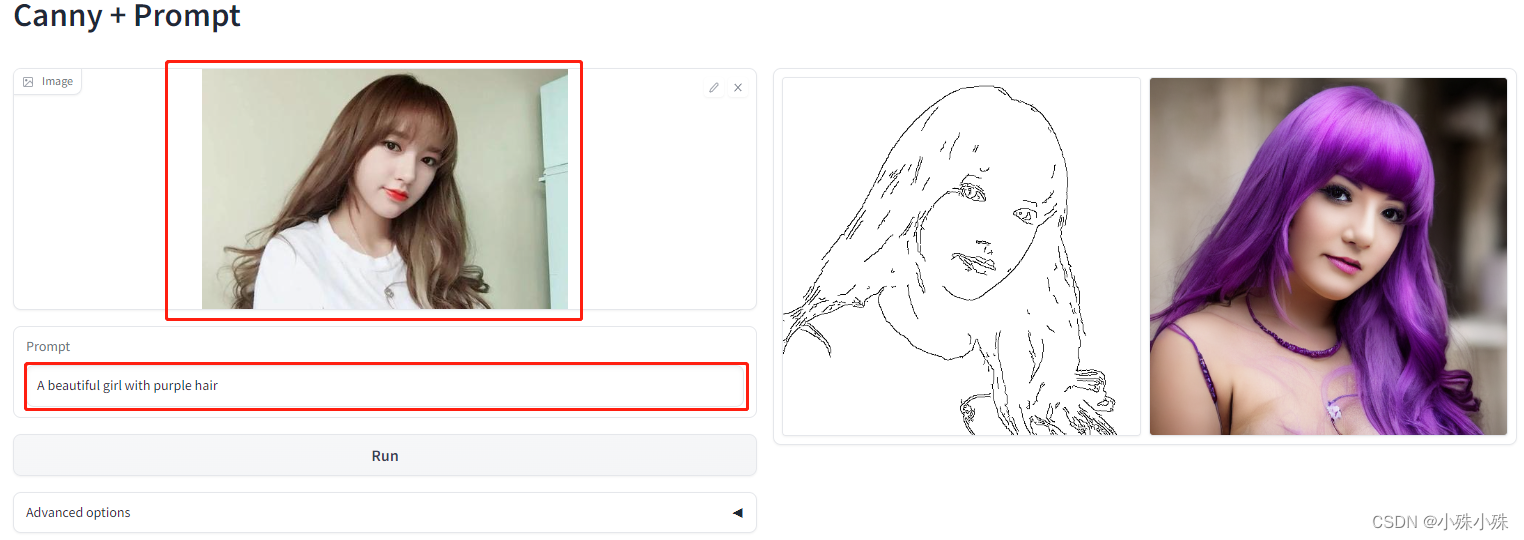
第一个红框上传图片、第二个红框填写prompt,只支持英文,等待一会右侧会生成两张图,一个是根据原图生成的Canny图,另一个是根据Canny图和prompt生成的结果图,可以看到模型理解了我的意思生成的女孩头发是紫色,至于漂不漂亮就仁者见仁智者见智了。
点击Advanced options会出现附加选项,我简单介绍一下每个选项的意思:
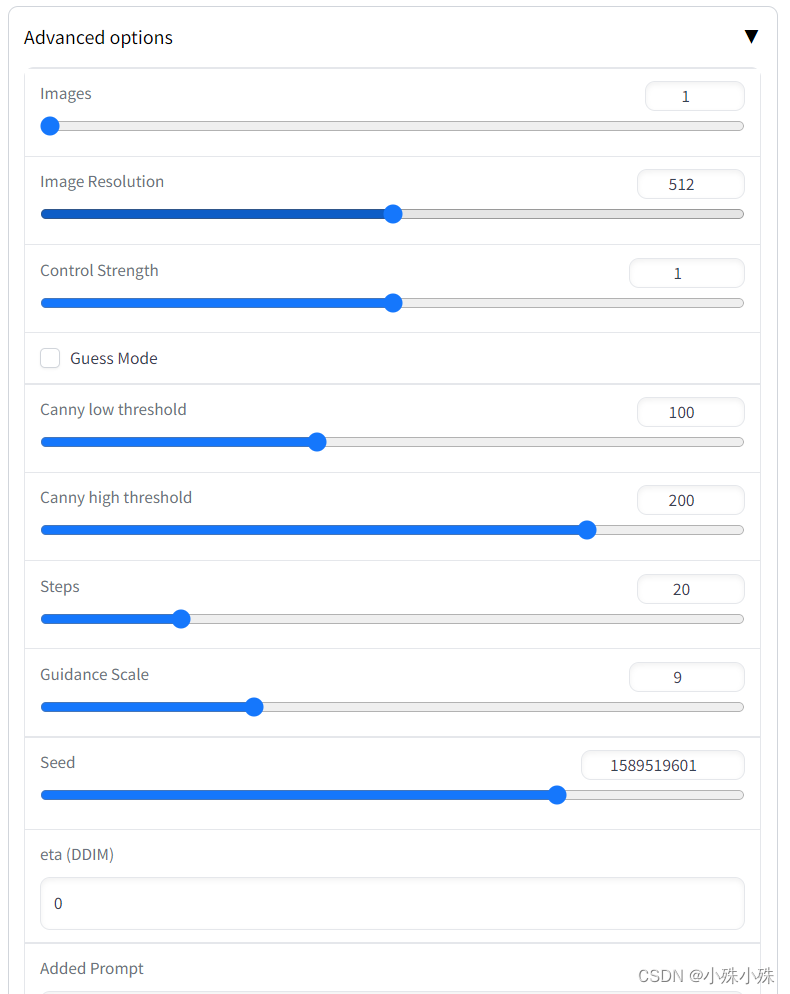
Images:生成几张图片,如果调很大,小心爆显存。
Image Resolution:生成的图片分辨率。
Control Strength:下面会介绍到,ControlNet分成Stable Diffusion和ControlNet两部分,这个参数是ControlNet所占的权重,当下面的Guess Mode未选中ControlNet部分的权重全都是这个值;如果下面的Guess Mode选中,在ControlNet部分每层(共13层)的权重会递增,范围从0到1。递增的代码如下,注释挺有意思:
# 位置 gradio_canny2image.py
# Magic number. IDK why. Perhaps because 0.825**12<0.01 but 0.826**12>0.01
model.control_scales = [strength * (0.825 ** float(12 - i)) for i in range(13)] if guess_mode else ([strength] * 13)
Guess Mode:不选中,模型在处理Negative Prompt部分时,Stable Diffusion和ControlNet两部分全有效;选中,在处理Negative Prompt部分时,只走Stable Diffusion分支,ControlNet部分无效。代码分两部分:
# 位置 gradio_canny2image.py
...
un_cond = {"c_concat": None if guess_mode else [control], "c_crossattn": [model.get_learned_conditioning([n_prompt] * num_samples)]}
...

# 位置 cldm/cldm.py
if cond['c_concat'] is None:
            eps = diffusion_model(x=x_noisy, timesteps=t, context=cond_txt, control=None, only_mid_control=self.only_mid_control)
        else:
            # ControlNet()  # 位置
            control = self.control_model(x=x_noisy, hint=torch.cat(cond['c_concat'], 1), timesteps=t, context=cond_txt)
            control = [c * scale for c, scale in zip(control, self.control_scales)]
            # ControlledUnetModel()  # 位置
            eps = diffusion_model(x=x_noisy, timesteps=t, context=cond_txt, control=control, only_mid_control=self.only_mid_control)
Canny low threshold:Canny的参数,如果边缘像素值小于低阈值,则会被抑制。
Canny high threshold:Canny的参数,边缘像素的值高于高阈值,将其标记为强边缘像素。
Steps:执行多少次“去噪”操作。
Guidance Scale:正向prompt所占比重,下面代码中的unconditional_guidance_scale就是这个参数,model_t是正向prompt+Added Prompt生成的特征,model_uncond是Negative Prompt生成的特征:
# 位置 cldm/ddim_hacked.py
model_output = model_uncond + unconditional_guidance_scale * (model_t - model_uncond)
Seed:生成噪声图时的随机种子,当这个值一定,其他条件不变的情况下,生成的结果也不变。
eta (DDIM):DDIM采样中的eta值。
Added Prompt:附加的正面prompt,比如best quality, extremely detailed
Negative Prompt:附件的负面prompt,如果生成的图不满意,哪部分不满意可以写在这里,比如longbody, lowres, bad anatomy
三、ControlNet结构
ControlNet官方给出的结构图如下:
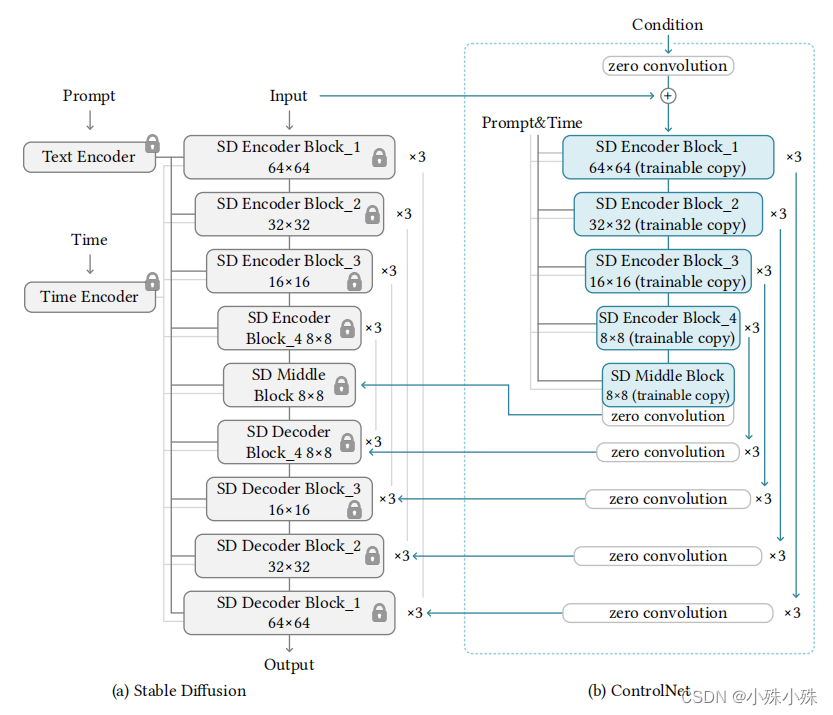
这个图总体概括了ControlNet的结构,但是很多细节没有表现出来,通过阅读代码我给出更加详细的模型结构介绍。项目中训练使用的数据输入512x512,我为了能区分宽高,使用1024x512的输入,我们以canny2image为例,并且batch_size=1。
1.整体结构
模型整体结构图如下:
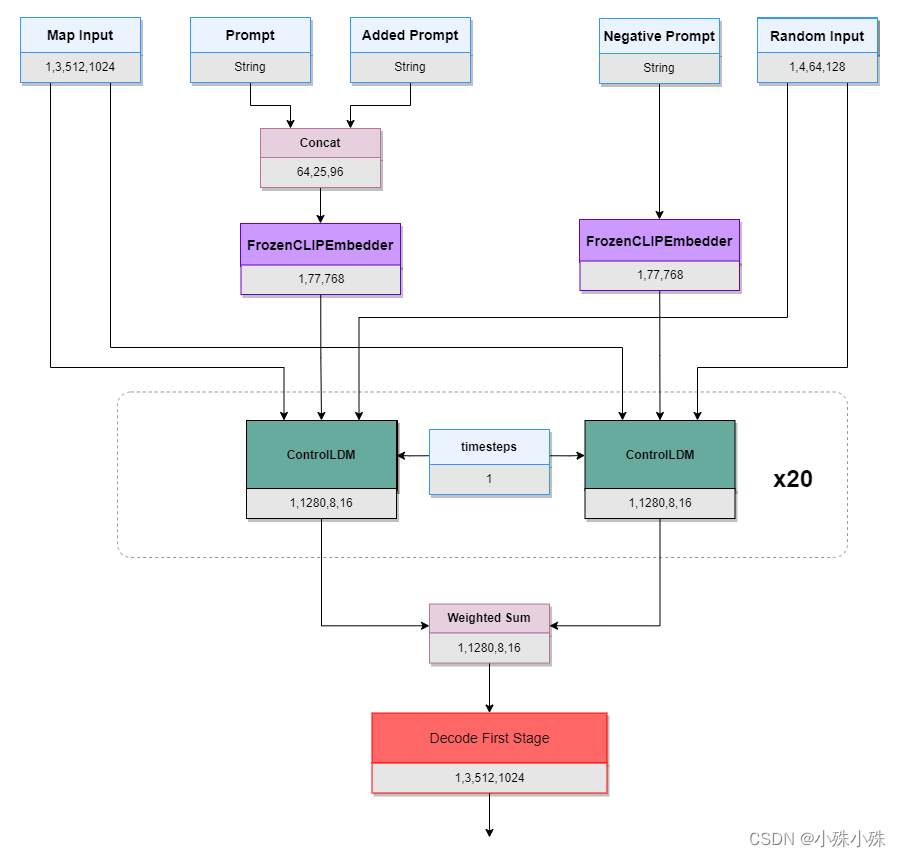
模型输入包括canny图(Map Input)、Prompt、附加Prompt(Added Prompt)、负面Prompt(Negative Prompt)、随机图(Random Input)。
Prompt和Added Prompt连个字符串拼接到一起经过CLIPEmbedder得到文本的空间表示(两个FrozenCLIPEmbedder共享参数),然后与Map Input、Random Input一同送入ControlNet的核心模块ControlLDM(Latent Diffusion),然后循环20次(对应页面参数Steps),其中timesteps每个时间步不一样,以Steps=20为例,timesteps分别等于[1,51,101,151,201,251,301,351,401,451,501,551,601,651,701,751,801,851,901,951]。
Negative Prompt也做类似操作,然后将Prompt和Prompt的输出做加权,公式如下,其中GuidanceScale为页面参数,默认9:
最后经过Decode First Stage还原成原图片大小。
2.ControlLDM
ControlLDM是ControlNet的核心模块,结构图如下:
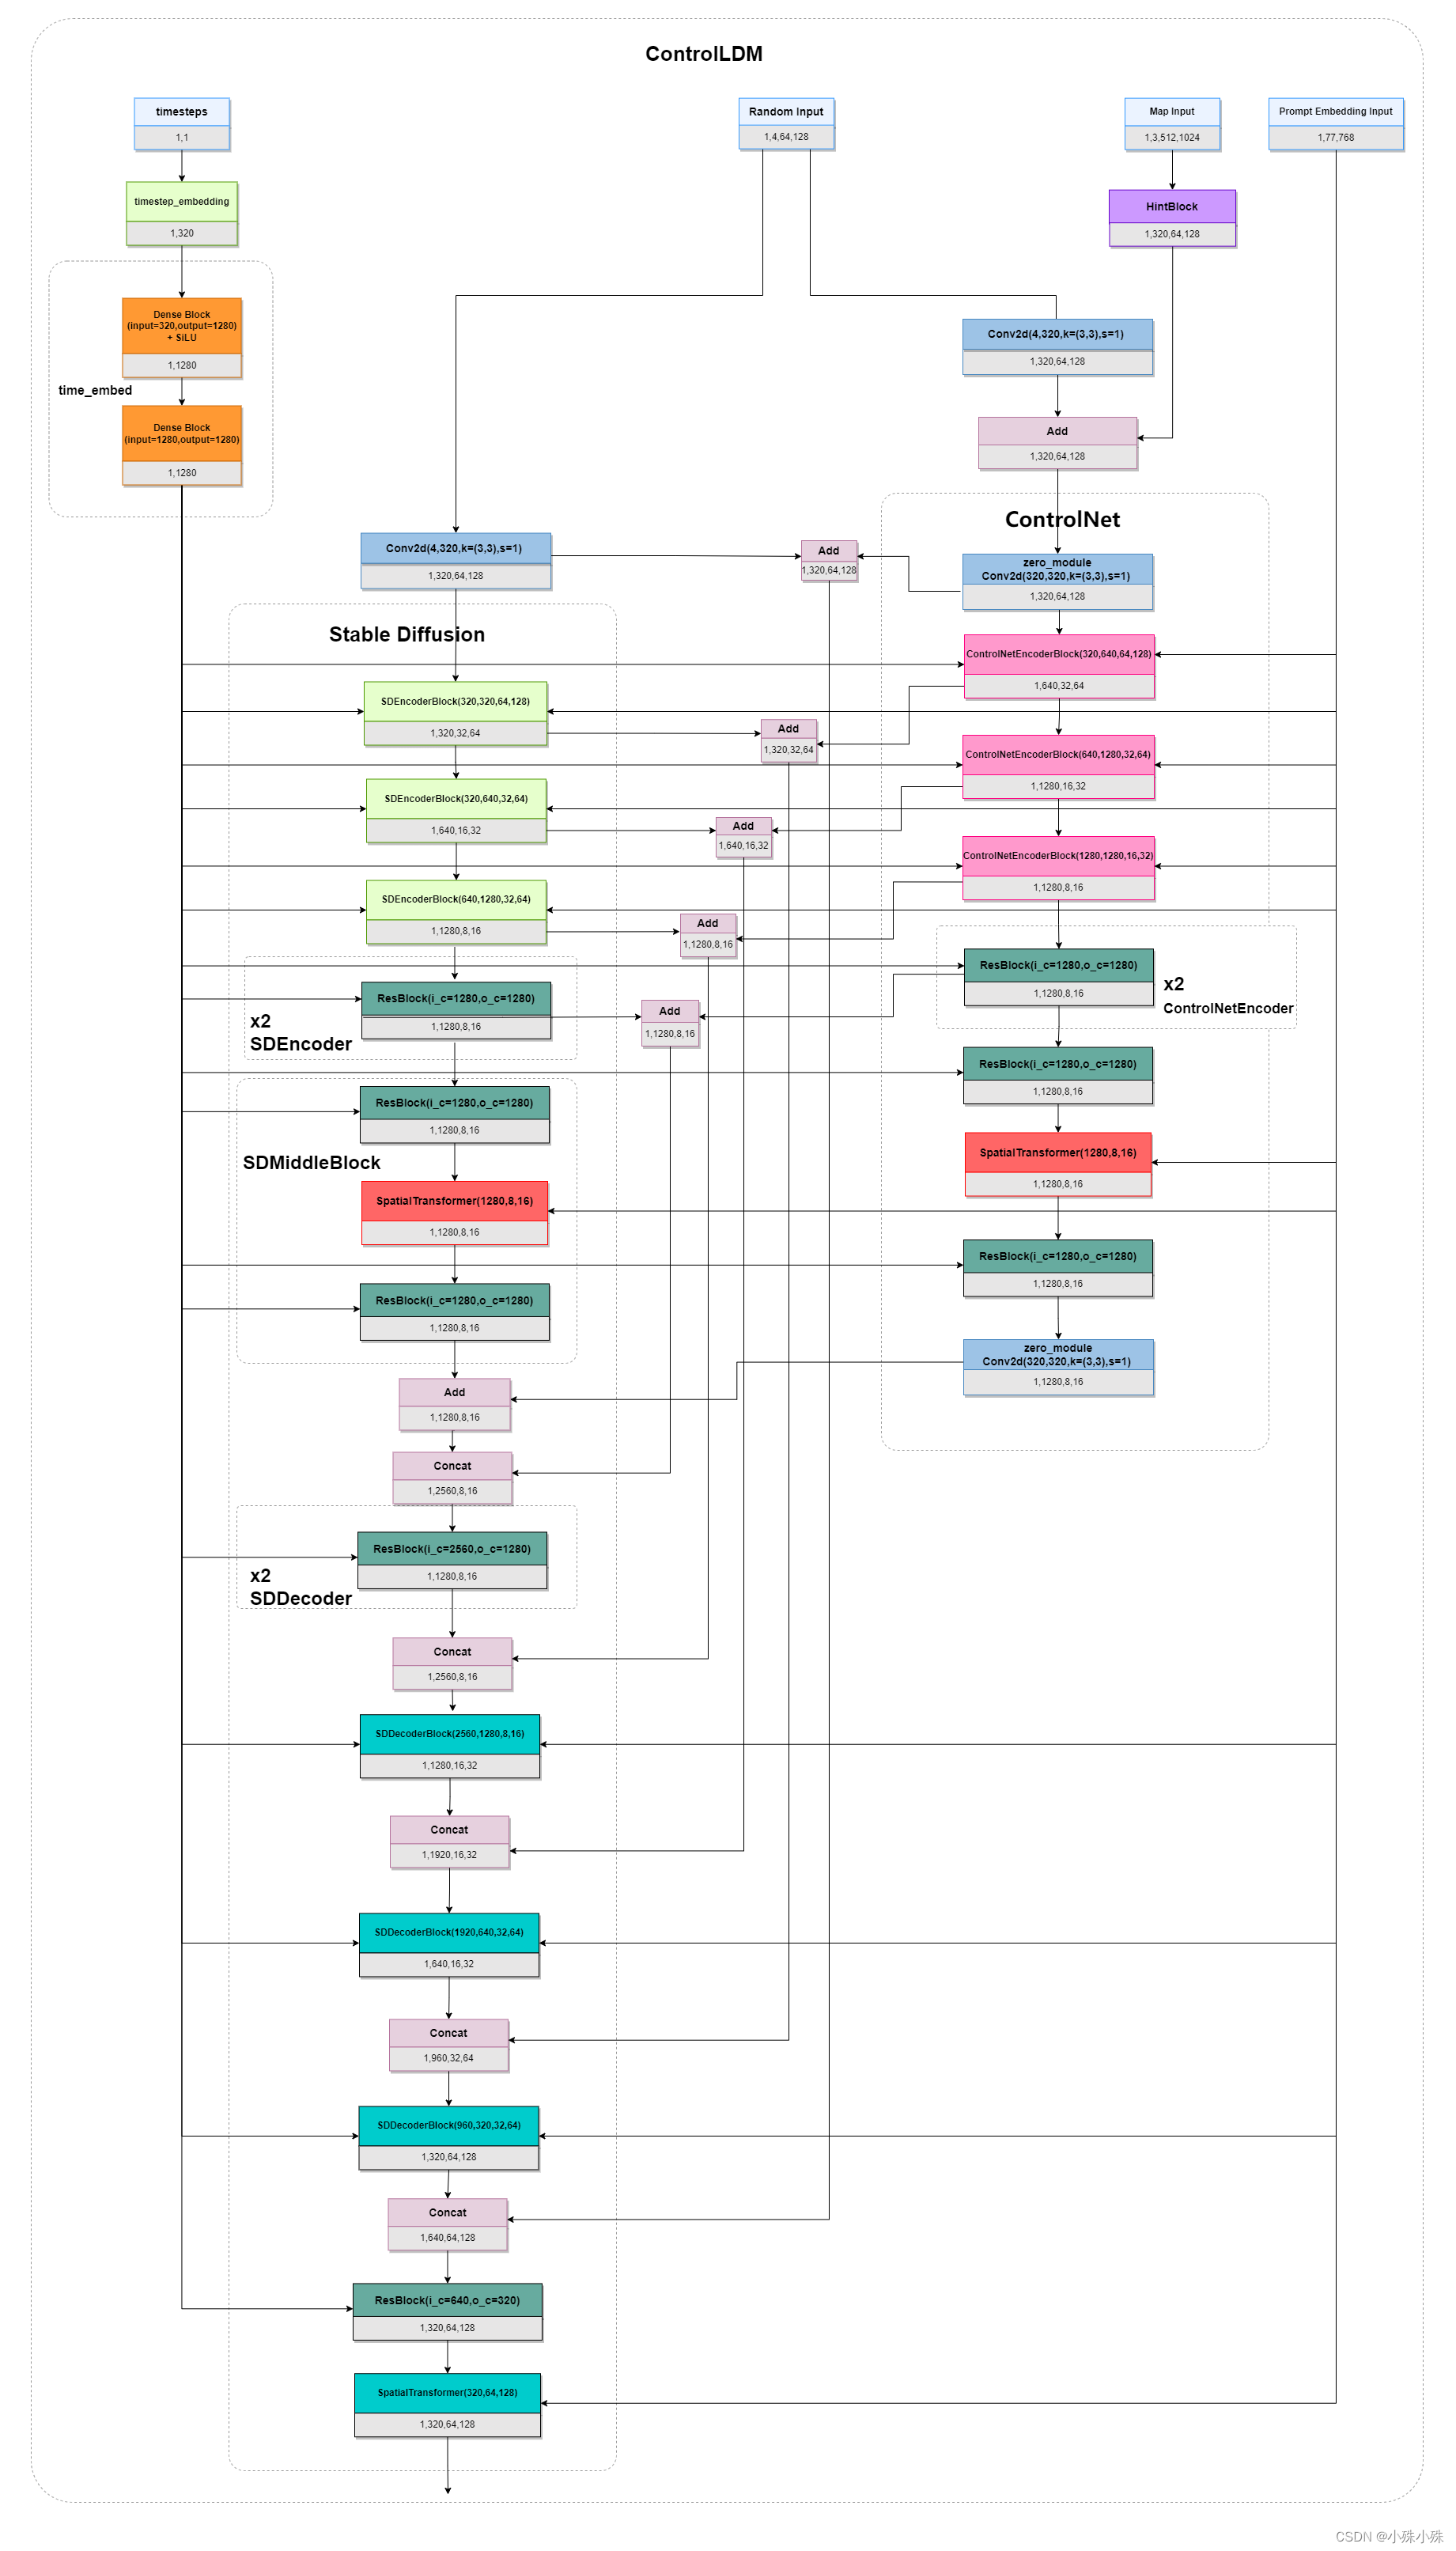
ControlLDM整体结构还算清晰,数据流转主要流程如下:
a.timesteps经过embedding转换为特征向量送入Stable Diffusion和ControlNet;
b.随机噪声被送入Stable Diffusion;
c.图像的Map经过HintBlock,与随机噪声相加,送入ControlNet;
d.Prompt的Embedding送入Stable Diffusion和ControlNet;
e.Stable Diffusion的所有参数被冻结不参与训练,Stable Diffusion由三个SDEncoderBlock、两个SDEncoder、一个SDMiddleBlock、两个SDDecoder和三个SDDecoderBlock组成;
f.ControlNet的结构与Stable Diffusion一致,只是每层后面增加一个零卷积;
g.Stable Diffusion和ControlNet中的ResBlock将上一层的输出和timesteps作为输入;
h.Stable Diffusion和ControlNet中的SpatialTransformer将上一层的输出和Prompt Embedding 作为输入。
图中还有一些模块需要单独说一下。
3.Timestep Embedding
timestep是模型的重要输入,直接影响去噪效果,timestep输入时是一个数字,经过Timestep Embedding变成长度是1280embedding。
代码如下:
# 位置 ldm/modules/diffusionmodules/util.py
def timestep_embedding(timesteps, dim, max_period=10000, repeat_only=False):
    """
    Create sinusoidal timestep embeddings.
    :param timesteps: a 1-D Tensor of N indices, one per batch element.
                      These may be fractional.
    :param dim: the dimension of the output.
    :param max_period: controls the minimum frequency of the embeddings.
    :return: an [N x dim] Tensor of positional embeddings.
    """
    if not repeat_only:
        half = dim // 2
        freqs = torch.exp(
            -math.log(max_period) * torch.arange(start=0, end=half, dtype=torch.float32) / half
        ).to(device=timesteps.device)
        args = timesteps[:, None].float() * freqs[None]
        embedding = torch.cat([torch.cos(args), torch.sin(args)], dim=-1)
        if dim % 2:
            embedding = torch.cat([embedding, torch.zeros_like(embedding[:, :1])], dim=-1)
    else:
        embedding = repeat(timesteps, 'b -> b d', d=dim)
    return embedding
4.HintBlock
HintBlock的主要功能是在输入的图像Map与其他特征融合前,先提取一波特征,属于常见的操作。HintBlock堆叠了几层卷积,以一个零卷积结尾,提升了Map的channel缩小了size。
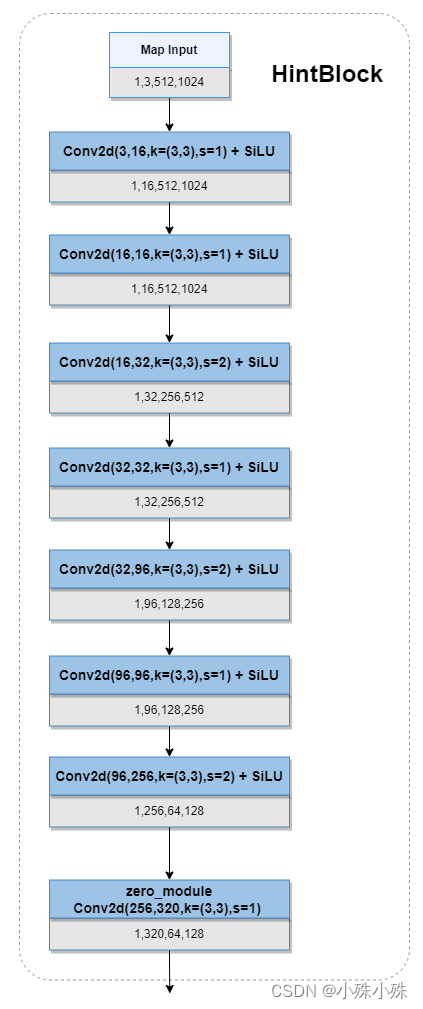
代码实现:
# 位置cldm/cldm.py
self.input_hint_block = TimestepEmbedSequential(
            conv_nd(dims, hint_channels, 16, 3, padding=1),
            nn.SiLU(),
            conv_nd(dims, 16, 16, 3, padding=1),
            nn.SiLU(),
            conv_nd(dims, 16, 32, 3, padding=1, stride=2),
            nn.SiLU(),
            conv_nd(dims, 32, 32, 3, padding=1),
            nn.SiLU(),
            conv_nd(dims, 32, 96, 3, padding=1, stride=2),
            nn.SiLU(),
            conv_nd(dims, 96, 96, 3, padding=1),
            nn.SiLU(),
            conv_nd(dims, 96, 256, 3, padding=1, stride=2),
            nn.SiLU(),
            zero_module(conv_nd(dims, 256, model_channels, 3, padding=1))
        )
5.ResBlock
ResBlock主要负责融合时间步的Embedding和上一层的输出,Embedding分支用到了全连接,参数激增;同时也使用了GroupNorm,一定程度的节省了算力,因为有一个残差边,ResBlock由此得名,结构如下:
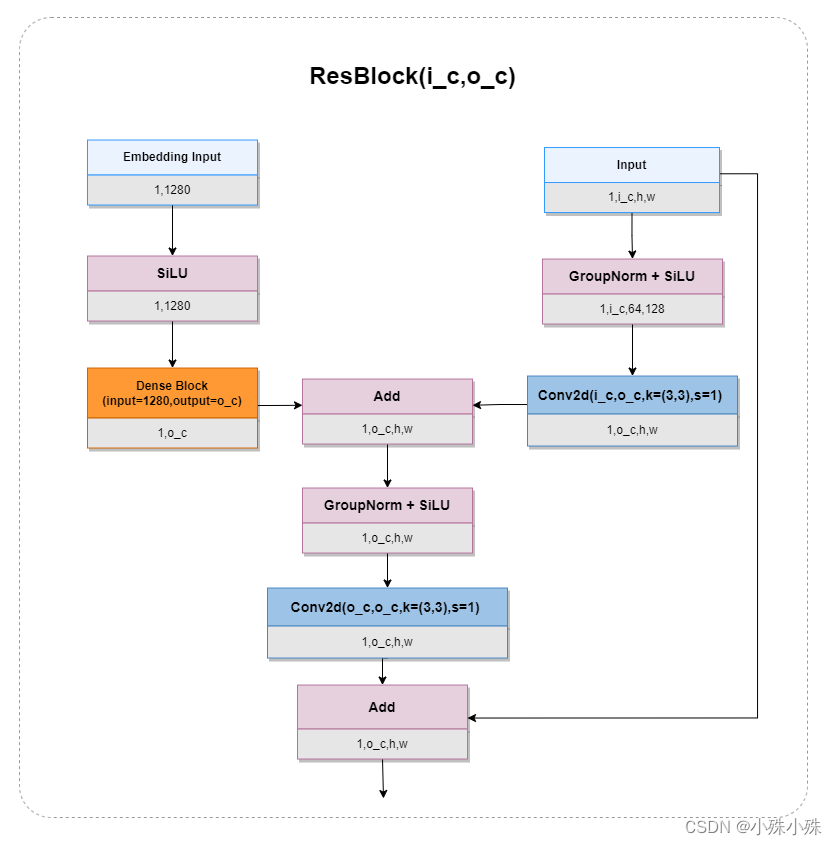
代码如下:
# 位置 ldm/modules/diffusionmodules/openaimodel.py
class ResBlock(TimestepBlock):
    """
    A residual block that can optionally change the number of channels.
    :param channels: the number of input channels.
    :param emb_channels: the number of timestep embedding channels.
    :param dropout: the rate of dropout.
    :param out_channels: if specified, the number of out channels.
    :param use_conv: if True and out_channels is specified, use a spatial
        convolution instead of a smaller 1x1 convolution to change the
        channels in the skip connection.
    :param dims: determines if the signal is 1D, 2D, or 3D.
    :param use_checkpoint: if True, use gradient checkpointing on this module.
    :param up: if True, use this block for upsampling.
    :param down: if True, use this block for downsampling.
    """

    def __init__(
        self,
        channels,
        emb_channels,
        dropout,
        out_channels=None,
        use_conv=False,
        use_scale_shift_norm=False,
        dims=2,
        use_checkpoint=False,
        up=False,
        down=False,
    ):
        super().__init__()
        self.channels = channels
        self.emb_channels = emb_channels
        self.dropout = dropout
        self.out_channels = out_channels or channels
        self.use_conv = use_conv
        self.use_checkpoint = use_checkpoint
        self.use_scale_shift_norm = use_scale_shift_norm

        self.in_layers = nn.Sequential(
            normalization(channels),
            nn.SiLU(),
            conv_nd(dims, channels, self.out_channels, 3, padding=1),
        )

        self.updown = up or down

        if up:
            self.h_upd = Upsample(channels, False, dims)
            self.x_upd = Upsample(channels, False, dims)
        elif down:
            self.h_upd = Downsample(channels, False, dims)
            self.x_upd = Downsample(channels, False, dims)
        else:
            self.h_upd = self.x_upd = nn.Identity()

        self.emb_layers = nn.Sequential(
            nn.SiLU(),
            linear(
                emb_channels,
                2 * self.out_channels if use_scale_shift_norm else self.out_channels,
            ),
        )
        self.out_layers = nn.Sequential(
            normalization(self.out_channels),
            nn.SiLU(),
            nn.Dropout(p=dropout),
            zero_module(
                conv_nd(dims, self.out_channels, self.out_channels, 3, padding=1)
            ),
        )

        if self.out_channels == channels:
            self.skip_connection = nn.Identity()
        elif use_conv:
            self.skip_connection = conv_nd(
                dims, channels, self.out_channels, 3, padding=1
            )
        else:
            self.skip_connection = conv_nd(dims, channels, self.out_channels, 1)

    def forward(self, x, emb):
        """
        Apply the block to a Tensor, conditioned on a timestep embedding.
        :param x: an [N x C x ...] Tensor of features.
        :param emb: an [N x emb_channels] Tensor of timestep embeddings.
        :return: an [N x C x ...] Tensor of outputs.
        """
        return checkpoint(
            self._forward, (x, emb), self.parameters(), self.use_checkpoint
        )


    def _forward(self, x, emb):
        if self.updown:
            in_rest, in_conv = self.in_layers[:-1], self.in_layers[-1]
            h = in_rest(x)
            h = self.h_upd(h)
            x = self.x_upd(x)
            h = in_conv(h)
        else:
            h = self.in_layers(x)
        emb_out = self.emb_layers(emb).type(h.dtype)
        while len(emb_out.shape) < len(h.shape):
            emb_out = emb_out[..., None]
        if self.use_scale_shift_norm:
            out_norm, out_rest = self.out_layers[0], self.out_layers[1:]
            scale, shift = th.chunk(emb_out, 2, dim=1)
            h = out_norm(h) * (1 + scale) + shift
            h = out_rest(h)
        else:
            h = h + emb_out
            h = self.out_layers(h)
        return self.skip_connection(x) + h
6.SpatialTransformer
SpatialTransformer主要负责融合Prompt Embedding和上一层的输出,结构如下:
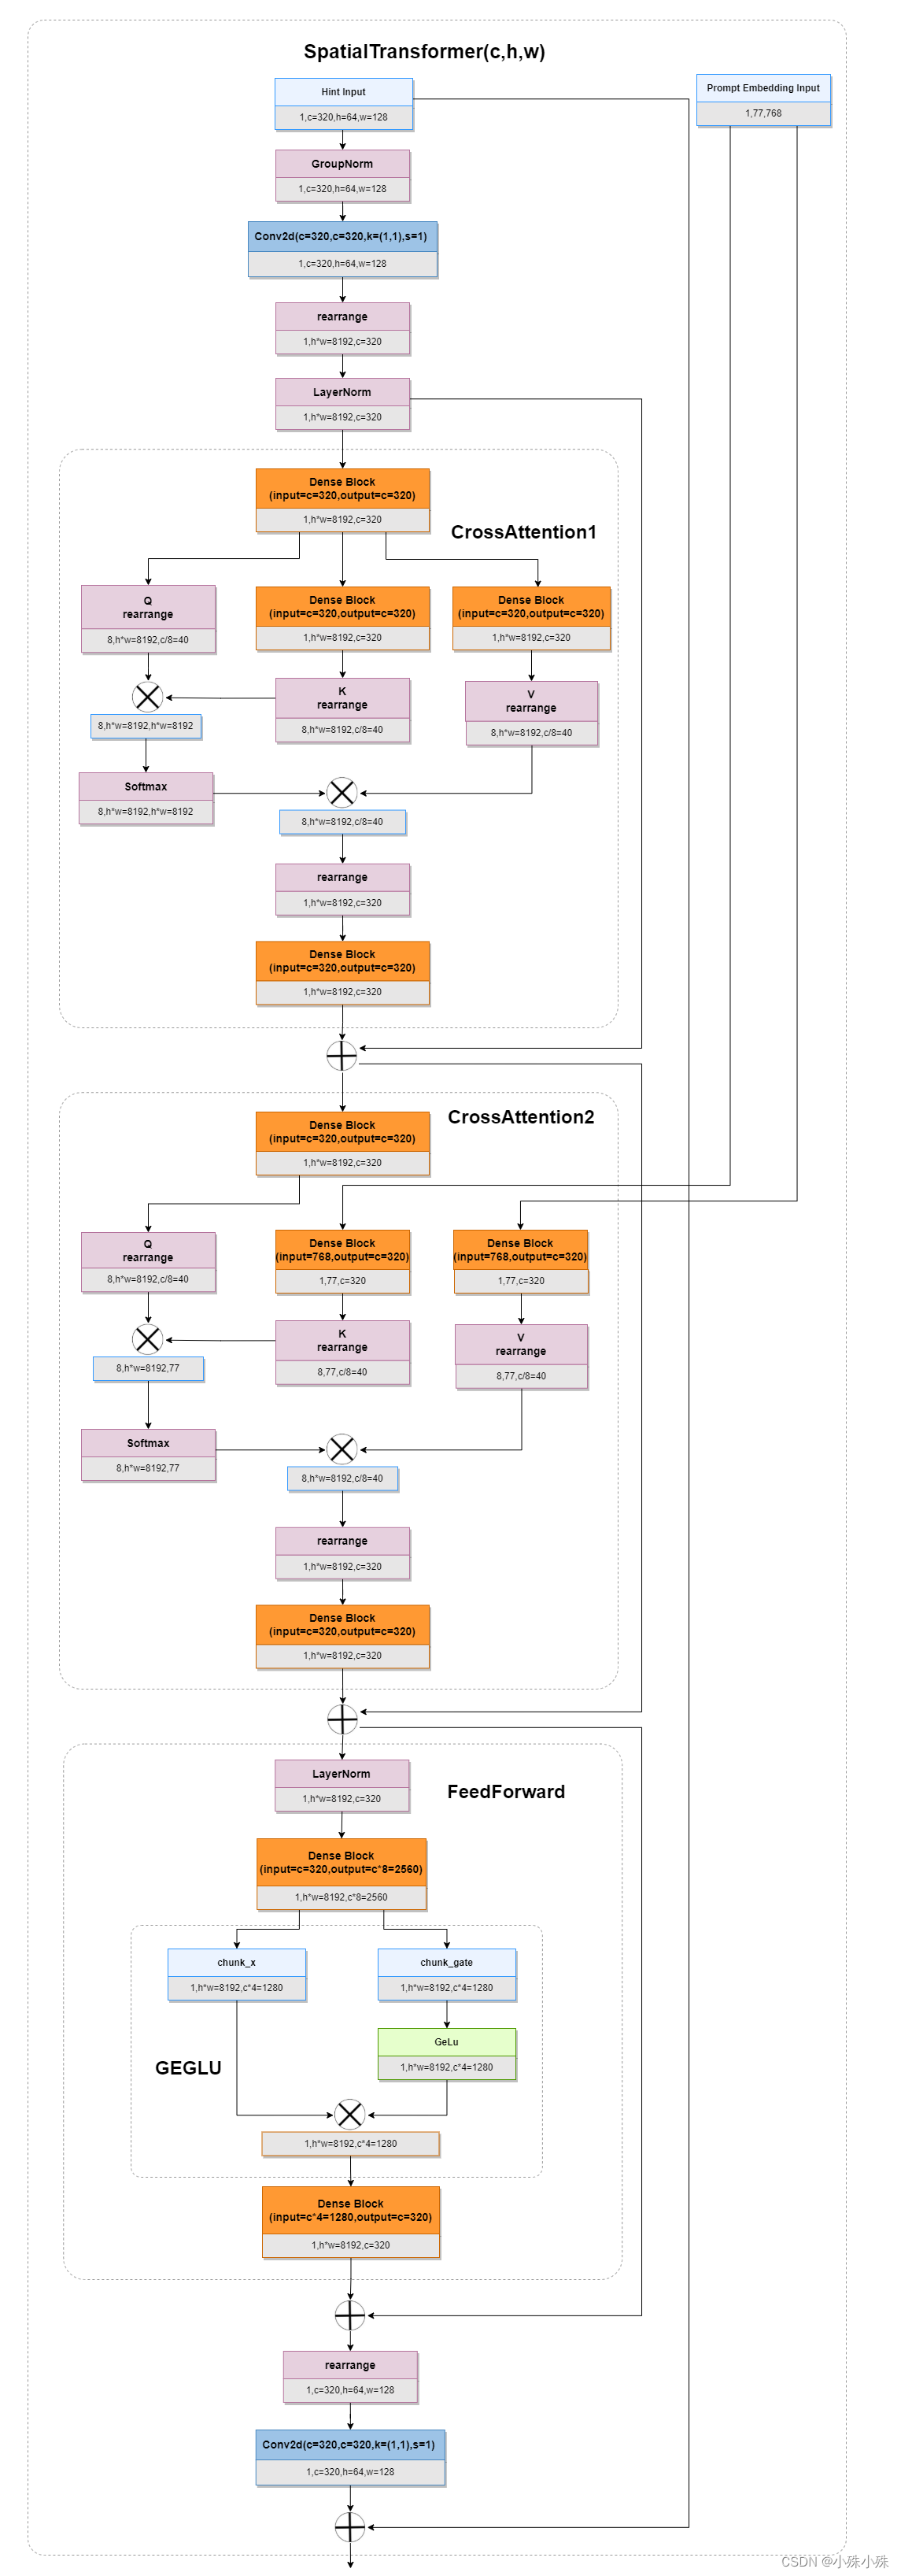
如上图所示,SpatialTransformer主要由两个CrossAttention模块和一个FeedForward模块组成。
CrossAttention1将上一个层的输出作为输入,将输入平分成三分,分别经过两个全连接得到K和V,K乘以Q经过Softmax得到一个概率图,让后在于V相乘,是一个比较标准的Attention结构,其实跟像是一个Self Attention。
CrossAttention2和CrossAttention1的大体结构一样,不同的是K和V是由Prompt Embedding生成的。经过了两个CrossAttention,图像特征与Prompt Embedding已经融合到一起了。
FeedForward模块使用了GEGLU,头尾有两个全连接层,进一步提取融合之后的特征。
代码实现:
# 位置 ldm/modules/attention.py
class BasicTransformerBlock(nn.Module):
ATTENTION_MODES = {
"softmax": CrossAttention, # vanilla attention
"softmax-xformers": MemoryEfficientCrossAttention
}
def __init__(self, dim, n_heads, d_head, dropout=0., context_dim=None, gated_ff=True, checkpoint=True,
disable_self_attn=False):
super().__init__()
attn_mode = "softmax-xformers" if XFORMERS_IS_AVAILBLE else "softmax"
assert attn_mode in self.ATTENTION_MODES
attn_cls = self.ATTENTION_MODES[attn_mode]
self.disable_self_attn = disable_self_attn
self.attn1 = attn_cls(query_dim=dim, heads=n_heads, dim_head=d_head, dropout=dropout,
context_dim=context_dim if self.disable_self_attn else None) # is a self-attention if not self.disable_self_attn
self.ff = FeedForward(dim, dropout=dropout, glu=gated_ff)
self.attn2 = attn_cls(query_dim=dim, context_dim=context_dim,
heads=n_heads, dim_head=d_head, dropout=dropout) # is self-attn if context is none
self.norm1 = nn.LayerNorm(dim)
self.norm2 = nn.LayerNorm(dim)
self.norm3 = nn.LayerNorm(dim)
self.checkpoint = checkpoint
def forward(self, x, context=None):
return checkpoint(self._forward, (x, context), self.parameters(), self.checkpoint)
def _forward(self, x, context=None):
x = self.attn1(self.norm1(x), context=context if self.disable_self_attn else None) + x
x = self.attn2(self.norm2(x), context=context) + x
x = self.ff(self.norm3(x)) + x
return x
class SpatialTransformer(nn.Module):
"""
Transformer block for image-like data.
First, project the input (aka embedding)
and reshape to b, t, d.
Then apply standard transformer action.
Finally, reshape to image
NEW: use_linear for more efficiency instead of the 1x1 convs
"""
def __init__(self, in_channels, n_heads, d_head,
depth=1, dropout=0., context_dim=None,
disable_self_attn=False, use_linear=False,
use_checkpoint=True):
super().__init__()
if exists(context_dim) and not isinstance(context_dim, list):
context_dim = [context_dim]
self.in_channels = in_channels
inner_dim = n_heads * d_head
self.norm = Normalize(in_channels)
if not use_linear:
self.proj_in = nn.Conv2d(in_channels,
inner_dim,
kernel_size=1,
stride=1,
padding=0)
else:
self.proj_in = nn.Linear(in_channels, inner_dim)
self.transformer_blocks = nn.ModuleList(
[BasicTransformerBlock(inner_dim, n_heads, d_head, dropout=dropout, context_dim=context_dim[d],
disable_self_attn=disable_self_attn, checkpoint=use_checkpoint)
for d in range(depth)]
)
if not use_linear:
self.proj_out = zero_module(nn.Conv2d(inner_dim,
in_channels,
kernel_size=1,
stride=1,
padding=0))
else:
self.proj_out = zero_module(nn.Linear(in_channels, inner_dim))
self.use_linear = use_linear
def forward(self, x, context=None):
# note: if no context is given, cross-attention defaults to self-attention
if not isinstance(context, list):
context = [context]
b, c, h, w = x.shape
x_in = x
x = self.norm(x)
if not self.use_linear:
x = self.proj_in(x)
x = rearrange(x, 'b c h w -> b (h w) c').contiguous()
if self.use_linear:
x = self.proj_in(x)
for i, block in enumerate(self.transformer_blocks):
x = block(x, context=context[i])
if self.use_linear:
x = self.proj_out(x)
x = rearrange(x, 'b (h w) c -> b c h w', h=h, w=w).contiguous()
if not self.use_linear:
x = self.proj_out(x)
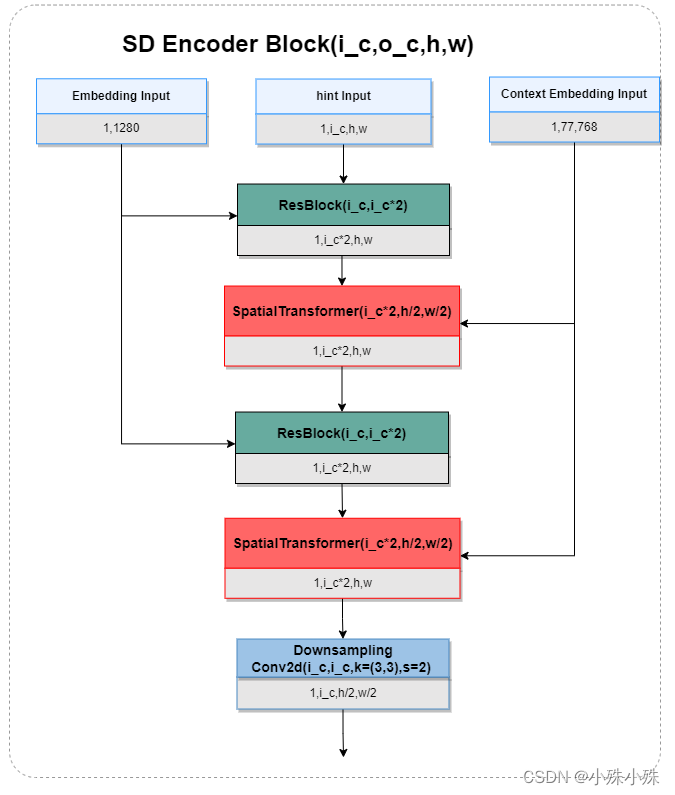
return x + x_in7.SD Encoder Block
SD Encoder Block是Stable Diffusion编码阶段的组成单元,是编码阶段的模块,主要是ResBlock和SpatialTransformer的堆叠,实现了timestep、hint Map、和PromptEmbedding的特征融合,同时进行下采样,增加特征图的通道数。值得注意的是,这部分代码是冻结的,结构图如下:
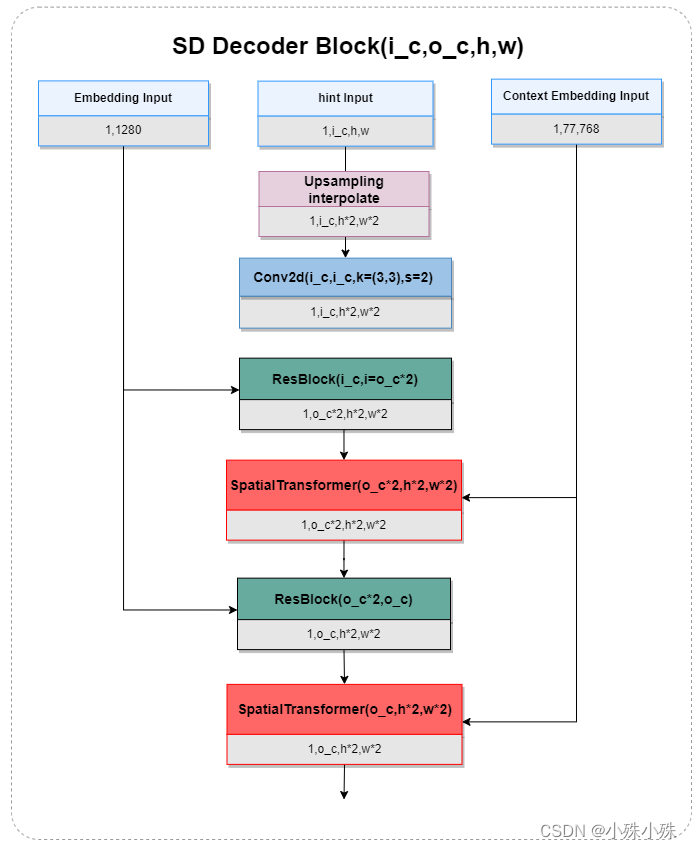
8.SD Decoder Block
SD Decoder Block也是Stable Diffusion编码阶段的组成单元,是解码阶段的模块,主要也是ResBlock和SpatialTransformer的堆叠,实现了timestep、hint Map、和PromptEmbedding的特征融合,同时进行上采样,减少特征图的通道数。这部分代码也是冻结的。结构图如下:
SD Encoder Block + SD Decoder Block代码实现:
# 位置 cldm/cldm.py
class ControlledUnetModel(UNetModel):
def forward(self, x, timesteps=None, context=None, control=None, only_mid_control=False, **kwargs):
hs = []
with torch.no_grad():
t_emb = timestep_embedding(timesteps, self.model_channels, repeat_only=False)
emb = self.time_embed(t_emb)
h = x.type(self.dtype)
for module in self.input_blocks:
h = module(h, emb, context)
hs.append(h)
h = self.middle_block(h, emb, context)
if control is not None:
h += control.pop()
for i, module in enumerate(self.output_blocks):
if only_mid_control or control is None:
h = torch.cat([h, hs.pop()], dim=1)
else:
h = torch.cat([h, hs.pop() + control.pop()], dim=1)
h = module(h, emb, context)
h = h.type(x.dtype)
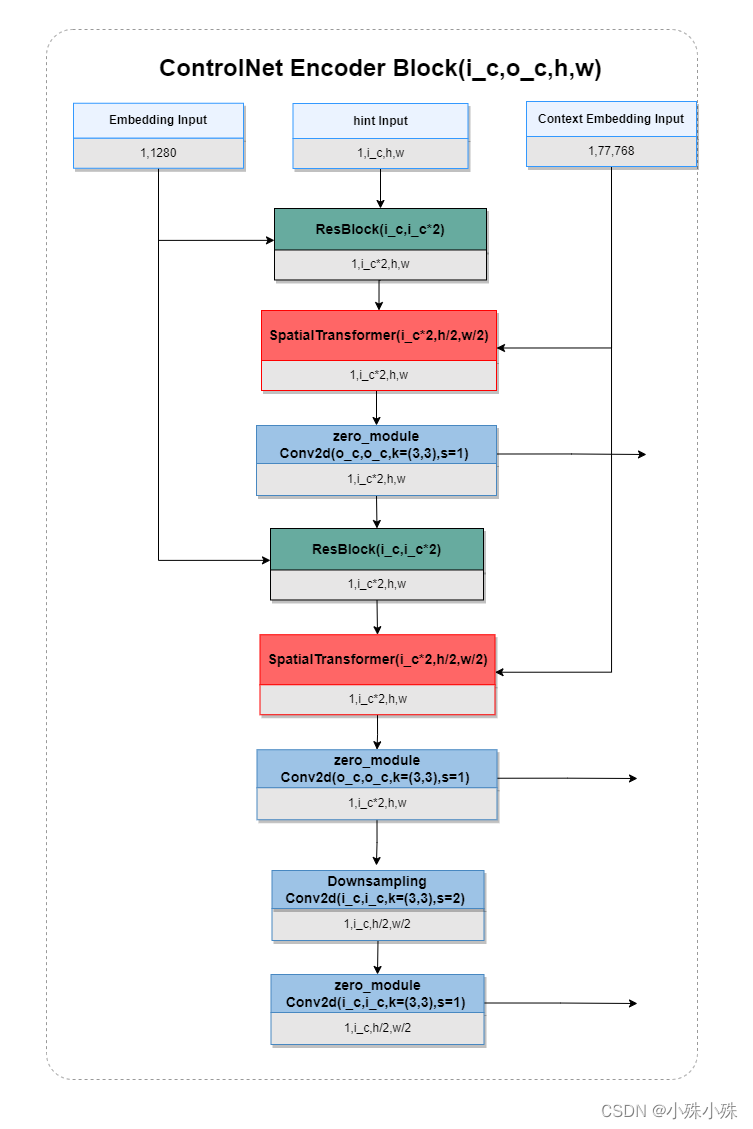
return self.out(h)9.ControlNet Encoder Block
ControlNet Encoder Block是克隆自SD Encoder Block,只是加入了零卷积,并且参数是可训练的,结构图如下:
10.Stable Diffusion
整个Stable Diffusion的参数都是冻结不可训练的,冻结参数的代码如下:
# 位置 cldm/cldm.py
def configure_optimizers(self):
        lr = self.learning_rate
        params = list(self.control_model.parameters())
        if not self.sd_locked:
            params += list(self.model.diffusion_model.output_blocks.parameters())
            params += list(self.model.diffusion_model.out.parameters())
        opt = torch.optim.AdamW(params, lr=lr)
        return opt
四、训练
ControlNet的训练也不复杂,主要是准备好数据集,我们还以canny2image为例。
1.准备数据集
训练数据需要3种文件,原图、cannyMap图和对应的Prompt,如果只是想训练流程跑通,可以使用fill50k数据集,如果要使用自己的数据集,就要准备自己需要的风格的图片了,下面我介绍如何获得cannyMap图和对应的Prompt。
a. 生成cannyMap
项目中有现成的页面用于生成cannyMap,执行如下命令:
python gradio_annotator.py输入控制台打印的地址,一般是 http://127.0.0.1:7860/ 。
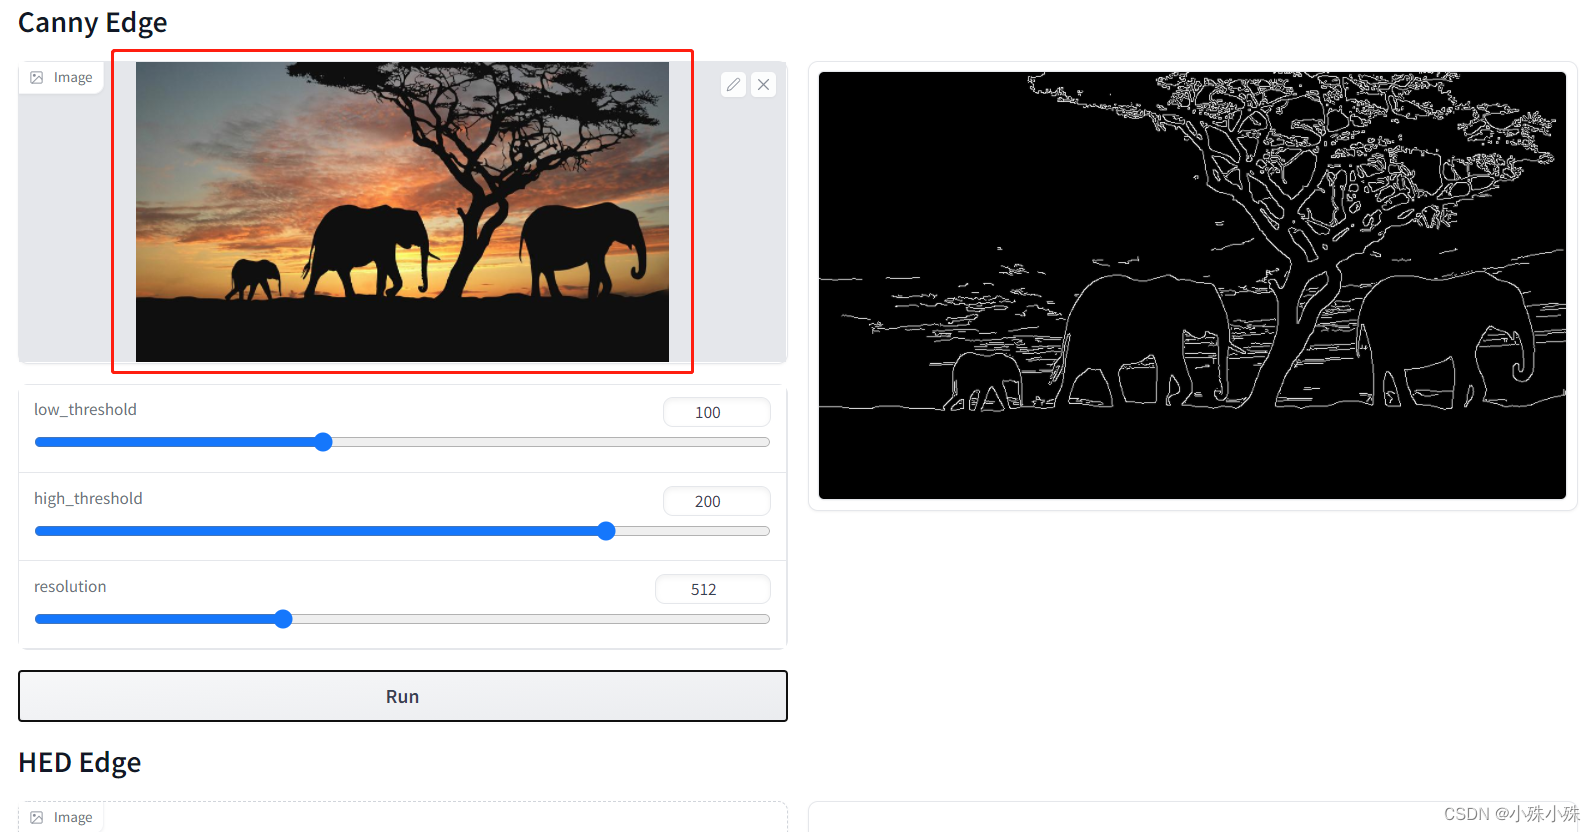
在上图的红框处上传图片,然后点击Run就生成cannyMap了,如果你的数据集不大,可以用这个方法,如果数据很多,就得写个简单的程序了,也很简单,掉下面这个方法就可以:
# 位置 gradio_annotator.py
def canny(img, res, l, h):
    img = resize_image(HWC3(img), res)
    global model_canny
    if model_canny is None:
        from annotator.canny import CannyDetector
        model_canny = CannyDetector()
    result = model_canny(img, l, h)
    return [result]
b.生成Prompt
生成Prompt最简单的方法是使用stable-different-webui,安装教程请跳转这里,使用deepbooru插件帮咱生成prompt,按照下面的红框做就可以了。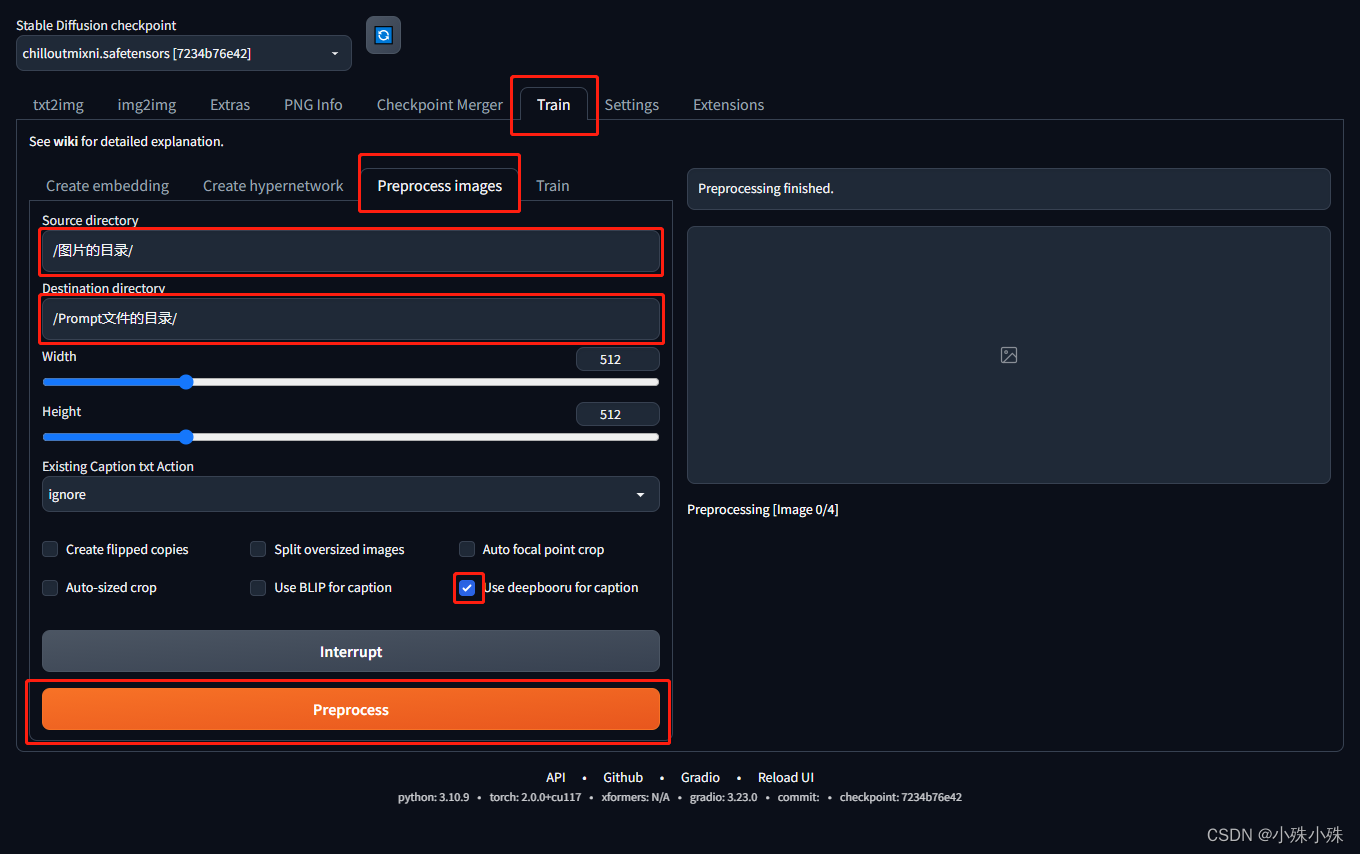
结果生成在上图第四个红框的目录下,目录结构下面这个样子:
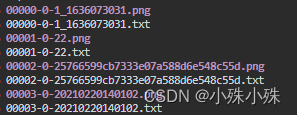
txt中的内容长这样:
1girl, asian, bangs, black_eyes, blunt_bangs, closed_mouth, lips, long_hair, looking_at_viewer, realistic, shirt, smile, solo, white_shirt
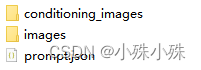
c.准备prompt.json文件
prompt.json文件内容结构如下,key的意义一目了然:

最终数据集目录结构如下:
d.修改数据集prompt.json路径
修改tutorial_train.py这个文件中prompt.json文件的目录:

2.生成ControlNet模型
我们可以从这里下载Stable Different的预训练模型放到models目录,然后通过下面的命令生成ControlNet模型,这一步主要是复制Stable Different Encoder的结构和参数:
python tool_add_control.py ./models/v1-5-pruned.ckpt ./models/control_sd15_ini.ckpt3.执行训练
我们终于来到了最激动人心的部分:训练!
python tutorial_train.py五、其它
1.损失函数
ControlNet论文中提到使用L2损失:
![]()
代码中其实还可以选择L1损失:
# 位置  ldm/models/diffusion/dpm_solver/ddpm.py
def get_loss(self, pred, target, mean=True):
        if self.loss_type == 'l1':
            loss = (target - pred).abs()
            if mean:
                loss = loss.mean()
        elif self.loss_type == 'l2':
            if mean:
                loss = torch.nn.functional.mse_loss(target, pred)
            else:
                loss = torch.nn.functional.mse_loss(target, pred, reduction='none')
        else:
            raise NotImplementedError("unknown loss type '{loss_type}'")

        return loss
2.随机替换提示
在训练过程中,会随机将50%的文本提示替换为空字符串。这有助于ControlNet从输入条件映射中识别语义内容的能力。这主要是因为当提示符对SD不可见时,编码器可以从Map输入中学习更多语义,以替代提示。
3.支持低资源设备
如果你的设备配置很低可以只训练ControlNet的中间部分,这样调整代码:
# 位置 tutorial_train.py
sd_locked = True
only_mid_control = True
如果配置一般,可以只用标准的训练过程,即冻结Stable Diffusion、训练ControlNet,这也是默认配置,代码如下:
# 位置 tutorial_train.py
sd_locked = True
only_mid_control = False
如果配置炒鸡好,可以全量训练:
# 位置 tutorial_train.py
sd_locked = False
only_mid_control = False
ControlNet的重点内容节本就是这些,我将持续更新Stable Diffusion的相关内容,点个关注,不迷路。