一、准备交叉编译环境
我的环境如下:
- 系统:ubuntu20.04
- NDK版本:r17c
NDK构建交叉工具链的方法参考:https://developer.android.com/ndk/guides/standalone_toolchain?hl=zh-cn
NDK r17c下载链接:https://developer.android.com/ndk/downloads/older_releases?hl=zh-cn#ndk-17c-downloads,下载之后解压,我的NDK解压路径为:/work/android/sdk/ndk/android-ndk-r17c/
安装独立工具链需要安装python,如果没有,安装下:
lorien@ubuntu-20: sudo apt-get install python
然后执行工具链构建脚本:
lorien@ubuntu-20: cd /work/android/sdk/ndk/android-ndk-r17c/build/tools/

lorien@ubuntu-20: ./make_standalone_toolchain.py \
    --arch arm64 \
    --api 21 \
    --install-dir /work/tmp/android-toolchain
–install-dir参数指定了交叉工具链的路径,进入该目录看下:
lorien@ubuntu-20: cd /work/tmp/android-toolchain/
lorien@ubuntu-20: ls
aarch64-linux-android  COPYING       COPYING.LIB      lib      manifest_4691093.xml     MODULE_LICENSE_MIT  repo.prop  test
AndroidVersion.txt     COPYING3      COPYING.RUNTIME  lib64    MODULE_LICENSE_BSD_LIKE  NOTICE              share
bin                    COPYING3.LIB  include          libexec  MODULE_LICENSE_GPL       prebuilt_include    sysroot
几个比较重要的目录:
- bin目录:里面是编译、链接可执行工具
- sysroot:里面是基础库的头文件和lib
二、交叉编译ffmpeg
首先,下载ffmpeg源码:
lorien@ubuntu-20: git clone https://git.ffmpeg.org/ffmpeg.git ffmpeg
进入ffmpeg源码根目录,编写配置脚本config-arm64.sh:
#!/bin/bash

export PATH=$PATH:/work/tmp/android-toolchain/bin

SYSROOT=/work/tmp/android-toolchain/sysroot
target_host=aarch64-linux-android

export CFLAGS="-fPIC -D__ANDROID_API__=21 -I$SYSROOT/usr/include"
export LDFLAGS="-L$SYSROOT/usr/lib"

./configure --cross-prefix=$target_host- \
	--enable-cross-compile \
	--sysroot=$SYSROOT \
	--arch=aarch64 \
	--target-os=linux \
	--enable-static \
	--disable-shared \
	--enable-gpl \
	--enable-nonfree \
	--disable-debug \
	--enable-small \
	--disable-ffmpeg \
	--disable-ffplay \
	--disable-ffprobe \
	--disable-doc \
	--disable-devices \
	--disable-avdevice \
	--disable-postproc \
	--prefix=$(pwd)/install/

make clean
make -j4
make install
编译可能遇到错误:
错误一:
libavcodec/aaccoder.c: In function 'search_for_ms':
libavcodec/aaccoder.c:803:25: error: expected identifier or '(' before numeric constant
                     int B0 = 0, B1 = 0;
                         ^
libavcodec/aaccoder.c:865:28: error: lvalue required as left operand of assignment
                         B0 += b1+b2;
                            ^
libavcodec/aaccoder.c:866:25: error: 'B1' undeclared (first use in this function)
                         B1 += b3+b4;
                         ^
libavcodec/aaccoder.c:866:25: note: each undeclared identifier is reported only once for each function it appears in
make: *** [libavcodec/aaccoder.o] Error 1
解决:将libavcodec/aaccoder.c文件B0变量替换成b0
错误二:
libavcodec/hevc_mvs.c: In function 'derive_spatial_merge_candidates':
libavcodec/hevc_mvs.c:208:15: error: 'y0000000' undeclared (first use in this function)
             ((y ## v) >> s->ps.sps->log2_min_pu_size))
               ^
libavcodec/hevc_mvs.c:204:14: note: in definition of macro 'TAB_MVF'
     tab_mvf[(y) * min_pu_width + x]
              ^
libavcodec/hevc_mvs.c:274:16: note: in expansion of macro 'TAB_MVF_PU'
     (cand && !(TAB_MVF_PU(v).pred_flag == PF_INTRA))
                ^
libavcodec/hevc_mvs.c:368:23: note: in expansion of macro 'AVAILABLE'
     is_available_b0 = AVAILABLE(cand_up_right, B0) &&
                       ^
libavcodec/hevc_mvs.c:208:15: note: each undeclared identifier is reported only once for each function it appears in
             ((y ## v) >> s->ps.sps->log2_min_pu_size))
解决: 将libavcodec/hevc_mvs.c文件的变量B0改成b0,xB0改成xb0,yB0改成yb0
错误三:
libavcodec/opus_pvq.c: In function ‘quant_band_template’:
libavcodec/opus_pvq.c:498:9: error: expected identifier or ‘(’ before
numeric constant
int B0 = blocks;
^ libavcodec/opus_pvq.c:559:12: error: lvalue required as left operand of assignment
B0 = blocks;
^ make: *** [libavcodec/opus_pvq.o] Error 1
解决:将libavcodec/opus_pvq.c文件的变量B0改成b0
编译成功后,我们通过make install进行安装,看下最终编译产物:
lorien@ubuntu-20: cd /work/android/media/ffmpeg/install/
lorien@ubuntu-20: ls
include  lib  share

lorien@ubuntu-20: cd lib
lorien@ubuntu-20: ls
libavcodec.a  libavformat.a  libavutil.a  libswresample.a  libswscale.a  pkgconfig
可以看到在lib下有一系列静态库文件。.a文件有点多,下面我们将所有.a文件通过aarch64-linux-android-ld命令打包一个so文件,方便后面引入,ld命令各参数的含义不做过多解释,大家自行google,打包脚本如下:
#!/bin/bash

export PATH=$PATH:/work/tmp/android-toolchain/bin
SYSROOT=/work/tmp/android-toolchain/sysroot

aarch64-linux-android-ld -rpath-link=-L$SYSROOT/usr/lib \
    -L$SYSROOT/usr/lib \
    -lc -lm -lz -ldl \
    -soname libffmpeg.so \
    -shared \
    -nostdlib \
    -Bsymbolic \
    --whole-archive \
    --no-undefined \
    -o libffmpeg.so \
    libavcodec.a libavformat.a libavutil.a libswresample.a libswscale.a \
    $SYSROOT/../lib/gcc/aarch64-linux-android/4.9.x/libgcc.a
通过ld命令,将所有.a文件打包成libffmpeg.so文件。接下来再用strip命令优化下so:
lorien@ubuntu-20: aarch64-linux-android-strip libffmpeg.so
至此,libffmpeg.so库文件就已经制作好了。
三、集成
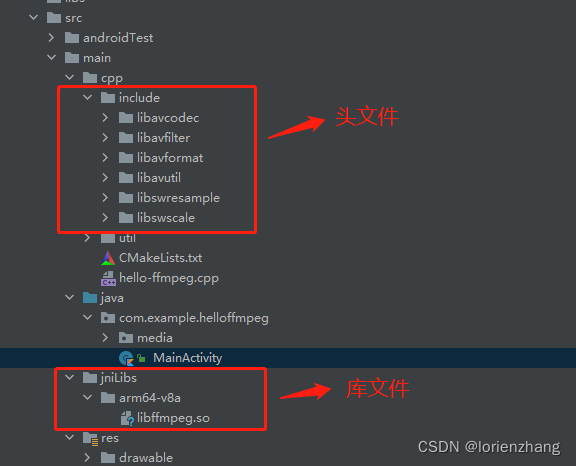
首先,我们使用Android Studio创建一个native工程:HelloFFmpeg,创建将上面编译产物拷贝到工程相应目录下,需要拷贝的内容分为:头文件和库文件两个部分。
产物拷贝进工程之后,接下来我们编写CMakeList.txt,指定编译参数,主要指定ffmpeg头文件以及库文件等编译参数:
cmake_minimum_required(VERSION 3.10.2)

project("helloffmpeg")

include_directories(
        include
        ${CMAKE_SOURCE_DIR}/util)

add_library( # Sets the name of the library.
        hello-ffmpeg

        # Sets the library as a shared library.
        SHARED

        # Provides a relative path to your source file(s).
        hello-ffmpeg.cpp)

add_library(ffmpeg SHARED IMPORTED)
set_target_properties(ffmpeg PROPERTIES IMPORTED_LOCATION ${CMAKE_SOURCE_DIR}/../jniLibs/${ANDROID_ABI}/libffmpeg.so)

find_library( # Sets the name of the path variable.
        log-lib

        # Specifies the name of the NDK library that
        # you want CMake to locate.
        log)

target_link_libraries( # Specifies the target library.
        hello-ffmpeg

        # Links the target library to the log library
        # included in the NDK.
        ${log-lib}
        ffmpeg)
接着,我们编写JNI调用下ffmpeg相关接口,并通过Android TextView组件予以展示:
#include <jni.h>
#include <string>

#include "util/LogUtil.h"

extern "C" {


#include "libavcodec/version.h"
#include "libavcodec/avcodec.h"
#include "libavformat/version.h"
#include "libavutil/version.h"
#include "libavfilter/version.h"
#include "libswresample/version.h"
#include "libswscale/version.h"
}

extern "C" JNIEXPORT jstring JNICALL
Java_com_example_helloffmpeg_media_FFMediaPlayerKt_nativeGetFFmpegVersion(
        JNIEnv* env,
        jclass clazz) {


    char strBuffer[1024 * 4] = {

    0};
    strcat(strBuffer, "libavcodec : ");
    strcat(strBuffer, AV_STRINGIFY(LIBAVCODEC_VERSION));
    strcat(strBuffer, "\nlibavformat : ");
    strcat(strBuffer, AV_STRINGIFY(LIBAVFORMAT_VERSION));
    strcat(strBuffer, "\nlibavutil : ");
    strcat(strBuffer, AV_STRINGIFY(LIBAVUTIL_VERSION));
    strcat(strBuffer, "\nlibavfilter : ");
    strcat(strBuffer, AV_STRINGIFY(LIBAVFILTER_VERSION));
    strcat(strBuffer, "\nlibswresample : ");
    strcat(strBuffer, AV_STRINGIFY(LIBSWRESAMPLE_VERSION));
    strcat(strBuffer, "\nlibswscale : ");
    strcat(strBuffer, AV_STRINGIFY(LIBSWSCALE_VERSION));
    strcat(strBuffer, "\navcodec_config : ");
    strcat(strBuffer, avcodec_configuration());
    strcat(strBuffer, "\navcodec_license : ");
    strcat(strBuffer, avcodec_license());
    LOGD("GetFFmpegVersion\n%s", strBuffer);

    return env->NewStringUTF(strBuffer);
}
最终,TextView展示内容如下:

四、总结
本文我们借助Android NDK对ffmpeg进行了交叉编译,同时在Android工程完成了集成,接下来,我们将通过FFmpeg对MP4格式的视频进行解码,并在Android surfaceview上展示出视频画面。感兴趣的朋友欢迎继续阅读:Android FFmpeg开发(二),实现视频解码和渲染
附上源码地址
git clone [email protected]:lorienzhang/HelloFFmpeg.git
# 检出 v1 tag 进行查看
git checkout v1