目录
1.MSYS2:作用是在window中模拟一套unix like环境
1.上面安装后会有MSYS2 MinGW x64程序,点击运行它
1.将ffmpeg源码放在msys64/home/用户名/ 的目录下
1.注意在SDK Tools中下载NDK和CMake,如下图:
3.将上面ffmpeg编译后的产物include和lib放到如下图所示地方
一.Linux基本命令
ls:当前目录下的文件
ls -alt:当前目录下所有文件的详细信息(是文件还是文件夹,以及权限)
cd:切换文件目录
pwd:定位当前文件位置
cp:将当前目录下的文件拷贝
rm:删除文件或文件夹
sudo:切换用户
pkg-config:链接库(后面介绍更新)
admin@DESKTOP-JANKVQQ MINGW64 ~
$ ls
build.sh              ffmpeg                   ffmpeg_ndk_install  x264_install
build_ndk_ffmpeg2.sh  ffmpeg-snapshot.tar.bz2  pax_global_header
build_ndk_ffmpeg3.sh  ffmpeg_install           x264-master

admin@DESKTOP-JANKVQQ MINGW64 ~
$ pwd
/home/admin

admin@DESKTOP-JANKVQQ MINGW64 ~
$ mkdir wo

admin@DESKTOP-JANKVQQ MINGW64 ~
$ ls
build.sh              ffmpeg                   ffmpeg_ndk_install  x264-master
build_ndk_ffmpeg2.sh  ffmpeg-snapshot.tar.bz2  pax_global_header   x264_install
build_ndk_ffmpeg3.sh  ffmpeg_install           wo

admin@DESKTOP-JANKVQQ MINGW64 ~
$ ls -alt
total 11883
drwxr-xr-x 1 admin None        0 Sep 25 15:47 .
drwxr-xr-x 1 admin None        0 Sep 25 15:47 wo
-rw-r--r-- 1 admin None      738 Sep  4 20:12 .bash_history
drwxr-xr-x 1 admin None        0 Sep  4 19:57 ffmpeg_ndk_install
drwxr-xr-x 1 admin None        0 Sep  4 18:10 ffmpeg
-rw-r--r-- 1 admin None      700 Sep  4 17:49 build_ndk_ffmpeg3.sh
-rwxr-xr-x 1 admin None     2700 Sep  4 13:37 build_ndk_ffmpeg2.sh
drwxr-xr-x 1 admin None        0 Aug 29 00:12 ffmpeg_install
-rw-r--r-- 1 admin None      448 Aug 28 21:27 build.sh
drwxr-xr-x 1 admin None        0 Aug 28 20:39 x264-master
drwxr-xr-x 1 admin None        0 Aug 28 19:48 x264_install
drwxr-xr-x 1 admin None        0 Aug 21 19:02 ..
-rw-r--r-- 1 admin None 12110742 Aug 21 18:47 ffmpeg-snapshot.tar.bz2
-rw-r--r-- 1 admin None       52 Jun  2 06:31 pax_global_header
-rw-r--r-- 1 admin None       21 Mar 12  2022 .bash_logout
-rw-r--r-- 1 admin None     1256 Mar 12  2022 .bash_profile
-rw-r--r-- 1 admin None     5828 Mar 12  2022 .bashrc
-rw-r--r-- 1 admin None     3150 Mar 12  2022 .inputrc
-rw-r--r-- 1 admin None     1575 Mar 12  2022 .profile

admin@DESKTOP-JANKVQQ MINGW64 ~
$ cd wo

admin@DESKTOP-JANKVQQ MINGW64 ~/wo
$ echo "111111" >> 1.txt

admin@DESKTOP-JANKVQQ MINGW64 ~/wo
$ ls
1.txt

admin@DESKTOP-JANKVQQ MINGW64 ~/wo
$ cd ..

admin@DESKTOP-JANKVQQ MINGW64 ~
$ cp ./wo/1.txtx .
cp: cannot stat './wo/1.txtx': No such file or directory

admin@DESKTOP-JANKVQQ MINGW64 ~
$ cp wo/1.txtx .
cp: cannot stat 'wo/1.txtx': No such file or directory

admin@DESKTOP-JANKVQQ MINGW64 ~
$ ls
build.sh              ffmpeg                   ffmpeg_ndk_install  x264-master
build_ndk_ffmpeg2.sh  ffmpeg-snapshot.tar.bz2  pax_global_header   x264_install
build_ndk_ffmpeg3.sh  ffmpeg_install           wo

admin@DESKTOP-JANKVQQ MINGW64 ~
$ cp ./wo/1.txtx .
cp: cannot stat './wo/1.txtx': No such file or directory

admin@DESKTOP-JANKVQQ MINGW64 ~
$ cp ./wo/1.txt .

admin@DESKTOP-JANKVQQ MINGW64 ~
$ ls
1.txt                 build_ndk_ffmpeg3.sh     ffmpeg_install      wo
build.sh              ffmpeg                   ffmpeg_ndk_install  x264-master
build_ndk_ffmpeg2.sh  ffmpeg-snapshot.tar.bz2  pax_global_header   x264_install

admin@DESKTOP-JANKVQQ MINGW64 ~
$ rm 1.txt

admin@DESKTOP-JANKVQQ MINGW64 ~
$ ls
build.sh              ffmpeg                   ffmpeg_ndk_install  x264-master
build_ndk_ffmpeg2.sh  ffmpeg-snapshot.tar.bz2  pax_global_header   x264_install
build_ndk_ffmpeg3.sh  ffmpeg_install           wo

admin@DESKTOP-JANKVQQ MINGW64 ~
$ rm -rf wo

admin@DESKTOP-JANKVQQ MINGW64 ~
$ ls
build.sh              ffmpeg                   ffmpeg_ndk_install  x264_install
build_ndk_ffmpeg2.sh  ffmpeg-snapshot.tar.bz2  pax_global_header
build_ndk_ffmpeg3.sh  ffmpeg_install           x264-master

admin@DESKTOP-JANKVQQ MINGW64 ~
$ sudo mkdir 111
bash: sudo: command not found

admin
二.需要下载MSYS2、ffmpeg源码、x264编码
1.MSYS2:作用是在window中模拟一套unix like环境
下载地址:MSYS2

然后点击下载完成的文件进行安装,安装完成目录如下:

2.ffmpeg源码
下载地址:Download FFmpeg

3.x264:作用是用于ffmpeg编码
下载地址:x264, the best H.264/AVC encoder - VideoLAN

三.编译x264源码和ffmpeg源码
1.上面安装后会有MSYS2 MinGW x64程序,点击运行它
2.然后在窗口中运行安装工具链命令
①.pacman -s mingw-w64-x86_64-toolchain

然后输入Y确认安装
②.pacman -S base-devel
同上
3.安装一个汇编编译器(此步骤可以省略)
pacman -S nasm
4.编译x264源码
①.先新建一个脚本文件,命令如下:
touch build.sh
②.修改脚本文件,如下:
basepath=$(cd ‘dirname $0‘;pwd)

echo ${basepath}

cd ${basepath}/x264-master
pwd

./configure --prefix=${basepath}/x264_install --enable-static
make
make install
③.运行脚本文件
sh build.sh
运行结束后x264源码编译完成,如下:

5.编译ffmpeg源码
修改build.sh脚本,如下:
basepath=$(cd ‘dirname $0‘;pwd)

echo ${basepath}

#cd ${basepath}/x264-master
#pwd

#./configure --prefix=${basepath}/x264_install --enable-static
#make
#make install

cd ${basepath}/ffmpeg
pwd

./configure --prefix=${basepath}/ffmpeg_install --enable-static --enable-shared --enable-libx264 --enable-gpl \
--extra-cflags=-I${basepath}/x264_install/include \
--extra-ldflags=-L${basepath}/x264_install/lib

make
make install
上面的运行完成如下所示:

对,你没有看错,是报错了,可以根据上面提示找到config.log,日志中重要错误提示如下:
Package x11 was not found in the pkg-config search path.
Perhaps you should add the directory containing `x11.pc'
to the PKG_CONFIG_PATH environment variable
Package 'x11', required by 'virtual:world'
可以看出需要配置环境变量,配置如下:

然后在运行sh build.sh即可编译ffmpeg源码,编译成功后内容如下所示:

四.使用ndk编译ffmpeg Android环境包
1.将ffmpeg源码放在msys64/home/用户名/ 的目录下
2.需要下载ndk编译工具,如下:

3.编写编译脚本,如下:
basepath=$(cd ‘dirname $0‘;pwd)
echo ${basepath}
cd ${basepath}/ffmpeg
pwd
ANDROID_NDK_HOME=/d/config/AndroidStudio/sdk/ndk/21.4.7075529
HOST=windows-x86_64
ARCH=armv7a
API=21
./configure \
--prefix=${basepath}/ffmpeg_ndk_install \
--enable-static \
--enable-shared \
--enable-cross-compile \
--target-os=android \
--arch=arm \
--cc=${ANDROID_NDK_HOME}/toolchains/llvm/prebuilt/${HOST}/bin/${ARCH}-linux-androideabi${API}-clang \
--cross-prefix=${ANDROID_NDK_HOME}/toolchains/arm-linux-androideabi-4.9/prebuilt/${HOST}/bin/arm-linux-androideabi- \
--disable-ffmpeg \
--disable-ffplay \
--disable-ffprobe \
--disable-postproc \
--disable-avdevice
make
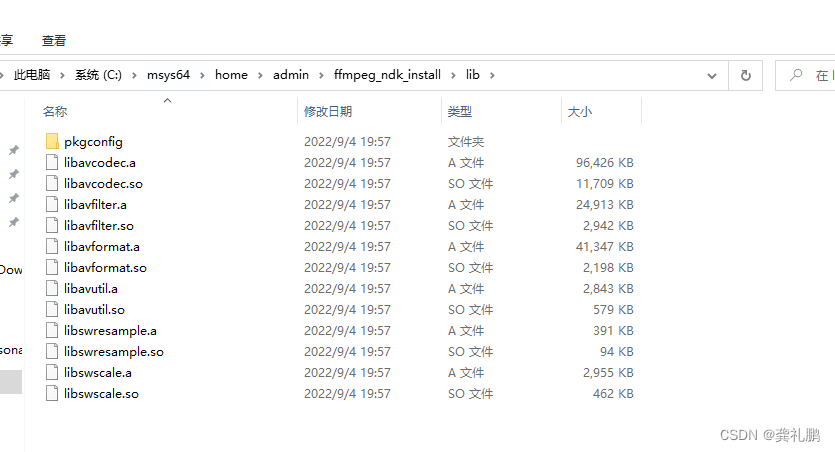
make install4.得到编译后的产物如下所示:


交叉编译:在一个系统中编译出另一个系统的可以运行的程序,称为交叉编译。上面的在window系统下编译Android系统可以运行的ffmpeg库就是交叉编译。
五.将ffmpeg编译的包放到Android项目中
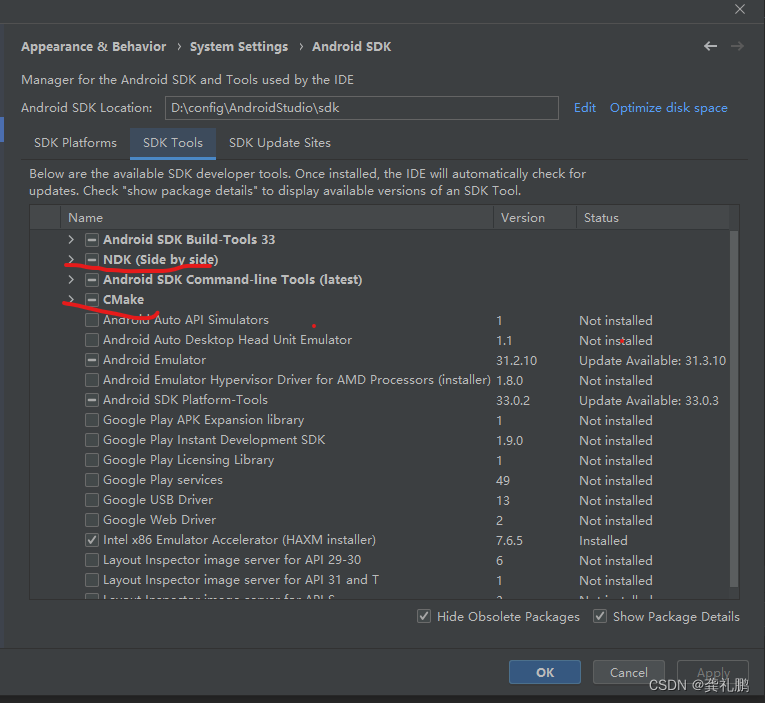
1.注意在SDK Tools中下载NDK和CMake,如下图:
2.新建ndk项目,如下图:

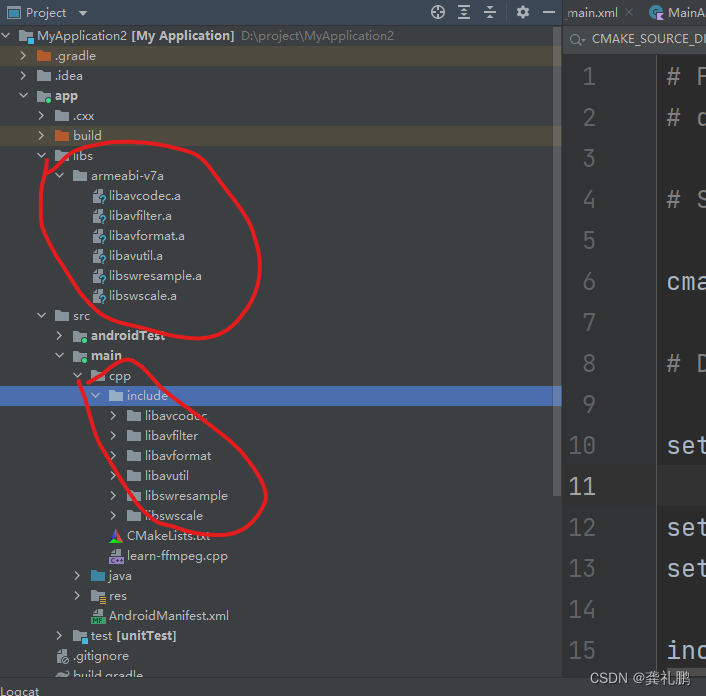
3.将上面ffmpeg编译后的产物include和lib放到如下图所示地方
4. 然后将cmake文件编写如下:
# For more information about using CMake with Android Studio, read the
# documentation: https://d.android.com/studio/projects/add-native-code.html

# Sets the minimum version of CMake required to build the native library.

cmake_minimum_required(VERSION 3.18.1)

# Declares and names the project.

set(CMAKE_CXX_FLAGS "${CMAKE_CXX_FLAGS} -std=gnu++11")

set(jnilibs ${CMAKE_SOURCE_DIR}/../../../libs)
set(libname learn-ffmpeg)

include_directories(
        include
        ${CMAKE_SOURCE_DIR}/util
)

link_directories(
        ${jnilibs}/${ANDROID_ABI})

file(GLOB src-files
        ${CMAKE_SOURCE_DIR}/*.cpp)

add_library( # Sets the name of the library.
        ${libname}

        # Sets the library as a shared library.
        SHARED

        # Provides a relative path to your source file(s).
        ${src-files}
        )

set(third-party-libs
        avformat
        avcodec
        avfilter
        swresample
        swscale
        avutil
        )

set(native-libs
        android
        EGL
        GLESv3
        OpenSLES
        log
        m
        z
        )

target_link_libraries( # Specifies the target library.
        ${libname}

        # Links the target library to the log library
        # included in the NDK.
        ${log-lib}
        ${third-party-libs}
        ${native-libs}
        )
5.learn-ffmpeg.cpp如下
#include <cstdio>
#include <cstring>
//#include "util/LogUtil.h"
#include "jni.h"

//由于 FFmpeg 库是 C 语言实现的,告诉编译器按照 C 的规则进行编译
extern "C" {
#include <libavcodec/version.h>
#include <libavcodec/avcodec.h>
#include <libavformat/version.h>
#include <libavutil/version.h>
#include <libavfilter/version.h>
#include <libswresample/version.h>
#include <libswscale/version.h>
};

#ifdef __cplusplus
extern "C" {
#endif
/*
 * Class:     com_byteflow_learnffmpeg_media_FFMediaPlayer
 * Method:    native_GetFFmpegVersion
 * Signature: ()Ljava/lang/String;
 */
extern "C" jstring Java_com_example_myapplication_MainActivity_native_1GetFFmpegVersion
        (JNIEnv *env, jobject cls)
{
    char strBuffer[1024 * 4] = {0};
    strcat(strBuffer, "libavcodec : ");
    strcat(strBuffer, AV_STRINGIFY(LIBAVCODEC_VERSION));
    strcat(strBuffer, "\nlibavformat : ");
    strcat(strBuffer, AV_STRINGIFY(LIBAVFORMAT_VERSION));
    strcat(strBuffer, "\nlibavutil : ");
    strcat(strBuffer, AV_STRINGIFY(LIBAVUTIL_VERSION));
    strcat(strBuffer, "\nlibavfilter : ");
    strcat(strBuffer, AV_STRINGIFY(LIBAVFILTER_VERSION));
    strcat(strBuffer, "\nlibswresample : ");
    strcat(strBuffer, AV_STRINGIFY(LIBSWRESAMPLE_VERSION));
    strcat(strBuffer, "\nlibswscale : ");
    strcat(strBuffer, AV_STRINGIFY(LIBSWSCALE_VERSION));
    strcat(strBuffer, "\navcodec_configure : \n");
    strcat(strBuffer, avcodec_configuration());
    strcat(strBuffer, "\navcodec_license : ");
    strcat(strBuffer, avcodec_license());
//    LOGCATE("GetFFmpegVersion\n%s", strBuffer);
    return env->NewStringUTF(strBuffer);
}

#ifdef __cplusplus
}
#endif
6.MainActivity.kt如下:
package com.example.myapplication
import android.os.Bundle
import androidx.appcompat.app.AppCompatActivity
import com.example.myapplication.databinding.ActivityMainBinding
class MainActivity : AppCompatActivity() {
private lateinit var binding: ActivityMainBinding
override fun onCreate(savedInstanceState: Bundle?) {
super.onCreate(savedInstanceState)
binding = ActivityMainBinding.inflate(layoutInflater)
setContentView(binding.root)
// Example of a call to a native method
binding.sampleText.text = GetFFmpegVersion()
}
fun GetFFmpegVersion(): String? {
return native_GetFFmpegVersion()
}
/**
* A native method that is implemented by the 'myapplication' native library,
* which is packaged with this application.
*/
external fun native_GetFFmpegVersion(): String
companion object {
// Used to load the 'myapplication' library on application startup.
init {
System.loadLibrary("learn-ffmpeg")
}
}
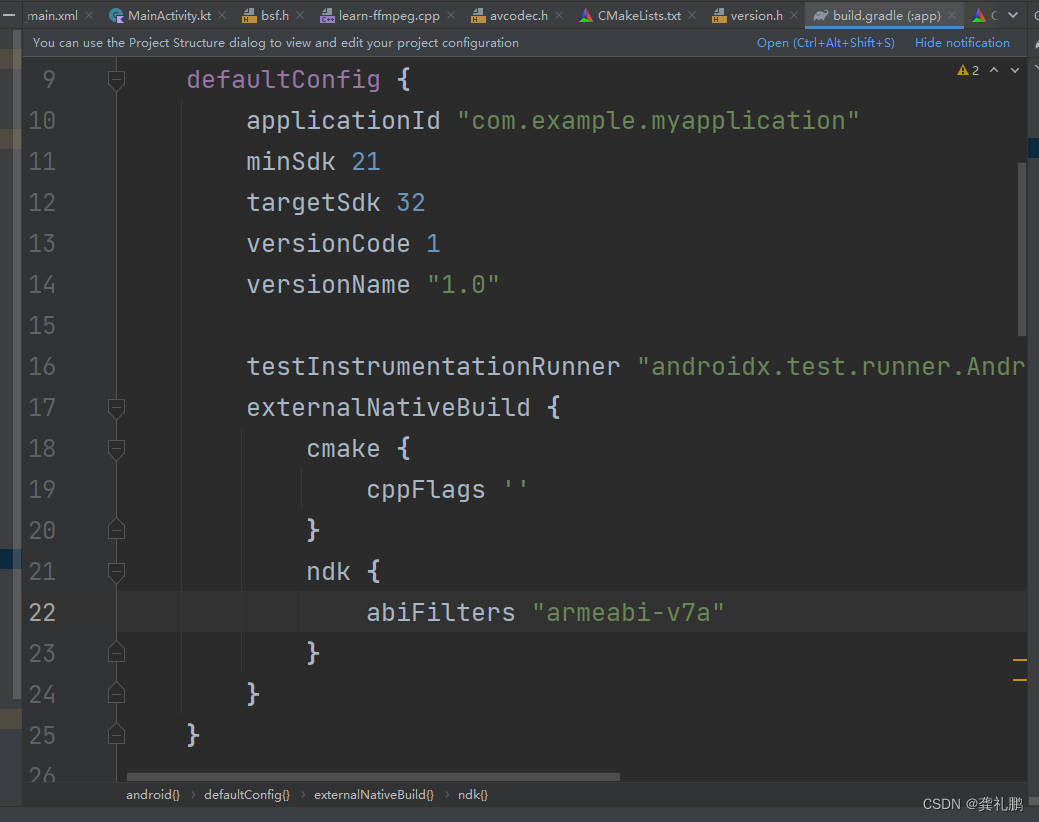
}7.最后需要注意我们编译的cpu架构版本
我是"armeabi-v7a",所以需要在app下面的build.gradle添加cpu架构,如下:
ndk {
    abiFilters "armeabi-v7a"
}
8.然后就可以正常跑起来了,如下图:
