一:需求
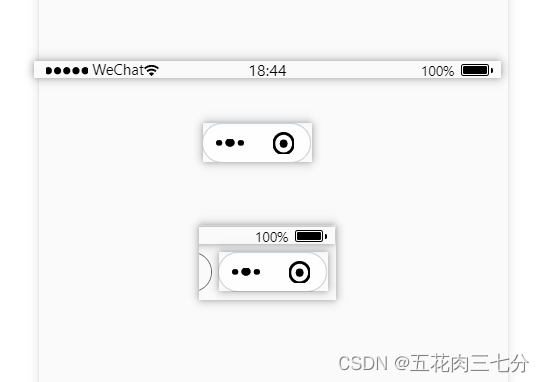
- 把微信小程序标题栏处变成搜索栏。
- 自定义返回上级页面。
二:需求分析
- 首先要把小程序标题栏设置为可自定义。
- 然后计算原标题栏的高度组成结构。
- 根据计算高度设置搜索框和返回按钮的布局。
- 最后进行代码功能实现。
三:功能实现
1:设置标题栏可自定义
usingComponents是使用的相关组件
{
    "usingComponents": {
        "van-uploader": "@vant/weapp/uploader/index",
        "van-button": "@vant/weapp/button/index",
         "van-search": "@vant/weapp/search/index"
      },
    "navigationStyle": "custom"
}
2:计算标题栏高度
标题栏高度组成部分:最上边的状态栏高度statusBarHeight和中间按钮高度getMenuButtonBoundingClientRect和中间按钮的上下边距margin
- 获取状态栏高度wx.getSystemInfo.statusBarHeight
- 获取中间按钮高度wx.getMenuButtonBoundingClientRect()(这里一共四个值top, width, height, right具体对应可查微信开发文档)
- 获取中间按钮的上下边距margin = top(中间按钮上边界坐标) - statusBarHeight
 onLoad: function (options) {
        this.setData({
            menuButtonInfo: wx.getMenuButtonBoundingClientRect()
          })
        //   console.log(this.data.menuButtonInfo)
          const { top, width, height, right } = this.data.menuButtonInfo
          wx.getSystemInfo({
            success: (res) => {
              const { statusBarHeight } = res
              const margin = top - statusBarHeight
              this.setData({
                navHeight: (height + statusBarHeight + (margin * 2)),
                searchMarginTop: statusBarHeight + margin, // 状态栏 + 胶囊按钮边距
                searchHeight: height,  // 与胶囊按钮同高
                searchWidth: right - width // 胶囊按钮右边坐标 - 胶囊按钮宽度 = 按钮左边可使用宽度
              })
            },
          })
        // 生命周期函数--监听页面加载
    },
四:代码实现
1:js
Page({
    data:{
        navHeight: '',
        menuButtonInfo: {},
        searchMarginTop: 0, // 搜索框上边距
        searchWidth: 0, // 搜索框宽度
        searchHeight: 0, // 搜索框高度
    },
    goBack(){
        wx.navigateBack({
            delta: 1, // 回退前 delta(默认为1) 页面
        })
    },
    onLoad: function (options) {
        this.setData({
            menuButtonInfo: wx.getMenuButtonBoundingClientRect()
          })
        //   console.log(this.data.menuButtonInfo)
          const { top, width, height, right } = this.data.menuButtonInfo
          wx.getSystemInfo({
            success: (res) => {
              const { statusBarHeight } = res
              const margin = top - statusBarHeight
              this.setData({
                navHeight: (height + statusBarHeight + (margin * 2)),
                searchMarginTop: statusBarHeight + margin, // 状态栏 + 胶囊按钮边距
                searchHeight: height,  // 与胶囊按钮同高
                searchWidth: right - width // 胶囊按钮右边坐标 - 胶囊按钮宽度 = 按钮左边可使用宽度
              })
            },
          })
        // 生命周期函数--监听页面加载
    },
})
2:wxss
/* 自定义导航栏 */
view {
  box-sizing: border-box;
  overflow: hidden;
}
.custom-bar {
  /* background-color: #aaa; */
  position: fixed;
  left: 0;
  top: 0;
  width: 100%;
  background-color: #fafafa;
  z-index: 9;
}
.custom-bar__wrapper {
  padding: 0 10rpx;
  display: flex;
  justify-content: space-between;
  align-items: center;
}
.search-group {
  width: 88%;
  height: 100%;
  border: 1px solid #666;
  background-color: #fafafa;
  border-radius: 60rpx;
}
.van-search {
  font-size: 25rpx;
  margin: 0 -15rpx;
  height: 100%;
}
.goback {
  justify-content: flex-start;
  width: 40rpx;
  height: 40rpx;
  margin-left: 20rpx;
}
.search-btn {
  width: 100rpx;
  font-size: 35rpx;
}
3:wxml
<!-- 自定义导航栏 -->
<view class="custom-bar" style="height:{

   {navHeight}}px">
    <view class="custom-bar__wrapper" style="margin-top:{

   {searchMarginTop}}px; height: {

   {searchHeight}}px;width: {

   {searchWidth}}px" >
        <image src="../../../images/assetsImg/img5.png" class="goback" bindtap="goBack"></image>
      <view class="search-group">
        <van-search use-action-slot="true" background="#fafafa" shape="round" field-class="van-search" focus  value="{

   { inputValue }}" placeholder="请输入关键字" bind:change="changeValue"> <view class="search-btn" slot="action" bind:tap="onClick">搜索</view></van-search>
    </view>
    </view>
  </view>
五:效果展示

