一、前言
最近有空,把之前的项目梳理记录一下,惠已惠人。我的demo代码
二、详情
人脸模型是在 pytorch 下训练的,工程文件用的是这个:MobileFaceNet_Tutorial_Pytorch
训练完成之后,先转为onnx模型并做简化,代码如下:
def export_onnx():
    import onnx
    parser = argparse.ArgumentParser()
    #parser.add_argument('--weights', type=str, default=r'F:\demo\Pytorch_demo\yolov5_fruit\weights\fruit_last.pt', help='weights path')
    parser.add_argument('--img-size', nargs='+', type=int, default=[112, 112], help='image size')
    parser.add_argument('--batch-size', type=int, default=1, help='batch size')
    opt = parser.parse_args()
    print(opt)

    # Parameters
    f = "zeng_mobileface_model\zeng_insightface.onnx"
    sim_onnx_path = "zeng_mobileface_model\zeng_insightface_sim.onnx"
    img = torch.zeros((opt.batch_size, 3, *opt.img_size))  # image size, (1, 3, 320, 192) iDetection

    # Load pytorch model
    #google_utils.attempt_download(opt.weights)
    #model = torch.load(opt.weights, map_location=torch.device('cpu'))['model'].float()

    #model.eval()
    device = "cpu"
    model = MobileFaceNet(512).to(device)  # embeding size is 512 (feature vector)
    model.load_state_dict(
        torch.load('F:\demo\Pytorch_demo\MobileFaceNet_Tutorial_Pytorch\zeng_mobileface_model\Iter_455000_model.ckpt',
                   map_location='cpu')['net_state_dict'])
    print('MobileFaceNet face detection model generated')

    model.eval()

    _ = model(img)  # dry run
    torch.onnx.export(model, img, f, verbose=False, opset_version=11, input_names=['images'],
                      output_names=['output'])  # output_names=['classes', 'boxes']

    # Check onnx model
    model = onnx.load(f)  # load onnx model
    onnx.checker.check_model(model)  # check onnx model
    print(onnx.helper.printable_graph(model.graph))  # print a human readable representation of the graph
    print('Export complete. ONNX model saved to %s\nView with https://github.com/lutzroeder/netron' % f)
    model_simp, check = simplify(model)
    onnx.save(model_simp, sim_onnx_path)
    print("Simplify onnx done !")
    assert check, "Simplified ONNX model could not be validated"
    import os
    os.remove(f)
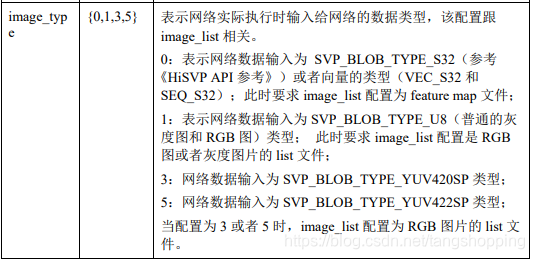
1. onnx 转换问题
由于 pytorch 有 onnx 导出接口,所以导出 onnx 会以为很轻松,谁知道每次简化完,会有些奇怪的 op ,与朋友交流,经其提醒才发现原来 mobilefacenet 网络输出前做了个 L2范数归一化。

如上图,那两个黑色的东东,一开始我以为是onnx简化代码出了问题,再三简化还是老样子。
# 只截取了部分代码, face_model.py  MobileFaceNet 类里面,forward 函数下
out = self.conv_6_dw(out)

out = self.conv_6_flatten(out)

out = self.linear(out)

out = self.bn(out)

#return l2_norm(out)  # 注释这行

return out  # 输出这样的值
再运行转换 onnx 代码,之后输出就好了。
2. TypeError: ONNX node of type PRelu is not supported.
这个问题与下面那个问题蛮棘手的,网上没多少相关的博客,或者是我搜索的方式不对,最相近的是这篇 如何让onnx2caffe支持prelu层的转换?,建议先看看这个,了解一下需要改哪些文件。反正花了我一上午才搞定,出问题原因是,
_ONNX_NODE_REGISTRY = {


    "Conv": _convert_conv,
    "Relu": _convert_relu,
    "PRelu": _convert_prelu,  # 这个原来没有的,我自己后来加的
    "BatchNormalization": _convert_BatchNorm,
    "Add": _convert_Add,
    "Mul": _convert_Mul,
    "Reshape": _convert_Reshape,
    "MaxPool": _convert_pool,
    "AveragePool": _convert_pool,
    "Dropout": _convert_dropout,
    "Gemm": _convert_gemm,
    "MatMul": _convert_matmul,  # 这个原来没有的,我自己后来加的
    "Upsample": _convert_upsample,
    "Concat": _convert_concat,
    "ConvTranspose": _convert_conv_transpose,
    "Sigmoid": _convert_sigmoid,
    "Flatten": _convert_Flatten,
    "Transpose": _convert_Permute,
    "Softmax": _convert_Softmax,
}
由于上面op字典中,没有PRelu这个op,故报错,改进原因也简单,自己添加相关处理函数。不过有个前提要注意,caffe要支持这些op,不然这里改了,caffe还是会报错的,上面那个链接里面,那个答主就是其caffe版本对 prelu 的支持不大好。
具体需要改两个地方:
(1). 在onnx2caffe源码包的目录下, 打开onnx2caffe子目录, 打开其中的_operators.py。在_operators.py的最下面找到上面的字典,添加一行 “PRelu”: _convert_prelu ;
之后再往上翻,还是在 _operators.py 文件中,添加一个函数,建议在 _convert_relu(node, graph, err) 函数函数下面添加,方便复制与查错,函数实现如下:
# 这个函数只是层名的转换,不涉及到参数复制,故基本参考 _convert_relu(node, graph, err) 函数实现
def _convert_prelu(node, graph, err):
    input_name = str(node.inputs[0])
    output_name = str(node.outputs[0])
    name = str(node.name)

    if input_name == output_name:
        inplace = True
    else:
        inplace = False

    layer = myf("PReLU", name, [input_name], [output_name], in_place=inplace)
    # l_top_relu1 = L.ReLU(l_bottom, name=name, in_place=True)

    graph.channel_dims[output_name] = graph.channel_dims[input_name]

    return layer
(2). 在同目录下,打开 _weightloader.py 文件,翻到最下面,在 op 字典中也添加一行 “PRelu”: _convert_prelu ;
然后往上翻,还是在 _convert_relu(node, graph, err) 函数下添加一个处理函数,如下:
def _convert_prelu(net, node, graph, err):

    weight = node.input_tensors[node.inputs[1]]

    # copy weight to caffe model
    shape = weight.shape
    # 因为 onnx 中 prelu 是三维数组,如(64, 1, 1),而 caffe 中 prelu 是一维,如 (64, )
    # 故要 reshape ,不然会报错
    weight = weight.reshape((shape[0]))
    np.copyto(net.params[node.name][0].data, weight, casting='same_kind') # 复制参数到 caffe 模型
之后继续转换模型,又出现新的错误,我们下面谈。
3.TypeError: ONNX node of type MatMul is not supported.
经过上面的讲解,这个问题应该知道怎么改了,我简单提下在 _operators.py 及 _weightloader.py 最下面字典处添加 “MatMul”: _convert_matmul,
然后在 _operators.py 及 _weightloader.py 中分别添加两个函数:
# 注意 : 这是在 _operators.py 文件中
def _convert_matmul(node, graph, err):  # 建立网络结构图

    node_name = node.name
    input_name = str(node.inputs[0])  # 上层节点名
    output_name = str(node.outputs[0])  # 输出节点名
    weight_name = node.inputs[1]  # 本层参数名
    if weight_name in node.input_tensors:  # 判断参数数组是否真的存在
        W = node.input_tensors[weight_name]  # 获得参数数组
    else:  # 没有的话也就没意义继续了
        err.missing_initializer(node,
                                "MatMul weight tensor: {} not found in the graph initializer".format(weight_name, ))
        return

    b = None
    bias_flag = False
    if len(node.inputs) > 2:  # 如果只有上层节点名和 W 权值,则为 2
        b = node.input_tensors[node.inputs[2]]
    # 权值 shape 不对,也没意义继续了
    if len(W.shape) != 2 or (b is not None and len(b.shape) != 1):
        return err.unsupported_op_configuration(node, "MatMul is supported only for inner_product layer")
    if b is not None:
        bias_flag = True
        if W.shape[1] != b.shape[0]:  # FC 中,二者 shape[0] 是输出通道数, 一定相等,shape[1] 是输入通道数。
            return err.unsupported_op_configuration(node,
                                                    "MatMul is supported only for inner_product layer")
    # 不同于 gemm ,matmul 不做转置操作,w = (A, B), A 是输入通道数, B 是输出通道数
    layer = myf("InnerProduct", node_name, [input_name], [output_name], num_output=W.shape[1], bias_term=bias_flag)
    graph.channel_dims[output_name] = W.shape[1]  # 获得输出通道数

    return layer
# 注意 : 这是在 _weightloader.py 文件中
def _convert_matmul(net, node, graph, err):
    node_name = node.name
    weight_name = node.inputs[1]
    if weight_name in node.input_tensors:  # 判断是否有参数,免得下面报错
        W = node.input_tensors[weight_name]  # 如果有,获得参数数组
    else:
        err.missing_initializer(node,
                                "MatMul weight tensor: {} not found in the graph initializer".format(weight_name, ))

    b = None
    if len(node.inputs) > 2:
        b = node.input_tensors[node.inputs[2]]
    if len(W.shape) != 2 or (b is not None and len(b.shape) != 1):
        return err.unsupported_op_configuration(node, "MatMul is supported only for inner_product layer")
    if b is not None:
        if W.shape[1] != b.shape[0]:
            return err.unsupported_op_configuration(node, "MatMul is supported only for inner_product layer")
    net.params[node_name][0].data[...] = W  # 卖个关子,这样写并不完全对,下面有讲
之后再次编译,无报错,成功生成 caffe 模型文件。验证一下caffe的准确率,跑一个 LFW 就好,结果如下:
#                      Acc        Threshold
pytorch 版原模型 : 	  99.433     0.635(LFW)

转换的 caffe 模型 old:97.983     0.670  # 第一次转换结果,有错误
# 注 : 0.67 的阈值取得最大准确率
不要高兴太早,第一次转换结果就是下面那行,可以发现准确率差有点大,说明转换过程肯定出错了!开始痛苦地找原因。
4. 输出结果不一致
选定一张图,输入pytorch模型,打印未经L2范数归一的输出结果。再用同样的图片预处理代码处理同一张图片,输入onnx模型,demo参考这个:onnx推理 demo. 比较二者输出结果,发现无差异,说明onnx是没问题的,出问题的是 onnx -> caffe 过程。
采用同样一张图片,输入caffe 模型,打印最终输出结果,发现二者确实存在差异。再打印输入数据,确认二者是否一致,发现也是一致,这说明输入数据没问题。然后跳到中间,确认网络中间输出,依次类推,采用二分法查找网络问题点。最后确定问题节点是 matmul 层 (其实大致也猜得到是它出问题,毕竟转换代码是我自己写的)。查看onnx matmul层的文档,

很正常,就是普通的矩阵相乘 op,它自己也说操作与numpy 的 matmul 一样。然后查看onnx模型与caffe模型的参数值是否一致,可视化发现二者参数值也一致,那么问题出在哪?我有漏掉什么东西吗?
查找 caffe 的 InnerProduct 层介绍发现,caffe 的 InnerProduct 会先将权值数组做个转置,然后与输入数据相乘,而onnx是不转置,直接乘的,即:
ONNX :  X * W = output
Caffe : X * W.T = output'
这就是问题所在,caffe将权值数组做了转置,再相乘,所以输出数据不对。为了应对这种情况应该这样:
ONNX :  X * W = output
W' = W.T
Caffe : X * W'.T = X * (W.T).T = X * W = output
所以还要对代码做一定修改,找到onnx2caffe源码包的目录下, 打开onnx2caffe子目录,打开 _weightloader.py文件,找到 _convert_matmul 函数,修改最后一行为:
# 注意,这是在 _weightloader.py 文件, _convert_matmul 函数中
#net.params[node_name][0].data[...] = W  # 这句注释掉
net.params[node_name][0].data[...] = W.transpose() # 这句才对 先做转置,caffe里再转置就回到原点
再次跑数据集,比较结果:
#                      Acc        Threshold
pytorch 版原模型 : 	  99.433     0.635(LFW)

转换的 caffe 模型 new:99.433     0.635  # 最终转换结果,可用
# 注: 0.635 阈值处取得最大值
可以发现一模一样,说明转换终于正确!
5. 海思测试结果
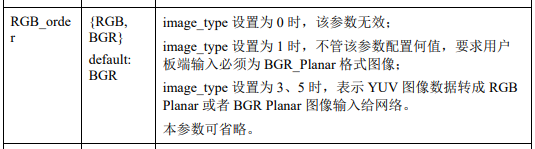
模型训练时是rgb 输入,那么海思上输入格式得是 rgb_planner 格式,这里注意一下,无论模型是输入rgb 还是 bgr,输入板端的只能是 bgr_planner 格式。然后nnie会根据转化模型时的 RGB_order 参数来决定是否对数据进行转化,当 RGB_order = RGB 时,nnie才会做转化,否则是不会转化的。
抱着测试的心态,对它们做了如下的测试,项目、结果如下:
#  threshold = 0.635
#  原始输入格式      RGB_order   转化后输入格式    LFW上准确率
#  BGR_planner        RGB		 RGB_planner		99.27
#  RGB_planner	   	  RGB		 BGR_planner		99.58
#  RGB_planner	   	  BGR		 RGB_planner		99.27
#  BGR_planner	   	  BGR		 BGR_planner		99.55
让我奇怪的是,为什么rgb模型输入 rgb_planner ,表现反而不好,难道是我有些细节忽略了?
三、总结
模型转换是个大坑,需要多从底层出发,了解其原理,以做出正确操作。此外,自己还是太菜,做事想当然,不然也不会卡了一天。