cobbler的简介:
- 基本概念:
- cobbler 是一款快速的网络系统部署工具。
- 集中管理所需的服务,如DHCP、DNS、TFTP、WEB
- cobbler内部集成了一个镜像版本仓库
- cobbler内部集成了一个ks应答文件仓库
- cobbler还提供了包括yum源管理、WEB界面管理、API接口、电源管理等功能
cobbler平台部署:
1. 安装软件包:
- cobbler ------cobbler程序包
- cobbler --------cobbler的web服务包
- pykickstart -------cobbler检查kickstart应答文件语法错误
- httpd----------------Apache Web服务
- dhcp----------------DHCP服务
- tftp-server---------TFTP服务
- rsync --------------远程同步
[root@localhost ~]# yum -y install cobbler cobbler-web dhcp tftp-server pykickstart httpd xinetd rsync
2. 开启所需的服务:
[root@localhost ~]# systemctl start httpd
[root@localhost ~]# systemctl enable httpd.service
[root@localhost ~]# systemctl start cobblerd.service
[root@localhost ~]# systemctl enable cobblerd.service
[root@localhost ~]# systemctl start xinetd.service
[root@localhost ~]# systemctl enable xinetd.service
[root@localhost ~]# systemctl start rsyncd
[root@localhost ~]# systemctl enable rsyncd
3. 配置cobbler
- 修改配置文件/etc/cobbler/settings
- 部署cobbler相关的软件包
- 配置DHCP服务
- 导入系统镜像
- kickstart文件生成
3.1. 修改配置文件
[root@localhost ~]# vim /etc/cobbler/settings
修改以下内容:
next_server: 192.168.20.10   ---设置下一个服务器还为本机
server: 192.168.20.10        ---设置本机为cobbler服务器
manage_dhcp: 1               ---设备cobbler管理dhcp服务
pxe_just_once: 1			 ---防止客户端重复安装操作系统
注意:冒号和你输入的值之间最少需要一个空格。
- 开机启动项:匹配及停止
- 硬盘启动 2. 光驱设备 3. U盘 4. 网络引导
3.2. 配置cobbler的dhcp:
[root@localhost ~]# vim /etc/cobbler/dhcp.template
:%s /旧的/新的/g      ----全文替换
#在末行模式输入如下内容:
:%s /192.168.1/192.168.20/g
五次替换,共四行
3.3. 重启相关的服务:
[root@localhost ~]# systemctl restart cobblerd.service
[root@localhost ~]# systemctl restart httpd.service
[root@localhost ~]# systemctl restart tftp.socket [root@localhost ~]# systemctl restart rsyncd
3.4. 同步刷新cobbler配置:
[root@localhost ~]# cobbler sync   ---检测所以配置是否正确
.......

*** TASK COMPLETE ***
[root@localhost ~]# firefox http://192.168.20.10/cobbler_web   ---了解
用户名:cobbler
密码:cobbler
注意:这里需要selinux关闭
3.5. 导入安装镜像数据
[root@localhost ~]# mkdir /mnt      ---创建挂载目录
[root@localhost ~]# mount /dev/cdrom  /mnt  --把光盘挂载在/mnt
[root@localhost ~]# ls /mnt/
CentOS_BuildTag  EFI  EULA  GPL  images  isolinux  LiveOS  Packages  repodata  RPM-GPG-KEY-CentOS-7  RPM-GPG-KEY-CentOS-Testing-7  TRANS.TBL
###将光盘的内容导入到cobbler
[root@localhost ~]# cobbler import  --path=/mnt --name=CentOs7
.......
*** TASK COMPLETE ***
##cobbler导入的镜像存放在/var/www/cobbler/ks_mirror
[root@localhost ~]# ls /var/www/cobbler/ks_mirror/
CentOs7  config
[root@localhost ~]# cobbler list   ---查看镜像信息
[root@localhost ~]# cobbler profile remove --name=CentOs7-x86_64  ---删除菜单信息
[root@localhost ~]# cobbler distro  remove  --name=CentOs7-x86_64 ----删除镜像信息
3.6. 安装
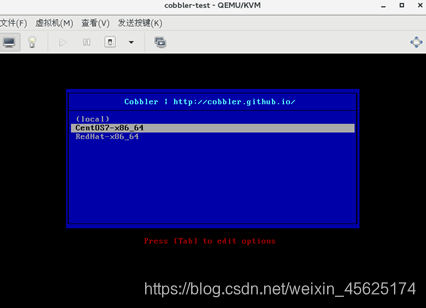
找台交换机把你需要装系统的机器和cobbler服务器搭建在一台交换机上然后打开需要装系统的机器就会出现这种界面,下面是虚拟机操作模拟的。