Cobbler自动装机
一、概述
cobbler是一个使用Python开发的开源项目,通过将部署系统所涉及的所有服务集中在一起,来提供一个全自动批量快速建立linux系统的网络安装环境
cobbler提供了dhcp管理,yum源管理,电源管理等功能,除此之外还支持命令行管理,web界面管理,并且提供了API接口,方便进行二次开发
二、装机准备
两台绑定同一块虚拟网卡(vmnet8)的虚拟机,一台作为装机服务器(192.168.245.100),一台全新未安装系统
所需软件:cobbler,cobbler-web,dhcp,tftp,pykickstart,httpd,rsync,xinetd openssl
[root@sheng ~]# yum -y install cobbler cobbler-web dhcp tftp pykickstart httpd rsync xinetd
已加载插件:fastestmirror
Loading mirror speeds from cached hostfile
 * base: mirrors.aliyun.com
 * extras: mirrors.aliyun.com
 * updates: mirrors.aliyun.com
base                                                                                                  | 3.6 kB  00:00:00
epel                                                                                                  | 4.7 kB  00:00:00
extras                                                                                                | 2.9 kB  00:00:00
updates                                                                                               | 2.9 kB  00:00:00
正在解决依赖关系
...
已安装:
  cobbler.x86_64 0:2.8.5-0.3.el7          cobbler-web.noarch 0:2.8.5-0.3.el7         dhcp.x86_64 12:4.2.5-79.el7.centos
  httpd.x86_64 0:2.4.6-93.el7.centos      pykickstart.noarch 0:1.99.66.21-1.el7      tftp.x86_64 0:5.2-22.el7
三、装机步骤
[root@sheng cobbler]# rpm -qc cobbler
/etc/cobbler/settings         //Cobbler的主配置文件
[root@sheng cobbler]# vim /etc/cobbler/settings   //主配置文件需要配置以下选项
next_server: 192.168.245.100   //指定的服务器,系统从哪里安装
server: 192.168.245.100     //Cobbler服务器ip地址
manage_dhcp: 1  //是否接管dhcp服务,1为接管,不用再配置dhcp.conf文件了
pxe_just_once: 1  //避免重复安装
[root@sheng cobbler]# systemctl start httpd    //开启httpd服务
[root@sheng cobbler]# systemctl start cobblerd   //开启cobbler服务
[root@sheng cobbler]# cobbler check   //cobbler装机检查,运行这条命令之前一定要启动httpd和cobbler否则执行不起来
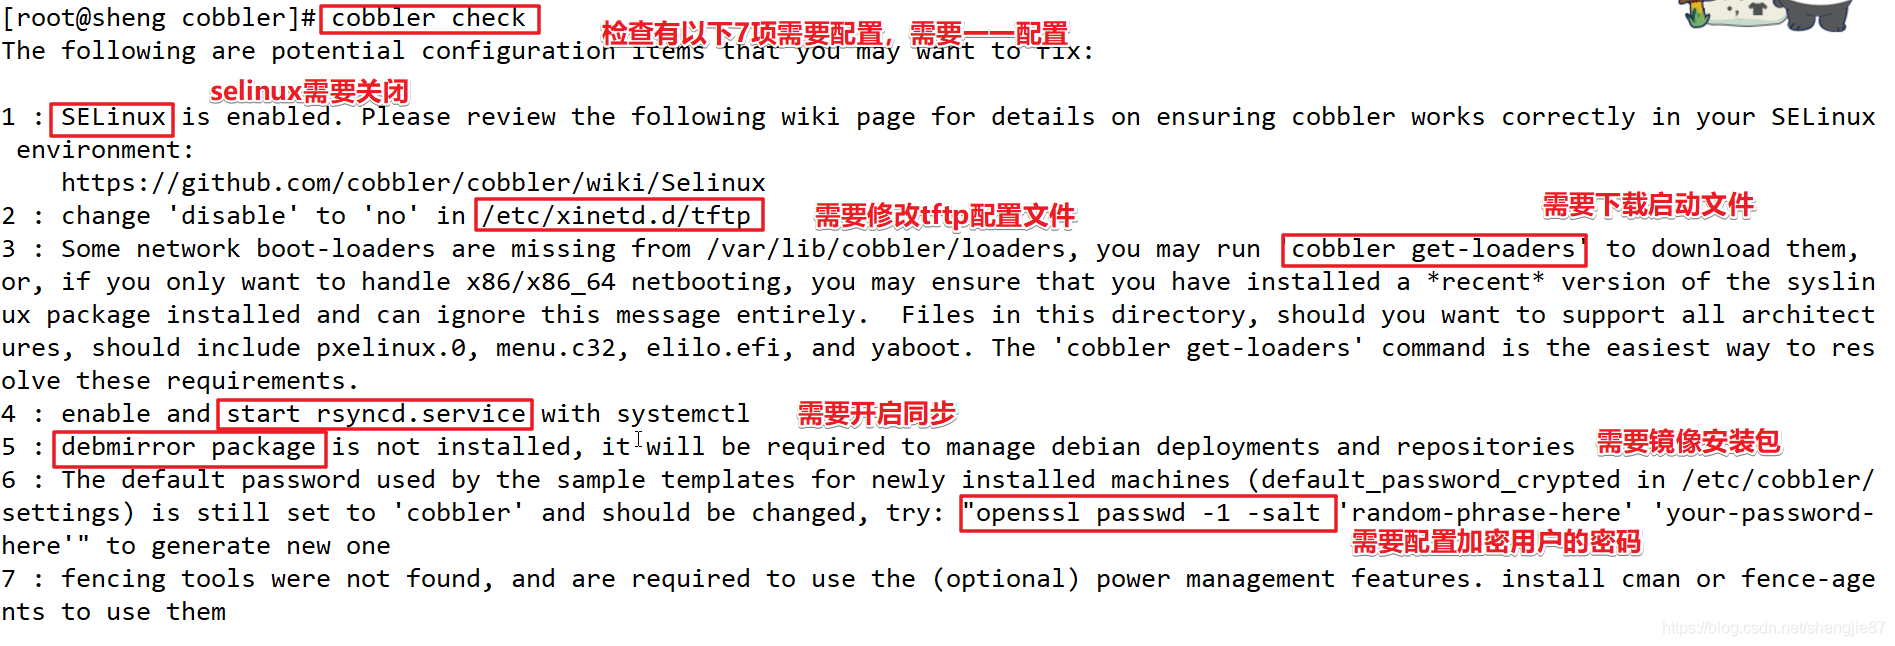
cobbler check会检查所有需要完成的配置,如果没完成会一条条列出来,不满足要求的可依次设置,所以接下来我们需要先关闭selinux
1、关闭selinux
[root@sheng cobbler]# vim /etc/selinux/config   //selinux的配置文件,配置完需重启
SELINUX=disabled
2、配置启用TFTP
[root@sheng cobbler]# vim /etc/xinetd.d/tftp
disable                 = no
[root@sheng ~]# cobbler check
……
Restart cobblerd and then run ‘cobbler sync’ to apply changes.
3、开启同步
以上,我们已经完成2个操作,关闭selinux和开启tftp配置,配置完成后需要cobbler check提示需要重启cobbler服务然后启动rsync同步服务使配置同步
[root@sheng ~]# systemctl start rsyncd    //启动同步服务
[root@sheng ~]# systemctl enable rsyncd    //设置成开机自启
Created symlink from /etc/systemd/system/multi-user.target.wants/rsyncd.service to /usr/lib/systemd/system/rsyncd
[root@sheng ~]# cobbler check  //再次检查还有2条未完成,忽略2和4不是我们需要的
The following are potential configuration items that you may want to fix:

1 : Some network boot-loaders are missing from /var/lib/cobbler/loaders, you may run 'cobbler get-loaders' to download them, or, if you only want to handle x86/x86_64 netbooting, you may ensure that you have installed a *recent* version of the syslinux package installed and can ignore this message entirely.  Files in this directory, should you want to support all architectures, should include pxelinux.0, menu.c32, elilo.efi, and yaboot. The 'cobbler get-loaders' command is the easiest way to resolve these requirements.
2 : debmirror package is not installed, it will be required to manage debian deployments and repositories
3 : The default password used by the sample templates for newly installed machines (default_password_crypted in /etc/cobbler/settings) is still set to 'cobbler' and should be changed, try: "openssl passwd -1 -salt 'random-phrase-here' 'your-password-here'" to generate new one
4 : fencing tools were not found, and are required to use the (optional) power management features. install cman or fence-agents to use them

Restart cobblerd and then run 'cobbler sync' to apply changes.
[root@sheng ~]# systemctl restart cobblerd.service
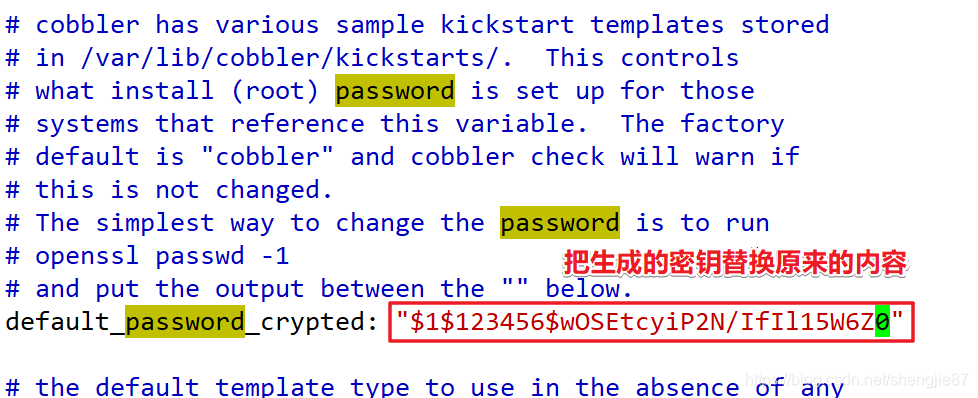
接下来需要给新系统的root用户添加一个加密的密码:
[root@sheng ~]# openssl passwd -1 -salt '123456' '123456'   //用盐值加密的方式添加密码
$1$123456$wOSEtcyiP2N/IfIl15W6Z0  //产生的密钥

[root@sheng ~]# vim /etc/cobbler/settings   //将此密钥写入配置文件里
default_password_crypted: "$1$123456$wOSEtcyiP2N/IfIl15W6Z0"
[root@sheng ~]# systemctl restart rsyncd   //重启同步服务,cobbler sync命令也可以
[root@sheng ~]# systemctl restart cobblerd.service //重启cobbler服务
rsync和cobbler必须都要重启才能应用修改的配置
4、配置dhcp
cobbler同样是从网络自动装机的,那么也要配置dhcp让客户机可以获得ip地址
[root@sheng ~]# cd /etc/cobbler/
[root@sheng cobbler]# vim dhcp.template  //dhcp配置文件,因为已经被接管,所以只需要配置这个文件就不用管dhcp.conf了
subnet 192.168.245.0 netmask 255.255.255.0 {    //子网段
     option routers             192.168.245.2;   //网关
     range dynamic-bootp        192.168.245.200 192.168.245.250;   //地址池
     default-lease-time         21600;
     max-lease-time             43200;
     next-server                $next_server;
[root@sheng dhcp]# systemctl start dhcpd.service  //启动dhcp服务
Job for dhcpd.service failed because the control process exited with error code. See "systemctl status dhcpd.service" and "journalctl -xe" for details.
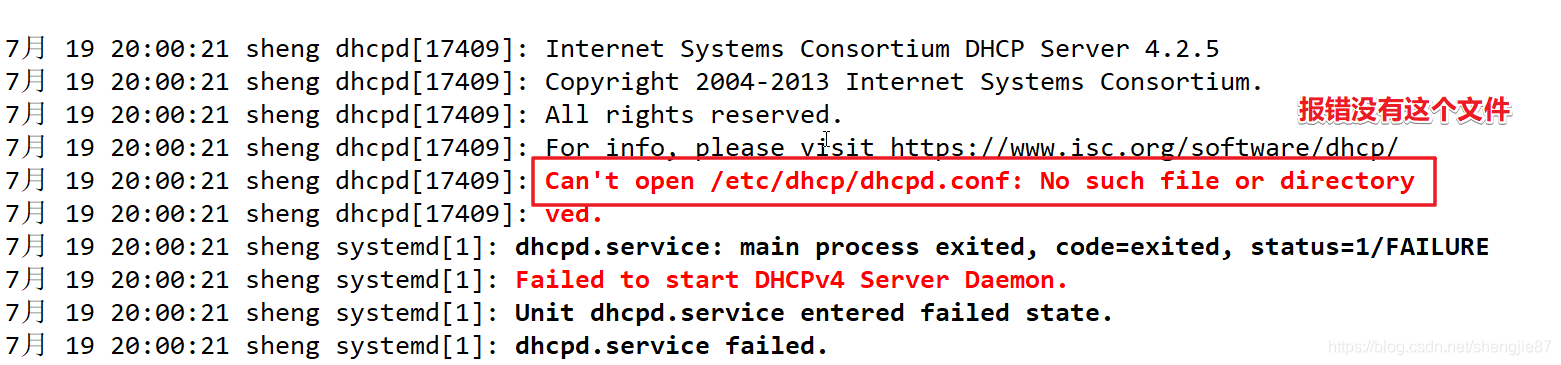
[root@sheng cobbler]# cp -f /usr/share/doc/dhcp-4.2.5/dhcpd.conf.example /etc/dhcp/dhcpd.conf
虽然dhcp已经被cobbler接管,但是配置文件还是要有!
配置完以后cobbler服务也需要重启!
5、下载装机启动文件
[root@sheng cobbler]# cobbler get-loaders   //从网络上下载cobbler装机的启动文件

task started: 2020-07-19_200727_get_loaders
task started (id=Download Bootloader Content, time=Sun Jul 19 20:07:27 2020)
downloading https://cobbler.github.io/loaders/README to /var/lib/cobbler/loaders/README
downloading https://cobbler.github.io/loaders/COPYING.elilo to /var/lib/cobbler/loaders/COPYING.elilo
……
*** TASK COMPLETE ***
//省略过程,此步骤一定要保证网络稳定!
再次cobbler check检查已经都完成了需要的配置,下面只需要挂载上安装光盘就可以了

[root@sheng cobbler]# systemctl restart cobblerd.service
6、挂载安装光盘
[root@sheng cobbler]# mount /dev/sr0 /mnt    //将安装光盘挂载到/mnt目录下
mount: /dev/sr0 写保护,将以只读方式挂载
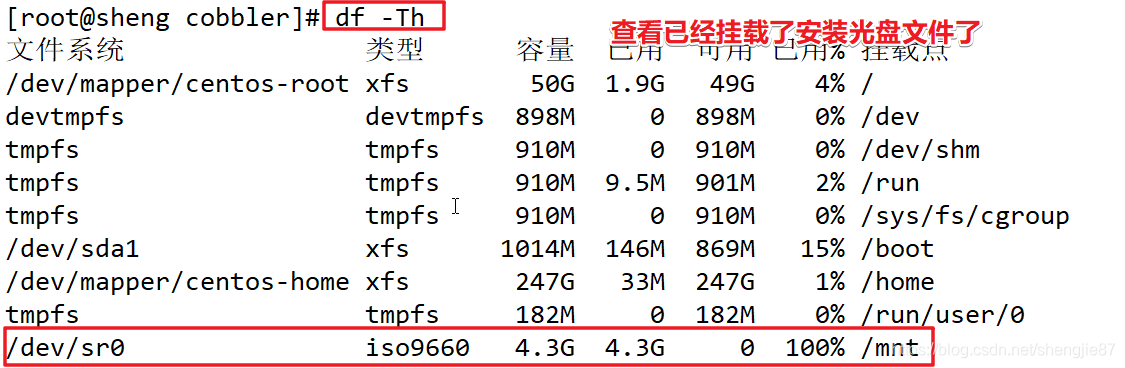
导入光盘的信息:
[root@sheng cobbler]# cobbler import --path=/mnt/ --name=CentOS-7-x86_64 --arch=x86_64
task started: 2020-07-19_201538_import
task started (id=Media import, time=Sun Jul 19 20:15:38 2020)
……
*** TASK COMPLETE ***

[root@sheng ks_mirror]# cobbler list   //查看装机的列表信息
distros:
   CentOS-7-x86_64

profiles:
   CentOS-7-x86_64

systems:

repos:

images:

mgmtclasses:

packages:

files:
7、开启Cobbler相关服务
所有配置完成以后需要重启以下服务:
[root@sheng ks_mirror]# systemctl restart httpd
[root@sheng ks_mirror]# systemctl restart dhcpd
[root@sheng ks_mirror]# systemctl restart tftp
[root@sheng ks_mirror]# systemctl restart cobblerd
[root@sheng ks_mirror]# systemctl restart rsyncd
8、验证安装
客户机只需要设置从网络启动就可以自动安装了

但是装完不是图像化界面,只是最小化安装。