
目录
Android 采用 SQLite 作为数据库存储,开源社区常见的 ORM(Object Relational Mapping)库有ORMLite、GreenDAO等。Room 和其它库一样,也是在 SQLite 上提供了一层封装。

Entity:实体类,对应的是数据库的一张表结构,使用注解 @Entity 标记。相当于 JavaBean
Dao:包含访问数据库的一些列方法,使用注解 @Dao 标记。
DataBase:数据库持有者,作为与应用持久化相关数据的底层连接的主要接入点。使用注解 @Database 标记,另外需满足以下条件:定义的类必须是一个继承于 RoomDatabase 的抽象类,在注解中需要定义与数据库相关联的实体类列表。包含一个没有参数的抽象方法并且返回一个 Dao对象。

优化:当数据发生变化时,通过 LiveData 通知 View 层,实现数据自动更新。
Room + ViewModel + LiveData

应用实现
步骤1:使用 room,在build.gradle(app级)添加 room 依赖。
implementation 'androidx.room:room-runtime:2.3.0'
annotationProcessor 'androidx.room:room-compiler:2.3.0'注意:当你添加了 room 依赖后,可能出现如下错误
3 issues were found when checking AAR metadata:原因是你的 room 版本过高或者 Gradle 版本过低,所以可以通过提升 Gradle 版本或者使用低版本的 room。
步骤2:布局文件
avtivity_main.xml
<?xml version="1.0" encoding="utf-8"?>
<androidx.constraintlayout.widget.ConstraintLayout xmlns:android="http://schemas.android.com/apk/res/android"
    xmlns:app="http://schemas.android.com/apk/res-auto"
    xmlns:tools="http://schemas.android.com/tools"
    android:layout_width="match_parent"
    android:layout_height="match_parent"
    tools:context=".MainActivity">

    <androidx.constraintlayout.widget.Guideline
        android:id="@+id/guideline2"
        android:layout_width="wrap_content"
        android:layout_height="wrap_content"
        android:orientation="horizontal"
        app:layout_constraintGuide_percent="0.11" />

    <androidx.constraintlayout.widget.Guideline
        android:id="@+id/guideline3"
        android:layout_width="wrap_content"
        android:layout_height="wrap_content"
        android:orientation="horizontal"
        app:layout_constraintGuide_percent="0.22" />

    <androidx.constraintlayout.widget.Guideline
        android:id="@+id/guideline4"
        android:layout_width="wrap_content"
        android:layout_height="wrap_content"
        android:orientation="vertical"
        app:layout_constraintGuide_begin="205dp" />

    <Button
        android:id="@+id/button"
        android:layout_width="wrap_content"
        android:layout_height="wrap_content"
        android:text="添加"
        android:onClick="mInsert"
        app:layout_constraintBottom_toTopOf="@+id/guideline2"
        app:layout_constraintEnd_toStartOf="@+id/guideline4"
        app:layout_constraintStart_toStartOf="parent"
        app:layout_constraintTop_toTopOf="parent" />

    <Button
        android:id="@+id/button2"
        android:layout_width="wrap_content"
        android:layout_height="wrap_content"
        android:onClick="mDelete"
        android:text="删除"
        app:layout_constraintBottom_toTopOf="@+id/guideline2"
        app:layout_constraintEnd_toEndOf="parent"
        app:layout_constraintStart_toStartOf="@+id/guideline4"
        app:layout_constraintTop_toTopOf="parent" />

    <Button
        android:id="@+id/button3"
        android:layout_width="wrap_content"
        android:layout_height="wrap_content"
        android:text="修改"
        android:onClick="mUpdate"
        app:layout_constraintBottom_toTopOf="@+id/guideline3"
        app:layout_constraintEnd_toStartOf="@+id/guideline4"
        app:layout_constraintStart_toStartOf="parent"
        app:layout_constraintTop_toTopOf="@+id/guideline2" />

    <Button
        android:id="@+id/button4"
        android:layout_width="wrap_content"
        android:layout_height="wrap_content"
        android:text="清空"
        android:onClick="mClear"
        app:layout_constraintBottom_toTopOf="@+id/guideline3"
        app:layout_constraintEnd_toEndOf="parent"
        app:layout_constraintStart_toStartOf="@+id/guideline4"
        app:layout_constraintTop_toTopOf="@+id/guideline2" />

    <androidx.recyclerview.widget.RecyclerView
        android:id="@+id/recycler_view"
        android:layout_width="409dp"
        android:layout_height="584dp"
        app:layout_constraintBottom_toBottomOf="parent"
        app:layout_constraintEnd_toEndOf="parent"
        app:layout_constraintStart_toStartOf="parent"
        app:layout_constraintTop_toTopOf="@+id/guideline3"
        app:layout_constraintVertical_bias="0.428" />
</androidx.constraintlayout.widget.ConstraintLayout>
item.xml(对学生信息的展示是用的 RecyclerView)
<?xml version="1.0" encoding="utf-8"?>
<androidx.constraintlayout.widget.ConstraintLayout xmlns:android="http://schemas.android.com/apk/res/android"
    xmlns:app="http://schemas.android.com/apk/res-auto"
    xmlns:tools="http://schemas.android.com/tools"
    android:layout_width="match_parent"
    android:layout_height="70dp">

    <TextView
        android:id="@+id/textView3"
        android:layout_width="wrap_content"
        android:layout_height="wrap_content"
        android:text="19"
        android:textSize="20sp"
        app:layout_constraintBottom_toTopOf="@+id/guideline5"
        app:layout_constraintEnd_toEndOf="parent"
        app:layout_constraintStart_toStartOf="@+id/guideline7"
        app:layout_constraintTop_toTopOf="parent" />

    <TextView
        android:id="@+id/textView2"
        android:layout_width="wrap_content"
        android:layout_height="wrap_content"
        android:text="Jack"
        android:textSize="24sp"
        app:layout_constraintBottom_toTopOf="@+id/guideline5"
        app:layout_constraintEnd_toStartOf="@+id/guideline7"
        app:layout_constraintStart_toStartOf="@+id/guideline6"
        app:layout_constraintTop_toTopOf="parent" />

    <androidx.constraintlayout.widget.Guideline
        android:id="@+id/guideline5"
        android:layout_width="wrap_content"
        android:layout_height="wrap_content"
        android:orientation="horizontal"
        app:layout_constraintGuide_percent="1.0" />

    <androidx.constraintlayout.widget.Guideline
        android:id="@+id/guideline6"
        android:layout_width="wrap_content"
        android:layout_height="wrap_content"
        android:orientation="vertical"
        app:layout_constraintGuide_begin="102dp" />

    <androidx.constraintlayout.widget.Guideline
        android:id="@+id/guideline7"
        android:layout_width="wrap_content"
        android:layout_height="wrap_content"
        android:orientation="vertical"
        app:layout_constraintGuide_begin="300dp" />

    <TextView
        android:id="@+id/textView"
        android:layout_width="wrap_content"
        android:layout_height="wrap_content"
        android:text="1"
        android:textSize="20sp"
        app:layout_constraintBottom_toTopOf="@+id/guideline5"
        app:layout_constraintEnd_toStartOf="@+id/guideline6"
        app:layout_constraintStart_toStartOf="parent"
        app:layout_constraintTop_toTopOf="parent" />
</androidx.constraintlayout.widget.ConstraintLayout>步骤3:创建 Entity 实体类
Student.java
package com.example.room2;

import androidx.room.ColumnInfo;
import androidx.room.Entity;
import androidx.room.Ignore;
import androidx.room.PrimaryKey;

@Entity(tableName = "student")
public class Student {

    @PrimaryKey(autoGenerate = true)
    @ColumnInfo(name = "id", typeAffinity = ColumnInfo.INTEGER)
    public int id;

    @ColumnInfo(name = "name", typeAffinity = ColumnInfo.TEXT)
    public String name;

    @ColumnInfo(name = "age", typeAffinity = ColumnInfo.INTEGER)
    public int age;

//    @ColumnInfo(name = "sex", typeAffinity = ColumnInfo.INTEGER)
//    public int sex;

    public Student(int id, String name, int age) {
        this.id = id;
        this.name = name;
        this.age = age;
    }

    /**
     *TODO room 只需要一个构造方法,当我们有多个的时候,打上 @Ignore 标签,Room 就不会管它了
     * 上面的构造方法给 Room 用,下面的构造方法就可以给我们自己用
     */

    @Ignore
    public Student(String name, int age) {
        this.name = name;
        this.age = age;
    }
    @Ignore
    public Student(int id) {
        this.id = id;
    }
}
步骤4: Dao 类
StudentDao.java
package com.example.room2;

import androidx.lifecycle.LiveData;
import androidx.room.Dao;
import androidx.room.Delete;
import androidx.room.Insert;
import androidx.room.Query;
import androidx.room.Update;

import java.util.List;

@Dao
public interface StudentDao {
    @Insert
    void insertStudent(Student... students);

    @Delete
    void deleteStudent(Student... students);

    @Query("DELETE FROM student")
    void deleteAllStudent();

    @Update
    void updateStudent(Student... students);

    @Query("SELECT * FROM STUDENT")
    LiveData<List<Student>> getAllStudentsLive();

    @Query("SELECT * FROM student WHERE id = :id")
    List<Student> getStudentById(int id);
}
步骤5:Database 能够返回一个 Dao 对象
package com.example.room2;

import android.content.Context;

import androidx.annotation.NonNull;
import androidx.room.Database;
import androidx.room.Room;
import androidx.room.RoomDatabase;
import androidx.room.migration.Migration;
import androidx.sqlite.db.SupportSQLiteDatabase;

/**
 * 通过 DataBase 我们可以拿到 Dao
 */
@Database(entities = {Student.class}, version = 1, exportSchema = false)
public abstract class MyDataBase extends RoomDatabase {

    private static final String DATABASE_NAME = "my_db.db";
    private static MyDataBase mInstance; // 单例

    //private MyDataBase(){}// Room 里不需要,有了反而会报错

    public static synchronized MyDataBase getInstance(Context context){
        if (mInstance == null) {
            //mInstance = new MyDataBase();// room 不这么写
            mInstance = Room.databaseBuilder(context.getApplicationContext(),
                            MyDataBase.class,
                            DATABASE_NAME)
                            .build();
        }
        return mInstance;
    }


    /**
     * 返回一个 Dao
     */
    public abstract StudentDao getStudentDao();

}
步骤6:Repository 与 Room 打交道
studentRepository.java
package com.example.room2;

import android.content.Context;
import android.os.AsyncTask;

import androidx.lifecycle.LiveData;

import java.util.List;

/**
 * 持有 DAO 与 ROOM 打交道
 */
public class StudentRepository {
    private StudentDao studentDao;

    public StudentRepository(Context context) {
        MyDataBase dataBase = MyDataBase.getInstance(context);
        this.studentDao = dataBase.getStudentDao();
    }

    /**
     * 插入
     * @param students 可变参数
     */
    public void insertStudents(Student... students){
        new insertStudentsTask(studentDao).execute(students);
    }
    // 异步操作
    class insertStudentsTask extends AsyncTask<Student, Void, Void> {

        private StudentDao studentDao;

        public insertStudentsTask(StudentDao studentDao) {
            this.studentDao = studentDao;
        }

        @Override
        protected Void doInBackground(Student... students) {
            studentDao.insertStudent(students);
            return null;
        }
    }

    /**
     * 更新
     * @param students 可变参数
     */
    public void updateStudent(Student... students){
        new updateStudentsTask(studentDao).execute(students);
    }
    //异步操作
    class updateStudentsTask extends AsyncTask<Student, Void, Void>{
        private StudentDao studentDao;

        public updateStudentsTask(StudentDao studentDao) {
            this.studentDao = studentDao;
        }
        @Override
        protected Void doInBackground(Student... students) {
            studentDao.updateStudent(students);
            return null;
        }
    }

    /**
     * 删除
     * @param students 可变参数
     */
    public void deleteStudent(Student... students){
        new deleteStudentsTask(studentDao).execute(students);
    }
    //异步操作
    class deleteStudentsTask extends AsyncTask<Student, Void, Void>{
        private StudentDao studentDao;

        public deleteStudentsTask(StudentDao studentDao) {
            this.studentDao = studentDao;
        }
        @Override
        protected Void doInBackground(Student... students) {
            studentDao.deleteStudent(students);
            return null;
        }
    }

    /**
     * 删除所以数据
     */
    public void deleteAllStudents(){
        new deleteAllStudentsTask(studentDao).execute();
    }
    //异步操作
    class deleteAllStudentsTask extends AsyncTask<Void, Void, Void>{
        private StudentDao studentDao;

        public deleteAllStudentsTask(StudentDao studentDao) {
            this.studentDao = studentDao;
        }

        @Override
        protected Void doInBackground(Void... voids) {
            studentDao.deleteAllStudent();
            return null;
        }
    }

    /**
     * 获取所以数据,
     * LiveData 的方式与 UI 界面进行数据绑定
     */
    public LiveData<List<Student>> getAllStudentsLive(){
        return studentDao.getAllStudentsLive();
    }
}
步骤7:ViewModel,与 Repository 打交道
StudentViewModel.java
package com.example.room2;

import android.app.Application;

import androidx.annotation.NonNull;
import androidx.lifecycle.AndroidViewModel;
import androidx.lifecycle.LiveData;

import java.util.List;

/**
 * 使用 AndroidViewModel 就可以有上下文
 */
public class StudentViewModel extends AndroidViewModel {

    private StudentRepository studentRepository;

    public StudentViewModel(@NonNull Application application) {
        super(application);
        studentRepository = new StudentRepository(application);
    }

    /**
     * 插入
     */
    public void insertStudents(Student... students){
        studentRepository.insertStudents(students);
    }
    /**
     * 更新
     */
    public void deleteStudent(Student... students){
        studentRepository.deleteStudent(students);
    }
    /**
     * 删除
     */
    public void deleteAllStudents(){
        studentRepository.deleteAllStudents();
    }
    /**
     * 删除所以
     */
    public void updateStudent(Student... students){
        studentRepository.updateStudent(students);
    }

    /**
     * 获取所以数据
     */
    public LiveData<List<Student>> getAllStudentsLive(){
        return studentRepository.getAllStudentsLive();
    }
}
步骤8: 给 RecyclerView 添加适配器
StudentRecyclerViewAdapter.java
package com.example.room2;

import android.view.LayoutInflater;
import android.view.View;
import android.view.ViewGroup;
import android.widget.TextView;

import androidx.annotation.NonNull;
import androidx.recyclerview.widget.RecyclerView;

import java.util.List;

public class StudentRecyclerViewAdapter extends RecyclerView.Adapter {

    List<Student> students;

    public StudentRecyclerViewAdapter(List<Student> students) {
        this.students = students;
    }

    @NonNull
    @Override
    public RecyclerView.ViewHolder onCreateViewHolder(@NonNull ViewGroup parent, int viewType) {
        View root = LayoutInflater.from(parent.getContext()).inflate(R.layout.item, parent, false);
        return new MyViewHolder(root);
    }

    @Override
    public void onBindViewHolder(@NonNull RecyclerView.ViewHolder holder, int position) {
        Student student = students.get(position);
        TextView tvId = holder.itemView.findViewById(R.id.textView);
        tvId.setText(String.valueOf(student.id));
        TextView tvName = holder.itemView.findViewById(R.id.textView2);
        tvName.setText(student.name);
        TextView tvAge = holder.itemView.findViewById(R.id.textView3);
        tvAge.setText(String.valueOf(student.age));
    }

    @Override
    public int getItemCount() {
        return students == null ? 0 : students.size();
    }

    static class MyViewHolder extends RecyclerView.ViewHolder{

        public MyViewHolder(@NonNull View itemView) {
            super(itemView);
        }
    }

    public void setStudents(List<Student> students){
        this.students = students;
    }
}
步骤9:MainActivity.java
package com.example.room2;

import android.os.Bundle;
import android.view.View;

import androidx.appcompat.app.AppCompatActivity;
import androidx.lifecycle.Observer;
import androidx.lifecycle.ViewModelProvider;
import androidx.recyclerview.widget.LinearLayoutManager;
import androidx.recyclerview.widget.RecyclerView;

import java.util.ArrayList;
import java.util.List;

public class MainActivity extends AppCompatActivity {

    StudentViewModel viewModel;
    private StudentRecyclerViewAdapter adapter;

    @Override
    protected void onCreate(Bundle savedInstanceState) {
        super.onCreate(savedInstanceState);
        setContentView(R.layout.activity_main);

        List<Student> students = new ArrayList<>();
        RecyclerView recyclerView = findViewById(R.id.recycler_view);
        recyclerView.setLayoutManager(new LinearLayoutManager(this));
        adapter = new StudentRecyclerViewAdapter(students);
        recyclerView.setAdapter(adapter);

        viewModel = new ViewModelProvider(this,
                new ViewModelProvider.AndroidViewModelFactory(getApplication())).get(StudentViewModel.class);
        //TODO 监听 LiveData 数据的改变 --> 更新 UI
        viewModel.getAllStudentsLive().observe(this, new Observer<List<Student>>() {
            @Override
            public void onChanged(List<Student> students) {
                adapter.setStudents(students);
                adapter.notifyDataSetChanged();
            }
        });
    }

    public void mInsert(View view) {
        Student s1 = new Student("Jack", 18);
        Student s2 = new Student("Rose", 20);
        viewModel.insertStudents(s1, s2);
    }


    public void mDelete(View view) {
        Student s1 = new Student(2);
        viewModel.deleteStudent(s1);
    }


    public void mUpdate(View view) {
        Student s1 = new Student(3, "Json", 20);
        viewModel.updateStudent(s1);
    }


    public void mClear(View view) {
        viewModel.deleteAllStudents();
    }
}
数据库升级
使用 Migration 升级数据库
问题:如果用户设备上数据库版本为1,而当前要安装的 App 数据库版本为3,怎么办?
Room 会先判断当前有没有直接从1到3的方案,如果有,就直接执行从1到3的升级方案,如果没有,那么 Room 会按照顺序先后执行 Migration(1,2)、Migration(2,3)以完成升级。
在MyDataBase 里添加如下代码:
    /**
     * 数据库升级
     */
    static final Migration MIGRATION_1_2 = new Migration(1, 2) {
        @Override
        public void migrate(@NonNull SupportSQLiteDatabase database) {
            database.execSQL("ALTER TABLE student ADD COLUMN sex INTEGER NOT NULL DEFAULT 1");
        }
    };
上面代码是在 student 表里添加了一个字段,所以我们的 Student.java 实体类也要添加这个属性
    @ColumnInfo(name = "sex", typeAffinity = ColumnInfo.INTEGER)
    public int sex;
最后,在 MyDataBase.java修改如下两个地方,即课完成版本的升级。

异常处理
假设我们将数据库版本升级到4,却没有为此写相应的 Migration,则会出现一个 IllegalStateException 异常,加入 fallbackToDestructiveMigration(),该方法在出现升级异常时,重建数据表,同时数据也会丢失。

Schema 文件
Room 在每次数据库升级过程中,都会导出一个 Schema 文件,这是一个 json 格式的文件,其中包含了数据库的基本信息,有了该文件,开发者能清楚的知道数据库的历次变更情况,极大的方便了开发者排查问题。
销毁和重建策略
在 SQLite 中修改表结构比较麻烦,例如,我们想将 Student 表中 sex 字段类型从 INTEGER 修改为 TEXT,最好的方式是采用销毁与重建策略,大致分为以下步骤:
创建一张符合表结构要求的临时表 temp_student
将数据从旧表 student 复制到临时表 temp_student
删除旧表 student
将临时表 temp_student 重命名为 student

在 MyDataBase.java 里添加如下代码:
    /**
     * 修改一张表的字段
     */
    static final Migration MIGRATION_2_3 = new Migration(2, 3) {
        @Override
        public void migrate(@NonNull SupportSQLiteDatabase database) {
            // 1. 创建一张临时表
            database.execSQL("CREATE TABLE temp_student (" +
                    "id INTEGER PRIMARY KEY AUTOINCREMENT NOT NULL," +
                    "name TEXT,"+
                    "age INTEGER NOT NULL,"+
                    "sex TEXT DEFAULT 'M')");
            // 2. 复制数据到临时表
            database.execSQL("INSERT INTO temp_student (name, age, sex)" +
                    "SELECT name, age, sex FROM student");
            // 3. 删除旧表 student
            database.execSQL("DROP TABLE student");
            // 4. 将临时表 temp_student 重命名为 student
            database.execSQL("ALTER TABLE temp_student RENAME TO student");
        }
    };
预填充数据库
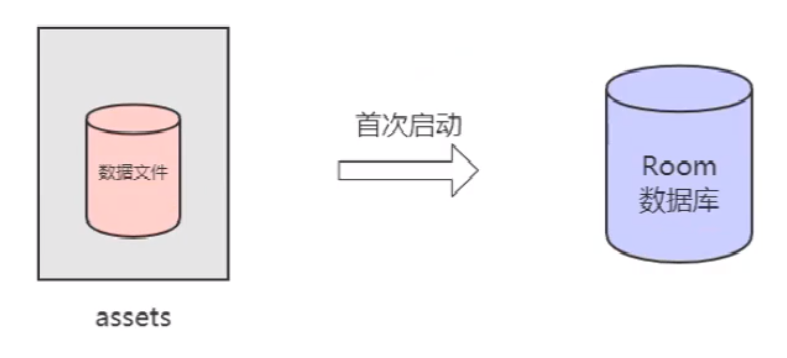
有时候我们希望应用自带一些数据供我们使用,我们可以将数据库文件放入 assets 目录一起打包发布,在用户首次打开 App 时,使用 createFromAsset() 和 createFromFile() 创建 Room 数据库。
完整demo
上面应用的实现是在 room2 model 里。
链接:https://pan.baidu.com/s/1_Dm1BHW_hq5V_8K12sjjLQ
提取码:4jti