ListView(列表视图)
ListView显示从内置 QML 类型(如 ListModel 和 XmlListModml)创建的模型的数据,或者在从 QAbstractItemModel 或 QAbstractListModel 继承的C++中定义的自定义模型类。
- ListView继承自flickable,所以具有弹动效果
- ListView按照水平或垂直布局
常用的属性:
| cacheBuffer | 确定是否将委托保留在视图的可见区域之外.大于零,则视图可以在指定的缓冲区内保持尽可能多的委托实例化 |
| count | 返回项数 |
| currentIndex currentItem currentSection |
当前的索引 当前的项目 当前的部分:保存当前位于视图开头的部分 |
| delegate | 设置委托 |
| displaced | 设置通用过渡 |
| displayMarginBeginning displayMarginEnd |
允许在视图几何图形之外显示委托,默认值为 0 |
| footer | 页脚 |
| header headerItem |
标题 标题项 |
| highlight highlightFollowsCurrentItem highlightItem (第二项为true才能使用) highlightMoveDuration highlightMoveVelocity highlightResizeDuration highlightResizeVelocity |
需要突出的控件 保存突出显示是否由视图管理(默认为true) 保存从突出显示组件创建的突出显示项 高亮移动持续时间 高亮移动速度(默认值为 400 像素/秒) 高亮显示调整大小持续时间 高亮显示大小速度 |
| keyNavigationEnabled keyNavigationWraps |
保存列表的键导航是否已启用 保存列表是否换行键导航 |
| model | 保存为列表提供数据的模型 |
| move moveDisplaced |
保存过渡以应用于视图中由于视图模型中的移动操作而移动的项 保存过渡以应用于视图模型中的移动操作所取代的项 |
| populate | 保存要应用于最初为视图创建的项的过渡 |
| remove removeDisplaced |
保存要应用于从视图中删除的项的过渡 保存转换以应用于视图中因删除视图中的其他项而替换的项 |
| add addDisplaced |
保存要应用于从视图中添加的项的过渡 保存转换以应用于视图中因添加视图中的其他项而替换的项 |
| spacing | 间距 |
附加属性:
| ListView.delayRemove | 此附加属性保存是否可以销毁委托(默认为true) |
| ListView.isCurrentItem | 如果此委托是当前项,则此附加属性为 true 用于调整当前项的外观 |
| ListView.nextSection | 属性保存下一个元素的部分 |
| ListView.previousSection | 属性保存前一个元素的部分 |
| ListView.section | 保存此元素的部分 |
| ListView.view | 保存管理此委托实例的视图 |
信号:
| add() | 将项目添加到视图后,将立即发出此附加信号 |
| remove() | 从视图中移除项目之前立即发出 |
方法:
| positionViewAtBeginning() positionViewAtEnd() |
把位置定位在开头 把位置定位在结尾 |
| decrementCurrentIndex() incrementCurrentIndex() |
递减当前索引 递增当前索引 |
| forceLayout() | 此方法强制 ListView 立即响应模型中的任何未完成更改。 |
| indexAt itemAt |
返回该位置的索引 返回该位置的项 |
| positionViewAtIndex | 定位视图 |
以下为以上属性和方法的使用:
1.最常见的使用:
//创建模型
ListModel {
    id:model1
    ListElement { name: "Bill Smith";number: "555 3264"}
    ListElement { name: "John Brown";number: "555 8426"}
    ListElement { name: "Sam Wise";number: "555 0473"}
}

//使用视图显示
ListView {
    width: 180; height: 200
    model: model1 //设置模型
    delegate: Text {    //使用Text显示数据
        text: name + ": " + number
    }
}
2.使用Component来进行委托
ListModel {
        id:model1
        ListElement { name: "Bill Smith";number: "555 3264"}
        ListElement { name: "John Brown";number: "555 8426"}
        ListElement { name: "Sam Wise";number: "555 0473"}
    }
    Component{
        id:component1
        Row{
            spacing: 10
            Text {text:"姓名:"+name }
            Text {text:"电话:"+number}
        }
    }
    ListView{
        anchors.fill: parent
        model: model1  //设置模型
        delegate:component1 //委托
    }
3.方向和布局方向:
orientation(方向)
| ListView.Vertical (default) | 竖直(默认) |
| ListView.Horizontal | 水平 |
layoutDirection(水平的布局方向)
| Qt.LeftToRight (default) | 从左到右 |
| Qt.RightToLeft | 从右到左 |
verticalLayoutDirection (竖直的布局方向)
| ListView.TopToBottom (default) | 从上到下 |
| ListView.BottomToTop | 从下到上 |
使用水平布局方向,从左到右:
 ListView{
        anchors.fill: parent
        model: model1
        delegate:component1
        orientation: ListView.Horizontal//设置水平布局,从左到右
    }
使用水平布局方向,从右到左:
ListView{
        anchors.fill: parent
        model: model1
        delegate:component1
        orientation: ListView.Horizontal//设置水平布局
        layoutDirection: Qt.RightToLeft//从右到左布局
} 
3.突出(高亮)的使用
ListModel {
        id:model1
        ListElement { name: "Bill Smith";number: "555 3264"}
        ListElement { name: "John Brown";number: "555 8426"}
        ListElement { name: "Sam Wise";number: "555 0473"}
    }

    Rectangle {
        x:50;width: 200;height: 500
        Component {
            id: contactDelegate
            Item {
                width: 180; height: 40
                Column {
                    Text { text: '<b>Name:</b> ' + name }
                    Text { text: '<b>Number:</b> ' + number }
                }
            }
        }

        ListView {
            anchors.fill: parent
            model: model1 //设置模型
            delegate: contactDelegate //设置委托
            highlight: Rectangle { color: "lightsteelblue";} //设置高亮
            focus: true //获取焦点,使用键盘切换
        }
    }
添加弹动效果:
ListModel {
        id:model1
        ListElement { name: "Bill Smith";number: "555 3264"}
        ListElement { name: "John Brown";number: "555 8426"}
        ListElement { name: "Sam Wise";number: "555 0473"}
    }
    Component {
        id: highlight
        Rectangle {
            width: 180; height: 40
            color: "lightsteelblue"; radius: 5
            y: list.currentItem.y
            Behavior on y {
                SpringAnimation {
                    spring: 3
                    damping: 0.2
                }
            }
        }
    }
    Component{
        id:component1
        Column{
            spacing: 10
            Text {text:"姓名:"+name }
            Text {text:"电话:"+number}
        }
    }

    ListView {
        id: list
        width: 180; height: 200
        model: model1
        delegate: component1
        highlight: highlight
        highlightFollowsCurrentItem: false
        focus: true
    }
4.委托中使用视图属性位置
委托会根据需要实例化,并且可以随时销毁。因此,状态永远不应存储在委托中
使用的方法:
ListView {
id:list1
anchors.fill: parent
model: model1
Component {
id: contactDelegate
Item {
width: list1.width //方法一
height: list1.view.height //方法二
Column {
Text { text: '<b>Name:</b> ' + name }
Text { text: '<b>Number:</b> ' + number }
}
}
}
delegate: contactDelegate
highlight: Rectangle { color: "lightsteelblue";}
focus: true
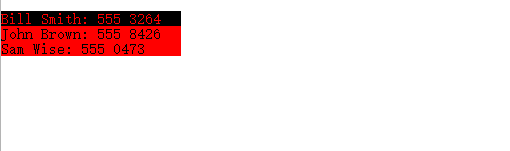
}ListView.isCurrentItem的使用
用于设置内容的属性,判断是否为当前项。
ListModel {
        id:model1
        ListElement { name: "Bill Smith";number: "555 3264"}
        ListElement { name: "John Brown";number: "555 8426"}
        ListElement { name: "Sam Wise";number: "555 0473"}
    }
    ListView {
        width: 180; height: 200
        Component {
            id: contactsDelegate
            Rectangle {
                id: wrapper
                width: 180
                height: contactInfo.height
                //当前项的话,背景颜色为黑色,不是的话为红色
                color: ListView.isCurrentItem ? "black" : "red"
                Text {
                    id: contactInfo
                    text: name + ": " + number
                    //当前项的话,字体为红色,不是的话为黑色
                    color: wrapper.ListView.isCurrentItem ? "red" : "black"
                }
            }
        }

        model: model1
        delegate: contactsDelegate
        focus: true
    }
5.标头和页脚和堆叠顺序
headerPositioning、footerPositioning (标头和页脚的定位)
| ListView.InlineHeader | (默认)页眉位于内容的开头,并像普通项目一样与内容一起移动。 |
| ListView.OverlayHeader | 页眉位于视图的开头 |
| ListView.PullBackHeader | 页眉位于视图的开头。标头可以通过向前移动内容来推开,并通过向后移动内容来拉回。 |
视图中的堆叠顺序:
| 属性 | z值 |
| delegate | 1 |
| footer | 1 |
| header | 1 |
| highlight | 0 |
| section.deleate | 2 |
例子:
ListModel {
        id:model1
        ListElement { name: "Bill Smith";number: "555 3264"}
        ListElement { name: "John Brown";number: "555 8426"}
        ListElement { name: "Sam Wise";number: "555 0473"}
    }
    Component{
        id:component1
        Row{
            spacing: 10
            Text {text:"姓名:"+name }
            Text {text:"电话:"+number}
        }
    }
    ListView{
        id:list1
        anchors.fill: parent
        header: Component{ //添加标题
            Rectangle{
                width: list1.width
                color: "red"
                height: 30
                Text { text:"标题"}
            }
        }
        footer: Component{ //添加页脚
            Rectangle{
                width: list1.width
                color: "red"
                height: 30
                Text { text:"页脚"}
            }
        }
        model: model1  //设置模型
        delegate:component1 //委托
    }
6.listView中的鼠标事件
鼠标点击项,变为当前项:
| currentIndex | 当前项 |
| indexAt(x,y) | 获取x,y位置的索引 |
       ListView{
            id:list1
            anchors.fill: parent
            model: model1
            delegate:component1
            spacing: 10
            highlight: Rectangle{color: "lightsteelblue"}
            focus: true

            MouseArea{  //设置鼠标区域
                id:mouse1
                anchors.fill: parent
                onPressed: {
                    //获取鼠标位置的项,并作为当前项
                    list1.currentIndex=list1.indexAt(mouse1.mouseX,mouse1.mouseY)
                }
            }
        }
7.对列表视图进行分组:
section group(组)
section.criteria (分组的标准)
ViewSection.FullString(默认) 根据值创建部分 ViewSection.FirstCharacter 根据值的第一个字符创建部分 section.delegate (分组的代理)
section.property (分组的属性)
section.labelPositioning(标签定位)
ViewSection.InlineLabels 部分标签在分隔部分的项目委托之间内联显示(默认) ViewSection.CurrentLabelAtStart 当前分区标签在移动视图时会粘附在视图的开头 ViewSection.NextLabelAtEnd 下一个部分标签(超出所有可见部分)在移动视图时粘在视图的末尾 注意: 向 ListView 添加节不会自动按节条件对列表项重新排序。如果模型不是按部分排序的,则创建的部分可能不是唯一的;不同部分之间的每个边界都将导致创建部分标题,即使该部分存在于其他地方也是如此。
例子:
ListModel {
        id: nameModel
        ListElement { name: "Alice"; team: "Crypto" }
        ListElement { name: "Bob"; team: "Crypto" }
        ListElement { name: "Jane"; team: "QA" }
        ListElement { name: "Victor"; team: "QA" }
        ListElement { name: "Wendy"; team: "Graphics" }
    }
    Component {
        id: nameDelegate
        Text {
            text: name;
            font.pixelSize: 24
            anchors.left: parent.left
            anchors.leftMargin: 2
        }
    }
    ListView {
        anchors.fill: parent
        model: nameModel
        delegate: nameDelegate
        focus: true
        highlight: Rectangle {
            color: "lightblue"
            width: parent.width
        }
        section {   //添加分组
            property: "team" //设置分组的属性
            criteria: ViewSection.FullString //设置分组标准
            delegate: Rectangle {  //设置代理
                color: "#b0dfb0"
                width: parent.width
                height: childrenRect.height + 4
                Text {
                    anchors.horizontalCenter: parent.horizontalCenter
                    font.pixelSize: 16
                    font.bold: true
                    text: section  //内容为分组的内容
                }
            }
        }
    }
参考文档: