车漆的效果除了基础的pbr效果,上面还可以添加两层额外的效果。一层是清漆的效果,另一层就是薄膜干涉的效果。

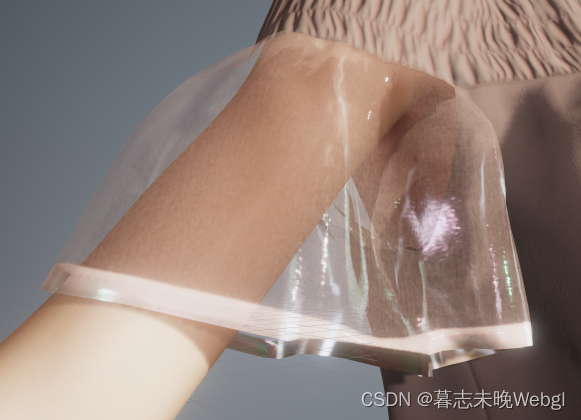
这个就是薄膜干涉的效果,可以明显的看出来颜色被分散开来。
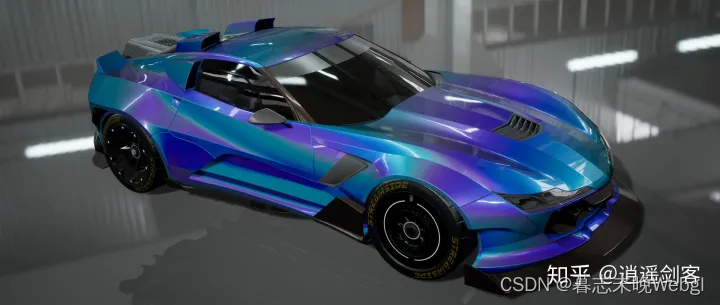

这里图片是取自https://zhuanlan.zhihu.com/p/67763458 大佬的知乎。
还有一层就是清漆的效果,也就是ClearCoat,也叫透明图层,这个原理就是为了模拟车上面喷的那层漆的效果。这个效果就实现起来比较简单,额外的增加了一层效果,
具体实现,涂层清漆的效果的之前在皮肤的那一章使用过,我这里不在介绍。
接下来,我们要使用unity内置的方式取实现镭射的效果。
// Evaluate the reflectance for a thin-film layer on top of a dielectric medum.
real3 EvalIridescence(real eta_1, real cosTheta1, real iridescenceThickness, real3 baseLayerFresnel0, real iorOverBaseLayer = 0.0)
{


    real3 I;

    // iridescenceThickness unit is micrometer for this equation here. Mean 0.5 is 500nm.
    real Dinc = 3.0 * iridescenceThickness;

    // Note: Unlike the code provide with the paper, here we use schlick approximation
    // Schlick is a very poor approximation when dealing with iridescence to the Fresnel
    // term and there is no "neutral" value in this unlike in the original paper.
    // We use Iridescence mask here to allow to have neutral value

    // Hack: In order to use only one parameter (DInc), we deduced the ior of iridescence from current Dinc iridescenceThickness
    // and we use mask instead to fade out the effect
    real eta_2 = lerp(2.0, 1.0, iridescenceThickness);
    // Following line from original code is not needed for us, it create a discontinuity
    // Force eta_2 -> eta_1 when Dinc -> 0.0
    // real eta_2 = lerp(eta_1, eta_2, smoothstep(0.0, 0.03, Dinc));
    // Evaluate the cosTheta on the base layer (Snell law)
    real sinTheta2Sq = Sq(eta_1 / eta_2) * (1.0 - Sq(cosTheta1));

    // Handle TIR:
    // (Also note that with just testing sinTheta2Sq > 1.0, (1.0 - sinTheta2Sq) can be negative, as emitted instructions
    // can eg be a mad giving a small negative for (1.0 - sinTheta2Sq), while sinTheta2Sq still testing equal to 1.0), so we actually
    // test the operand [cosTheta2Sq := (1.0 - sinTheta2Sq)] < 0 directly:)
    real cosTheta2Sq = (1.0 - sinTheta2Sq);
    // Or use this "artistic hack" to get more continuity even though wrong (no TIR, continue the effect by mirroring it):
    //   if( cosTheta2Sq < 0.0 ) => { sinTheta2Sq = 2 - sinTheta2Sq; => so cosTheta2Sq = sinTheta2Sq - 1 }
    // ie don't test and simply do
    //   real cosTheta2Sq = abs(1.0 - sinTheta2Sq);
    if (cosTheta2Sq < 0.0)
        I = real3(1.0, 1.0, 1.0);
    else
    {


        real cosTheta2 = sqrt(cosTheta2Sq);

        // First interface
        real R0 = IorToFresnel0(eta_2, eta_1);
        real R12 = F_Schlick(R0, cosTheta1);
        real R21 = R12;
        real T121 = 1.0 - R12;
        real phi12 = 0.0;
        real phi21 = PI - phi12;

        // Second interface
        // The f0 or the base should account for the new computed eta_2 on top.
        // This is optionally done if we are given the needed current ior over the base layer that is accounted for
        // in the baseLayerFresnel0 parameter:
        if (iorOverBaseLayer > 0.0)
        {


            // Fresnel0ToIor will give us a ratio of baseIor/topIor, hence we * iorOverBaseLayer to get the baseIor
            real3 baseIor = iorOverBaseLayer * Fresnel0ToIor(baseLayerFresnel0 + 0.0001); // guard against 1.0
            baseLayerFresnel0 = IorToFresnel0(baseIor, eta_2);
        }

        real3 R23 = F_Schlick(baseLayerFresnel0, cosTheta2);
        real  phi23 = 0.0;

        // Phase shift
        real OPD = Dinc * cosTheta2;
        real phi = phi21 + phi23;

        // Compound terms
        real3 R123 = clamp(R12 * R23, 1e-5, 0.9999);
        real3 r123 = sqrt(R123);
        real3 Rs = Sq(T121) * R23 / (real3(1.0, 1.0, 1.0) - R123);

        // Reflectance term for m = 0 (DC term amplitude)
        real3 C0 = R12 + Rs;
        I = C0;

        // Reflectance term for m > 0 (pairs of diracs)
        real3 Cm = Rs - T121;
        for (int m = 1; m <= 2; ++m)
        {


            Cm *= r123;
            real3 Sm = 2.0 * EvalSensitivity(m * OPD, m * phi);
            //vec3 SmP = 2.0 * evalSensitivity(m*OPD, m*phi2.y);
            I += Cm * Sm;
        }

        // Since out of gamut colors might be produced, negative color values are clamped to 0.
        I = max(I, float3(0.0, 0.0, 0.0));
    }

    return I;
}
上面就是内置的实现镭射的函数,大家可以在unity的内置文件BSDF中找到,我们使用这个求出镭射效果的F项,将默认的F进行一个插值即可。
//unity内置的镭射效果的实现
float topIor = lerp(1.0, 1.5, ClearCoat); //镭射反射率,有涂层的话就提高反射率
float viewAngle = lerp(NoV,sqrt(1.0 + Sq(1.0/topIor) * (Sq(dot(N, V)) - 1.0)), ClearCoat); //视角方向
float3 F_Iridescence = EvalIridescence(topIor, viewAngle, IridescenceThickness, SpecularColor); //求出镭射的F
F = lerp(F, F_Iridescence, Iridescence); //和原来默认的进行插值
上面是在直接光中使用。我们需要增加两个配置项,Iridescence是控制镭射效果强度,IridescenceThickness是控制镭射的厚度
//unity内置的镭射效果的实现 在环境光漫反射里面,直接去修改SpecularColor的值
float topIor = lerp(1.0, 1.5, ClearCoat); //镭射反射率,有涂层的话就提高反射率
float viewAngle = lerp(NoV,sqrt(1.0 + Sq(1.0/topIor) * (Sq(dot(N, V)) - 1.0)), ClearCoat); //视角方向
float3 F_Iridescence = EvalIridescence(topIor, viewAngle, IridescenceThickness, SpecularColor); //求出镭射的F
SpecularColor = lerp(SpecularColor, F_Iridescence, Iridescence); //和原来默认的进行插值
而在间接光里面,选择的是直接将SpecularColor 修改掉的方式实现。