文章目录
学习链接
教你用Vue2如何做过渡&动画效果+著名动画库
简单学会使用Vue2中的列表过渡和状态过渡效果
Vue Router 进阶—过渡动效&数据获取
animate.css动画库
animista可定制的动画库
单元素/组件的过渡 transition
Vue 提供了 transition 的封装组件,在下列情形中,可以给任何元素和组件添加进入/离开过渡
- 条件渲染 (使用 v-if)
- 条件展示 (使用 v-show)
- 动态组件
- 组件根节点
过渡的类名及理解
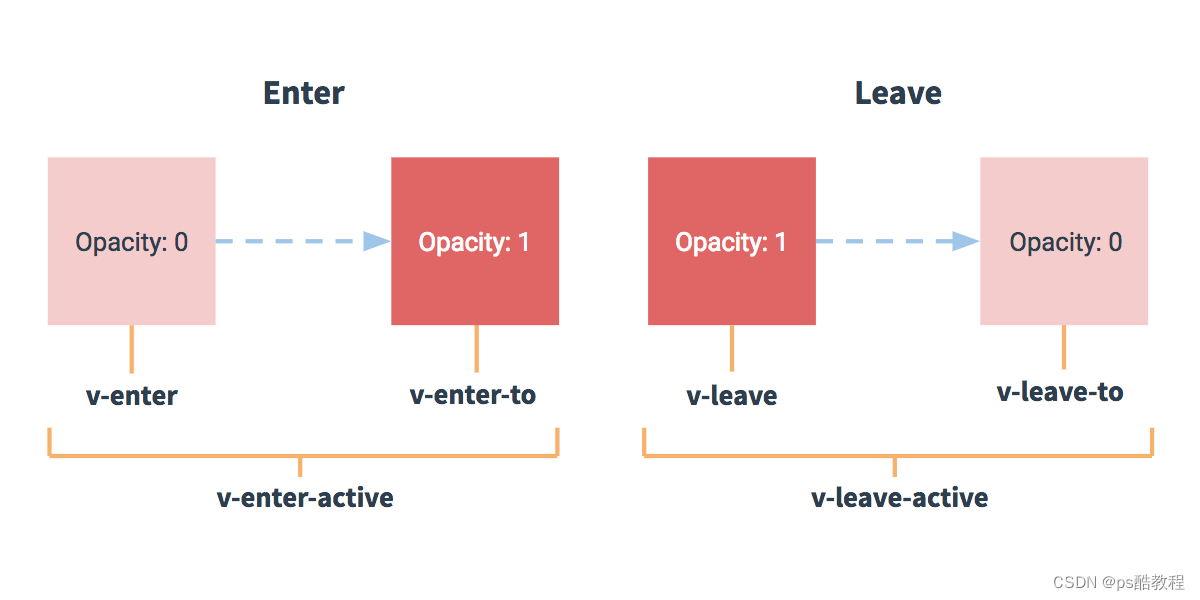
在进入/离开的过渡中,会有 6 个 class 切换。
-
v-enter:定义进入过渡的开始状态。在元素被插入之前生效,在元素被插入之后的下一帧移除。 -
v-enter-active:定义进入过渡生效时的状态。在整个进入过渡的阶段中应用,在元素被插入之前生效,在过渡/动画完成之后移除。这个类可以被用来定义进入过渡的过程时间,延迟和曲线函数。 -
v-enter-to:2.1.8 版及以上定义进入过渡的结束状态。在元素被插入之后下一帧生效 (与此同时 v-enter 被移除),在过渡/动画完成之后移除。 -
v-leave:定义离开过渡的开始状态。在离开过渡被触发时立刻生效,下一帧被移除。 -
v-leave-active:定义离开过渡生效时的状态。在整个离开过渡的阶段中应用,在离开过渡被触发时立刻生效,在过渡/动画完成之后移除。这个类可以被用来定义离开过渡的过程时间,延迟和曲线函数。 -
v-leave-to:2.1.8 版及以上定义离开过渡的结束状态。==在离开过渡被触发之后下一帧生效 ==(与此同时 v-leave 被删除),在过渡/动画完成之后移除。
我们知道CSS3中的过渡它的特点:当我们修改某个dom元素属性的时候,如果这个属性变化前后可以以数值的形式表示出来,并且这个属性被指定为过渡属性,设置了过渡时间,那么dom元素它的这个属性就会慢慢的逐渐变化为修改后的值。关键点就是:这个dom的某个过渡属性由一个数值改为成另外一个数值,就会产生逐渐变化的效果。
下面是vue官网的图示,进入的话:首先看v-enter,它元素被插入之前生效,在元素被插入之后的下一帧移除。它为什么要在元素被插入之后的下一帧移除掉?也就是说,这个dom插入到了文档中,并且当前的第一帧的时候,此时这个dom的样式可以认为就是v-enter这个类名设置的,这个时候就可以当作这个dom的属性的初始值,下一帧把它移除掉了,也就没了v-enter这个类名了,那么属性又会变成默认值(如果没有特别设置的话),并且v-enter-active这个类名也是在元素插入之前就添加进去了(也就设置了transition了),v-enter-to也是在v-enter移除时的那一帧加上去的,那么就满足CSS3产生过渡动画的条件了(1.指定了过渡属性,2.过渡属性发生了可计量的变化)。过渡动画完成之后,v-enter-active和v-enter-to这两个类名被删除。
离开的话,首先看:v-leave-to,它在离开过渡被触发之后下一帧生效,假设说,我在v-leave-to设置了过渡属性的变化后的值,那么这个类名加到dom上时,属性就产生了变化,v-enter-active又设置了transition指定了过渡属性,那么就会产生过渡动画。
示例
从下图,可以很清楚的看到类名的变化过程,但是v-enter和v-leave变化的只有一帧,所以基本看不到它们。

<style>

	/* 注意:项目中必须要写上下面这些类名,vue才会帮我们在适当的时机添加上这些类名,否则不会加的 */

    /* 在进入之前 和 进入的过程中 都会给dom加上这个类,所以进入的过程中是有指定过渡属性的 */
    .slide-fade-enter-active {


        transition: all 2s ease;
    }

    /* 在离开之前 和 离开的过程中 都会给dom加上这个类,所以离开的过程中是有指定过渡属性的 */
    .slide-fade-leave-active {


        transition: all 2s cubic-bezier(1.0, 0.5, 0.8, 1.0);
    }


    /* 在插入之前就添加了这个类名,在插入完成后的下一帧就被删除了(刚插入完成的那个时刻是有有这个类名的,那个时候的下一帧就删了这个类名),从而引起过渡属性产生变化 */
    .slide-fade-enter,
    /* 在离开过渡被触发之后的下一帧的时刻,添加这个类名(在添加这个类名的上一帧时刻和添加这个类名的那一帧时刻,这个类名引起属性发生了变化),从而引起属性产生变化 */
    .slide-fade-leave-to {


        transform: translateX(10px);
        opacity: 0;
    }
</style>

<template>
    <div style="margin: 0 50px;border: 1px solid red;">
        <div id="example-1">

        	<!-- 切换show显示/隐藏 -->
            <button @click="show = !show">
                Toggle render
            </button>

            <!-- 使用transition包裹单个元素,并使用v-show -->
            <transition name="slide-fade">
                <p v-if="show">hello</p>
            </transition>

        </div>
    </div>
</template>

<script>

export default {


    name: 'Animatez1',
    data() {


        return {


            show: false
        }
    },
}
</script>
CSS 动画
CSS 动画用法同 CSS 过渡,区别是在动画中 v-enter 类名在节点插入 DOM 后不会立即删除,而是在 animationend 事件触发时删除。
动画的理解
我们知道在css3中,如果某时刻,直接给某个dom添加动画属性相关的样式,这个dom会立即执行此动画。vue中也是直接在dom中添加相关的class,这些class中可以设置动画相关的样式,从而在添加样式时,就产生了动画。
示例
下面直接看示例吧,在示例中,我们明显的可以看到,在p标签“消失”前,会被添加上bounce-leave-active和bounce-leave-to这2个类名,然后这个dom被删除。在p标签“出现”时,会被添加上bounce-enter-active和bounce-enter-to这2个类名,并且在动画结束后,这2个类名会被移除掉。所以,我们只需要在bounce-enter-active和bounce-leave-active添加动画相关的样式即可。

<style>

/* 注意:项目中必须要写上下面这些类名,vue才会帮我们在适当的时机添加上这些类名,否则不会加的 */

/* 指定进入时, 的动画样式 */
.bounce-enter-active {


    animation: bounce-in 2s;
}
/* 指定离开时, 的动画样式 */
.bounce-leave-active {


    animation: bounce-in 2s reverse;
}

@keyframes bounce-in {


    0% {


        transform: scale(0);
    }

    50% {


        transform: scale(1.5);
    }

    100% {


        transform: scale(1);
    }
}
</style>

<template>
    <div style="margin: 0 50px;border: 1px solid red;width: 500px;">
        <div id="example-2">

            <button @click="show = !show">Toggle show</button>

            <transition name="bounce">
                <p v-if="show">Lorem ipsum dolor sit amet, consectetur adipiscing elit.
                               Mauris facilisis enim libero, at lacinia diam fermentum id.
                               Pellentesque habitant morbi tristique senectus et netus.
                </p>
            </transition>
        </div>
    </div>
</template>

<script>

export default {


    name: 'Animatez2',
    data() {


        return {


            show: true
        }
    },
}
</script>
自定义过渡的类名
我们可以通过以下 attribute 来自定义过渡类名:
- enter-class
- enter-active-class
- enter-to-class (2.1.8+)
- leave-class
- leave-active-class
- leave-to-class (2.1.8+)
他们的优先级高于普通的类名,这对于 Vue 的过渡系统和其他第三方 CSS 动画库,如 Animate.css 结合使用十分有用。
特别注意的一点是:设置的类名一定要存在,否则vue会直接删除和添加dom,并不会在适当的时机添加样式。
示例
安装animate.css
npm install animate.css --save
main.js中引入animate.css
import Vue from 'vue'
import App from './App.vue'

import '@/assets/base.scss'
import '@/assets/iconfont/iconfont.css'
import ElementUI from 'element-ui';
import 'element-ui/lib/theme-chalk/index.css';

import router from '@/router'
import 'animate.css'

import prevImg from './plugins/prevImg';

Vue.config.productionTip = false

Vue.use(ElementUI)
Vue.use(prevImg)


new Vue({


  router,
  render: h => h(App),
}).$mount('#app')
使用animate.css
可以看到如下特点:
- 在进入的过程中,会添加
animate__animated、animate__backInDown、custom-classes-transition-enter-to这3个类名(原先应该要出现的custom-classes-transition-enter-active被指定的enter-active-class给取代了,并且里面写了2个类名) - 在离开的过程中,会添加
animate__animated、animate__backOutDown、custom-classes-transition-leave-to这3个类名(原先应该要出现的custom-classes-transition-leave-active被指定的leave-active-class给取代了,并且里面写了2个类名) - 我们注意到,hello1它似乎不是从正上方掉下来,而是掉下来后,往左移了过去。离开的时候,又是往右移,再掉下去(这个是因为animate.css的这个被应用的动画里有scale(0.7)缩小了的缘故)。并且hello1出现的时候,外面这个div的红框,是立即变高,hello离开后,等到离开动画结束后,外面这个div的红框的高度立即变小了(当被插入时,只是有动画,但是它仍然像个正常的文档流,应当要占据自己的空间)。
- 我们再看下使用的这个动画类
.animate__animated {


  /* 默认动画持续时间是1秒 */
  -webkit-animation-duration: 1s;
  animation-duration: 1s;
  -webkit-animation-duration: var(--animate-duration);
  animation-duration: var(--animate-duration);
  -webkit-animation-fill-mode: both;
  /* 等待期取第一帧和完成状态取最后一帧 */
  animation-fill-mode: both;
}

/* 进入的动画 */
.animate__backInDown {


  -webkit-animation-name: backInDown;
  animation-name: backInDown;
}

/* 进入的动画 的定义 */
@-webkit-keyframes backInDown {


  0% {


    -webkit-transform: translateY(-1200px) scale(0.7);
    transform: translateY(-1200px) scale(0.7);
    opacity: 0.7;
  }

  80% {


    -webkit-transform: translateY(0px) scale(0.7);
    transform: translateY(0px) scale(0.7);
    opacity: 0.7;
  }

  100% {


    -webkit-transform: scale(1);
    transform: scale(1);
    opacity: 1;
  }
}

/* 离开的动画 */
.animate__backOutDown {


  -webkit-animation-name: backOutDown;
  animation-name: backOutDown;
}

/* 离开的动画 的定义 */
@-webkit-keyframes backOutDown {


  0% {


    -webkit-transform: scale(1);
    transform: scale(1);
    opacity: 1;
  }

  20% {


    -webkit-transform: translateY(0px) scale(0.7);
    transform: translateY(0px) scale(0.7);
    opacity: 0.7;
  }

  100% {


    -webkit-transform: translateY(700px) scale(0.7);
    transform: translateY(700px) scale(0.7);
    opacity: 0.7;
  }
}

<style>
    .animate__animated.animate__backInDown.custom-classes-transition-enter-to {


        /* 可在此处设置动画的持续时间,以覆盖animate.css的默认的1s */
        /* animation-duration: 2s; */
    }
</style>

<template>
    <div style="margin: 0 50px;border: 1px solid red;width: 500px;">

        <button @click="show = !show">
            Toggle render
        </button>

        <transition
            name="custom-classes-transition"
            enter-active-class="animate__animated animate__backInDown"
            leave-active-class="animate__animated animate__backOutDown">
            <p v-if="show">hello1</p>
        </transition>

    </div>
</template>

<script>

export default {


    name: 'Animatez3',
    data() {


        return {


            show: true
        }
    },
}
</script>
初始渲染的过渡
可以通过 appear attribute 设置节点在初始渲染的过渡。
这是什么意思呢?就是说,一个被transition包裹的东西,它第一次被渲染出来的时候,要不要设置动画,默认情况下,这个过程它是没有动画的。其实就是当我们第一次打开网页,或者刷新页面的时候,如果这个元素v-if是true,那么它应该是显示的,但是它(第一次)出现的这个过程默认是没有动画的。可以通过设置appear属性让第一次出现也出现动画。
示例
当我们点击刷新的时候,就已经有动画这个过程了

<style>
    .animate__animated.custom-classes-transition-enter-to,
    .animate__animated.custom-classes-transition-leave-to {


        /* 可在此处设置动画的持续时间,以覆盖animate.css的默认的1s */
        animation-duration: 2s;
    }
</style>

<template>
    <div style="margin: 0 50px;border: 1px solid red;width: 500px;">
        <button @click="show = !show">
            Toggle render
        </button>
        <transition
            name="custom-classes-transition"
            appear
            enter-active-class="animate__animated animate__fadeInDown"
            leave-active-class="animate__animated animate__fadeOutDown">
            <p v-if="show">hello1</p>
        </transition>
    </div>
</template>

<script>

export default {


    name: 'Animatez3',
    data() {


        return {


            show: true
        }
    },
}
</script>
多个元素的过渡
当有相同标签名的元素切换时,需要通过 key attribute 设置唯一的值来标记以让 Vue 区分它们,否则 Vue 为了效率只会替换相同标签内部的内容。即使在技术上没有必要,给在<transition> 组件中的多个元素设置 key 是一个更好的实践。
未添加key属性
发现,未添加key属性时,它是直接就替换,但是没有动画效果

<style>
    .v-enter {


        opacity: 0;
        transform: translateX(50px);
    }
    .v-leave-to {


        opacity: 0;
        transform: translateX(-50px);
    }
    .v-enter-active, .v-leave-active {


        transition: all 0.5s;
    }
</style>

<template>
    <div style="margin: 0 50px;border: 1px solid red;width: 500px;">
        <button @click="show = !show">
            Toggle render
        </button>
        <p></p>
        <transition>
            <button id="btn1" v-if="show">save</button>
            <button id="btn2" v-else>delete</button>
        </transition>
    </div>
</template>

<script>

export default {


    name: 'Animatez3',
    data() {


        return {


            show: true
        }
    },
}
</script>
添加key属性
下面与上面的区别,仅仅是添加了key属性而已,可是却有了动画效果。
当时这个动画效果有点问题阿,问题出在要离开的元素还没离开,还正在离开动画当中,另一个要进来的元素正在开始进来的动画了,等到要离开的元素离开了,进来的元素的位置突然一下往左移动了。
为什么呢?因为这里的动画,仅仅用到了transform:translateX(50px),也就是说,刚开始,进入的动画,要偏离自己原本位置往右50像素开始,然后往左进入,它在这个过程未结束之前,左边这个元素还没消失,它就只能靠着左边的这个元素,等到左边元素消失了,它就突然往左了。

<style>
    .v-enter {


        opacity: 0;
        transform: translateX(50px);
    }
    .v-leave-to {


        opacity: 0;
        transform: translateX(-50px);
    }
    .v-enter-active, .v-leave-active {


        transition: all 0.5s;
    }
</style>

<template>
    <div style="margin: 0 50px;border: 1px solid red;width: 500px;">
        <button @click="show = !show">
            Toggle render
        </button>
        <p></p>
        <transition>
            <button key="save" id="btn1" v-if="show">save</button>
            <button key="delete" id="btn2" v-else>delete</button>
        </transition>
    </div>
</template>

<script>

export default {


    name: 'Animatez3',
    data() {


        return {


            show: true
        }
    },
}
</script>
加个绝对定位
分析了上面的这个问题,现在给这2个button添加上绝对定位,再来看看效果。现在看上去,就正常多了。因为绝对定位后,要进来的元素就不会受左边这个元素的位置影响了,它往左偏移50像素的开始位置,就是相对于父元素左边的50个像素了。

<style>
    .v-enter {


        opacity: 0;
        transform: translateX(50px);
    }
    .v-leave-to {


        opacity: 0;
        transform: translateX(-50px);
    }
    .v-enter-active, .v-leave-active {


        transition: all 0.5s;
    }
    #btn1,#btn2 {


        position: absolute;
    }
</style>

<template>
    <div style="margin: 0 50px;border: 1px solid red;width: 500px;">
        <button @click="show = !show">
            Toggle render
        </button>
        <p></p>
        <transition>
            <button key="save" id="btn1" v-if="show">save</button>
            <button key="delete" id="btn2" v-else>delete</button>
        </transition>
    </div>
</template>

<script>

export default {


    name: 'Animatez3',
    data() {


        return {


            show: true
        }
    },
}
</script>
过渡模式
还是上面的那个问题,同时生效的进入和离开的过渡不能满足所有要求,所以 Vue 提供了过渡模式。
-
in-out:新元素先进行过渡,完成之后当前元素过渡离开。 -
out-in:当前元素先进行过渡,完成之后新元素过渡进入。
上面,我们是用了绝对定位解决的问题。但是vue给我们提供了过渡模式,让我们即使不用绝对定位也能解决上面的问题
下面,我把绝对定位给注释了,给transition添加了mode:out-in,为了方便观察,我把过渡持续时间设置为1s,其它,都未动。我们可以看到的是当前元素离开之后,新元素才开始进入动画的。

<style>
    .v-enter {


        opacity: 0;
        transform: translateX(50px);
    }
    .v-leave-to {


        opacity: 0;
        transform: translateX(-50px);
    }
    .v-enter-active, .v-leave-active {


        transition: all 1s;
    }
    #btn1,#btn2 {


        /* position: absolute; */
    }
</style>

<template>
    <div style="margin: 0 50px;border: 1px solid red;width: 500px;">
        <button @click="show = !show">
            Toggle render
        </button>
        <p></p>
        <transition mode="out-in">
            <button key="save" id="btn1" v-if="show">save</button>
            <button key="delete" id="btn2" v-else>delete</button>
        </transition>
    </div>
</template>

<script>

export default {


    name: 'Animatez3',
    data() {


        return {


            show: true
        }
    },
}
</script>
动态组件
多个组件的过渡简单很多 - 我们不需要使用 key attribute。相反,我们只需要使用动态组件
示例
在示例中,我们可以看到,使用mode=“out-in”,等到要离开的元素离开动画结束后,新的元素才开始进入的动画

<style>
    .component-fade-enter-active, .component-fade-leave-active {


        transition: opacity 2s ease;
    }
    .component-fade-enter, .component-fade-leave-to{


        opacity: 0;
    }
</style>
<template>
    <div style="margin-left: 50px;border: 1px solid red;">
        <el-button @click="componentName = 'Animate2A'">Animate2A</el-button>
        <el-button @click="componentName = 'Animate2B'">Animate2B</el-button>
        <transition name="component-fade" mode="out-in">
            <component v-bind:is="componentName"></component>
        </transition>
    </div>
</template>

<script>
import Animate2A from './Animate2A.vue' // 就 <div> Animate2A </div>
import Animate2B from './Animate2B.vue' // 就 <div> Animate2B </div>
export default {


    name: 'Animate2',
    data() {


        return {


            componentName:'Animate2A'
        }
    },
    components: {


        Animate2A,
        Animate2B
    }
}
</script>
案例
可以结合animate.css来个动态的切换效果,比如:登录/注册,假设它们的宽高都不一样,并且都添加上效果,指定mode='out-in’先离开后进入。

<style>
    .component-fade-enter-active, .component-fade-leave-active {


        transition: opacity 2s ease;
    }
    .component-fade-enter, .component-fade-leave-to{


        opacity: 0;
    }
</style>
<template>
    <div style="margin-left: 50px;border: 1px solid red;">
        <el-button @click="componentName = 'Animate2A'">Animate2A</el-button>
        <el-button @click="componentName = 'Animate2B'">Animate2B</el-button>
        <transition appear enter-active-class="animate__animated animate__backInLeft" leave-active-class="animate__animated animate__backOutLeft" mode="out-in">
            <component v-bind:is="componentName"></component>
        </transition>
    </div>
</template>

<script>
import Animate2A from './Animate2A.vue' // <div style="height:60px;width:100px;background-color: #bfa;">登录</div>
import Animate2B from './Animate2B.vue' // <div style="height:220px;width:100px;background-color: pink;">注册</div>
export default {


    name: 'Animate2',
    data() {


        return {


            componentName:'Animate2A'
        }
    },
    components: {


        Animate2A,
        Animate2B
    }
}
</script>
列表过渡
目前为止,关于过渡我们已经讲到:
- 单个节点
- 同一时间渲染多个节点中的一个
那么怎么同时渲染整个列表,比如使用 v-for?在这种场景中,使用 <transition-group> 组件。在我们深入例子之前,先了解关于这个组件的几个特点:
-
不同于<transition>,它会以一个真实元素呈现:默认为一个 <span>。你也可以通过 tag attribute 更换为其他元素。 -
过渡模式不可用,因为我们不再相互切换特有的元素。 -
内部元素
总是需要提供唯一的 key attribute 值。 -
CSS 过渡的类将会应用在内部的元素中,而不是这个组/容器本身。
列表的进入/离开过渡
示例

外部这个组容器渲染成了p标签,并且会在v-for渲染出来的元素中使用样式,可以看到默认跟原来使用<transition>的样式,没什么区别。
当然,这个例子有个问题,当添加和移除元素的时候,周围的元素会瞬间移动到他们的新布局的位置,而不是平滑的过渡,我们下面会解决这个问题。
<style>
.list-item {


    display: inline-block;
    margin-right: 10px;
}

/* 动画的过程中,指定过渡的属性 */
.list-enter-active,
.list-leave-active {


    transition: all 1.5s;
}

/* .list-enter在插入前至插入完成的那一帧生效,插入完成后的下一帧移除,从而引起过渡属性的值发生变化
	.list-leave-to在离开过渡被触发之后下一帧生效,引起过渡属性变化
 */
.list-enter,
.list-leave-to {


    opacity: 0;
    transform: translateY(30px);
}
</style>

<template>

    <div style="margin-left: 50px;border: 1px solid red;">

        <div id="list-demo" class="demo">

            <button v-on:click="add">Add</button>
            <button v-on:click="remove">Remove</button>

            <transition-group name="list" tag="p">
                <span v-for="item in items" v-bind:key="item" class="list-item">
                    {

   { item }}
                </span>
            </transition-group>

        </div>
    </div>
</template>

<script>

export default {


    name: 'Animate3',
    data() {


        return {


            items: [1, 2, 3, 4, 5, 6, 7, 8, 9],
            nextNum: 10
        }
    },
    methods: {


        randomIndex: function () {


            return Math.floor(Math.random() * this.items.length)
        },
        add: function () {


            this.items.splice(this.randomIndex(), 0, this.nextNum++)
        },
        remove: function () {


            this.items.splice(this.randomIndex(), 1)
        },
    },
    components: {


    }
}
</script>
列表的排序过渡
<transition-group> 组件还有一个特殊之处。不仅可以进入和离开动画,还可以改变定位。
要使用这个新功能只需了解新增的 v-move class,它会在元素的改变定位的过程中应用。
像之前的类名一样,可以通过 name attribute 来自定义前缀,也可以通过 move-class attribute 手动设置。
示例
与上面的区别,就在于:仅加上了下面2个样式,即可实现add和remove都有平滑过渡动画

<style>
.list-item {


    display: inline-block;
    margin-right: 10px;
}

.list-enter-active,
.list-leave-active {


    transition: all 1.5s;
}

.list-enter,
.list-leave-to {


    opacity: 0;
    transform: translateY(30px);
}

/* 这个样式实现的效果:当点击add的时候,加入的位置缓慢右移,同时新元素插入 */
.list-move {


  transition: transform 1s;
}

/* 这个样式实现的效果:当点击remove的时候,移除的位置缓慢左移,同时元素逐渐消失 */
.list-leave-active {


  position: absolute;
}
</style>

<template>
    <div style="margin-left: 50px;border: 1px solid red;">
        <div id="list-demo" class="demo">

            <button v-on:click="add">Add</button>
            <button v-on:click="remove">Remove</button>

            <transition-group name="list" tag="p">
                <span v-for="item in items" v-bind:key="item" class="list-item">
                    {

   { item }}
                </span>
            </transition-group>
        </div>
    </div>
</template>

<script>

export default {


    name: 'Animate3',
    data() {


        return {


            items: [1, 2, 3, 4, 5, 6, 7, 8, 9],
            nextNum: 10
        }
    },
    methods: {


        randomIndex: function () {


            return Math.floor(Math.random() * this.items.length)
        },
        add: function () {


            this.items.splice(this.randomIndex(), 0, this.nextNum++)
        },
        remove: function () {


            this.items.splice(this.randomIndex(), 1)
        },
    },
    components: {


    }
}
</script>
vue2路由过渡动画示例

需要安装animate.css哦,
npm install animate.css
并在main.js中引入animate.css
import 'animate.css'
App.vue
<template>
  <div id="app">
    <transition  enter-active-class="animate__animated animate__bounceInUp" leave-active-class="animate__animated animate__bounceOutUp" mode="out-in">
      <router-view/>
    </transition>
  </div>
</template>

<style>

</style>
User.vue
<template>
    <div id="user" style="border:1px solid red;">
        用户
        <router-link to="/home">/home</router-link>
    </div>
</template>

<script>

export default {


    name: 'User',
    components: {


    }
}
</script>

<style>

</style>
Home.vue
<template>
    <div id="home" style="border:1px solid red;">
        Home
        <router-link to="/user">/user</router-link>
    </div>
</template>

<script>

export default {


    name: 'Home',
    components: {


    }
}
</script>

<style>

</style>