前言:
Glide 作为Android 图片加载领域最火的一款框架,其背后的源码设计同样精彩,今天就来一探究竟(基于Glide4.13.2版本)。
由于Glide框架的源码非常庞大,我们不会把所有细节分析一遍,本文只分析其核心源码,重点分析其对生命周期的监听和缓存的处理。
目录
我们的分析思路就从最简单的
Glide.with(context).load(url).into(imageView) 开始(其中url是String类型) 来看看其背后的源码到底是怎么样的。
一、with
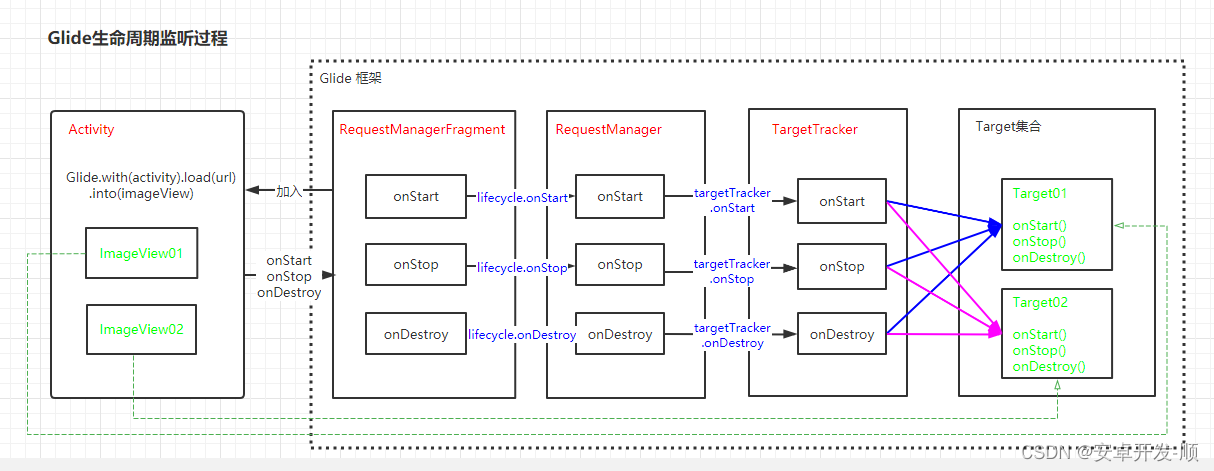
分析with之前,先来一张我梳理的Glide生命周期的监听过程图,先大概有个印象:
下面开始分析:
Glide有6个with的重载方法,返回值都是RequestManager
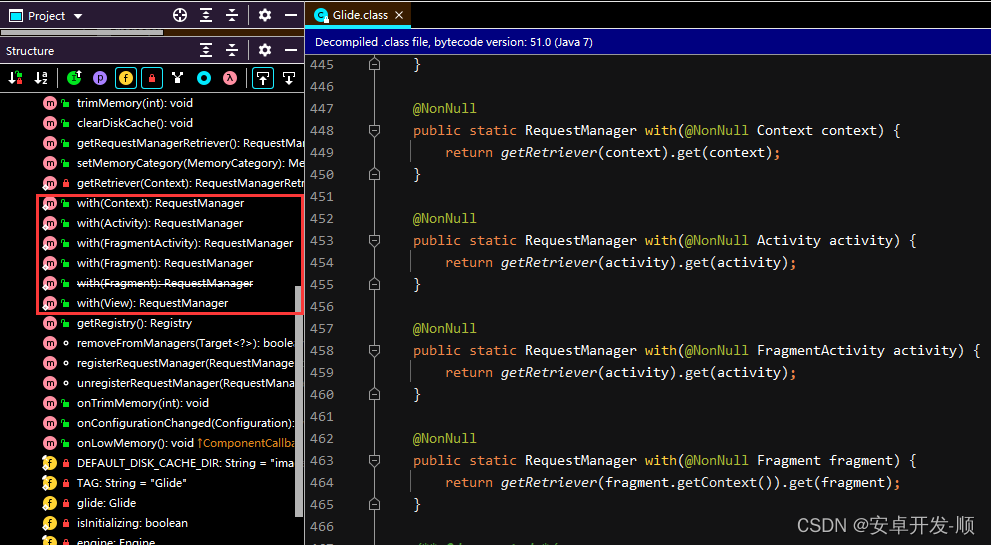
这6个方法其实可以分为两类:
- 在主线程调用并且传入 Activity、Fragment或者View类型的Context(这种情况Glide会默认创建一个空的(不可见的)Fragment来感应当前Activity的生命周期)
- 在子线程调用或者传入的Context是ApplicationContext(只要在子线程调用,无论传入什么都会装换为ApplicationContext)
下面我们通过看源码来验证:
我们看with(Activity)的情况
    @NonNull
    public static RequestManager with(@NonNull Activity activity) {
        return getRetriever(activity).get(activity);
    }
其中 getRetriever返回了一个 RequestManagerRetriever 对象
  @NonNull
  private static RequestManagerRetriever getRetriever(@Nullable Context context) {
    // Context could be null for other reasons (ie the user passes in null), but in practice it will
    // only occur due to errors with the Fragment lifecycle.
    Preconditions.checkNotNull(
        context,
        "You cannot start a load on a not yet attached View or a Fragment where getActivity() "
            + "returns null (which usually occurs when getActivity() is called before the Fragment "
            + "is attached or after the Fragment is destroyed).");
    return Glide.get(context).getRequestManagerRetriever();
  }
我们来看RequestManagerRetriever的get方法:
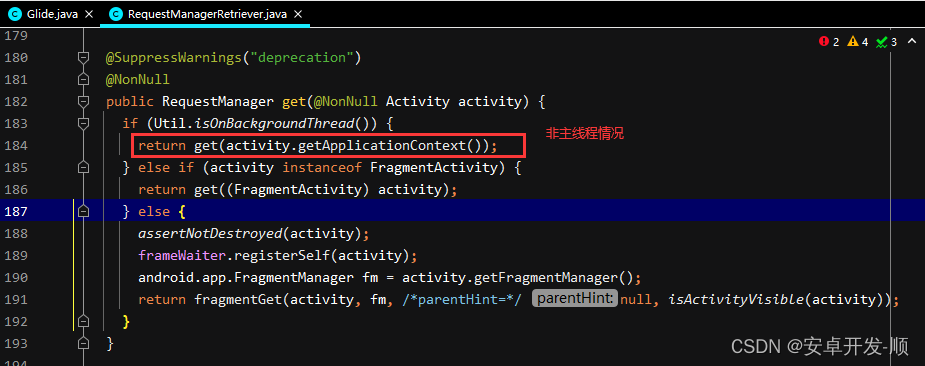
看,虽然传入的是Activity,但是如果不是主线程就转换为ApplicationContext来处理,这样就和with(Application)是一样的,我们先来看这条分支:
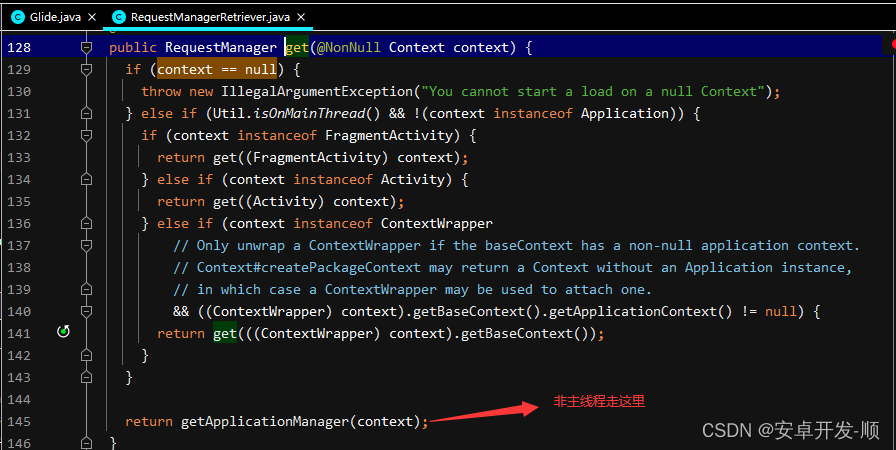
继续跟进:
    @NonNull
    private RequestManager getApplicationManager(@NonNull Context context) {
        if (this.applicationManager == null) {
            synchronized(this) {
                if (this.applicationManager == null) {
                    Glide glide = Glide.get(context.getApplicationContext());
                    this.applicationManager = this.factory.build(glide,
                           new ApplicationLifecycle(),
                           new EmptyRequestManagerTreeNode(),
                           context.getApplicationContext());
                }
            }
        }

        return this.applicationManager;
    }
比较直接,通过工厂模式创建一个 RequestManager 对象返回就结束了。
然后我们重点来看第二条分支的情况(主线程+Activity、Fragment、或者View)
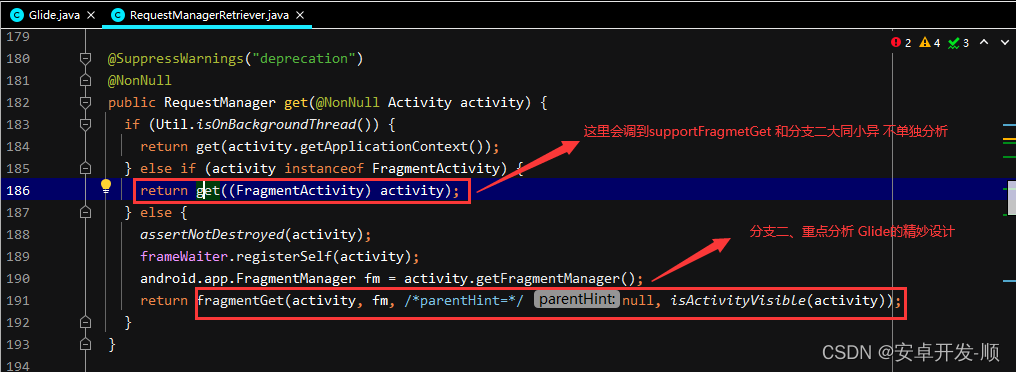
跟进到fragmentGet,通过方法名可以看出,这里面会构造一个Fragment
/** @deprecated */
@Deprecated
@NonNull
private RequestManager fragmentGet(@NonNull Context context, @NonNull FragmentManager fm, @Nullable android.app.Fragment parentHint, boolean isParentVisible) {
//重点代码,这里会创建出RequestManagerFragment
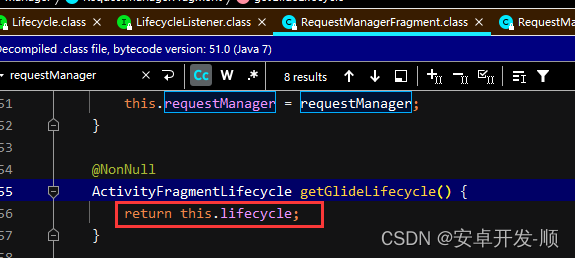
RequestManagerFragment current = this.getRequestManagerFragment(fm, parentHint, isParentVisible);
RequestManager requestManager = current.getRequestManager();
if (requestManager == null) {
Glide glide = Glide.get(context);
requestManager = this.factory.build(glide, current.getGlideLifecycle(),
current.getRequestManagerTreeNode(), context);
current.setRequestManager(requestManager);
}
return requestManager;
}继续跟进fragmentGet方法的第一行代码:
this.getRequestManagerFragment(fm, parentHint, isParentVisible);
package com.bumptech.glide.manager;
public class RequestManagerRetriever implements Callback {
...
    @NonNull
    private RequestManagerFragment getRequestManagerFragment(@NonNull FragmentManager fm, @Nullable android.app.Fragment parentHint, boolean isParentVisible) {
        //第一步 先通过Tag找下当前是否已经有构造好的Fragment
        RequestManagerFragment current = (RequestManagerFragment)fm.findFragmentByTag("com.bumptech.glide.manager");
        if (current == null) {
            //第二步 如果第一步找不到 在从缓存里找下
            current = (RequestManagerFragment)this.pendingRequestManagerFragments.get(fm);
            if (current == null) {
                //第三步 缓存里也没有 就创建一个
                current = new RequestManagerFragment();
                current.setParentFragmentHint(parentHint);
                if (isParentVisible) {
                    current.getGlideLifecycle().onStart();
                }

                //放入缓存 避免重复创建,此时再调用当前方法就能从缓存直接拿到了
                this.pendingRequestManagerFragments.put(fm, current);
                fm.beginTransaction().add(current, "com.bumptech.glide.manager").commitAllowingStateLoss();

                //发handler去移除缓存里的fragment,当此handler消息被执行时,通过
                //fm.findFragmentByTag已经可以获取到当前fragment了
                //注意,这里必须是发handler 不能直接从缓存移除
                //因为fragment的加载也是通过handler消息来驱动的,这里牵扯到handler消息机制的原理,简单理解就是handler消息是排队被处理的,下面发的handler消息排在处理fragment消息的后面
                this.handler.obtainMessage(1, fm).sendToTarget();
            }
        }

        return current;
    }
}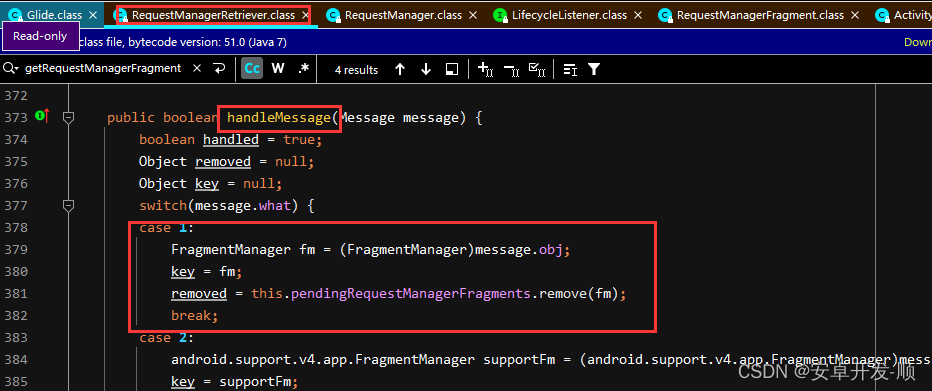
注释里写的比较清楚了,先通过fm.findFragmentByTag来获取,没有就从缓存取,在没有就创建出RequestManagerFragment。
这里面有个细节就是作者设计了一个缓存pendingRequestManagerFragments(就是一个Map)来防止fragment重复创建,其中从缓存中移除fragment的时机涉及到了fragment的加载原理(handler驱动),和handler机制的原理,如果对二者不熟悉,可能不太容易理解。

注释里面我也给出了详细的解释,如还不能理解请先看下Fragment、Handler相关源码。
现在Fragment有了,那是如何做到感应当前Activity生命周期的呢?
我们来看下RequestManagerFragment的源码:
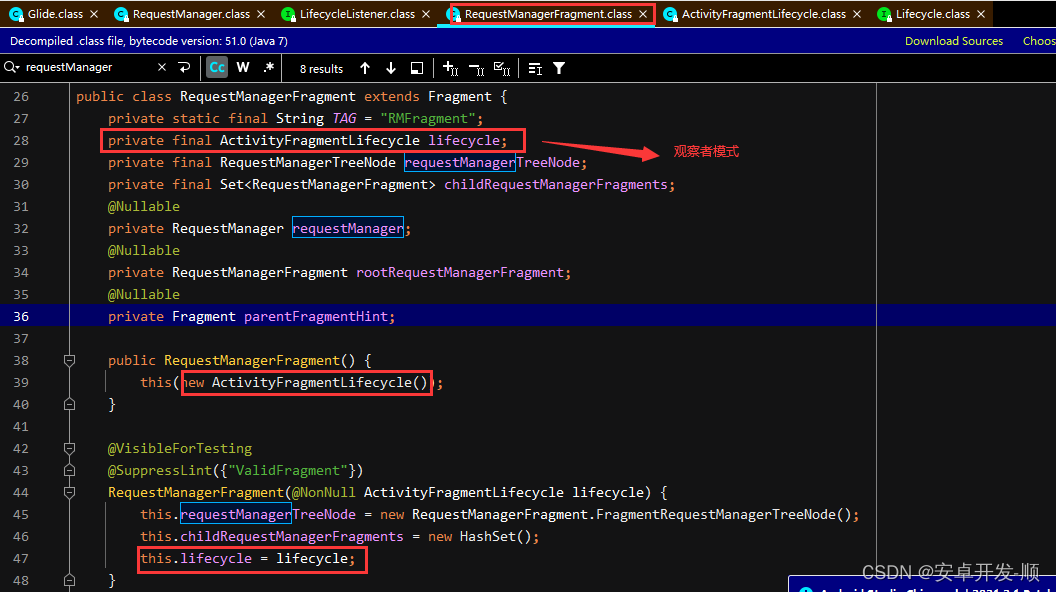
首先,RequestManagerFragment 持有一个 ActivityFragmentLifecycle 对象,这个对象在fragment初始化的时候就被创建出来了,赋值给成员变量 lifecycle。
再看下ActivityFragmentLifecycle 的源码:
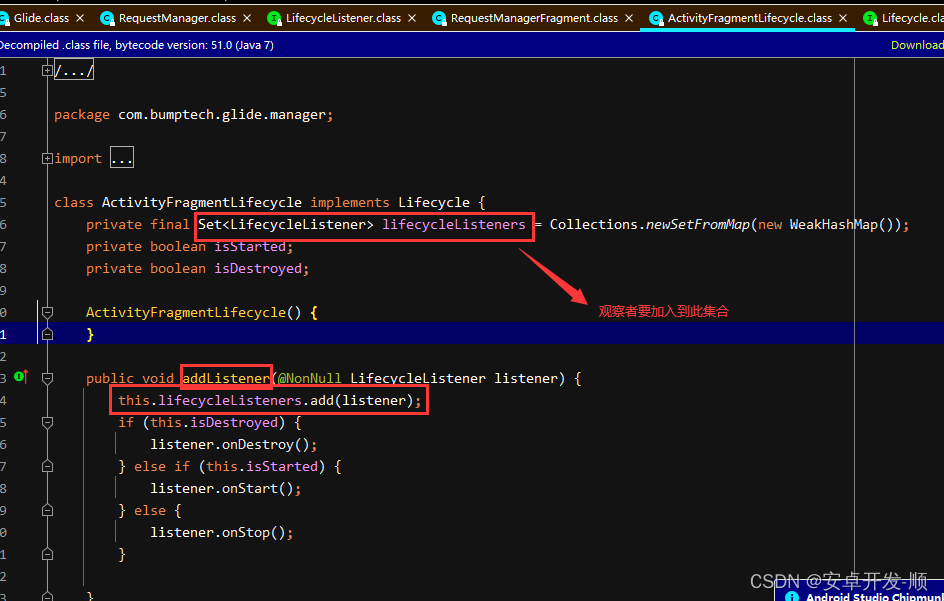
接口 Lifecycle
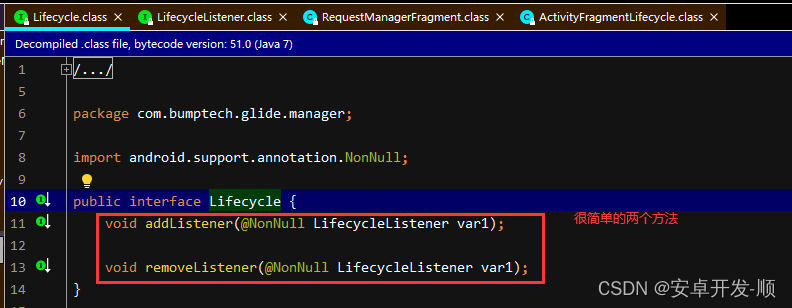
接口 LifecycleListener

这里是观察者模式的体现,我们知道Fragment是可以感知到Activity的生命周期:
Activity进入onStart、onStop、onDestroy状态时,
其内部的Fragment对应的onStar、onStop、onDestroy方法
也会被同步调用
此时RequestManagerFragment作为被观察者会通过lifecycle来通知观察者,
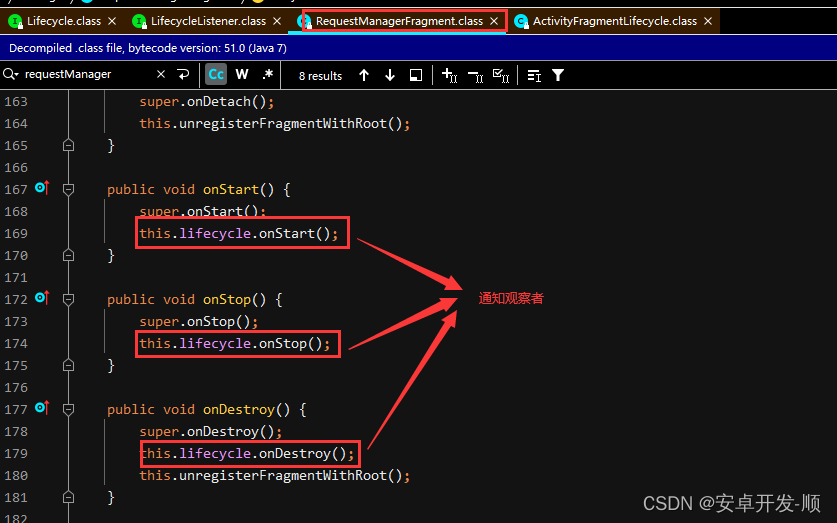
这里会调用到ActivityFragmentLifecycle 里面,遍历所有观察者 回调对应方法
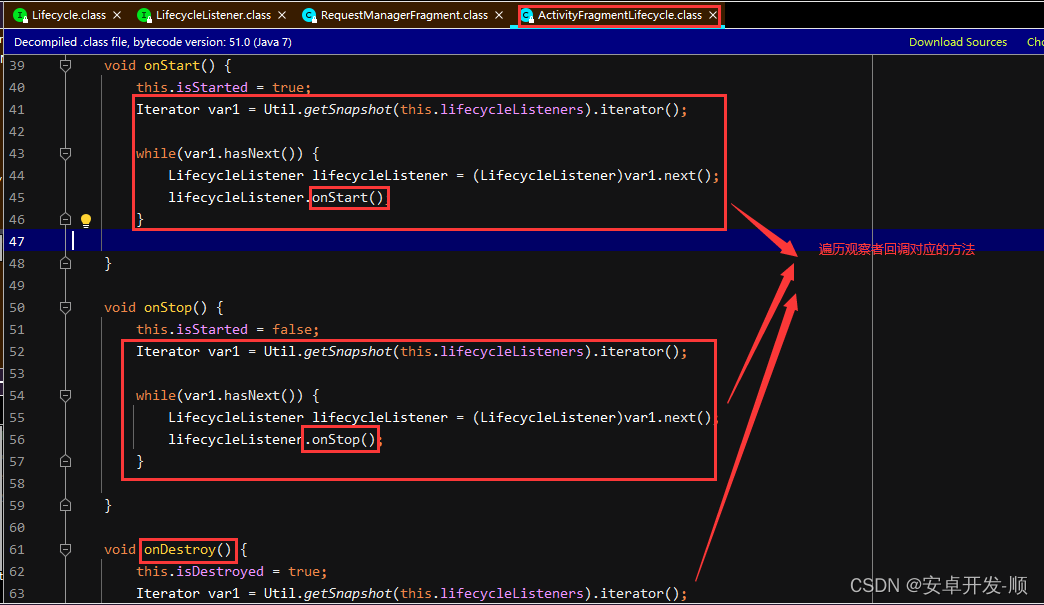
这里接口稍微有点多,可以对照源码来看更清晰,总之就是观察者模式,感应到Activity生命周期后通知观察者。
那么问题来了,谁是观察者?什么时候注册进来的?
我们回到创建RequestManagerFragment的步骤中
    /** @deprecated */
    @Deprecated
    @NonNull
    private RequestManager fragmentGet(@NonNull Context context, @NonNull FragmentManager fm, @Nullable android.app.Fragment parentHint, boolean isParentVisible) {
        //重点代码,这里会创建出RequestManagerFragment
        RequestManagerFragment current = this.getRequestManagerFragment(fm, parentHint, isParentVisible);
        RequestManager requestManager = current.getRequestManager();
        if (requestManager == null) {
            Glide glide = Glide.get(context);
            requestManager = this.factory.build(glide, current.getGlideLifecycle(),
                             current.getRequestManagerTreeNode(), context);
            current.setRequestManager(requestManager);
        }

        return requestManager;
    }
RequestManagerFragment创建完后,通过工厂模式创建RequestManager,(这里有个判断requestManager == null,第一次肯定是null的)
注意这里传入了一个参数:current.getGlideLifectycle
我们看RequestManager的创建过程:
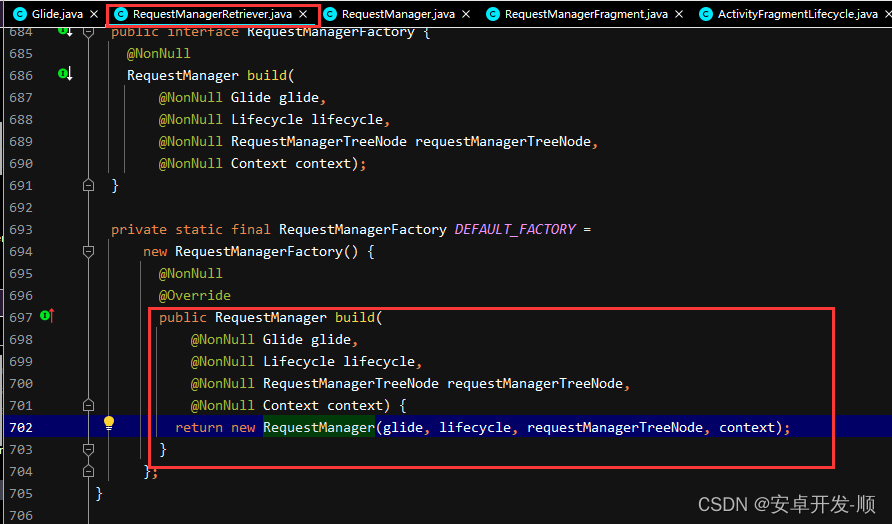
package com.bumptech.glide;

//实现了LifecycleListener 说明可以作为观察者
public class RequestManager implements LifecycleListener, ... {

    //final 修饰的成员变量 肯定是在构造方法赋值
    final Lifecycle lifecycle;
    ...

    //这里的lifecycle 参数就是从RequestManagerFragment里面取出来的lifecycle
    public RequestManager(@NonNull Glide glide, @NonNull Lifecycle lifecycle, @NonNull RequestManagerTreeNode treeNode, @NonNull Context context) {
        this(glide, lifecycle, treeNode, new RequestTracker(), glide.getConnectivityMonitorFactory(), context);
    }

    RequestManager(Glide glide, Lifecycle lifecycle, RequestManagerTreeNode treeNode, RequestTracker requestTracker, ConnectivityMonitorFactory factory, Context context) {
        this.targetTracker = new TargetTracker();
        this.addSelfToLifecycle = new Runnable() {
            public void run() {
                RequestManager.this.lifecycle.addListener(RequestManager.this);
            }
        };
        this.mainHandler = new Handler(Looper.getMainLooper());
        ...
        if (Util.isOnBackgroundThread()) {
            this.mainHandler.post(this.addSelfToLifecycle);
        } else {
            //关键代码 把自身加入
            lifecycle.addListener(this);
        }

        lifecycle.addListener(this.connectivityMonitor);
        this.setRequestOptions(glide.getGlideContext().getDefaultRequestOptions());
        glide.registerRequestManager(this);
    }
    ...
}
我们看到, RequestManager实现了LifecycleListener接口,并在构造方法里把自身加入到观察者集合中,所以RequestManager就是其中一个观察者!
好了,先稍微梳理下以上的逻辑:
- 主线程中调用Glide.with 方法,传入Activity、Fragment或者View
- Glide内部默认创建一个空的不可见的Fragment (RequestManagerFragment或者SupportRequestManagerFragment)添加到当前Activity上
- Activity生命周期发生变化时会默认调用Fragment对应的生命周期(系统默认行为)
- Fragment 调用内部的ActivityFragmentLifecycle 对应的onStart onStop onDestroy方法
- ActivityFragmentLifecycle 会对应的调用内部注册进来的观察者的onStart onStop onDestroy方法
梳理完这5个步骤,我们继续分析:
RequestManager既然作为观察者并实现了LifecycleListener 接口 ,那肯定对应实现了相关回调方法:
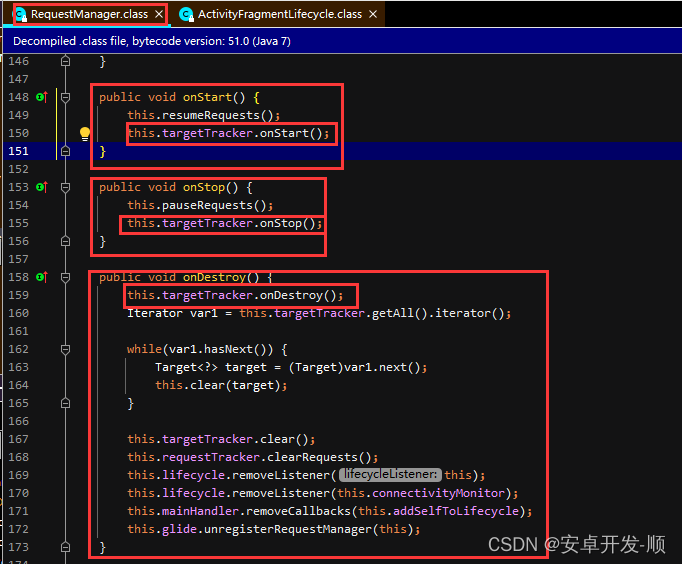
我们看到RequestManager内部又对应调用了targetTracker的onStart onStop onDestroy方法,那targetTracker又是什么?
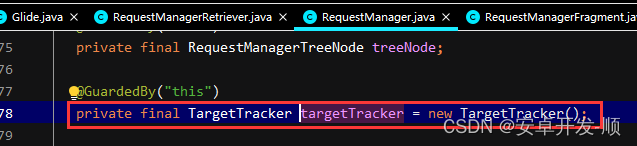
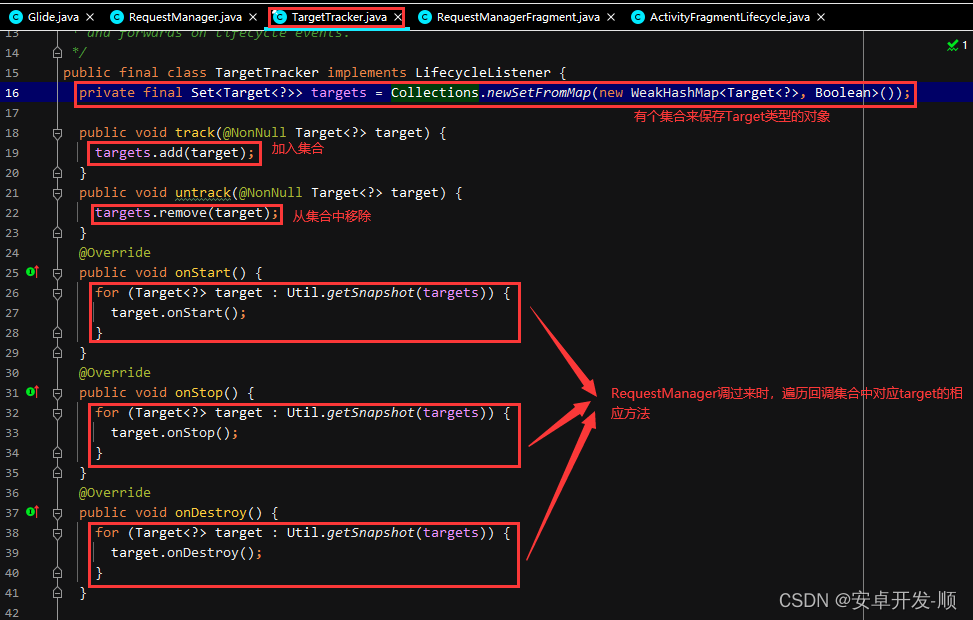
我们看到TargetTracker里面维护了一个集合,集合里是一个一个的Target,生命周期回调过来时,会循环遍历集合里面的Target对象然后调用其对应的onStart onStop onDestroy方法。
打破砂锅问到底,Target又是什么?什么时候加入到TargetTracker里面的集合中去的呢?
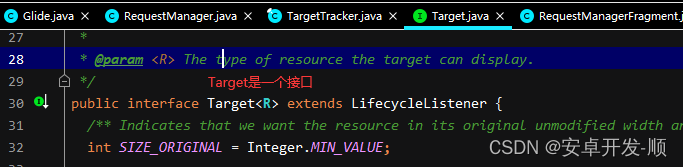
先看下Target有哪些具体的实现类:
根据不同的情况会包装成不同的target:
比如:
- 如果你调用了asBitmap方法 Glide就会给你包装一个BitmapImageViewTarget
- 如果没有特殊指定,Glide内部默认调用asDrawable方法,这样就会包装成一个DrawableImageViewTarget
- ......
那这些Target什么时候加入到TargetTracker里面的集合中去的呢?
这里先剧透一下:是在后面执行into的时候把最终要展示的目标控件封装成了Target对象然后加入到集合里去的。
看到这里在来看下这张图,是不是就清晰多了:
以上就是with相关的内容,核心就是Glide对当前Activity生命周期的监听,通过监听可以实现:
- 对缓存做及时释放和处理
- 对图片请求做对应的停止和启动管理
- 从而实现图片加载性能的优化,避免oom
但是如果我们使用Glide在子线程或者直接使用ApplicationContext ,那以上巧妙的设计和性能的优化管理就无用武之地了
因此使用Glide首选在主线程使用 Activity、Fragment、View作为with方法的入参。
二、load
在第一步with函数中,我们最终得到了一个RequestManager对象,接下来要调用其load方法:
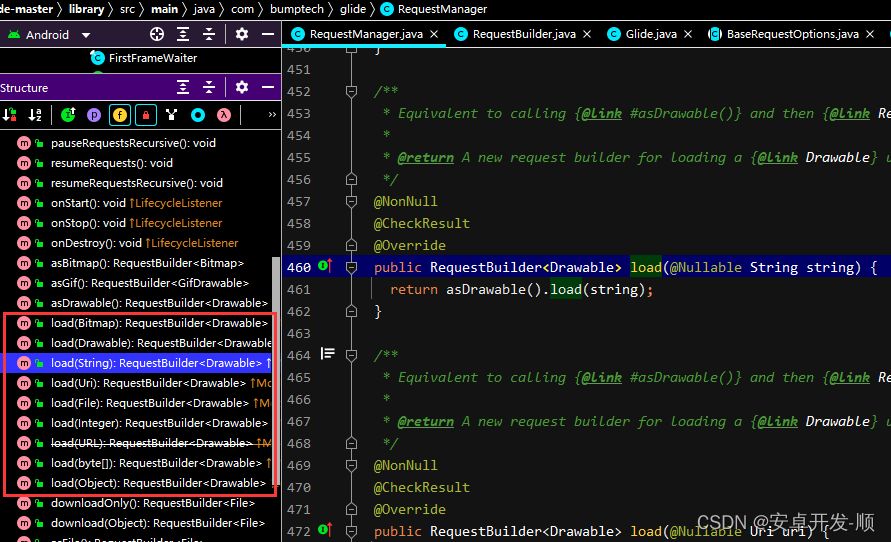
我们看到load方法也是有多个重载方法,支持以Bitmap、Drawable、String、Uri、File等多种形式进行最终图像的渲染。
在调用load方法之前如果没有默认指定产物类型(asBitmap,asGif等),则默认会调用asDrawable方法:
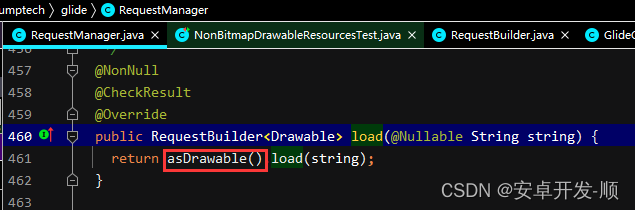
跟进去:
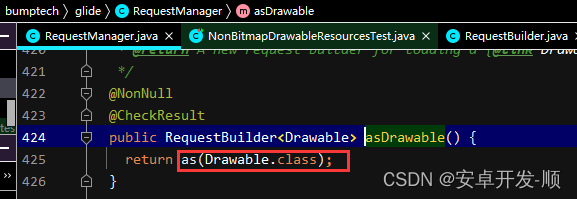
继续调用as方法:
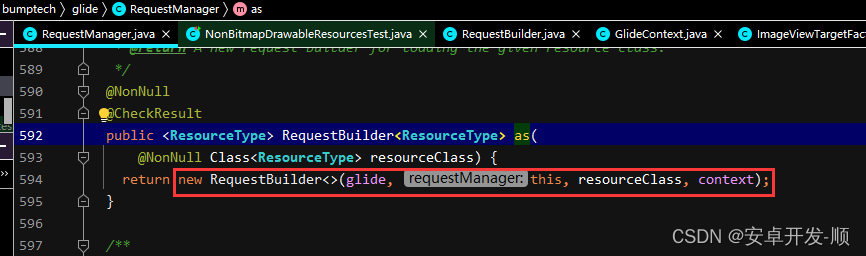
最终得到了一个RequestBuilder对象,注意这里的resourceClass是Drawable.class,这就决定了最终会封装一个DrawableImageViewTarget来处理ImageView的渲染工作。
继续执行load方法
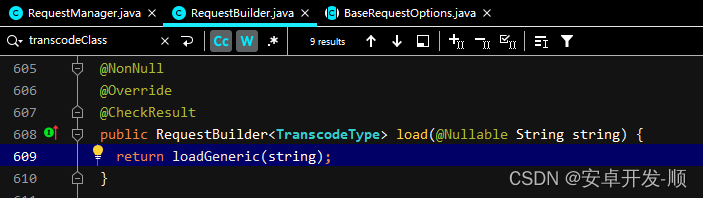
继续跟进:
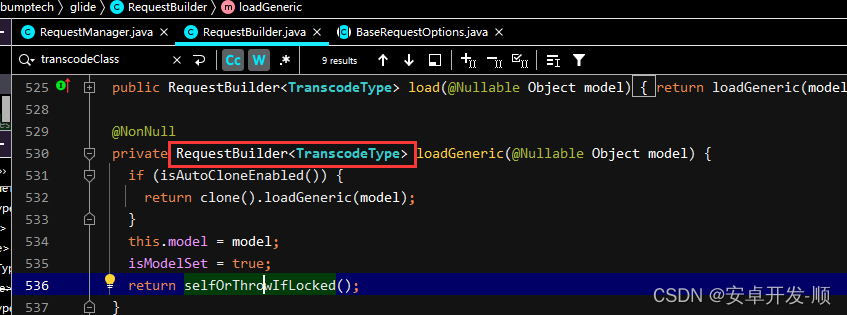
最终还是返回一个RequestBuilder对象 注意这里的泛型TranscodeType 是上面的Drawable类型
以上就是load函数的分析,为后面的info做铺垫。
三、into
我们只分析into(ImageView imageView)的情况
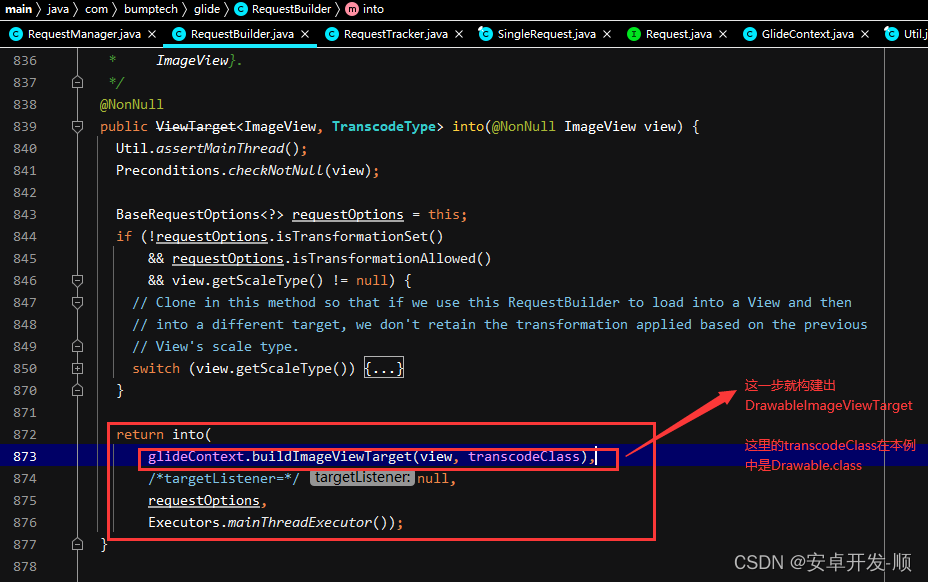
继续跟进到into里面:
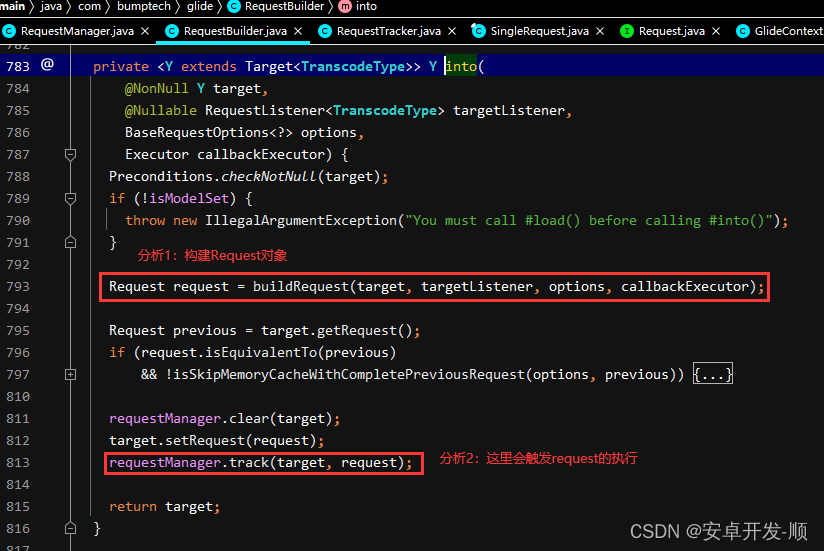
先看分析1:构建Request对象
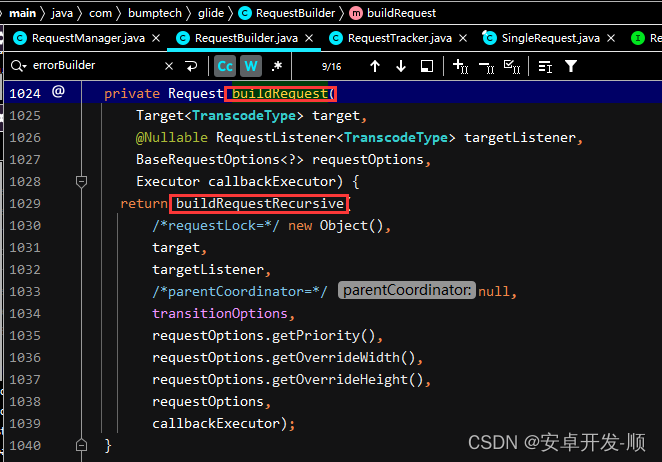
又调用了 buildRequestRecursive()方法;
buildRequestRecursive 会继续调用
buildThumbnailRequestRecursive()方法
buildThumbnailRequestRecursive 又会调用到 obtainRequest方法
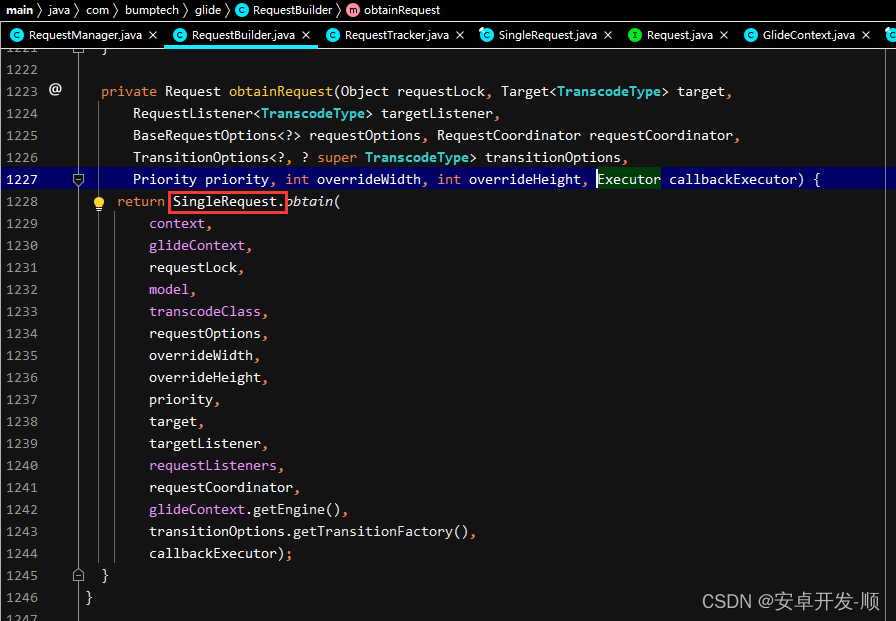
最终得到一个SingleRequest对象。
先记住这个SingleRequest对象,我们在来看分析2(主线分支)

调到了RequestManager中的tarck方法,我们跟进671行的代码:
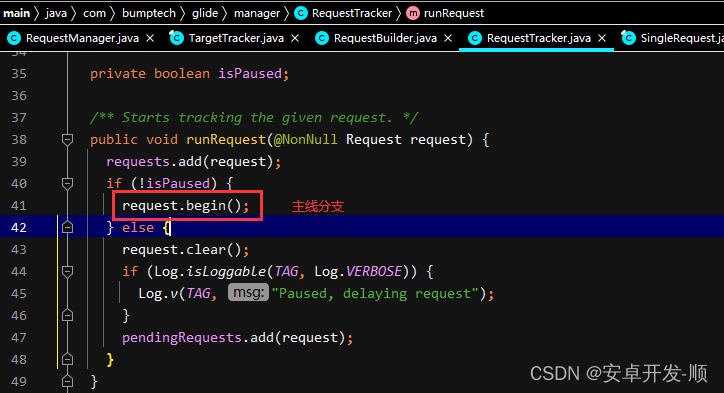
继续跟进:request.begin
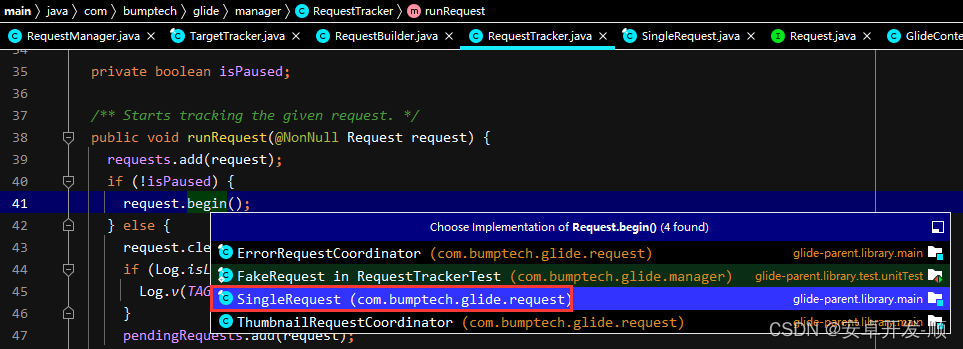
注意这里是上面提到的SingleRequest
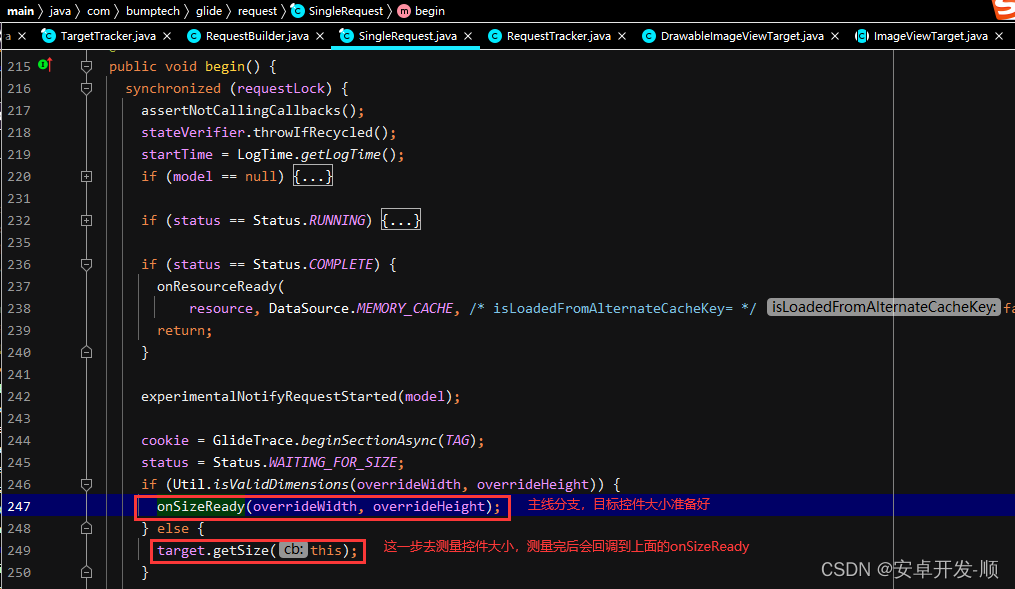
主线分支会走进onSizeReady:
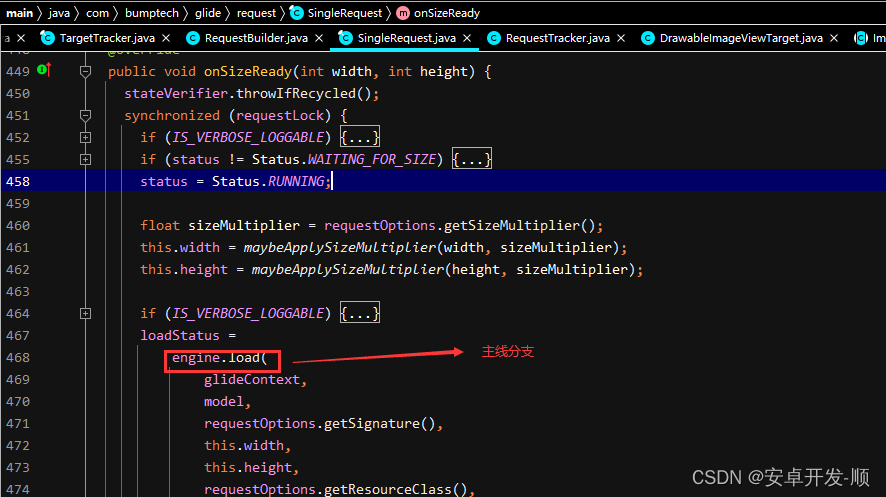
继续跟进到 engine.load
Engine.java
public <R> LoadStatus load(
GlideContext glideContext,
...) {
//构造出一个 key 用于处理缓存的key
EngineKey key = keyFactory.buildKey(
model,
signature,
width,
height,
transformations,
resourceClass,
transcodeClass,
options);
EngineResource<?> memoryResource;
synchronized (this) {
//先去内存中查找是否有直接可以用的缓存
memoryResource = loadFromMemory(key, isMemoryCacheable, startTime);
if (memoryResource == null) {
//没有缓存就继续去执行加载任务
return waitForExistingOrStartNewJob(glideContext,...);
}
}
// 如果有缓存就回调onResourceReady方法
cb.onResourceReady(memoryResource, ...);
return null;
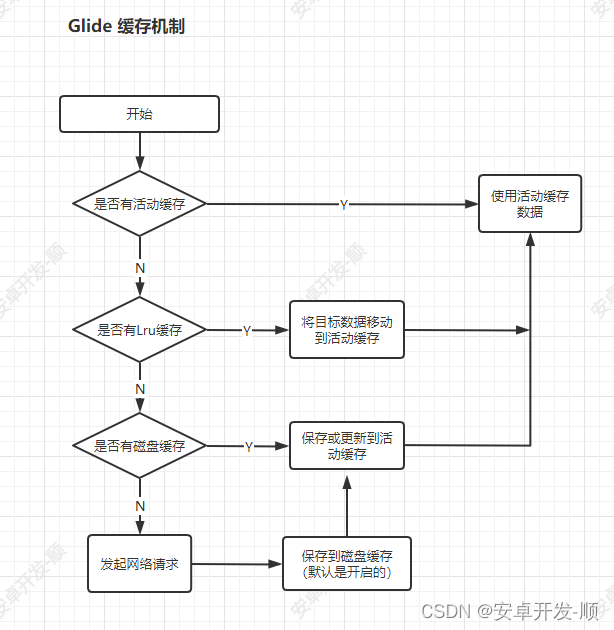
}这里面首先构造出一个缓存的key,从这里开始 Glide的缓存机制相关内容就开始登场了
通过key先去内存缓存中查找是否有可用的缓存:
memoryResource = loadFromMemory(key, isMemoryCacheable, startTime);
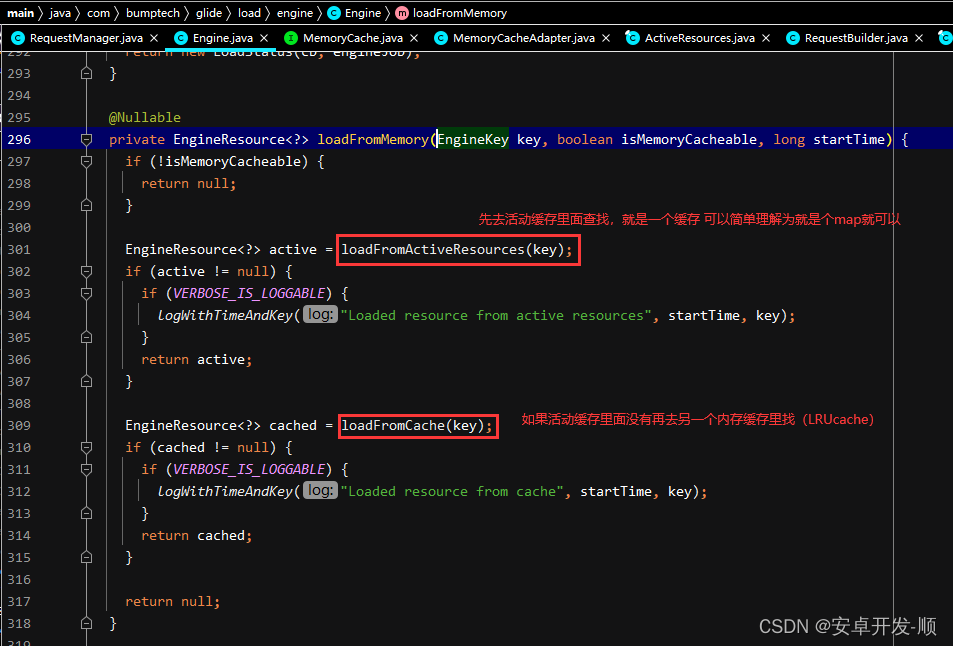
Glide的设计思路是这样的,有两个内存缓存:
- 活动缓存:用来存放当前页面正在展示的图片的缓存,在当前Activity执行onDestroy之前是不会被清理的
- 二级缓存(LruCache)有大小限制,按照LRUCache原理进行维护,当活动缓存被清理时,内容会移动到二级缓存,当二级缓存里面的内容被当前页面使用时,被使用的部分又会被移动到活动缓存
这里来解释下,为什么要设计两个内存缓存:
- 首先,我们不希望内存缓存是没有限制的,要控制一定的大小,否则越来越大会撑爆内存,因此设计上采用LRUCache,设置一定的大小(超过大小限制后最久远,最不常用的优先被移除)
- 然后,这样就会引发一个问题,如果当前页面的图片比较多,比如有滚动列表,随着滚动图片的数量可能超过缓存大小,这样就导致当前正在使用的图片数据被移除,在滚动回来的时候,可能会引发图片丢失,这种问题处理起来会非常复杂
- 因此,作者设计了一个活动缓存来只保存当前页面正在使用的图片数据,在当前Activity执行onDestroy的时候才进行回收,这样就保证了当前正在使用的缓存不会被移除掉。
- 最后,活动缓存被清理时,实际上是移动到了LRUCache里面,而LRUCache中的数据被使用时,被使用的数据又移动到了活动缓存里面,这样既保证了缓存不会无限大,也保证了当前正在使用的图片数据不会被清理。
继续看主线逻辑,如果缓存里没有目标数据就执行:
waitForExistingOrStartNewJob
private <R> LoadStatus waitForExistingOrStartNewJob( GlideContext glideContext,...) {

    EngineJob<?> current = jobs.get(key, onlyRetrieveFromCache);
    if (current != null) {
      current.addCallback(cb, callbackExecutor);
      if (VERBOSE_IS_LOGGABLE) {
        logWithTimeAndKey("Added to existing load", startTime, key);
      }
      //如果已经有相同的任务了 就不在继续执行
      return new LoadStatus(cb, current);
    }

    //得到一个EngineJob
    EngineJob<R> engineJob =  engineJobFactory.build(...);

    //得到一个DecodeJob
    DecodeJob<R> decodeJob = decodeJobFactory.build(...);

    jobs.put(key, engineJob);

    engineJob.addCallback(cb, callbackExecutor);
    //将decodeJob交给EngineJob执行
    engineJob.start(decodeJob);

    if (VERBOSE_IS_LOGGABLE) {
      logWithTimeAndKey("Started new load", startTime, key);
    }
    return new LoadStatus(cb, engineJob);
  }
构造了一个decodeJob,然后交给EngineJob执行
engineJob.start(decodeJob);
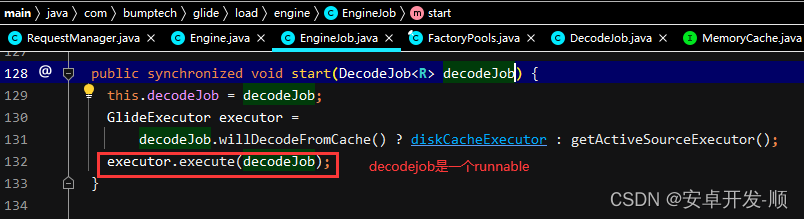
我们去看DecodeJob的run方法:
 继续看runWrapped方法
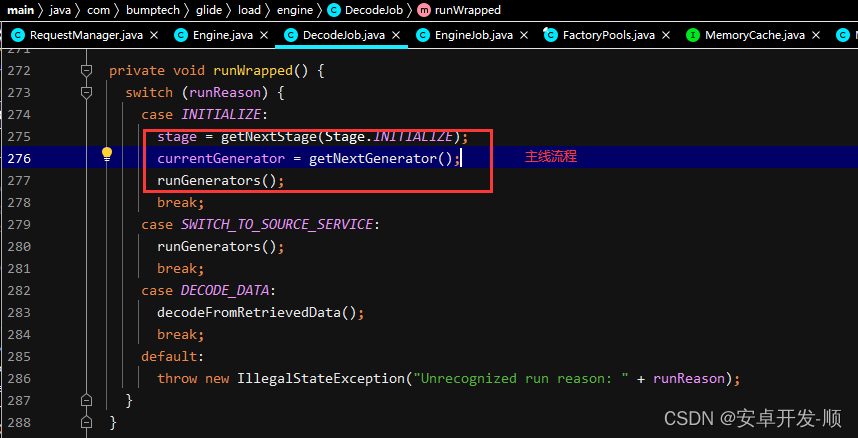
其中,getNextGenerator方法:
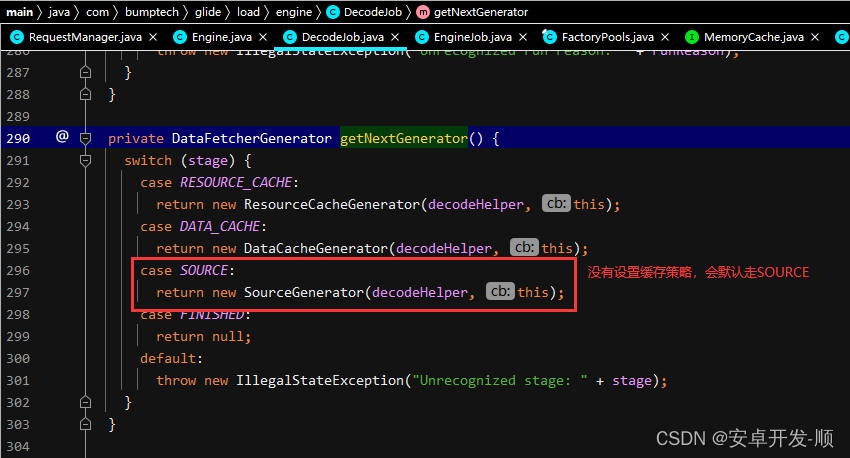
我们后续会分析SourceGenerator的情况。
再看runGenerators方法:

跟进(磁盘缓存在此判断):
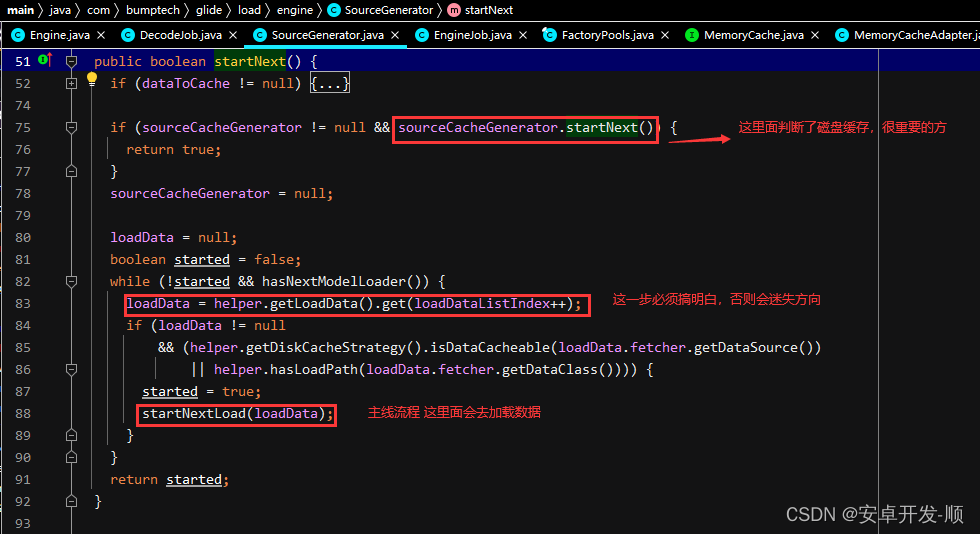
磁盘缓存终于出现了,在发起请求之前先会判断磁盘缓存,我们先看下sourceCacheGenerator.startNext()方法
如果没有磁盘缓存就继续执行加载流程,我们先看
loadData = helper.getLoadData().get(loadDataListIndex++);
其中:getLoadData()方法如下:
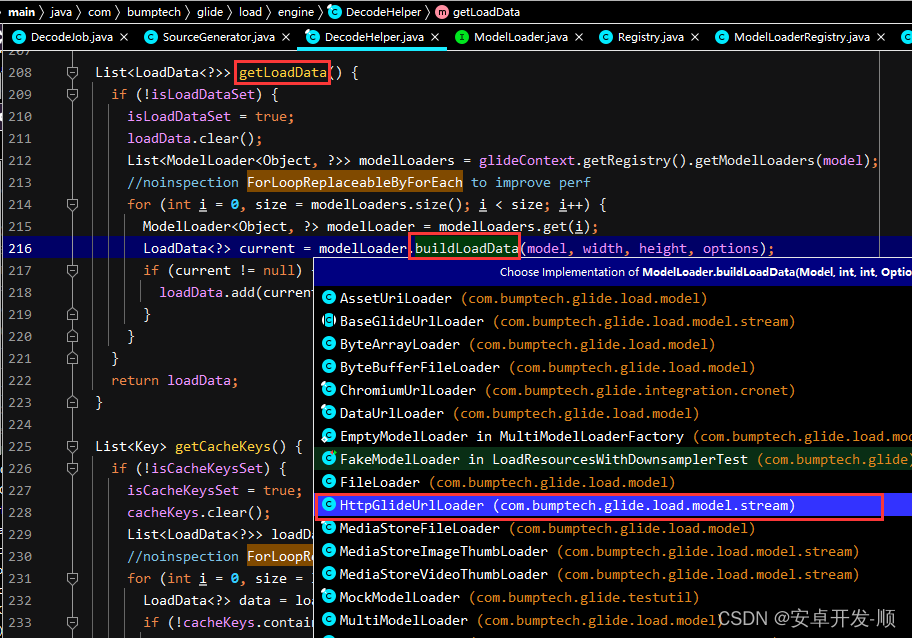
这里面我们要关心的隐藏的目标是HttpGlideUrlLoader,为什么是这个呢?
这个需要回到Glide的构造过程中,它有一个注册机机制,因为我们之前load方法传入的是String类型的url,所以这里得到的就是HttpGlideUrlLoader。
还记得第一部分with方法中的这一步吗?
  @NonNull
  private static RequestManagerRetriever getRetriever(@Nullable Context context) {
    // Context could be null for other reasons (ie the user passes in null), but in practice it will
    // only occur due to errors with the Fragment lifecycle.
    Preconditions.checkNotNull(
        context,
        "You cannot start a load on a not yet attached View or a Fragment where getActivity() "
            + "returns null (which usually occurs when getActivity() is called before the Fragment "
            + "is attached or after the Fragment is destroyed).");
    return Glide.get(context).getRequestManagerRetriever();
  }
其中Glide.get(context)会依次调用以下方法:
----> Glide: checkAndInitializeGlide()
----> Glide: initializeGlide(Context context, GeneratedAppGlideModule xxx)
----> Glide: initializeGlide(Context x, GlideBuilder x,GeneratedAppGlideModule x)
----> GlideBuilder: build()
----> Glide: 构造方法
----> RegistryFactory: lazilyCreateAndInitializeRegistry(...)
----> RegistryFactory: createAndInitRegistry()
----> RegistryFactory: initializeDefaults()
此方法中就注册了GlideUrl 和 HttpGlideUrlLoader的对应关系
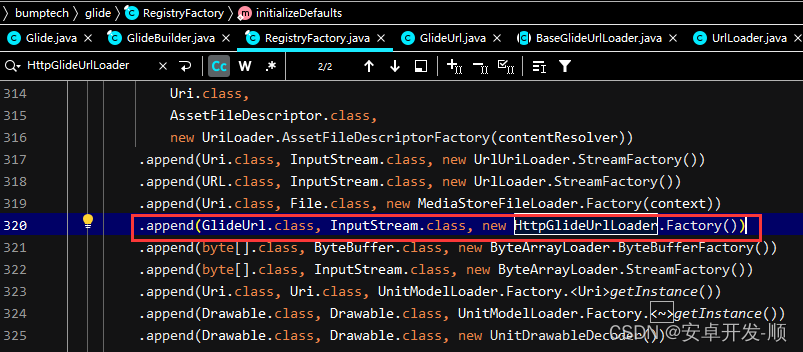
这里面明显有个问题,load传入的String类型的一个网络地址,怎么这里我们找到的是GlideUrl.class对应的 HttpGlideUrlLoader呢?
这里面Glide做了层层的封装,我大概总结一下:
- Glide这个注册机里面其实注册了String.class 对应的工程
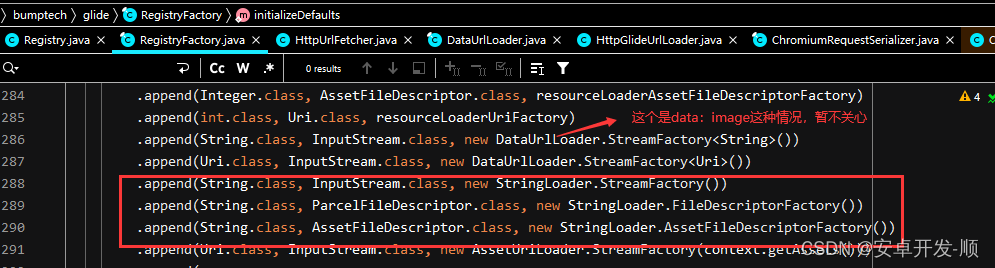
- 但是在这三个工厂内部都转成了Uri的形式来处理
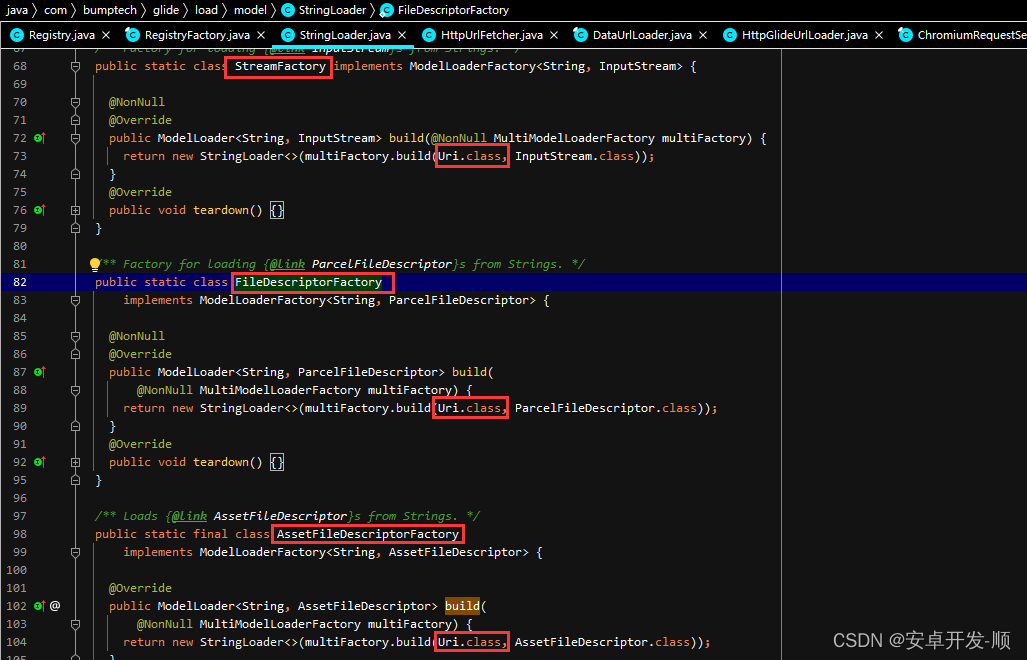
- Uri.class 对应的工厂中相关的工厂又转换成了GlideUrl.class
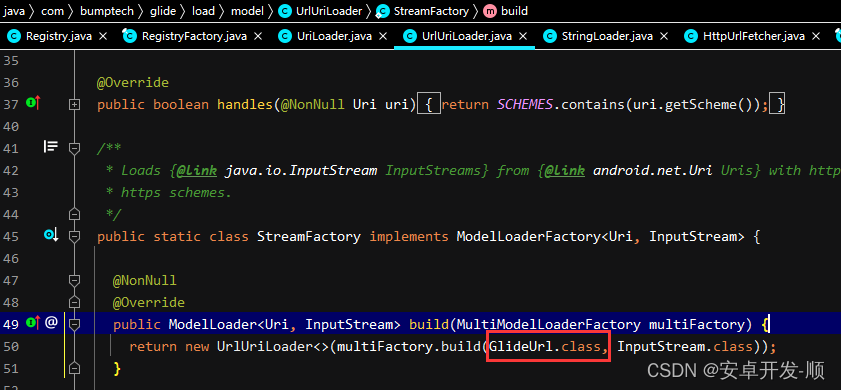
- 因此 我们要找的是GlideUrl对应的工厂HttpGlideUrlLoader.Factory
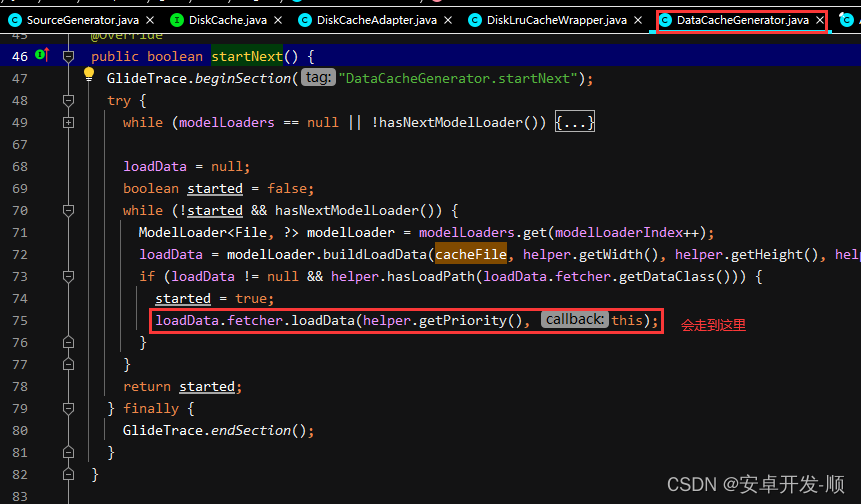
我们回到主线分析流程中,继续看geLoadData方法
跟进到HttpGlideUrlLoader的buildLoadData方法中:
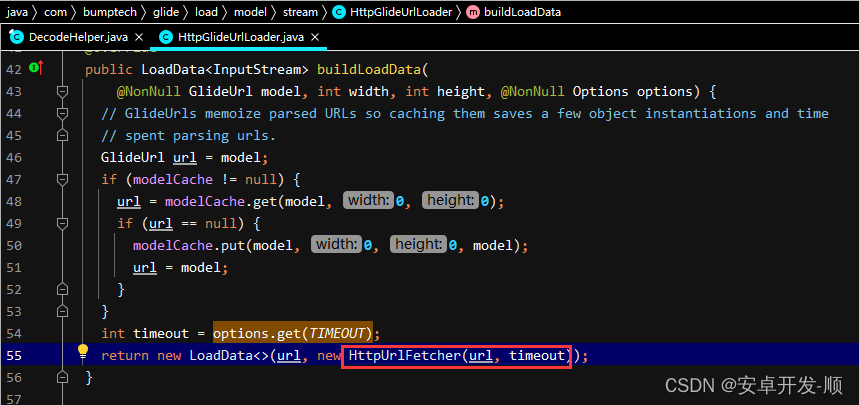
返回了一个LoadData对象 其中构建了一个非常重要的Fetcher(取数器):
HttpUrlFetcher ---- > 此对象非常重要,正真发起网络请求就在此类中实现
返回后,我们回到SourceGenerator的startNext方法中,在贴一遍截图
我们继续分析源码,接下来该到上图88行的 startNextLoad中了
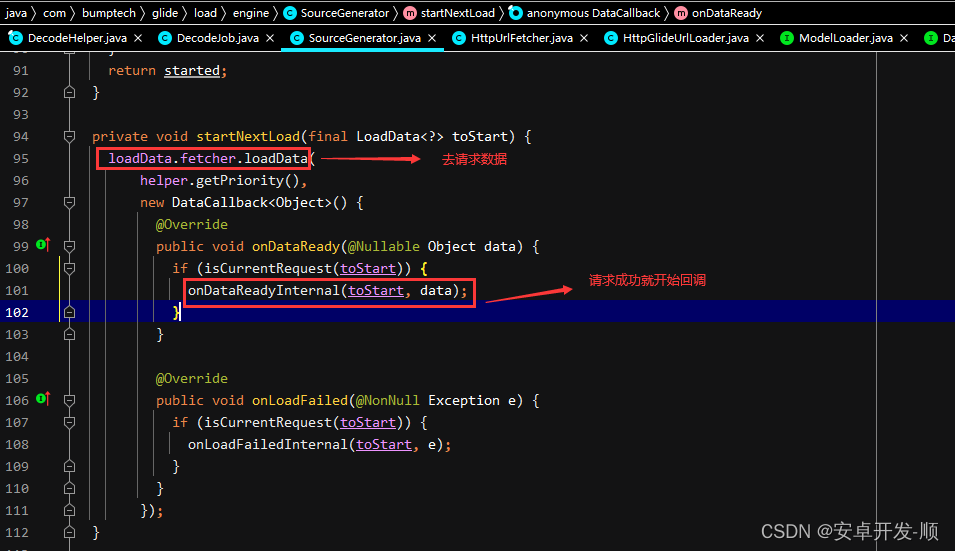
跟进到请求数据环节(终于要看到曙光了)
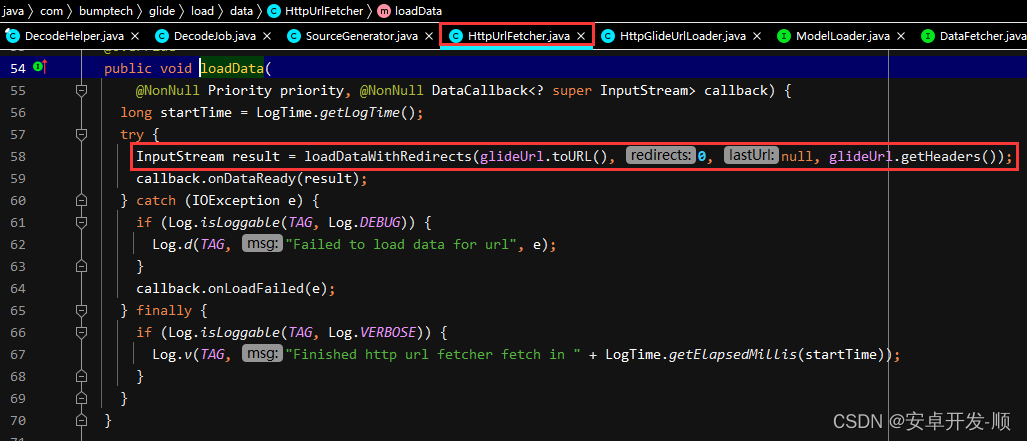
InputStream都出来了,希望就在下一个方法:
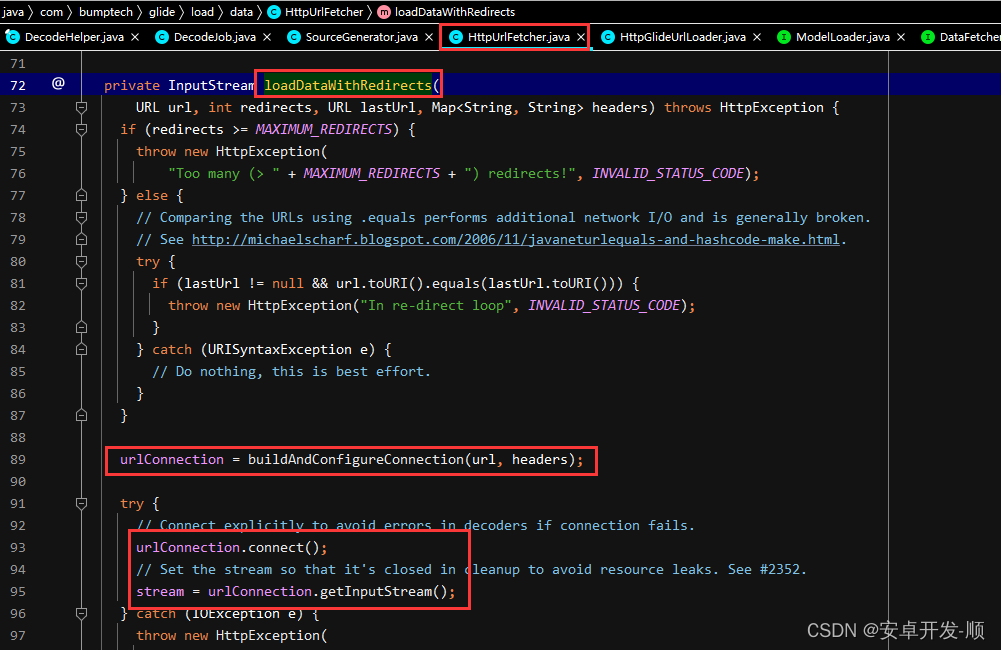
看到URLConnection后无比亲切,终于去请求数据了。
接下来就开始分析请求到数据以后是怎么一步一步渲染到我们的界面上的去的,开始返航
跟进到onDataReadyInternal

我们先来看分支一,默认使用磁盘缓存的情况(分支一会包含分支二的代码,主要看):
cb.reschedule() 会调用到DecodeJob的里面
  @Override
  public void reschedule() {
    runReason = RunReason.SWITCH_TO_SOURCE_SERVICE;
    callback.reschedule(this);
  }
callback.reschedule() 会调用到EngineJob里面
  @Override
  public void reschedule(DecodeJob<?> job) {
    // Even if the job is cancelled here, it still needs to be scheduled so that it can clean itself
    // up.
    getActiveSourceExecutor().execute(job);
  }
通过线程池执行 DecodeJob,那么我们就去DecodeJob里面看它的run方法
 @Override
  public void run() {
   ...
    try {
      if (isCancelled) {
        notifyFailed();
        return;
      }
      runWrapped();
    } catch (CallbackException e) {
     ...
 }
又调用了runWrapped,注意这里的runReason已在分支一的第一步中的DecodeJob的reschedule方面里改变
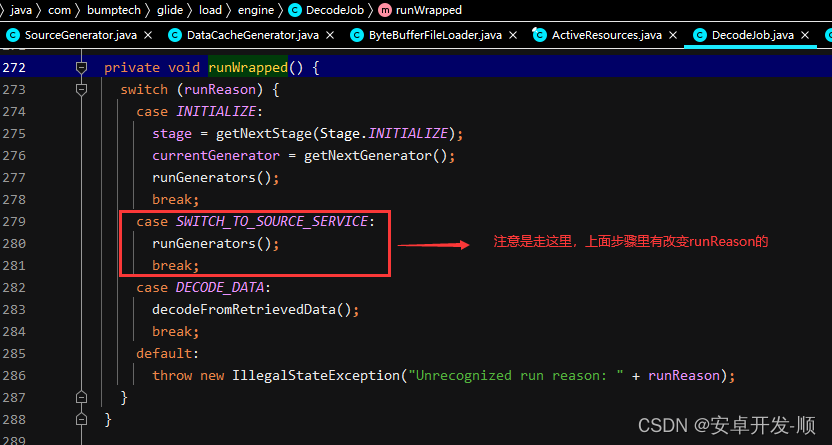
进入 runGenerators 方法
  private void runGenerators() {
    ...
    while (!isCancelled
        && currentGenerator != null
        && !(isStarted = currentGenerator.startNext())) {
      stage = getNextStage(stage);
      currentGenerator = getNextGenerator();

      if (stage == Stage.SOURCE) {
        reschedule();
        return;
      }
    }
   ...
  }
看 currentGenerator.startNext()方法
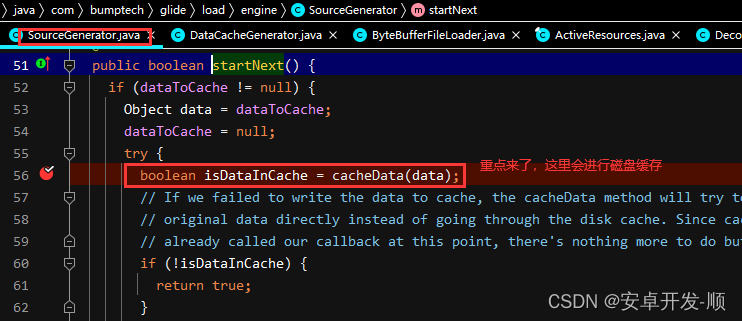
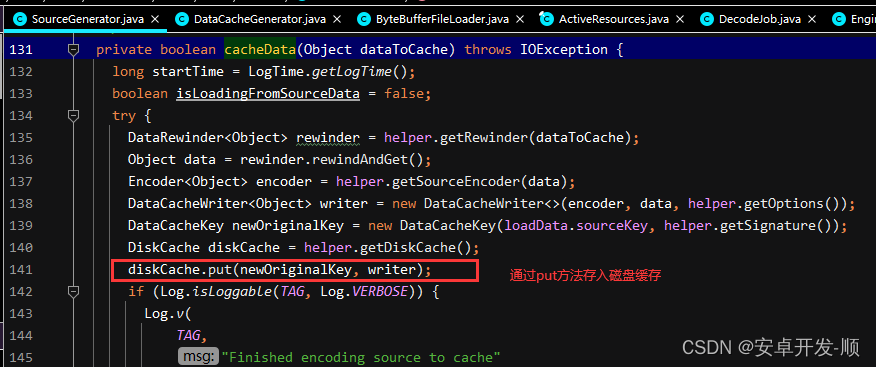
看cacheData里面如何进行磁盘缓存
回到 SourceGenerator 继续往下执行:
@Override
public boolean startNext() {
if (dataToCache != null) {
Object data = dataToCache;
dataToCache = null;
try {
boolean isDataInCache = cacheData(data);
...
} catch (IOException e) {
...
}
}
//此处条件会满足然后返回true
if (sourceCacheGenerator != null && sourceCacheGenerator.startNext()) {
return true;
}
...
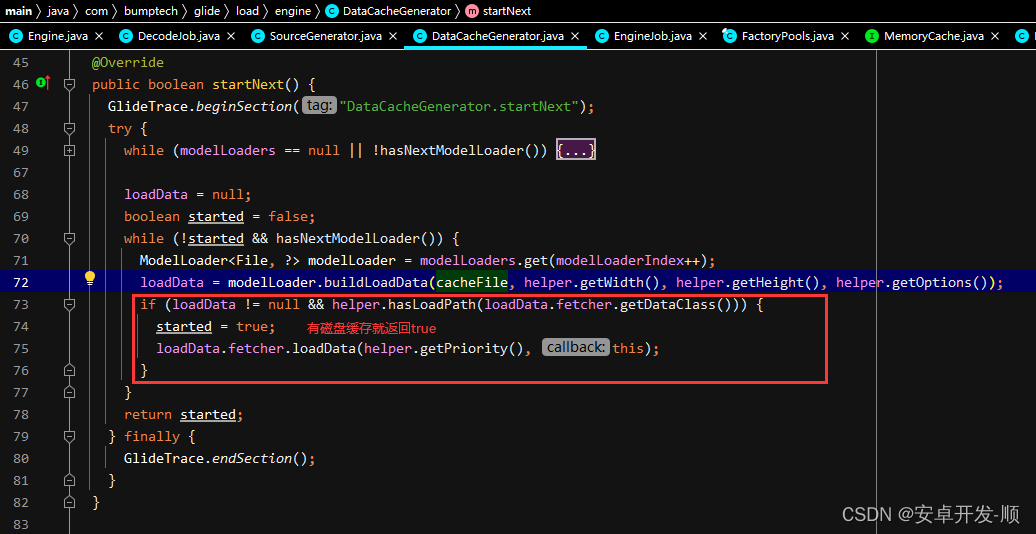
}看 sourceCacheGenerator.startNext()
跟进去: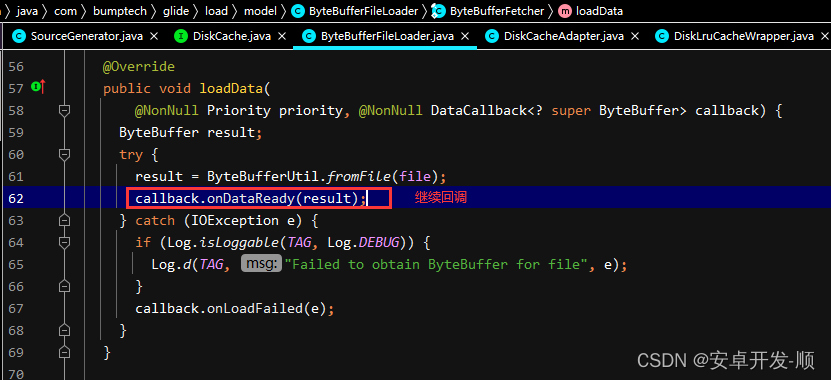
进入 DataCacheGenerator
  @Override
  public void onDataReady(Object data) {
    cb.onDataFetcherReady(sourceKey, data, loadData.fetcher, DataSource.DATA_DISK_CACHE, sourceKey);
  }
继续跟进,进入SourceGenerator :
  @Override
  public void onDataFetcherReady(
      Key sourceKey, Object data, DataFetcher<?> fetcher, DataSource dataSource, Key attemptedKey) {
    // This data fetcher will be loading from a File and provide the wrong data source, so override
    // with the data source of the original fetcher
    cb.onDataFetcherReady(sourceKey, data, fetcher, loadData.fetcher.getDataSource(), sourceKey);
  }
继续跟进,进入DecodeJob,这里和分支二要走的逻辑就一样了,或者说分支二直接从这里看就可以了:
  @Override
  public void onDataFetcherReady(...) {
   ...

    if (Thread.currentThread() != currentThread) {
      runReason = RunReason.DECODE_DATA;
      callback.reschedule(this);
    } else {
      GlideTrace.beginSection("DecodeJob.decodeFromRetrievedData");
      try {
        //开始解码
        decodeFromRetrievedData();
      } finally {
        GlideTrace.endSection();
      }
    }
  }
开始解码:
  private void decodeFromRetrievedData() {
    ...
    Resource<R> resource = null;
    try {
      //得到resource
      resource = decodeFromData(currentFetcher, currentData, currentDataSource);
    } catch (GlideException e) {
      e.setLoggingDetails(currentAttemptingKey, currentDataSource);
      throwables.add(e);
    }
    if (resource != null) {
      //通知出去
      notifyEncodeAndRelease(resource, currentDataSource, isLoadingFromAlternateCacheKey);
    } else {
      runGenerators();
    }
  }
得到Resource并通知:
  private void notifyEncodeAndRelease(...) {
    GlideTrace.beginSection("DecodeJob.notifyEncodeAndRelease");
    try {
      if (resource instanceof Initializable) {
        ((Initializable) resource).initialize();
      }
      Resource<R> result = resource;
      LockedResource<R> lockedResource = null;
      if (deferredEncodeManager.hasResourceToEncode()) {
        lockedResource = LockedResource.obtain(resource);
        result = lockedResource;
      }

      //完成的通知
      notifyComplete(result, dataSource, isLoadedFromAlternateCacheKey);
      ...
    } finally {
      GlideTrace.endSection();
    }
  }
继续看notifyComplete
  private void notifyComplete(
      Resource<R> resource, DataSource dataSource, boolean isLoadedFromAlternateCacheKey) {
    setNotifiedOrThrow();
    //继续回调
    callback.onResourceReady(resource, dataSource, isLoadedFromAlternateCacheKey);
  }
继续回调进入EngineJob
  @Override
  public void onResourceReady(...) {
    ...
    //继续通知
    notifyCallbacksOfResult();
  }
go on: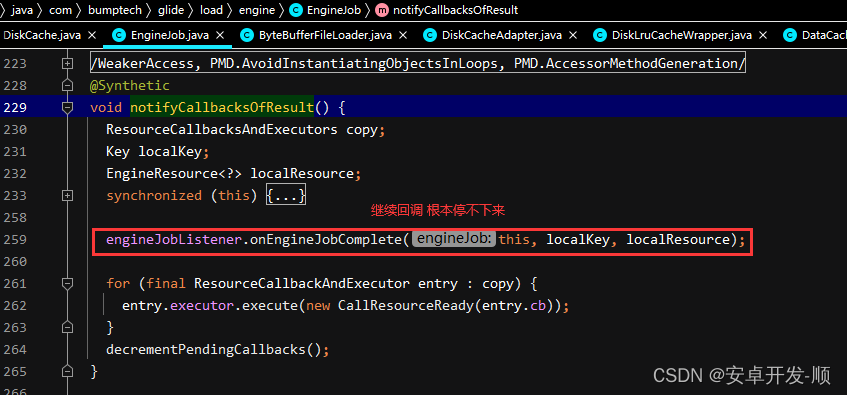
继续回调,根本停不下来,进入Engine:
  @Override
  public synchronized void onEngineJobComplete(
      EngineJob<?> engineJob, Key key, EngineResource<?> resource) {

    if (resource != null && resource.isMemoryCacheable()) {
      //重点又来了,存入活动缓存
      activeResources.activate(key, resource);
    }

    jobs.removeIfCurrent(key, engineJob);
  }
重点来了,存入活动缓存!

继续回到主线分析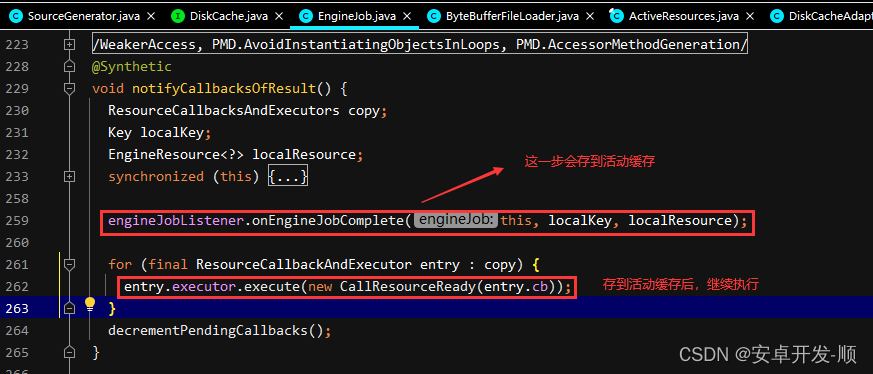
看CallResourceReady的run方法
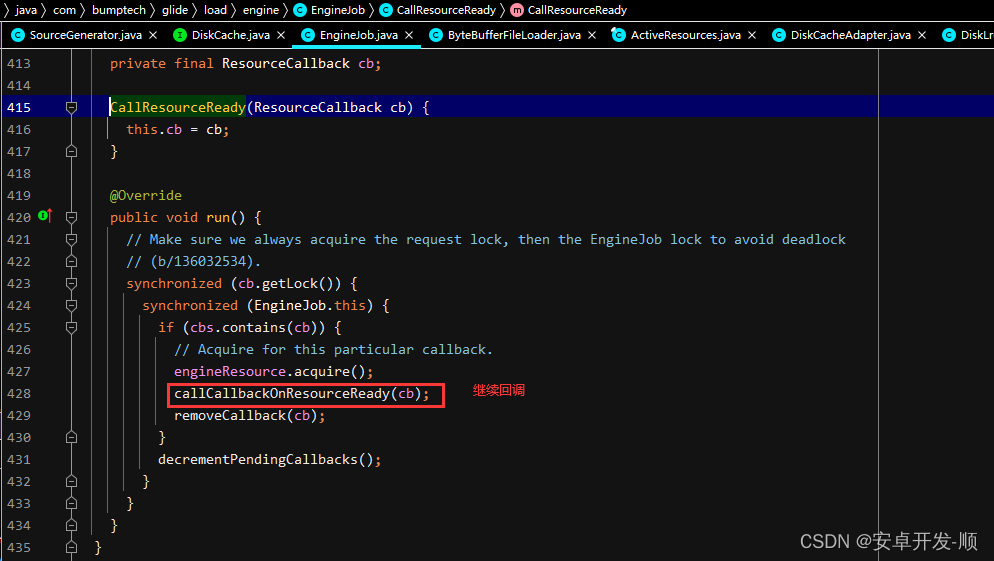 进来看看
进来看看
  @GuardedBy("this")
  void callCallbackOnResourceReady(ResourceCallback cb) {
    try {
      ...
      cb.onResourceReady(engineResource, dataSource, isLoadedFromAlternateCacheKey);
    } catch (Throwable t) {
      throw new CallbackException(t);
    }
  }
继续,进入SingleRequest:
  @Override
  public void onResourceReady(Resource<?> resource, DataSource dataSource, boolean isLoadedFromAlternateCacheKey) {
    stateVerifier.throwIfRecycled();
    Resource<?> toRelease = null;
    try {
      ...

        onResourceReady( (Resource<R>) resource, (R) received, dataSource, isLoadedFromAlternateCacheKey);
      }
    } finally {
      if (toRelease != null) {
        engine.release(toRelease);
      }
    }
  }
进入onResourceReady看看
  @GuardedBy("requestLock")
  private void onResourceReady(...) {
  ...
    try {
      ...

      if (!anyListenerHandledUpdatingTarget) {
        Transition<? super R> animation = animationFactory.build(dataSource, isFirstResource);
        //继续回调
        target.onResourceReady(result, animation);
      }
    } finally {
      isCallingCallbacks = false;
    }

    ...
  }
继续回调,胜利就在眼前

进入看看:
private void setResourceInternal(@Nullable Z resource) {
// Order matters here. Set the resource first to make sure that the Drawable has a valid and
// non-null Callback before starting it.
setResource(resource);
maybeUpdateAnimatable(resource);
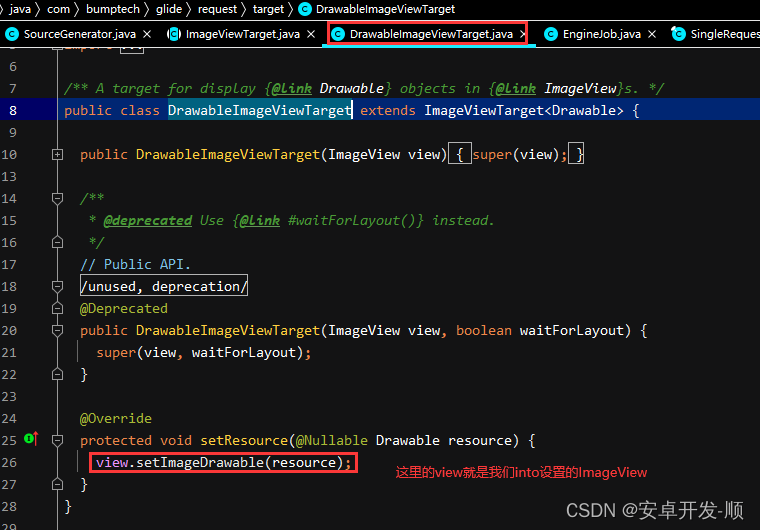
}这里的setResource是个接口,这里的实现类是 DrawableImageViewTarget ,前面with的时候分析过,因为没有设置asBitmap、asGIF之类的,默认封装一个DrawableImageViewTarget
大工告成,下面画个图来把此过程中涉及到的缓存处理来总结下: