前言
最近研究了一下Glide源码,发现很多地方写的真的很精妙,值得细细品味。Glide 功能丰富,图片三级缓存、可深度定制(继承AppGlideModule、LibraryGlideModule实现更多功能)、修改网络请求库、支持多种输入输出资源的转换(例如输入Stream,输出bitmap等等)、生命周期的管理
虽然下面分析完了,整体的流程,但是想要真正领会设计思想,还需要好好沉淀一下。文章篇幅比较长,但逻辑并不复杂
一、基本使用流程
Glide最基本的使用流程就是下面这行代码,其它所有扩展的额外功能都是以其建造者链式调用的基础上增加的。
Glide.with(context).load(url).into(iv);
或
GlideApp.with(context).load(url).into(iv);
其中的GlideApp是注解处理器自动生成的,要使用GlideApp,必须先配置应用的AppGlideModule模块,里面可以为空配置,也可以根据实际情况添加指定配置。
@GlideModule
public class MyAppGlideModule extends AppGlideModule {

    @Override
    public void applyOptions(Context context, GlideBuilder builder) {
        // 通过builder 参数,可以配置一些Glide的参数,例如缓存大小、MemoryCache、DiskCache、各种Executor 等等,具体可以GlideBuilder的方法

    }
  @Override
  public void registerComponents(@NonNull Context context, @NonNull Glide glide,
      @NonNull Registry registry) {
    // 通过参数registry,可以注册 ModelLoader(数据加载) 、Encoder(写入数据)、Decoder()
  }

}
当我们启用了 @GlideModule 注解之后会在编译期间生成 GeneratedAppGlideModuleImpl。从下面的代码中可以看出,它实际上就是对我们自定义的 MyAppGlideModule 做了一层包装。这么去做的目的就是它可以通过反射来寻找 GeneratedAppGlideModuleImpl,并通过调用 GeneratedAppGlideModuleImpl 的方法来间接调用我们的 MyAppGlideModule。本质上是一种代理模式的应用:
这个类的路径是在 /build/generated/source/apt/debug/com/bumptech/glide/GeneratedAppGlideModuleImpl.java
final class GeneratedAppGlideModuleImpl extends GeneratedAppGlideModule {
  private final MyAppGlideModule appGlideModule;

  GeneratedAppGlideModuleImpl() {
    appGlideModule = new MyAppGlideModule();
    if (Log.isLoggable("Glide", Log.DEBUG)) {
      Log.d("Glide", "Discovered AppGlideModule from annotation: com.bumptech.glide.samples.gallery.GalleryModule");
    }
  }

  @Override
  public void applyOptions(@NonNull Context context, @NonNull GlideBuilder builder) {
    appGlideModule.applyOptions(context, builder);
  }

  @Override
  public void registerComponents(@NonNull Context context, @NonNull Glide glide,
      @NonNull Registry registry) {
    appGlideModule.registerComponents(context, glide, registry);
  }

  @Override
  public boolean isManifestParsingEnabled() {
    return appGlideModule.isManifestParsingEnabled();
  }

  @Override
  @NonNull
  public Set<Class<?>> getExcludedModuleClasses() {
    return Collections.emptySet();
  }

  @Override
  @NonNull
  GeneratedRequestManagerFactory getRequestManagerFactory() {
    return new GeneratedRequestManagerFactory();
  }
}
现在看这些类,可能有点不知所云,可以先不理会,知道在继承AppGlideModule,可以做一些自定义的事情,具体是哪些事情,看完下面的源码分析后,会清晰明了。
下面源码,会省略部分的代码(例如,进行检查之类的代码),只体现整体的逻辑
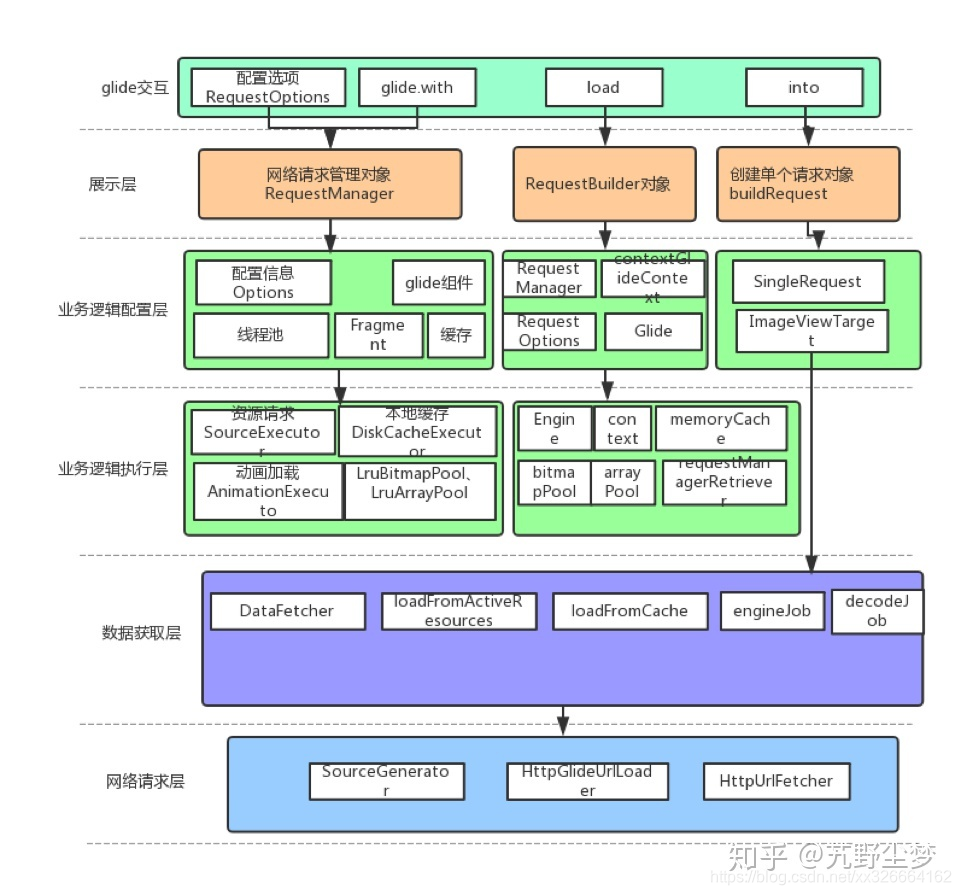
借鉴一张艽野尘梦绘制的Glide框架图,让我们对Glide的总体框架有一个初步的了解
二、Glide.with()源码详解
GlideApp.with 也是调用了Glide.with,先从下图看一下with的整体流程
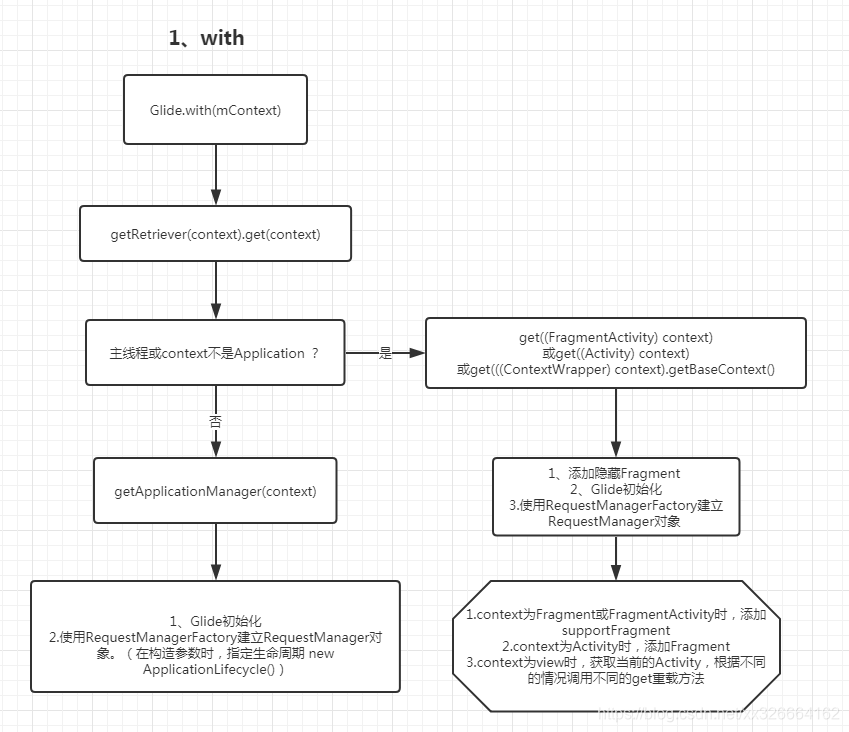
关于with 的函数,一共有六个多态函数,下面选取三种,作为重点分析,其它类似
1、Glide#with
代码一  类Glide.java
    public static RequestManager with(@NonNull Context context) {
        return getRetriever(context).get(context);
    }

    public static RequestManager with(@NonNull Activity activity) {
        return getRetriever(activity).get(activity);
    }

    public static RequestManager with(@NonNull Fragment fragment) {
        return getRetriever(fragment.getActivity()).get(fragment);
    }
2、Glide#getRetriever
代码二 类Glide.java
    private static RequestManagerRetriever getRetriever(@Nullable Context context) {
        //get 函数中创建了Glide单例
        return Glide.get(context).getRequestManagerRetriever();
    }

    public static Glide get(@NonNull Context context) {
        //经典的单例,double check 创建单例,不用多说
        if (glide == null) {
            synchronized (Glide.class) {
                if (glide == null) {
                    checkAndInitializeGlide(context);
                }
            }
        }
        return glide;
    }
    private static void checkAndInitializeGlide(@NonNull Context context) {
		//初始化Glide
        initializeGlide(context);
    }
    private static void initializeGlide(@NonNull Context context) {
        //这里创建了一个GlideBuilder,还记得自定义GlideModule时 实现applyOptions函数,其中的GlideBuilder参数吗?没错,就是这里创建的
        initializeGlide(context, new GlideBuilder());
    }
3、Glide#initializeGlide
代码三 类Glide.java
    private static void initializeGlide(@NonNull Context context, @NonNull GlideBuilder builder) {
        Context applicationContext = context.getApplicationContext();
        //通过反射找到GeneratedAppGlideModuleImpl 类,如果能找到,就说明自定义了GlideModule
        //那么就需要在合适的地方调用applyOptions、registerComponents 来实现自定义的功能
        GeneratedAppGlideModule annotationGeneratedModule = getAnnotationGeneratedGlideModules();
        List<com.bumptech.glide.module.GlideModule> manifestModules = Collections.emptyList();
        if (annotationGeneratedModule == null || annotationGeneratedModule.isManifestParsingEnabled()) {
            // 从AndroidManifest.xml 获取自定义的GlideModule(这是另外一种自定义GlideModule的方式)
            manifestModules = new ManifestParser(applicationContext).parse();
        }
		//如果在注解中指明了要排除的GlideModule,则把GlideModule删除,在GlideModule中 从AndroidManifest.xml 中获取的
        if (annotationGeneratedModule != null
                && !annotationGeneratedModule.getExcludedModuleClasses().isEmpty()) {
            Set<Class<?>> excludedModuleClasses =
                    annotationGeneratedModule.getExcludedModuleClasses();
            Iterator<com.bumptech.glide.module.GlideModule> iterator = manifestModules.iterator();
            while (iterator.hasNext()) {
                com.bumptech.glide.module.GlideModule current = iterator.next();
                if (!excludedModuleClasses.contains(current.getClass())) {
                    continue;
                }
                if (Log.isLoggable(TAG, Log.DEBUG)) {
                    Log.d(TAG, "AppGlideModule excludes manifest GlideModule: " + current);
                }
                iterator.remove();
            }
        }
		// 获取工厂,用于创建RequestManager(该工厂用于,如果with()参数传递的是application)
        RequestManagerRetriever.RequestManagerFactory factory =
                annotationGeneratedModule != null
                        ? annotationGeneratedModule.getRequestManagerFactory() : null;
        builder.setRequestManagerFactory(factory);
        //执行用户在 manifest 中配置的 GlideModule 接口中的方法
        for (com.bumptech.glide.module.GlideModule module : manifestModules) {
            module.applyOptions(applicationContext, builder);
        }
        //执行使用注解配置的GlideModule 接口中的方法
        if (annotationGeneratedModule != null) {
            annotationGeneratedModule.applyOptions(applicationContext, builder);
        }
        //创建Glide
        Glide glide = builder.build(applicationContext);
        //下面registerComponents 方法的执行,需要传递Registry对象,而该对象是在创建Glide 的时候,被赋值,并设置一系列的参数
        //执行用户在 manifest 中配置的 GlideModule 接口中的registerComponents 方法
        for (com.bumptech.glide.module.GlideModule module : manifestModules) {
            module.registerComponents(applicationContext, glide, glide.registry);
        }
        //执行用户在 manifest 中配置的 GlideModule 接口中的registerComponents 方法
        if (annotationGeneratedModule != null) {
            annotationGeneratedModule.registerComponents(applicationContext, glide, glide.registry);
        }
        applicationContext.registerComponentCallbacks(glide);
        //向单例赋值
        Glide.glide = glide;
    }
4、GlideBuilder#build
代码四 类GlideBuilder.java
    Glide build(@NonNull Context context) {
       //创建执行器,用于从数据源获取数据,例如网络请求
        if (sourceExecutor == null) {
            sourceExecutor = GlideExecutor.newSourceExecutor();
        }
        //创建执行器,用于从本地缓存获取数据
        if (diskCacheExecutor == null) {
            diskCacheExecutor = GlideExecutor.newDiskCacheExecutor();
        }
        if (animationExecutor == null) {
            animationExecutor = GlideExecutor.newAnimationExecutor();
        }
        //根据当前机器参数计算需要设置的缓存大小
        if (memorySizeCalculator == null) {
            memorySizeCalculator = new MemorySizeCalculator.Builder(context).build();
        }

        if (connectivityMonitorFactory == null) {
            connectivityMonitorFactory = new DefaultConnectivityMonitorFactory();
        }
        //创建 Bitmap 池,用于回收LruCache缓存的图片,把图片回收到bitmapPool中,这样下次再创建图片时,可服用该内存,避免连续创建回收内存,造成的内存抖动
        if (bitmapPool == null) {

            int size = memorySizeCalculator.getBitmapPoolSize();
            if (size > 0) {
                bitmapPool = new LruBitmapPool(size);
            } else {
                bitmapPool = new BitmapPoolAdapter();
            }
        }

        //创建数组池
        if (arrayPool == null) {
            arrayPool = new LruArrayPool(memorySizeCalculator.getArrayPoolSizeInBytes());
        }

        //创建内存缓存
        if (memoryCache == null) {
            memoryCache = new LruResourceCache(memorySizeCalculator.getMemoryCacheSize());
        }

        //创建磁盘缓存
        if (diskCacheFactory == null) {
            diskCacheFactory = new InternalCacheDiskCacheFactory(context);
        }
        //创建Engine,用于真正的执行,例如发起网络请求,从磁盘读取等
        if (engine == null) {
            engine =
                    new Engine(
                            memoryCache,
                            diskCacheFactory,
                            diskCacheExecutor,
                            sourceExecutor,
                            GlideExecutor.newUnlimitedSourceExecutor(),
                            animationExecutor,
                            isActiveResourceRetentionAllowed);
        }

        if (defaultRequestListeners == null) {
            defaultRequestListeners = Collections.emptyList();
        } else {
            defaultRequestListeners = Collections.unmodifiableList(defaultRequestListeners);
        }

        RequestManagerRetriever requestManagerRetriever =
                new RequestManagerRetriever(requestManagerFactory);
		//创建Glide
        return new Glide(
                context,
                engine,
                memoryCache,
                bitmapPool,
                arrayPool,
                requestManagerRetriever,
                connectivityMonitorFactory,
                logLevel,
                defaultRequestOptions.lock(),
                defaultTransitionOptions,
                defaultRequestListeners,
                isLoggingRequestOriginsEnabled);
    }
终于到了真正创建Glide的地方
5、Glide#Glide
代码五 类Glide.java
   Glide(
            @NonNull Context context,
            @NonNull Engine engine,
            @NonNull MemoryCache memoryCache,
            @NonNull BitmapPool bitmapPool,
            @NonNull ArrayPool arrayPool,
            @NonNull RequestManagerRetriever requestManagerRetriever,
            @NonNull ConnectivityMonitorFactory connectivityMonitorFactory,
            int logLevel,
            @NonNull RequestOptions defaultRequestOptions,
            @NonNull Map<Class<?>, TransitionOptions<?, ?>> defaultTransitionOptions,
            @NonNull List<RequestListener<Object>> defaultRequestListeners,
            boolean isLoggingRequestOriginsEnabled) {
        this.engine = engine;
        this.bitmapPool = bitmapPool;
        this.arrayPool = arrayPool;
        this.memoryCache = memoryCache;
        this.requestManagerRetriever = requestManagerRetriever;
        this.connectivityMonitorFactory = connectivityMonitorFactory;

        DecodeFormat decodeFormat = defaultRequestOptions.getOptions().get(Downsampler.DECODE_FORMAT);
        bitmapPreFiller = new BitmapPreFiller(memoryCache, bitmapPool, decodeFormat);

        final Resources resources = context.getResources();

        registry = new Registry();
        registry.register(new DefaultImageHeaderParser());

          ...省略若干代码,创建需要加入到registry 的类...

        ContentResolver contentResolver = context.getContentResolver();
		//添加各种Encoder(把数据存为File)、ResourceDecoder(把数据从类型A转为类型B)、ModelLoaderFactory(用于创建ModelLoader,它用于将任意复杂的数据模型转换为可由 DataFetcher 获取模型所代表的资源数据的具体数据类型。用来加载资源的。 )
        registry
                .append(ByteBuffer.class, new ByteBufferEncoder())
                ...省略若干代码...
                .append(Drawable.class, Drawable.class, new UnitDrawableDecoder())
                /* Transcoders */
                .register(
                        Bitmap.class,
                        BitmapDrawable.class,
                        new BitmapDrawableTranscoder(resources))
                .register(Bitmap.class, byte[].class, bitmapBytesTranscoder)
                .register(
                        Drawable.class,
                        byte[].class,
                        new DrawableBytesTranscoder(
                                bitmapPool, bitmapBytesTranscoder, gifDrawableBytesTranscoder))
                .register(GifDrawable.class, byte[].class, gifDrawableBytesTranscoder);

        ImageViewTargetFactory imageViewTargetFactory = new ImageViewTargetFactory();
        glideContext =
                new GlideContext(
                        context,
                        arrayPool,
                        registry,
                        imageViewTargetFactory,
                        defaultRequestOptions,
                        defaultTransitionOptions,
                        defaultRequestListeners,
                        engine,
                        isLoggingRequestOriginsEnabled,
                        logLevel);
    }
ModelLoader
这里对ModelLoader 类进行说明:
工厂接口,用于将任意复杂的数据模型转换为可由 DataFetcher 用于获取模型所代表的资源数据的具体数据类型。叫他加载器比较合适,用来加载资源的。
除此之外,还允许将图片按照 ImageView 大小按需加载。防止浪费内存。
Glide 初始化时会注册很多个 ModelLoader ,除了在创建Glide时 通过registry 注册的之外还会注册用户在 manifest 中配置的 ModelLoader
ModelLoader 中有两个方法以及一个内部类:LoadData,下来看看这两个方法:
@Nullable
LoadData<Data> buildLoadData(@NonNull Model model, int width, int height,
                                 @NonNull Options options);
boolean handles(@NonNull Model model);
-
buildLoadData 方法构建一个 LoadData 实例,除了包含 Model 之外还有宽高以及 Option,加载图片时可以根据需要的宽高以及其他设置做到按需加载。
-
handles 方法比较简单,就是用来判断给定模型是不是此加载器可能加载的已识别类型。
LoadData
ModelLoader的内部类 LoadData ,主要作用就是装了三个东西:
- 用于识别资源唯一性的 Key;
- 缓存相关的备用 Key 列表
- DataFetcher
其中 DataFetcher最重要,为什么说它是最重要的呢,因为加载资源的根源就在这里(找了半天终于找到了),例如发起网络请求等等,都在这个里面。
ResourceDecoder
ResourceDecoder的作用是将ModelLoader加载出来的数据,进行解码,解码成Bitmap,或者BitmapDrawable之类的。Glide中常用的Decoder有两个,其他都是将这两个Decoder进行包装,它们分别是ByteBufferBitmapDecoder和StreamBitmapDecoder。
DataRewinder
Rewinder担任的是ModelLoader到ResourceDecoder的桥梁的角色,DecodeJob将ModelLoader获得的数据,构造出DataRewinder,然后使用Rewinder将数据传给ResourceDecoder进行解码。
Encoder
Encoder的作用是将数据转换成文件,用来配合Glide硬盘缓存。所以Encoder的相关类,都是转为File类型的
此时Glide 已经创建好了,接下来回到代码一 ,执行get操作,在RequestManagerRetriever 中创建RequestManager
6、RequestManagerRetriever#get
代码六 在RequestManagerRetriever 类中
    public RequestManager get(@NonNull Context context) {
        if (context == null) {
            throw new IllegalArgumentException("You cannot start a load on a null Context");
        } else if (Util.isOnMainThread() && !(context instanceof Application)) {
           //在主线程,且context 不是Application类型的
           //在满足这个条件下的,都是需要创建一个Fragment ,来关联生命周期的,创建Fragment的过程就不陈述了,都比较简单
            if (context instanceof FragmentActivity) {
                return get((FragmentActivity) context);
            } else if (context instanceof Activity) {
                return get((Activity) context);
            } else if (context instanceof ContextWrapper) {
                return get(((ContextWrapper) context).getBaseContext());
            }
        }
		//这种情况下,使用代码四中,通过setRequestManagerFactory 设置的RequestManagerFactory,来创建RequestManager
        return getApplicationManager(context);
    }
至此with 函数就算分析完了,得到了RequestManager 对象。从命名就能看出来,它是请求管理者
三、load(url)源码
此时已经是在RequestManager 对象下面操作了,这里的load 设置图片来源,有多种方式,从本地资源Drawable,String,Uri,File等,我们这里仅分析从网络请求图片的过程
1、RequestManager#load
    public RequestBuilder<Drawable> load(@Nullable String string) {
        return asDrawable().load(string);
    }
2、RequestManager#asDrawable
    //如果是其它的类型,就使用其它的asXXXX函数(例如asGif)
    public RequestBuilder<Drawable> asDrawable() {
       //这里传入Drawable.class,
        return as(Drawable.class);
    }

    public <ResourceType> RequestBuilder<ResourceType> as(
            @NonNull Class<ResourceType> resourceClass) {
        //创建RequestBuilder
        return new RequestBuilder<>(glide, this, resourceClass, context);
    }
3、RequestBuilder#load
    public RequestBuilder<TranscodeType> load(@Nullable Object model) {
       // 这里的model 是一个url
        return loadGeneric(model);
    }

    @NonNull
    private RequestBuilder<TranscodeType> loadGeneric(@Nullable Object model) {
        // 这里的model 是一个url
        this.model = model;
        // 记录url已设置
        isModelSet = true;
        return this;
    }
四、 into(iv)源码
该函数是在RequestBuilder 中执行的
1、RequestBuilder#into
    public ViewTarget<ImageView, TranscodeType> into(@NonNull ImageView view) {
        BaseRequestOptions<?> requestOptions = this;
        if (!requestOptions.isTransformationSet()
                && requestOptions.isTransformationAllowed()
                && view.getScaleType() != null) {
            // Clone in this method so that if we use this RequestBuilder to load into a View and then
            // into a different target, we don't retain the transformation applied based on the previous
            // View's scale type.
            //根据ImageView 的ScaleType 类型,进行参数设置,注意这里是clone 一个新的对象,在新对象上操作的
            switch (view.getScaleType()) {
                case CENTER_CROP:
                    requestOptions = requestOptions.clone().optionalCenterCrop();
                    break;
                case CENTER_INSIDE:
                    requestOptions = requestOptions.clone().optionalCenterInside();
                    break;
                case FIT_CENTER:
                case FIT_START:
                case FIT_END:
                    requestOptions = requestOptions.clone().optionalFitCenter();
                    break;
                case FIT_XY:
                    requestOptions = requestOptions.clone().optionalCenterInside();
                    break;
                case CENTER:
                case MATRIX:
                default:
                    // Do nothing.
            }
        }

        return into(
                //这个transcodeClass是指的drawable或bitmap,就是前面as函数传入的类型
                glideContext.buildImageViewTarget(view, transcodeClass),
                /*targetListener=*/ null,
                requestOptions,
                //在主线程,也就是通过 主线程的Handler 执行
                Executors.mainThreadExecutor());
    }
2、GlideContext # buildImageViewTarget
    public <X> ViewTarget<ImageView, X> buildImageViewTarget(
            @NonNull ImageView imageView, @NonNull Class<X> transcodeClass) {
        return imageViewTargetFactory.buildTarget(imageView, transcodeClass);
    }
3、ImageViewTargetFactory # buildTarget
创建ViewTarget,用于显示一个Bitmap或Drawable 到 ImageView 中
  public <Z> ViewTarget<ImageView, Z> buildTarget(@NonNull ImageView view,
      @NonNull Class<Z> clazz) {
    if (Bitmap.class.equals(clazz)) {
      return (ViewTarget<ImageView, Z>) new BitmapImageViewTarget(view);
    } else if (Drawable.class.isAssignableFrom(clazz)) {
      //因为前面调用asDrawable ,所以会创建这个ViewTarget
      return (ViewTarget<ImageView, Z>) new DrawableImageViewTarget(view);
    } else {
      throw new IllegalArgumentException(
          "Unhandled class: " + clazz + ", try .as*(Class).transcode(ResourceTranscoder)");
    }
  }
Glide内部只维护了两种target,一种是BitmapImageViewTarget,另一种则是DrawableImageViewTarget
4、RequestBuilder#into
回到第1步的,return into 的函数
    private <Y extends Target<TranscodeType>> Y into(
            @NonNull Y target,
            @Nullable RequestListener<TranscodeType> targetListener,
            BaseRequestOptions<?> options,
            Executor callbackExecutor) {
        Preconditions.checkNotNull(target);
        if (!isModelSet) {
            //调用过load 函数,这个变量是true
            throw new IllegalArgumentException("You must call #load() before calling #into()");
        }
		//创建请求,用于显示图片。图片有可能是从缓存中,也有可能是从网络获取
        Request request = buildRequest(target, targetListener, options, callbackExecutor);

		//获取该目标 对应的request,和当前的request进行比较
        Request previous = target.getRequest();
        if (request.isEquivalentTo(previous)
                && !isSkipMemoryCacheWithCompletePreviousRequest(options, previous)) {
            request.recycle();
            // If the request is completed, beginning again will ensure the result is re-delivered,
            // triggering RequestListeners and Targets. If the request is failed, beginning again will
            // restart the request, giving it another chance to complete. If the request is already
            // running, we can let it continue running without interruption.
            if (!Preconditions.checkNotNull(previous).isRunning()) {
                // Use the previous request rather than the new one to allow for optimizations like skipping
                // setting placeholders, tracking and un-tracking Targets, and obtaining View dimensions
                // that are done in the individual Request.
                previous.begin();
            }
            return target;
        }

        requestManager.clear(target);
        //把当前的request,设置到target(ViewTarget)
        target.setRequest(request);
        //进行图片请求操作,第6步
        requestManager.track(target, request);

        return target;
    }
5、RequestBuilder#buildRequest
先来看看,这个request 是如何创建的
经过一次调用,最终是在这个函数中进行具体的创建
    private Request buildRequestRecursive(
            Target<TranscodeType> target,
            @Nullable RequestListener<TranscodeType> targetListener,
            @Nullable RequestCoordinator parentCoordinator,
            TransitionOptions<?, ? super TranscodeType> transitionOptions,
            Priority priority,
            int overrideWidth,
            int overrideHeight,
            BaseRequestOptions<?> requestOptions,
            Executor callbackExecutor) {

        // Build the ErrorRequestCoordinator first if necessary so we can update parentCoordinator.
        ErrorRequestCoordinator errorRequestCoordinator = null;
        //判断是否设置了,发生错误时,显示的图片
        if (errorBuilder != null) {
            errorRequestCoordinator = new ErrorRequestCoordinator(parentCoordinator);
            parentCoordinator = errorRequestCoordinator;
        }
         //创建缩略图和原图的Request
        Request mainRequest =  buildThumbnailRequestRecursive(
                        target,
                        targetListener,
                        parentCoordinator,
                        transitionOptions,
                        priority,
                        overrideWidth,
                        overrideHeight,
                        requestOptions,
                        callbackExecutor);

        if (errorRequestCoordinator == null) {
            return mainRequest;
        }

        int errorOverrideWidth = errorBuilder.getOverrideWidth();
        int errorOverrideHeight = errorBuilder.getOverrideHeight();
        if (Util.isValidDimensions(overrideWidth, overrideHeight)
                && !errorBuilder.isValidOverride()) {
            errorOverrideWidth = requestOptions.getOverrideWidth();
            errorOverrideHeight = requestOptions.getOverrideHeight();
        }

        //创建错误时图片的内容
        Request errorRequest = errorBuilder.buildRequestRecursive(
                        target,
                        targetListener,
                        errorRequestCoordinator,
                        errorBuilder.transitionOptions,
                        errorBuilder.getPriority(),
                        errorOverrideWidth,
                        errorOverrideHeight,
                        errorBuilder,
                        callbackExecutor);
        //把这两个请求,都传进errorRequestCoordinator中
        errorRequestCoordinator.setRequests(mainRequest, errorRequest);
        return errorRequestCoordinator;
    }
    private Request buildThumbnailRequestRecursive(
            Target<TranscodeType> target,
            RequestListener<TranscodeType> targetListener,
            @Nullable RequestCoordinator parentCoordinator,
            TransitionOptions<?, ? super TranscodeType> transitionOptions,
            Priority priority,
            int overrideWidth,
            int overrideHeight,
            BaseRequestOptions<?> requestOptions,
            Executor callbackExecutor) {
        if (thumbnailBuilder != null) {
            // Recursive case: contains a potentially recursive thumbnail request builder.
            TransitionOptions<?, ? super TranscodeType> thumbTransitionOptions =
                    thumbnailBuilder.transitionOptions;

            // Apply our transition by default to thumbnail requests but avoid overriding custom options
            // that may have been applied on the thumbnail request explicitly.
            if (thumbnailBuilder.isDefaultTransitionOptionsSet) {
                thumbTransitionOptions = transitionOptions;
            }
			//取出缩略图的配置,优先级,,缩略图的宽高等
            Priority thumbPriority = thumbnailBuilder.isPrioritySet()
                    ? thumbnailBuilder.getPriority() : getThumbnailPriority(priority);

            int thumbOverrideWidth = thumbnailBuilder.getOverrideWidth();
            int thumbOverrideHeight = thumbnailBuilder.getOverrideHeight();
            if (Util.isValidDimensions(overrideWidth, overrideHeight)
                    && !thumbnailBuilder.isValidOverride()) {
                thumbOverrideWidth = requestOptions.getOverrideWidth();
                thumbOverrideHeight = requestOptions.getOverrideHeight();
            }

            ThumbnailRequestCoordinator coordinator = new ThumbnailRequestCoordinator(parentCoordinator);
            //使用缩略图的参数,创建一个Request
            Request fullRequest =
                    obtainRequest(
                            target,
                            targetListener,
                            requestOptions,
                            coordinator,
                            transitionOptions,
                            priority,
                            overrideWidth,
                            overrideHeight,
                            callbackExecutor);
            isThumbnailBuilt = true;
            // Recursively generate thumbnail requests.
            //因为调用.thumbnail 传递GlideRequest 参数时,这个请求也可能设置了缩略图和错误图(也就是缩略图的缩略图),所以这里进行递归创建Request
            Request thumbRequest =
                    thumbnailBuilder.buildRequestRecursive(
                            target,
                            targetListener,
                            coordinator,
                            thumbTransitionOptions,
                            thumbPriority,
                            thumbOverrideWidth,
                            thumbOverrideHeight,
                            thumbnailBuilder,
                            callbackExecutor);
            isThumbnailBuilt = false;
            coordinator.setRequests(fullRequest, thumbRequest);
            return coordinator;
        }

         ... 下面省略若干代码,是根据其他情况,创建Request ...
    }
在上面的代码,不论是什么情况,最终都调用了函数obtainRequest,创建Request
    private Request obtainRequest(
            Target<TranscodeType> target,
            RequestListener<TranscodeType> targetListener,
            BaseRequestOptions<?> requestOptions,
            RequestCoordinator requestCoordinator,
            TransitionOptions<?, ? super TranscodeType> transitionOptions,
            Priority priority,
            int overrideWidth,
            int overrideHeight,
            Executor callbackExecutor) {
        //创建SingleRequest,这里通过obtain 从工厂池中获取,有对象复用功能
        return SingleRequest.obtain(
                context,
                glideContext,
                model,
                transcodeClass,
                requestOptions,
                overrideWidth,
                overrideHeight,
                priority,
                target,
                targetListener,
                requestListeners,
                requestCoordinator,
                glideContext.getEngine(),
                transitionOptions.getTransitionFactory(),
                callbackExecutor);
    }
创建完Request后, 接着回到第4步 requestManager.track(target, request); 开始请求
6、RequestManager # track
    synchronized void track(@NonNull Target<?> target, @NonNull Request request) {
        //把填充目标(这里是ImageView)加入跟踪器里,如果activity生命周期发生变化,就会执行填充目标相应的生命周期
        targetTracker.track(target);
        //执行Request
        requestTracker.runRequest(request);
    }
  public void runRequest(@NonNull Request request) {
    requests.add(request);
    //填充目标(ImageView)所在的activity Fragment stop后,isPaused就是true
    if (!isPaused) {
       //如果不是暂停,就开始执行
      request.begin();
    } else {
      request.clear();
      if (Log.isLoggable(TAG, Log.VERBOSE)) {
        Log.v(TAG, "Paused, delaying request");
      }
      //加入待执行列表
      pendingRequests.add(request);
    }
  }
从前面的创建过程知道,Request 可能会有多种,例如SingleRequest、ErrorRequestCoordinator等,其中内部都是由SingleRequest 组成的,真正的操作也是在它里面。所以这里就分析SingleRequest #begin
7 、SingleRequest #begin
    public synchronized void begin() {
        ...
        if (model == null) {

            ...
            // model(url)为空,回调加载失败
           onLoadFailed(new GlideException("Received null   model"), logLevel);
           return;
        }
        if (status == Status.RUNNING) {
            throw new IllegalArgumentException("Cannot restart a running request");
        }

        // If we're restarted after we're complete (usually via something like a notifyDataSetChanged
        // that starts an identical request into the same Target or View), we can simply use the
        // resource and size we retrieved the last time around and skip obtaining a new size, starting a
        // new load etc. This does mean that users who want to restart a load because they expect that
        // the view size has changed will need to explicitly clear the View or Target before starting
        // the new load.
        if (status == Status.COMPLETE) {
            //到 第26步,把数据显示到ImageView 上
            onResourceReady(resource, DataSource.MEMORY_CACHE);
            return;
        }

        // Restarts for requests that are neither complete nor running can be treated as new requests
        // and can run again from the beginning.

        status = Status.WAITING_FOR_SIZE;
        if (Util.isValidDimensions(overrideWidth, overrideHeight)) {
            // 当使用override() API为图片指定了一个固定的宽高时直接执行onSizeReady,
            // 最终的核心处理位于onSizeReady
            onSizeReady(overrideWidth, overrideHeight);
        } else {
        // 根据imageView的宽高算出图片的宽高,最终也会走到onSizeReady
            target.getSize(this);
        }

        if ((status == Status.RUNNING || status == Status.WAITING_FOR_SIZE)
                && canNotifyStatusChanged()) {
             // 预先加载设置的缩略图
            target.onLoadStarted(getPlaceholderDrawable());
        }
    }
真正的请求 是在 onSizeReady 开始的
8 、SingleRequest #onSizeReady
    public synchronized void onSizeReady(int width, int height) {

        if (status != Status.WAITING_FOR_SIZE) {
            return;
        }
        //设置状态为正在请求
        status = Status.RUNNING;
		//设置宽高
        float sizeMultiplier = requestOptions.getSizeMultiplier();
        this.width = maybeApplySizeMultiplier(width, sizeMultiplier);
        this.height = maybeApplySizeMultiplier(height, sizeMultiplier);

		//这里的engine 是在创建Glide的时候,build() 创建的,engine封装了各种Executor,内存缓存等
        loadStatus =
                engine.load(
                        glideContext,
                        model,
                        requestOptions.getSignature(),
                        this.width,
                        this.height,
                        requestOptions.getResourceClass(),
                        transcodeClass,
                        priority,
                        requestOptions.getDiskCacheStrategy(),
                        requestOptions.getTransformations(),
                        requestOptions.isTransformationRequired(),
                        requestOptions.isScaleOnlyOrNoTransform(),
                        requestOptions.getOptions(),
                        requestOptions.isMemoryCacheable(),
                        requestOptions.getUseUnlimitedSourceGeneratorsPool(),
                        requestOptions.getUseAnimationPool(),
                        requestOptions.getOnlyRetrieveFromCache(),
                        this,
                        callbackExecutor);

        // This is a hack that's only useful for testing right now where loads complete synchronously
        // even though under any executor running on any thread but the main thread, the load would
        // have completed asynchronously.
        if (status != Status.RUNNING) {
            loadStatus = null;
        }
    }
9、Engine # load
在这里开始图片的请求,图片的三级缓存的功能,也在这里
这里我们先定义一下三级缓存:
-
弱引用缓存,使用弱引用,来缓存图片,图片被回收后,会保存到内存缓存中。
-
内存缓存LruCache(默认是在创建Glide的时候创建的,也可自定义), 如果弱引用缓存找不到图片,就从内存缓存中查找,找到图片后,删除内存缓存(防止因Lru的策略,图片正在使用,但是被回收掉的问题)
-
磁盘缓存 ,上面两级缓存都没有图片,如果在磁盘缓存中找到,就把图片加载后,放到弱引用缓存中。磁盘缓存数据的种类有两种,一种是缓存源数据,这种数据需要经过解析才能得到图片。一种是图片数据,直接加载进来就可以用的。可以通过diskCacheStrategyOf 来自由选择如何缓存
    public synchronized <R> LoadStatus load(
            GlideContext glideContext,
            Object model,
            Key signature,
            int width,
            int height,
            Class<?> resourceClass,
            Class<R> transcodeClass,
            Priority priority,
            DiskCacheStrategy diskCacheStrategy,
            Map<Class<?>, Transformation<?>> transformations,
            boolean isTransformationRequired,
            boolean isScaleOnlyOrNoTransform,
            Options options,
            boolean isMemoryCacheable,
            boolean useUnlimitedSourceExecutorPool,
            boolean useAnimationPool,
            boolean onlyRetrieveFromCache,
            ResourceCallback cb,
            Executor callbackExecutor) {
        long startTime = VERBOSE_IS_LOGGABLE ? LogTime.getLogTime() : 0;

        //生成缓存key,以后就根据这个key,在缓存中查找
        EngineKey key = keyFactory.buildKey(model, signature, width, height, transformations,
                resourceClass, transcodeClass, options);

        //检查弱引用缓存是否有目标图片
        EngineResource<?> active = loadFromActiveResources(key, isMemoryCacheable);
        if (active != null) {
           //在弱引用缓存中找到图片,直接返回
            cb.onResourceReady(active, DataSource.MEMORY_CACHE);
            if (VERBOSE_IS_LOGGABLE) {
                logWithTimeAndKey("Loaded resource from active resources", startTime, key);
            }
            return null;
        }
        //检查内存的弱引用缓存是否有目标图片
        EngineResource<?> cached = loadFromCache(key, isMemoryCacheable);
        if (cached != null) {
            //在内存缓存中找到图片,直接返回
            cb.onResourceReady(cached, DataSource.MEMORY_CACHE);
            if (VERBOSE_IS_LOGGABLE) {
                logWithTimeAndKey("Loaded resource from cache", startTime, key);
            }
            return null;
        }
		//在弱引用和内存缓存中,都没有找到图片,就执行任务。这个任务,会现在磁盘缓存中查找,因为磁盘读取耗时较大,所以放在任务线程中
        EngineJob<?> current = jobs.get(key, onlyRetrieveFromCache);
        if (current != null) {
            current.addCallback(cb, callbackExecutor);
            if (VERBOSE_IS_LOGGABLE) {
                logWithTimeAndKey("Added to existing load", startTime, key);
            }
            return new LoadStatus(cb, current);
        }
		//创建一个执行工作,它里面有很多Executor,其它线程可以放进来执行
        EngineJob<R> engineJob =
                engineJobFactory.build(
                        key,
                        isMemoryCacheable,
                        useUnlimitedSourceExecutorPool,
                        useAnimationPool,
                        onlyRetrieveFromCache);
		//创建一个解码工作,用于处理图片的
        DecodeJob<R> decodeJob =
                decodeJobFactory.build(
                        glideContext,
                        model,
                        key,
                        signature,
                        width,
                        height,
                        resourceClass,
                        transcodeClass,
                        priority,
                        diskCacheStrategy,
                        transformations,
                        isTransformationRequired,
                        isScaleOnlyOrNoTransform,
                        onlyRetrieveFromCache,
                        options,
                        engineJob);
        // 放在Jobs内部维护的HashMap中
        jobs.put(key, engineJob);
        // 注册ResourceCallback接口,就是在成功获取图片后,需要显示到ImageView 上的回调,这个接口回调到SingleRequest 中
        engineJob.addCallback(cb, callbackExecutor);
        //开始执行
        engineJob.start(decodeJob);

        return new LoadStatus(cb, engineJob);
    }
    public synchronized void start(DecodeJob<R> decodeJob) {
        this.decodeJob = decodeJob;
        //若能从磁盘缓存获取数据,就使用diskCacheExecutor
        //否则在根据其他的条件判断使用哪个Executor
        GlideExecutor executor = decodeJob.willDecodeFromCache()
                ? diskCacheExecutor
                : getActiveSourceExecutor();
        executor.execute(decodeJob);
    }
    boolean willDecodeFromCache() {
        //先看下面的getNextStage 分析
        Stage firstStage = getNextStage(Stage.INITIALIZE);
        //那这里就很明了了,如果可以从磁盘缓存读取,就返回true
        return firstStage == Stage.RESOURCE_CACHE || firstStage == Stage.DATA_CACHE;
    }
很多地方都用到这个函数,获取下一个阶段,应该从哪里获取数据
    private Stage getNextStage(Stage current) {
        switch (current) {
            case INITIALIZE:
            //当前是初始阶段,则看磁盘缓存策略,是否可以在磁盘中获取资源缓存(也就是解析后的缓存)
                return diskCacheStrategy.decodeCachedResource()
                        ? Stage.RESOURCE_CACHE : getNextStage(Stage.RESOURCE_CACHE);
            case RESOURCE_CACHE:
            //当前是资源缓存,看下一步能不能从磁盘缓存中获取源数据缓存
                return diskCacheStrategy.decodeCachedData()
                        ? Stage.DATA_CACHE : getNextStage(Stage.DATA_CACHE);
            case DATA_CACHE:
                // Skip loading from source if the user opted to only retrieve the resource from cache.
                //当前是数据缓存,下一步能不能从源数据处获取数据,例如从服务器获取
                return onlyRetrieveFromCache ? Stage.FINISHED : Stage.SOURCE;
            case SOURCE:
            case FINISHED:
                return Stage.FINISHED;
            default:
                throw new IllegalArgumentException("Unrecognized stage: " + current);
        }
    }
executor.execute(decodeJob); 会进入到 Decodejob 的run 函数,接着调用runWrapped,下面就进入该函数看看
10、Decodejob # runWrapped
    /**
     * 初始化之后第一次运行时 runReason 为 INITIALIZE
     */
    private void runWrapped() {
        runWrappedCount++;
        switch (runReason) {
            case INITIALIZE:
                //获取下一阶段的状态
                stage = getNextStage(Stage.INITIALIZE);
                //根据下一阶段状态,判断具体有哪个类执行
                currentGenerator = getNextGenerator();
                runGenerators();
                break;
            case SWITCH_TO_SOURCE_SERVICE:
                runGenerators();
                break;
            case DECODE_DATA:
                decodeFromRetrievedData();
                break;
            default:
                throw new IllegalStateException("Unrecognized run reason: " + runReason);
        }
    }

    private DataFetcherGenerator getNextGenerator() {
        switch (stage) {
            //从磁盘缓存获取资源数据
            case RESOURCE_CACHE:
                return new ResourceCacheGenerator(decodeHelper, this);
            //从磁盘缓存获取源数据
            case DATA_CACHE:
                return new DataCacheGenerator(decodeHelper, this);
            //从数据源获取数据,例如 从服务器获取数据
            case SOURCE:
                return new SourceGenerator(decodeHelper, this);
            case FINISHED:
                return null;
            default:
                throw new IllegalStateException("Unrecognized stage: " + stage);
        }
    }

    private void runGenerators() {
        currentThread = Thread.currentThread();
        startFetchTime = LogTime.getLogTime();
        boolean isStarted = false;
        while (!isCancelled && currentGenerator != null
                   //这里执行当前的Generator,进第11步
                && !(isStarted = currentGenerator.startNext())) {

            stage = getNextStage(stage);
            currentGenerator = getNextGenerator();

            if (stage == Stage.SOURCE) {
                reschedule();
                return;
            }
        }
        // We've run out of stages and generators, give up.
        if ((stage == Stage.FINISHED || isCancelled) && !isStarted) {
            notifyFailed();
        }

        // Otherwise a generator started a new load and we expect to be called back in
        // onDataFetcherReady.
    }
currentGenerator.startNext() 这里的currentGenerator 是SourceGenerator
11、SourceGenerator # startNext
    @Override
    public boolean startNext() {
        //第一次 从源数据获取数据时,是不会执行到这里的
        //从下面的分析可知,等下次有数据时,也会调用到这里,就把数据缓存到磁盘
        if (dataToCache != null) {
            Object data = dataToCache;
            dataToCache = null;
            //放入缓存
            cacheData(data);
        }

        if (sourceCacheGenerator != null && sourceCacheGenerator.startNext()) {
            return true;
        }
        sourceCacheGenerator = null;

        loadData = null;
        boolean started = false;
        while (!started && hasNextModelLoader()) {
            //helper.getLoadData() 获取所有符合条件的ModelLoader,这些ModelLoader 包括默认的和自定义的
           // 这里的符合条件,也就是ModelLoader 中的handles函数是否返回true,再说直白点,就是判断在load()传入的对象类型,是否可以被ModelLoader所处理
            loadData = helper.getLoadData().get(loadDataListIndex++);
            if (loadData != null
                    && (helper.getDiskCacheStrategy().isDataCacheable(loadData.fetcher.getDataSource())
                    || helper.hasLoadPath(loadData.fetcher.getDataClass()))) {
                started = true;
                //通过LoadData对象内部的 fetcher ,来进行实际的请求操作(例如发起网络请求)
                loadData.fetcher.loadData(helper.getPriority(), this);
            }
        }
        return started;
    }
12、DecodeHelper # getLoadData
    List<LoadData<?>> getLoadData() {
        if (!isLoadDataSet) {
            isLoadDataSet = true;
            loadData.clear();
            //获取已注册的加载器中所有可以加载当前模型的加载器
            List<ModelLoader<Object, ?>> modelLoaders = glideContext.getRegistry().getModelLoaders(model);
            //noinspection ForLoopReplaceableByForEach to improve perf
            for (int i = 0, size = modelLoaders.size(); i < size; i++) {
                ModelLoader<Object, ?> modelLoader = modelLoaders.get(i);
                //每一个ModeLoader 都有一个内部类LoadData,通过函数buildLoadData 来创建
                LoadData<?> current =
                        modelLoader.buildLoadData(model, width, height, options);
                if (current != null) {
                    loadData.add(current);
                }
            }
        }
        return loadData;
    }
13、Registry # getModelLoaders
    @NonNull
    public <Model> List<ModelLoader<Model, ?>> getModelLoaders(@NonNull Model model) {
        List<ModelLoader<Model, ?>> result = modelLoaderRegistry.getModelLoaders(model);
        if (result.isEmpty()) {
            throw new NoModelLoaderAvailableException(model);
        }
        return result;
    }
14 、ModeLoaderRegistry # getModelLoaders
    public <A> List<ModelLoader<A, ?>> getModelLoaders(@NonNull A model) {
        List<ModelLoader<A, ?>> modelLoaders = getModelLoadersForClass(getClass(model));
        int size = modelLoaders.size();
        boolean isEmpty = true;
        List<ModelLoader<A, ?>> filteredLoaders = Collections.emptyList();
        for (int i = 0; i < size; i++) {
            ModelLoader<A, ?> loader = modelLoaders.get(i);
            //通过 ModelLoader#handles 方法判断加载器是否可以处理当前类型的数据(这个数据时通过load 传递进来的),返回所有可以处理的加载器
            if (loader.handles(model)) {
                if (isEmpty) {
                    filteredLoaders = new ArrayList<>(size - i);
                    isEmpty = false;
                }
                filteredLoaders.add(loader);
            }
        }
        return filteredLoaders;
    }
再回到第12步的 modelLoader.buildLoadData ,这里的modelLoader 有一个类型是StringLoader
StringLoader.buildLoadData->MultiModelLoader.buildLoadData
15、MultiModelLoader # buildLoadData
  @Override
  public LoadData<Data> buildLoadData(
      @NonNull Model model, int width, int height, @NonNull Options options) {
    Key sourceKey = null;
    int size = modelLoaders.size();
    List<DataFetcher<Data>> fetchers = new ArrayList<>(size);
    //noinspection ForLoopReplaceableByForEach to improve perf
    for (int i = 0; i < size; i++) {
      //这里的modelLoaders,是在创建MultiModelLoader的时候赋值的
      ModelLoader<Model, Data> modelLoader = modelLoaders.get(i);
      //在这里有进行了一次过滤,在更小的范围内查找,可以处理model的ModelLoader。(这次是在StringLoader 中查找,可以处理URL的ModelLoader)
      if (modelLoader.handles(model)) {
        LoadData<Data> loadData = modelLoader.buildLoadData(model, width, height, options);
        if (loadData != null) {
          //这里把LoadData的值提取出来,
          sourceKey = loadData.sourceKey;
          //以本例子,这里的fetcher 是HttpUrlFetcher
          fetchers.add(loadData.fetcher);
        }
      }
    }
    return !fetchers.isEmpty() && sourceKey != null
        ? new LoadData<>(sourceKey, new MultiFetcher<>(fetchers, exceptionListPool))
        : null;
  }
获取到满意的LoadData后,就继续第11步往下执行,来到loadData.fetcher.loadData(helper.getPriority(), this);
通过上面的分析知道,这里的fetcher 是HttpUrlFetcher,所以去看看它的函数loadData
16、HttpUrlFetcher # loadData
  public void loadData(
      @NonNull Priority priority, @NonNull DataCallback<? super InputStream> callback) {
    long startTime = LogTime.getLogTime();
    try {
      InputStream result = loadDataWithRedirects(glideUrl.toURL(), 0, null, glideUrl.getHeaders());
      //获取数据成功后,这里进行了回调,
      callback.onDataReady(result);
    } catch (IOException e) {

      callback.onLoadFailed(e);
    } finally {

      }
    }
  }
这里进行网络请求
    private InputStream loadDataWithRedirects(URL url, int redirects, URL lastUrl,
                                              Map<String, String> headers) throws IOException {

		//通过HttpURLConnection网络请求数据
        urlConnection = connectionFactory.build(url);
        for (Map.Entry<String, String> headerEntry : headers.entrySet()) {
            urlConnection.addRequestProperty(headerEntry.getKey(), headerEntry.getValue());
        }
        urlConnection.setConnectTimeout(timeout);
        urlConnection.setReadTimeout(timeout);
        urlConnection.setUseCaches(false);
        urlConnection.setDoInput(true);

        // Stop the urlConnection instance of HttpUrlConnection from following redirects so that
        // redirects will be handled by recursive calls to this method, loadDataWithRedirects.
        urlConnection.setInstanceFollowRedirects(false);

        // Connect explicitly to avoid errors in decoders if connection fails.
        urlConnection.connect();
        // Set the stream so that it's closed in cleanup to avoid resource leaks. See #2352.
        stream = urlConnection.getInputStream();
        if (isCancelled) {
            return null;
        }
        final int statusCode = urlConnection.getResponseCode();
        if (isHttpOk(statusCode)) {
            //如果请求成功,返回数据流
            return getStreamForSuccessfulRequest(urlConnection);
        } else if (isHttpRedirect(statusCode)) {
           //...省略部分代码,如果需要重定向,递归调用该函数...
            return loadDataWithRedirects(redirectUrl, redirects + 1, url, headers);
        }
        ...省略部分代码
    }
数据获取成功,就回到 第16步的 callback.onDataReady(result); 进行数据的回调
第16步的loadData,是在第11步调用的 loadData.fetcher.loadData(helper.getPriority(), this); 可以看到传入this,callback 是 SourceGenerator 的类型。其实就是接口 DataCallback,接下来就看看该接口在SourceGenerator中的实现
17、SourceGenerator#onDataReady
    @Override
    public void onDataReady(Object data) {

        DiskCacheStrategy diskCacheStrategy = helper.getDiskCacheStrategy();
        if (data != null && diskCacheStrategy.isDataCacheable(loadData.fetcher.getDataSource())) {
            //如果该数据类型,有启用磁盘缓存,就把值付给dataToCache ,还记得这个变量吗?在第11步的startNext
            dataToCache = data;
            //调用DecodeJob的reschedule,用线程池执行任务,实际上就是再次调用SourceGenerator的startNext
            cb.reschedule();
        } else {
          // 又是一个回调函数
            cb.onDataFetcherReady(loadData.sourceKey, data, loadData.fetcher,
                    loadData.fetcher.getDataSource(), originalKey);
        }
    }
这个cb 变量是创建SourceGenerator的传递进来的,也就是在第10步的 Decodejob. getNextGenerator 函数创建了SourceGenerator,传入的回调接口是this,那么就是回调到Decodejob,下面看看这个回调接口
18、 Decodejob # onDataFetcherReady
    @Override
    public void reschedule() {
        runReason = RunReason.SWITCH_TO_SOURCE_SERVICE;
        callback.reschedule(this);
    }

    @Override
    public void onDataFetcherReady(Key sourceKey, Object data, DataFetcher<?> fetcher,
                                   DataSource dataSource, Key attemptedKey) {
        Log.d(TAG, "onDataFetcherReady()");
        this.currentSourceKey = sourceKey;
        this.currentData = data;
        this.currentFetcher = fetcher;
        this.currentDataSource = dataSource;
        this.currentAttemptingKey = attemptedKey;
        if (Thread.currentThread() != currentThread) {
            runReason = RunReason.DECODE_DATA;
            callback.reschedule(this);
        } else {
            GlideTrace.beginSection("DecodeJob.decodeFromRetrievedData");
            try {
                decodeFromRetrievedData();
            } finally {
                GlideTrace.endSection();
            }
        }
    }
19、 Decodejob # decodeFromRetrievedData
    private void decodeFromRetrievedData() {

        Resource<R> resource = null;
        try {
            // 从数据中解码得到资源
            resource = decodeFromData(currentFetcher, currentData, currentDataSource);
        } catch (GlideException e) {
        }
        if (resource != null) {
            // 通知编码和发布,最终得到的Resource<Bitmap>对象,第24步
            notifyEncodeAndRelease(resource, currentDataSource);
        } else {
            runGenerators();
        }
    }
我们先来分析decodeFromData,这个过程比较多 步骤:20 -23
20、Decodejob # decodeFromData
    private <Data> Resource<R> decodeFromData(DataFetcher<?> fetcher, Data data,
                                              DataSource dataSource) throws GlideException {

        try {
            if (data == null) {
                return null;
            }
            //继续解析数据
            Resource<R> result = decodeFromFetcher(data, dataSource);
            return result;
        } finally {
            fetcher.cleanup();
        }
    }
    //这里的data 是一个泛型,本例中是 Stream 流,从http请求获取到的
    private <Data> Resource<R> decodeFromFetcher(Data data, DataSource dataSource)
            throws GlideException {
        //获取一个LoadPath,它是根据数据类型(这里是stream),ResourceDecoder(资源解码),transcoder(资源转码)
        //从这些参数可以看出,最终把数据流转为Bitmap 或Drawable ,就是在LoadPath中进行的,这里是指DecodePath
        LoadPath<Data, ?, R> path = decodeHelper.getLoadPath((Class<Data>) data.getClass());
        return runLoadPath(data, dataSource, path);
    }
    private <Data, ResourceType> Resource<R> runLoadPath(Data data, DataSource dataSource,
                                                         LoadPath<Data, ResourceType, R> path) throws GlideException {
        Options options = getOptionsWithHardwareConfig(dataSource);
        DataRewinder<Data> rewinder = glideContext.getRegistry().getRewinder(data);
        try {
            // ResourceType in DecodeCallback below is required for compilation to work with gradle.
            //执行LoadPath 的load ,进行解码,转换操作
            return path.load(
                    rewinder, options, width, height, new DecodeCallback<ResourceType>(dataSource));
        } finally {
            rewinder.cleanup();
        }
    }
20 、LoadPath # load
    public Resource<Transcode> load(DataRewinder<Data> rewinder, @NonNull Options options, int width,
                                    int height, DecodePath.DecodeCallback<ResourceType> decodeCallback) throws GlideException {

        try {
            return loadWithExceptionList(rewinder, options, width, height, decodeCallback, throwables);
        }
    }
    private Resource<Transcode> loadWithExceptionList(DataRewinder<Data> rewinder,
                                                      @NonNull Options options,
                                                      int width, int height, DecodePath.DecodeCallback<ResourceType> decodeCallback,
                                                      List<Throwable> exceptions) throws GlideException {
        Resource<Transcode> result = null;
        //noinspection ForLoopReplaceableByForEach to improve perf
        for (int i = 0, size = decodePaths.size(); i < size; i++) {
            DecodePath<Data, ResourceType, Transcode> path = decodePaths.get(i);
            try {
                //重点在这里,调用LoadPath 的decode 解码
                result = path.decode(rewinder, width, height, options, decodeCallback);
            } catch (GlideException e) {
                exceptions.add(e);
            }
            if (result != null) {
                break;
            }
        }

        if (result == null) {
            throw new GlideException(failureMessage, new ArrayList<>(exceptions));
        }

        return result;
    }
21 、DecodePath # decode
    public Resource<Transcode> decode(DataRewinder<DataType> rewinder, int width, int height,
                                      @NonNull Options options, DecodeCallback<ResourceType> callback) throws GlideException {
        //解码
        Resource<ResourceType> decoded = decodeResource(rewinder, width, height, options);
        // 这个方法是回调到Decodejob.onResourceDecoded ,作用是调用RequestOptions中的Transform处理图片,然后将ResourceCache的Key和Encode准备好(放在变量 deferEncoderManager中),稍后进行写入缓存。
        Resource<ResourceType> transformed = callback.onResourceDecoded(decoded);
        //进行数据类型的转换
        return transcoder.transcode(transformed, options);
    }
    @NonNull
    private Resource<ResourceType> decodeResource(DataRewinder<DataType> rewinder, int width,
                                                  int height, @NonNull Options options) throws GlideException {

        try {
            return decodeResourceWithList(rewinder, width, height, options, exceptions);
        }
    }
    @NonNull
    private Resource<ResourceType> decodeResourceWithList(DataRewinder<DataType> rewinder, int width,
                                                          int height, @NonNull Options options, List<Throwable> exceptions) throws GlideException {
        Resource<ResourceType> result = null;
        //noinspection ForLoopReplaceableByForEach to improve perf
        for (int i = 0, size = decoders.size(); i < size; i++) {
            ResourceDecoder<DataType, ResourceType> decoder = decoders.get(i);
            try {
                DataType data = rewinder.rewindAndGet();
                if (decoder.handles(data, options)) {
                    data = rewinder.rewindAndGet();
                    //根据DataType和ResourceType的类型分发给不同的解码器Decoder
                    result = decoder.decode(data, width, height, options);
                }
            }

            if (result != null) {
                break;
            }
        }
        return result;
    }
decode是一个ResourceDecoder接口(资源解码器),根据不同的DataType和ResourceType它会有不同的实现类,这里的实现类是ByteBufferBitmapDecoder,下面看看它的decode 流程
22、ByteBufferBitmapDecoder # decode
  public Resource<Bitmap> decode(@NonNull ByteBuffer source, int width, int height,
      @NonNull Options options)
      throws IOException {
    InputStream is = ByteBufferUtil.toStream(source);
    return downsampler.decode(is, width, height, options);
  }
调用了downsampler.decode ,downsampler是在创建ByteBufferBitmapDecoder的时候赋值的,而ByteBufferBitmapDecoder 和 downsampler 的创建是在第2.5 步
downsampler主要是对流进行解码,旋转,压缩,圆角等处理
23、DownSampler#decode
记过一次调用到下面这个decode 函数
    public Resource<Bitmap> decode(InputStream is, int requestedWidth, int requestedHeight,
                                   Options options, DecodeCallbacks callbacks) throws IOException {


        byte[] bytesForOptions = byteArrayPool.get(ArrayPool.STANDARD_BUFFER_SIZE_BYTES, byte[].class);
        BitmapFactory.Options bitmapFactoryOptions = getDefaultOptions();
        bitmapFactoryOptions.inTempStorage = bytesForOptions;

        DecodeFormat decodeFormat = options.get(DECODE_FORMAT);
        DownsampleStrategy downsampleStrategy = options.get(DownsampleStrategy.OPTION);
        boolean fixBitmapToRequestedDimensions = options.get(FIX_BITMAP_SIZE_TO_REQUESTED_DIMENSIONS);
        boolean isHardwareConfigAllowed =
                options.get(ALLOW_HARDWARE_CONFIG) != null && options.get(ALLOW_HARDWARE_CONFIG);

        try {
            //解析得到bitmap
            Bitmap result = decodeFromWrappedStreams(is, bitmapFactoryOptions,
                    downsampleStrategy, decodeFormat, isHardwareConfigAllowed, requestedWidth,
                    requestedHeight, fixBitmapToRequestedDimensions, callbacks);
             //把bitmap 封装进Resource ,返回Resource 对象
            return BitmapResource.obtain(result, bitmapPool);
        } finally {
            releaseOptions(bitmapFactoryOptions);
            byteArrayPool.put(bytesForOptions);
        }
    }
至此已经得到了解析后的资源了,接下来就是要显示到指定的ImageView控件上
我们回到第19步: notifyEncodeAndRelease(resource, currentDataSource);
24 、 Decodejob # notifyEncodeAndRelease
private void notifyEncodeAndRelease(Resource<R> resource, DataSource dataSource) {

        if (resource instanceof Initializable) {
            ((Initializable) resource).initialize();
        }

        Resource<R> result = resource;
        LockedResource<R> lockedResource = null;
        if (deferredEncodeManager.hasResourceToEncode()) {
            lockedResource = LockedResource.obtain(resource);
            result = lockedResource;
        }
        // 通知主线程回调,加载图片
        notifyComplete(result, dataSource);
        // 更新状态为编码
        stage = Stage.ENCODE;
        try {
            //是否可以将转换的图片缓存
            if (deferredEncodeManager.hasResourceToEncode()) {
                //磁盘缓存入口
                deferredEncodeManager.encode(diskCacheProvider, options);
            }
        } finally {
            if (lockedResource != null) {
                lockedResource.unlock();
            }
        }
        // Call onEncodeComplete outside the finally block so that it's not called if the encode process
        // throws.
        onEncodeComplete();
    }
    private void notifyComplete(Resource<R> resource, DataSource dataSource) {
        setNotifiedOrThrow();
         // 这个callback 就是 EngineJob对象,  是在创建Decodejob的时候,传递进来,第本节 第9步
        callback.onResourceReady(resource, dataSource);
    }
下面就到EngineJob 中看看onResourceReady 函数
25、EngineJob # onResourceReady
    public void onResourceReady(Resource<R> resource, DataSource dataSource) {
        synchronized (this) {
            this.resource = resource;
            this.dataSource = dataSource;
        }
        notifyCallbacksOfResult();
    }
    void notifyCallbacksOfResult() {
       //这个类是重点
        ResourceCallbacksAndExecutors copy;
        Key localKey;
        EngineResource<?> localResource;
        synchronized (this) {
            stateVerifier.throwIfRecycled();
             ...
            engineResource = engineResourceFactory.build(resource, isCacheable);
            ...
            //cbs 在类初始化的时候,就被赋值,在本节第9步 为cbs 设置了它的回调接口。
            //engineJob.addCallback(cb, callbackExecutor); 这个cb 参数是SingleRequest 的对象实现了接口ResourceCallback

            copy = cbs.copy();
            incrementPendingCallbacks(copy.size() + 1);

            localKey = key;
            localResource = engineResource;
        }
        //这里就是把解析后的图片,也就是即将要显示出来的图片,缓存到弱引用缓存中
        listener.onEngineJobComplete(this, localKey, localResource);

        for (final ResourceCallbackAndExecutor entry : copy) {
            //遍历每一个回调接口,entry.cb 就是SingleRequest 对象,执行接口ResourceCallback
            entry.executor.execute(new CallResourceReady(entry.cb));
        }
        decrementPendingCallbacks();
    }
内部类CallResourceReady # run
        public void run() {
            synchronized (EngineJob.this) {
                if (cbs.contains(cb)) {
					...
					//执行回调
                    callCallbackOnResourceReady(cb);
                    ...
                }
               ...
            }
        }
    synchronized void callCallbackOnResourceReady(ResourceCallback cb) {
        try {
			//cb 就是SingleRequest 对象,所以下面去它里面看onResourceReady

            cb.onResourceReady(engineResource, dataSource);
        } catch (Throwable t) {
            throw new CallbackException(t);
        }
    }
注意,上面的注释,指明的xxxx对象,是针对本例而言的
26、EngineJob # onResourceReady
这个函数的调用,在第7步,就出现过,那时候有个分支是已经加载完成,执行onResourceReady
经过几次对用,把Resource 中的资源解析出来,传进参数result中,到下面这个函数
    private synchronized void onResourceReady(Resource<R> resource, R result, DataSource dataSource) {
        // We must call isFirstReadyResource before setting status.
        boolean isFirstResource = isFirstReadyResource();
        status = Status.COMPLETE;
        this.resource = resource;
        isCallingCallbacks = true;
        try {
            ... 省略若干代码...
            if (!anyListenerHandledUpdatingTarget) {
                Transition<? super R> animation =
                        animationFactory.build(dataSource, isFirstResource);
                //target 函数是在 第3步 buildTarget 时,创建的  ,在第4步的 buildRequest 把target 传递进Request 中
                target.onResourceReady(result, animation);
            }
        } finally {
            isCallingCallbacks = false;
        }

        notifyLoadSuccess();
    }
27、ImageViewTarget # onResourceReady
ImageViewTarget 是一个抽象类
    public void onResourceReady(@NonNull Z resource, @Nullable Transition<? super Z> transition) {
        if (transition == null || !transition.transition(resource, this)) {
            setResourceInternal(resource);
        } else {
            maybeUpdateAnimatable(resource);
        }
    }
    private void setResourceInternal(@Nullable Z resource) {
        //这是一个抽象函数,执行不同的实现,本例值得是BitmapImageViewTarget
        setResource(resource);
        maybeUpdateAnimatable(resource);
    }
28 、 BitmapImageViewTarget # setResource
  protected void setResource(Bitmap resource) {
    //把图片设置到ImageView中
    view.setImageBitmap(resource);
  }
至此,Glide 源码就大致分析完了,其中关于三级缓存的,逻辑不是很集中,是为了让整体流程顺畅,关于缓存的,也可参考这篇文章 源码解析:Glide 4.9之缓存策略
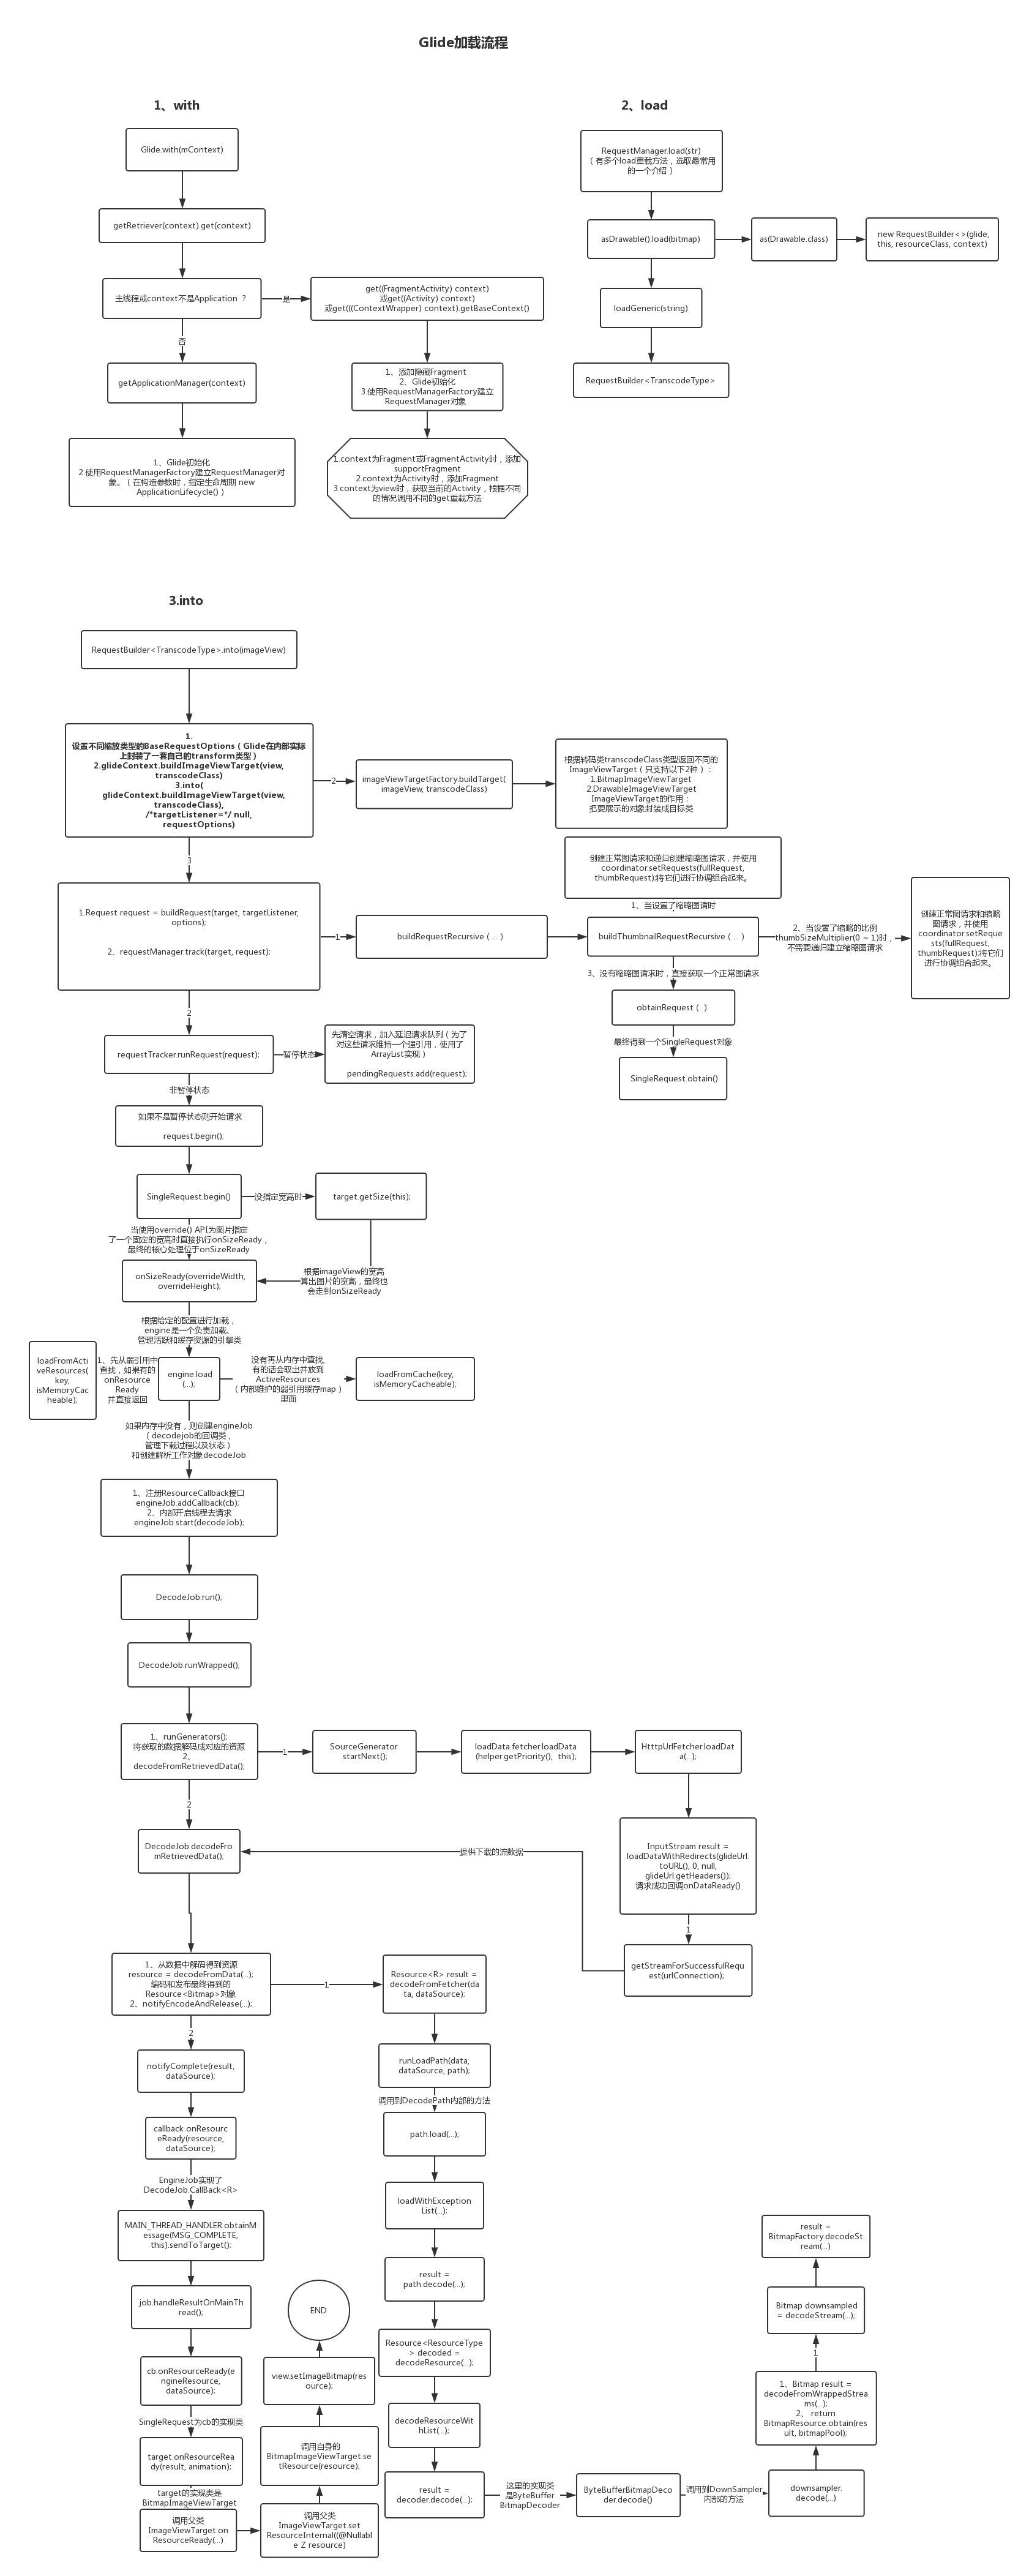
下面借鉴一张流程图,挺详细的,但是本文的部分流程,图中并没有。
参考:
https://github.com/0xZhangKe/Glide-note