本专栏将从基础开始,循序渐进,以实战为线索,逐步深入SpringSecurity相关知识相关知识,打造完整的SpringSecurity学习步骤,提升工程化编码能力和思维能力,写出高质量代码。希望大家都能够从中有所收获,也请大家多多支持。
专栏地址:SpringSecurity专栏
本文涉及的代码都已放在gitee上:gitee地址
如果文章知识点有错误的地方,请指正!大家一起学习,一起进步。
专栏汇总:专栏汇总
本章包括
- 实现OAuth 2资源服务器
- 实现令牌验证
- 定制令牌管理
在本章中,我们将讨论用Spring Security实现一个资源服务器。 资源服务器是管理用户资源的组件。资源服务器这个名字一开始可能并不引人注意,但就OAuth 2而言,它代表了你所保护的后端,就像我们在前几章所保护的其他应用一样。例如,还记得我们在第11章实现的业务逻辑服务器吗?为了允许客户端访问资源,资源服务器需要一个有效的访问令牌。客户端从授权服务器获得一个访问令牌,并通过在HTTP请求头中添加令牌来调用资源服务器上的资源。图14.1提供了第12章的复习内容,显示了资源服务器在OAuth 2认证架构中的位置。
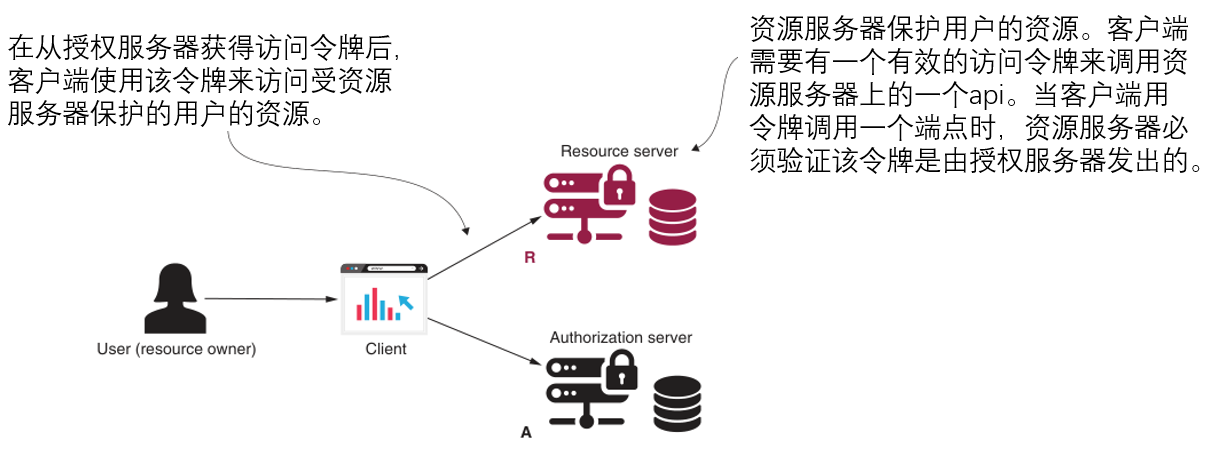
图14.1 资源服务器是OAuth 2架构中的一个组成部分。资源服务器负责管理用户数据。要调用资源服务器上的一个端点,客户端需要用有效的访问令牌证明用户批准它使用他们的数据。
在第12章和第13章中,我们讨论了实现一个客户端和一个授权服务器。在本章中,你将学习如何实现资源服务器。但在讨论资源服务器的实现时,更重要的是选择资源服务器验证令牌的方式。我们有多种选择来实现资源服务器层面的令牌验证。图14.2显示了这个流程的一种方式。
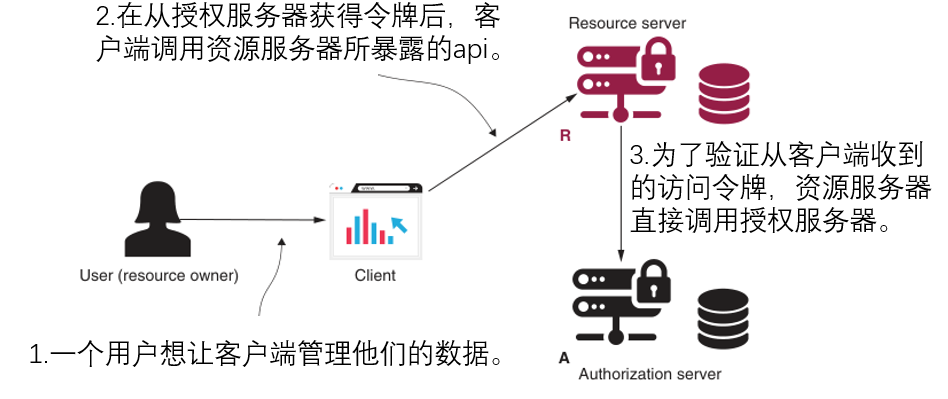
图14.2 为了验证令牌,资源服务器直接调用授权服务器。授权服务器知道它是否发出了一个特定的令牌。
第二种方法是使用一个共同的数据库,授权服务器在其中存储令牌,然后资源服务器可以访问和验证这些令牌(图14.3)。
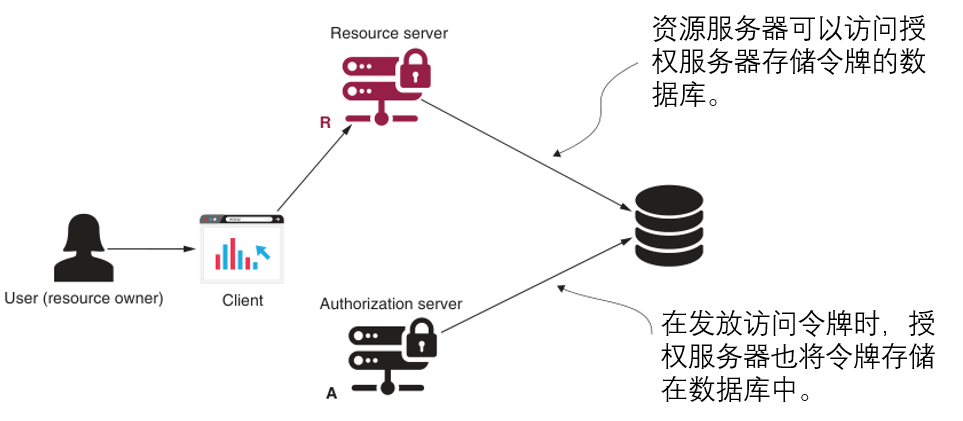
图14.3 授权服务器和资源服务器都访问一个共享数据库。授权服务器在发出令牌后将其存储在这个数据库中。然后,资源服务器可以访问它们来验证它收到的令牌。
最后,第三种方案使用加密签名(图14.4)。授权服务器在签发令牌时对其进行签名,而资源服务器则验证签名。这里我们一般使用JSON网络令牌(JWTs)。我们在第15章讨论这种方法。

图14.4 当发出一个访问令牌时,授权服务器使用私钥对其进行签名。为了验证一个令牌,资源服务器只需要检查签名是否有效。
14.1 实现一个资源服务器
我们从实现我们的第一个资源服务器应用开始,这是OAuth 2的最后一个知识点。我们之所以有一个发行令牌的授权服务器,是为了允许客户访问用户的资源。资源服务器管理和保护用户的资源。由于这个原因,你需要知道如何实现资源服务器。我们使用Spring Boot提供的默认实现,它允许资源服务器直接调用授权服务器,以了解令牌是否有效(图14.5)。
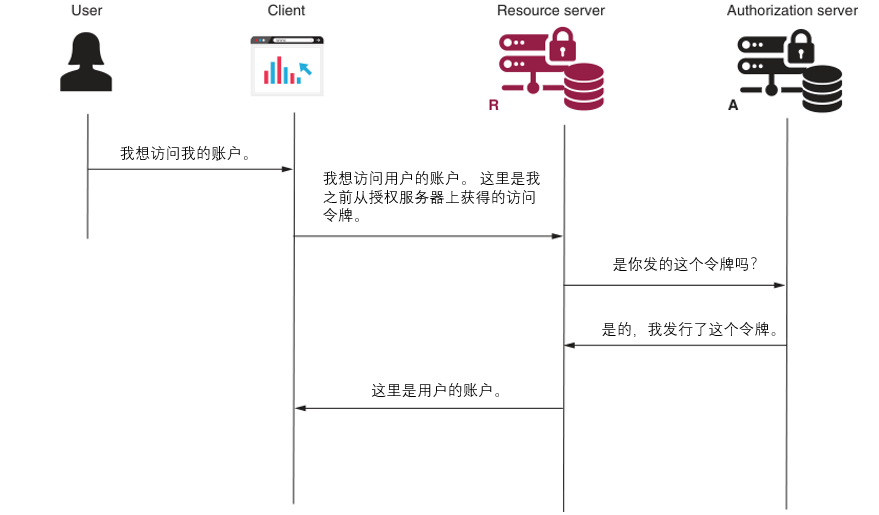
图14.5 当资源服务器需要验证一个令牌时,它直接调用授权服务器。如果授权服务器确认它发出了令牌,那么资源服务器就认为该令牌有效。
和授权服务器的情况一样,资源服务器的实现在Spring社区也遭遇了变化。这些变化影响了我们,因为现在在实践中,你会发现开发者实现资源服务器的方式各不相同。我提供了一些例子,在这些例子中,你可以用两种方式配置资源服务器,这样,当你在现实世界的场景中遇到这些情况时,你就能理解并能够使用这两种方式。
为了实现一个资源服务器,我们创建一个新的项目并添加依赖关系,如下面的代码片断。
<dependency>
            <groupId>org.springframework.boot</groupId>
            <artifactId>spring-boot-starter-web</artifactId>
        </dependency>

        <dependency>
            <groupId>org.springframework.boot</groupId>
            <artifactId>spring-boot-starter-oauth2-resource-server</artifactId>
        </dependency>

        <dependency>
            <groupId>org.springframework.cloud</groupId>
            <artifactId>spring-cloud-starter-oauth2</artifactId>
        </dependency>
- 完整pom如下
<?xml version="1.0" encoding="UTF-8"?>
<project xmlns="http://maven.apache.org/POM/4.0.0" xmlns:xsi="http://www.w3.org/2001/XMLSchema-instance"
         xsi:schemaLocation="http://maven.apache.org/POM/4.0.0 https://maven.apache.org/xsd/maven-4.0.0.xsd">
    <modelVersion>4.0.0</modelVersion>
    <parent>
        <groupId>org.springframework.boot</groupId>
        <artifactId>spring-boot-starter-parent</artifactId>
        <version>2.3.12.RELEASE</version>
<!--        <version>2.6.11</version>-->
        <relativePath/> <!-- lookup parent from repository -->
    </parent>
    <groupId>com.hashnode</groupId>
    <artifactId>ch14-001-resource-server</artifactId>
    <name>ch14-001-resource-server</name>

    <properties>
        <java.version>1.8</java.version>
    </properties>

    <dependencies>
        <dependency>
            <groupId>org.springframework.boot</groupId>
            <artifactId>spring-boot-starter-web</artifactId>
        </dependency>

        <dependency>
            <groupId>org.springframework.boot</groupId>
            <artifactId>spring-boot-starter-oauth2-resource-server</artifactId>
        </dependency>

        <dependency>
            <groupId>org.springframework.cloud</groupId>
            <artifactId>spring-cloud-starter-oauth2</artifactId>
            <exclusions>
                <exclusion>
                    <artifactId>bcpkix-jdk15on</artifactId>
                    <groupId>org.bouncycastle</groupId>
                </exclusion>
            </exclusions>
        </dependency>


        <!-- https://mvnrepository.com/artifact/com.google.guava/guava -->
        <dependency>
            <groupId>com.google.guava</groupId>
            <artifactId>guava</artifactId>
            <version>31.1-jre</version>
        </dependency>

        <!-- https://mvnrepository.com/artifact/org.projectlombok/lombok -->
        <dependency>
            <groupId>org.projectlombok</groupId>
            <artifactId>lombok</artifactId>
            <version>1.18.12</version>
            <scope>provided</scope>
        </dependency>

        <!-- https://mvnrepository.com/artifact/cn.hutool/hutool-all -->
        <dependency>
            <groupId>cn.hutool</groupId>
            <artifactId>hutool-all</artifactId>
            <version>5.7.22</version>
        </dependency>

    </dependencies>

    <dependencyManagement>
        <dependencies>
            <dependency>
                <groupId>org.springframework.cloud</groupId>
                <artifactId>spring-cloud-dependencies</artifactId>
                <version>Hoxton.SR12</version>
                <type>pom</type>
                <scope>import</scope>
            </dependency>
        </dependencies>
    </dependencyManagement>

    <build>
        <plugins>
            <plugin>
                <groupId>org.apache.maven.plugins</groupId>
                <artifactId>maven-compiler-plugin</artifactId>
                <version>3.8.1</version>
                <configuration>
                    <source>1.8</source>
                    <target>1.8</target>
                    <encoding>UTF-8</encoding>
                </configuration>
            </plugin>
            <plugin>
                <groupId>org.springframework.boot</groupId>
                <artifactId>spring-boot-maven-plugin</artifactId>
            </plugin>
        </plugins>
    </build>

</project>
除了依赖关系,你还需要为spring-cloud-dependencies工件添加dependencyManagement标签。下一个代码片断显示了如何做到这一点。
<dependencyManagement>
    <dependencies>
        <dependency>
            <groupId>org.springframework.cloud</groupId>
            <artifactId>spring-cloud-dependencies</artifactId>
            <version>Hoxton.SR12</version>
            <type>pom</type>
            <scope>import</scope>
        </dependency>
    </dependencies>
</dependencyManagement>
资源服务器的目的是管理和保护一个用户的资源。所以为了证明它是如何工作的,我们需要一个我们想要访问的资源。我们通过定义通常的controller,为我们的测试创建一个/hello api,如下表所示。
清单14.1 定义测试api的controller
package com.hashnode.proj0001firstspringsecurity.controller;

import org.springframework.web.bind.annotation.GetMapping;
import org.springframework.web.bind.annotation.RestController;

@RestController
public class HelloController {


    @GetMapping("/hello")
    public String hello() {


        return "Hello!";
    }
}
我们还需要一个配置类,在其中使用@EnableResourceServer注解,让Spring Boot配置我们的应用程序成为资源服务器所需的东西。下面列出了配置类。
package com.laurentiuspilca.ssia.config;

import org.springframework.context.annotation.Configuration;
import org.springframework.security.oauth2.config.annotation.web.configuration.EnableResourceServer;

@Configuration
@EnableResourceServer
public class ResourceServerConfig {


}
我们现在有一个资源服务器。但如果你不能访问api,它就没有用了,就像我们的情况一样,因为我们没有配置资源服务器可以检查令牌的任何方式。你知道,对资源的请求也需要提供一个有效的访问令牌。即使它确实提供了一个有效的访问令牌,请求仍然无法工作。我们的资源服务器无法验证这些是有效的令牌,验证授权服务器确实发出了这些令牌。这是因为我们没有实现资源服务器在验证访问令牌方面的任何选项。让我们采取这种方法,在接下来的两节中讨论我们的选项;第15章介绍了另外一种实现方式。
14.2 远程检查令牌
在本节中,我们通过允许资源服务器直接调用授权服务器来实现令牌验证。这种方法是你可以实现的最简单的方法,可以让你用有效的访问令牌来访问资源服务器。如果你的系统中的令牌是普通的(例如,简单的UUID,如Spring Security的授权服务器的默认实现),你就会选择这种方法。我们首先讨论这种方法,然后通过一个例子来实现它。这种验证令牌的机制很简单(图14.6):
- 授权服务器暴露了一个api。对于一个有效的令牌,它将返回该令牌之前所发给的用户的授权。我们把这个api叫做check_token。
- 资源服务器为每个请求调用check_token api。这样,它验证了从客户端收到的令牌,也获得了客户端授予的权限。
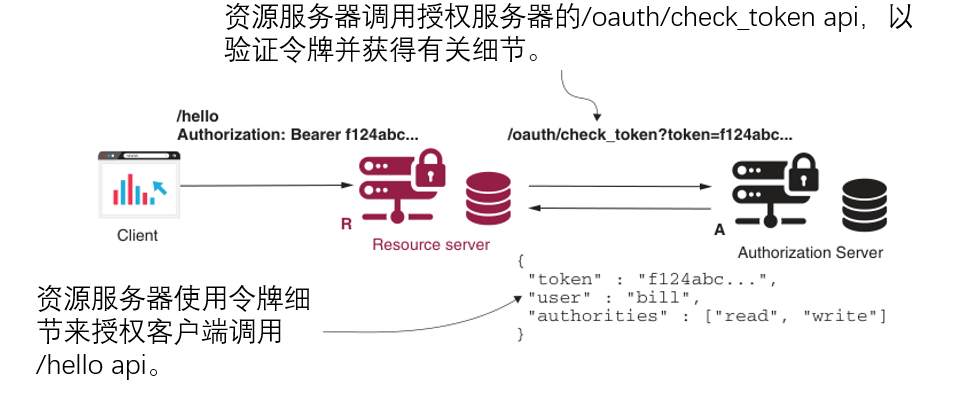
图14.6 为了验证一个令牌并获得其详细信息,资源服务器调用授权服务器的api /oauth/check_token。资源服务器使用检索到的关于令牌的详细信息来授权该调用。
这种方法的优势在于其简单性。你可以把它应用于任何种类的令牌实现。这种方法的缺点是,对于资源服务器上的每一个拥有新的、未知的令牌的请求,资源服务器会调用授权服务器来验证令牌。这些调用会给授权服务器带来不必要的负担。另外,请记住经验法则:**网络并不是100%可靠的。每当你在架构中设计一个新的远程调用时,你都需要牢记这一点。**你可能还需要应用一些替代性的解决方案,如果因为某些网络不稳定而导致调用失败,该怎么办(图14.7)。
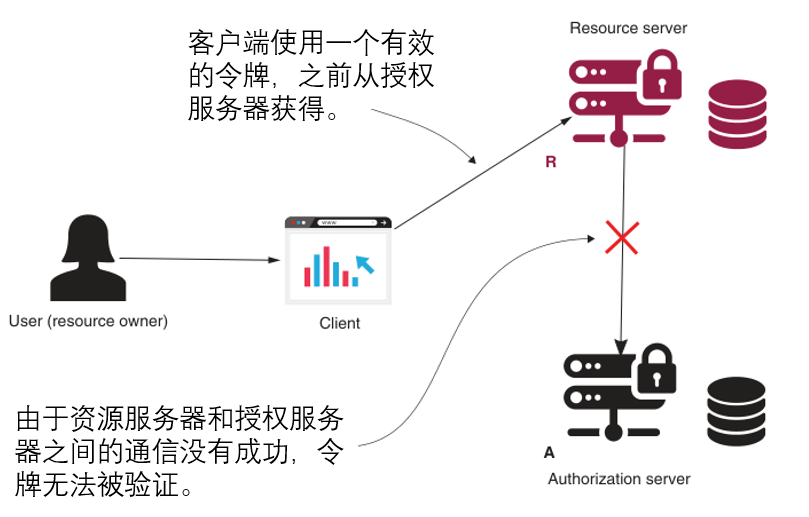
图14.7 网络并非100%可靠。如果资源服务器和授权服务器之间的连接出现故障,令牌就无法被验证。这意味着资源服务器会拒绝客户端访问用户的资源,即使它有一个有效的令牌。
让我们继续在项目实现我们的资源服务器。我们想要的是,如果客户端提供了一个由授权服务器发出的访问令牌,就允许它访问/hello端点。我们已经在第13章中开发了授权服务器。
默认情况下,授权服务器实现了/oauth/check_token这个api,资源服务器可以用它来验证一个令牌。然而,目前授权服务器隐含地拒绝了所有对该api的请求。在使用/oauth/check_token api之前,你需要确保资源服务器可以调用它。
为了让经过验证的请求能够调用/oauth/check_token api,我们在授权服务器的AuthServerConfig类中重写configure(AuthorizationServerSecurityConfigurer c)方法。重写configure()方法允许我们设置可以调用/oauth/check_token api的条件。下面的列表向你展示了如何做到这一点。
清单14.3 启用对check_token api的认证访问
package com.hashnode.proj0001firstspringsecurity.config;

import org.springframework.beans.factory.annotation.Autowired;
import org.springframework.context.annotation.Configuration;
import org.springframework.security.authentication.AuthenticationManager;
import org.springframework.security.config.annotation.web.builders.HttpSecurity;
import org.springframework.security.oauth2.config.annotation.configurers.ClientDetailsServiceConfigurer;
import org.springframework.security.oauth2.config.annotation.web.configuration.AuthorizationServerConfigurerAdapter;
import org.springframework.security.oauth2.config.annotation.web.configuration.EnableAuthorizationServer;
import org.springframework.security.oauth2.config.annotation.web.configurers.AuthorizationServerEndpointsConfigurer;
import org.springframework.security.oauth2.config.annotation.web.configurers.AuthorizationServerSecurityConfigurer;

@Configuration
@EnableAuthorizationServer
public class AuthServerConfig
        extends AuthorizationServerConfigurerAdapter {


    @Autowired
    private AuthenticationManager authenticationManager;

    @Override
    public void configure(
            ClientDetailsServiceConfigurer clients) throws Exception {


        clients.inMemory()
                .withClient("client")
                .secret("secret")
                //在客户端的授权授予类型列表中添加 refresh_token。
                .authorizedGrantTypes(
                        "password",
                        "refresh_token")
                .scopes("read");
    }


    @Override
    public void configure(AuthorizationServerEndpointsConfigurer endpoints) {


        endpoints.authenticationManager(authenticationManager);
    }

    @Override
    public void configure(AuthorizationServerSecurityConfigurer security) {


        //指定我们可以调用check_token api的条件。
        security.checkTokenAccess("isAuthenticated()");
    }

}
你甚至可以通过使用permitAll()而不是isAuthenticated()使这个api在没有认证的情况下被访问。但我们不建议让api不受保护。在现实世界中,你最好对这个api使用认证。
除了使这个端点可以访问外,如果我们决定只允许经过认证的访问,那么我们需要为资源服务器本身进行客户注册。对于认证服务器来说,资源服务器也是一个客户端,需要它自己的凭证。我们像其他客户一样添加这些证书。对于资源服务器,你不需要任何授予类型或范围,而只需要一组资源服务器用来调用 check_token 端点的凭证。下一个列表介绍了在我们的例子中为资源服务器添加凭证的配置变化。
package com.hashnode.proj0001firstspringsecurity.config;

import org.springframework.beans.factory.annotation.Autowired;
import org.springframework.context.annotation.Configuration;
import org.springframework.security.authentication.AuthenticationManager;
import org.springframework.security.config.annotation.web.builders.HttpSecurity;
import org.springframework.security.oauth2.config.annotation.configurers.ClientDetailsServiceConfigurer;
import org.springframework.security.oauth2.config.annotation.web.configuration.AuthorizationServerConfigurerAdapter;
import org.springframework.security.oauth2.config.annotation.web.configuration.EnableAuthorizationServer;
import org.springframework.security.oauth2.config.annotation.web.configurers.AuthorizationServerEndpointsConfigurer;
import org.springframework.security.oauth2.config.annotation.web.configurers.AuthorizationServerSecurityConfigurer;

@Configuration
@EnableAuthorizationServer
public class AuthServerConfig
        extends AuthorizationServerConfigurerAdapter {


    // Omitted code

    @Override
    public void configure(
            ClientDetailsServiceConfigurer clients)
            throws Exception {


        clients.inMemory()
                .withClient("client")
                .secret("secret")
                .authorizedGrantTypes("password", "refresh_token")
                .scopes("read")
                //在调用/oauth/check_token api时,为资源服务器添加一组凭证。
                .and()
                .withClient("resourceserver")
                .secret("resourceserversecret");
    }


    @Override
    public void configure(AuthorizationServerEndpointsConfigurer endpoints) {


        endpoints.authenticationManager(authenticationManager);
    }

    @Override
    public void configure(AuthorizationServerSecurityConfigurer security) {


        //指定我们可以调用check_token api的条件。
        security.checkTokenAccess("isAuthenticated()");
    }

}
现在你可以启动授权服务器,像你在第13章学到的那样获得一个令牌。下面是cURL的调用。
curl -v -XPOST -u client:secret http://localhost:8080/oauth/token?grant_type=password^&username=john^&password=12345^&scope=read
响应为
{

    "access_token":"0b4cf44f-3ee3-432a-9539-cace596170a3","token_type":"bearer","refresh_token":"6c7a3630-da28-4678-948f-161b8b87e2ea","expires_in":43199,"scope":"read"}
接下来,我们调用check_token api来查找我们在前面的代码片段中获得的访问令牌的详细信息。下面是这个调用。
curl -XPOST -u resourceserver:resourceserversecret http://localhost:8080/oauth/check_token?token=0b4cf44f-3ee3-432a-9539-cace596170a3
响应为
{

    "active":true,"exp":1675106753,"user_name":"john","authorities":["read"],"client_id":"client","scope":["read"]}
观察我们从check_token api得到的响应。它告诉我们关于访问令牌的所有细节:
- 令牌是否仍然有效以及何时过期
- 该令牌为其颁发的用户
- 拥有哪些权限
- 该令牌为哪个客户签发的
现在,如果我们使用cURL调用api,资源服务器应该能够使用它来验证令牌。我们需要配置授权服务器的端点和资源服务器用来访问端点的凭证。我们可以在application.properties文件中完成这一切。下一个代码片断介绍了细节。
security.oauth2.resource.token-info-uri=http://localhost:8080/oauth/check_token
security.oauth2.client.client-id=resourceserver
security.oauth2.client.client-secret=resourceserversecret
顺便说一下,如果你打算像我一样在同一个系统上运行两个应用程序,不要忘记使用server.port属性设置不同的端口。我使用端口8080(默认端口)来运行授权服务器,端口9090用于资源服务器。
你可以运行这两个应用程序,并通过调用/hello api来测试整个设置。你需要在请求的授权头中设置访问令牌,而且你需要在其值前加上bearer这个词。对于这个词,情况是不确定的。这意味着你也可以写 "Bearer "或 “BEARER”。
curl -H "Authorization: bearer 0b4cf44f-3ee3-432a-9539-cace596170a3" http://localhost:9090/hello
响应为
Hello!
如果你在没有令牌或用错令牌的情况下调用端点,结果会是HTTP响应中出现401未授权状态。下一个代码片段展示了该响应。
curl -v "http:/./localhost:9090/hello"
响应为
...
< HTTP/1.1 401
...
{


	"error":"unauthorized",
	"error_description":"Full authentication is
	required to access this resource"
}
在没有Spring Security OAuth的情况下使用令牌
现在人们普遍关心的问题是,如何在没有Spring Security OAuth的情况下实现前面例子中的资源服务器。虽然有人说Spring Security OAuth已经被废弃了,但在我看来,你还是应该了解它,因为你很有可能在现有的项目中找到这些类。为了澄清这一点,我在相关的地方添加了一个对比,即在没有Spring Security OAuth的情况下实现同样的事情的方法。在这里,我们讨论了在不使用Spring Security OAuth而直接使用Spring Security配置的情况下,使用令牌实现资源服务器。
如果你还记得,我们在前几章讨论了httpBasic()、formLogin()和其他认证方法。你了解到,当调用这样的方法时,你只需在过滤器链上添加一个新的过滤器,从而在你的应用程序中启用不同的认证机制。你猜怎么着?在其最新的版本中,Spring Security也提供了一个oauth2ResourceServer()方法,可以启用资源服务器认证方法。你可以像到目前为止使用的其他方法一样使用它来设置认证方法,而且你不再需要在你的依赖项中加入Spring Security OAuth项目。但是,请注意,这个功能还不成熟,要使用它,你需要添加Spring Boot没有自动配置的其他依赖项。下面的代码片段介绍了使用令牌自省实现资源服务器所需的依赖性。
<dependency>
 <groupId>org.springframework.security</groupId>
 <artifactId>spring-security-oauth2-resource-server</artifactId>
 <version>5.2.1.RELEASE</version>
</dependency>
<dependency>
 <groupId>com.nimbusds</groupId>
 <artifactId>oauth2-oidc-sdk</artifactId>
 <version>8.4</version>
 <scope>runtime</scope>
</dependency>
一旦你在pom.xml文件中添加了所需的依赖项,你就可以配置认证方法,如下面的代码片断所示。
@Configuration
public class ResourceServerConfig
     extends WebSecurityConfigurerAdapter {


 @Override
 protected void configure(HttpSecurity http) throws Exception {


     http.authorizeRequests()
             .anyRequest().authenticated()
             .and()
             .oauth2ResourceServer(
                     c -> c.opaqueToken(
                             o -> {


                                 o.introspectionUri("…");
                                 o.introspectionClientCredentials("client", "secret");
                             })
             );
 }
}
为了使代码片段更容易被阅读,我省略了 introspectionUri() 方法的参数值,即 check_token URI。作为oauth2ResourceServer()方法的一个参数,我添加了一个Customizer实例。使用Customizer实例,你可以根据你选择的方法来指定资源服务器所需的参数。对于直接令牌,你需要指定资源服务器调用的URI来验证令牌,以及资源服务器在调用这个URI时需要验证的凭证。
14.3 用JdbcTokenStore实现数据库查询
在本节中,我们将实现一个授权服务器和资源服务器使用共享数据库的应用。我们称这种架构风格为blackboarding。 为什么是blackboarding?你可以把它看成是授权服务器和资源服务器使用blackboarding来管理令牌。这种发行和验证令牌的方法的优点是消除了资源服务器和授权服务器之间的直接通信。然而,它意味着增加了一个共享数据库,这可能成为一个瓶颈。像任何架构风格一样,你可以发现它适用于各种情况。例如,如果你已经让你的服务共享一个数据库,那么对你的访问令牌也使用这种方法可能是有意义的。出于这个原因,我认为你必须知道如何实现这种方法。
这种架构意味着,当授权服务器发出一个令牌时,它也将令牌存储在与资源服务器共享的数据库中(图14.8)。
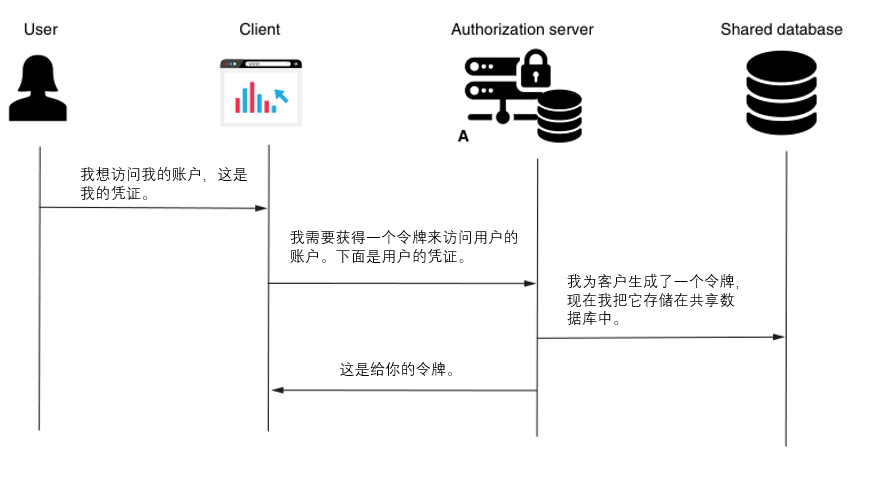
图14.8 当授权服务器发出一个令牌时,它也将令牌存储在一个共享数据库中。 这样,资源服务器就可以得到令牌,并在以后进行验证。
这也意味着资源服务器在需要验证令牌时访问数据库(图14.9)。
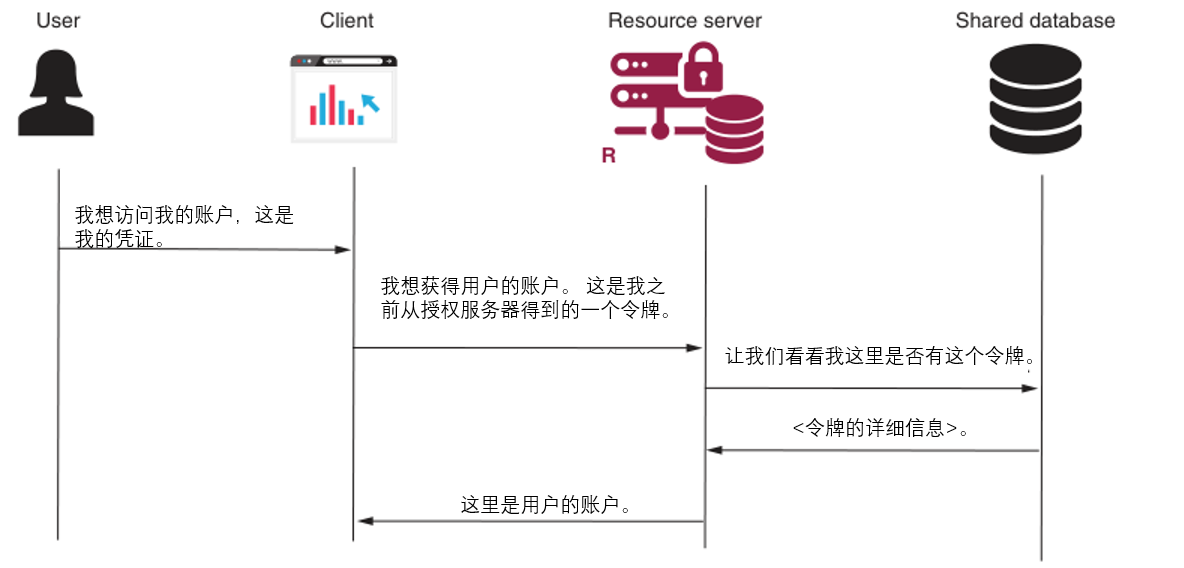
图14.9 资源服务器在共享数据库中搜索该令牌。如果令牌存在,资源服务器会在数据库中找到与之相关的细节,包括用户名及其授权。有了这些细节,资源服务器就可以对请求进行授权。
TokenStore是代表Spring Security中管理令牌的对象,无论是在授权服务器还是在资源服务器上。在授权服务器中,你可以直观地看到它在认证架构中的位置,我们之前使用了SecurityContext。一旦认证完成,授权服务器会使用TokenStore来生成一个令牌(图14.10)。
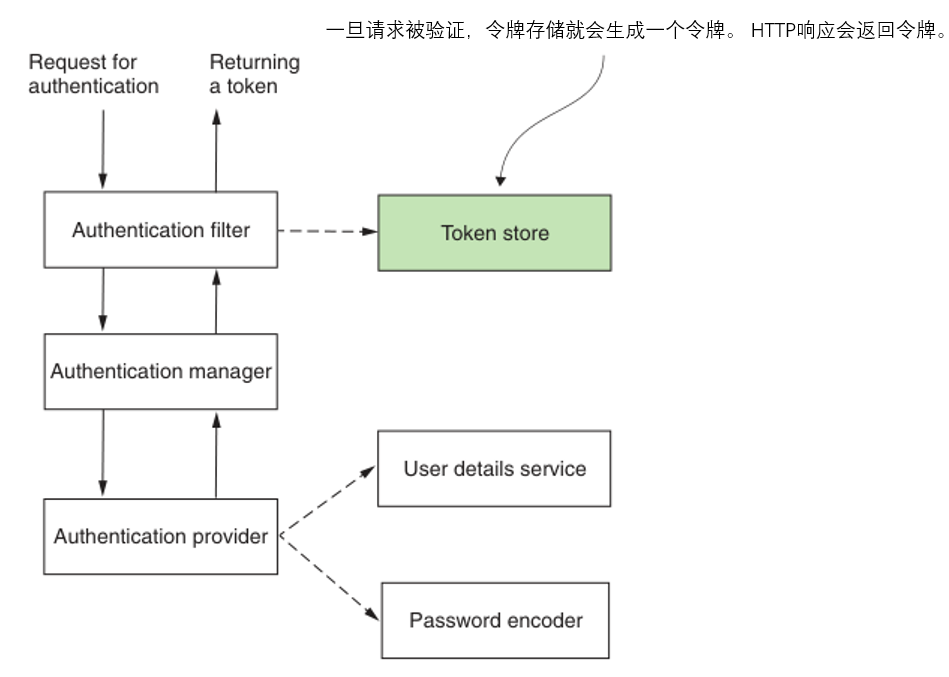
图14.10 授权服务器在认证过程结束时使用一个令牌库来生成令牌。客户端使用这些令牌来访问资源服务器管理的资源。
对于资源服务器来说,认证过滤器使用TokenStore来验证令牌并找到用户的详细信息,随后用于授权。然后,资源服务器将用户的详细信息存储在安全上下文中(图14.11)。
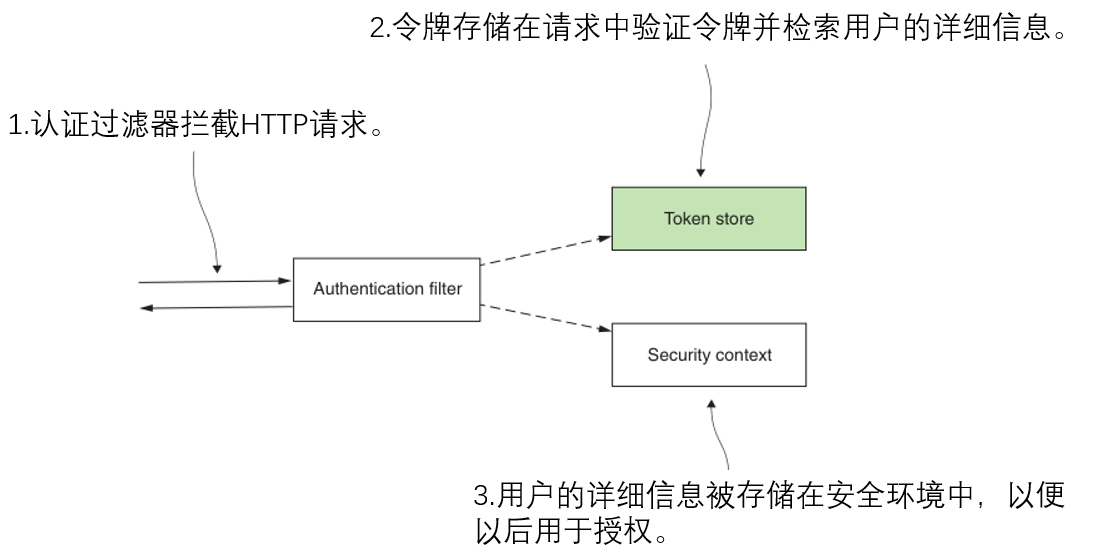
图14.11 资源服务器使用令牌存储来验证令牌并检索授权所需的细节。然后,这些细节被存储在安全上下文中。
授权服务器和资源服务器实现了两个不同的职责,但这些职责不一定要由两个独立的应用程序来完成。在大多数现实世界的实现中,你会在不同的应用程序中开发它们,这就是为什么我们在本书的例子中也这样做。但是,你可以选择在同一个应用程序中实现这两个功能。在这种情况下,你不需要建立任何调用或有一个共享数据库。然而,如果你在同一个应用程序中实现了这两个职责,那么授权服务器和资源服务器都可以访问同一个Bean。因此,这些可以使用相同的token存储,而不需要进行网络调用或访问数据库。
Spring Security为TokenStore接口提供了各种实现,在大多数情况下,你不需要编写自己的实现。例如,对于之前所有的授权服务器实现,我们并没有指定TokenStore的实现。Spring Security提供了一个InMemoryTokenStore类型的默认令牌存储。你可以想象,在所有这些情况下,令牌都存储在应用程序的内存中。它们并没有持久化!如果你重启授权服务器,重启前发出的令牌就不再有效了。
为了用blackboarding实现令牌管理,Spring Security提供了JdbcTokenStore实现。顾名思义,这个令牌存储通过JDBC直接与数据库一起工作。它的工作原理与我们在第三章讨论的JdbcUserDetailsManager类似,但JdbcTokenStore不是管理用户,而是管理令牌。
在这个例子中,我们使用JdbcTokenStore来实现blackboarding。但是你可以选择使用TokenStore来保存令牌,并继续使用/oauth/check_token api。如果你不想使用共享数据库,但你需要持久化令牌,这样如果授权服务器重新启动,你仍然可以使用之前发出的令牌,你就会选择这样做。
JdbcTokenStore希望你在数据库中拥有两个表。它用一个表来存储访问令牌(这个表的名字是oauth_access _token),用一个表来存储刷新令牌(这个表的名字是oauth_refresh_token)。 用来存储令牌的表会持久化刷新令牌。
正如我们在第三章讨论的JdbcUserDetailsManager组件的情况一样,你可以定制JdbcTokenStore,为表或列使用其他名称。JdbcTokenStore方法必须覆盖它用来检索或存储令牌细节的任何SQL查询。为了简短起见,在我们的例子中,我们使用默认的名称。
我们需要改变我们的pom.xml文件,以声明必要的依赖关系来连接到我们的数据库。下面的代码片段介绍了我在pom.xml文件中使用的依赖关系。
- authorization-server
<dependency>
    <groupId>org.springframework.boot</groupId>
    <artifactId>spring-boot-starter-web</artifactId>
</dependency>

<dependency>
    <groupId>org.springframework.boot</groupId>
    <artifactId>spring-boot-starter-security</artifactId>
</dependency>

<dependency>
    <groupId>org.springframework.cloud</groupId>
    <artifactId>spring-cloud-starter-oauth2</artifactId>
</dependency>


<dependency>
    <groupId>org.springframework.boot</groupId>
    <artifactId>spring-boot-starter-data-jpa</artifactId>
</dependency>

<dependency>
    <groupId>mysql</groupId>
    <artifactId>mysql-connector-java</artifactId>
    <scope>runtime</scope>
</dependency>
sql如下:
CREATE TABLE IF NOT EXISTS `oauth_access_token` (
`token_id` varchar(255) NOT NULL,
`token` blob,
`authentication_id` varchar(255) DEFAULT NULL,
`user_name` varchar(255) DEFAULT NULL,
`client_id` varchar(255) DEFAULT NULL,
`authentication` blob,
`refresh_token` varchar(255) DEFAULT NULL,
PRIMARY KEY (`token_id`));


CREATE TABLE IF NOT EXISTS `oauth_refresh_token` (
`token_id` varchar(255) NOT NULL,
`token` blob,
`authentication` blob,
PRIMARY KEY (`token_id`));
在application.properties文件中,你需要添加数据源的定义。 下一个代码片断提供了定义。
spring.datasource.url=jdbc:mysql://localhost/spring?useLegacyDatetimeCode=false&serverTimezone=UTC
spring.datasource.username=root
spring.datasource.password=
下面的列表按照我们在第一个例子中使用的方式介绍了AuthServerConfig类,我们改变这个类来注入数据源,然后定义和配置令牌存储。下一个代码清单显示了这种变化。
package com.hashnode.proj0001firstspringsecurity.config;

import org.springframework.beans.factory.annotation.Autowired;
import org.springframework.context.annotation.Bean;
import org.springframework.context.annotation.Configuration;
import org.springframework.security.authentication.AuthenticationManager;
import org.springframework.security.oauth2.config.annotation.configurers.ClientDetailsServiceConfigurer;
import org.springframework.security.oauth2.config.annotation.web.configuration.AuthorizationServerConfigurerAdapter;
import org.springframework.security.oauth2.config.annotation.web.configuration.EnableAuthorizationServer;
import org.springframework.security.oauth2.config.annotation.web.configurers.AuthorizationServerEndpointsConfigurer;
import org.springframework.security.oauth2.provider.token.TokenStore;
import org.springframework.security.oauth2.provider.token.store.JdbcTokenStore;

import javax.sql.DataSource;


@Configuration
@EnableAuthorizationServer
public class AuthServerConfig
        extends AuthorizationServerConfigurerAdapter {


    @Autowired
    private AuthenticationManager authenticationManager;

    //注入我们在application.properties文件中配置的数据源。
    @Autowired
    private DataSource dataSource;

    @Override
    public void configure(ClientDetailsServiceConfigurer clients) throws Exception {


        clients.inMemory()
                .withClient("client")
                .secret("secret")
                .authorizedGrantTypes("password", "refresh_token")
                .scopes("read");
    }

    @Override
    public void configure(AuthorizationServerEndpointsConfigurer endpoints) {


        endpoints
                .authenticationManager(authenticationManager)
            //配置令牌存储
                .tokenStore(tokenStore());
    }

    //创建一个JdbcTokenStore的实例,通过application.properties文件中配置的数据源提供对数据库的访问。
    @Bean
    public TokenStore tokenStore() {


        return new JdbcTokenStore(dataSource);
    }
}
WebSecurityConfig如下
package com.hashnode.proj0001firstspringsecurity.config;

import org.springframework.context.annotation.Bean;
import org.springframework.context.annotation.Configuration;
import org.springframework.security.authentication.AuthenticationManager;
import org.springframework.security.config.annotation.web.configuration.WebSecurityConfigurerAdapter;
import org.springframework.security.core.userdetails.User;
import org.springframework.security.core.userdetails.UserDetails;
import org.springframework.security.core.userdetails.UserDetailsService;
import org.springframework.security.crypto.password.NoOpPasswordEncoder;
import org.springframework.security.crypto.password.PasswordEncoder;
import org.springframework.security.provisioning.InMemoryUserDetailsManager;

@Configuration
public class WebSecurityConfig extends WebSecurityConfigurerAdapter {


    @Bean
    public UserDetailsService uds() {


        InMemoryUserDetailsManager uds = new InMemoryUserDetailsManager();

        UserDetails u = User.withUsername("john")
                .password("12345")
                .authorities("read")
                .build();

        uds.createUser(u);

        return uds;
    }

    @Bean
    public PasswordEncoder passwordEncoder() {


        return NoOpPasswordEncoder.getInstance();
    }

    @Override
    @Bean
    public AuthenticationManager authenticationManagerBean() throws Exception {


        return super.authenticationManagerBean();
    }

}
现在我们可以启动我们的授权服务器并发行令牌。我们发布令牌的方式与第13章和本章前面的内容相同。从这个角度来看,没有什么变化。但是现在,我们可以看到我们的令牌也存储在数据库中。下一个代码段显示了你用来发布令牌的cURL命令。
curl -v -XPOST -u client:secret "http://localhost:8080/oauth/token?grant_type=password&username=john&password=12345&scope=read"
响应是:
{

    "access_token":"4d19e472-72db-4f4e-a1c6-6bbf4da39340","token_type":"bearer","refresh_token":"abc3ca54-12ee-4907-b8cb-61dec06b9ded","expires_in":42197,"scope":"read"}
响应中返回的访问令牌也可以在oauth_access_token表中找到一条记录。因为我配置了刷新令牌授予类型,所以我收到了一个刷新令牌。出于这个原因,我也在oauth_refresh_token表中找到了刷新令牌的记录。因为数据库会持久化令牌,所以即使授权服务器宕机或重启后,资源服务器也可以验证所发出的令牌。
现在是时候配置资源服务器了,以便它也使用相同的数据基础。至于授权服务器,我们需要在pom.xml文件中添加必要的依赖项。因为资源服务器需要连接到数据库,我们还需要添加spring-boot-starter-jdbc依赖项和JDBC驱动。下面的代码片段显示了pom.xml文件中的依赖关系。
<dependency>
    <groupId>org.springframework.boot</groupId>
    <artifactId>spring-boot-starter-web</artifactId>
</dependency>

<dependency>
    <groupId>org.springframework.boot</groupId>
    <artifactId>spring-boot-starter-oauth2-resource-server</artifactId>
</dependency>

<dependency>
    <groupId>org.springframework.cloud</groupId>
    <artifactId>spring-cloud-starter-oauth2</artifactId>
</dependency>

<dependency>
    <groupId>org.springframework.boot</groupId>
    <artifactId>spring-boot-starter-data-jpa</artifactId>
</dependency>

<dependency>
    <groupId>mysql</groupId>
    <artifactId>mysql-connector-java</artifactId>
    <scope>runtime</scope>
</dependency>
在application.properties文件中,我配置了数据源,使资源服务器可以连接到与授权服务器相同的数据库。下面的代码片段显示了资源服务器的application.properties文件的内容
server.port=9090
spring.datasource.url=jdbc:mysql://localhost/spring
spring.datasource.username=root
spring.datasource.password=
# 注意,不要配置 security.oauth2.resource.token-info-uri=http://localhost:8080/oauth/check_token
# security.oauth2.client.client-id=resourceserver
# security.oauth2.client.client-secret=resourceserversecret   否则会冲突
在资源服务器的配置类中,我们注入数据源并配置JdbcTokenStore。下面的列表显示了对资源服务器的配置类的修改。
package com.hashnode.proj0001firstspringsecurity.config;

import org.springframework.beans.factory.annotation.Autowired;
import org.springframework.context.annotation.Bean;
import org.springframework.context.annotation.Configuration;
import org.springframework.security.oauth2.config.annotation.web.configuration.EnableResourceServer;
import org.springframework.security.oauth2.config.annotation.web.configuration.ResourceServerConfigurerAdapter;
import org.springframework.security.oauth2.config.annotation.web.configurers.ResourceServerSecurityConfigurer;
import org.springframework.security.oauth2.provider.token.TokenStore;
import org.springframework.security.oauth2.provider.token.store.JdbcTokenStore;

import javax.sql.DataSource;

@Configuration
@EnableResourceServer
public class ResourceServerConfig extends ResourceServerConfigurerAdapter {


    //注入我们在application.properties文件中配置的数据源。
    @Autowired
    private DataSource dataSource;

    @Override
    public void configure(ResourceServerSecurityConfigurer resources) {


        //配置令牌存储
        resources.tokenStore(tokenStore());
    }

    @Bean
    public TokenStore tokenStore() {


        //基于注入的数据源创建一个JdbcTokenStore。
        return new JdbcTokenStore(dataSource);
    }
}
现在你也可以启动你的资源服务器,用你之前发出的访问令牌调用/hello端点。接下来的代码片段向你展示了如何使用cURL调用api。
curl -H "Authorization:Bearer 4d19e472-72db-4f4e-a1c6-6bbf4da39340" "http://localhost:9090/hello"
响应为
Hello
在这一节中,我们实现了资源服务器和授权服务器之间通信的blackboarding方法。我们使用了一个名为JdbcTokenStore的TokenStore的实现。现在我们可以将令牌持久化在数据库中,而且我们可以避免在资源服务器和授权服务器之间直接调用以验证令牌。但是,让授权服务器和资源服务器都依赖同一个数据库是一个缺点。为了避免使用共享数据库,我们是否有其他的实施方案?是的;在第15章,我们将讨论本章介绍的方法的替代方案–使用JWT的签名令牌。
注意 在没有Spring Security OAuth的情况下编写资源服务器的配置,就不可能使用blackboarding方法。
14.4 各种方法的简短比较
在本章中,你学会了实现两种方法,允许资源服务器验证它从客户端收到的令牌:
- 直接调用授权服务器。当资源服务器需要验证一个令牌时,它直接调用发出该令牌的授权服务器。
- 使用共享数据库(blackboarding)。授权服务器和资源服务器都在同一个数据库中工作。授权服务器将签发的令牌存储在数据库中,而资源服务器则读取这些令牌进行验证。
让我们简单地总结一下。在表14.1中,你可以找到本章讨论的两种方法的优缺点。
表14.1 使用所提出的资源服务器验证令牌的方法的优点和缺点
| 方式 | 优点 | 缺点 |
|---|---|---|
| 直接调用授权服务器 | 易于实现。 它可以适用于任何令牌的实现。 | 这意味着授权服务器和资源服务器之间的直接依赖关系。 这可能会给授权服务器带来不必要的压力。 |
| 使用一个共享的数据库(blackboarding)。 | 消除了授权服务器和资源服务器之间直接通信的需要。它可以适用于任何令牌的实现。持久性令牌允许授权在授权服务器重启后或授权服务器宕机时仍能正常工作。 | 这比直接调用授权服务器更难实现。需要在系统中增加一个组件,即共享数据库。 共享数据库可能成为一个瓶颈,影响系统的性能。 |
总结
- 资源服务器是一个管理用户资源的Spring组件。
- 资源服务器需要一种方法来验证授权服务器发给客户的令牌。
- 为资源服务器验证令牌的一个选择是直接调用授权服务器。这种方法可能会给授权服务器带来太大的压力。我通常避免使用这种方法。
- 为了让资源服务器能够验证令牌,我们可以选择实现一个blackboarding结构。在这个实现中,授权服务器和资源服务器访问同一个数据库,在那里他们管理令牌。
- Blackboarding的优点是消除了资源服务器和授权服务器之间的直接依赖关系。但它意味着增加了一个数据库来保存令牌,这可能成为一个瓶颈,并在大量请求的情况下影响系统的性能。
- 为了实现令牌管理,我们需要使用一个类型为TokenStore的对象。我们可以编写自己的TokenStore的实现,但在大多数情况下,我们使用Spring Security提供的实现。
- JdbcTokenStore是一个TokenStore实现,你可以用它来在数据库中持久化访问和刷新令牌。