本专栏将从基础开始,循序渐进,以实战为线索,逐步深入SpringSecurity相关知识相关知识,打造完整的SpringSecurity学习步骤,提升工程化编码能力和思维能力,写出高质量代码。希望大家都能够从中有所收获,也请大家多多支持。
专栏地址:SpringSecurity专栏
本文涉及的代码都已放在gitee上:gitee地址
如果文章知识点有错误的地方,请指正!大家一起学习,一起进步。
专栏汇总:专栏汇总
本章包括
- 在一个实践的例子中应用认证
- 用UserDetails接口定义用户
- 定义一个自定义的UserDetailsService
- 使用所提供的PasswordEncoder的实现
- 通过实现一个AuthenticationProvider来定义你的认证逻辑
- 设置表单登录认证方法
在这前几章中,我们已经走了很长的路,已经讨论了很多关于认证的细节。但我们已经单独应用了这些新的细节。现在是时候把我们学到的东西放在一个更复杂的项目中了。这个实践的例子可以帮助你更好地了解我们到目前为止所讨论的所有组件是如何在一个真正的应用中一起工作的。
6.1 项目要求和设置
在本节中,我们实现了一个小型的Web应用程序,用户在成功认证后,可以在主页面上看到一个产品列表。你可以在sia-ch6-ex1中找到所提供的项目的完整实现。
对于我们的项目,一个数据库为这个应用程序存储产品和用户。每个用户的密码都用bcrypt或scrypt进行散列。我选择两种散列算法是为了给我们一个理由来定制这个例子中的认证逻辑。在用户表中有一列存储了加密类型。第三张表存储了用户的授权。
图6.1描述了这个应用程序的认证流程。我对我们要定制的组件进行了不同的着色。对于其他组件,我们使用Spring Security提供的默认值。该请求遵循我们在第2章到第5章中讨论的标准认证流程。我在图中用箭头表示请求,箭头有一条连续的线。AuthenticationFilter拦截请求,然后将认证责任委托给AuthenticationManager,后者使用AuthenticationProvider来认证请求。它返回成功认证的呼叫的细节,这样AuthenticationFilter就可以将这些信息存储在SecurityContext中。

图6.1 实践中的网络应用的认证流程。自定义认证提供者实现了认证逻辑。为此,AuthenticationProvider使用了一个UserDetailsService实现和两个PasswordEncoder实现,每个请求的哈希算法都有一个。UserDetailsService的实现被称为JpaUserDetailsService,它使用Spring Data和JPA来与数据库合作并获取用户的详细信息。
我们在这个例子中实现的是AuthenticationProvider和所有与认证逻辑有关的东西。如图6.1所示,我们创建了AuthenticationProviderService类,它实现了AuthenticationProvider接口。这个实现定义了认证逻辑,它需要调用UserDetailsService来从数据库中找到用户的详细信息,并调用PasswordEncoder来验证密码是否正确。对于这个应用程序,我们创建了一个JpaUserDetailsService,它使用Spring Data JPA来与数据库协作。出于这个原因,它依赖于Spring Data JpaRepository,在我们的案例中,我将其命名为UserRepository。我们需要两个密码编码器,因为该应用程序要验证用bcrypt加密的密码和用scrypt加密的密码。作为一个简单的Web应用程序,它需要一个标准的登录表单来进行用户验证。为此,我们将formLogin配置为认证方法。
注意 在本书的一些例子中,我使用了Spring Data JPA。这种方法使你更接近于你在使用Spring Security时发现的应用。你不需要成为JPA的专家来理解这些例子。从Spring Data和JPA的角度来看,我把用例限制在简单的语法上,并把重点放在Spring Security上。然而,如果你想了解更多关于JPA和Hibernate等JPA实现,我强烈建议你阅读Christian Bauer等人编写的《Java Persistence with Hibernate》第二版(Manning, 2015)。关于Spring Data的精彩讨论,你可以阅读Craig Walls的《Spring in Action》第五版(Manning, 2018)。
该应用程序也有一个主页面,用户在成功登录后可以访问。这个页面显示存储在数据库中的产品的详细信息。在图6.2中,我对我们创建的组件进行了阴影处理。我们需要一个MainPageController,它定义了应用程序在请求主页面时执行的动作。MainPageController在主页面上显示用户的名字,所以这就是为什么它依赖于SecurityContext。它从安全上下文中获取用户名,并从一个我称之为ProductService的服务中获取要显示的产品列表。ProductService使用ProductRepository从数据库中获取产品列表,ProductRepository是一个标准的Spring Data JPA仓库。
该数据库包含三个表:用户、权限和产品。图6.3展示了这些表之间的实体关系图(ERD)。
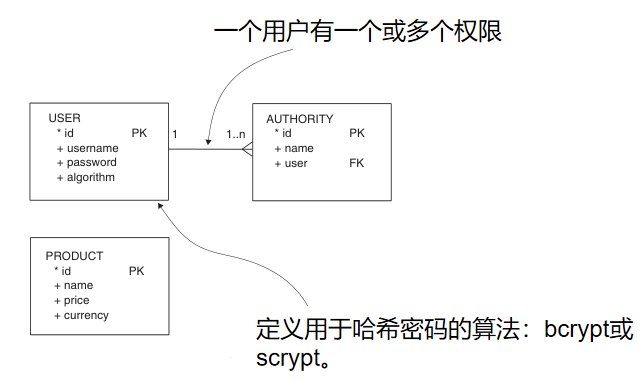
图6.3 当前例子的数据库的实体关系图(ERD)。用户表存储了用户名、密码和用于哈希密码的算法。另外,一个用户有一个或多个权限,这些权限存储在权限表中。第三个表,名为product,存储产品记录的细节:名称、价格和token。主页面显示存储在这个表中的所有产品的详细信息。
我们实现这个项目的主要步骤如:
- 设置数据库
- 定义用户管理
- 实现认证逻辑
- 实现主页面
- 运行并测试应用程序
让我们开始实施。我们首先要创建表。我使用的数据库的名字是spring。你应该首先通过使用命令行工具或客户端来创建数据库。如果你使用的是MySQL,就像本书中的例子一样,你可以使用MySQL Workbench来创建数据库,并最终运行这些脚本。不过,我更喜欢让Spring Boot运行创建数据库结构并向其添加数据的脚本。要做到这一点,你必须在你项目的资源文件夹中创建schema.sql和data.sql文件。schema.sql文件包含所有创建或改变数据库结构的查询,而data.sql文件存储所有处理数据的查询。Listings 6.1, 6.2, and 6.3定义了应用程序使用的三个表。
用户表的字段是:
- id-代表表的主键,它被定义为自动递增
- username-存储用户名
- password-保存密码散列(bcrypt或scrypt)
- algorithm-存储BCRYPT或SCRYPT值,并决定哪个是当前记录的密码散列方法清单6.1提供了用户表的定义。你可以手动运行这个脚本,或者把它添加到schema.sql文件中,让Spring Boot在项目启动时运行它。
清单6.1 创建用户表的脚本
CREATE TABLE IF NOT EXISTS `spring`.`user` (
    `id` INT NOT NULL AUTO_INCREMENT,
    `username` VARCHAR(45) NOT NULL,
    `password` TEXT NOT NULL,
    `algorithm` VARCHAR(45) NOT NULL,
    PRIMARY KEY (`id`));
权限表的字段是:
- id-代表表的主键,它被定义为自动递增
- name-代表权限的名称
- user-代表用户表的外键
清单6.2提供了权限表的定义。你可以手动运行这个脚本,或者把它添加到schema.sql文件中,让Spring Boot在项目启动时运行它。
清单6.2 创建权限表的脚本
CREATE TABLE IF NOT EXISTS `spring`.`authority` (
    `id` INT NOT NULL AUTO_INCREMENT,
    `name` VARCHAR(45) NOT NULL,
    `user` INT NOT NULL,
    PRIMARY KEY (`id`));
第三个表被命名为产品。它存储的是用户成功登录后显示的数据。这个表的字段是
- id-代表表的主键,被定义为自动递增
- name-代表产品的名称,是一个字符串
- price-代表产品的价格,是一个双数
- currency-代表货币(例如,USD,EUR,等等),是一个字符串
清单6.3提供了产品表的定义。你可以手动运行这个脚本,或者把它添加到schema.sql文件中,让Spring Boot在项目启动时运行它。
清单6.3 创建产品表的脚本
CREATE TABLE IF NOT EXISTS `spring`.`product` (
`id` INT NOT NULL AUTO_INCREMENT,
`name` VARCHAR(45) NOT NULL,
`price` VARCHAR(45) NOT NULL,
`currency` VARCHAR(45) NOT NULL,
PRIMARY KEY (`id`));
注意 在权限和用户之间最好有一个多对多的关系。为了从持久层的角度保持这个例子的简单性,并把重点放在Spring Security的基本方面,我决定让它变成一对多。
让我们添加一些数据,我们可以用它们来测试我们的应用程序。你可以手动运行这些INSERT查询,或者把它们添加到项目资源文件夹中的data.sql文件中,让Spring Boot在你启动应用程序时运行它们。
INSERT IGNORE INTO `spring`.`user` (`id`, `username`, `password`,`algorithm`) VALUES ('1', 'john', '$2a$10$xn3LI/AjqicFYZFruSwve.681477XaVNaUQbr1gioaWPn4t1KsnmG', 'BCRYPT');
INSERT IGNORE INTO `spring`.`authority` (`id`, `name`, `user`) VALUES ('1','READ', '1');
INSERT IGNORE INTO `spring`.`authority` (`id`, `name`, `user`) VALUES ('2','WRITE', '1');
INSERT IGNORE INTO `spring`.`product` (`id`, `name`, `price`, `currency`) VALUES ('1', 'Chocolate', '10', 'USD');
在这段代码中,用户John的密码是用bcrypt进行散列的。原始密码是12345。
注意 在例子中使用schema.sql和data.sql文件是很常见的。在实际应用中,你可以选择一个允许你同时对SQL脚本进行编辑的解决方案。你会发现这经常使用像Flyway(https://flywaydb.org/)或Liquibase(https://www.liquibase.org/)这样的依赖关系来完成。
现在我们有了一个数据库和一些测试数据,让我们开始实施。
我们创建了一个新的项目,并添加了以下依赖项,如列表6.4所示:
- spring-boot-starter-data-jpa-使用Spring Data连接数据库
- spring-boot-starter-security-列出Spring Security依赖项
- spring-boot-starter-thymeleaf-添加Thymeleaf作为模板引擎以简化网页的定义
- spring-boot-starter-web-列出标准Web依赖项 mysql-nector-java-补充MySQL JDBC驱动程序
<?xml version="1.0" encoding="UTF-8"?>
<project xmlns="http://maven.apache.org/POM/4.0.0" xmlns:xsi="http://www.w3.org/2001/XMLSchema-instance"
         xsi:schemaLocation="http://maven.apache.org/POM/4.0.0 https://maven.apache.org/xsd/maven-4.0.0.xsd">
    <modelVersion>4.0.0</modelVersion>
    <parent>
        <groupId>org.springframework.boot</groupId>
        <artifactId>spring-boot-starter-parent</artifactId>
        <version>2.3.12.RELEASE</version>
        <relativePath/> <!-- lookup parent from repository -->
    </parent>
    <groupId>com.laurentiuspilca</groupId>
    <artifactId>ssia-ch6-ex1</artifactId>
    <version>0.0.1-SNAPSHOT</version>
    <name>ssia-ch6-ex1</name>
    <description>Demo project for Spring Boot</description>

    <properties>
        <java.version>11</java.version>
    </properties>

    <dependencies>
        <dependency>
            <groupId>org.springframework.boot</groupId>
            <artifactId>spring-boot-starter-data-jpa</artifactId>
        </dependency>
        <dependency>
            <groupId>org.springframework.boot</groupId>
            <artifactId>spring-boot-starter-security</artifactId>
        </dependency>
        <dependency>
            <groupId>org.springframework.boot</groupId>
            <artifactId>spring-boot-starter-thymeleaf</artifactId>
        </dependency>
        <dependency>
            <groupId>org.springframework.boot</groupId>
            <artifactId>spring-boot-starter-web</artifactId>
        </dependency>

        <dependency>
            <groupId>mysql</groupId>
            <artifactId>mysql-connector-java</artifactId>
            <scope>runtime</scope>
        </dependency>
        <dependency>
            <groupId>org.springframework.boot</groupId>
            <artifactId>spring-boot-starter-test</artifactId>
            <scope>test</scope>
            <exclusions>
                <exclusion>
                    <groupId>org.junit.vintage</groupId>
                    <artifactId>junit-vintage-engine</artifactId>
                </exclusion>
            </exclusions>
        </dependency>
        <dependency>
            <groupId>org.springframework.security</groupId>
            <artifactId>spring-security-test</artifactId>
            <scope>test</scope>
        </dependency>
    </dependencies>

    <build>
        <plugins>
            <plugin>
                <groupId>org.springframework.boot</groupId>
                <artifactId>spring-boot-maven-plugin</artifactId>
            </plugin>
        </plugins>
    </build>

</project>
application.properties文件需要像这样声明数据库连接参数。
spring.datasource.url=jdbc:mysql://localhost/spring?useLegacyDatetimeCode=false&serverTimezone=UTC
spring.datasource.username=root
spring.datasource.password=
spring.datasource.initialization-mode=always
注意 我可能会在这个问题上重复自己的观点,但请确保你永远不要暴露密码!在我们的例子中,这是很好的,但在现实世界中,你不应该在application.properties文件中把敏感数据写成证书或私钥。在我们的例子中,这很好,但在现实世界中,你不应该在application.properties文件中把敏感数据写成凭证或私钥。相反,应使用秘密保险库来实现这一目的。
6.2 实现用户管理
在本节中,我们将讨论实现应用程序的用户管理部分。
就Spring Security而言,用户管理的代表组件是UserDetailsService。你至少需要实现这个契约来指示Spring Security如何检索用户的详细信息。
现在我们已经有了一个项目并配置了数据库连接,是时候考虑与应用安全相关的实现了。我们需要采取以下步骤来构建应用程序中负责用户管理的这一部分:
- 为两种散列算法定义密码编码器对象。
- 定义JPA实体来表示用户和权限表,这些表存储了认证过程中需要的细节。
- 声明Spring Data的JpaRepository合同。在这个例子中,我们只需要直接引用用户,所以我们声明一个名为UserRepository的仓库。
- 创建一个装饰器,在User JPA实体上实现UserDetails契约。在这里,我们使用3.2.5节中讨论的分离责任的方法。
- 实现UserDetailsService合同。为此,创建一个名为JpaUserDetailsService的类。这个类使用我们在步骤3中创建的UserRepository来从数据库中获取用户的详细信息。如果JpaUserDetailsService找到了用户,它将以我们在第4步中定义的装饰器的实现形式返回用户。
我们首先考虑用户和密码管理。我们从例子的要求中知道,我们的应用程序用于哈希密码的算法是bcrypt和scrypt。我们可以先创建一个配置类,并将这两个密码编码器声明为bean,如下表所示。
清单6.5 为每个PasswordEncoder注册一个bean
package com.laurentiuspilca.ssia.config;

import com.laurentiuspilca.ssia.services.AuthenticationProviderService;
import org.springframework.beans.factory.annotation.Autowired;
import org.springframework.context.annotation.Bean;
import org.springframework.context.annotation.Configuration;
import org.springframework.security.config.annotation.authentication.builders.AuthenticationManagerBuilder;
import org.springframework.security.config.annotation.web.builders.HttpSecurity;
import org.springframework.security.config.annotation.web.configuration.WebSecurityConfigurerAdapter;
import org.springframework.security.crypto.bcrypt.BCryptPasswordEncoder;
import org.springframework.security.crypto.scrypt.SCryptPasswordEncoder;

@Configuration
public class ProjectConfig extends WebSecurityConfigurerAdapter {


    @Bean
    public BCryptPasswordEncoder bCryptPasswordEncoder() {


        return new BCryptPasswordEncoder();
    }

    @Bean
    public SCryptPasswordEncoder sCryptPasswordEncoder() {


        return new SCryptPasswordEncoder();
    }
}
对于用户管理,我们需要声明一个UserDetailsService的实现,它通过用户的名字从数据库中检索到用户。它需要将用户作为UserDetails接口的实现返回,我们需要实现两个JPA实体用于认证。用户和权限。清单6.6显示了如何定义用户。它与权威实体有一对多的关系。
清单6.6 用户实体类
package com.laurentiuspilca.ssia.entities;

import com.laurentiuspilca.ssia.entities.enums.EncryptionAlgorithm;

import javax.persistence.*;
import java.util.List;

@Entity
public class User {


    @Id
    @GeneratedValue(strategy = GenerationType.IDENTITY)
    private Integer id;

    private String username;
    private String password;

    @Enumerated(EnumType.STRING)
    private EncryptionAlgorithm algorithm;

    @OneToMany(mappedBy = "user", fetch = FetchType.EAGER)
    private List<Authority> authorities;

    public Integer getId() {


        return id;
    }

    public void setId(Integer id) {


        this.id = id;
    }

    public String getUsername() {


        return username;
    }

    public void setUsername(String username) {


        this.username = username;
    }

    public String getPassword() {


        return password;
    }

    public void setPassword(String password) {


        this.password = password;
    }

    public EncryptionAlgorithm getAlgorithm() {


        return algorithm;
    }

    public void setAlgorithm(EncryptionAlgorithm algorithm) {


        this.algorithm = algorithm;
    }

    public List<Authority> getAuthorities() {


        return authorities;
    }

    public void setAuthorities(List<Authority> authorities) {


        this.authorities = authorities;
    }
}
EncryptionAlgorithm是一个枚举,定义了请求中指定的两种支持的散列算法。
public enum EncryptionAlgorithm {


    BCRYPT, SCRYPT
}
下面的列表显示了如何实现Authority实体。它与用户实体有一个多对一的关系。
清单6.7 Authority实体类
package com.laurentiuspilca.ssia.entities;

import javax.persistence.*;

@Entity
public class Authority {


    @Id
    @GeneratedValue(strategy = GenerationType.IDENTITY)
    private Integer id;

    private String name;

    @JoinColumn(name = "user")
    @ManyToOne
    private User user;

    public Integer getId() {


        return id;
    }

    public void setId(Integer id) {


        this.id = id;
    }

    public String getName() {


        return name;
    }

    public void setName(String name) {


        this.name = name;
    }

    public User getUser() {


        return user;
    }

    public void setUser(User user) {


        this.user = user;
    }
}
必须声明一个资源库,以便从数据库中按名字检索用户。下面的列表显示了如何做到这一点。
清单6.8 用户实体的Spring Data资源库的定义
package com.laurentiuspilca.ssia.repositories;

import com.laurentiuspilca.ssia.entities.User;
import org.springframework.data.jpa.repository.JpaRepository;

import java.util.Optional;

public interface UserRepository extends JpaRepository<User, Integer> {


	//不一定要写查询,Spring Data会在需要的查询中翻译方法的名称。
    Optional<User> findUserByUsername(String username);
}
我在这里使用一个Spring Data JPA资源库。然后Spring Data实现接口中声明的方法,并根据其名称执行查询。该方法返回一个包含用户实体的Optional实例,该实体的名称是作为参数提供的。如果数据库中不存在这样的用户,该方法将返回一个空的Optional实例。
为了从UserDetailsService中返回用户,我们需要将其表示为UserDetails。在下面的列表中,CustomUserDetails类实现了UserDetails接口并包装了User实体。
清单6.9 UserDetails合同的实现
package com.laurentiuspilca.ssia.model;

import com.laurentiuspilca.ssia.entities.User;
import org.springframework.security.core.GrantedAuthority;
import org.springframework.security.core.authority.SimpleGrantedAuthority;
import org.springframework.security.core.userdetails.UserDetails;

import java.util.Collection;
import java.util.stream.Collectors;

public class CustomUserDetails implements UserDetails {


    private final User user;

    public CustomUserDetails(User user) {


        this.user = user;
    }

   // Omitted code

    public final User getUser() {


        return user;
    }
}
CustomUserDetails类实现了UserDetails接口的方法。下面的列表显示了这是如何做到的。
清单6.10 实现UserDetails接口的其余方法
package com.laurentiuspilca.ssia.model;

import com.laurentiuspilca.ssia.entities.User;
import org.springframework.security.core.GrantedAuthority;
import org.springframework.security.core.authority.SimpleGrantedAuthority;
import org.springframework.security.core.userdetails.UserDetails;

import java.util.Collection;
import java.util.stream.Collectors;

public class CustomUserDetails implements UserDetails {


    private final User user;

    public CustomUserDetails(User user) {


        this.user = user;
    }

    @Override
    public Collection<? extends GrantedAuthority> getAuthorities() {


        return user.getAuthorities().stream()
            //将数据库中发现的每个用户的授权名称映射到SimpleGrantedAuthority上。
                   .map(a -> new SimpleGrantedAuthority(a.getName()))
            //在一个列表中收集并返回SimpleGrantedAuthority的所有实例。
                   .collect(Collectors.toList());
    }

    @Override
    public String getPassword() {


        return user.getPassword();
    }

    @Override
    public String getUsername() {


        return user.getUsername();
    }

    @Override
    public boolean isAccountNonExpired() {


        return true;
    }

    @Override
    public boolean isAccountNonLocked() {


        return true;
    }

    @Override
    public boolean isCredentialsNonExpired() {


        return true;
    }

    @Override
    public boolean isEnabled() {


        return true;
    }

    public final User getUser() {


        return user;
    }
}
注意 在清单 6.10 中,我使用了 SimpleGrantedAuthority,它是 GrantedAuthority 接口的直接实现。Spring Security提供了这种实现。
现在你可以实现UserDetailsService,看起来像清单6.11。如果应用程序通过用户名找到了用户,它将在一个CustomUserDetails实例中包装并返回User类型的实例。如果用户不存在,该服务应该抛出一个 UsernameNotFoundException 类型的异常。
清单6.11 UserDetailsService合同的实现
package com.laurentiuspilca.ssia.services;

import com.laurentiuspilca.ssia.entities.User;
import com.laurentiuspilca.ssia.model.CustomUserDetails;
import com.laurentiuspilca.ssia.repositories.UserRepository;
import org.springframework.beans.factory.annotation.Autowired;
import org.springframework.security.core.userdetails.UserDetailsService;
import org.springframework.security.core.userdetails.UsernameNotFoundException;
import org.springframework.stereotype.Service;

import java.util.function.Supplier;

@Service
public class JpaUserDetailsService implements UserDetailsService {


    @Autowired
    private UserRepository userRepository;

    @Override
    public CustomUserDetails loadUserByUsername(String username) {


        //声明一个创建异常实例的provider
        Supplier<UsernameNotFoundException> s =
                () -> new UsernameNotFoundException("Problem during authentication!");

        User u = userRepository
            //返回一个包含用户的可选实例,如果用户不存在,则返回一个空的可选实例。
            .findUserByUsername(username)
            //如果Optional实例为空,则抛出一个由定义的Supplier创建的异常;否则,它返回User实例
            .orElseThrow(s);

        //用CustomUserDetails装饰器包装用户实例,并返回它。
        return new CustomUserDetails(u);
    }
}
6.3 实现自定义认证逻辑
在完成了用户和密码管理后,我们可以开始编写自定义认证逻辑。要做到这一点,我们必须实现一个AuthenticationProvider(列表6.12),并在Spring Security认证架构中注册它。编写认证逻辑所需的依赖性是UserDetailsService的实现和两个密码编码器。除了自动连接这些,我们还覆盖了authenticate()和supports()方法。我们实现supports()方法来指定支持的认证实现类型是UsernamePasswordAuthenticationToken。
清单6.12 实现AuthenticationProvider
package com.laurentiuspilca.ssia.services;

import com.laurentiuspilca.ssia.model.CustomUserDetails;
import org.springframework.beans.factory.annotation.Autowired;
import org.springframework.security.authentication.AuthenticationProvider;
import org.springframework.security.authentication.BadCredentialsException;
import org.springframework.security.authentication.UsernamePasswordAuthenticationToken;
import org.springframework.security.core.Authentication;
import org.springframework.security.core.AuthenticationException;
import org.springframework.security.crypto.bcrypt.BCryptPasswordEncoder;
import org.springframework.security.crypto.password.PasswordEncoder;
import org.springframework.security.crypto.scrypt.SCryptPasswordEncoder;
import org.springframework.stereotype.Service;

@Service
public class AuthenticationProviderService implements AuthenticationProvider {


    //注入必要的依赖关系,即UserDetailsService和两个PasswordEncoder实现。
    @Autowired
    private JpaUserDetailsService userDetailsService;

    @Autowired
    private BCryptPasswordEncoder bCryptPasswordEncoder;

    @Autowired
    private SCryptPasswordEncoder sCryptPasswordEncoder;

    @Override
    public Authentication authenticate(Authentication authentication) throws AuthenticationException {


        // ...
    }

    @Override
    public boolean supports(Class<?> aClass) {


        return UsernamePasswordAuthenticationToken.class.isAssignableFrom(aClass);
    }

}
authenticate()方法首先通过用户名加载用户,然后验证密码是否与存储在数据库中的哈希值相符(清单6.13)。这种验证取决于用于散列用户密码的算法。
清单6.13 通过重写authenticate()定义认证逻辑
package com.laurentiuspilca.ssia.services;

import com.laurentiuspilca.ssia.model.CustomUserDetails;
import org.springframework.beans.factory.annotation.Autowired;
import org.springframework.security.authentication.AuthenticationProvider;
import org.springframework.security.authentication.BadCredentialsException;
import org.springframework.security.authentication.UsernamePasswordAuthenticationToken;
import org.springframework.security.core.Authentication;
import org.springframework.security.core.AuthenticationException;
import org.springframework.security.crypto.bcrypt.BCryptPasswordEncoder;
import org.springframework.security.crypto.password.PasswordEncoder;
import org.springframework.security.crypto.scrypt.SCryptPasswordEncoder;
import org.springframework.stereotype.Service;

@Service
public class AuthenticationProviderService implements AuthenticationProvider {


    @Autowired
    private JpaUserDetailsService userDetailsService;

    @Autowired
    private BCryptPasswordEncoder bCryptPasswordEncoder;

    @Autowired
    private SCryptPasswordEncoder sCryptPasswordEncoder;

    @Override
    public Authentication authenticate(Authentication authentication) throws AuthenticationException {


        String username = authentication.getName();
        String password = authentication.getCredentials().toString();

        //通过UserDetailsService,从数据库中找到用户的详细信息。
        CustomUserDetails user = userDetailsService.loadUserByUsername(username);

        //根据用户特有的散列算法验证密码。
        switch (user.getUser().getAlgorithm()) {


                //如果bcrypt对用户的密码进行加密,则使用BCryptPasswordEncoder。
            case BCRYPT:
                return checkPassword(user, password, bCryptPasswordEncoder);
                //否则,使用SCryptPasswordEncoder
            case SCRYPT:
                return checkPassword(user, password, sCryptPasswordEncoder);
        }

        throw new  BadCredentialsException("Bad credentials");
    }

    @Override
    public boolean supports(Class<?> aClass) {


        return UsernamePasswordAuthenticationToken.class.isAssignableFrom(aClass);
    }

}
在清单6.13中,我们选择了PasswordEncoder,用来根据用户的算法属性值来验证密码。在列表6.14中,你可以找到checkPassword()方法的定义。这个方法使用作为参数发送的密码编码器来验证从用户输入的原始密码是否与数据库中的编码相符。如果密码是有效的,它将返回一个认证契约的实现实例。
UsernamePasswordAuthenticationToken类是Authentication接口的一个实现。我在清单6.14中调用的构造函数也将认证的值设置为真。这个细节很重要,因为你知道 AuthenticationProvider 的 authenticate() 方法必须返回一个已认证的实例。
清单6.14 认证逻辑中使用的checkPassword()方法
package com.laurentiuspilca.ssia.services;

import com.laurentiuspilca.ssia.model.CustomUserDetails;
import org.springframework.beans.factory.annotation.Autowired;
import org.springframework.security.authentication.AuthenticationProvider;
import org.springframework.security.authentication.BadCredentialsException;
import org.springframework.security.authentication.UsernamePasswordAuthenticationToken;
import org.springframework.security.core.Authentication;
import org.springframework.security.core.AuthenticationException;
import org.springframework.security.crypto.bcrypt.BCryptPasswordEncoder;
import org.springframework.security.crypto.password.PasswordEncoder;
import org.springframework.security.crypto.scrypt.SCryptPasswordEncoder;
import org.springframework.stereotype.Service;

@Service
public class AuthenticationProviderService implements AuthenticationProvider {


    @Autowired
    private JpaUserDetailsService userDetailsService;

    @Autowired
    private BCryptPasswordEncoder bCryptPasswordEncoder;

    @Autowired
    private SCryptPasswordEncoder sCryptPasswordEncoder;

    @Override
    public Authentication authenticate(Authentication authentication) throws AuthenticationException {


        String username = authentication.getName();
        String password = authentication.getCredentials().toString();

        //通过UserDetailsService,从数据库中找到用户的详细信息。
        CustomUserDetails user = userDetailsService.loadUserByUsername(username);

        //根据用户特有的散列算法验证密码。
        switch (user.getUser().getAlgorithm()) {


                //如果bcrypt对用户的密码进行加密,则使用BCryptPasswordEncoder。
            case BCRYPT:
                return checkPassword(user, password, bCryptPasswordEncoder);
                //否则,使用SCryptPasswordEncoder
            case SCRYPT:
                return checkPassword(user, password, sCryptPasswordEncoder);
        }

        throw new  BadCredentialsException("Bad credentials");
    }

    @Override
    public boolean supports(Class<?> aClass) {


        return UsernamePasswordAuthenticationToken.class.isAssignableFrom(aClass);
    }

    private Authentication checkPassword(CustomUserDetails user, String rawPassword, PasswordEncoder encoder) {


        if (encoder.matches(rawPassword, user.getPassword())) {


            return new UsernamePasswordAuthenticationToken(user.getUsername(), user.getPassword(), user.getAuthorities());
        } else {


            throw new BadCredentialsException("Bad credentials");
        }
    }
}
现在我们需要在配置类中注册AuthenticationProvider。下一个列表显示了如何做到这一点。
清单6.15 在配置类中注册AuthenticationProvider
package com.laurentiuspilca.ssia.config;

import com.laurentiuspilca.ssia.services.AuthenticationProviderService;
import org.springframework.beans.factory.annotation.Autowired;
import org.springframework.context.annotation.Bean;
import org.springframework.context.annotation.Configuration;
import org.springframework.security.config.annotation.authentication.builders.AuthenticationManagerBuilder;
import org.springframework.security.config.annotation.web.builders.HttpSecurity;
import org.springframework.security.config.annotation.web.configuration.WebSecurityConfigurerAdapter;
import org.springframework.security.crypto.bcrypt.BCryptPasswordEncoder;
import org.springframework.security.crypto.scrypt.SCryptPasswordEncoder;

@Configuration
public class ProjectConfig extends WebSecurityConfigurerAdapter {


    //从上下文中获取AuthenticationProviderService的实例。
    @Autowired
    private AuthenticationProviderService authenticationProvider;

    @Bean
    public BCryptPasswordEncoder bCryptPasswordEncoder() {


        return new BCryptPasswordEncoder();
    }

    @Bean
    public SCryptPasswordEncoder sCryptPasswordEncoder() {


        return new SCryptPasswordEncoder();
    }

     //通过重写configure()方法,为Spring Security注册了认证提供者。
    @Override
    protected void configure(AuthenticationManagerBuilder auth) {


        auth.authenticationProvider(authenticationProvider);
    }


    @Override
    protected void configure(HttpSecurity http) throws Exception {


        http.formLogin()
            .defaultSuccessUrl("/main", true);
        http.authorizeRequests().anyRequest().authenticated();
    }
}
在配置类中,我们要将认证实现设置为formLogin方法,并将路径/main设置为默认的成功URL,如下图所示。我们想把这个路径作为Web应用程序的主页面来实现。
清单6.16 将formLogin配置为认证方法
package com.laurentiuspilca.ssia.config;

import com.laurentiuspilca.ssia.services.AuthenticationProviderService;
import org.springframework.beans.factory.annotation.Autowired;
import org.springframework.context.annotation.Bean;
import org.springframework.context.annotation.Configuration;
import org.springframework.security.config.annotation.authentication.builders.AuthenticationManagerBuilder;
import org.springframework.security.config.annotation.web.builders.HttpSecurity;
import org.springframework.security.config.annotation.web.configuration.WebSecurityConfigurerAdapter;
import org.springframework.security.crypto.bcrypt.BCryptPasswordEncoder;
import org.springframework.security.crypto.scrypt.SCryptPasswordEncoder;

@Configuration
public class ProjectConfig extends WebSecurityConfigurerAdapter {


    //从上下文中获取AuthenticationProviderService的实例。
    @Autowired
    private AuthenticationProviderService authenticationProvider;

    @Bean
    public BCryptPasswordEncoder bCryptPasswordEncoder() {


        return new BCryptPasswordEncoder();
    }

    @Bean
    public SCryptPasswordEncoder sCryptPasswordEncoder() {


        return new SCryptPasswordEncoder();
    }

     //通过重写configure()方法,为Spring Security注册了认证提供者。
    @Override
    protected void configure(AuthenticationManagerBuilder auth) {


        auth.authenticationProvider(authenticationProvider);
    }


    @Override
    protected void configure(HttpSecurity http) throws Exception {


        http.formLogin()
            .defaultSuccessUrl("/main", true);
        http.authorizeRequests().anyRequest().authenticated();
    }
}
6.4 实现主页面
最后,现在我们已经有了安全部分,我们可以实现应用程序的主页面。它是一个简单的页面,显示产品表的所有记录。这个页面只有在用户登录后才能访问。为了从数据库中获取产品记录,我们必须在项目中添加一个产品实体类和一个ProductRepository接口。下面的列表定义了产品类。
清单6.17 定义产品JPA实体
@Entity
public class Product {


    @Id
    @GeneratedValue(strategy = GenerationType.IDENTITY)
    private Integer id;
    private String name;
    private double price;
    @Enumerated(EnumType.STRING)
    private Currency currency;
// Omitted code
}
Currency枚举声明了应用程序中允许作为货币的类型。比如说。
public enum Currency {


	USD, GBP, EUR
}
ProductRepository接口只需要继承自JpaRepository。 因为应用场景要求显示所有的产品,所以我们需要使用从JpaRepository接口继承的findAll()方法,如下面列表所示。
清单6.18 产品存储库接口的定义
//该接口不需要声明任何方法。我们只使用从Spring Data实现的JpaRepository接口继承的方法。
public interface ProductRepository
        extends JpaRepository<Product, Integer> {


}
清单6.19 产品服务类的实现
@Service
public class ProductService {


    @Autowired
    private ProductRepository productRepository;
    public List<Product> findAll() {


        return productRepository.findAll();
    }
}
最后,MainPageController定义了页面的路径,并将页面要显示的内容填充到Model对象中。
清单6.20 控制器类的定义
@Controller
public class MainPageController {


    @Autowired
    private ProductService productService;
    @GetMapping("/main")
    public String main(Authentication a, Model model) {


        model.addAttribute("username", a.getName());
        model.addAttribute("products", productService.findAll());
        return "main.html";
    }
}
main.html页面存储在resources/templates文件夹中,显示产品和登录用户的名字。
清单6.21 主页面的定义
<!DOCTYPE html>
<!--声明前缀th,以便我们可以在页面中使用Thymeleaf组件。-->
<html lang="en" xmlns:th="http://www.thymeleaf.org">
    <head>
        <meta charset="UTF-8">
        <title>Products</title>
    </head>
    <body>
        <!--在页面上显示此信息。在执行控制器动作后,${username}是被从模型中注入到页面的变量。-->
        <h2 th:text="'Hello, ' + ${username} + '!'" />
        <p><a href="/logout">Sign out here</a></p>

        <h2>These are all the products:</h2>
        <table>
            <thead>
            <tr>
                <th> Name </th>
                <th> Price </th>
            </tr>
            </thead>
            <tbody>
               <!--如果模型列表中没有产品,显示一条信息-->
            <tr th:if="${products.empty}">
                <td colspan="2"> No Products Available </td>
            </tr>
                <!--对于在模型列表中发现的每个产品,在表中创建一行-->
            <tr th:each="book : ${products}">
                <td><span th:text="${book.name}"> Name </span></td>
                <td><span th:text="${book.price}"> Price </span></td>
            </tr>
            </tbody>
        </table>
    </body>
</html>
6.5 运行和测试应用程序
我们已经完成了本书第一个实践项目的代码编写。现在是时候验证它是否按照我们的规范工作了。因此,让我们运行该应用程序并尝试登录。运行该应用程序后,我们可以在浏览器中输入地址http://localhost :8080来访问它。如图6.4所示,出现了标准的登录表格。我存储在数据库中的用户(也是本章开头给出的脚本中的用户)是John,密码是12345,用bcrypt加密过的。你可以使用这些凭证来登录。
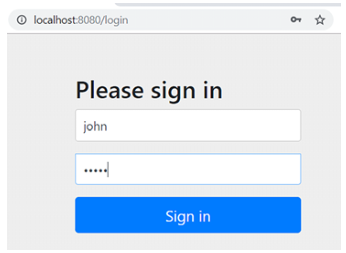
图6.4 应用程序的登录表格
注意 在现实世界的应用中,你不应该让你的用户定义像 "12345 "这样的简单密码。如此简单的密码很容易被猜到,并代表了一种安全风险。维基百科提供了一篇关于密码的内容丰富的文章:https://en.wikipedia.org/wiki/Password_strength。它不仅解释了设置强密码的规则,而且还解释了如何计算密码强度。
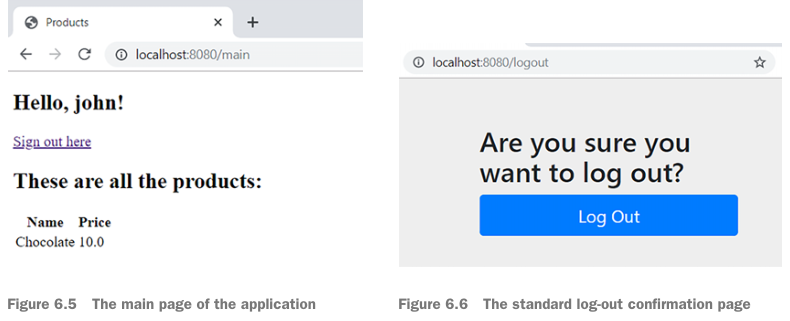
一旦登录,应用程序会将你重定向到主页面(图6.5)。在这里,从安全环境中获取的用户名出现在页面上,同时还有数据库中的产品列表。
当你点击这里签出链接时,应用程序会将你重定向到标准签出确认页面(图6.6)。这是由Spring Security预定义的,因为我们使用formLogin认证方法。
点击注销后,如果你想订购更多的巧克力,你会被重新引导到登录页面(图6.7)。

图6.7 从应用程序注销后出现的登录页面。
祝贺你! 你刚刚实现了第一个实战案例,并成功地将本书中已经讨论过的一些基本内容放在一起。通过这个例子,你开发了一个小型的Web应用,它的认证是由Spring Security管理的。你使用了表单登录认证方法,并将用户的详细信息存储在数据库中。你还实现了自定义的认证逻辑。
在结束本章之前,我想再发表一个看法。像任何软件需求一样,你可以用不同的方式实现同一个应用程序。我选择这个实现是为了尽可能多地触及我们之前讨论的东西。主要是,我想有一个理由来实现一个自定义的AuthenticationProvider。作为一个练习,我让你通过使用第四章中讨论的DelegatingPasswordEncoder来简化实现。
总结
- 在现实世界的应用中,有一些依赖关系需要同一概念的不同实现是很常见的。这可能是Spring Security的UserDetails和JPA实现的User实体,就像我们的案例一样。
对此,一个好的建议是在不同的类中解耦责任,以增强可读性。- 在大多数情况下,你有多种方法来实现相同的功能。你应该选择最简单的解决方案。让你的代码更容易理解,可以减少出错的空间,从而减少安全漏洞。