本专栏将从基础开始,循序渐进,以实战为线索,逐步深入SpringSecurity相关知识相关知识,打造完整的SpringSecurity学习步骤,提升工程化编码能力和思维能力,写出高质量代码。希望大家都能够从中有所收获,也请大家多多支持。
专栏地址:SpringSecurity专栏
本文涉及的代码都已放在gitee上:gitee地址
如果文章知识点有错误的地方,请指正!大家一起学习,一起进步。
专栏汇总:专栏汇总
文章目录
本章包括
- 使用加密签名验证令牌
- 在OAuth 2架构中使用JSON Web令牌
- 用对称和非对称密钥签署令牌 向JWT添加自定义细节
在这一章中,我们将讨论使用JSON Web令牌(JWTs)来实现令牌。你在第14章中了解到,资源服务器需要验证由授权服务器发出的令牌。我告诉了你三种方法来做到这一点:
- 使用资源服务器和授权服务器之间的直接调用,我们在第14.2节中实现了这一点
- 使用一个共享数据库来存储令牌,我们在第14.3节中实现了这一点
- 使用加密签名,我们将在本章中讨论这个问题
使用加密签名来验证令牌的好处是允许资源服务器验证令牌,而不需要直接调用授权服务器,也不需要共享数据库。这种实现令牌验证的方法常用于用OAuth 2实现认证和授权的系统中。由于这个原因,你需要知道这种实现令牌验证的方法。我们将为这个方法写一个例子,就像我们在第14章为其他两个方法写的那样。
15.1 使用用JWT的对称密钥签署的token
签署令牌最直接的方法是使用对称密钥。使用这种方法,使用同一把钥匙,你可以同时签署令牌和验证其签名。 使用对称钥匙签署令牌的好处是比我们在本章后面讨论的其他方法更简单,也更快。然而,正如你将看到的,它也有缺点。你不能总是与参与认证过程的所有应用程序共享用于签署令牌的密钥。我们将在第15.2节比较对称密钥和非对称密钥对时讨论这些优点和缺点。
现在,让我们开始一个新的项目来实现一个使用对称密钥签名的JWTs的系统。我们首先简要回顾一下第11章中详细介绍的JWTs。然后,我们在一个例子中实现这些。
15.1.1 使用JWTs
在这一节中,我们简要地回顾一下JWTs。我们在第11章中详细讨论了JWTs,但我认为我们最好先复习一下JWTs的工作原理。然后我们继续实现授权服务器和资源服务器。我们在本章中讨论的一切都依赖于JWTs,所以我认为在进一步学习第一个例子之前,先进行复习是非常必要的。
JWT是一个令牌的实现。一个令牌由三部分组成:头、主体和签名。头部和主体中的细节用JSON表示,并且是Base64编码的。第三部分是签名,使用加密算法生成,该算法使用头部和主体作为输入(图15.1)。加密算法也意味着需要一个密钥。拥有适当密钥的人可以签署令牌或验证签名的真实性。如果令牌上的签名是真实的,这就保证了在令牌被签署后没有人改变它。

图15.1 JWT由三部分组成:头、主体和签名。头部和主体包含用JSON表示的细节。这些部分被Base64编码,然后被签名。令牌是由这三部分组成的字符串,用点分开。
当JWT被签名时,我们也称它为JWS(JSON Web Token Signed)。通常情况下,应用加密算法来签署令牌就足够了,但有时你可以选择对其进行加密。如果一个令牌被签名,即使黑客看到了令牌中的内容,他们也不能改变令牌的内容,因为如果他们这样做,签名就会变得无效(图15.2)。 为了使签名有效,签名必须是
- 用正确的密钥生成
- 匹配已签署的内容

图15.2 一个黑客拦截了一个令牌并改变了其内容。资源服务器拒绝该调用,因为令牌的签名不再与内容相匹配。
如果一个令牌是加密的,我们也称它为JWE(JSON网络令牌加密)。没有有效的密钥,你无法看到加密令牌的内容。
15.1.2 实现授权服务器以发布JWTs
在这一节中,我们将实现一个授权服务器,向客户端发出JWT以获得授权。你在第14章中得知,管理令牌的组件是TokenStore。我们在本节所做的是使用Spring Security提供的TokenStore的不同实现。我们使用的实现的名字是JwtTokenStore,它管理JWTs。我们还在这一节中测试了授权服务器。稍后,在第15.1.3节,我们将实现一个资源服务器,并拥有一个使用JWTs的完整系统。你可以通过两种方式实现JWT的令牌验证:
- 如果我们使用相同的密钥来签署令牌和验证签名,我们说密钥是对称的。
- 如果我们用一把钥匙来签署令牌,但用另一把钥匙来验证签名,我们就说我们使用了非对称钥匙对。
在这个例子中,我们用对称密钥实现签名。这种方法意味着授权服务器和资源服务器都知道并使用相同的密钥。 授权服务器用密钥签署令牌,而资源服务器用相同的密钥对签名进行验证(图15.3)。
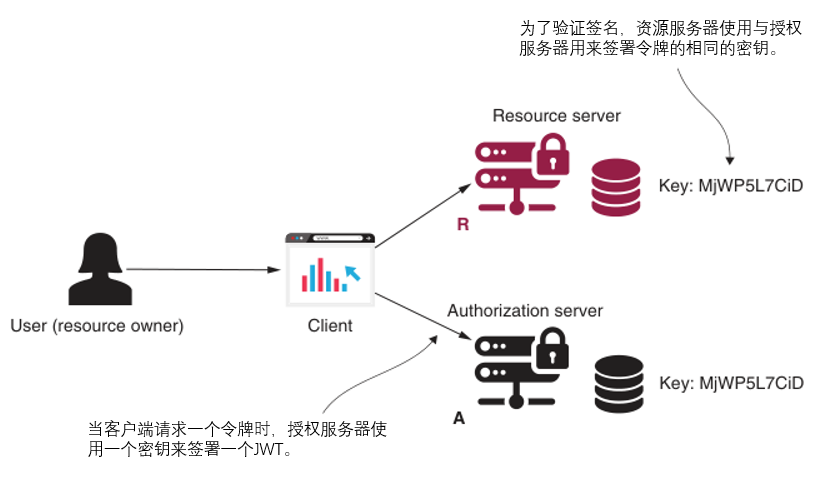
图15.3 使用对称密钥。授权服务器和资源服务器都共享同一个密钥。授权服务器使用该密钥来签署令牌,而资源服务器则使用该密钥来验证签名。
让我们创建项目并添加所需的依赖项。接下来的代码片段介绍了我们需要添加的依赖项。这些都是我们在第13章和第14章中用于授权服务器的那些。
<dependency>
    <groupId>org.springframework.boot</groupId>
    <artifactId>spring-boot-starter-web</artifactId>
</dependency>

<dependency>
    <groupId>org.springframework.boot</groupId>
    <artifactId>spring-boot-starter-security</artifactId>
</dependency>

<dependency>
    <groupId>org.springframework.cloud</groupId>
    <artifactId>spring-cloud-starter-oauth2</artifactId>
</dependency>
我们配置JwtTokenStore的方式与第14章JdbcTokenStore的方式相同。此外,我们需要定义一个JwtAccessTokenConverter类型的对象。通过JwtAccessTokenConverter,我们可以配置授权服务器如何验证令牌;在我们的例子中,使用对称密钥。下面的列表向你展示了如何在配置类中配置JwtTokenStore。
package com.laurentiuspilca.ssia.config;

import org.springframework.beans.factory.annotation.Autowired;
import org.springframework.beans.factory.annotation.Value;
import org.springframework.context.annotation.Bean;
import org.springframework.context.annotation.Configuration;
import org.springframework.security.authentication.AuthenticationManager;
import org.springframework.security.oauth2.config.annotation.configurers.ClientDetailsServiceConfigurer;
import org.springframework.security.oauth2.config.annotation.web.configuration.AuthorizationServerConfigurerAdapter;
import org.springframework.security.oauth2.config.annotation.web.configuration.EnableAuthorizationServer;
import org.springframework.security.oauth2.config.annotation.web.configurers.AuthorizationServerEndpointsConfigurer;
import org.springframework.security.oauth2.provider.token.TokenStore;
import org.springframework.security.oauth2.provider.token.store.JwtAccessTokenConverter;
import org.springframework.security.oauth2.provider.token.store.JwtTokenStore;

@Configuration
@EnableAuthorizationServer
public class AuthServerConfig
        extends AuthorizationServerConfigurerAdapter {


    //从application.properties文件中获取对称密钥的值。
    @Value("${jwt.key}")
    private String jwtKey;

    @Autowired
    private AuthenticationManager authenticationManager;

    @Override
    public void configure(ClientDetailsServiceConfigurer clients) throws Exception {


        clients.inMemory()
                .withClient("client")
                .secret("secret")
                .authorizedGrantTypes("password", "refresh_token")
                .scopes("read");
    }

    @Override
    public void configure(AuthorizationServerEndpointsConfigurer endpoints) {


        endpoints
          .authenticationManager(authenticationManager)
                //配置令牌存储和访问令牌转换器对象
          .tokenStore(tokenStore())
          .accessTokenConverter(jwtAccessTokenConverter());
    }

    @Bean
    public TokenStore tokenStore() {


        //创建一个与访问令牌转换器相关联的令牌库
        return new JwtTokenStore(jwtAccessTokenConverter());
    }

    @Bean
    public JwtAccessTokenConverter jwtAccessTokenConverter() {


        JwtAccessTokenConverter converter = new JwtAccessTokenConverter();
        //设置访问令牌转换器对象的对称密钥的值
        converter.setSigningKey(jwtKey);
        return converter;
    }
}
在这个例子中,我把对称密钥的值存储在application.properties文件中,正如下面的代码片段所示。然而,别忘了,签名密钥是敏感数据,在真实世界的情况下,你应该把它存储在别人访问不到的地方。
jwt.key=ymLTU8rq83j4fmJZj60wh4OrMNuntIj4fmJ
请记住我们在第13章和第14章中关于授权服务器的例子,对于每一个授权服务器,我们还定义了一个UserDetailsServer和PasswordEncoder。清单15.2提醒你如何为授权服务器配置这些组件。为了使解释简短,我不会在本章的所有例子中重复同样的代码。
清单15.2 配置授权服务器的用户管理
package com.laurentiuspilca.ssia.config;

import org.springframework.context.annotation.Bean;
import org.springframework.context.annotation.Configuration;
import org.springframework.security.authentication.AuthenticationManager;
import org.springframework.security.config.annotation.web.configuration.WebSecurityConfigurerAdapter;
import org.springframework.security.core.userdetails.User;
import org.springframework.security.core.userdetails.UserDetails;
import org.springframework.security.core.userdetails.UserDetailsService;
import org.springframework.security.crypto.password.NoOpPasswordEncoder;
import org.springframework.security.crypto.password.PasswordEncoder;
import org.springframework.security.provisioning.InMemoryUserDetailsManager;

@Configuration
public class WebSecurityConfig extends WebSecurityConfigurerAdapter {


    @Bean
    public UserDetailsService uds() {


        InMemoryUserDetailsManager uds = new InMemoryUserDetailsManager();

        UserDetails user = User.withUsername("john")
                .password("12345")
                .authorities("read")
                .build();

        uds.createUser(user);

        return uds;
    }

    @Bean
    public PasswordEncoder passwordEncoder() {


        return NoOpPasswordEncoder.getInstance();
    }

    @Override
    @Bean
    public AuthenticationManager authenticationManagerBean() throws Exception {


        return super.authenticationManagerBean();
    }

}
我们现在可以启动授权服务器并调用/oauth/token端点来获取访问令牌。下面的代码片段向你展示了调用/oauth/token端点的cURL命令。
curl -v -XPOST -u client:secret http://localhost:8080/oauth/token?grant_type=password^&username=john^&password=12345^&scope=read
回复为
{
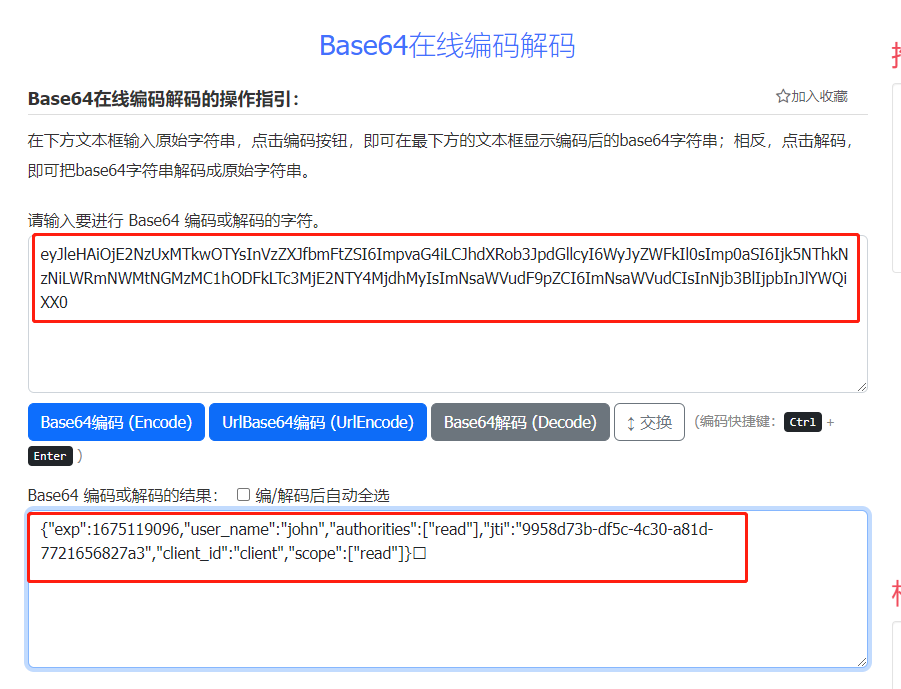
"access_token":"eyJhbGciOiJIUzI1NiIsInR5cCI6IkpXVCJ9.eyJleHAiOjE2NzUxMTkwOTYsInVzZXJfbmFtZSI6ImpvaG4iLCJhdXRob3JpdGllcyI6WyJyZWFkIl0sImp0aSI6Ijk5NThkNzNiLWRmNWMtNGMzMC1hODFkLTc3MjE2NTY4MjdhMyIsImNsaWVudF9pZCI6ImNsaWVudCIsInNjb3BlIjpbInJlYWQiXX0.uwe7E9KhMkul-8DSxXrE4WE7i1K_29slwclHmPjKSGs","token_type":"bearer","refresh_token":"eyJhbGciOiJIUzI1NiIsInR5cCI6IkpXVCJ9.eyJ1c2VyX25hbWUiOiJqb2huIiwic2NvcGUiOlsicmVhZCJdLCJhdGkiOiI5OTU4ZDczYi1kZjVjLTRjMzAtYTgxZC03NzIxNjU2ODI3YTMiLCJleHAiOjE2Nzc2Njc4OTYsImF1dGhvcml0aWVzIjpbInJlYWQiXSwianRpIjoiYzI4YmI2YTMtOGNjZS00Y2M1LTk0MDUtMTBhMmY3ZWE2MTJhIiwiY2xpZW50X2lkIjoiY2xpZW50In0.j1qzZ9h7bziBEmTxoaASOQ6UaC8NEkcd7wHTkr2XlcM","expires_in":43199,"scope":"read","jti":"9958d73b-df5c-4c30-a81d-7721656827a3"}
你可以从响应中观察到,访问和刷新令牌现在都是JWTs。在代码片断中,我缩短了令牌的长度,使代码片断更易读。你会在控制台的响应中看到,这些令牌要长得多。在下一个代码片断中,你会发现令牌主体的解码(JSON)形式。
在建立了授权服务器之后,我们现在可以实现资源服务器。
15.1.3 实现一个使用JWT的资源服务器
在这一节中,我们将实现资源服务器,它使用对称密钥来评估我们在第15.1.2节中设置的授权服务器发出的令牌。在本节结束时,你将知道如何编写一个完整的OAuth 2系统,该系统使用使用对称密钥签署的JWTs。我们创建一个新的项目,并在pom.xml中添加所需的依赖项,正如下面的代码片段所展示的那样。
<dependency>
    <groupId>org.springframework.boot</groupId>
    <artifactId>spring-boot-starter-oauth2-resource-server</artifactId>
</dependency>
<dependency>
    <groupId>org.springframework.boot</groupId>
    <artifactId>spring-boot-starter-web</artifactId>
</dependency>
<dependency>
    <groupId>org.springframework.cloud</groupId>
    <artifactId>spring-cloud-starter-oauth2</artifactId>
</dependency>
我没有在第13章和第14章已经使用的基础上添加任何新的依赖。 因为我们需要一个api来验证安全性,我定义了一个控制器和一个方法来暴露一个简单的api,我们用它来测试资源服务器。下面的代码定义了控制器。
清单15.3 HelloController类
package com.laurentiuspilca.ssia.controllers;

import org.springframework.web.bind.annotation.GetMapping;
import org.springframework.web.bind.annotation.RestController;

@RestController
public class HelloController {


    @GetMapping("/hello")
    public String hello() {


        return "Hello!";
    }
}
现在我们有了一个要保护的端点,我们可以声明配置类,在那里我们配置TokenStore。我们将为资源服务器配置TokenStore,正如我们为授权服务器所做的那样。最重要的一点是要确保我们使用相同的密钥值。资源服务器需要该密钥来验证令牌的签名。下一个列表定义了资源服务器的配置类。
package com.laurentiuspilca.ssia.config;

import org.springframework.beans.factory.annotation.Value;
import org.springframework.context.annotation.Bean;
import org.springframework.context.annotation.Configuration;
import org.springframework.security.oauth2.config.annotation.web.configuration.EnableResourceServer;
import org.springframework.security.oauth2.config.annotation.web.configuration.ResourceServerConfigurerAdapter;
import org.springframework.security.oauth2.config.annotation.web.configurers.ResourceServerSecurityConfigurer;
import org.springframework.security.oauth2.provider.token.TokenStore;
import org.springframework.security.oauth2.provider.token.store.JwtAccessTokenConverter;
import org.springframework.security.oauth2.provider.token.store.JwtTokenStore;

@Configuration
@EnableResourceServer
public class ResourceServerConfig extends ResourceServerConfigurerAdapter {


    //注入application.properties文件中的键值
    @Value("${jwt.key}")
    private String jwtKey;

    //配置 TokenStore
    @Override
    public void configure(ResourceServerSecurityConfigurer resources) {


        resources.tokenStore(tokenStore());
    }

    @Bean
    public TokenStore tokenStore() {


        //声明TokenStore并将其添加到Spring上下文中。
        return new JwtTokenStore(jwtAccessTokenConverter());
    }

    @Bean
    public JwtAccessTokenConverter jwtAccessTokenConverter() {


        //创建一个访问令牌转换器并设置用于验证令牌签名的对称密钥。
        JwtAccessTokenConverter converter = new JwtAccessTokenConverter();
        converter.setSigningKey(jwtKey);
        return converter;
    }
}
注意 不要忘记在应用程序的.properties文件中设置键的值。
用于对称加密或签名的密钥只是一串随机的字节。你用一种随机性的算法来生成它。在我们的例子中,你可以使用任何字符串值,例如 “abcde”。在现实世界中,使用一个长度最好超过258字节的随机生成值是个好主意。
因为我在同一台机器上同时运行授权服务器和资源服务器,我需要为这个应用程序配置一个不同的端口。接下来的代码片断介绍了application.properties文件的内容。
server.port=9090

jwt.key=ymLTU8rq83j4fmJZj60wh4OrMNuntIj4fmJ
现在我们可以启动我们的资源服务器,并使用你之前从授权服务器获得的有效JWT调用/hello端点。你必须将令牌添加到请求的授权HTTP头中,在我们的例子中以 "Bearer "为前缀。接下来的代码片段向你展示了如何使用cURL调用端点。
curl -H "Authorization:Bearer eyJhbGciOiJIUzI1NiIsInR5cCI6IkpXVCJ9.eyJleHAiOjE2NzUxMTkwOTYsInVzZXJfbmFtZSI6ImpvaG4iLCJhdXRob3JpdGllcyI6WyJyZWFkIl0sImp0aSI6Ijk5NThkNzNiLWRmNWMtNGMzMC1hODFkLTc3MjE2NTY4MjdhMyIsImNsaWVudF9pZCI6ImNsaWVudCIsInNjb3BlIjpbInJlYWQiXX0.uwe7E9KhMkul-8DSxXrE4WE7i1K_29slwclHmPjKSGs" http://localhost:9090/hello
响应是
Hello!
你刚刚完成了一个使用OAuth 2与JWT作为令牌实现的系统。正如你所发现的,Spring Security使这个实现变得简单。 在这一节中,你学会了如何使用对称密钥来签署和验证令牌。 但你可能会发现在现实世界的场景中,在授权服务器和资源服务器上使用同一密钥是不可行的。在第15.2节中,你将学习如何实现一个类似的系统,在这些场景中使用非对称密钥进行令牌验证。
在没有Spring Security OAuth项目的情况下使用对称性密钥
正如我们在第14章所讨论的,你也可以用oauth2ResourceServer()配置你的资源服务器来使用JWTs。正如我们所提到的,这种方法对于未来的项目来说是比较可取的,但你可能会在现有的应用程序中发现它。因此,你需要了解这种方法,以便将来实现,当然,如果你想把现有的项目迁移到它。接下来的代码片段向你展示了如何使用对称密钥配置JWT认证,而不使用Spring Security OAuth项目的类。
@Configuration
public class ResourceServerConfig
     extends WebSecurityConfigurerAdapter {


 @Value("${jwt.key}")
 private String jwtKey;
 @Override
 protected void configure(HttpSecurity http) throws Exception {


     http.authorizeRequests()
             .anyRequest().authenticated()
             .and()
             .oauth2ResourceServer(
                     c -> c.jwt(
                             j -> j.decoder(jwtDecoder());
));
 }
// Omitted code
}
正如你所看到的,这次我使用了作为参数发送给oauth2ResourceServer()的Customizer对象的jwt()方法。使用jwt()方法,我们可以计算出我们的应用程序验证令牌时需要的细节。在这种情况下,由于我们讨论的是使用对称密钥的验证,我在同一个类中创建了一个JwtDecoder来提供对称密钥的值。接下来的代码片段显示了我如何使用decoder()方法来设置这个解码器。
@Bean
public JwtDecoder jwtDecoder() {


 byte [] key = jwtKey.getBytes();
 SecretKey originalKey = new SecretKeySpec(key, 0, key.length, "AES");
 NimbusJwtDecoder jwtDecoder =
         NimbusJwtDecoder.withSecretKey(originalKey)
                 .build();
 return jwtDecoder;
}
我们配置的元素是一样的!如果你选择使用这种方法来设置你的资源服务器,那只是语法上的不同。
15.2 使用用JWT的非对称密钥签署的令牌
在本节中,我们实现了一个OAuth 2认证的例子,授权服务器和资源服务器使用非对称密钥对来签署和验证令牌。有时,像我们在第15.1节中实现的那样,只有授权服务器和资源服务器共享一个密钥是不可行的。通常,如果授权服务器和资源服务器不是由同一个组织开发的,就会发生这种情况。在这种情况下,我们说授权服务器不 "信任 "资源服务器,所以你不希望授权服务器与资源服务器共享一个密钥。而且,对于对称密钥,资源服务器有太多的权力:不仅可以验证令牌,还可以对其进行签名(图15.4)。
在担任不同项目的顾问时,我看到过通过邮件或其他不安全的渠道交换对称密钥的情况。 千万不要这样做!对称钥匙是一种私人钥匙。拥有这种钥匙的人可以用它来访问系统。我的经验法则是,如果你需要在系统外分享钥匙,它就不应该是对称的。
当我们不能假设授权服务器和资源服务器之间存在信任关系时,我们就使用非对称密钥对。出于这个原因,你需要知道如何实现这样一个系统。在这一节中,我们将通过一个例子向你展示如何实现这一目标的所有必要方面。
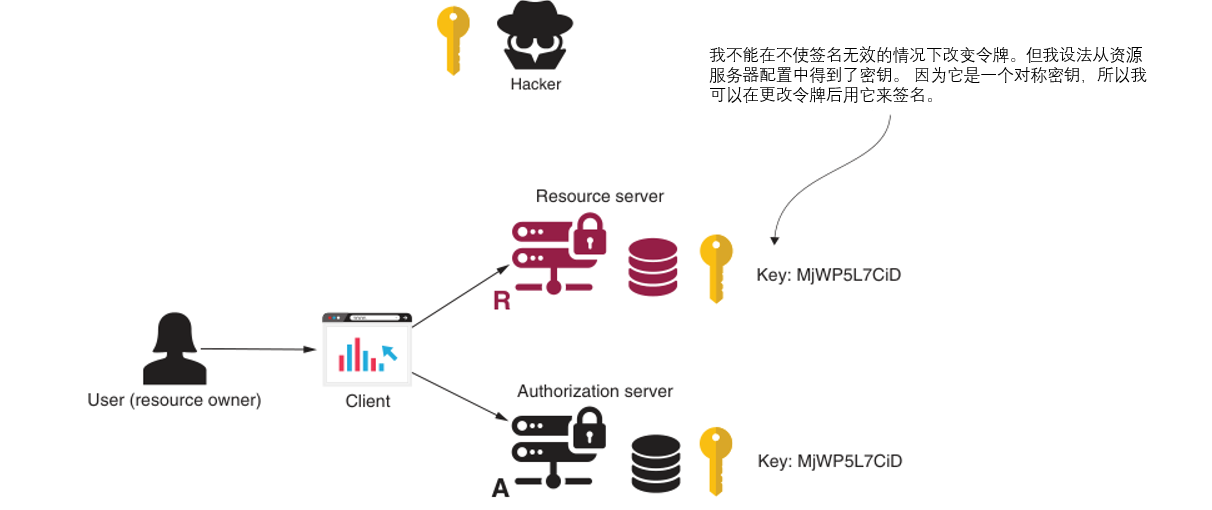
图15.4 如果黑客以某种方式获得了对称密钥,他们就可以改变令牌并签名。这样一来,他们就能获得用户的资源。
什么是非对称密钥对,它是如何工作的?这个概念很简单。一个非对称密钥对有两个密钥:一个叫做私钥,另一个叫做公钥。授权服务器使用私钥来签署令牌,而某人只能通过使用私钥来签署令牌(图15.5)。
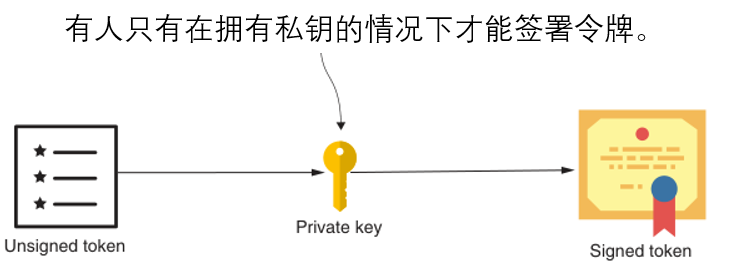
图15.5 为了签署令牌,有人需要使用私钥。然后,任何人都可以使用该密钥对的公钥来验证签名者的身份。
公钥与私钥相连,这就是为什么我们称它为一对。但公钥只能用于验证签名。没有人可以用公钥签署令牌(图15.6)。
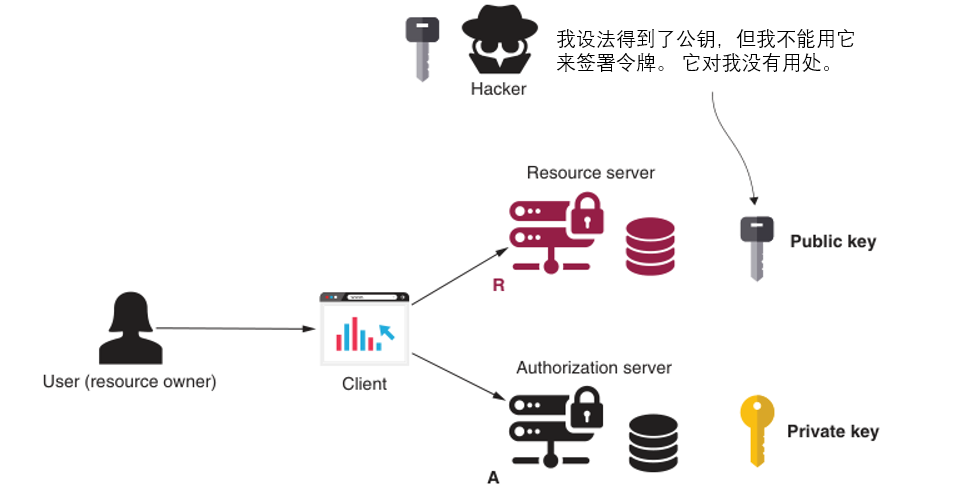
图15.6 如果黑客设法获得了公钥,他们将不能用它来签署令牌。公钥只能用于验证签名。
15.2.1 生成密钥对
在这一节中,我将教你如何生成一个非对称密钥对。我们需要一个密钥对来配置我们在15.2.2和15.2.3节中实现的授权服务器和资源服务器。这是一个非对称密钥对(这意味着它有一个由授权服务器用来签署令牌的私有部分和一个由资源服务器用来验证签名的公共部分)。为了生成密钥对,我使用keytool和OpenSSL,这是两个简单易用的命令行工具。你的JDK安装了keytool,所以你的计算机上可能已经有了它。对于OpenSSL,你需要从https://www.openssl.org/ 下载它。如果你使用Git Bash,它自带了OpenSSL,就不需要单独安装它。我总是喜欢用Git Bash进行这些操作,因为它不需要我单独安装这些工具。或者使用PuTTY Key Generator生成。一旦你有了这些工具,你需要运行两个命令:
- 生成一个私钥
- 获得先前生成的私钥的公钥
生成私钥
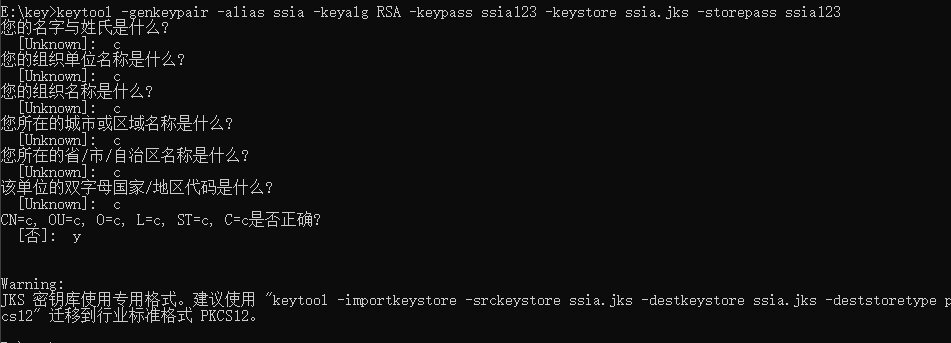
要生成一个私钥,请运行下一个代码段中的keytool命令。它在一个名为sia.jks的文件中生成了一个私钥。我还使用密码 "sia123 "来保护私钥,并使用别名 "sia "来给密钥命名。在下面的command中,你可以看到用于生成密钥的算法,RSA:
keytool -genkeypair -alias ssia -keyalg RSA -keypass ssia123 -keystore ssia.jks -storepass ssia123
获得公钥
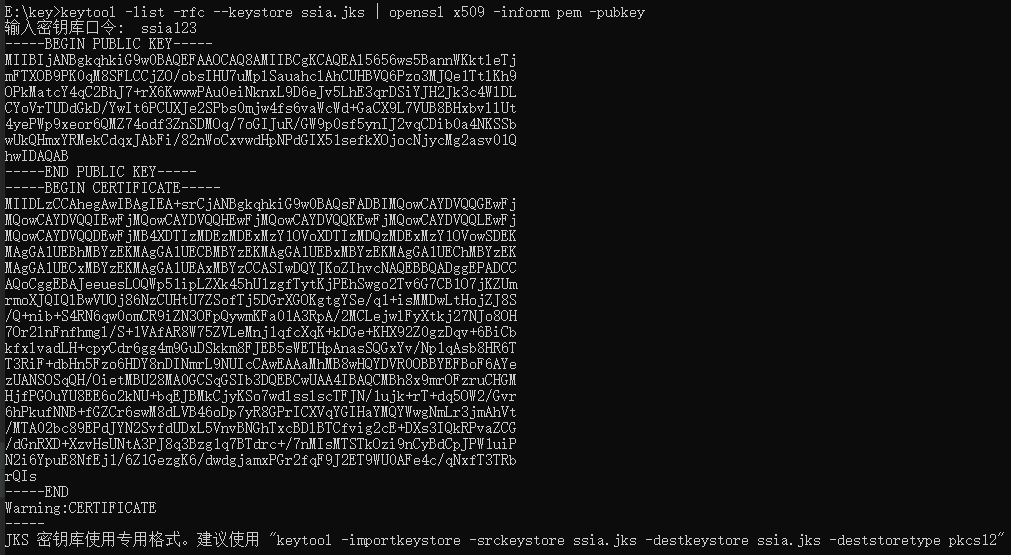
为了获得先前生成的私钥的公钥,你可以运行keytool命令。
keytool -list -rfc --keystore ssia.jks | openssl x509 -inform pem -pubkey
你会被提示输入生成公钥时使用的密码;在我的例子中是sia123。然后,你应该在输出中找到公钥和证书(在这个例子中,只有密钥的值对我们来说是必要的),这个密钥应该类似于下一个代码段。
-----BEGIN PUBLIC KEY-----
MIIBIjANBgkqhkiG9w0BAQEFAAOCAQ8AMIIBCgKCAQEAl5656ws5BannWKktleTj
mFTXOB9PK0qM8SFLCCjZO/obsIHU7uMplSauahclAhCUHBVQ6Pzo3MJQe1TtlKh9
OPkMatcY4qC2BhJ7+rX6KwwwPAu0eiNknxL9D6eJv5LhE3qrDSiYJH2Jk3c4WlDL
CYoVrTUDdGkD/YwIt6PCUXJe2SPbs0mjw4fs6vaWcWd+GaCX9L7VUB8BHxbvllUt
4yePWp9xeor6QMZ74odf3ZnSDMOq/7oGIJuR/GW9p0sf5ynIJ2vqCDib0a4NKSSb
wUkQHmxYRMekCdqxJAbFi/82nWoCxvwdHpNPdGIX51sefkXOjocNjycMg2asv01Q
hwIDAQAB
-----END PUBLIC KEY-----
这就是了!我们有一个可以用来签署JWT的私钥和一个可以用来验证签名的公钥。现在我们只需要在我们的授权和资源服务器中配置这些。
15.2.2 实现一个使用私钥的授权服务器
在这一节中,我们将配置授权服务器以使用私钥来签署JWTs。在第15.2.1节中,你学到了如何生成一个私钥和公钥。pom.xml文件中使用了与我们在第15.1节中实现的授权服务器相同的dependencies,pom.xml如下
<?xml version="1.0" encoding="UTF-8"?>
<project xmlns="http://maven.apache.org/POM/4.0.0" xmlns:xsi="http://www.w3.org/2001/XMLSchema-instance"
         xsi:schemaLocation="http://maven.apache.org/POM/4.0.0 https://maven.apache.org/xsd/maven-4.0.0.xsd">
    <modelVersion>4.0.0</modelVersion>
    <parent>
        <groupId>org.springframework.boot</groupId>
        <artifactId>spring-boot-starter-parent</artifactId>
        <version>2.3.12.RELEASE</version>
        <relativePath/> <!-- lookup parent from repository -->
    </parent>
    <groupId>com.laurentiuspilca</groupId>
    <artifactId>ch15-003-authorization-server-ppk</artifactId>
    <version>0.0.1-SNAPSHOT</version>
    <name>ssia-ch15-ex2-as</name>
    <description>Demo project for Spring Boot</description>

    <properties>
        <java.version>1.8</java.version>
        <spring-cloud.version>Hoxton.SR12</spring-cloud.version>
    </properties>

    <dependencies>
        <dependency>
            <groupId>org.springframework.boot</groupId>
            <artifactId>spring-boot-starter-security</artifactId>
        </dependency>
        <dependency>
            <groupId>org.springframework.boot</groupId>
            <artifactId>spring-boot-starter-web</artifactId>
        </dependency>
        <dependency>
            <groupId>org.springframework.cloud</groupId>
            <artifactId>spring-cloud-starter-oauth2</artifactId>
        </dependency>
        <dependency>
            <groupId>org.springframework.boot</groupId>
            <artifactId>spring-boot-starter-test</artifactId>
            <scope>test</scope>
            <exclusions>
                <exclusion>
                    <groupId>org.junit.vintage</groupId>
                    <artifactId>junit-vintage-engine</artifactId>
                </exclusion>
            </exclusions>
        </dependency>
        <dependency>
            <groupId>org.springframework.security</groupId>
            <artifactId>spring-security-test</artifactId>
            <scope>test</scope>
        </dependency>
    </dependencies>

    <dependencyManagement>
        <dependencies>
            <dependency>
                <groupId>org.springframework.cloud</groupId>
                <artifactId>spring-cloud-dependencies</artifactId>
                <version>${spring-cloud.version}</version>
                <type>pom</type>
                <scope>import</scope>
            </dependency>
        </dependencies>
    </dependencyManagement>

    <build>
        <plugins>
            <plugin>
                <groupId>org.springframework.boot</groupId>
                <artifactId>spring-boot-maven-plugin</artifactId>
            </plugin>
        </plugins>
    </build>

</project>
我把私钥文件 ssia.jks 复制到我的应用程序的资源文件夹中。我将密钥添加到资源文件夹中,因为对我来说,直接从classpath中读取它比较容易。然而,它并不是必须在classpath中的。在application.properties文件中,我存储了文件名、密钥的别名,以及我生成密码时用来保护私钥的密码。我们需要这些细节来配置JwtTokenStore。下面的代码片段向你展示了我的application.properties文件的内容。
password=ssia123
privateKey=ssia.jks
alias=ssia
与我们为授权服务器使用符号密钥所做的配置相比,唯一改变的是JwtAccessTokenConverter对象的定义。我们仍然使用JwtTokenStore。如果你还记得,我们在第15.1节中使用JwtAccessTokenConverter来配置对称密钥。我们使用同一个JwtAccessTokenConverter对象来设置私钥。下面的列表显示了授权服务器的配置类。
package com.laurentiuspilca.ssia.config;

import org.springframework.beans.factory.annotation.Autowired;
import org.springframework.beans.factory.annotation.Value;
import org.springframework.context.annotation.Bean;
import org.springframework.context.annotation.Configuration;
import org.springframework.core.io.ClassPathResource;
import org.springframework.security.authentication.AuthenticationManager;
import org.springframework.security.oauth2.config.annotation.configurers.ClientDetailsServiceConfigurer;
import org.springframework.security.oauth2.config.annotation.web.configuration.AuthorizationServerConfigurerAdapter;
import org.springframework.security.oauth2.config.annotation.web.configuration.EnableAuthorizationServer;
import org.springframework.security.oauth2.config.annotation.web.configurers.AuthorizationServerEndpointsConfigurer;
import org.springframework.security.oauth2.provider.token.TokenStore;
import org.springframework.security.oauth2.provider.token.store.JwtAccessTokenConverter;
import org.springframework.security.oauth2.provider.token.store.JwtTokenStore;
import org.springframework.security.oauth2.provider.token.store.KeyStoreKeyFactory;

@Configuration
@EnableAuthorizationServer
public class AuthServerConfig
        extends AuthorizationServerConfigurerAdapter {


    //从application.properties文件中注入私钥文件的名称、别名和密码。
    @Value("${password}")
    private String password;

    @Value("${privateKey}")
    private String privateKey;

    @Value("${alias}")
    private String alias;

    @Autowired
    private AuthenticationManager authenticationManager;

    @Override
    public void configure(ClientDetailsServiceConfigurer clients) throws Exception {


        clients.inMemory()
                .withClient("client")
                .secret("secret")
                .authorizedGrantTypes("password", "refresh_token")
                .scopes("read");
    }

    @Override
    public void configure(AuthorizationServerEndpointsConfigurer endpoints) {


        endpoints
          .authenticationManager(authenticationManager)
          .tokenStore(tokenStore())
          .accessTokenConverter(jwtAccessTokenConverter());
    }

    @Bean
    public TokenStore tokenStore() {


        return new JwtTokenStore(jwtAccessTokenConverter());
    }

    @Bean
    public JwtAccessTokenConverter jwtAccessTokenConverter() {


        JwtAccessTokenConverter converter = new JwtAccessTokenConverter();

        //创建一个KeyStoreKeyFactory对象,从classpath读取私钥文件。
        KeyStoreKeyFactory keyStoreKeyFactory =
                new KeyStoreKeyFactory(
                        new ClassPathResource(privateKey),
                        password.toCharArray());
	//使用KeyStoreKeyFactory对象检索密钥对,并将密钥对设置到JwtAccessTokenConverter对象中。
        converter.setKeyPair(keyStoreKeyFactory.getKeyPair(alias));

        return converter;
    }
}
现在你可以启动授权服务器并调用/oauth/token端点来生成一个新的访问令牌。当然,你只能看到一个正常的JWT被创建,但现在不同的是,为了验证其签名,你需要使用配对中的公钥。顺便说一下,别忘了这个令牌只是签名的,而不是加密的。接下来的代码片段向你展示了如何调用/oauth/token api。
curl -v -XPOST -u client:secret http://localhost:8080/oauth/token?grant_type=password^&username=john^&password=12345^&scope=read
响应如下
{

    "access_token":"eyJhbGciOiJSUzI1NiIsInR5cCI6IkpXVCJ9.eyJleHAiOjE2NzUxMjIxNjEsInVzZXJfbmFtZSI6ImpvaG4iLCJhdXRob3JpdGllcyI6WyJyZWFkIl0sImp0aSI6IjJlMmIzYTUxLTQyYzUtNGNkZS04YThhLWZmMzFhZDI2ZDQ2OSIsImNsaWVudF9pZCI6ImNsaWVudCIsInNjb3BlIjpbInJlYWQiXX0.g3mLowjUHZYyrOmqctpXx_aQtvR_ZJTdB8RoCLXl5DFmM7l_U_xvcM9Tc93t5wbc3jiKXg29XPlWbVe7nPp6khqDDgaxjIrVaJvrpweUQibjXC0ZRGEIZbt_qrRb0RxH0LiImy3j7qRydzFmhQ6CfT3oI2CRLaRNGWO17R1dGsQj6L5DkhA2JPZgQU41xMKy9GRvqiOXoekp2tQrQ6tJGDmoWXJIR08Kx5plYZnNNVSe6ldD5u1zhVYYsBSjXp8QKruA-HKmKmlaCknWtomw5i0SMzO182Vgz7H92f6vlvXIzi8MWZuoEH8-mYgL_nG_5dwpWnQeKIGsKaJpxhpypA","token_type":"bearer","refresh_token":"eyJhbGciOiJSUzI1NiIsInR5cCI6IkpXVCJ9.eyJ1c2VyX25hbWUiOiJqb2huIiwic2NvcGUiOlsicmVhZCJdLCJhdGkiOiIyZTJiM2E1MS00MmM1LTRjZGUtOGE4YS1mZjMxYWQyNmQ0NjkiLCJleHAiOjE2Nzc2NzA5NjEsImF1dGhvcml0aWVzIjpbInJlYWQiXSwianRpIjoiZjljYzFhZGItNjNhNy00ZTk5LThmOGYtYTlhNzdjNDJiNjc4IiwiY2xpZW50X2lkIjoiY2xpZW50In0.QytbcoI58hi0MbOqZoErtuQgsnd4NOIxuuYn7WqASZolh1-LOHg3_0BOhMqm4jQAMk1wQQHmopWGHx2ZrS90GvWG0zDPBxeHK3uG_W-4I-TXMQ9fBFQLbBLPDSQ0_fpm1lhMh-s9hVdbHBflJNLYBmKqgtbFwPwmXB6bkyWjcOy5Vg0FN7dAivMfxcNov8LPRCCJx2OTsyByMommAkubOTq_Pp5fvp90WKLBD_sXaQn9o0ULvv1teymcTUMCX4zL25GR-jl__zPjw5eaYOqZallcT493da0CAHhte-OnpRtH68-I30muGt0Mdh_rosWn70KqGRAwCcHwNgU5ryHwGA","expires_in":43199,"scope":"read","jti":"2e2b3a51-42c5-4cde-8a8a-ff31ad26d469"}
15.2.3 实现一个使用公钥的资源服务器
在本节中,我们将实现一个资源服务器,使用公钥来验证令牌的签名。当我们完成这一节时,你将拥有一个完整的系统,它通过OAuth 2实现认证,并使用公钥-私钥对来保护令牌。授权服务器使用私钥来签署令牌,而资源服务器则使用公钥来验证签名。我们在pom.xml如下
<?xml version="1.0" encoding="UTF-8"?>
<project xmlns="http://maven.apache.org/POM/4.0.0" xmlns:xsi="http://www.w3.org/2001/XMLSchema-instance"
         xsi:schemaLocation="http://maven.apache.org/POM/4.0.0 https://maven.apache.org/xsd/maven-4.0.0.xsd">
    <modelVersion>4.0.0</modelVersion>
    <parent>
        <groupId>org.springframework.boot</groupId>
        <artifactId>spring-boot-starter-parent</artifactId>
        <version>2.3.12.RELEASE</version>
        <relativePath/> <!-- lookup parent from repository -->
    </parent>
    <groupId>com.laurentiuspilca</groupId>
    <artifactId>ch15-004-rs-pubk</artifactId>
    <version>0.0.1-SNAPSHOT</version>
    <name>ch15-004-rs-pubk</name>
    <description>Demo project for Spring Boot</description>

    <properties>
        <java.version>1.8</java.version>
        <spring-cloud.version>Hoxton.SR12</spring-cloud.version>
    </properties>

    <dependencies>
        <dependency>
            <groupId>org.springframework.boot</groupId>
            <artifactId>spring-boot-starter-oauth2-resource-server</artifactId>
        </dependency>
        <dependency>
            <groupId>org.springframework.boot</groupId>
            <artifactId>spring-boot-starter-web</artifactId>
        </dependency>
        <dependency>
            <groupId>org.springframework.cloud</groupId>
            <artifactId>spring-cloud-starter-oauth2</artifactId>
        </dependency>
        <dependency>
            <groupId>org.springframework.boot</groupId>
            <artifactId>spring-boot-starter-test</artifactId>
            <scope>test</scope>
            <exclusions>
                <exclusion>
                    <groupId>org.junit.vintage</groupId>
                    <artifactId>junit-vintage-engine</artifactId>
                </exclusion>
            </exclusions>
        </dependency>
    </dependencies>

    <dependencyManagement>
        <dependencies>
            <dependency>
                <groupId>org.springframework.cloud</groupId>
                <artifactId>spring-cloud-dependencies</artifactId>
                <version>${spring-cloud.version}</version>
                <type>pom</type>
                <scope>import</scope>
            </dependency>
        </dependencies>
    </dependencyManagement>

    <build>
        <plugins>
            <plugin>
                <groupId>org.springframework.boot</groupId>
                <artifactId>spring-boot-maven-plugin</artifactId>
            </plugin>
        </plugins>
    </build>

</project>
资源服务器需要拥有该配对的公钥来验证令牌的签名,所以让我们把这个密钥添加到application.properties文件中。在15.2.1节中,你学到了如何生成公钥。接下来的代码片段显示了我的application.properties文件的内容。
server.port=9090

publicKey=-----BEGIN PUBLIC KEY-----MIIBIjANBgkqhkiG9w0BAQEFAAOCAQ8AMIIBCgKCAQEAl5656ws5BannWKktleTjmFTXOB9PK0qM8SFLCCjZO/obsIHU7uMplSauahclAhCUHBVQ6Pzo3MJQe1TtlKh9OPkMatcY4qC2BhJ7+rX6KwwwPAu0eiNknxL9D6eJv5LhE3qrDSiYJH2Jk3c4WlDLCYoVrTUDdGkD/YwIt6PCUXJe2SPbs0mjw4fs6vaWcWd+GaCX9L7VUB8BHxbvllUt4yePWp9xeor6QMZ74odf3ZnSDMOq/7oGIJuR/GW9p0sf5ynIJ2vqCDib0a4NKSSbwUkQHmxYRMekCdqxJAbFi/82nWoCxvwdHpNPdGIX51sefkXOjocNjycMg2asv01QhwIDAQAB-----END PUBLIC KEY-----
为了提高可读性,我缩写了公钥。下面的代码清单告诉你如何在资源服务器的配置类中配置这个密钥。
代码清单15.6 资源服务器和公钥的配置类
package com.laurentiuspilca.ssia.config;

import org.springframework.beans.factory.annotation.Value;
import org.springframework.context.annotation.Bean;
import org.springframework.context.annotation.Configuration;
import org.springframework.security.oauth2.config.annotation.web.configuration.EnableResourceServer;
import org.springframework.security.oauth2.config.annotation.web.configuration.ResourceServerConfigurerAdapter;
import org.springframework.security.oauth2.config.annotation.web.configurers.ResourceServerSecurityConfigurer;
import org.springframework.security.oauth2.provider.token.TokenStore;
import org.springframework.security.oauth2.provider.token.store.JwtAccessTokenConverter;
import org.springframework.security.oauth2.provider.token.store.JwtTokenStore;

@Configuration
@EnableResourceServer
public class ResourceServerConfig extends ResourceServerConfigurerAdapter {


    //注入application.properties文件中的公钥
    @Value("${publicKey}")
    private String publicKey;

    @Override
    public void configure(ResourceServerSecurityConfigurer resources) {


        resources.tokenStore(tokenStore());
    }

    //在Spring上下文中创建并添加一个JwtTokenStore。
    @Bean
    public TokenStore tokenStore() {


        return new JwtTokenStore(jwtAccessTokenConverter());
    }

    @Bean
    public JwtAccessTokenConverter jwtAccessTokenConverter() {


        JwtAccessTokenConverter converter = new JwtAccessTokenConverter();
        //设置令牌库用于验证令牌的公钥。
        converter.setVerifierKey(publicKey);
        return converter;
    }
}
当然,要有一个端点,我们还需要添加控制器。接下来的代码片段定义了控制器。
package com.laurentiuspilca.ssia.controllers;

import org.springframework.web.bind.annotation.GetMapping;
import org.springframework.web.bind.annotation.RestController;

@RestController
public class HelloController {


    @GetMapping("/hello")
    public String hello() {


        return "Hello!";
    }
}
让我们运行并调用端点来测试资源服务器。下面是命令。
curl -H "Authorization:Bearer eyJhbGciOiJSUzI1NiIsInR5cCI6IkpXVCJ9.eyJleHAiOjE2NzUxMjIxNjEsInVzZXJfbmFtZSI6ImpvaG4iLCJhdXRob3JpdGllcyI6WyJyZWFkIl0sImp0aSI6IjJlMmIzYTUxLTQyYzUtNGNkZS04YThhLWZmMzFhZDI2ZDQ2OSIsImNsaWVudF9pZCI6ImNsaWVudCIsInNjb3BlIjpbInJlYWQiXX0.g3mLowjUHZYyrOmqctpXx_aQtvR_ZJTdB8RoCLXl5DFmM7l_U_xvcM9Tc93t5wbc3jiKXg29XPlWbVe7nPp6khqDDgaxjIrVaJvrpweUQibjXC0ZRGEIZbt_qrRb0RxH0LiImy3j7qRydzFmhQ6CfT3oI2CRLaRNGWO17R1dGsQj6L5DkhA2JPZgQU41xMKy9GRvqiOXoekp2tQrQ6tJGDmoWXJIR08Kx5plYZnNNVSe6ldD5u1zhVYYsBSjXp8QKruA-HKmKmlaCknWtomw5i0SMzO182Vgz7H92f6vlvXIzi8MWZuoEH8-mYgL_nG_5dwpWnQeKIGsKaJpxhpypA" http://localhost:9090/hello
响应如下
Hello!
在没有Spring Security OAuth项目的情况下使用非对称性密钥
在这里,我们将讨论如果应用程序使用非对称密钥进行令牌验证,将使用Spring Security OAuth项目的资源服务器迁移到简单的Spring Security项目中需要做哪些改变。实际上,使用非对称密钥与使用对称密钥的项目没有太大区别。唯一的变化是你需要使用的JwtDecoder。在这种情况下,你需要配置密钥对的公共部分,而不是配置用于令牌验证的对称密钥。下面的代码片断显示了如何做到这一点。
public JwtDecoder jwtDecoder() {


 try {


     KeyFactory keyFactory = KeyFactory.getInstance("RSA");
     var key = Base64.getDecoder().decode(publicKey);
     var x509 = new X509EncodedKeySpec(key);
     var rsaKey = (RSAPublicKey) keyFactory.generatePublic(x509);
     return NimbusJwtDecoder.withPublicKey(rsaKey).build();
 } catch (Exception e) {


     throw new RuntimeException("Wrong public key");
 }
}
一旦你有了一个使用公钥验证令牌的JwtDecoder,你需要使用oauth2ResourceServer()方法来设置解码器。你这样做就像一个对称密钥。下一个代码片断显示了如何做到这一点。
@Configuration
public class ResourceServerConfig
     extends WebSecurityConfigurerAdapter {


 @Value("${publicKey}")
 private String publicKey;
 @Override
 protected void configure(HttpSecurity http) throws Exception {


     http.oauth2ResourceServer(
             c -> c.jwt(
                     j -> j.decoder(jwtDecoder())
             )
     );
     http.authorizeRequests()
             .anyRequest().authenticated();
 }
// Omitted code
}
15.2.4 使用一个api来暴露公钥
在本节中,我们将讨论一种让资源服务器知道公钥的方法–授权服务器公开公钥。在我们在第15.2节中实现的系统中,我们使用私人-公共密钥对来签署和验证令牌。我们在资源服务器端配置了公钥。资源服务器使用公钥来验证 JWTs。但是,如果你想改变密钥对会怎样?不要永远保持相同的密钥对,这是一个很好的做法,这也是你在本节学习实现的内容。随着时间的推移,你应该轮流使用钥匙!这将使你的系统不至于太差。这可以使你的系统不那么容易受到钥匙盗窃的影响(图15.7)。
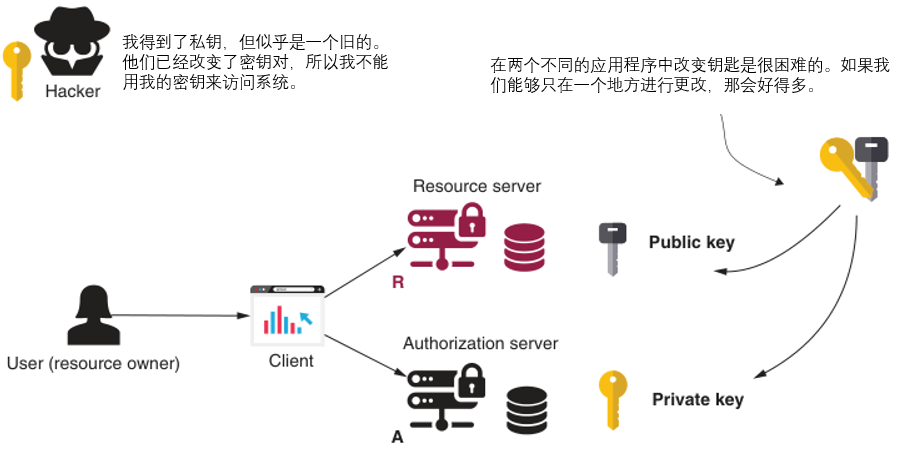
图15.7 如果定期更换钥匙,系统就不容易受到钥匙盗窃的影响。但如果钥匙被配置在两个应用程序中,就更难轮换了。
到目前为止,我们已经在授权服务器端配置了私钥,在资源服务器端配置了公钥(图15.7)。设置在两个地方使得密钥更难管理。但如果我们只把它们配置在一边,你就可以更容易地管理这些密钥。解决方案是将整个密钥对移到授权服务器端,并允许授权服务器用一个端点暴露公钥(图15.8)。
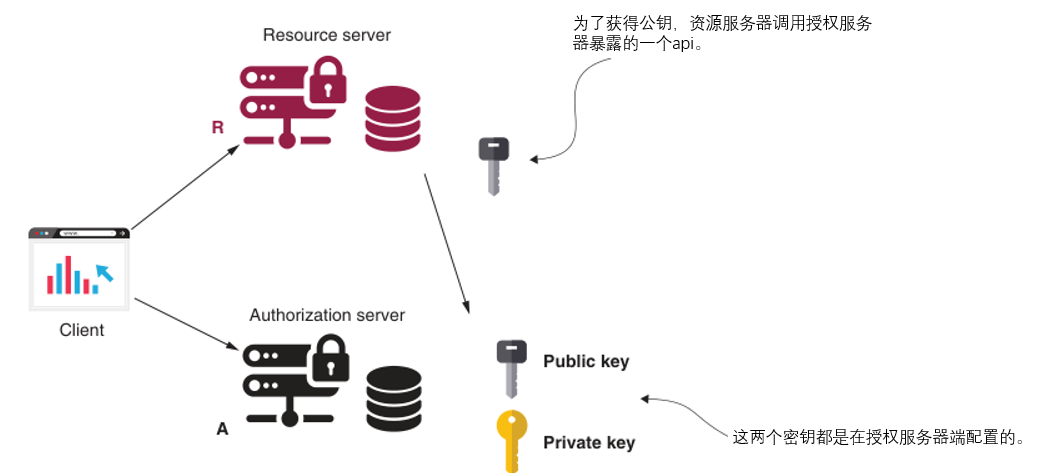
图15.8 两把钥匙都是在授权服务器上配置的。为了获得公钥,资源服务器会调用授权服务器的一个api。这种方法允许我们更容易地轮换密钥,因为我们只需要在一个地方配置它们。
对于授权服务器,我们保持与15.2.3节中开发的项目相同的设置。我们只需要确保我们能够访问暴露公钥的api。默认情况下,对它的所有请求都被拒绝。我们需要覆盖api的配置,允许任何拥有客户证书的人访问它。在代码15.7中,你可以找到你需要对授权服务器的配置类所做的修改。这些配置允许任何拥有有效客户证书的人调用端点以获得公钥。
package com.laurentiuspilca.ssia.config;

import org.springframework.beans.factory.annotation.Autowired;
import org.springframework.beans.factory.annotation.Value;
import org.springframework.context.annotation.Bean;
import org.springframework.context.annotation.Configuration;
import org.springframework.core.io.ClassPathResource;
import org.springframework.security.authentication.AuthenticationManager;
import org.springframework.security.oauth2.config.annotation.configurers.ClientDetailsServiceConfigurer;
import org.springframework.security.oauth2.config.annotation.web.configuration.AuthorizationServerConfigurerAdapter;
import org.springframework.security.oauth2.config.annotation.web.configuration.EnableAuthorizationServer;
import org.springframework.security.oauth2.config.annotation.web.configurers.AuthorizationServerEndpointsConfigurer;
import org.springframework.security.oauth2.config.annotation.web.configurers.AuthorizationServerSecurityConfigurer;
import org.springframework.security.oauth2.provider.token.TokenStore;
import org.springframework.security.oauth2.provider.token.store.JwtAccessTokenConverter;
import org.springframework.security.oauth2.provider.token.store.JwtTokenStore;
import org.springframework.security.oauth2.provider.token.store.KeyStoreKeyFactory;

@Configuration
@EnableAuthorizationServer
public class AuthServerConfig
        extends AuthorizationServerConfigurerAdapter {


    @Value("${password}")
    private String password;

    @Value("${privateKey}")
    private String privateKey;

    @Value("${alias}")
    private String alias;

    @Autowired
    private AuthenticationManager authenticationManager;

    @Override
    public void configure(ClientDetailsServiceConfigurer clients) throws Exception {


        clients.inMemory()
                //添加资源服务器用于调用端点的客户凭证,该凭证暴露了公钥。
                .withClient("client")
                .secret("secret")
                .authorizedGrantTypes("password", "refresh_token")
                .scopes("read")
             .and()
                .withClient("resourceserver")
                .secret("resourceserversecret");
    }

    @Override
    public void configure(AuthorizationServerEndpointsConfigurer endpoints) {


        endpoints
          .authenticationManager(authenticationManager)
          .tokenStore(tokenStore())
          .tokenEnhancer(jwtAccessTokenConverter());
    }

    @Bean
    public TokenStore tokenStore() {


        return new JwtTokenStore(jwtAccessTokenConverter());
    }

    @Bean
    public JwtAccessTokenConverter jwtAccessTokenConverter() {


        JwtAccessTokenConverter converter = new JwtAccessTokenConverter();

        KeyStoreKeyFactory keyStoreKeyFactory =
                new KeyStoreKeyFactory(
                        new ClassPathResource(privateKey),
                        password.toCharArray());
        converter.setKeyPair(keyStoreKeyFactory.getKeyPair(alias));

        return converter;
    }

    @Override
    public void configure(AuthorizationServerSecurityConfigurer security) {


        //配置授权服务器,为任何用有效客户证书认证的请求公开公钥的端点。
        security.tokenKeyAccess("isAuthenticated()");
    }
}
你可以启动授权服务器并调用/oauth/token_key端点,以确保你正确实现配置。接下来的代码片段向你展示了cURL调用。
curl -u resourceserver:resourceserversecret http://localhost:8080/oauth/token_key
响应是
{

    "alg":"SHA256withRSA","value":"-----BEGIN PUBLIC KEY-----\nMIIBIjANBgkqhkiG9w0BAQEFAAOCAQ8AMIIBCgKCAQEAhORXDLLrdozoNFsIyaY48NwZaSP2f94JobhEV1CYw4ImqOH7My+odLyI063aDu0HLOeV0yGUj+oZVRNM/8Y5Qhl/fIRZeCtCDVybT7yJdBz/WvzAulfI4aGWSdjGUCwS88z5Af2BJUKGv7bkwRtaF+btTq8OEC/ke0GKOkWh2nGDKeHK645OOv59qLEoa8v6Ns/SveQCfB93Zx7V+utuV6Xjp8jqUN2X5MtM9+AQ2eihhTuLGCfZm0c51QXUihXYx4GH4kLMOULOXvI3uCSdrgkF6heTFRhN6sPCex1TEWB1mbGpCDGkRZ6Q0IeSKb5fcuW+LhUqfTwCKz6cvXT6kwIDAQAB\n-----END PUBLIC KEY-----"}
为了让资源服务器使用这个端点并获得公钥,你只需要在其属性文件中配置端点和凭证。接下来的代码片段定义了资源服务器的application.properties文件。
server.port=9090

security.oauth2.resource.jwt.key-uri=http://localhost:8080/oauth/token_key

security.oauth2.client.client-id=resourceserver
security.oauth2.client.client-secret=resourceserversecret
因为资源服务器现在从授权服务器的/oauth/token_key端点获取公钥,所以你不需要在资源服务器配置类中配置它。资源服务器的配置类可以保持为空,正如下面的代码片段所示。
package com.laurentiuspilca.ssia.config;

import org.springframework.context.annotation.Configuration;
import org.springframework.security.oauth2.config.annotation.web.configuration.EnableResourceServer;
import org.springframework.security.oauth2.config.annotation.web.configuration.ResourceServerConfigurerAdapter;

@Configuration
@EnableResourceServer
public class ResourceServerConfig extends ResourceServerConfigurerAdapter {


}
你现在也可以启动资源服务器,并调用它所暴露的/hello端点,看看整个设置是否像预期的那样工作。下一个代码段向你展示了如何使用cURL调用/hello端点。在这里,你像我们在第15.2.3节所做的那样获得一个令牌,并使用它来调用资源服务器的测试api:
curl -v -XPOST -u client:secret http://localhost:8080/oauth/token?grant_type=password^&username=john^&password=12345^&scope=read
curl -H "Authorization:Bearer eyJhbGciOiJSUzI1NiIsInR5cCI6IkpXVCJ9.eyJleHAiOjE2NzUxMjQwNDAsInVzZXJfbmFtZSI6ImpvaG4iLCJhdXRob3JpdGllcyI6WyJyZWFkIl0sImp0aSI6Ijk2OGMyODZjLTIyYTktNDgzMS1iNmNmLTRkYTc2ZTM4MzQzYSIsImNsaWVudF9pZCI6ImNsaWVudCIsInNjb3BlIjpbInJlYWQiXX0.JBHIk62D_19q1jifnR_WDfTUwf7wNJYsGuUAW_sjh9Nszl8H5DUm183WG6F3hrKNQhZG1kkg2apusicgIcSY1v4ZIvlbba6ZMoozzWmw1zmdwDksxSpHT2pv5J7oQexQMXcxGxvu9r_LTbWiB_LpKCIf9s05nUeoIUSgzZA4xAUOuvx5C9JGx6FcnM9d3Ld4tHtRM4Hk9qjfw1H295VFPUnulQUA9cLxb65-G8ivM6eU3YM2W7uJw0Yo8dQjhBQb72RXN-ybGyGwtxlKWClV3PuIgScySskjHWpZyP6yfTJq6opLRiuWGvR4jBdogLP-kk2rFqhburrkS5fH1rZjrg" http://localhost:9090/hello
相应结果为
Hello!
15.3 向JWT添加自定义细节
在本节中,我们将讨论向JWT令牌添加自定义细节。在大多数情况下,你所需要的不超过Spring Security已经添加到令牌的内容。然而,在现实世界的场景中,你有时会发现需要在令牌中添加客户的细节。在本节中,我们将实现一个例子,在这个例子中,你将学习如何改变授权服务器以在JWT上添加自定义细节,以及如何改变资源服务器以读取这些细节。如果你把我们在前面的例子中生成的一个令牌拿出来解码,你会看到Spring Security添加到令牌中的默认值。下面的列表介绍了这些默认值。
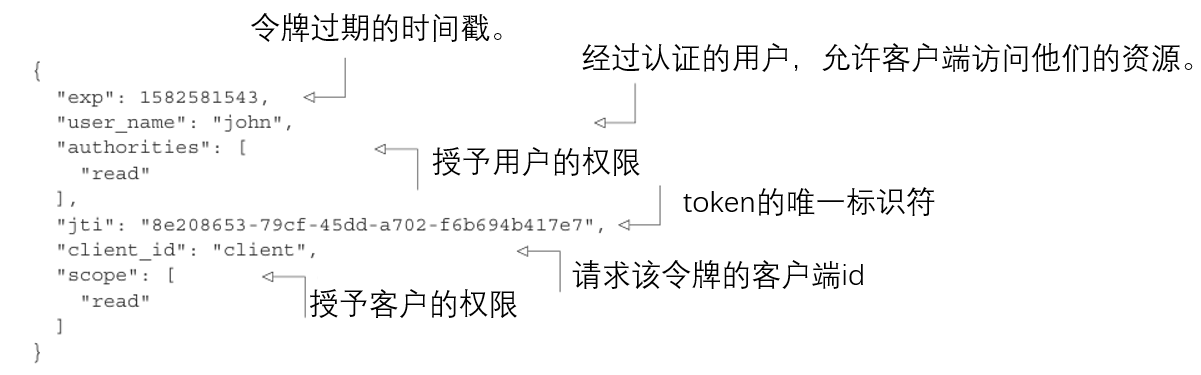
正如你在清单15.8中所看到的,默认情况下,令牌通常会存储基本授权所需的所有细节。但是,如果你的真实世界场景的要求要求更多的东西呢?一些例子可能是
- 你在一个读者评论书籍的应用程序中使用了一个授权服务器。一些api应该只被超过特定数量评论的用户访问。
- 你需要只在用户从特定时区认证的情况下允许访问。
对于我的第一个例子,你需要将评论的数量添加到令牌中。对于第二个例子,你需要添加客户端连接的时区。无论你是哪种情况,你都需要知道如何定制JWTs。
15.3.1 配置授权服务器为令牌添加自定义细节
在这一节中,我们将讨论为向令牌添加自定义细节而需要对授权服务器做出的修改。为了使这个例子简单化,我假设需求是添加授权服务器本身的时区。为了给你的令牌添加额外的细节,你需要创建一个类型为TokenEnhancer的对象。下面的列表定义了我为这个例子创建的TokenEnhancer对象。
清单15.9 一个自定义的token增强器
package com.laurentiuspilca.ssia.config;

import org.springframework.security.oauth2.common.DefaultOAuth2AccessToken;
import org.springframework.security.oauth2.common.OAuth2AccessToken;
import org.springframework.security.oauth2.provider.OAuth2Authentication;
import org.springframework.security.oauth2.provider.token.TokenEnhancer;

import java.time.ZoneId;
import java.util.HashMap;
import java.util.Map;

//实现TokenEnhancer接口
public class CustomTokenEnhancer implements TokenEnhancer {


    //重写增强()方法,该方法接收当前token并返回增强后的token。
    @Override
    public OAuth2AccessToken enhance(OAuth2AccessToken oAuth2AccessToken,
                                     OAuth2Authentication oAuth2Authentication) {


        //在我们收到的令牌的基础上创建一个新的令牌对象
        DefaultOAuth2AccessToken token = new DefaultOAuth2AccessToken(oAuth2AccessToken);

        //以map的形式定义我们要添加到令牌的细节。
        HashMap<String, Object> info = new HashMap<>();
        info.put("generatedInZone",ZoneId.systemDefault().toString());

        //将额外的细节添加到令牌中
        token.setAdditionalInformation(info);

        //返回包含额外细节的令牌
        return token;
    }
}
TokenEnhancer对象的enhance()方法接收我们增强的令牌作为参数,并返回 "增强的 "令牌,包含额外的细节。在这个例子中,我使用了我们在第15.2节中开发的同样的应用程序,只是改变了configure()方法以应用令牌增强器。下面的列表介绍了这些变化。
清单 15.10 配置 TokenEnhancer 对象
package com.laurentiuspilca.ssia.config;

import org.springframework.beans.factory.annotation.Autowired;
import org.springframework.beans.factory.annotation.Value;
import org.springframework.context.annotation.Bean;
import org.springframework.context.annotation.Configuration;
import org.springframework.core.io.ClassPathResource;
import org.springframework.security.authentication.AuthenticationManager;
import org.springframework.security.oauth2.config.annotation.configurers.ClientDetailsServiceConfigurer;
import org.springframework.security.oauth2.config.annotation.web.configuration.AuthorizationServerConfigurerAdapter;
import org.springframework.security.oauth2.config.annotation.web.configuration.EnableAuthorizationServer;
import org.springframework.security.oauth2.config.annotation.web.configurers.AuthorizationServerEndpointsConfigurer;
import org.springframework.security.oauth2.provider.token.TokenEnhancerChain;
import org.springframework.security.oauth2.provider.token.TokenStore;
import org.springframework.security.oauth2.provider.token.store.JwtAccessTokenConverter;
import org.springframework.security.oauth2.provider.token.store.JwtTokenStore;
import org.springframework.security.oauth2.provider.token.store.KeyStoreKeyFactory;

import java.util.List;

@Configuration
@EnableAuthorizationServer
public class AuthServerConfig
        extends AuthorizationServerConfigurerAdapter {


    @Value("${password}")
    private String password;

    @Value("${privateKey}")
    private String privateKey;

    @Value("${alias}")
    private String alias;

    @Autowired
    private AuthenticationManager authenticationManager;

    @Override
    public void configure(ClientDetailsServiceConfigurer clients) throws Exception {


        clients.inMemory()
                .withClient("client")
                .secret("secret")
                .authorizedGrantTypes("password", "refresh_token")
                .scopes("read");
    }

    @Override
    public void configure(AuthorizationServerEndpointsConfigurer endpoints) {


        //定义一个TokenEnhancerChain
        TokenEnhancerChain tokenEnhancerChain = new TokenEnhancerChain();

        //将我们的两个token增强器对象添加到一个列表中
         ArrayList<TokenEnhancer> tokenEnhancers = new ArrayList<>();
        tokenEnhancers.add(new CustomTokenEnhancer());
        tokenEnhancers.add(jwtAccessTokenConverter());

        //将token增强器的列表添加到链中
        tokenEnhancerChain.setTokenEnhancers(tokenEnhancers);

        //配置令牌增强器对象
        endpoints
          .authenticationManager(authenticationManager)
          .tokenStore(tokenStore())
          .tokenEnhancer(tokenEnhancerChain);
    }

    @Bean
    public TokenStore tokenStore() {


        return new JwtTokenStore(jwtAccessTokenConverter());
    }

    @Bean
    public JwtAccessTokenConverter jwtAccessTokenConverter() {


        JwtAccessTokenConverter converter = new JwtAccessTokenConverter();

        KeyStoreKeyFactory keyStoreKeyFactory =
                new KeyStoreKeyFactory(
                        new ClassPathResource(privateKey),
                        password.toCharArray());
        converter.setKeyPair(keyStoreKeyFactory.getKeyPair(alias));

        return converter;
    }
}
正如你所看到的,配置我们的自定义令牌增强器是比较复杂的。我们必须创建一个token增强器链并设置整个链,而不是只设置一个对象。 如果我们只配置我们的自定义令牌增强器,我们将覆盖访问token converter的行为。相反,我们在一个责任链中添加两者,并配置包含这两个对象的链。
让我们启动授权服务器,生成一个新的访问令牌,并检查它,看看它看起来如何。接下来的代码片段向你展示了如何调用/oauth/token终端点来获取访问令牌。
curl -v -XPOST -u client:secret http://localhost:8080/oauth/token?grant_type=password^&username=john^&password=12345^&scope=read
响应为
{
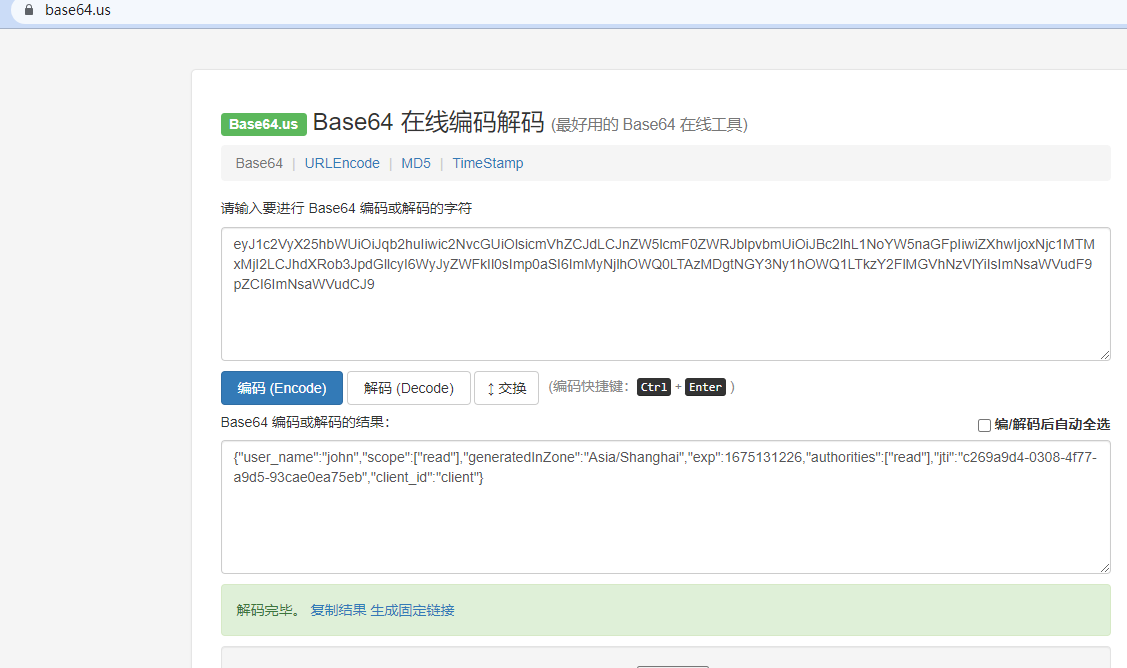
"access_token":"eyJhbGciOiJSUzI1NiIsInR5cCI6IkpXVCJ9.eyJ1c2VyX25hbWUiOiJqb2huIiwic2NvcGUiOlsicmVhZCJdLCJnZW5lcmF0ZWRJblpvbmUiOiJBc2lhL1NoYW5naGFpIiwiZXhwIjoxNjc1MTMxMjI2LCJhdXRob3JpdGllcyI6WyJyZWFkIl0sImp0aSI6ImMyNjlhOWQ0LTAzMDgtNGY3Ny1hOWQ1LTkzY2FlMGVhNzVlYiIsImNsaWVudF9pZCI6ImNsaWVudCJ9.cvqUxfr3vhADHduzR5JPcjLRdBxsq-QrGQjrTnp40IEyhSG6zWanqrX8q75lC8KdAfs7NquB9JQQj44uu1pw4sp5strU1XlOS0k8A1g_G4tMR5rTNkq2Dl71lJm9NQPqA2lNj5lQWYf13Ke6l_oxxwcsibDHK-EoXdkJD8qSFNBvrDblNgamBat0uQdMbP-9_QKiiEtnYDGthxL8sdyedWd6MUsE_8lkZy27e2wLA3nCko12VlwIA6aET9bGol-3CvI57pNhQwq-PdJNwfJyEvQlNLd6Sd8dafjST586sXfNbzRuhEOYSNQPF0fhtDpRmVIJqHIZu4UNu-RwnFVNsQ","token_type":"bearer","refresh_token":"eyJhbGciOiJSUzI1NiIsInR5cCI6IkpXVCJ9.eyJ1c2VyX25hbWUiOiJqb2huIiwic2NvcGUiOlsicmVhZCJdLCJhdGkiOiJjMjY5YTlkNC0wMzA4LTRmNzctYTlkNS05M2NhZTBlYTc1ZWIiLCJnZW5lcmF0ZWRJblpvbmUiOiJBc2lhL1NoYW5naGFpIiwiZXhwIjoxNjc3NjgwMDI2LCJhdXRob3JpdGllcyI6WyJyZWFkIl0sImp0aSI6ImZhMTg2NDY1LWM0NWItNDQxYS04ZWQzLTJjODJmYTZkZTg4ZSIsImNsaWVudF9pZCI6ImNsaWVudCJ9.LiHnsX92ZRjss5ggPRU678dSAxRm622FDQ7Zk5Kohw3th2M69p99XjekwQq4wyxaHfIGuVUYZUyGCo6BePpLWQBzABxLkUmTidIPJ6SnFBgoAaPD8MR7XoIvpj-7UDVhP1Vxkrk7sgzAtrdg_I5hBPFdVjpVOG1CIXotgLH4b0Swxxpqe7dRzQPlniqYTE4NlI2KrUpJ_PWZQg8KHH-zkMMHteK25uDL8IcgXIVc_OFirnGgM4DNQASL_x7e7R2AIYEMZgA4dQKvOcFzGc87oSnx6PTaJnp35Jxs39451dWcu4HqHyLCPZasXba8VEohSs8z3sEYyB-19eLuc4HubA","expires_in":43199,"scope":"read","generatedInZone":"Asia/Shanghai","jti":"c269a9d4-0308-4f77-a9d5-93cae0ea75eb"}
如果你对token进行解码,你可以看到它的主体看起来就像清单15.11中的那个。你可以进一步观察到,框架在默认情况下,也会在响应中添加自定义的细节。但我建议你总是参考令牌中的任何信息。记住,通过签署令牌,我们确保如果有人修改令牌的内容,签名不会被验证。这样,我们就知道,如果签名是正确的,没有人改变了令牌的内容。你对响应本身没有同样的保证。
清单15.11
15.3.2 配置资源服务器以读取JWT的自定义详细信息
在这一节中,我们将讨论我们需要对资源服务器进行的修改,以读取我们添加到JWT中的额外细节。一旦你改变了你的授权服务器,在JWT中添加了自定义细节,你就希望资源服务器能够读取这些细节。你需要在你的资源服务器中做的改变是直接的,以访问自定义的细节。
我们在第15.1节中讨论了AccessTokenConverter是将令牌连接到认证的对象。这就是我们需要改变的对象,以便它也考虑到令牌中的自定义细节。之前,你创建了一个JwtAccessTokenConverter类型的bean,如下面的代码片段所示。
@Bean
public JwtAccessTokenConverter jwtAccessTokenConverter() {


    var converter = new JwtAccessTokenConverter();
    converter.setSigningKey(jwtKey);
    return converter;
}
我们用这个令牌来设置资源服务器用于令牌验证的密钥。我们创建了一个JwtAccessTokenConverter的自定义实现,它也考虑到了我们对令牌的新细节。最简单的方法是扩展这个类并覆盖extractAuthentication()方法。这个方法将令牌转换为一个认证对象。下一个列表向你展示了如何实现一个自定义的AcessTokenConverter。
清单15.12 创建一个自定义的AccessTokenConverter
package com.laurentiuspilca.ssia.config;

import org.springframework.security.oauth2.provider.OAuth2Authentication;
import org.springframework.security.oauth2.provider.token.store.JwtAccessTokenConverter;

import java.util.Map;

public class AdditionalClaimsAccessTokenConverter
        extends JwtAccessTokenConverter {


    @Override
    public OAuth2Authentication extractAuthentication(Map<String, ?> map) {


        //应用JwtAccessTokenConverter类实现的逻辑,获得初始认证对象
        OAuth2Authentication authentication = super.extractAuthentication(map);
        //将自定义的细节添加到认证中
        authentication.setDetails(map);
        //返回认证对象
        return authentication;
    }
}
在资源服务器的配置类中,你现在可以使用自定义访问令牌转换器。下一个列表定义了配置类中的AccessTokenConverter Bean。
清单15.13 定义新的AccessTokenConverter Bean
package com.laurentiuspilca.ssia.config;

import org.springframework.beans.factory.annotation.Value;
import org.springframework.context.annotation.Bean;
import org.springframework.context.annotation.Configuration;
import org.springframework.security.oauth2.config.annotation.web.configuration.EnableResourceServer;
import org.springframework.security.oauth2.config.annotation.web.configuration.ResourceServerConfigurerAdapter;
import org.springframework.security.oauth2.config.annotation.web.configurers.ResourceServerSecurityConfigurer;
import org.springframework.security.oauth2.provider.token.TokenStore;
import org.springframework.security.oauth2.provider.token.store.JwtAccessTokenConverter;
import org.springframework.security.oauth2.provider.token.store.JwtTokenStore;

@Configuration
@EnableResourceServer
public class ResourceServerConfig extends ResourceServerConfigurerAdapter {


    @Value("${publicKey}")
    private String publicKey;

    @Override
    public void configure(ResourceServerSecurityConfigurer resources) {


        resources.tokenStore(tokenStore());
    }

    @Bean
    public TokenStore tokenStore() {


        return new JwtTokenStore(jwtAccessTokenConverter());
    }

    @Bean
    public JwtAccessTokenConverter jwtAccessTokenConverter() {


        //创建一个新的AccessTokenConverter对象的实例。
        AdditionalClaimsAccessTokenConverter converter = new AdditionalClaimsAccessTokenConverter();
        converter.setVerifierKey(publicKey);
        return converter;
    }
}
测试变化的一个简单方法是将它们注入控制器类,并在HTTP响应中返回它们。清单15.14告诉你如何定义控制器类。
清单15.14 controller类
package com.laurentiuspilca.ssia.controllers;

import org.springframework.security.oauth2.provider.OAuth2Authentication;
import org.springframework.security.oauth2.provider.authentication.OAuth2AuthenticationDetails;
import org.springframework.web.bind.annotation.GetMapping;
import org.springframework.web.bind.annotation.RestController;

@RestController
public class HelloController {


    @GetMapping("/hello")
    public String hello(OAuth2Authentication authentication) {


        OAuth2AuthenticationDetails details =
                (OAuth2AuthenticationDetails) authentication.getDetails();

        return "Hello! " + details.getDecodedDetails();
    }
}
现在你可以启动资源服务器,用包含自定义细节的JWT来测试api。接下来的代码片段向你展示了如何调用/hello端点以及调用的结果。getDecodedDetails()方法返回一个包含令牌细节的Map。在这个例子中,为了保持简单,我直接打印了getDecodedDetails()返回的整个值。如果你只需要使用一个特定的值,你可以检查返回的Map并使用它的键来获得所需的值。
curl -H "Authorization:Bearer eyJhbGciOiJSUzI1NiIsInR5cCI6IkpXVCJ9.eyJ1c2VyX25hbWUiOiJqb2huIiwic2NvcGUiOlsicmVhZCJdLCJnZW5lcmF0ZWRJblpvbmUiOiJBc2lhL1NoYW5naGFpIiwiZXhwIjoxNjc1MTMxMjI2LCJhdXRob3JpdGllcyI6WyJyZWFkIl0sImp0aSI6ImMyNjlhOWQ0LTAzMDgtNGY3Ny1hOWQ1LTkzY2FlMGVhNzVlYiIsImNsaWVudF9pZCI6ImNsaWVudCJ9.cvqUxfr3vhADHduzR5JPcjLRdBxsq-QrGQjrTnp40IEyhSG6zWanqrX8q75lC8KdAfs7NquB9JQQj44uu1pw4sp5strU1XlOS0k8A1g_G4tMR5rTNkq2Dl71lJm9NQPqA2lNj5lQWYf13Ke6l_oxxwcsibDHK-EoXdkJD8qSFNBvrDblNgamBat0uQdMbP-9_QKiiEtnYDGthxL8sdyedWd6MUsE_8lkZy27e2wLA3nCko12VlwIA6aET9bGol-3CvI57pNhQwq-PdJNwfJyEvQlNLd6Sd8dafjST586sXfNbzRuhEOYSNQPF0fhtDpRmVIJqHIZu4UNu-RwnFVNsQ" http://localhost:9090/hello
响应为:
Hello! {

    user_name=john, scope=[read], generatedInZone=Asia/Shanghai, exp=1675131226, authorities=[read], jti=c269a9d4-0308-4f77-a9d5-93cae0ea75eb, client_id=client}
总结
- 在OAuth 2认证架构中,使用加密签名经常是目前应用程序验证token的方式。
- 当我们使用带有加密签名的令牌验证时,JSON Web令牌(JWT)是最广泛使用的令牌实现。
- 你可以使用对称密钥来签署和验证令牌。尽管使用对称密钥是一种直接的方法,但当授权服务器不信任资源服务器时,你不能使用它。
- 如果对称密钥在你的实现中不可行,你可以使用非对称密钥对实现令牌签名和验证。
- 建议定期更换钥匙,使系统不容易被盗。我们把定期更换钥匙称为钥匙轮换。
- 你可以直接在资源服务器端配置公钥。虽然这种方法很简单,但它使密钥的变更变得困难。
- 为了简化密钥的轮换,你可以在授权服务器端配置密钥,并允许资源服务器在特定的端点读取这些密钥。
- 你可以根据你的实现的要求,通过向其主体添加细节来定制JWTs。授权服务器将自定义细节添加到令牌主体中,而资源服务器则使用这些细节进行授权。