编译器对于软件来说至关重要,编译的质量直接影响软件的运行效率。对编译生成的程序运行性能影响最大的就是编译器中的优化选项,但是在现代编译器中,除了最基础的-O0、-O1、-O2外,还有数百个优化选项,这些优化选项构成了2的数百次方种组合,任何一个软件开发工程师都不可能清楚地知道究竟哪些优化选项的组合能使编译出的程序达到最高运行效率。为了将寻找合适的优化选项的过程交给电脑自动完成,OpenTuner被开发了出来。
本文首先介绍OpenTuner的基本原理,然后讲解OpenTuner的编译安装及其使用。
一、OpenTuner的基本原理
OpenTuner是一个用于构建领域特定的多目标程序自动调优器的框架,其基本思想是通过迭代方式在编译器优化选项组合的搜索空间中找到效果较好的优化选项组合。OpenTuner首先从其搜索空间中选出一组优化选项,然后编译并运行,再根据其运行效果改进优化选项的组合,最终选出符合用户要求的优化选项组合。
在传统的编译调优过程中,软件开发人员需要人工寻找合适的优化选项组合,此外,针对不同架构的目标机器,软件的优化过程也不一样,这使得人工调优效率低。自动调优器可以使用比人工方式大得多的搜索空间,而且在可移植性上有着天然的优势,能够显著提高程序优化的效率。在使用自动调优器后,软件开发人员从人工寻找转为提供可能的优化选项搜索空间,在软件移植方面仅需将其在不同的优化集的机器上重新运行即可。
OpenTuner整体框架如下图所示:
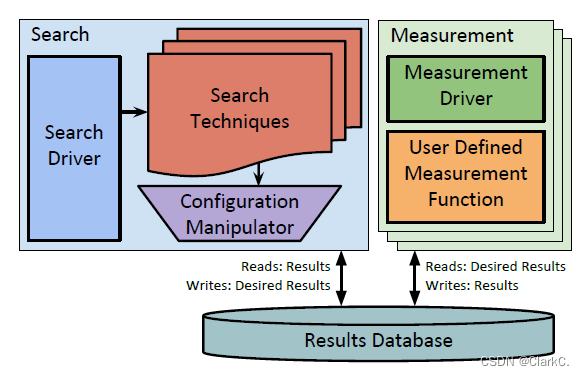
图中的搜索组件的搜索技术使用用户定义的优化选项操作器(Configuration Manipulator)来读取和写入优化选项;测量组件使用用户定义的测量函数评估候选的优化选项组合。这两个组件仅通过一个结果数据库进行通信,该数据库用于记录调优过程中收集的所有结果,并且能够并行执行多个测量。具体来说,搜索组件从数据库中读取先前的优化选项组合的测量结果(Results),据此进行迭代搜索并将得到的新的优化选项组合(Desired Results)写入数据库,然后测量组件从数据库中读取新的优化选项组合并测试其运行结果,再写回数据库。
OpenTuner引入了通用框架来描述程序自动调优的复杂搜索空间。同时,OpenTuner将搜索技术集合的概念引入到程序自动调优中,使得多种搜索技术能够协同工作以找到最佳解。OpenTuner还提供了比传统的程序自动调优器更为复杂的搜索技术,使得程序自动调优的广泛应用能够解决更复杂的搜索问题,并且易于移植。
论文作者通过将OpenTuner应用在了7个不同的项目中展示了其多样性,并通过16个Benchmarks展示了其有效性,OpenTuner比先前的最佳技术的效率提高了2.8倍。OpenTuner能够在规模超过10^3600的大型搜索空间中使用,同时仅需搜索全空间的2%就可以找到较为满意的结果。
二、OpenTuner的使用
本节介绍其源码的编译及其使用方法。OpenTuner源码地址:GitHub - jansel/opentuner: An extensible framework for program autotuning
将下载的源码包解压,进入解压后的文件夹:
cd opentuner-master安装OpenTuner,官方推荐使用Python3.7以上版本,这里我选择使用3.8版本。首先安装该版本的Python:
sudo apt-get install python3.8然后切换Python版本到3.8:
sudo rm /usr/bin/python
sudo ln -s /usr/bin/python3.8 /usr/bin/python
此时再查看python版本验证是否更改成功
![]()
再安装python3.8版本相对应的开发包:
sudo apt-get install python3.8-dev由于OpenTuner使用pip进行安装,首先安装pip工具:
sudo apt-get install python3-pip安装环境搭建完成后,即可开始OpenTuner的安装:
sudo pip install opentuner安装成功后,我们可以通过运行opentuner-master/examples/gccflags/gccflags_minimal.py脚本来验证安装结果:
cd /opentuner-master/examples/gccflags
./gccflags_minimal.py
该python脚本实现的是对opentuner-master/examples/gccflags/apps/raytracer.cpp文件的性能优化,是OpenTuner用于学习的一个极简版。内容如下所示:
#!/usr/bin/env python
#
# Autotune flags to g++ to optimize the performance of apps/raytracer.cpp
#
# This is an extremely simplified version meant only for tutorials
#

import opentuner
from opentuner import ConfigurationManipulator
from opentuner import EnumParameter
from opentuner import IntegerParameter
from opentuner import MeasurementInterface
from opentuner import Result

GCC_FLAGS = [
    'align-functions', 'align-jumps', 'align-labels',
    'align-loops', 'asynchronous-unwind-tables',
    'branch-count-reg', 'branch-probabilities',
    # ... (176 total)
]

# (name, min, max)
GCC_PARAMS = [
    ('early-inlining-insns', 0, 1000),
    ('gcse-cost-distance-ratio', 0, 100),
    ('iv-max-considered-uses', 0, 1000),
    # ... (145 total)
]


class GccFlagsTuner(MeasurementInterface):

    def manipulator(self):
        """
        Define the search space by creating a
        ConfigurationManipulator
        """
        manipulator = ConfigurationManipulator()
        manipulator.add_parameter(
            IntegerParameter('opt_level', 0, 3))
        for flag in GCC_FLAGS:
            manipulator.add_parameter(
                EnumParameter(flag,
                              ['on', 'off', 'default']))
        for param, min, max in GCC_PARAMS:
            manipulator.add_parameter(
                IntegerParameter(param, min, max))
        return manipulator

    def compile(self, cfg, id):
        """
        Compile a given configuration in parallel
        """
        gcc_cmd = 'g++ apps/raytracer.cpp -o ./tmp{0}.bin'.format(id)
        gcc_cmd += ' -O{0}'.format(cfg['opt_level'])
        for flag in GCC_FLAGS:
            if cfg[flag] == 'on':
                gcc_cmd += ' -f{0}'.format(flag)
            elif cfg[flag] == 'off':
                gcc_cmd += ' -fno-{0}'.format(flag)
        for param, min, max in GCC_PARAMS:
            gcc_cmd += ' --param {0}={1}'.format(
                param, cfg[param])
        return self.call_program(gcc_cmd)

    def run_precompiled(self, desired_result, input, limit, compile_result, id):
        """
        Run a compile_result from compile() sequentially and return performance
        """
        assert compile_result['returncode'] == 0

        try:
            run_result = self.call_program('./tmp{0}.bin'.format(id))
            assert run_result['returncode'] == 0
        finally:
            self.call_program('rm ./tmp{0}.bin'.format(id))

        return Result(time=run_result['time'])

    def compile_and_run(self, desired_result, input, limit):
        """
        Compile and run a given configuration then
        return performance
        """
        cfg = desired_result.configuration.data
        compile_result = self.compile(cfg, 0)
        return self.run_precompiled(desired_result, input, limit, compile_result, 0)


if __name__ == '__main__':
    argparser = opentuner.default_argparser()
    GccFlagsTuner.main(argparser.parse_args())
运行该文件的效果如下所示:
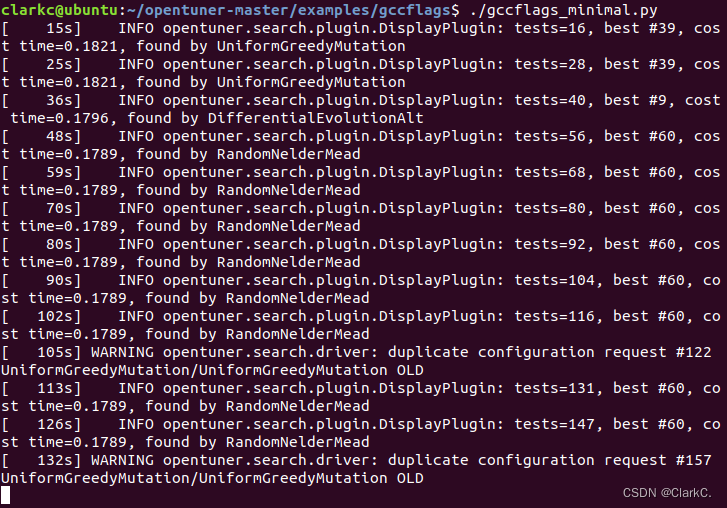
观察运行时的界面我们可以发现,随着一次次的迭代,被优化程序的运行时间不断减少,最佳优化选项组合不断更新。
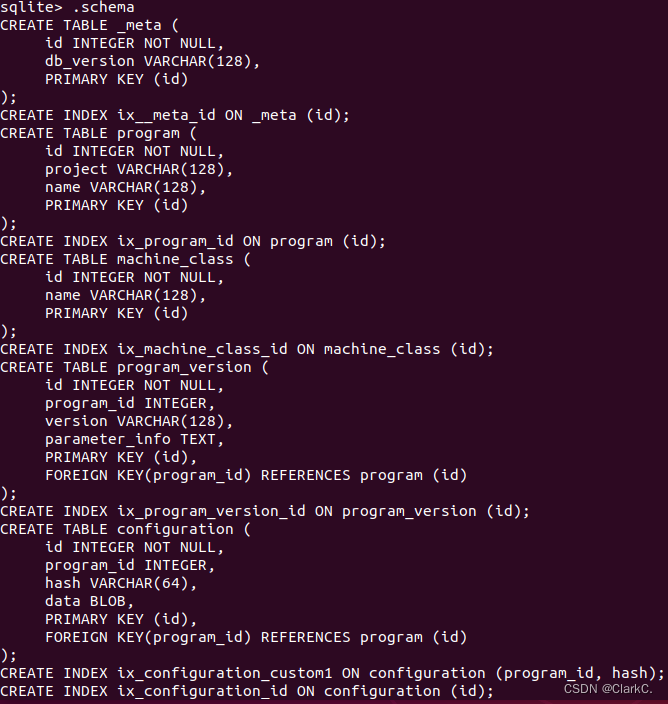
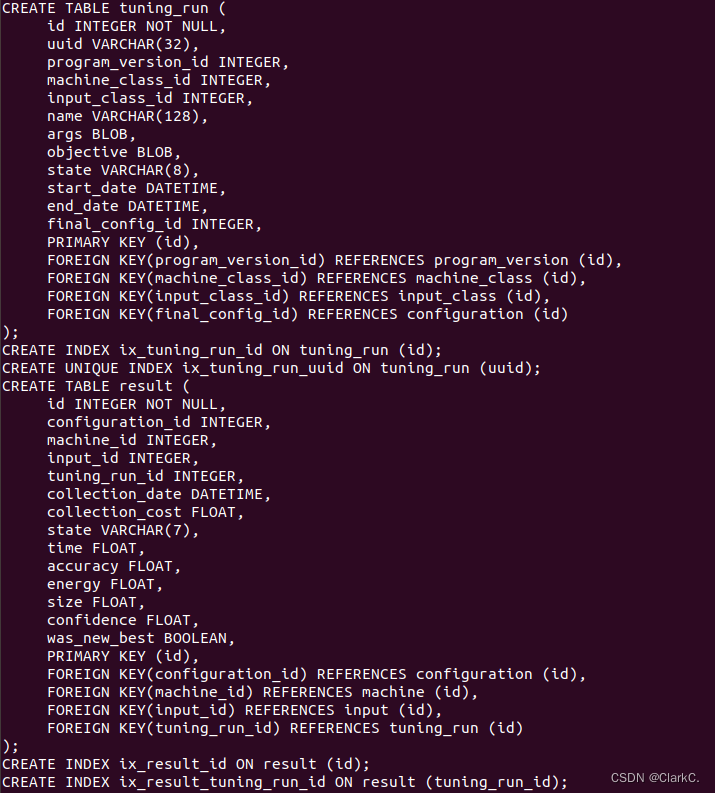
OpenTuner会将运行时收集到的信息存储在opentuner.db/ubuntu.db数据库中,使用如下命令可查看该数据库中的内容:
sqlite3 opentuner.db/ubuntu.db 使用该命令会进入SQLite3数据库查看界面,用.tables命令查看数据库中存储的表格,如下图所示:

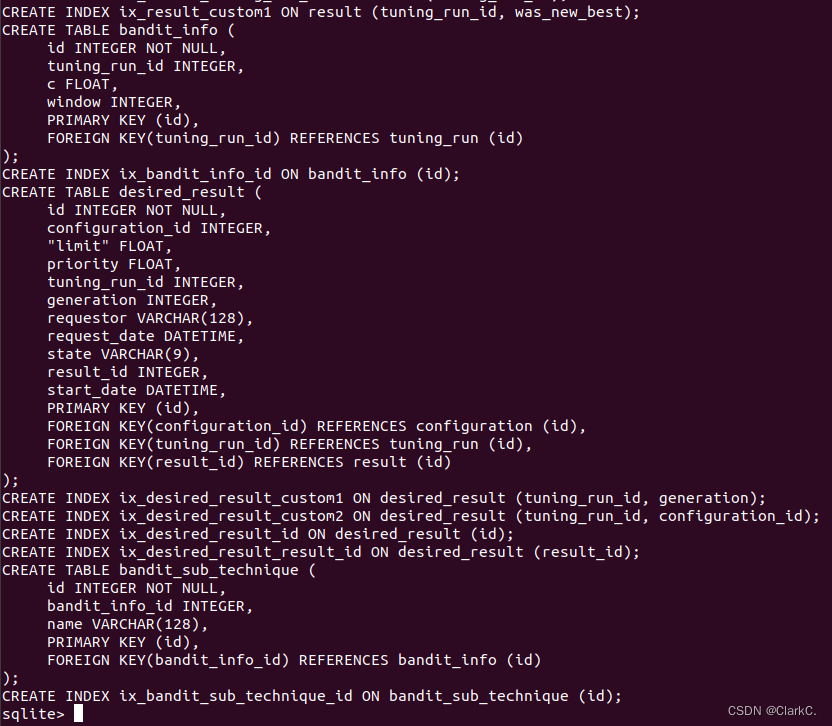
使用.schma命令查看数据库建立时的命令,可以看到各个表格各列的信息:

使用SELECT * FROM results WHERE was_new_best = 1; 命令查看result表格中各次最佳运行结果的详细信息。要完整输出表中的内容(含列名),使用.header on以及.mode column命令。
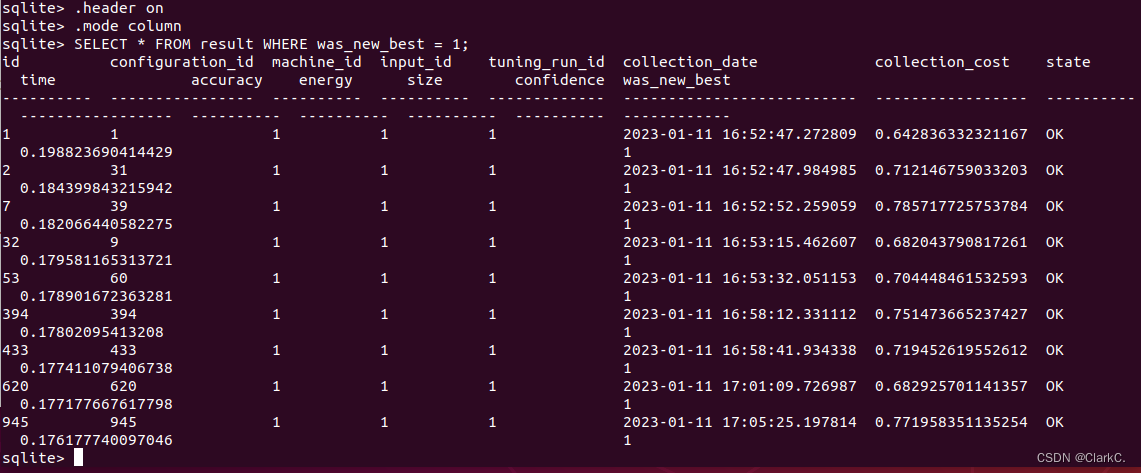
根据这些迭代结果的编号如id和configuration_id,再结合前面所展示的数据库建立信息中各表格的外键,即可通过SQL命令在其他表格中查看其对应的信息。
除了通过SQLite3数据库查看运行结果外,OpenTuner的源码包中还提供了支持数据库可视化查看的工具。有关可视化界面的内容位于opentuner/stats_app文件夹下,这部分的使用可以参考:https://www.jianshu.com/p/ac6996f41a9c