KVM存储池就是一个大的容器,里面主要是虚拟机的镜像文件和其他的磁盘相关文件。当虚拟机磁盘空间不够时,需要对其进行添加和管理。
KVM存储池是被libvirt所管理的文件、目录或存储设备,存储池可以位于本地,也可以通过网络共享,存储池最终可被虚拟主机所使用。
默认libvirt使用基于目录的dir的存储池设计,/var/lib/libvirt/images目录就是默认的存储池。
本地分区来作为存储池
1、准备一个格式化的分区
查看磁盘是否有空闲的空间。此处可以看到在sda3结束sectors的值与/dev/sda总共的sectors的值少一些,说明还有些磁盘空间没有使用,可以在此基础上继续创建分区。
[root@localhost ~]# fdisk -l

Disk /dev/sda: 46.2 GB, 46170898432 bytes, 90177536 sectors
Units = sectors of 1 * 512 = 512 bytes
Sector size (logical/physical): 512 bytes / 512 bytes
I/O size (minimum/optimal): 512 bytes / 512 bytes
Disk label type: dos
Disk identifier: 0x000b0983

   Device Boot      Start         End      Blocks   Id  System
/dev/sda1   *        2048     2099199     1048576   83  Linux
/dev/sda2         2099200    10487807     4194304   82  Linux swap / Solaris
/dev/sda3        10487808    83886079    36699136   83  Linux
使用fdisk命令进行磁盘分区。此时创建的分区是在扩展分区里(2G),磁盘大小设置的1G。因为此时的分区是在原有磁盘的基础上进行的,所以完成后需要重启,或执行partprobe命令立即读取最新的分区表。
[root@localhost ~]# fdisk /dev/sda
Welcome to fdisk (util-linux 2.23.2).

Changes will remain in memory only, until you decide to write them.
Be careful before using the write command.

Command (m for help): n
Partition type:
   p   primary (3 primary, 0 extended, 1 free)
   e   extended
Select (default e):
Using default response e
Selected partition 4
First sector (83886080-90177535, default 83886080):
Using default value 83886080
Last sector, +sectors or +size{

    K,M,G} (83886080-90177535, default 90177535): +2G
Partition 4 of type Extended and of size 2 GiB is set

Command (m for help): n
All primary partitions are in use
Adding logical partition 5
First sector (83888128-88080383, default 83888128):
Using default value 83888128
Last sector, +sectors or +size{

    K,M,G} (83888128-88080383, default 88080383): +1G
Partition 5 of type Linux and of size 1 GiB is set

Command (m for help): p

Disk /dev/sda: 46.2 GB, 46170898432 bytes, 90177536 sectors
Units = sectors of 1 * 512 = 512 bytes
Sector size (logical/physical): 512 bytes / 512 bytes
I/O size (minimum/optimal): 512 bytes / 512 bytes
Disk label type: dos
Disk identifier: 0x000b0983

   Device Boot      Start         End      Blocks   Id  System
/dev/sda1   *        2048     2099199     1048576   83  Linux
/dev/sda2         2099200    10487807     4194304   82  Linux swap / Solaris
/dev/sda3        10487808    83886079    36699136   83  Linux
/dev/sda4        83886080    88080383     2097152    5  Extended
/dev/sda5        83888128    85985279     1048576   83  Linux

Command (m for help): w
The partition table has been altered!

Calling ioctl() to re-read partition table.

WARNING: Re-reading the partition table failed with error 16: Device or resource busy.
The kernel still uses the old table. The new table will be used at
the next reboot or after you run partprobe(8) or kpartx(8)
Syncing disks.
[root@localhost ~]# partprobe /dev/sda
[root@localhost ~]# fdisk -l

Disk /dev/sda: 46.2 GB, 46170898432 bytes, 90177536 sectors
Units = sectors of 1 * 512 = 512 bytes
Sector size (logical/physical): 512 bytes / 512 bytes
I/O size (minimum/optimal): 512 bytes / 512 bytes
Disk label type: dos
Disk identifier: 0x000b0983

   Device Boot      Start         End      Blocks   Id  System
/dev/sda1   *        2048     2099199     1048576   83  Linux
/dev/sda2         2099200    10487807     4194304   82  Linux swap / Solaris
/dev/sda3        10487808    83886079    36699136   83  Linux
/dev/sda4        83886080    88080383     2097152    5  Extended
/dev/sda5        83888128    85985279     1048576   83  Linux
对分区进行格式化,将分区格式化为xfs类型。
[root@localhost ~]# mkfs.xfs /dev/sda5
meta-data=/dev/sda5              isize=512    agcount=4, agsize=65536 blks
         =                       sectsz=512   attr=2, projid32bit=1
         =                       crc=1        finobt=0, sparse=0
data     =                       bsize=4096   blocks=262144, imaxpct=25
         =                       sunit=0      swidth=0 blks
naming   =version 2              bsize=4096   ascii-ci=0 ftype=1
log      =internal log           bsize=4096   blocks=2560, version=2
         =                       sectsz=512   sunit=0 blks, lazy-count=1
realtime =none                   extsz=4096   blocks=0, rtextents=0
将分区添加到存储池中
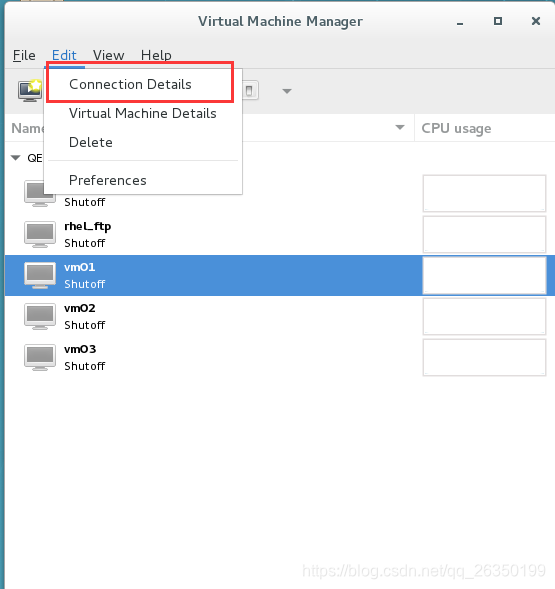
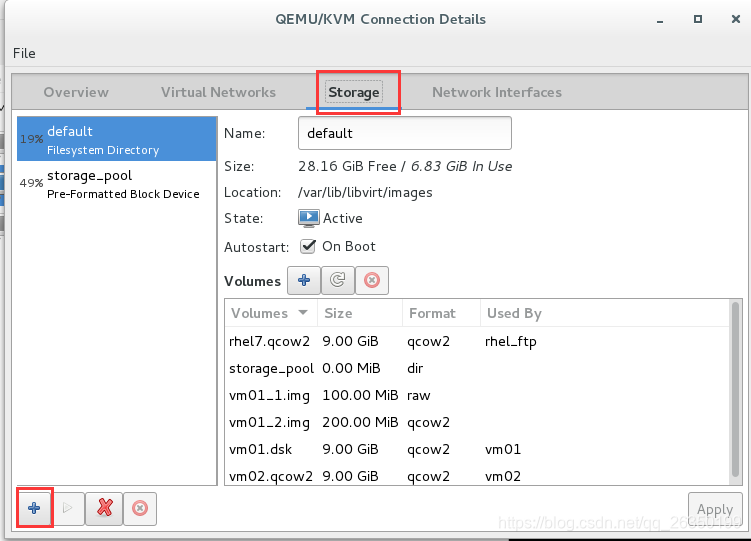
分区创建完成后,在virt-manager菜单中选择connection details选项。
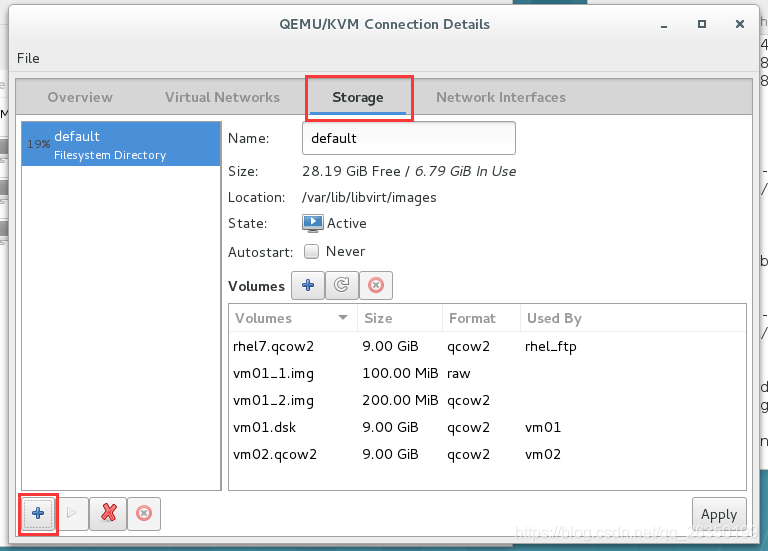
选择storage选项卡,在此添加存储池,确定存储池的源和目标。此时libvirt会自动将创建的存储池所在分区进行挂载。


在宿主机上使用命令df -Th查看系统磁盘使用情况,发现/dev/sda5已经挂载了。
[root@localhost ~]# df -Th
Filesystem     Type      Size  Used Avail Use% Mounted on
/dev/sda3      xfs        35G  6.8G   29G  20% /
devtmpfs       devtmpfs  3.8G     0  3.8G   0% /dev
tmpfs          tmpfs     3.9G  144K  3.9G   1% /dev/shm
tmpfs          tmpfs     3.9G  9.0M  3.9G   1% /run
tmpfs          tmpfs     3.9G     0  3.9G   0% /sys/fs/cgroup
/dev/sr0       iso9660   3.6G  3.6G     0 100% /var/ftp/dvd
/dev/sda1      xfs      1014M  170M  845M  17% /boot
tmpfs          tmpfs     781M   12K  781M   1% /run/user/0
/dev/sda5      xfs      1014M   33M  982M   4% /var/lib/libvirt/images/storage_pool
查看存储池的配置文件,配置文件存放的地址为/etc/libvirt/storage/autostart/目录下。
[root@localhost ~]# virsh pool-dumpxml storage_pool
<pool type='fs'>
  <name>storage_pool</name>
  <uuid>dedec99a-2339-4526-a074-91772200d839</uuid>
  <capacity unit='bytes'>1063256064</capacity>
  <allocation unit='bytes'>33734656</allocation>
  <available unit='bytes'>1029521408</available>
  <source>
    <device path='/dev/sda5'/>
    <format type='auto'/>
  </source>
  <target>
    <path>/var/lib/libvirt/images/storage_pool</path>
    <permissions>
      <mode>0755</mode>
      <owner>0</owner>
      <group>0</group>
      <label>system_u:object_r:unlabeled_t:s0</label>
    < /permissions>
  </target>
</pool>
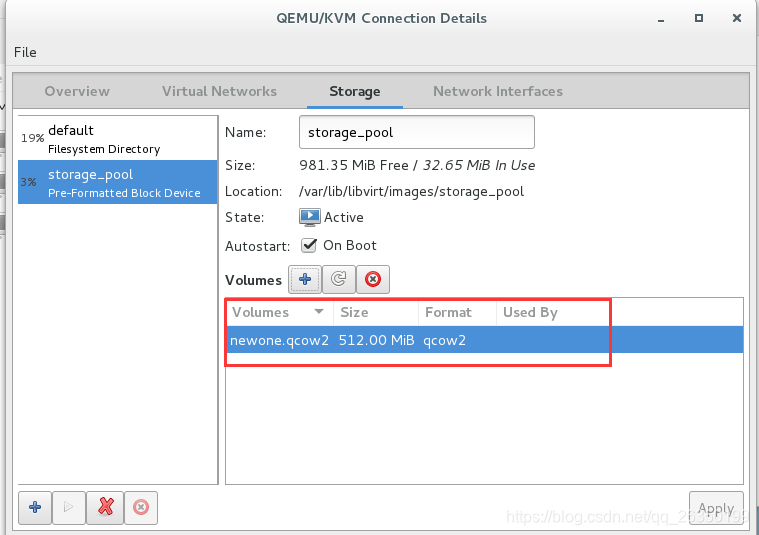
在存储池中,单击volumes的“+”号可以创建新的卷,卷其实就是磁盘文件,可以使用此卷来创建新的虚拟机,或者将其添加到其他的虚拟机中。


查看存储池中的卷。
[root@localhost ~]# ll /var/lib/libvirt/images/storage_pool/
total 452
-rw-------. 1 root root 537198592 Apr 10 07:20 newone.qcow2
[root@localhost ~]# ll /var/lib/libvirt/images/
total 3424020
-rw-r--r--. 1 root root  496828416 Apr  7 16:16 rhel7.qcow2
drwxr-xr-x. 2 root root         26 Apr 10 07:20 storage_pool
-rw-r--r--. 1 root root  104857600 Mar 24 16:06 vm01_1.img
-rw-r--r--. 1 root root     197120 Mar 24 16:27 vm01_2.img
-rw-------. 1 qemu qemu 8591507968 Apr  7 14:58 vm01.dsk
-rw-------. 1 root root 1410203648 Mar 31 10:06 vm02.qcow2

[root@localhost ~]# virsh pool-list
 Name                 State      Autostart
-------------------------------------------
 default              active     yes
 storage_pool         active     yes

[root@localhost ~]# virsh pool-info storage_pool
Name:           storage_pool
UUID:           dedec99a-2339-4526-a074-91772200d839
State:          running
Persistent:     yes
Autostart:      yes
Capacity:       1014.00 MiB
Allocation:     32.65 MiB
Available:      981.35 MiB
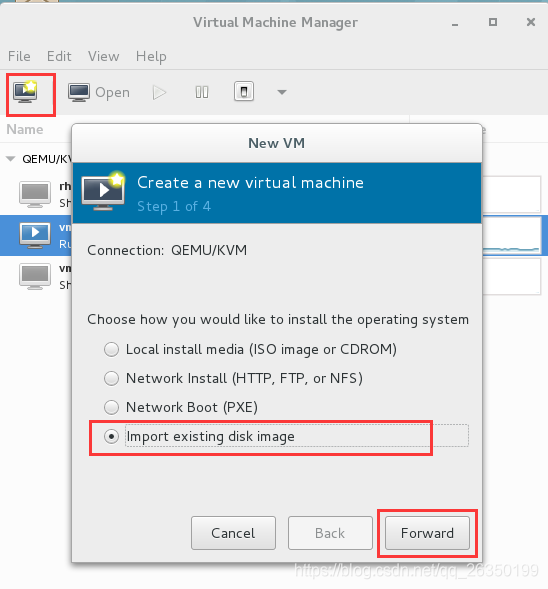
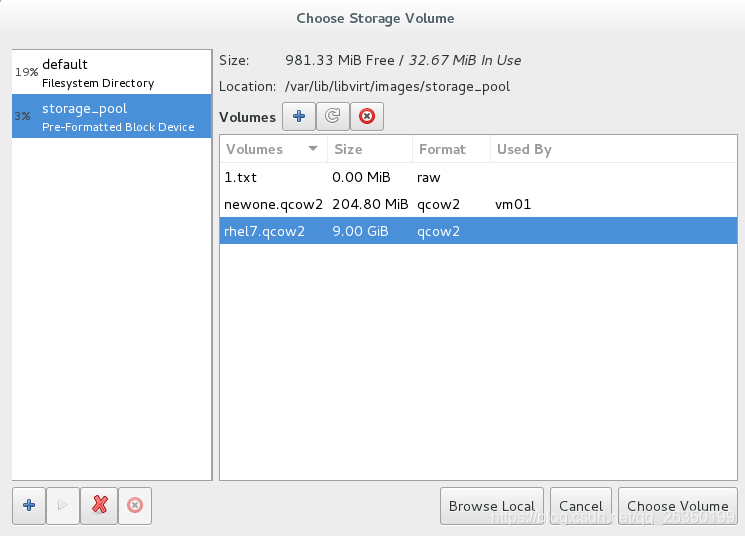
在虚拟机上如何使用创建好的存储卷呢?
1、可以将将做好的一些虚拟机镜像文件放置到新建的存储卷中进行使用。实际rhel7.qcow2大小只有400M左右。


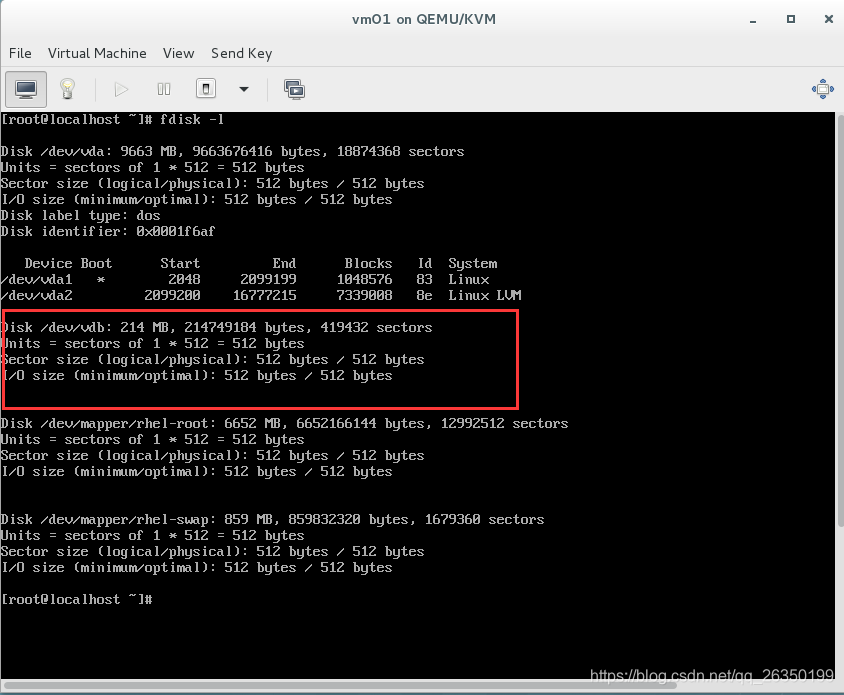
2、给某个虚拟机增加磁盘空间。
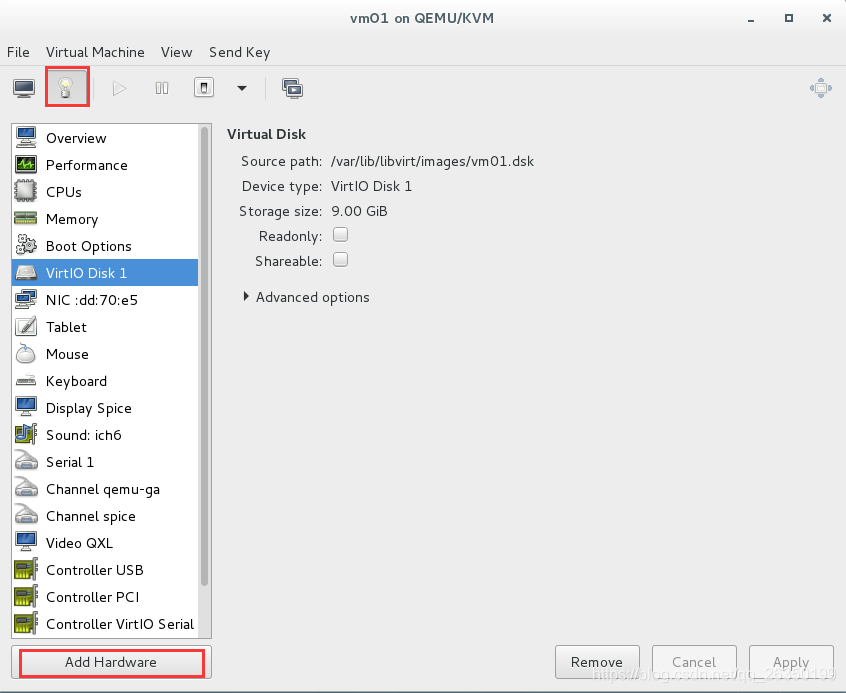

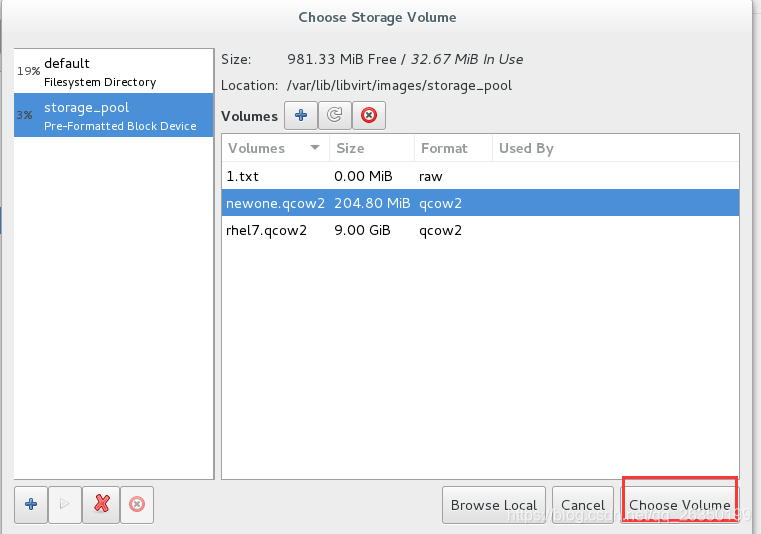


打开虚拟机,使用fdisk -l查看到新增的硬盘。
使用NFS分区来创建存储池
选择一台虚拟机部署NFS服务器,设置一个共享的文件系统,分享给其他虚拟机,作为虚拟机的存储池。
完成NFS服务器的安装。

创建共享目录,并设置其权限,让其他用户也有写权限。

配置NFS服务器,让目录共享给其同一个网段的用户进行读写操作。开启NFS服务器。

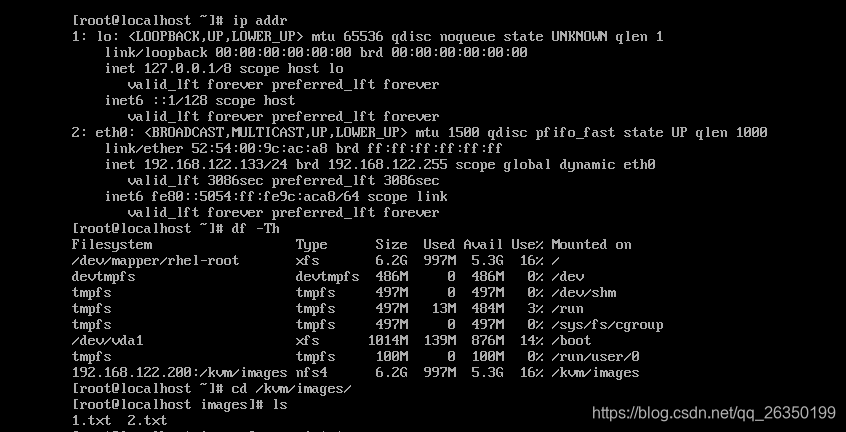
在宿主机上查看NFS虚拟机上共享的情况,是否能够访问。
[root@localhost ~]# showmount -e 192.168.122.200
Export list for 192.168.122.200:
/kvm/images192.168.122.0/24(rw,no_root_squash) *
将NFS共享添加到存储池中。


在宿主机上查看可以看到kvm新增的nfs共享存储池
[root@localhost ~]# df -Th
Filesystem                  Type      Size  Used Avail Use% Mounted on
/dev/sda3                   xfs        35G  6.9G   29G  20% /
devtmpfs                    devtmpfs  3.8G     0  3.8G   0% /dev
tmpfs                       tmpfs     3.9G   92K  3.9G   1% /dev/shm
tmpfs                       tmpfs     3.9G  9.1M  3.9G   1% /run
tmpfs                       tmpfs     3.9G     0  3.9G   0% /sys/fs/cgroup
/dev/sr0                    iso9660   3.6G  3.6G     0 100% /var/ftp/dvd
/dev/sda1                   xfs      1014M  170M  845M  17% /boot
/dev/sda5                   xfs      1014M  507M  508M  50% /var/lib/libvirt/images/storage_pool
tmpfs                       tmpfs     781M   12K  781M   1% /run/user/0
192.168.122.200:/kvm/images nfs4      6.2G  998M  5.3G  16% /var/lib/libvirt/images/share
新打开一个虚拟机,使用命令查看磁盘,也能看到共享的存储池。同时可以对磁盘进行添加和删除文件。(如果df -Th暂时无法查看到新增的nfs共享文件夹,则需要自己手动挂载一下。mount -t nfs 192.168.122.200:/kvm/images /kvm/images)