五,管理虚拟存储
5.1 虚拟磁盘概述
5.1.1 虚拟化项目中存储的注意事项
- [x] 存储的性能几乎总是虚拟化的瓶颈
- [x] 通过多个硬盘驱动以分布磁盘I/O来实现存储解决方案
- [x] 考虑部署集中化的SAN/NFS来实现高可用性和实时迁移

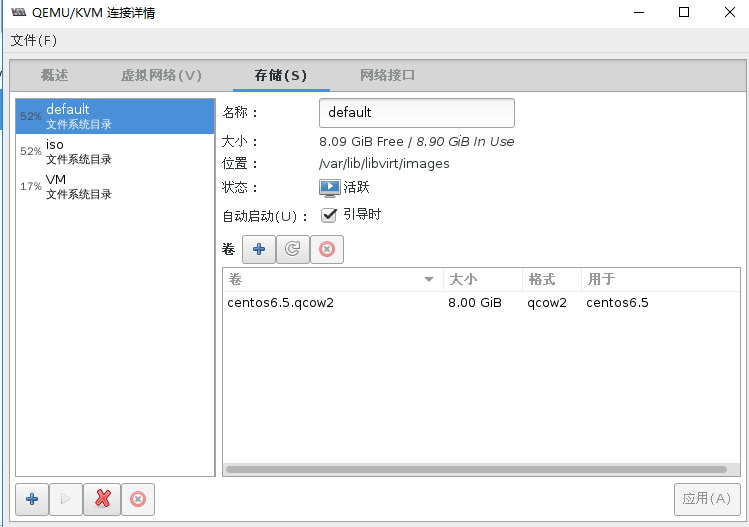
5.1.2 KVM存储模式
- [x] 基于文件系统的存储
- dir:Filesystem Directory 虚拟文件系统目录
- fs:Pre-Formatted Block Device
- netfs:Network Exported Directory
- [x] 基于设备的存储
- Disk:Physical Disk Device
- Iscsi:iSCSI Target
- logical:LVM Volume Group
5.1.3 虚拟磁盘类型
- [x] 固定 Fixed
- 在配置时,指定磁盘大小
- 不管在虚拟磁盘上实际存储多少数据,都将占用相同大小主机磁盘空间
- [x] 动态 Dynamic
- 增长到最大容量,但是只根据需求使用更多的空间
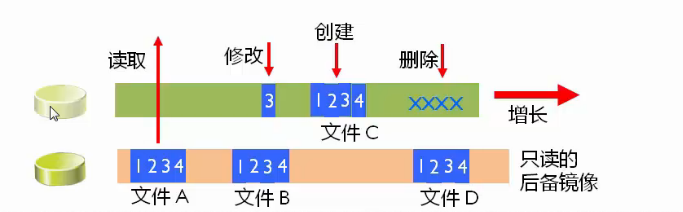
- [x] 差异 Differencing
- 因为创建是差异磁盘,所以只保存变更的数据
- 例如,将操作系统安装在父盘,然后创建差异化磁盘来执行进一步配置
5.1.4 KVM支持的虚拟磁盘类型
- [x] raw
- 这并非是一种真正的磁盘格式,而是代表虚拟机所使用的原始镜像
- 它并不存储元数据,因此可以作为保证虚拟机兼容性的候选方案。然而,也正因为它不存储元数据,因此不能自持某些高级特性,比如快照和压缩等。
- 格式简单,容易转换为其他的格式。需要文件系统的支持才能支持sparse file
- [x] cow:copy-on-write格式,昙花一现
- [x] qcow:QEMU早期的copy-on-write格式,过渡性方案
- [x] qcow2
- 按需进行分配磁盘空间,不管文件系统是否支持
- 支持快照
- 支持zlib的磁盘压缩
- 支持AES的加密
- [x] vmdk(Virtual Machine Disk)
- VMware环境当中默认使用的磁盘格式
- [x] vhd vhdx(Virtual Hard Disk)
- 微软默认采用的文件格式
- [x] vdi(VirtualBox)
- [x] 可以通过qemu-img --help查看支持的格式
[root@localhost ~]# qemu-img --help | grep Supported
Supported formats: vvfat vpc vmdk vhdx vdi ssh sheepdog rbd raw host_cdrom host_floppy host_device file qed qcow2 qcow parallels nbd iscsi gluster dmg tftp ftps ftp https http cloop bochs blkverify blkdebug
5.2 使用qemu-img管理虚拟磁盘
5.2.1 qemu-img概述
- [x] qemu-img 是一个功能强制磁盘镜像管理工具
- [x] qemu-img --help 包括以下功能
- check 检查完整性
- create 创建镜像
- commit 提交更改
- compare 比较
- convert 转换
- info 获得信息
- map 映射
- snapshot 快照管理
- rebase 在已有的镜像的基础上创建新的镜像
- resize 调整大小
- amend 修订镜像格式选项
5.2.2 创建虚拟磁盘
[root@localhost ~]# qemu-img | grep create
  create [-q] [-f fmt] [-o options] filename [size] #创建磁盘的命令格式
       contain only zeros for qemu-img to create a sparse image during
  '-n' skips the target volume creation (useful if the volume is created 'snapshot' is the name of the snapshot to create, apply or delete '-c' creates a snapshot [root@localhost ~]# qemu-img create t1.img 1g #只输入磁盘名和大小创建 Formatting 't1.img', fmt=raw size=1073741824 #默认的磁盘格式fmt=raw [root@localhost ~]# qemu-img info t1.img #查看虚拟磁盘的信息 image: t1.img #文件名称 file format: raw #文件格式 virtual size: 1.0G (1073741824 bytes) #虚拟磁盘大小 disk size: 0 #磁盘空间尺寸是0???? [root@localhost ~]# ll -h t1.img -rw-r--r-- 1 root root 1.0G 5月 2 11:24 t1.img #ll查看磁盘是1G没错 [root@localhost ~]# du -sh t1.img #但我们用du查看一下,发现磁盘真实空间的占用还真是0 0 t1.img
根据以上测试,我们发现默认情况下qemu-img创建的磁盘文件的类型是动态的(Dynamic 空洞)会根据真实存放数据的大小进行动态扩容直到磁盘空间设定值的大小。
#假如我们想看一下各种磁盘格式所附带的-o option都有什么,我们可以这么做
[root@localhost ~]# qemu-img create -f raw -o ? #raw格式磁盘只有一个尺寸大小选项
Supported options:
size             Virtual disk size
[root@localhost ~]# qemu-img create -f qcow2 -o?    #qcow2则有很多选项
Supported options:
size             Virtual disk size
compat           Compatibility level (0.10 or 1.1) backing_file File name of a base image #用于指定后端镜像文件 backing_fmt Image format of the base image #设置后端镜像的镜像格式 encryption Encrypt the image #用于设置加密 cluster_size qcow2 cluster size #设置镜像中的簇大小,取值在512到2M之间,默认值64K preallocation Preallocation mode (allowed values: off, metadata, falloc, full) #设置镜像文件空间的预分配模式 lazy_refcounts Postpone refcount updates
利用dd命令模拟创建一个没有空洞的文件
[root@localhost vm]# dd if=/dev/zero of=flat1.img bs=1024k count=1000
记录了1000+0 的读入 记录了1000+0 的写出 1048576000字节(1.0 GB)已复制,2.2495 秒,466 MB/秒 [root@localhost vm]# qemu-img info flat1.img image: flat1.img file format: raw virtual size: 1.0G (1048576000 bytes) disk size: 1.0G #磁盘占用也是1G,没有空洞 #ext4文件格式是支持空洞文件的创建的,例如dd命令我们也可以实现空洞文件的创建 [root@localhost vm]# dd if=/dev/zero of=flat2.img bs=1024k count=0 seek=1024 记录了0+0 的读入 记录了0+0 的写出 0字节(0 B)已复制,0.000114639 秒,0.0 kB/秒 [root@localhost vm]# qemu-img info flat2.img image: flat2.img file format: raw virtual size: 1.0G (1073741824 bytes) disk size: 0 #实际磁盘占用0
空洞文件被复制以后,那么还是空洞文件吗?
[root@localhost vm]# du -sh flat*
1001M   flat1.img
0   flat2.img
[root@localhost vm]# cp flat1.img flat1a.img
[root@localhost vm]# cp flat2.img flat2a.img [root@localhost vm]# du -sh flat* 1001M flat1a.img #非空洞文件复制后还是非空洞 1001M flat1.img 0 flat2a.img #空洞文件复制后还是空洞文件 0 flat2.img #利用--sparse=always将非空洞文件复制成空洞文件 [root@localhost vm]# cp flat1.img flat1b.img --sparse=always [root@localhost vm]# du -sh flat* 1001M flat1a.img 0 flat1b.img #加了参数的cp复制出来的是空洞文件。 1001M flat1.img 0 flat2a.img 0 flat2.img #利用--sparse=never将空洞文件复制成非空洞文件 [root@localhost vm]# cp flat2.img flat2b.img --sparse=never [root@localhost vm]# du -sh flat* 1001M flat1a.img 0 flat1b.img 1001M flat1.img 0 flat2a.img 1.1G flat2b.img #加了参数的cp复制出来的是非空洞文件 0 flat2.img
5.2.3 检查虚拟磁盘
[root@localhost vm]# du -sh ce* 1.1G centos6.5-2.qcow2 [root@localhost vm]# qemu-img info centos6.5-2.qcow2 image: centos6.5-2.qcow2 file format: qcow2 #文件格式 virtual size: 8.0G (8589934592 bytes) #虚拟磁盘尺寸大小 disk size: 1.0G #磁盘真实占用大小 cluster_size: 65536 Format specific information: compat: 1.1 lazy refcounts: true [root@localhost vm]# qemu-img check centos6.5-2.qcow2 No errors were found on the image. #检查结果没有错误 131072/131072 = 100.00% allocated, 0.00% fragmented, 0.00% compressed clusters Image end offset: 8591507456 5.2.4 预分配磁盘策略(qcow2)
- [x] off
- 缺省策略,即不使用预分配策略
- [x] metadata
- 分配元数据(metadata),预分配后的虚拟磁盘仍然属于稀疏映像类型(空洞文件)
- [x] full
- 分配所有磁盘空间并置零,预分配后的虚拟磁盘属于非稀疏映像类型
- [x] falloc
- 分配文件的块并标示它们的状态为未初始化,相对full模式来说,创建虚拟磁盘的速度要快很多。
[root@localhost vm]# qemu-img create -f qcow2 test2.qcow2 -o ?
Supported options:
size             Virtual disk size
compat           Compatibility level (0.10 or 1.1)
backing_file     File name of a base image backing_fmt Image format of the base image encryption Encrypt the image cluster_size qcow2 cluster size preallocation Preallocation mode (allowed values: off, metadata, falloc, full) #预分配策略 lazy_refcounts Postpone refcount updates #preallocation=off创建磁盘 [root@localhost vm]# qemu-img create -f qcow2 test1.qcow2 1g -o preallocation=off Formatting 'test1.qcow2', fmt=qcow2 size=1073741824 encryption=off cluster_size=65536 preallocation='off' lazy_refcounts=off [root@localhost vm]# qemu-img info test1.qcow2 image: test1.qcow2 file format: qcow2 virtual size: 1.0G (1073741824 bytes) disk size: 196K #我们发现磁盘实际占用196K cluster_size: 65536 Format specific information: compat: 1.1 lazy refcounts: false #preallocation=metadata创建磁盘 [root@localhost vm]# qemu-img create -f qcow2 test2.qcow2 1g -o preallocation=metadata Formatting 'test2.qcow2', fmt=qcow2 size=1073741824 encryption=off cluster_size=65536 preallocation='metadata' lazy_refcounts=off [root@localhost vm]# qemu-img info test2.qcow2 image: test2.qcow2 file format: qcow2 virtual size: 1.0G (1073741824 bytes) disk size: 328K #我们发现磁盘的实际占用变成了328K cluster_size: 65536 Format specific information: compat: 1.1 lazy refcounts: false #preallocation=falloc创建磁盘 [root@localhost vm]# qemu-img create -f qcow2 test3.qcow2 1g -o preallocation=falloc Formatting 'test3.qcow2', fmt=qcow2 size=1073741824 encryption=off cluster_size=65536 preallocation='falloc' lazy_refcounts=off [root@localhost vm]# qemu-img info test3.qcow2 image: test3.qcow2 file format: qcow2 virtual size: 1.0G (1073741824 bytes) disk size: 1.0G #我们发现磁盘真实占用也是1G cluster_size: 65536 Format specific information: compat: 1.1 lazy refcounts: false #preallocation=full创建磁盘 [root@localhost vm]# qemu-img create -f qcow2 test4.qcow2 1g -o preallocation=full Formatting 'test4.qcow2', fmt=qcow2 size=1073741824 encryption=off cluster_size=65536 preallocation='full' lazy_refcounts=off [root@localhost vm]# qemu-img info test4.qcow2 image: test4.qcow2 file format: qcow2 virtual size: 1.0G (1073741824 bytes) disk size: 1.0G #我们发现falloc和full创建的磁盘的真实占用都是1G cluster_size: 65536 Format specific information: compat: 1.1 lazy refcounts: false #四种预分配策略进行对比 [root@localhost vm]# ll -h test* -rw-r--r-- 1 root root 193K 5月 4 09:45 test1.qcow2 #off -rw-r--r-- 1 root root 1.1G 5月 4 09:49 test2.qcow2 #metadata -rw-r--r-- 1 root root 1.1G 5月 4 09:51 test3.qcow2 #falloc -rw-r--r-- 1 root root 1.1G 5月 4 09:54 test4.qcow2 #full [root@localhost vm]# du -sh test* 196K test1.qcow2 #off 332K test2.qcow2 #metadata 1.1G test3.qcow2 #falloc 1.1G test4.qcow2 #full
通过对比我们发现预分配策略里,off和metadata预分配策略都属于空洞文件,而falloc和full属于非空洞文件。
5.2.5 后备差异虚拟磁盘
- [x] 存储与基础镜像(父)磁盘的变化
- 基础镜像(父)磁盘不会改变
- 差异磁盘隔离变化
- 多个差异磁盘可以使用相同的基础镜像(父)磁盘
- [x] 优点:标准化基础镜像,节省空间
- [x] 缺点:增加了开销,较差的性能

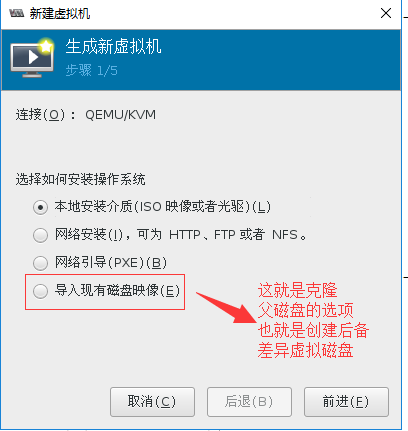
演示后备差异虚拟磁盘(克隆)

#创建父磁盘并安装父Centos6.5操作系统
[root@localhost vm]# qemu-img create -f qcow2 Base_CentOS6.5.qcow2
qemu-img: Base_CentOS6.5.qcow2: Image creation needs a size parameter
[root@localhost vm]# qemu-img create -f qcow2 Base_CentOS6.5.qcow2 10G
Formatting 'Base_CentOS6.5.qcow2', fmt=qcow2 size=10737418240 encryption=off cluster_size=65536 lazy_refcounts=off [root@localhost vm]# virt-install \ > --name=Base_CentOS7 \ > --disk path=/vm/Base_CentOS6.5.qcow2 \ > --vcpu=1 --ram=1024 \ > --cdrom=/iso/CentOS-6.5-x86_64-bin-DVD1.iso \ > --network network=default \ > --graphics vnc,listen=0.0.0.0 \ > --os-type=linux \ > --os-variant=rhel6 [root@localhost vm]# virsh list Id 名称 状态 ---------------------------------------------------- 1 vm2 running 9 Base_CentOS7 running #父操作系统 #创建OA后备差异虚拟磁盘,OA子系统盘 [root@localhost vm]# qemu-img create -f qcow2 \ > -o backing_file=Base_CentOS6.5.qcow2 \ #指定父盘 > OA-disk0.qcow2 #子盘名称 Formatting 'OA-disk0.qcow2', fmt=qcow2 size=10737418240 backing_file='Base_CentOS6.5.qcow2' encryption=off cluster_size=65536 lazy_refcounts=off [root@localhost vm]# qemu-img info OA-disk0.qcow2 image: OA-disk0.qcow2 file format: qcow2 virtual size: 10G (10737418240 bytes) disk size: 196K cluster_size: 65536 backing file: Base_CentOS6.5.qcow2 #父盘名称 Format specific information: compat: 1.1 lazy refcounts: false #创建ERP,HR,CRM子系统盘 [root@localhost vm]# qemu-img create -f qcow2 -o backing_file=Base_CentOS6.5.qcow2 ERP-disk0.qcow2 Formatting 'ERP-disk0.qcow2', fmt=qcow2 size=10737418240 backing_file='Base_CentOS6.5.qcow2' encryption=off cluster_size=65536 lazy_refcounts=off [root@localhost vm]# qemu-img create -f qcow2 -o backing_file=Base_CentOS6.5.qcow2 HR-disk0.qcow2 Formatting 'HR-disk0.qcow2', fmt=qcow2 size=10737418240 backing_file='Base_CentOS6.5.qcow2' encryption=off cluster_size=65536 lazy_refcounts=off [root@localhost vm]# qemu-img create -f qcow2 -o backing_file=Base_CentOS6.5.qcow2 CRM-disk0.qcow2 Formatting 'CRM-disk0.qcow2', fmt=qcow2 size=10737418240 backing_file='Base_CentOS6.5.qcow2' encryption=off cluster_size=65536 lazy_refcounts=off [root@localhost vm]# ll -h *-disk0.qcow2 -rw-r--r-- 1 root root 193K 5月 4 11:11 CRM-disk0.qcow2 -rw-r--r-- 1 root root 193K 5月 4 11:11 ERP-disk0.qcow2 -rw-r--r-- 1 root root 193K 5月 4 11:11 HR-disk0.qcow2 -rw-r--r-- 1 root root 193K 5月 4 11:07 OA-disk0.qcow2 #创建四种子系统虚拟机 [root@localhost vm]# virt-install --import \ > --name=oa \ > --vcpus=1 --ram=512 \ > --disk path=/vm/OA-disk0.qcow2 \ > --network network=default \ > --graphics vnc,listen=0.0.0.0 \ > --os-variant=rhel6 \ > --os-type=linux 开始安装...... 创建域...... #以下省略.... [root@localhost vm]# virt-install --import --name=erp --vcpus=1 --ram=512 --disk path=/vm/ERP-disk0.qcow2 --network network=default --graphics vnc,listen=0.0.0.0 --os-variant=rhel6 --os-type=linux 开始安装...... 创建域...... #以下省略.... [root@localhost vm]# virt-install --import --name=hr --vcpus=1 --ram=512 --disk path=/vm/HR-disk0.qcow2 --network network=default --graphics vnc,listen=0.0.0.0 --os-variant=rhel6 --os-type=linux 开始安装...... 创建域...... #以下省略.... [root@localhost vm]# virt-install --import --name=crm --vcpus=1 --ram=512 --disk path=/vm/CRM-disk0.qcow2 --network network=default --graphics vnc,listen=0.0.0.0 --os-variant=rhel6 --os-type=linux 开始安装...... 创建域...... #以下省略.... [root@localhost vm]# virsh list --all Id 名称 状态 ---------------------------------------------------- 1 vm2 running 10 oa running #子系统创建完毕 11 erp running #子系统创建完毕 12 hr running #子系统创建完毕 13 crm running #子系统创建完毕 - Base_CentOS7 关闭 - centos6.5 关闭 - centos6.5-2 关闭 - centos6.5-3 关闭
父子系统的方式,其实就是克隆的方式,我们如果要通过命令来实现就是如此操作。
如果在图形界面下,类似的方式如下图扫描二维码关注公众号,回复: 5640674 查看本文章
5.2.6 虚拟磁盘格式转换(虚拟机迁移案例)
#语法格式
[root@localhost ~]# qemu-img --help | grep convert convert [-c] [-p] [-q] [-n] [-f fmt] [-t cache] [-T src_cache] [-O output_fmt] [-o options] [-s snapshot_name] [-S sparse_size] filename [filename2 [...]] output_filename
案例:不同格式虚拟机的迁移
(1)我们在VMware Workstation虚拟机中找一个关闭状态的虚拟机进行导出
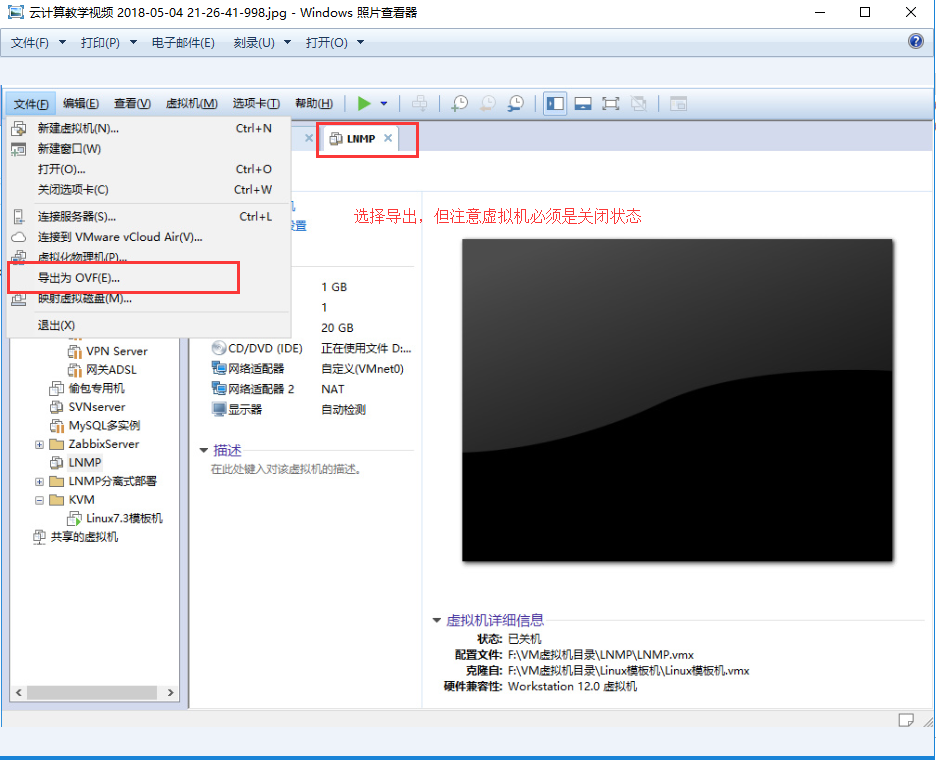
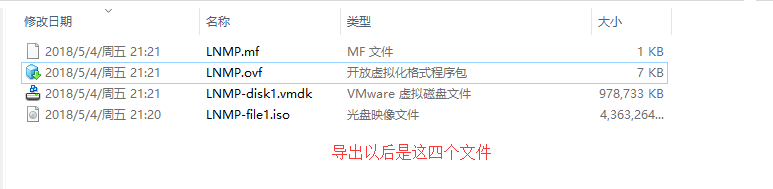
(2)先将.vmdk虚拟磁盘文件拷入到KVM虚拟机中
[root@localhost vm]# ll -h *.vmdk -rw-r--r-- 1 root root 956M 5月 4 22:05 LNMP-disk1.vmdk [root@localhost vm]# qemu-img info LNMP-disk1.vmdk image: LNMP-disk1.vmdk file format: vmdk virtual size: 20G (21474836480 bytes) disk size: 956M cluster_size: 65536 Format specific information: cid: 1935336885 parent cid: 4294967295 create type: streamOptimized extents: [0]: compressed: true virtual size: 21474836480 filename: LNMP-disk1.vmdk cluster size: 65536 format: (3)然后进行磁盘文件的格式转换
[root@localhost vm]# qemu-img convert -O qcow2 LNMP-disk1.vmdk \ > LNMP-disk1.qcow2 [root@localhost vm]# ll -h LNMP* -rw-r--r-- 1 root root 2.5G 5月 4 22:12 LNMP-disk1.qcow2 #转换后文件变大 -rw-r--r-- 1 root root 956M 5月 4 22:05 LNMP-disk1.vmdk [root@localhost vm]# du -sh LNMP* 2.5G LNMP-disk1.qcow2 #转换后文件变大 956M LNMP-disk1.vmdk (4)然后根据虚拟磁盘迁移前的VMware配置,导入到新的KVM虚拟机
1个vcpu
1GB内存
两个网卡(桥接+NAT)
磁盘类型:scsi
VNC显示卡
OS类型为RHEL6
#导入新的KVM虚拟机
[root@localhost vm]# virt-install
--import
--name=LNMP
--vcpus=1 --ram=1024
--disk bus=scsi,path=/vm/LNMP-disk1.qcow2
--network type=bridge,source=virbr0 --network network=default --graphics vnc,listen=0.0.0.0 --os-type=linux --os-variant=rhel6 --noautoconsole [root@localhost vm]# virsh list Id 名称 状态 ---------------------------------------------------- 17 LNMP running #虚拟机迁移成功
5.2.7 调整虚拟磁盘大小
- [x] 语法格式
[root@localhost vm]# qemu-img --help | grep resize resize [-q] filename [+ | -]size- [x] 操作之前,一定要做好数据备份
- [x] 增加文件大小后,需要在客户机中使用fdisk,parted等分区工具进行相应操作才能真正让客户机使用到增加后的镜像空间。
- [x] 缩小镜像之前,要在客户机中保证里面的文件系统有空余空间,否则会数据丢失
- [x] qcow2不支持缩小镜像的操作
#实操
[root@localhost vm]# qemu-img info LNMP-disk1.qcow2 image: LNMP-disk1.qcow2 file format: qcow2 virtual size: 20G (21474836480 bytes) #磁盘原始尺寸 disk size: 2.5G cluster_size: 65536 Format specific information:  compat: 1.1 lazy refcounts: false [root@localhost vm]# qemu-img resize LNMP-disk1.qcow2 +10G #增加10G尺寸 Image resized. [root@localhost vm]# qemu-img info LNMP-disk1.qcow2 image: LNMP-disk1.qcow2 file format: qcow2 virtual size: 30G (32212254720 bytes) #扩大了10G disk size: 2.5G cluster_size: 65536 Format specific information:  compat: 1.1 lazy refcounts: false
5.3 快照管理
5.3.1 快照/检查点概述
- [x] 磁盘快照
- 对磁盘数据进行快照
- 主要用于虚拟机备份等场合
- [x] 内存快照
- 对虚拟机的内存/设备信息进行保存
- 该机制同时用于休眠恢复,迁移等场景
- 主要使用virsh save(qemu migrate to file)实现,只能对运行的虚拟机进行
- [x] 检查点快照
- 同时保存虚拟机的磁盘快照和内存快照
- 用于将虚拟机恢复到某个时间点
- 可以保证数据的一致性
5.3.2 磁盘快照分类
- [x] 按快照信息保存分为:
- 内置快照:快照数据和base磁盘数据放在一个qcow2文件中
- 外置快照:快照数据单独的qcow2文件存放
- [x] 按虚拟机状态可以分为:
- 关机态快照:数据可以保持一致性
- 运行态快照:数据无法保持一致性,类似与系统crash后的磁盘数据。使用是可能需要fsck等操作。
- [x] 按磁盘数量可以分为:
- 单盘:单盘快照不涉及原子性
- 多盘:涉及原子性。主要分两个方面:1,是所有盘快照点相同 2,所有盘要么都快照成功,要么都快照失败。主要依赖于qemu的transaction实现
5.3.3 管理磁盘快照
语法格式:
[root@localhost ~]# qemu-img --help | grep snapshot
  snapshot [-q] [-l | -a snapshot | -c snapshot | -d snapshot] filename
Parameters to snapshot subcommand:
  'snapshot' is the name of the snapshot to create, apply or delete '-a' applies a snapshot (revert disk to saved state) #快照回滚 '-c' creates a snapshot #创建快照 '-d' deletes a snapshot #删除快照 '-l' lists all snapshots in the given image #显示快照列表
快照管理之磁盘快照实操:
#创建磁盘快照
[root@localhost vm]# qemu-img snapshot -l /vm/Base_CentOS6.5.qcow2
[root@localhost vm]# qemu-img snapshot -c s1 /vm/Base_CentOS6.5.qcow2 #创建磁盘快照
[root@localhost vm]# qemu-img snapshot -l /vm/Base_CentOS6.5.qcow2
Snapshot list:
ID        TAG                 VM SIZE                DATE       VM CLOCK
1 s1 0 2018-05-06 13:33:16 00:00:00.000 #关闭虚拟机回滚磁盘快照 #在虚拟机里删除一个文件然后进行磁盘回滚 [root@localhost vm]# qemu-img snapshot -a s1 /vm/Base_CentOS6.5.qcow2
需要注意的是,进行磁盘快照回滚时需要关闭虚拟机,回滚后,我们发现数据已经恢复
qemu-img方式的磁盘快照只能支持原生态的qcow2格式,不支持从raw格式转换而来的qcow2不然会出现问题。
5.4 存储池
5.4.1 存储池的基础概念
- [x] Libvirt可以以存储池的形式对存储进行统一管理,简化操作
- [x] 对于虚拟机操作来说,存储池和卷并不是必须的
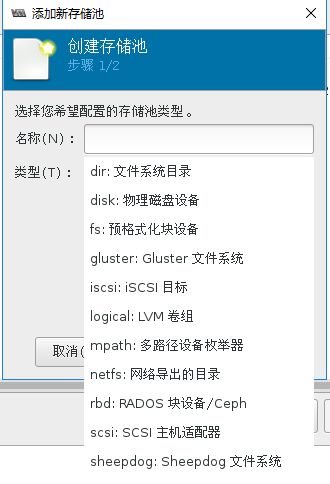
- [x] 支持以下存储池
- dir:Filesystem Directory
- disk:Physical Disk Device
- fs:Pre-Formatted Block Device
- gluster:Gluster FileSystem
- iscsi:iSCSI Target
- logical:LVM Volume Group
- mpath:Multipath Device Enumerator
- netfs:Network Export Directory
- rbd:RADOS Block Device/Ceph
- scsi:SCSI Host Adapter
- sheepdog:Sheepdog Filesystem
[root@localhost vm]# cd /etc/libvirt/storage/
[root@localhost storage]# ll
总用量 12
drwxr-xr-x. 2 root root  54 4月   4 20:39 autostart
-rw-------. 1 root root 538 3月  30 12:12 default.xml   #对应存储池的xml文件
-rw-------. 1 root root 511 4月   4 10:16 iso.xml   #对应存储池的xml文件
-rw-------. 1 root root 508 4月   4 20:39 VM.xml    #对应存储池的xml文件
[root@localhost storage]# cat iso.xml
<!--
WARNING: THIS IS AN AUTO-GENERATED FILE. CHANGES TO IT ARE LIKELY TO BE
OVERWRITTEN AND LOST. Changes to this xml configuration should be made using:
  virsh pool-edit iso   #警告这是一个自动文件若需要编辑请用virsh pool-edit iso
or other application using the libvirt API.
-->

<pool type='dir'> #池类型 <name>iso</name> #池名称 <uuid>b985a9b1-730b-43c7-96b1-00c494276117</uuid> #唯一uuid号 <capacity unit='bytes'>0</capacity> <allocation unit='bytes'>0</allocation> <available unit='bytes'>0</available> <source> </source> <target> <path>/iso</path> #源是在/iso这个目录里 </target> </pool> #我们发现在/etc/libvirt/storage/路径下还有一个目录autostart [root@localhost storage]# ll autostart/ 总用量 0 lrwxrwxrwx. 1 root root 32 3月 30 12:12 default.xml -> /etc/libvirt/storage/default.xml lrwxrwxrwx. 1 root root 28 4月 4 10:16 iso.xml -> /etc/libvirt/storage/iso.xml lrwxrwxrwx. 1 root root 27 4月 4 20:39 VM.xml -> /etc/libvirt/storage/VM.xml #如果我们用virsh pool-edit iso来打开iso.xml文件的话,会是如下内容 [root@localhost storage]# virsh pool-edit iso <pool type='dir'> <name>iso</name> <uuid>b985a9b1-730b-43c7-96b1-00c494276117</uuid> <capacity unit='bytes'>18238930944</capacity> #内容出现了变化 <allocation unit='bytes'>9555505152</allocation> #内容出现了变化 <available unit='bytes'>8683425792</available> #内容出现了变化 <source> </source> <target> <path>/iso</path> <permissions> <mode>0755</mode> <owner>0</owner> <group>0</group> <label>unconfined_u:object_r:default_t:s0</label> </permissions> </target> </pool>
virsh中的存储池相关命令
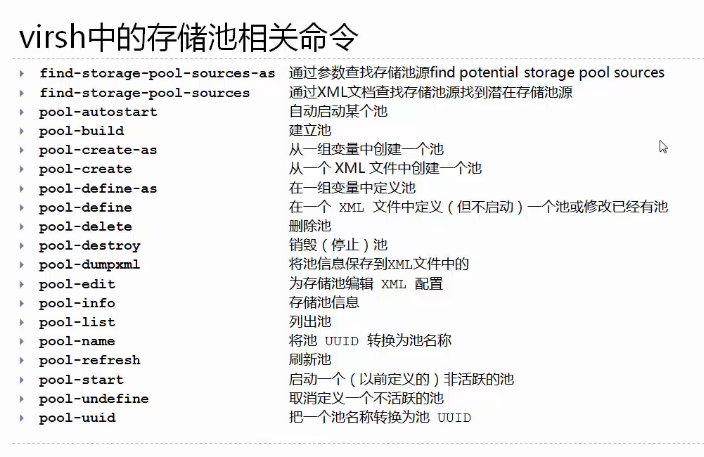
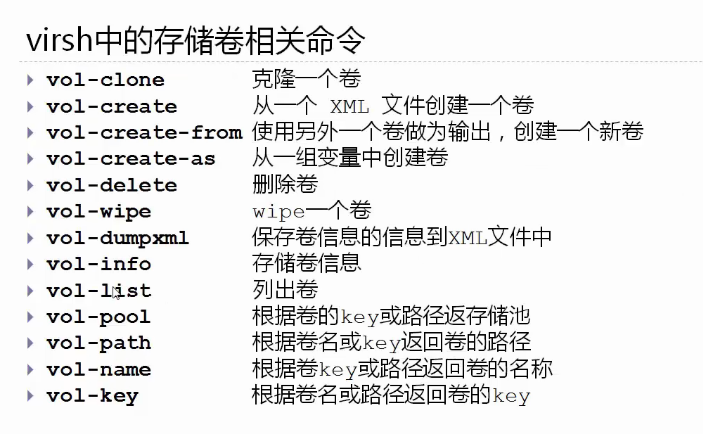
virsh中的存储卷相关命令
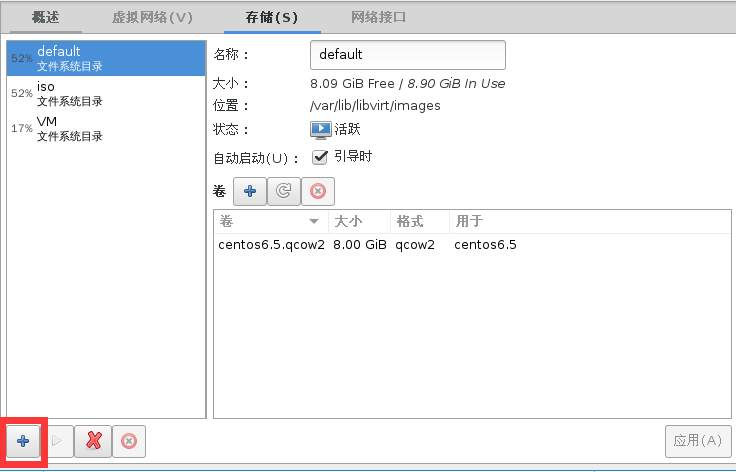
5.4.2 显示池与卷的信息
#pool-list 帮助
[root@localhost storage]# virsh pool-list --help NAME pool-list - 列出池 SYNOPSIS pool-list [--inactive] [--all] [--transient] [--persistent] [--autostart] [--no-autostart] [--type <string>] [--details] DESCRIPTION 返回池列表 OPTIONS  --inactive 列出不活跃的池  --all 不活跃和活跃的池  --transient 列出临时池  --persistent 列出持久池  --autostart 列出启用 autostart 的池  --no-autostart 列出禁用 autostart 的池  --type <string> 只列出指定类型的池(如果支持)  --details 为池显示扩展的详情 #查看所有的存储池 [root@localhost storage]# virsh pool-list setlocale: No such file or directory Name State Autostart ------------------------------------------- default active yes iso active yes VM active yes #查看某个存储池的详细信息 [root@localhost storage]# virsh pool-info VM setlocale: No such file or directory Name: VM UUID: 8594b419-685a-477d-88bd-c8f1b057073e State: running #存储池状态 Persistent: yes #是否是永久性存储池 Autostart: yes #是否随系统开机启动 Capacity: 39.24 GiB #总容量大小 Allocation: 6.97 GiB #已经分配容量 Available: 32.27 GiB #可用容量 #查看某个存储池中的所有存储卷 [root@localhost vm]# virsh vol-list VM setlocale: No such file or directory Name Path ------------------------------------------------------------------------------ Base_CentOS6.5.qcow2 /vm/Base_CentOS6.5.qcow2 centos6.5-2.qcow2 /vm/centos6.5-2.qcow2 chensiqi.qcow2 /vm/chensiqi.qcow2 CRM-disk0.qcow2 /vm/CRM-disk0.qcow2 ERP-disk0.qcow2 /vm/ERP-disk0.qcow2 HR-disk0.qcow2 /vm/HR-disk0.qcow2 LNMP-disk1.qcow2 /vm/LNMP-disk1.qcow2 LNMP-disk1.vmdk /vm/LNMP-disk1.vmdk lost+found /vm/lost+found OA-disk0.qcow2 /vm/OA-disk0.qcow2
5.4.3 基于目录的存储池
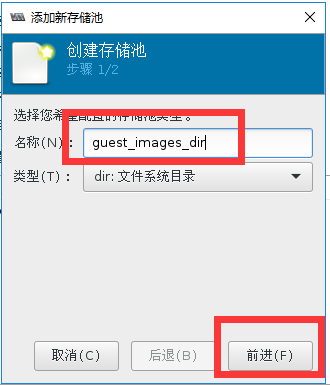
- [x] 准备目录
- 设置目录权限
# chown root:root /guest_images/# chmod 700 /guest_images
- 设置目录权限
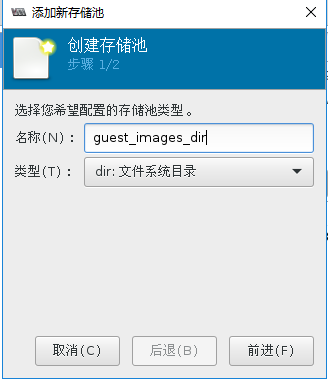
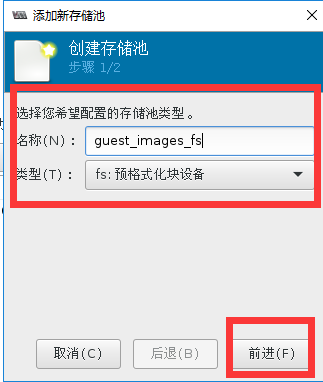
- [x] 通过virt-manager创建
- [x] 通过virsh创建
# virsh pool-define-as guest_images dir --target "/guest_images2"
存储池实操:
#创建存储池目录
root@localhost ~]# mkdir /guest_images
[root@localhost ~]# chown root:root /guest_images
[root@localhost ~]# chmod 700 /guest_images/
(1)通过virt-manager创建存储池
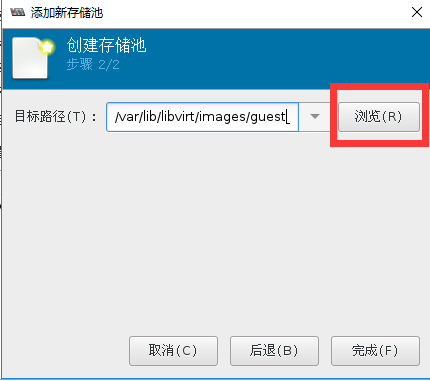

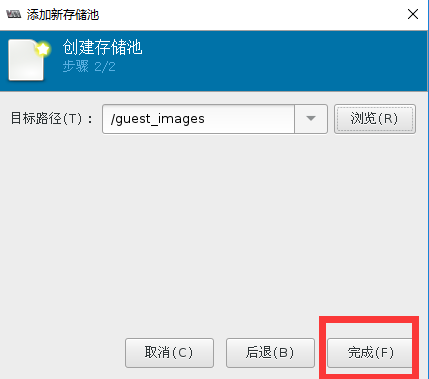
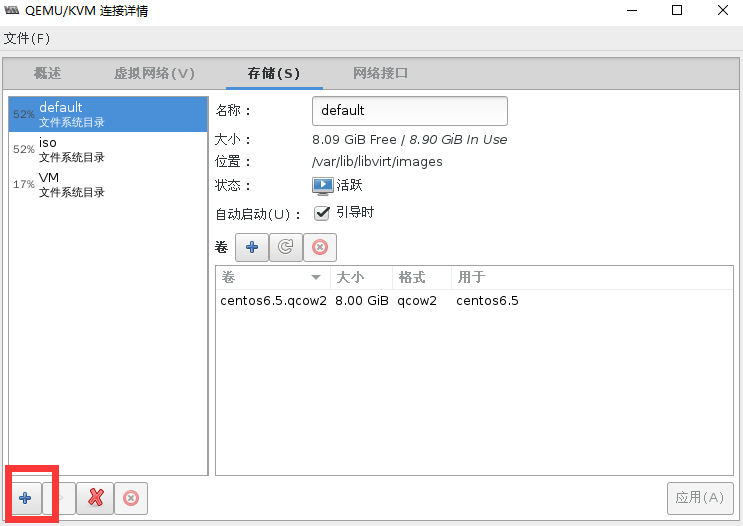
#用命令查看存储池状态
[root@localhost ~]# virsh pool-list
名称 状态 自动开始
-------------------------------------------
default 活动 是
guest_images_dir 活动 是 #创建完毕
iso 活动 是
VM 活动 是
#查看新创建的存储池的配置文件
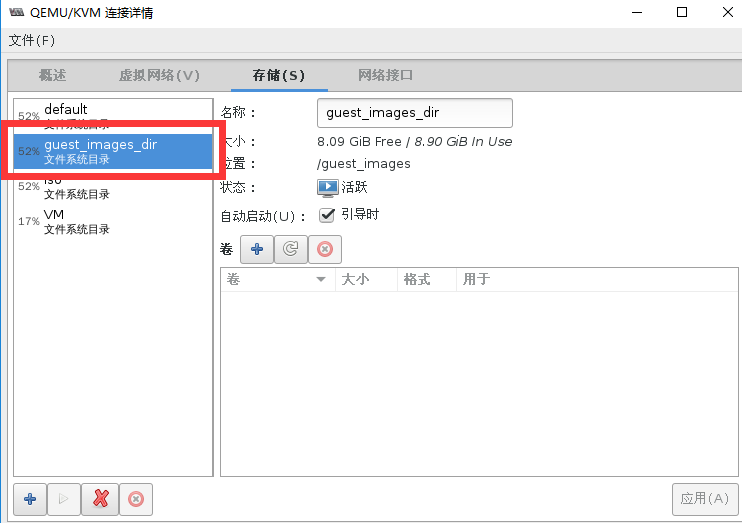
[root@localhost ~]# cat /etc/libvirt/storage/guest_images_dir.xml
<!--
WARNING: THIS IS AN AUTO-GENERATED FILE. CHANGES TO IT ARE LIKELY TO BE
OVERWRITTEN AND LOST. Changes to this xml configuration should be made using:
virsh pool-edit guest_images_dir
or other application using the libvirt API.
-->
<pool type='dir'> <name>guest_images_dir</name> <uuid>1a0b0e7f-8f40-4b59-96d0-42d8eb4ad709</uuid> <capacity unit='bytes'>0</capacity> <allocation unit='bytes'>0</allocation> <available unit='bytes'>0</available> <source> </source> <target> <path>/guest_images</path> </target> </pool> 通过virt-manager删除存储池
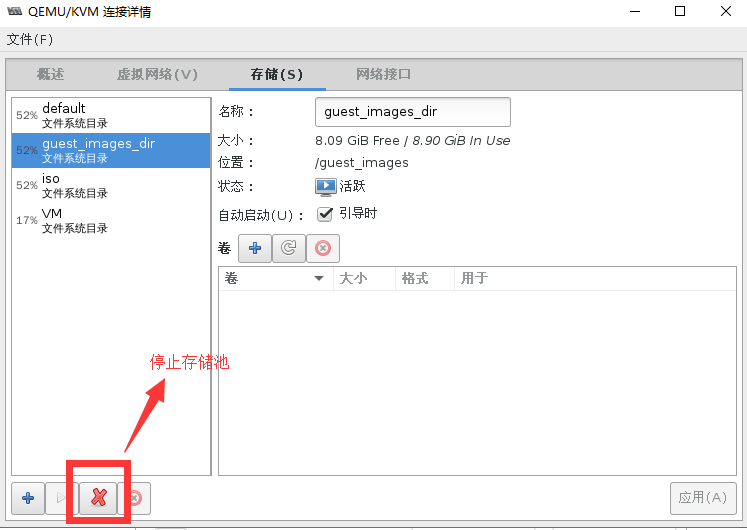
[root@localhost ~]# virsh pool-list --all setlocale: No such file or directory Name State Autostart ------------------------------------------- default active yes guest_images_dir inactive yes #状态变成了不活跃 iso active yes VM active yes 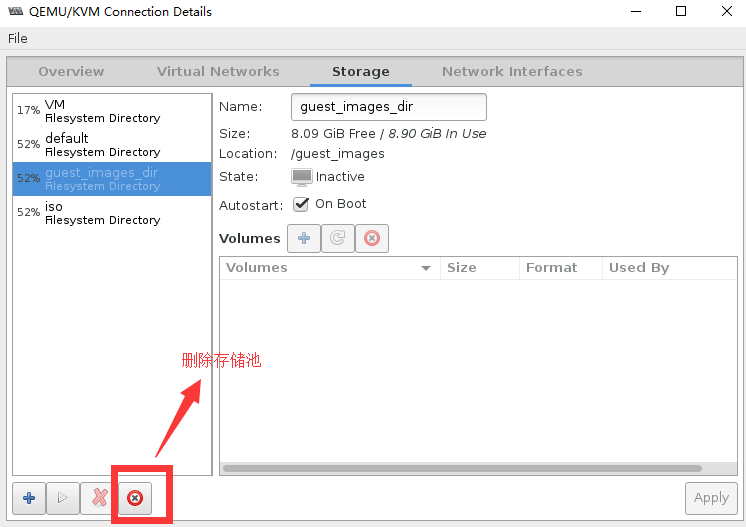
[root@localhost ~]# virsh pool-list --all
setlocale: No such file or directory
 Name                 State      Autostart
-------------------------------------------
 default              active     yes
 iso                  active     yes VM active yes [root@localhost ~]# ls /etc/libvirt/storage/ VM.xml autostart default.xml iso.xml
(2)通过virsh创建一个自定义存储池
#定义一个存储池
[root@localhost ~]# virsh pool-define --help
setlocale: No such file or directory
  NAME
    pool-define - define an inactive persistent storage pool or modify an existing persistent one from an XML file SYNOPSIS pool-define <file> #如果直接去定义存储池参数比较多,我们可以选择直接通过存储池的配置文件去定义存储池 DESCRIPTION Define or modify a persistent storage pool. OPTIONS [--file] <string> file containing an XML pool description [root@localhost ~]# virsh pool-define-as guest_images dir --target "/guest_images2" #guest_images存储池名字,target目标路径 Pool guest_images defined [root@localhost ~]# virsh pool-list --all setlocale: No such file or directory Name State Autostart ------------------------------------------- default active yes guest_images inactive no #新定义的存储池并没有启动 iso active yes VM active yes [root@localhost ~]# virsh pool-start guest_images #启动存储池 error: Failed to start pool guest_images #启动失败 error: cannot open directory '/guest_images2': 没有那个文件或目录 #我们不要用手动去创建存储池目录,因为可能会有权限问题。 #创建一个定义好的存储池的存储目录 root@localhost ~]# virsh pool-build guest_images Pool guest_images built [root@localhost ~]# ll -d /gue* drws--S--- 2 root root 6 May 6 16:25 /guest_images drwxr-xr-x 2 root root 6 May 11 10:55 /guest_images2 [root@localhost ~]# virsh pool-start guest_images #启动存储池 Pool guest_images started [root@localhost ~]# virsh pool-list --all setlocale: No such file or directory Name State Autostart ------------------------------------------- default active yes guest_images active no #存储池处于启动状态 iso active yes VM active yes [root@localhost ~]# virsh pool-autostart guest_images #标记存储池自动启动 setlocale: No such file or directory Pool guest_images marked as autostarted [root@localhost ~]# virsh pool-list --all setlocale: No such file or directory Name State Autostart ------------------------------------------- default active yes guest_images active yes iso active yes VM active yes
删除自定义的存储池
[root@localhost ~]# virsh pool-destroy guest_images #停止存储池的活动
Pool guest_images destroyed

[root@localhost ~]# virsh pool-list --all
 Name                 State      Autostart
-------------------------------------------
 default              active     yes
 guest_images         inactive   yes iso active yes VM active yes [root@localhost ~]# virsh pool-delete guest_images #删除存储池目录 Pool guest_images deleted [root@localhost ~]# ll -d /gue* #存储池的存储目录已经被删除了 drws--S--- 2 root root 6 May 6 16:25 /guest_images [root@localhost ~]# virsh pool-info guest_images #存储池配置文件还在 Name: guest_images UUID: 4f37b935-1529-4623-a367-e5e3435d3b55 State: inactive Persistent: yes Autostart: yes [root@localhost ~]# ll /etc/libvirt/storage/ total 16 -rw-------. 1 root root 508 Apr 4 20:39 VM.xml drwxr-xr-x. 2 root root 78 May 11 10:58 autostart -rw-------. 1 root root 538 Mar 30 12:12 default.xml -rw------- 1 root root 539 May 11 10:41 guest_images.xml #在这里 -rw-------. 1 root root 511 Apr 4 10:16 iso.xml [root@localhost ~]# virsh pool-undefine guest_images #清除存储池配置文件 Pool guest_images has been undefined [root@localhost ~]# ll /etc/libvirt/storage/ #已经没了 total 12 -rw-------. 1 root root 508 Apr 4 20:39 VM.xml drwxr-xr-x. 2 root root 54 May 11 11:23 autostart -rw-------. 1 root root 538 Mar 30 12:12 default.xml -rw-------. 1 root root 511 Apr 4 10:16 iso.xml [root@localhost ~]# virsh pool-info guest_images #配置文件已经没了 error: failed to get pool 'guest_images' error: 未找到存储池: 没有与名称 'guest_images' 匹配的存储池
5.4.4 基于分区的存储池
- [x] libvirtd会自动mount分区
- [x] 准备分区并创建文件系统
# fdisk /dev/sdc# mkfs.ext4 /dev/sdc1 - [x] 创建:
- Source Path:块设备名
- Target Path:mount到的目录名
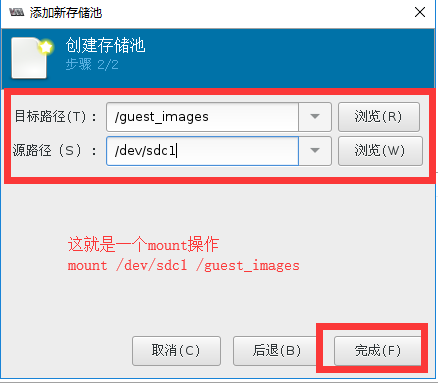
# virsh pool-define-as guest_images_fs fs --source-dev "/dev/sdc1" --target "/guest_images2"
操作准备
给虚拟机再加入一块磁盘,分区并进行格式化来继续我们的实验
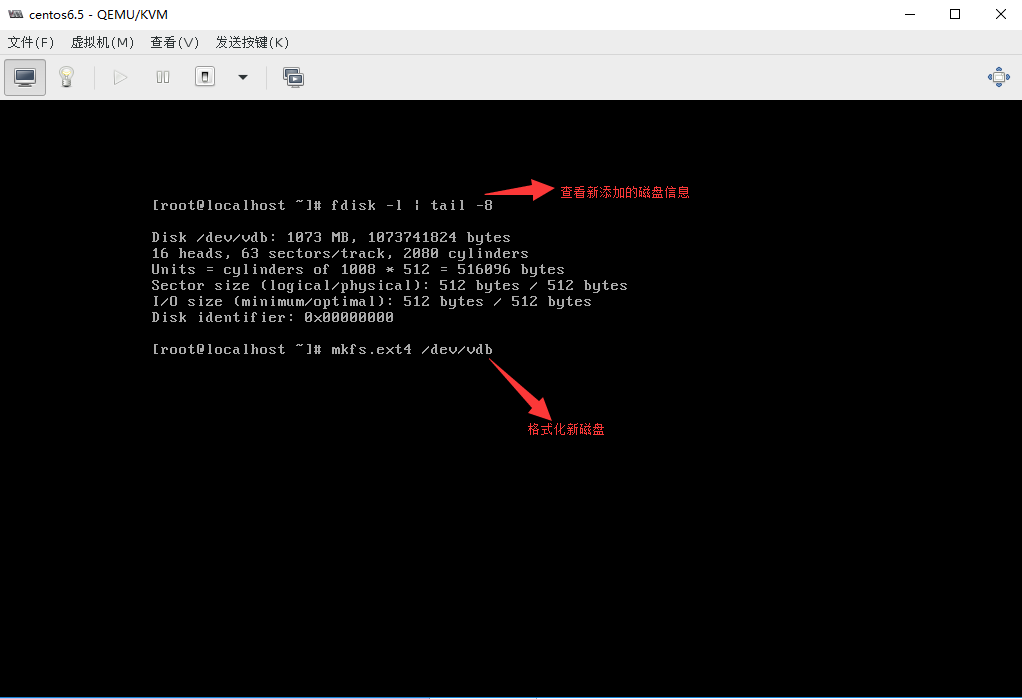
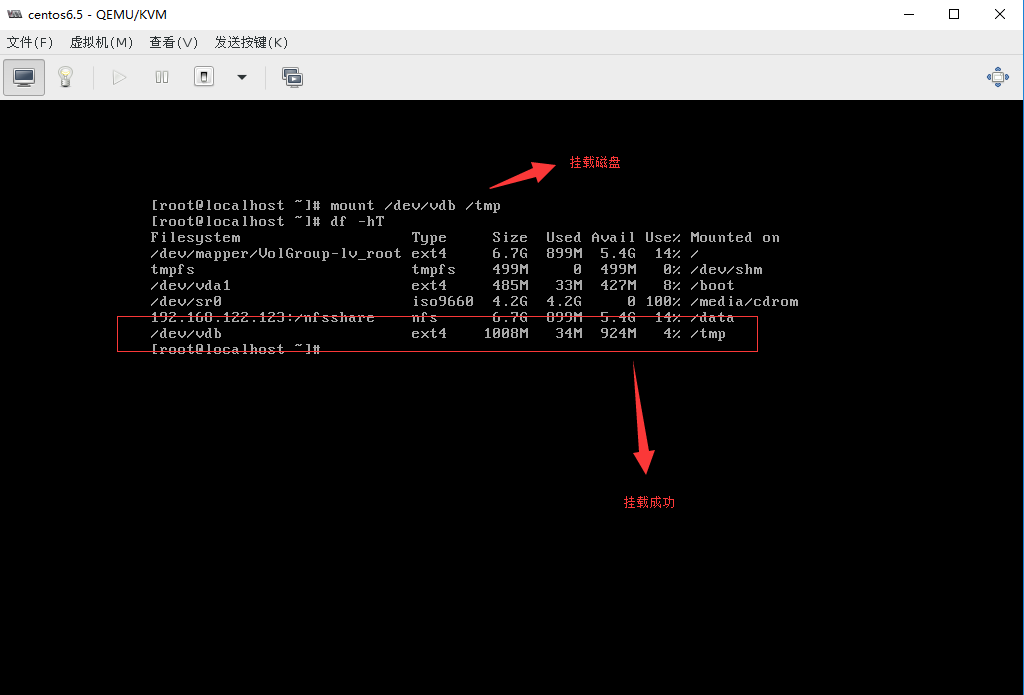
#将新磁盘sdc分两个分区,并进行格式化。
[root@localhost ~]# ll /dev/sdc
brw-rw---- 1 root disk 8, 32 5月 11 20:12 /dev/sdc brw-rw---- 1 root disk 8, 33 5月 11 20:12 /dev/sdc1 brw-rw---- 1 root disk 8, 34 5月 11 20:12 /dev/sdc2 [root@localhost ~]# rm -rf /guest_images/ #清除旧存储池存放目录
(1)通过virt-manager创建一个基于分区的存储池
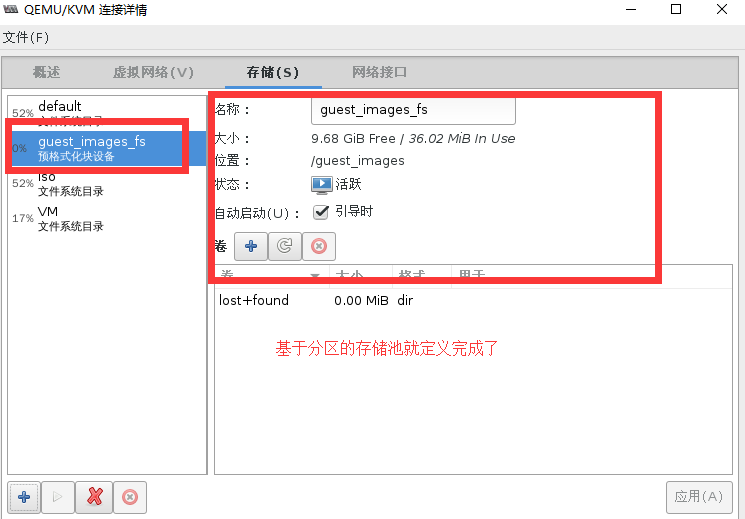
#验证创建的存储池
[root@localhost ~]# virsh pool-list --all
 名称               状态     自动开始
-------------------------------------------
 default              活动     是
 guest_images_fs      活动     是           #有了并处于活动状态
 iso                  活动     是
 VM                   活动     是

[root@localhost ~]# virsh pool-info guest_images_fs
名称:       guest_images_fs
UUID:           e50f34cc-89a5-47e3-80e5-324b91b0d001
状态:       running
持久:       是
自动启动: 是
容量:       9.72 GiB
分配:       36.02 MiB
可用:       9.68 GiB

[root@localhost ~]# ll -d /guest_images/
drwxr-xr-x 3 root root 4096 5月  11 20:14 /guest_images/    #存储池目录被自动创建了

[root@localhost ~]# df -h
文件系统                容量  已用  可用 已用% 挂载点
/dev/mapper/cl-root      17G  8.9G  8.1G   53% /
devtmpfs                901M     0  901M    0% /dev
tmpfs                   912M  4.0K  912M    1% /dev/shm
tmpfs                   912M  9.0M  903M    1% /run
tmpfs                   912M     0  912M    0% /sys/fs/cgroup
/dev/sda1              1014M  144M  871M   15% /boot
/dev/mapper/vmvg-lvvm1   40G  7.0G   31G   19% /vm
tmpfs                   183M  8.0K  183M    1% /run/user/0
/dev/sdc1               9.8G   37M  9.2G    1% /guest_images    #磁盘/dev/sdc1被自动挂载了

[root@localhost ~]# cat /etc/libvirt/storage/guest_images_fs.xml #查看存储池的配置文件
<!--
WARNING: THIS IS AN AUTO-GENERATED FILE. CHANGES TO IT ARE LIKELY TO BE
OVERWRITTEN AND LOST. Changes to this xml configuration should be made using:
  virsh pool-edit guest_images_fs
or other application using the libvirt API.
-->

<pool type='fs'> #磁盘类型为fs <name>guest_images_fs</name> <uuid>e50f34cc-89a5-47e3-80e5-324b91b0d001</uuid> <capacity unit='bytes'>0</capacity> <allocation unit='bytes'>0</allocation> <available unit='bytes'>0</available> <source> <device path='/dev/sdc1'/> #源磁盘路径 <format type='auto'/> </source> <target> <path>/guest_images</path> #目标目录路径 </target> </pool> [root@localhost ~]# mount | grep sdc1 #查看mount挂载的信息 /dev/sdc1 on /guest_images type ext4 (rw,relatime,data=ordered)
最后同学们在重启电脑验证存储池自动激活时是否可以自动挂载磁盘/dev/sdc1,在这里我就不继续演示了。
然后我们清理掉guest_images_fs存储池信息,继续实验
(2)通过virsh命令创建一个基于分区的存储池
[root@localhost ~]# virsh pool-define-as guest_images_fs fs \
> --source-dev "/dev/sdc1" --target "/guest_images2"
定义池 guest_images_fs

[root@localhost ~]# virsh pool-list --all
 名称               状态     自动开始
-------------------------------------------
 default 活动 是 guest_images_fs 不活跃 否 #新定义的存储池未启动 iso 活动 是 VM 活动 是 [root@localhost ~]# ll -d /gue* #没有目标挂载目录 drwxr-xr-x 2 root root 6 5月 11 20:22 /guest_images root@localhost ~]# virsh pool-build guest_images_fs #创建存储池存储目录 构建池 guest_images_fs [root@localhost ~]# ll -d /guest* drwxr-xr-x 2 root root 6 5月 11 20:22 /guest_images drwxr-xr-x 2 root root 6 5月 11 20:52 /guest_images2 #存在了 [root@localhost ~]# virsh pool-start guest_images_fs #启动存储池 池 guest_images_fs 已启动 [root@localhost ~]# virsh pool-list --all 名称 状态 自动开始 ------------------------------------------- default 活动 是 guest_images_fs 活动 否 #启动成功 iso 活动 是 VM 活动 是 [root@localhost ~]# virsh pool-autostart guest_images_fs #标记存储池开机自启动 池 guest_images_fs 标记为自动启动 [root@localhost ~]# virsh pool-list --all 名称 状态 自动开始 ------------------------------------------- default 活动 是 guest_images_fs 活动 是 iso 活动 是 VM 活动 是 [root@localhost ~]# mount | grep /dev/sdc1 #已经自动挂载 /dev/sdc1 on /guest_images2 type ext4 (rw,relatime,data=ordered)
5.4.5 基于LVM的存储池
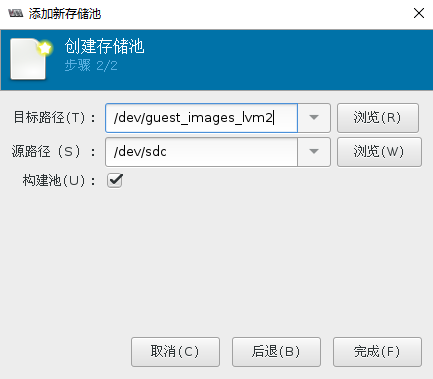
- [x] 基于LVM的存储池要求使用全部磁盘分区
- [x] 创建时存储池,有两种方法
- 使用现有的VG
- 创建新的VG
- Target Path:新的卷组名
- Source Path:存储设备的位置
- Build Pool:会创建新的VG
- [x] 创建
# virsh pool-define-as guest_images_lvm3 logical \ --source-dev=/dev/sdc --source-name=libvirt_lvm \ --target=/dev/libvirt_vg
(1)以手动的方式创建VG并通过virt-manager创建基于lvm的存储池
#fdisk分出一个全部容量的分区
[root@localhost storage]# ll /dev/sdc*
brw-rw---- 1 root disk 8, 32 5月 11 23:25 /dev/sdc brw-rw---- 1 root disk 8, 33 5月 11 23:25 /dev/sdc1 #这就是我们实验用的分区 #创建一个卷组 [root@localhost storage]# pvcreate /dev/sdc1 Physical volume "/dev/sdc1" successfully created. [root@localhost storage]# vgcreate guest_images_lvm /dev/sdc1 Volume group "guest_images_lvm" successfully created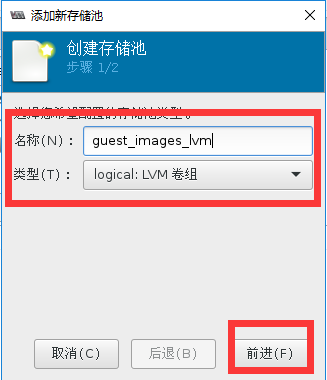

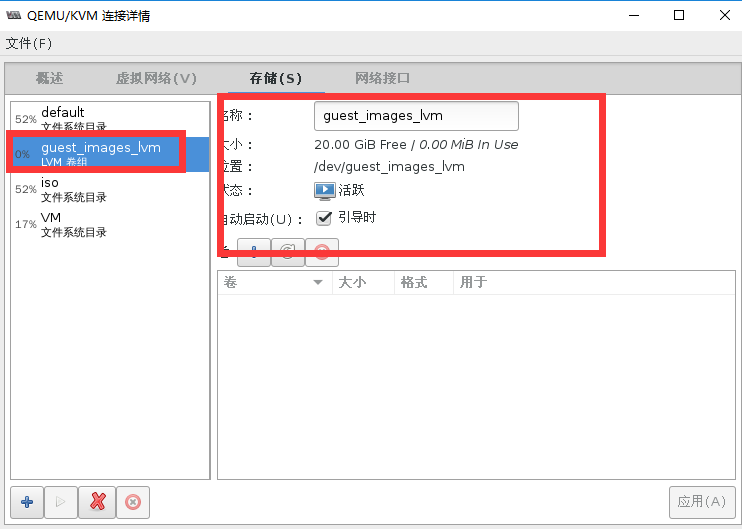
#验证存储池创建状态
[root@localhost storage]# virsh pool-list --all
 名称               状态     自动开始
-------------------------------------------
 default              活动     是
 guest_images_lvm     活动     是
 iso                  活动     是
 VM                   活动     是

[root@localhost storage]# cat /etc/libvirt/storage/guest_images_lvm.xml
<!--
WARNING: THIS IS AN AUTO-GENERATED FILE. CHANGES TO IT ARE LIKELY TO BE
OVERWRITTEN AND LOST. Changes to this xml configuration should be made using:
  virsh pool-edit guest_images_lvm
or other application using the libvirt API.
-->

<pool type='logical'> <name>guest_images_lvm</name> <uuid>a95d43e7-0d20-4347-8069-9ae39074058d</uuid> <capacity unit='bytes'>0</capacity> <allocation unit='bytes'>0</allocation> <available unit='bytes'>0</available> <source> <name>guest_images_lvm</name> <format type='lvm2'/> </source>
图形界面创建成功
(2)通过virt-manager创建vg并创建LVM存储池
先清除之前创建的存储池
#清除之前的vg卷组
[root@localhost storage]# vgs
  VG               #PV #LV #SN Attr   VSize  VFree
  cl                 1 2 0 wz--n- 19.00g 0 guest_images_lvm 1 0 0 wz--n- 20.00g 20.00g vmvg 1 1 0 wz--n- 40.00g 0 [root@localhost storage]# vgremove guest_images_lvm Volume group "guest_images_lvm" successfully removed [root@localhost storage]# vgs VG #PV #LV #SN Attr VSize VFree cl 1 2 0 wz--n- 19.00g 0 vmvg 1 1 0 wz--n- 40.00g 0 #清除之前的pv状态 [root@localhost storage]# pvs PV VG Fmt Attr PSize PFree /dev/sda2 cl lvm2 a-- 19.00g 0 /dev/sdb1 vmvg lvm2 a-- 40.00g 0 /dev/sdc1 lvm2 --- 20.00g 20.00g [root@localhost storage]# pvremove /dev/sdc1 Labels on physical volume "/dev/sdc1" successfully wiped. [root@localhost storage]# pvs PV VG Fmt Attr PSize PFree /dev/sda2 cl lvm2 a-- 19.00g 0 /dev/sdb1 vmvg lvm2 a-- 40.00g 0 #通过fdisk清除/dev/sdc1的磁盘分区,不要通过mkfs.ext4方式来清楚/dev/sdc1,不然图形软件无法自动pv化磁盘 [root@localhost storage]# ll /dev/sdc* brw-rw---- 1 root disk 8, 32 5月 11 23:41 /dev/sdc
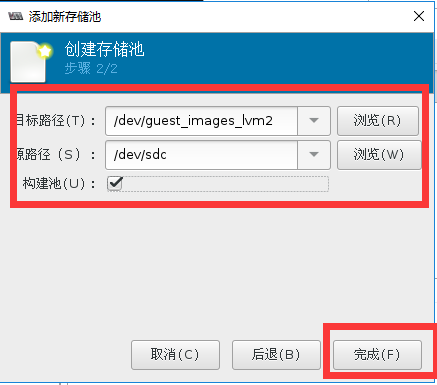
#验证存储池创建状态
[root@localhost storage]# vgs
VG #PV #LV #SN Attr VSize VFree
cl 1 2 0 wz--n- 19.00g 0
guest_images_lvm2 1 0 0 wz--n- 20.00g 20.00g
vmvg 1 1 0 wz--n- 40.00g 0
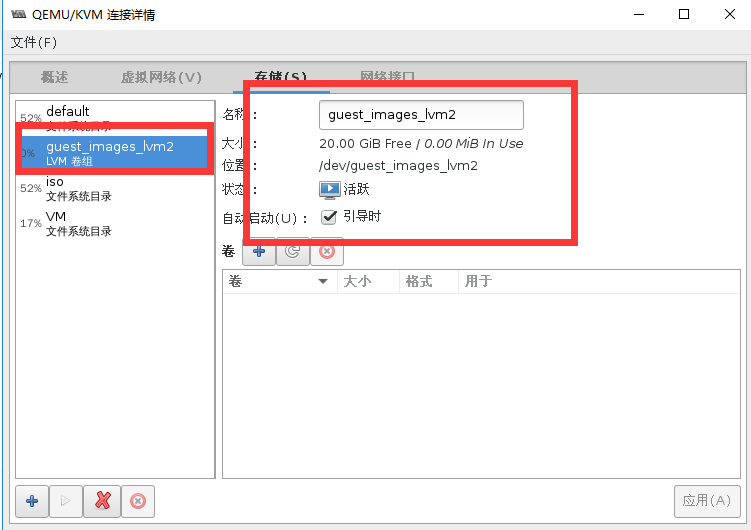
[root@localhost storage]# virsh pool-list --all
名称 状态 自动开始
-------------------------------------------
default 活动 是
guest_images_lvm2 活动 是
iso 活动 是
VM 活动 是
[root@localhost storage]# cat /etc/libvirt/storage/guest_images_lvm2.xml
<!--
WARNING: THIS IS AN AUTO-GENERATED FILE. CHANGES TO IT ARE LIKELY TO BE
OVERWRITTEN AND LOST. Changes to this xml configuration should be made using:
virsh pool-edit guest_images_lvm2
or other application using the libvirt API.
-->
<pool type='logical'> <name>guest_images_lvm2</name> <uuid>a66a085c-d017-409d-8925-4f508956e2b0</uuid> <capacity unit='bytes'>0</capacity> <allocation unit='bytes'>0</allocation> <available unit='bytes'>0</available> <source> <device path='/dev/sdc'/> <name>guest_images_lvm2</name> <format type='lvm2'/> </source> <target> <path>/dev/guest_images_lvm2</path> </target> </pool>(3)通过virsh命令创建vg并创建基于LVM的存储池
#清除之前创建的存储池并抹除vg痕迹
[root@localhost storage]# vgs
  VG                #PV #LV #SN Attr   VSize  VFree
  cl                  1 2 0 wz--n- 19.00g 0 guest_images_lvm2 1 0 0 wz--n- 20.00g 20.00g vmvg 1 1 0 wz--n- 40.00g 0 [root@localhost storage]# vgremove guest_images_lvm2 Volume group "guest_images_lvm2" successfully removed [root@localhost storage]# pvs PV VG Fmt Attr PSize PFree /dev/sda2 cl lvm2 a-- 19.00g 0 /dev/sdb1 vmvg lvm2 a-- 40.00g 0 /dev/sdc lvm2 --- 20.00g 20.00g [root@localhost storage]# pvremove /dev/sdc Labels on physical volume "/dev/sdc" successfully wiped. #virsh命令创建vg并创建基于LVM的存储池 [root@localhost storage]# virsh pool-define-as guest_images_lvm3 logical --source-dev=/dev/sdc --source-name=libvirt_lvm --target=/dev/libvirt_vg 定义池 guest_images_lvm3 [root@localhost storage]# vgs #我们发现virsh命令没有自动创建vg VG #PV #LV #SN Attr VSize VFree cl 1 2 0 wz--n- 19.00g 0 vmvg 1 1 0 wz--n- 40.00g 0 [root@localhost storage]# pvs #我们发现virsh命令没有自动创建pv PV VG Fmt Attr PSize PFree /dev/sda2 cl lvm2 a-- 19.00g 0 /dev/sdb1 vmvg lvm2 a-- 40.00g 0 #virsh命令创建卷组libvirt_lvm [root@localhost storage]# virsh pool-build guest_images_lvm3 构建池 guest_images_lvm3 [root@localhost storage]# pvs PV VG Fmt Attr PSize PFree /dev/sda2 cl lvm2 a-- 19.00g 0 /dev/sdb1 vmvg lvm2 a-- 40.00g 0 /dev/sdc libvirt_lvm lvm2 a-- 20.00g 20.00g [root@localhost storage]# vgs VG #PV #LV #SN Attr VSize VFree cl 1 2 0 wz--n- 19.00g 0 libvirt_lvm 1 0 0 wz--n- 20.00g 20.00g vmvg 1 1 0 wz--n- 40.00g 0 #启动LVM存储池并标记开机自启动 [root@localhost storage]# virsh pool-list --all 名称 状态 自动开始 ------------------------------------------- default 活动 是 guest_images_lvm3 不活跃 否 iso 活动 是 VM 活动 是 [root@localhost storage]# virsh pool-start guest_images_lvm3 池 guest_images_lvm3 已启动 [root@localhost storage]# virsh pool-autostart guest_images_lvm3 池 guest_images_lvm3 标记为自动启动 [root@localhost storage]# virsh pool-list --all 名称 状态 自动开始 ------------------------------------------- default 活动 是 guest_images_lvm3 活动 是 iso 活动 是 VM 活动 是
5.4.6 基于NFS的存储池
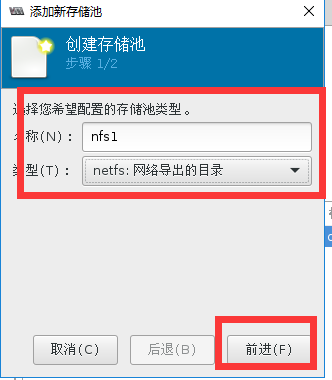
# virsh pool-define-as --name nfstrial2 --type netfs --source-host 192.1688.200.132 --source-path /nfsshare --target /nfstrial2环境准备
在一台KVM虚拟机中创建NFS共享存储文件系统
创建基于NFS共享存储的存储池
第一步:在一台虚拟机中yum安装nfs服务端
#这是一台NAT链接的虚拟机,yum安装nfs
[root@localhost ~]# yum -y install rpcbind nfs-utils
[root@localhost ~]# mkdir /nfsshare
[root@localhost ~]# useradd nfsnobody
[root@localhost ~]# chown nfsnobody.nfsnobody /nfsshare [root@localhost ~]# cat /etc/exports #因为虚拟机是NAT模式,若要宿主机能够挂载需要开通两个网段权限 /nfsshare 192.168.122.0(rw,sync) 192.168.200.0(rw,sync) [root@localhost ~]# service rpcbind start Starting rpcbind: [ OK ] [root@localhost ~]# service nfs start Starting NFS services: [ OK ] Starting NFS mountd: [ OK ] Starting NFS daemon: [ OK ] Starting RPC idmapd: [ OK ]
第二步:virt-manager创建基于NFS的存储池
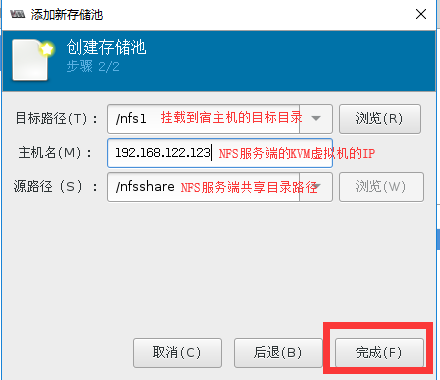
#在宿主机中测试共享目录
[root@localhost ~]# df -h | grep nfsshare #已经自动挂载
192.168.122.123:/nfsshare 6.7G 899M 5.4G 14% /nfs1
[root@localhost ~]# mount | grep nfsshare #已经自动挂载
192.168.122.123:/nfsshare on /nfs1 type nfs4 (rw,relatime,vers=4.0,rsize=131072,wsize=131072,namlen=255,hard,proto=tcp,port=0,timeo=600,retrans=2,sec=sys,clientaddr=192.168.122.1,local_lock=none,addr=192.168.122.123)
[root@localhost ~]# virsh pool-list --all
名称 状态 自动开始
-------------------------------------------
default 活动 是
iso 活动 是
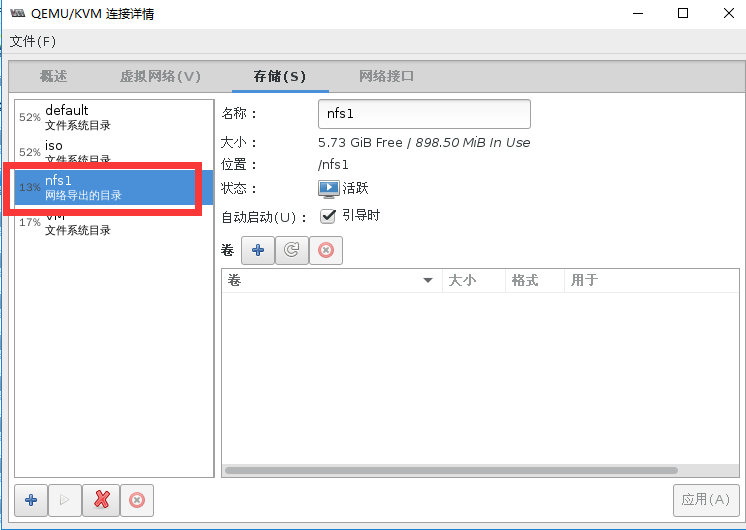
nfs1 活动 是 #已经处于活动状态
VM 活动 是
[root@localhost ~]# cat /etc/libvirt/storage/nfs1.xml
<!--
WARNING: THIS IS AN AUTO-GENERATED FILE. CHANGES TO IT ARE LIKELY TO BE
OVERWRITTEN AND LOST. Changes to this xml configuration should be made using:
virsh pool-edit nfs1
or other application using the libvirt API.
-->
<pool type='netfs'> #类型为网络文件系统network file system <name>nfs1</name> <uuid>a662a36a-8927-4aa9-a73b-67bad0a378ef</uuid> <capacity unit='bytes'>0</capacity> <allocation unit='bytes'>0</allocation> <available unit='bytes'>0</available> <source> <host name='192.168.122.123'/> #源共享主机IP <dir path='/nfsshare'/> #源共享主机目录 <format type='auto'/> </source> <target> <path>/nfs1</path> #目标挂载目录 </target> </pool>到这里就配置完毕了,同学们可以自动对共享目录进行写入测试
另外,glusterfs的配置方法也是类似的噢....
5.5 存储卷
5.5.1 存储卷概述
- [x] 存储池被分割为存储卷(Storage Volume)
- [x] 存储卷
- 文件
- 块设备(如物理分区,LVM逻辑卷等)
- libvirt管理的其他类型存储的抽象
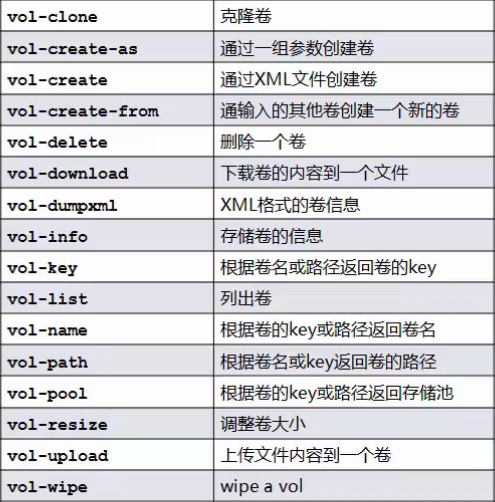
[root@localhost ~]# virsh help volume
 Storage Volume (help keyword 'volume'):
    vol-clone                      克隆卷。
    vol-create-as                  从一组变量中创建卷
    vol-create 从一个 XML 文件创建一个卷 vol-create-from 生成卷,使用另一个卷作为输入。 vol-delete 删除卷 vol-download 将卷内容下载到文件中 vol-dumpxml XML 中的卷信息 vol-info 存储卷信息 vol-key 为给定密钥或者路径返回卷密钥 vol-list 列出卷 vol-name 为给定密钥或者路径返回卷名 vol-path 为给定密钥或者路径返回卷路径 vol-pool 为给定密钥或者路径返回存储池 vol-resize 创新定义卷大小 vol-upload 将文件内容上传到卷中 vol-wipe 擦除卷
5.5.2 存储卷管理
- [x] 创建
- [x] 克隆
- [x] 删除
(1) 演示:存储卷的创建
[root@localhost ~]# virsh vol-create-as --help
  NAME
    vol-create-as - 从一组变量中创建卷

  SYNOPSIS
    vol-create-as <pool> <name> <capacity> [--allocation <string>] [--format <string>] [--backing-vol <string>] [--backing-vol-format <string>] [--prealloc-metadata] [--print-xml] DESCRIPTION 创建一个卷。 OPTIONS [--pool] <string> 卷名称 [--name] <string> 卷的名称 [--capacity] <string> 卷大小,以整数计(默认为字节) --allocation <string> 初始化分配大小,以整数计(默认为 KiB) --format <string> 文件格式类型:raw、bochs、qcow、qcow2、qed、vmdk --backing-vol <string> 提取快照时的后端卷 --backing-vol-format <string> 提取快照时的后端卷格式 --prealloc-metadata 预先分配的元数据(用于 qcow2 而不是整个分配) --print-xml 打印 XML 文档,但不能定义/创建
基于目录的存储池中的存储卷管理
#查看所有的存储池
[root@localhost ~]# virsh pool-list
 名称               状态     自动开始
-------------------------------------------
 default              活动     是
 iso                  活动     是
 nfs1                 活动     是
 VM                   活动     是      #目标存储池

 #查看VM存储的xml文档
 [root@localhost ~]# virsh pool-dumpxml VM
<pool type='dir'>   #基于目录的存储池
  <name>VM</name> <uuid>8594b419-685a-477d-88bd-c8f1b057073e</uuid> <capacity unit='bytes'>42137255936</capacity> <allocation unit='bytes'>7494885376</allocation> <available unit='bytes'>34642370560</available> <source> </source> <target> <path>/vm</path> #存储池位置 <permissions> <mode>0755</mode> <owner>0</owner> <group>0</group> </permissions> </target> </pool> #查看VM存储池的所有存储卷 [root@localhost ~]# virsh vol-list VM 名称 路径 ------------------------------------------------------------------------------ Base_CentOS6.5.qcow2 /vm/Base_CentOS6.5.qcow2 centos6.5-2.qcow2 /vm/centos6.5-2.qcow2 chensiqi.qcow2 /vm/chensiqi.qcow2 CRM-disk0.qcow2 /vm/CRM-disk0.qcow2 ERP-disk0.qcow2 /vm/ERP-disk0.qcow2 HR-disk0.qcow2 /vm/HR-disk0.qcow2 LNMP-disk1.qcow2 /vm/LNMP-disk1.qcow2 LNMP-disk1.vmdk /vm/LNMP-disk1.vmdk lost+found /vm/lost+found OA-disk0.qcow2 /vm/OA-disk0.qcow2 #向VM存储池里创建一个存储卷 [root@localhost ~]# virsh vol-create-as VM test1.qcow2 1G --format qcow2 创建卷 test1.qcow2 #查看test1.qcow2的卷信息的两种方式 [root@localhost ~]# virsh vol-info /vm/test1.qcow2 名称: test1.qcow2 类型: 文件 容量: 1.00 GiB 分配: 196.00 KiB [root@localhost ~]# virsh vol-info test1.qcow2 --pool VM 名称: test1.qcow2 类型: 文件 容量: 1.00 GiB 分配: 196.00 KiB
基于LVM的存储池中的存储卷管理
#定义一个基于LVM的存储池
[root@localhost ~]# ll /dev/sdc*
brw-rw---- 1 root disk 8, 32 5月 12 00:05 /dev/sdc [root@localhost ~]# virsh pool-define-as guest_images_lvm logical \ > --source-dev=/dev/sdc --target=/dev/vg_libvirt 定义池 guest_images_lvm #构建LVM存储池(如果构建失败,可手动pvcreate -y /dev/sdc后再执行) [root@localhost ~]# pvcreate -y /dev/sdc Wiping ext4 signature on /dev/sdc. Physical volume "/dev/sdc" successfully created. [root@localhost ~]# virsh pool-build guest_images_lvm 构建池 guest_images_lvm #启动基于LVM的存储池 [root@localhost ~]# virsh pool-list --all 名称 状态 自动开始 ------------------------------------------- default 活动 是 guest_images_lvm 不活跃 否 iso 活动 是 nfs1 活动 是 VM 活动 是 [root@localhost ~]# virsh pool-start guest_images_lvm 池 guest_images_lvm 已启动 [root@localhost ~]# virsh pool-autostart guest_images_lvm 池 guest_images_lvm 标记为自动启动 [root@localhost ~]# virsh pool-list --all 名称 状态 自动开始 ------------------------------------------- default 活动 是 guest_images_lvm 活动 是 iso 活动 是 nfs1 活动 是 VM 活动 是 #向LVM存储池中创建一个存储卷 [root@localhost ~]# virsh vol-create-as guest_images_lvm lvvoll 1G 创建卷 lvvoll [root@localhost ~]# virsh vol-create-as guest_images_lvm lvvol2 2G 创建卷 lvvol2 [root@localhost ~]# virsh vol-create-as guest_images_lvm lvvol3 3G 创建卷 lvvol3 [root@localhost ~]# virsh vol-list guest_images_lvm 名称 路径 ------------------------------------------------------------------------------ lvvol2 /dev/guest_images_lvm/lvvol2 lvvol3 /dev/guest_images_lvm/lvvol3 lvvoll /dev/guest_images_lvm/lvvoll
(2) 演示:存储卷的克隆
[root@localhost ~]# virsh vol-clone --help
  NAME
    vol-clone - 克隆卷。

  SYNOPSIS
    vol-clone <vol> <newname> [--pool <string>] [--prealloc-metadata] [--reflink]

  DESCRIPTION
    Clone an existing volume within the parent pool.

  OPTIONS
    [--vol] <string> 卷名称、密钥或者路径 [--newname] <string> 克隆名称 --pool <string> 池名或 uuid --prealloc-metadata 预先分配的元数据(用于 qcow2 而不是整个分配) --reflink use btrfs COW lightweight copy #克隆基于目录的存储池中的存储卷test1.qcow2 [root@localhost ~]# virsh vol-clone test1.qcow2 test2.qcow2 --pool VM 使用 test2.qcow2 克隆的卷 test1.qcow2 [root@localhost ~]# virsh vol-list VM 名称 路径 ------------------------------------------------------------------------------ Base_CentOS6.5.qcow2 /vm/Base_CentOS6.5.qcow2 centos6.5-2.qcow2 /vm/centos6.5-2.qcow2 chensiqi.qcow2 /vm/chensiqi.qcow2 CRM-disk0.qcow2 /vm/CRM-disk0.qcow2 ERP-disk0.qcow2 /vm/ERP-disk0.qcow2 HR-disk0.qcow2 /vm/HR-disk0.qcow2 LNMP-disk1.qcow2 /vm/LNMP-disk1.qcow2 LNMP-disk1.vmdk /vm/LNMP-disk1.vmdk lost+found /vm/lost+found OA-disk0.qcow2 /vm/OA-disk0.qcow2 test1.qcow2 /vm/test1.qcow2 test2.qcow2 /vm/test2.qcow2 #克隆后的盘 [root@localhost ~]# virsh vol-info /vm/test2.qcow2 名称: test2.qcow2 类型: 文件 容量: 1.00 GiB 分配: 196.00 KiB #克隆基于LVM的存储池中的存储卷 [root@localhost ~]# virsh vol-clone lvvoll lvvol4 --pool guest_images_lvm 使用 lvvol4 克隆的卷 lvvoll [root@localhost ~]# virsh vol-list guest_images_lvm 名称 路径 ------------------------------------------------------------------------------ lvvol2 /dev/guest_images_lvm/lvvol2 lvvol3 /dev/guest_images_lvm/lvvol3 lvvol4 /dev/guest_images_lvm/lvvol4 #克隆后的卷 lvvoll /dev/guest_images_lvm/lvvoll [root@localhost ~]# virsh vol-info /dev/guest_images_lvm/lvvol4 名称: lvvol4 类型: 块 容量: 1.00 GiB 分配: 1.00 GiB
(3) 演示:存储卷的删除
#查看命令帮助
[root@localhost ~]# virsh vol-delete --help
\  NAME
    vol-delete - 删除卷

  SYNOPSIS
    vol-delete <vol> [--pool <string>] [--delete-snapshots] DESCRIPTION 删除一个给定的卷。 OPTIONS [--vol] <string> 卷名称、密钥或者路径 --pool <string> 池名或 uuid --delete-snapshots delete snapshots associated with volume (must be supported by storage driver) #删除基于LVM存储池中的存储卷 [root@localhost ~]# virsh vol-delete lvvol4 guest_images_lvm 卷 lvvol4 被删除 [root@localhost ~]# virsh vol-delete lvvol3 guest_images_lvm 卷 lvvol3 被删除 [root@localhost ~]# virsh vol-delete lvvol2 guest_images_lvm 卷 lvvol2 被删除 [root@localhost ~]# virsh vol-delete lvvoll guest_images_lvm 卷 lvvoll 被删除 [root@localhost ~]# virsh vol-list guest_images_lvm 名称 路径 ------------------------------------------------------------------------------ #删除基于LVM的存储池 root@localhost ~]# virsh pool-destroy guest_images_lvm 销毁池 guest_images_lvm [root@localhost ~]# virsh pool-undefine guest_images_lvm 池 guest_images_lvm 已经被取消定义 [root@localhost ~]# virsh pool-list --all 名称 状态 自动开始 ------------------------------------------- default 活动 是 iso 活动 是 nfs1 活动 是 VM 活动 是 #删除基于目录的存储池中的存储卷 [root@localhost ~]# virsh vol-delete /vm/test2.qcow2 卷 /vm/test2.qcow2 被删除
5.5.3 向虚拟机添加卷
- [x] 通过virt-manager添加新设备
- 通过图形管理程序添加新设备
- [x] attach-device
- 通过XML添加新的设备
- [x] attach-disk
- 通过参数添加新的磁盘设备
(1)通过virt-manager添加新设备
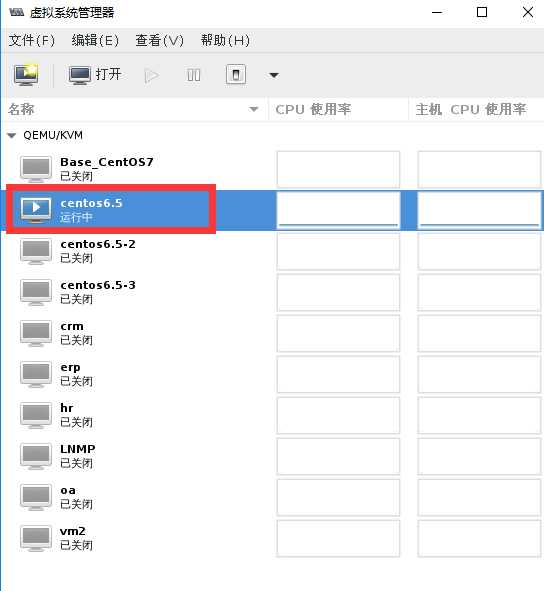
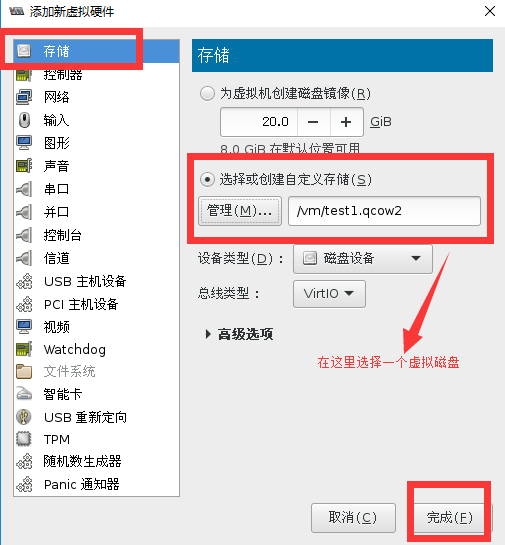
假如我们想要向一个虚拟机中添加一块虚拟磁盘
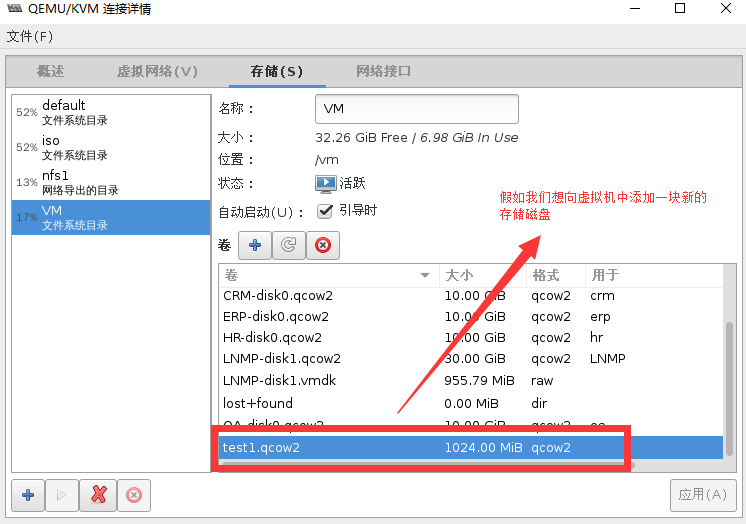
点开一个虚拟机,运行状态的也可以
选择硬件添加
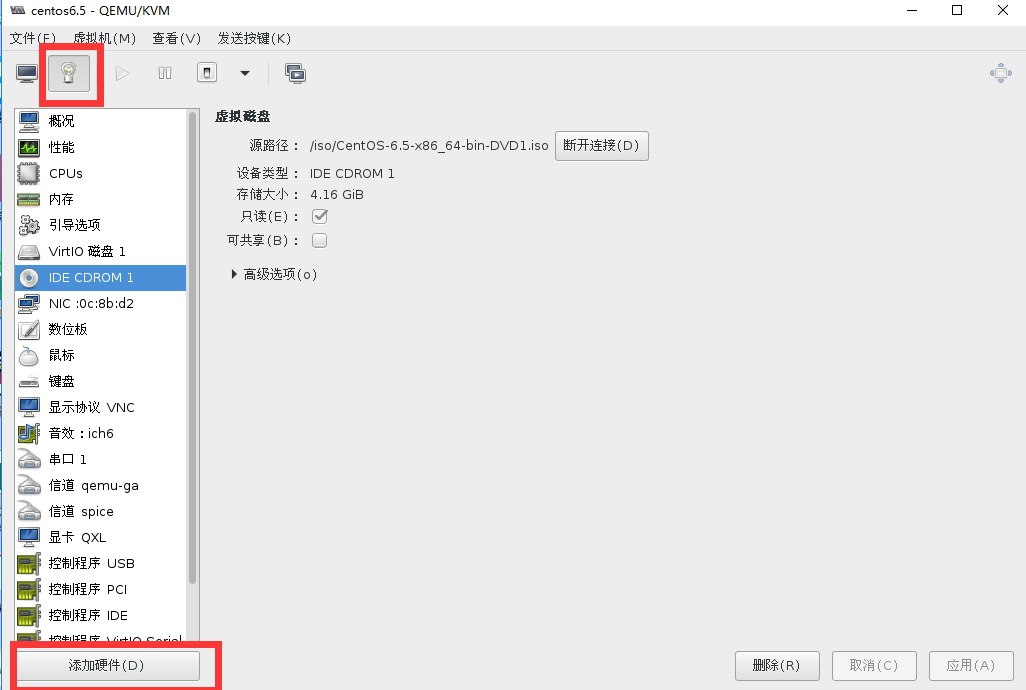
添加虚拟磁盘
进入运行中的虚拟机的交互界面
(2)通过XML文件添加新的设备
#创建一个disk类型的xml文档
[root@localhost ~]# cat /tmp/disks.xml
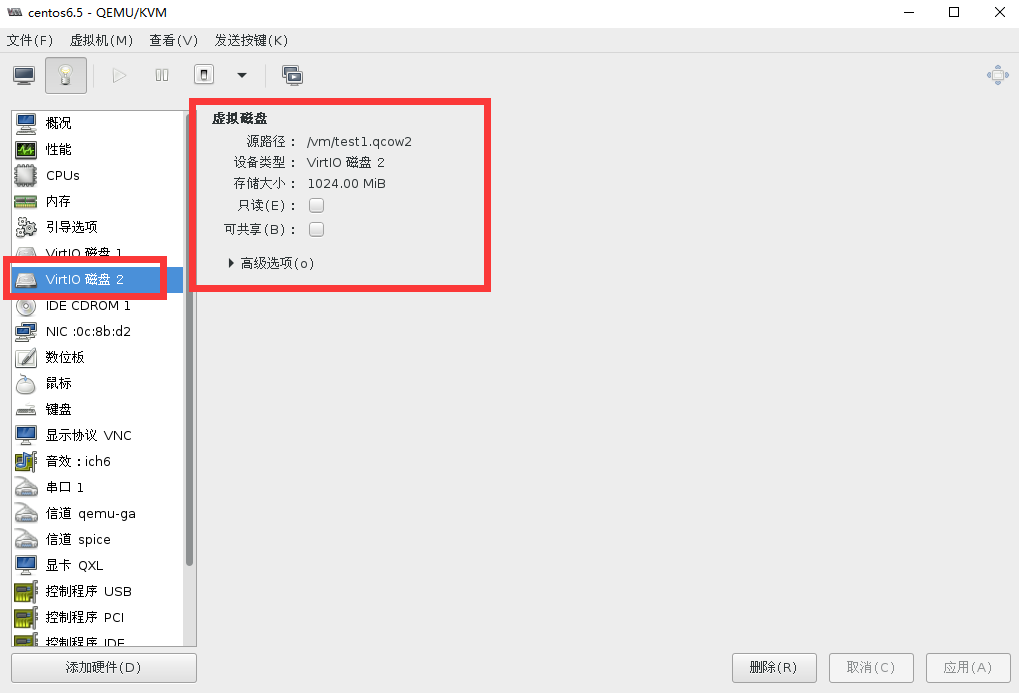
<disk type='file' device='disk'> #文件类型 <driver name='qemu' type='qcow2' cache='none'/> #磁盘类型 <source file='/vm/test1.qcow2'/> #虚拟卷位置 <target dev='vdb'/> #虚拟卷挂载名称 </disk> #查看virsh domblklist命令的帮助 [root@localhost ~]# virsh domblklist --help NAME domblklist - 列出所有域块 SYNOPSIS domblklist <domain> [--inactive] [--details] DESCRIPTION 获取域块设备小结 OPTIONS [--domain] <string> 域名,id 或 uuid --inactive 获取不活跃而不是运行的配置 --details type 和 device 值的附加显示 #查看虚拟机的磁盘挂载情况 [root@localhost ~]# virsh list --all Id 名称 状态 ---------------------------------------------------- 1 centos6.5 running #一个正在运行的虚拟机 - Base_CentOS7 关闭 - centos6.5-2 关闭 - centos6.5-3 关闭 - crm 关闭 - erp 关闭 - hr 关闭 - LNMP 关闭 - oa 关闭 - vm2 关闭 [root@localhost ~]# virsh domblklist centos6.5 #查看虚拟机的磁盘设备挂载情况 目标 源 ------------------------------------------------ vda /var/lib/libvirt/images/centos6.5.qcow2 hda /iso/CentOS-6.5-x86_64-bin-DVD1.iso #将磁盘类型的xml文档加入到虚拟机 [root@localhost ~]# virsh attach-device --help #查看命令帮助 NAME attach-device - 从一个XML文件附加装置 SYNOPSIS attach-device <domain> <file> [--persistent] [--config] [--live] [--current] DESCRIPTION 从一个XML文件附加装置. OPTIONS [--domain] <string> 域名,id 或 uuid [--file] <string> XML 文件 --persistent 让实时更改持久 #虚拟机永久生效 --config 影响下一次引导 #挂载的磁盘重启虚拟机生效 --live 影响运行的域 --current 影响当前域 [root@localhost ~]# virsh attach-device centos6.5 /tmp/disks.xml --persistent #将xml文件添加进虚拟机 成功附加设备 [root@localhost ~]# virsh domblklist centos6.5 目标 源 ------------------------------------------------ vda /var/lib/libvirt/images/centos6.5.qcow2 vdb /vm/test1.qcow2 #存储卷添加成功 hda /iso/CentOS-6.5-x86_64-bin-DVD1.iso通过virt-manager查看磁盘已经添加成功,如下图:
(3)通过参数添加新的磁盘设备
#克隆一个存储卷
[root@localhost ~]# virsh vol-clone test1.qcow2 test2.qcow2 --pool VM
使用 test2.qcow2 克隆的卷 test1.qcow2

[root@localhost ~]# ll /vm/test2.qcow2 -rw------- 1 qemu qemu 1245184 5月 18 22:00 /vm/test2.qcow2 #挂载一个存储卷到虚拟机 [root@localhost ~]# virsh attach-disk centos6.5 --source=/vm/test2.qcow2 --target=vdc 成功附加磁盘 [root@localhost ~]# virsh domblklist centos6.5 目标 源 ------------------------------------------------ vda /var/lib/libvirt/images/centos6.5.qcow2 vdb /vm/test1.qcow2 vdc /vm/test2.qcow2 #挂载成功 hda /iso/CentOS-6.5-x86_64-bin-DVD1.iso