上节课我们一起学习了Zookeeper集群的搭建,那只是个热身,这节课我们一起要学习的Hadoop集群的搭建才是重中之重。
首先还是先说一下Zookeeper在Hadoop集群的作用,以前我们学习Hadoop伪分布式的时候没有用到Zookeeper是因为伪分布式只有一个NameNode,没有Active和Standby状态的两个NameNode之说,因此根本就不需要Zookeepr来帮我们自动切换。但是Hadoop真正的集群就不一样了,为了集群的高可靠性,Hadoop集群采用主备NameNode方式来工作,一个处于Active激活状态,另一个处于Standby备份状态,一旦激活状态的NameNode发生宕机,处于备份状态的NameNode需要立即顶替上来进行工作,从而对外提供持续稳定的服务。那么,Zookeeper便是为我们提供这种服务的。
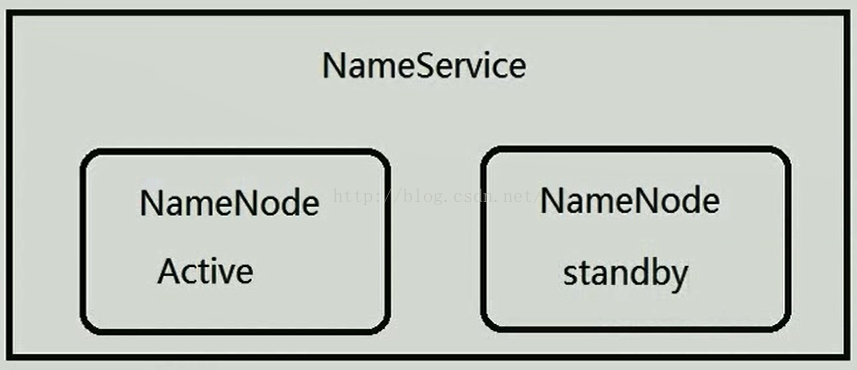
在Hadoop1.0当中,集群当中只有一个NameNode,一旦宕机,服务便停止,这是非常大的缺陷,在Hadoop2.0当中,针对这一问题进行了优化,它对NameNode进行了抽象处理,它把NameNode抽象成一个NameService,一个NameService下面有两个NameNode,如下图所示。既然有两个NameNode,就需要有一个人来协调,谁来协调呢?那就是Zookeeper,Zookeeper有一个选举机制,它能确保一个NameService下面只有一个活跃的NameNode。因此Zookeeper在Hadoop2.0当中是非常重要的。
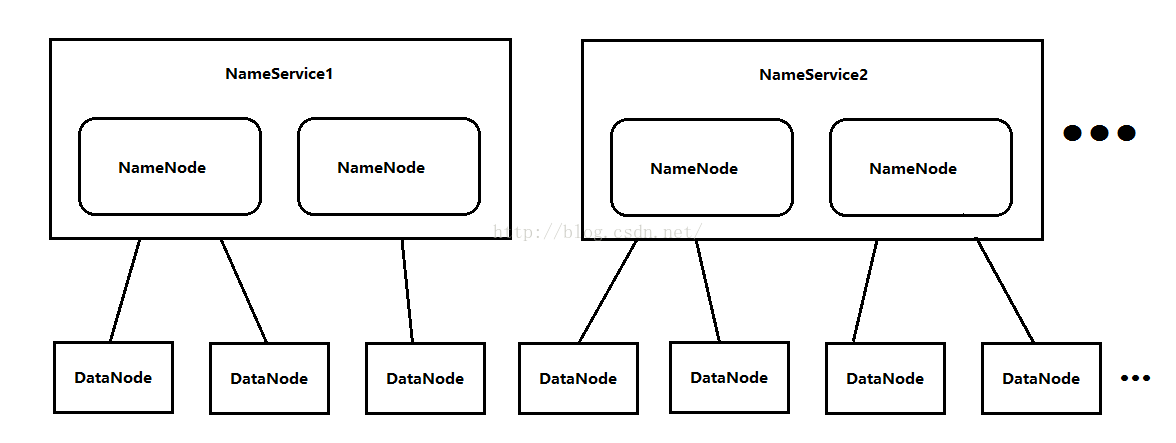
我们会疑问,在Hadoop集群当中一共就有两个NameNode吗?不是的,因为一个Hadoop集群每天面对的数据量是海量的,只有两个NameNode的话,内存会被写爆,因此NameService是可以水平扩展的,即一个集群有多个NameService,每个NameService有两个NameNode。NameService的名字依次是NameService1、NameService2...,由于DataNode是无限扩展的,因此NameService也是无限扩展的(当然不是说多的就没边了,合适的数量就好),如下图所示。
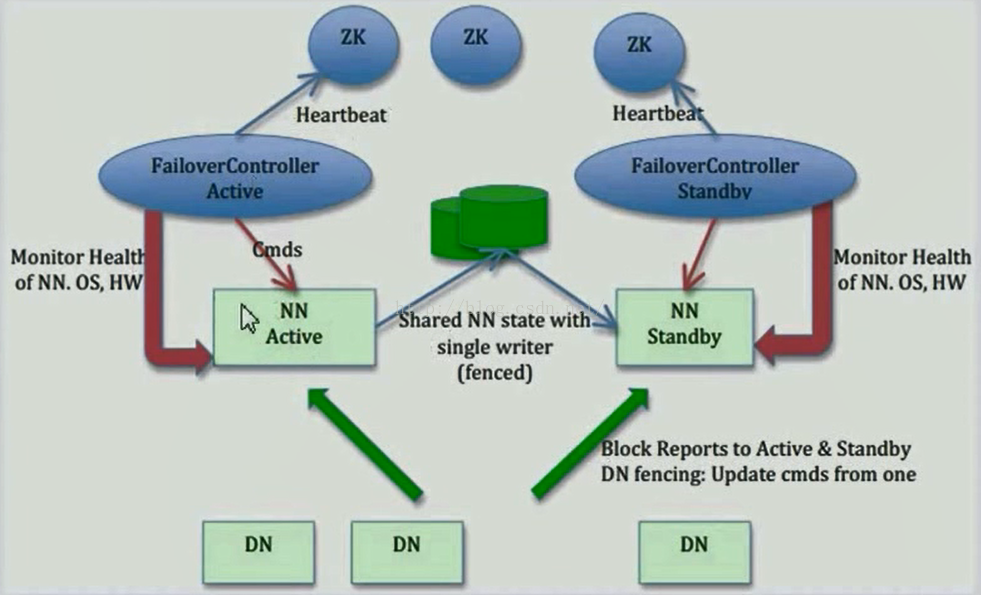
下面我看一张Hadoop高可靠性的工作原理图,其中NN代表的是NameNode,DN代表的是DataNode,ZK代表的是Zookeeper,我们发现这个集群当中有两个NameNode,一个处于Active状态,另一个处于Standby状态,NameNode是受Zookeeper控制的,但是又不是直接受Zookeeper控制,有一个中间件FailoverController(也就是ZKFC进程),每一个NameNode所在的机器都有一个ZKFC进程,ZKFC可以给NameNode发送一些指令,比如切换指令。同时ZKFC还负责监控NameNode,一旦它发现NameNode宕机了,它就会报告给Zookeeper,另一台NameNode上的ZKFC可以得到那一台NameNode宕机的信息,因为Zookeeper数据是同步的,因此它可以从ZK中得到这条信息,它得到这条信息之后,会向它控制的NameNode发送一条指令,让它由Standby状态切换为Active状态。具体原理是什么呢,刚开始的时候两个NameNode都正常工作,处于激活状态的NameNode会实时的把edits文件写入到存放edits的一个介质当中(如下图绿色的如数据库图形的东西),Standby状态的NameNode会实时的把介质当中的edits文件同步到它自己所在的机器。因此Active里面的信息与Standby里面的信息是实时同步的。FailoverController实时监控NameNode,不断把NameNode的情况汇报给Zookeeper,一旦Active状态的NameNode发生宕机,FailoverController就跟NameNode联系不上了,联系不上之后,FailoverController就会把Active宕机的信息汇报给Zookeeper,另一个FailoverController便从ZK中得到了这条信息,然后它给监控的NameNode发送切换指令,让它由Standby状态切换为Active状态。存放edits文件的方式可以使用NFS---网络文件系统,另一种是JournalNode,我们本课程便使用JournalNode来存储edits文件。DataNode连向的是NameService,DataNode既可以跟Active的NameNode通信又可以跟Standby的NameNode通信,一旦Active宕机,DataNode会自动向新的Active进行通信。
上面说了一大堆理论了,下面我们来开始搭建我们的Hadoop集群!,我们先来看一下我们的集群规划,我们打算布一个6台设备的集群,每台设备应该安装的软件、运行的进程如下图所示。其中DFSZKFailoverController是我们上图中介绍的FailoverContrlloer进程。我们可能会疑问,为什么NameNode和ResourceManager不放到一台设备上呢,是不能放到一起吗?不是的,之所以把它们分开是因为它们都是管理者(NameNode是HDFS的管理者,ResourceManager是Yarn的管理者)都十分耗资源,为了不让它们争抢资源,因此最好把它们分别布置到不同的设备上。NodeManager和DataNode最好在一台设备上,因为NodeManager以后要运行MapReduce程序,运行程序需要数据,数据从本地取最好,而DataNode刚好就是用来存储数据的。JournalNode是用来存储共享的edits文件的。
说明:
在hadoop2.0中通常由两个NameNode组成,一个处于active状态,另一个处于standby状态。Active NameNode对外提供服务,而Standby NameNode则不对外提供服务,仅同步active namenode的状态,以便能够在它失败时快速进行切换。
hadoop2.0官方提供了两种HDFS HA的解决方案,一种是NFS,另一种是QJM。这里我们使用简单的QJM。在该方案中,主备NameNode之间通过一组JournalNode同步元数据信息,一条数据只要成功写入多数JournalNode即认为写入成功。通常配置奇数个JournalNode
这里还配置了一个zookeeper集群,用于ZKFC(DFSZKFailoverController)故障转移,当Active NameNode挂掉了,会自动切换Standby NameNode为Active状态

接下来我们便真正开始部署集群了,首先我们需要给所有的设备安装jdk了,关于jdk安装,我这里就不再详细说明了,大家可以参考:http://blog.csdn.net/u012453843/article/details/52422736这篇博客来安装。hadoop的安装我们采取先先安装一台并且配置好之后,然后再拷贝到其它设备的方式来进行。其中Hadoop的安装过程大家可以参考:http://blog.csdn.net/u012453843/article/details/52431742这篇博客来安装,注意:参考这篇博客先不要配置hadoop因为我们集群的配置跟当时学习的时候的配置不一样。Hadoop我们使用64位的Hadoop-2.2.0.tar.gz,大家可以到:http://pan.baidu.com/s/1hsDfFso来下载。
安装完hadoop之后我们来配置HDFS,(hadoop2.0所有的配置文件都在$HADOOP_HOME/etc/hadoop目录下)
我们将Hadoop添加到环境变量中,如下所示,然后先按ESC键,再按Shift+ZZ(按两次Z)保存退出。
*:"$1":*)
;;
*)
if [ "$2" = "after" ] ; then ----------------------> 中间只截取了一部分信息
PATH=$PATH:$1
else
PATH=$1:$PATH
fi
esac
}
unset -f pathmunge
export JAVA_HOME=/usr/java/jdk1.7.0_80
export HADOOP_HOME=/itcast/hadoop-2.2.0
export PATH=$PATH:$JAVA_HOME/bin:$HADOOP_HOME/bin
安装好了hadoop,接下来我们开始配置hadoop,我们一共需要配置6个文件,如下图所示。

第一个文件:hadoop.env.sh
说明:我们修改java的导出路径,export JAVA_HOME=/usr/java/jdk1.7.0_80,然后先按ESC键,再按Shift+ZZ(按两次Z)保存退出。第一个文件就修改完了。

第二个文件:core-site.xml
说明:第一个property配置的的是nameservice,在以前伪分布式的时候配置的是类如:<value>hdfs://itcast01:9000</value>这样的值,现在在hadoop2.0中value的值有所变化,配置的是nameservice,nameservice包含两个NameNode,一个是Active状态,另一个额是Standby状态,在集群当中,DataNode不直接连向某NameNode,而是与NameService直接相连。因此配置的是nameservice。我们在<configuration></configuration>之间加上下面红色字体的配置,然后先按ESC键,再按Shift+ZZ(按两次Z)保存退出。(注意:<property></property>与<configuration></configuration>之间以Tab缩进,<property></property>里面的属性也用Tab缩进,否则可能会有问题)大家可以从:https://download.csdn.net/download/anaitudou/10427737 这个地址下载hadoop2.2.0集群搭建配置文档,里面的内容便是用Tab排版的,大家拷过来用就可以了。
[root@itcast01 hadoop]# vim core-site.xml
<?xml-stylesheet type="text/xsl" href="configuration.xsl"?>
<!--
Licensed under the Apache License, Version 2.0 (the "License");
you may not use this file except in compliance with the License.
You may obtain a copy of the License at
distributed under the License is distributed on an "AS IS" BASIS,
WITHOUT WARRANTIES OR CONDITIONS OF ANY KIND, either express or implied.
See the License for the specific language governing permissions and
limitations under the License. See accompanying LICENSE file.
-->
<configuration>
<!-- 指定hdfs的nameservice为ns1 -->
<property>
<name>fs.defaultFS</name>
<value>hdfs://ns1</value>
</property>
<!-- 指定hadoop临时目录 -->
<property>
<name>hadoop.tmp.dir</name>
<value>/itcast/hadoop-2.2.0/tmp</value>
</property>
<!-- 指定zookeeper地址 -->
<property>
<name>ha.zookeeper.quorum</name>
<value>itcast04:2181,itcast05:2181,itcast06:2181</value>
</property>
</configuration>
第三个文件:hdfs-site.xml
说明:
我们在<configuration></configuration>当中配置的第一个<property></property>指定hdfs的nameservice为谁,现在我们只有一个nameservice,等以后真正的集群环境,会有多个nameservice,那么在value中便可以以英文的逗号分隔,写多个nameservice,如<value>ns1,ns2,ns3,...</value>,前提是要和core-site.xml中配置的保持一致。
配置中有一个是关于配置隔离机制方法的配置,第一种方法是sshfence,这个配置的作用是什么呢?我们举例来说明,假如现在Active状态的NameNode出现了问题,但是进程却没有宕掉,这时FailoveController监测到Active状态的NameNode出现了问题并向ZK汇报,另外一个FailoverController可以从ZK中得到同步过来的相关信息,然后这个FailoverController便向它监控的NameNode发送指令,让它由Standby状态切换为Active状态,但这时就有问题了,出现问题的那个NameNode的状态依然是Active,这时又要来一个Active状态的NameNode,为了保证一个NameService下只有一个Active的NameNode,没有问题的NameNode会向有问题的NameNode发送SSH命令,把有问题的NameNode的进程给kill掉,这样就保证没问题的NameNode可以正常切换到Active状态。第二种方法是通过shell脚本的方法(shell(/bin/true)),这种方法适用的场景是什么呢?我们在上面不是有一张关于Hadoop高可靠性工作原理的图嘛,从图中可以看出FailoverController和它监测的NameNode是在同一台设备上的,假如这一台设备给宕掉了,那么FailoverController和NameNode都宕掉了,FailoverController也就不会再向ZK汇报NameNode的状态了,那么另外一个FailoverController长时间无法从ZK中得到Active的NameNode的信息,过了超时时长后,它会调用一个shell脚本,如果这个脚本返回true,那么它就发送命令给它监控的NameNode,让它由Standby状态切换为Active状态。
<?xml version="1.0" encoding="UTF-8"?>
<?xml-stylesheet type="text/xsl" href="configuration.xsl"?>
<!--
Licensed under the Apache License, Version 2.0 (the "License");
you may not use this file except in compliance with the License.
You may obtain a copy of the License at
distributed under the License is distributed on an "AS IS" BASIS,
WITHOUT WARRANTIES OR CONDITIONS OF ANY KIND, either express or implied.
See the License for the specific language governing permissions and
limitations under the License. See accompanying LICENSE file.
-->
<!--指定hdfs的nameservice为ns1,需要和core-site.xml中的保持一致 -->
<property>
<name>dfs.nameservices</name>
<value>ns1</value>
</property>
<!-- ns1下面有两个NameNode,分别是nn1,nn2 -->
<property>
<name>dfs.ha.namenodes.ns1</name>
<value>nn1,nn2</value>
</property>
<!-- nn1的RPC通信地址 -->
<property>
<name>dfs.namenode.rpc-address.ns1.nn1</name>
<value>itcast01:9000</value>
</property>
<!-- nn1的http通信地址 -->
<property>
<name>dfs.namenode.http-address.ns1.nn1</name>
<value>itcast01:50070</value>
</property>
<!-- nn2的RPC通信地址 -->
<property>
<name>dfs.namenode.rpc-address.ns1.nn2</name>
<value>itcast02:9000</value>
</property>
<!-- nn2的http通信地址 -->
<property>
<name>dfs.namenode.http-address.ns1.nn2</name>
<value>itcast02:50070</value>
</property>
<!-- 指定NameNode的元数据在JournalNode上的存放位置 -->
<property>
<name>dfs.namenode.shared.edits.dir</name>
<value>qjournal://itcast04:8485;itcast05:8485;itcast06:8485/ns1</value>
</property>
<!-- 指定JournalNode在本地磁盘存放数据的位置 -->
<property>
<name>dfs.journalnode.edits.dir</name>
<value>/itcast/hadoop-2.2.0/journal</value>
</property>
<!-- 开启NameNode失败自动切换 -->
<property>
<name>dfs.ha.automatic-failover.enabled</name>
<value>true</value>
</property>
<!-- 配置失败自动切换实现方式 -->
<property>
<name>dfs.client.failover.proxy.provider.ns1</name>
<value>org.apache.hadoop.hdfs.server.namenode.ha.ConfiguredFailoverProxyProvider</value>
</property>
<!-- 配置隔离机制方法,多个机制用换行分割,即每个机制暂用一行-->
<property>
<name>dfs.ha.fencing.methods</name>
<value>
sshfence
shell(/bin/true)
</value>
</property>
<!-- 使用sshfence隔离机制时需要ssh免登陆 ,需要配置私钥所在的路径,注意现在配置的是默认路径,如果路径有变化这里也要变化-->
<property>
<name>dfs.ha.fencing.ssh.private-key-files</name>
<value>/root/.ssh/id_rsa</value>
</property>
<!-- 配置sshfence隔离机制超时时间 -->
<property>
<name>dfs.ha.fencing.ssh.connect-timeout</name>
<value>30000</value>
</property>
</configuration>
第四个文件:mapred-site.xml
说明:在hadoop的目录下没有mapred-site.xml,而是有一个mapred-site.xml.template,我们需要先修改mapred-site.template文件为mared-site.xml
[root@itcast01 hadoop]# mv mapred-site.xml.template mapred-site.xml
[root@itcast01 hadoop]# ls
capacity-scheduler.xml hadoop-env.cmd hadoop-policy.xml httpfs-signature.secret mapred-env.sh ssl-client.xml.example yarn-site.xml
configuration.xsl hadoop-env.sh hdfs-site.xml httpfs-site.xml mapred-queues.xml.template ssl-server.xml.example
container-executor.cfg hadoop-metrics2.properties httpfs-env.sh log4j.properties mapred-site.xml yarn-env.cmd
core-site.xml hadoop-metrics.properties httpfs-log4j.properties mapred-env.cmd slaves yarn-env.sh
[root@itcast01 hadoop]#vim mapred-site.xml
<?xml-stylesheet type="text/xsl" href="configuration.xsl"?>
<!--
Licensed under the Apache License, Version 2.0 (the "License");
you may not use this file except in compliance with the License.
You may obtain a copy of the License at
distributed under the License is distributed on an "AS IS" BASIS,
WITHOUT WARRANTIES OR CONDITIONS OF ANY KIND, either express or implied.
See the License for the specific language governing permissions and
limitations under the License. See accompanying LICENSE file.
-->
<!-- 指定mr框架为yarn方式 -->
<property>
<name>mapreduce.framework.name</name>
<value>yarn</value>
</property>
</configuration>
<?xml version="1.0"?>
<!--
Licensed under the Apache License, Version 2.0 (the "License");
you may not use this file except in compliance with the License.
You may obtain a copy of the License at
distributed under the License is distributed on an "AS IS" BASIS,
WITHOUT WARRANTIES OR CONDITIONS OF ANY KIND, either express or implied.
See the License for the specific language governing permissions and
limitations under the License. See accompanying LICENSE file.
-->
<configuration>
<!-- 指定resourcemanager地址 -->
<property>
<name>yarn.resourcemanager.hostname</name>
<value>itcast03</value>
</property>
<!-- 指定nodemanager启动时加载server的方式为shuffle server -->
<property>
<name>yarn.nodemanager.aux-services</name>
<value>mapreduce_shuffle</value>
</property>
</configuration>
itcast04
itcast05
itcast06
JMX enabled by default
Using config: /itcast/zookeeper-3.4.5/bin/../conf/zoo.cfg
Mode: follower
[root@itcast04 bin]#
[root@itcast05 bin]# ./zkServer.sh status
JMX enabled by default
Using config: /itcast/zookeeper-3.4.5/bin/../conf/zoo.cfg
Mode: leader
[root@itcast05 bin]#
[root@itcast06 bin]# ./zkServer.sh status
JMX enabled by default
Using config: /itcast/zookeeper-3.4.5/bin/../conf/zoo.cfg
Mode: follower
[root@itcast06 bin]#

[root@itcast01 share]# ls
doc hadoop
[root@itcast01 share]# rm -rf doc/
[root@itcast01 share]# ls
hadoop
[root@itcast01 share]#
bin boot dev etc home lib lib64 lost+found media mnt opt proc root sbin selinux srv sys tmp usr var
[root@itcast02 /]#
127.0.0.1 localhost localhost.localdomain localhost4 localhost4.localdomain4
::1 localhost localhost.localdomain localhost6 localhost6.localdomain6
192.168.8.10 itcast01
192.168.8.20 itcast02
192.168.8.30 itcast03
192.168.8.40 itcast04
192.168.8.50 itcast05
192.168.8.60 itcast06
The authenticity of host 'itcast02 (192.168.8.20)' can't be established.
RSA key fingerprint is b4:aa:39:16:08:ef:bf:79:2c:5a:60:fc:32:ac:b6:13.
Are you sure you want to continue connecting (yes/no)? yes
Warning: Permanently added 'itcast02,192.168.8.20' (RSA) to the list of known hosts.
root@itcast02's password:
bin boot dev etc home itcast lib lib64 lost+found media mnt opt proc root sbin selinux srv sys tmp usr var[root@itcast02 /]# cd itcast
[root@itcast02 /]# cd itcast
[root@itcast02 itcast]# ls
The authenticity of host 'itcast03 (192.168.8.30)' can't be established.
RSA key fingerprint is b4:aa:39:16:08:ef:bf:79:2c:5a:60:fc:32:ac:b6:13.
Are you sure you want to continue connecting (yes/no)? yes
Warning: Permanently added 'itcast03,192.168.8.30' (RSA) to the list of known hosts.
root@itcast03's password:
[root@itcast03 /]# ls
bin boot dev etc home itcast lib lib64 lost+found media mnt opt proc root sbin selinux srv sys tmp usr var
[root@itcast03 /]# cd itcast/
[root@itcast03 itcast]# ls
hadoop-2.2.0
[root@itcast03 itcast]#
[root@itcast04 /]# ls
bin boot dev etc home itcast lib lib64 lost+found media mnt opt proc root sbin selinux srv sys tmp usr var
[root@itcast04 /]#
The authenticity of host 'itcast04 (192.168.8.40)' can't be established.
RSA key fingerprint is b4:aa:39:16:08:ef:bf:79:2c:5a:60:fc:32:ac:b6:13.
Are you sure you want to continue connecting (yes/no)? yes
Warning: Permanently added 'itcast04,192.168.8.40' (RSA) to the list of known hosts.
root@itcast04's password:
拷贝完之后,我们到itcast04上查看itcast目录下是否有了我们刚才拷贝的hadoop-2.2.0
zookeeper-3.4.5 -------->拷贝前 并没有hadoop-2.2.0
[root@itcast04 itcast]# ls
hadoop-2.2.0 zookeeper-3.4.5 -------->拷贝完之后发现已经有hadoop-2.2.0了。
[root@itcast04 itcast]#
# /etc/profile
unset -f pathmunge
export JAVA_HOME=/usr/java/jdk1.7.0_80
export HADOOP_HOME=/itcast/hadoop-2.2.0
export PATH=$PATH:$JAVA_HOME/bin:$HADOOP_HOME/bin

unset -f pathmunge
export JAVA_HOME=/usr/java/jdk1.7.0_80
export HADOOP_HOME=/itcast/hadoop-2.2.0
export PATH=$PATH:$JAVA_HOME/bin:$HADOOP_HOME/bin
[root@itcast02 etc]#
#在itcast01上生产一对钥匙,命令是ssh-keygen -t rsa,过程需要敲三次回车就可以了,如下图所示。

id_rsa id_rsa.pub known_hosts
[root@itcast01 ~]#
接下来我们将itcast01的公钥拷贝到其他节点,包括自己 ,如下所示。
The authenticity of host 'itcast01 (192.168.8.10)' can't be established.
RSA key fingerprint is b4:aa:39:16:08:ef:bf:79:2c:5a:60:fc:32:ac:b6:13.
Are you sure you want to continue connecting (yes/no)? yes
Warning: Permanently added 'itcast01,192.168.8.10' (RSA) to the list of known hosts.
root@itcast01's password:
Now try logging into the machine, with "ssh 'itcast01'", and check in:
root@itcast02's password:
Now try logging into the machine, with "ssh 'itcast02'", and check in:
root@itcast03's password:
Now try logging into the machine, with "ssh 'itcast03'", and check in:
root@itcast04's password:
Now try logging into the machine, with "ssh 'itcast04'", and check in:
root@itcast05's password:
Now try logging into the machine, with "ssh 'itcast05'", and check in:
root@itcast06's password:
Now try logging into the machine, with "ssh 'itcast06'", and check in:
#配置itcast03到itcast04、itcast05、itcast06的免密码登陆
#在itcast03上生产一对钥匙,使用命令: ssh-keygen -t rsa,如下图所示。

#将公钥拷贝到其他节点, 使用的命令:ssh-coyp-id itcast04,ssh-coyp-id itcast05, ssh-coyp-id itcast06,如下图所示。

#注意:两个namenode之间要配置ssh免密码登陆,别忘了配置itcast02到itcast01的免登陆
在itcast02上生产一对钥匙,使用命令: ssh-keygen -t rsa。接着使用命令ssh-coyp-id itcast01拷贝到itcast01上,如下图所示。

第一步:启动zookeeper集群(分别在itcast04、itcast05、itcast06上启动zk,上面我们已经启动过zookeeper了,就不用重启了。
cd /itcast/zookeeper-3.4.5/bin/
./zkServer.sh start
#查看状态:一个leader,两个follower
./zkServer.sh status
第二步:启动journalnode(注意:根据我们集群的规划,我们需要在itcast04、itcast05、itcast06上启动JournalNode,在hadoop的sbin目录下,有hadoop-daemon.sh和hadoop-daemons.sh命令,第一条命令是单独启动某台设备的某个进程,第二条命令是启动所有设备的某个进程,既然我们的集群只有3台设备有JournalNode,所以我们在itcast04、itcast05、itcast06上分别启动journalnode)如下图所示。我们启动journalnode使用的命令是./hadoop-daemon.sh start journalnode


第三步:格式化HDFS
#在itcast01上执行命令: hdfs namenode -format,如下图所示,当我们看到类似/itcast/hadoop-2.2.0/tmp/dfs/name has been successfully formatted这样的描述信息时说明格式化成功了。


第四步:格式化ZK(在itcast01上执行即可)
hdfs zkfc -formatZK


第五步:启动HDFS(在itcast01上执行)使用命令: sbin/start-dfs.sh,执行完命令之后,我们查看进程,发现NameNode和DFSZKFailoverController已经启动成功了。

sbin/start-yarn.sh

