一、Docker Compose
(一)Docker Compose介绍
Docker Compose是用于定义和运行多容器Docker应用程序的工具。通过Compose,您可以使用YML文件来配置应用程序需要的所有服务。然后,使用一个命令,就可以从YML文件配置中创建并启动所有服务。
(二)Compose安装
官网地址
Overview | Docker Documentation
Compose is a tool for defining and running multi-container Docker applications. With Compose, you use a YAML file to configure your application’s services. Then, with a single command, you create and start all the services from your configuration.
Compose是一个用于定义和运行多容器Docker应用程序的工具。使用Compose,您可以使用YAML文件来配置应用程序的服务。然后,使用一个命令就可以从配置中创建并启动所有服务。
Compose works in all environments: production, staging, development, testing, as well as CI workflows. It also has commands for managing the whole lifecycle of your application:
Compose可以在所有环境中工作:生产、登台、开发、测试以及CI工作流。它还有用于管理应用程序整个生命周期的命令
Start, stop, and rebuild services
View the status of running services
Stream the log output of running services
Run a one-off command on a service
启动、停止和重新构建服务
查看正在运行的业务状态
流化正在运行的业务的日志输出
对服务执行一次性命令
The key features of Compose that make it effective are:
Have multiple isolated environments on a single host
Preserves volume data when containers are created
Only recreate containers that have changed
Supports variables and moving a composition between environments
Compose有效的关键特征是:
在一台主机上有多个隔离的环境
创建容器时保存卷数据
只重新创建已更改的容器
支持变量和在环境之间移动组合
Key features and use cases | Docker Documentation
Using Compose is essentially a three-step process:
Define your app’s environment with a Dockerfile so it can be reproduced anywhere.
Define the services that make up your app in docker-compose. yml so they can be run together in an isolated environment
Run docker compose up and the Docker compose command starts and runs your entire app. You can alternatively run docker-compose up using Compose standalone(docker-compose binary)
使用Compose基本上是一个三步过程:
1、创建对应的DockerFile文件
2、创建yml文件,在yml文件中编排我们的服务
3、通过docker-compose up命令一键运行我们的容器
docker-compose.yml
version: "3.9"  # optional since v1.27.0

services:

  web:

    build: .

    ports:

      - "8000:5000"

    volumes:

      - .:/code

      - logvolume01:/var/log

    depends_on:

      - redis

  redis:

    image: redis

volumes:

  logvolume01: {}
安装
Install the Compose plugin | Docker Documentation
sudo cur1 -l "https://github.com/docker /compose/releases/download/1.29.2/docker-compose-$(uname -s)-$(uname -m)" -o /usr/loca1/bin/docker-compose
速度比较慢的话使用下面的地址:
cur1 -l https://get.daocloud.io/docker/compose/releases/download/1.25.5/docker-compose-`uname -s'- ^uname -m`/usr/loca1/bin/docker-compose
修改文件夹权限
chmod +x /usr/loca1/bin/ docker-compose
建立软连接
1n -s /usr/1oca1/bin/docker-compose /usr/bin/docker-compose
校验是否安装成功
docker compose version
(三)Compose初体验
Try Docker Compose | Docker Documentation
Step 1: Define the application dependencies
1、Create a directory for the project
mkdir composetest
cd composetest
2、Create a file called app.py in your project directory and paste the following code in
import time
import redis
from flask import Flask
app = Flask(__name__)
cache = redis.Redis(host='redis', port=6379)
def get_hit_count():
retries = 5
while True:
try:
return cache.incr('hits')
except redis.exceptions.ConnectionError as exc:
if retries == 0:
raise exc
retries -= 1
time.sleep(0.5)
@app.route('/')
def hello():
count = get_hit_count()
return 'Hello World! I have been seen {} times.\n'.format(count)
3、Create another file called requirements.txt in your project directory and paste the following code in
flask
redis
Step 2: Create a Dockerfile
# syntax=docker/dockerfile:1
FROM python:3.7-alpine
WORKDIR /code
ENV FLASK_APP=app.py
ENV FLASK_RUN_HOST=0.0.0.0
RUN apk add --no-cache gcc musl-dev linux-headers
COPY requirements.txt requirements.txt
RUN pip install -r requirements.txt
EXPOSE 5000
COPY . .
CMD ["flask", "run"]
Step 3: Define services in a Compose file
Create a file called docker-compose.yml(核心文件) in your project directory and paste the following
version: "3.9"
services:
web:
build: .
ports:
- "8000:5000"
redis:
image: "redis:alpine"
Step 4: Build and run your app with Compose
1、From your project directory, start up your application by running docker compose up
docker compose up
Creating network "composetest_default" with the default driver

Creating composetest_web_1 ...

Creating composetest_redis_1 ...

Creating composetest_web_1

Creating composetest_redis_1 ... done

Attaching to composetest_web_1, composetest_redis_1

web_1    |  * Running on http://0.0.0.0:5000/ (Press CTRL+C to quit)

redis_1  | 1:C 17 Aug 22:11:10.480 # oO0OoO0OoO0Oo Redis is starting oO0OoO0OoO0Oo

redis_1  | 1:C 17 Aug 22:11:10.480 # Redis version=4.0.1, bits=64, commit=00000000, modified=0, pid=1, just started

redis_1  | 1:C 17 Aug 22:11:10.480 # Warning: no config file specified, using the default config. In order to specify a config file use redis-server /path/to/redis.conf

web_1    |  * Restarting with stat

redis_1  | 1:M 17 Aug 22:11:10.483 * Running mode=standalone, port=6379.

redis_1  | 1:M 17 Aug 22:11:10.483 # WARNING: The TCP backlog setting of 511 cannot be enforced because /proc/sys/net/core/somaxconn is set to the lower value of 128.

web_1    |  * Debugger is active!

redis_1  | 1:M 17 Aug 22:11:10.483 # Server initialized

redis_1  | 1:M 17 Aug 22:11:10.483 # WARNING you have Transparent Huge Pages (THP) support enabled in your kernel. This will create latency and memory usage issues with Redis. To fix this issue run the command 'echo never > /sys/kernel/mm/transparent_hugepage/enabled' as root, and add it to your /etc/rc.local in order to retain the setting after a reboot. Redis must be restarted after THP is disabled.

web_1    |  * Debugger PIN: 330-787-903

redis_1  | 1:M 17 Aug 22:11:10.483 * Ready to accept connections
2、Enter http://localhost:8000/ in a browser to see the application running
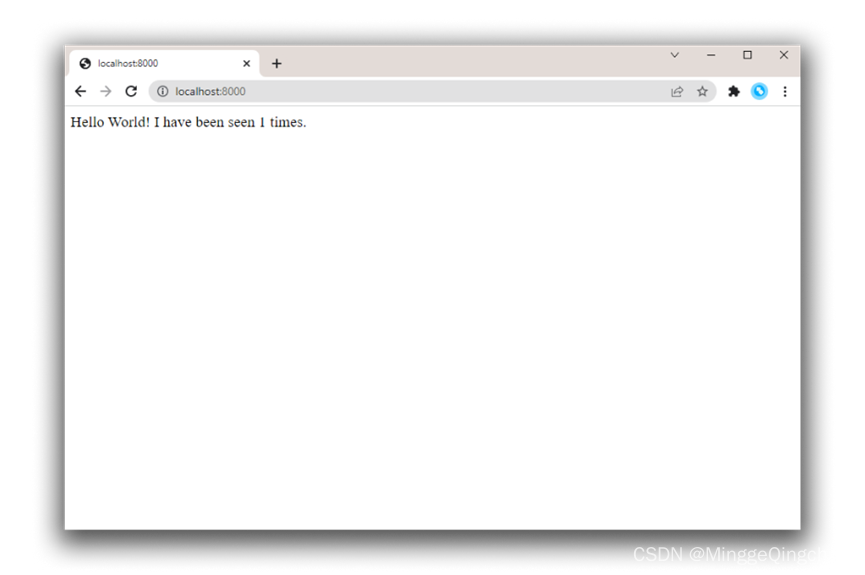
3、Refresh the page
4、Switch to another terminal window, and type docker image ls to list local images
docker image ls
REPOSITORY TAG IMAGE ID CREATED SIZE
composetest_web latest e2c21aa48cc1 4 minutes ago 93.8MB
python 3.4-alpine 84e6077c7ab6 7 days ago 82.5MB
redis alpine 9d8fa9aa0e5b 3 weeks ago 27.5MB
Step 5: Edit the Compose file to add a bind mount
version: "3.9"
services:
web:
build: .
ports:
- "8000:5000"
volumes:
- .:/code
environment:
FLASK_DEBUG: True
redis:
image: "redis:alpine"
Step 6: Re-build and run the app with Compose
docker compose up #启动服务
docker compose down 或者 Ctrl+C #退出服务
Step 7: Update the application
Step 8: Experiment with some other commands
docker compose up -d
Starting composetest_redis_1...
Starting composetest_web_1...
docker compose ps
Name Command State Ports
-------------------------------------------------------------------------------------
composetest_redis_1 docker-entrypoint.sh redis ... Up 6379/tcp
composetest_web_1 flask run Up 0.0.0.0:8000->5000/tcp
docker compose run web envdocker compose stopdocker compose down --volumes(四)Compose配置规则
Compose specification | Docker Documentation
Compose file version 3 reference | Docker Documentation
# 版本

version:’’

# 服务

services:

   服务1:

      # 服务配置

      build

      network

      images

   服务2:

服务3:

……

# 其它配置;如 网络,全局规则,数据卷等

# 数据卷

volumes:

# 全局规则

configs:

# 网络

networks:
(五)Compose部署实战
Sample apps with Compose | Docker Documentation
awesome-compose/README.md at master · docker/awesome-compose · GitHub
一键部署WordPress博客系统
1、Create an empty project directory 创建my_wordpress目录
mkdir my_wordpress
2、Change into your project directory
cd my_wordpress/
3、Create a docker-compose.yml file that starts your WordPress blog and a separate MySQL instance with volume mounts for data persistence
services:
db:
# We use a mariadb image which supports both amd64 & arm64 architecture
image: mariadb:10.6.4-focal
# If you really want to use MySQL, uncomment the following line
#image: mysql:8.0.27
command: '--default-authentication-plugin=mysql_native_password'
volumes:
- db_data:/var/lib/mysql
restart: always
environment:
- MYSQL_ROOT_PASSWORD=somewordpress
- MYSQL_DATABASE=wordpress
- MYSQL_USER=wordpress
- MYSQL_PASSWORD=wordpress
expose:
- 3306
- 33060
wordpress:
image: wordpress:latest
volumes:
- wp_data:/var/www/html
ports:
- 80:80
restart: always
environment:
- WORDPRESS_DB_HOST=db
- WORDPRESS_DB_USER=wordpress
- WORDPRESS_DB_PASSWORD=wordpress
- WORDPRESS_DB_NAME=wordpress
volumes:
db_data:
wp_data:
4、后台运行
docker compose up -d
5、查看运行效果
http://localhost:80
二、Docker Swarm
Swarm mode overview | Docker Documentation
docker swarm | Docker Documentation

Docker Swarm是Docker公司推出的用来管理Docker集群的平台,Swarm是容器集群管理工具,可以统一管理分布在不同主机的多个容器,相比起Kubenetes,Docker Swarm无需额外安装
Swarm是Docker公司推出的用来管理docker集群的平台,几乎全部用GO语言来完成的开发的
Docker Swarm代码开源地址
mirrors / docker / swarm · GitCode
Docker Swarm将一群Docker宿主机变成一个单一的虚拟主机,Swarm使用标准的Docker API接口作为其前端的访问入口,换言之,各种形式的Docker
简单理解就是多台服务器搭建一个Docker集群,每个服务器就是集群中的一个节点
Docker Swarm 和 Docker Compose
Docker Swarm 和 Docker Compose 一样,都是 Docker 官方管理跨节点容器的编排工具
但不同的是,Docker Compose 是一个在单个服务器或主机上创建多个容器的工具,而 Docker Swarm 则可以在多个服务器或主机上创建容器集群服务,对于微服务的部署,显然 Docker Swarm 会更加适合。如果下载的是最新版的Docker,那么Swarm就已经被包含在内了,无需再安装
从 Docker 1.12.0 版本开始,Docker Swarm 已经包含在 Docker 引擎中(docker swarm),并且已经内置了服务发现工具,我们就不需要像之前一样,再配置 Etcd 或者 Consul 来进行服务发现配置了。
Swarm deamon只是一个调度器(Scheduler)加路由器(router),Swarm自己不运行容器,它只是接受Docker客户端发来的请求,调度适合的节点来运行容器,这就意味着,即使Swarm由于某些原因挂掉了,集群中的节点也会照常运行,放Swarm重新恢复运行之后,他会收集重建集群信息
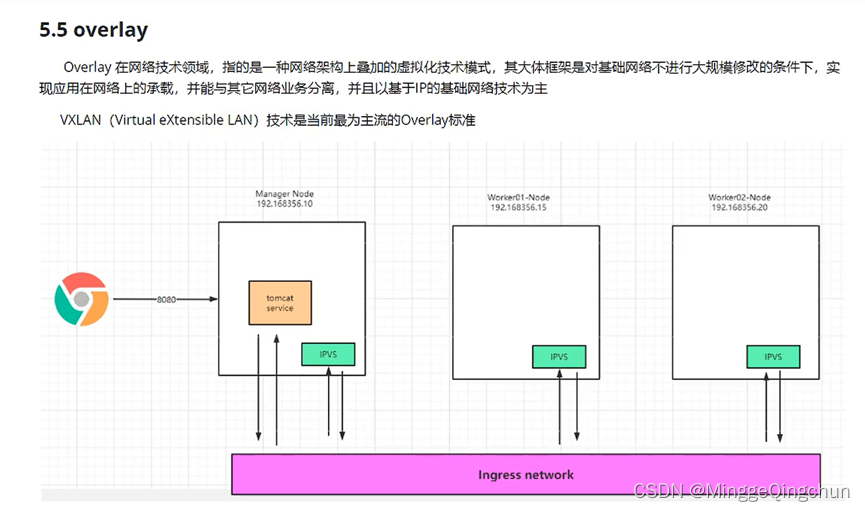
Docker Swarm架构包含两种角色,manager和node,前者是Swarm Daemon工作的节点,包含了调度器、路由、服务发现等功能,负责接收客户端的集群管理请求,然后调度Node进行具体的容器工作,比如容器的创建、扩容与销毁等。 manager本身也是一个node

从上图可以看出,Docker Client使用Swarm对 集群(Cluster)进行调度使用
Swarm是典型的master-slave结构,通过发现服务来选举manager。manager是中心管理节点,各个node上运行agent接受manager的统一管理,集群会自动通过Raft协议分布式选举出manager节点,无需额外的发现服务支持,避免了单点的瓶颈问题,同时也内置了DNS的负载均衡和对外部负载均衡机制的集成支持
通常情况下,为了集群的高可用,manager个数>=3的奇数,node的个数则是不限制
可参考
DockerSwarm - DockerSwarm_MinggeQingchun的博客-CSDN博客
Docker Swarm关键概念
1、Swarm
集群的管理和编排是使用嵌入docker引擎的SwarmKit,可以在docker初始化时启动swarm模式或者加入已存在的swarm
2、Node
一个节点是docker引擎集群的一个实例。您还可以将其视为Docker节点。您可以在单个物理计算机或云服务器上运行一个或多个节点,但生产群集部署通常包括分布在多个物理和云计算机上的Docker节点。
要将应用程序部署到swarm,请将服务定义提交给 管理器节点。管理器节点将称为任务的工作单元分派 给工作节点。
Manager节点还执行维护所需群集状态所需的编排和集群管理功能。Manager节点选择单个领导者来执行编排任务。
工作节点接收并执行从管理器节点分派的任务。默认情况下,管理器节点还将服务作为工作节点运行,但您可以将它们配置为仅运行管理器任务并且是仅管理器节点。代理程序在每个工作程序节点上运行,并报告分配给它的任务。工作节点向管理器节点通知其分配的任务的当前状态,以便管理器可以维持每个工作者的期望状态
3、Service
一个服务是任务的定义,管理机或工作节点上执行。它是群体系统的中心结构,是用户与群体交互的主要根源。创建服务时,你需要指定要使用的容器镜像。
4、Task
任务是在docekr容器中执行的命令,Manager节点根据指定数量的任务副本分配任务给worker节点
----------------------------使用方法--------------------------------
docker swarm:集群管理,子命令有init, join, leave, update。(docker swarm --help查看帮助)
docker service:服务创建,子命令有create, inspect, update, remove, tasks。(docker service--help查看帮助)
docker node:节点管理,子命令有accept, promote, demote, inspect, update, tasks, ls,rm。(docker node --help查看帮助)
node是加入到swarm集群中的一个docker引擎实体,可以在一台物理机上运行多个node,node分为:
manager nodes,也就是管理节点
worker nodes,也就是工作节点
1)manager node管理节点:执行集群的管理功能,维护集群的状态,选举一个leader节点去执行调度任务。
2)worker node工作节点:接收和执行任务。参与容器集群负载调度,仅用于承载task。
3)service服务:一个服务是工作节点上执行任务的定义。创建一个服务,指定了容器所使用的镜像和容器运行的命令。
service是运行在worker nodes上的task的描述,service的描述包括使用哪个docker 镜像,以及在使用该镜像的容器中执行什么命令。
4)task任务:一个任务包含了一个容器及其运行的命令。task是service的执行实体,task启动docker容器并在容器中执行任务
1、docker swarm init ; 创建manager节点
docker swarm init | Docker Documentation
$docker swarm init --advertise-addr 192.168.99.121
Swarm initialized: current node (bvz81updecsj6wjz393c09vti) is now a manager.
To add a worker to this swarm, run the following command:
docker swarm join \
--token SWMTKN-1-3pu6hszjas19xyp7ghgosyx9k8atbfcr8p2is99znpy26u2lkl-1awxwuwd3z9j1z3puu7rcgdbx \
172.17.0.2:2377
To add a manager to this swarm, run 'docker swarm join-token manager' and follow the instructions.
2、docker swarm join ; 创建work节点
docker swarm join | Docker Documentation
$docker swarm join [OPTIONS] HOST:PORT
$docker swarm join --token SWMTKN-1-3pu6hszjas19xyp7ghgosyx9k8atbfcr8p2is99znpy26u2lkl-7p73s1dx5in4tatdymyhg9hu2 192.168.99.121:2377
This node joined a swarm as a manager.
$docker node ls
ID HOSTNAME STATUS AVAILABILITY MANAGER STATUS
dkp8vy1dq1kxleu9g4u78tlag * manager2 Ready Active Reachable
dvfxp4zseq4s0rih1selh0d20 manager1 Ready Active Leader
3、docker service create ; 创建服务
$ docker service create [OPTIONS] IMAGE [COMMAND] [ARG...]
$ docker service create --name redis redis:3.0.6
dmu1ept4cxcfe8k8lhtux3ro3
$ docker service create --mode global --name redis2 redis:3.0.6
a8q9dasaafudfs8q8w32udass
$ docker service ls
ID NAME MODE REPLICAS IMAGE
dmu1ept4cxcf redis replicated 1/1 redis:3.0.6
a8q9dasaafud redis2 global 1/1 redis:3.0.6