
View是什么?
View是屏幕上的一块矩形区域,它负责用来显示一个区域,并且响应这个区域内的事件。可以说,手机屏幕上的任意一部分看的见得地方都是View,它很常见,比如 TextView 、ImageView 、Button以及LinearLayout、RelativeLayout都是继承子View的。
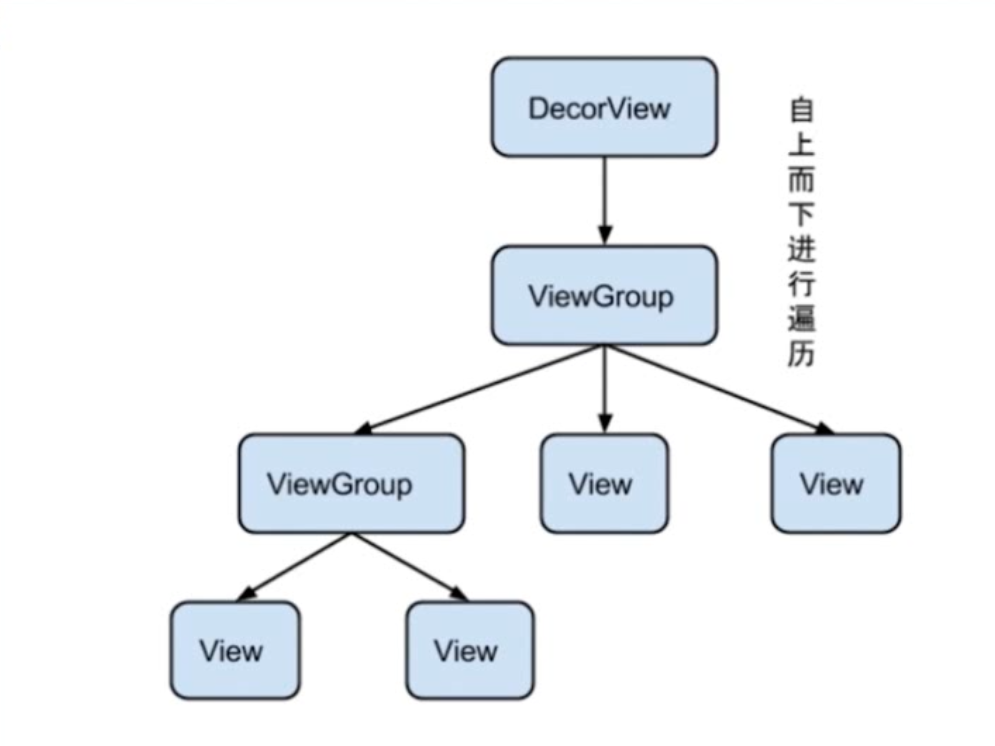
对于Activity来说,我们通过setContentView(view)添加的布局到Activity上,实际上都是添加到了Activity 内部的DecorView上面,这个DecorView,其实就是一个FrameLayout,因此实际上,我们的布局实际上添加到了FrameLayout里面。
绘制原理
1.测量
简单流程就是:
- 确定view是树结构
- 递归遍历每个子节点,即子view,进行测量。
下面具体说一下:
首先view是树结构。
也就是说子view是父view的孩子节点。
根节点是就是DecorView。
了解树的都知道,树的遍历都是递归遍历。
那么测量view的过程,其实就是遍历树的过程。
测量什么呢,怎么做一个记录呢。
就有了MesureSpec。是一个封装的int类型。
高2位表示mode,其余表示size。
mode即类型有哪些呢。
通常我们在定义一个view的宽高时有三种写法。
一是直接写多少多少dp
一个是match_parent
一个是wrap_content
所以mode也有三种,分别是:
EXACTLY:对应固定数值的写法,有确切的size。
AT_MOST:父view给定一个size,子view不超过这个size即可。
UNSPECIFIED:似乎没有用到。
所以不同类型的view它的测量方式是不同的。
比如LinearLayout和FrameLayout具体的测量方式是不同的。
测量的逻辑(可以先不要看代码,看一下具体逻辑,思考一下怎么实现)
-
测量一个view需要知道父view的MeasureSpec。因为需要父view的mode和size来确定子view的mode和size
-
根节点没有父view,那么MeasureSpec从哪里获取
最外层的根节点DecorView的MeasureSpec只由自己的LayoutParams决定
如果是match_parent和固定数值对应的就是EXACTLY
如果是wrap_content对应的就是AT_MOST
对应的方法是
private static int getRootMeasureSpec(int windowSize, int rootDimension) {
    int measureSpec;
    switch (rootDimension) {
    //如果是MATCH_PARENT,那么就是EXACTLY
    case ViewGroup.LayoutParams.MATCH_PARENT:
        // Window can't resize. Force root view to be windowSize.
        measureSpec = MeasureSpec.makeMeasureSpec(windowSize, MeasureSpec.EXACTLY);
        break;
    //如果是WRAP_CONTENT,就是AT_MOST
    case ViewGroup.LayoutParams.WRAP_CONTENT:
        // Window can resize. Set max size for root view.
        measureSpec = MeasureSpec.makeMeasureSpec(windowSize, MeasureSpec.AT_MOST);
        break;
    default:
        //如果是固定的值,也是EXACTLY
        // Window wants to be an exact size. Force root view to be that size.
        measureSpec = MeasureSpec.makeMeasureSpec(rootDimension, MeasureSpec.EXACTLY);
        break;
    }
    return measureSpec;
}
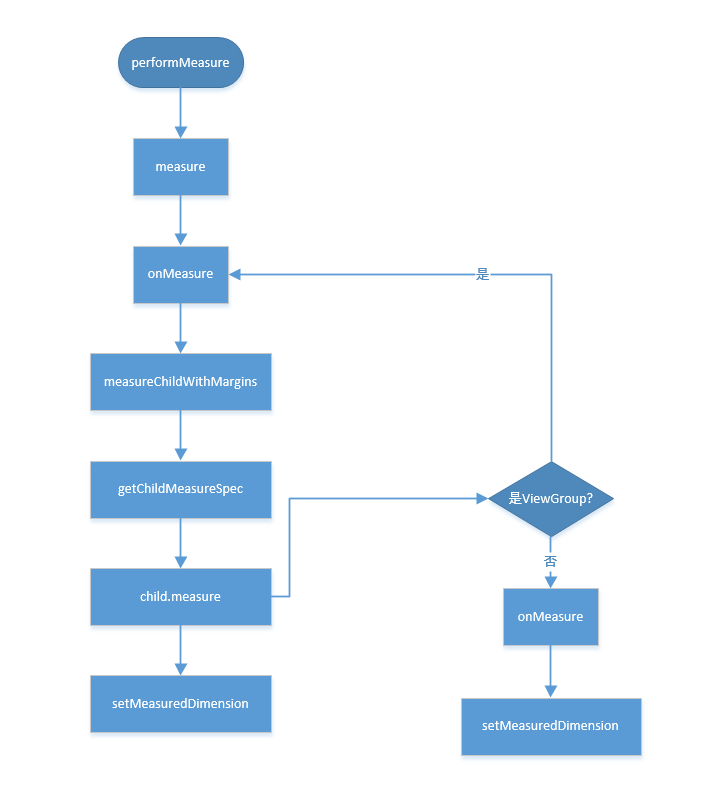
- 从根节点开始,遍历子view
整体流程是其实就是层次遍历。先计算子view的count,然后for循环,获取每个子view,计算其宽高的MeasureSpce,然后子view也是view吧。再去递归调用view的measure方法实现递归调用。
这里子view其实分为view和ViewGroup。
view的话后面不要递归遍历,直接计算就行了。
如果是ViewGroup还是要层次遍历,确保ViewGroup的子view都被调用到。
FrameLayout对应的 onMeasure 方法如下:
@Override
protected void onMeasure(int widthMeasureSpec, int heightMeasureSpec) {
    int count = getChildCount();

    for (int i = 0; i < count; i++) {
        final View child = getChildAt(i);
        if (mMeasureAllChildren || child.getVisibility() != GONE) {
            //分析1 : 遍历所有子控件,测量每个子控件的大小
                //参数1:View控件
                //参数2:宽MeasureSpec
                //参数3:父容器在宽度上已经用了多少了,因为FrameLayout的规则是:前面已经放置的View并不会影响后面放置View的宽高,是直接覆盖到上一个View上的.所以这里传0
                //参数4:高MeasureSpec
                //参数5:父容器在高度上已经用了多少了
            measureChildWithMargins(child, widthMeasureSpec, 0, heightMeasureSpec, 0);
        }
    }
    ......

    //分析2 : 测量完所有的子控件的大小之后,才知道自己的大小  这很符合FrameLayout的规则嘛
    setMeasuredDimension(resolveSizeAndState(maxWidth, widthMeasureSpec, childState),
            resolveSizeAndState(maxHeight, heightMeasureSpec,
                    childState << MEASURED_HEIGHT_STATE_SHIFT));
    ......
}
ViewGroup类中 measureChildWithMargins 方法实现:
    /**
     * Ask one of the children of this view to measure itself, taking into
     * account both the MeasureSpec requirements for this view and its padding
     * and margins. The child must have MarginLayoutParams The heavy lifting is
     * done in getChildMeasureSpec.
     *
     * @param child The child to measure
     * @param parentWidthMeasureSpec The width requirements for this view
     * @param widthUsed Extra space that has been used up by the parent
     *        horizontally (possibly by other children of the parent)
     * @param parentHeightMeasureSpec The height requirements for this view
     * @param heightUsed Extra space that has been used up by the parent
     *        vertically (possibly by other children of the parent)
     */
    protected void measureChildWithMargins(View child,
            int parentWidthMeasureSpec, int widthUsed,
            int parentHeightMeasureSpec, int heightUsed) {
        final MarginLayoutParams lp = (MarginLayoutParams) child.getLayoutParams();

        final int childWidthMeasureSpec = getChildMeasureSpec(parentWidthMeasureSpec,
                mPaddingLeft + mPaddingRight + lp.leftMargin + lp.rightMargin
                        + widthUsed, lp.width);
        final int childHeightMeasureSpec = getChildMeasureSpec(parentHeightMeasureSpec,
                mPaddingTop + mPaddingBottom + lp.topMargin + lp.bottomMargin
                        + heightUsed, lp.height);

        child.measure(childWidthMeasureSpec, childHeightMeasureSpec);
    }
View类中的setMeasuredDimension方法实现:
    /**
     * <p>This method must be called by {@link #onMeasure(int, int)} to store the
     * measured width and measured height. Failing to do so will trigger an
     * exception at measurement time.</p>
     *
     * @param measuredWidth The measured width of this view.  May be a complex
     * bit mask as defined by {@link #MEASURED_SIZE_MASK} and
     * {@link #MEASURED_STATE_TOO_SMALL}.
     * @param measuredHeight The measured height of this view.  May be a complex
     * bit mask as defined by {@link #MEASURED_SIZE_MASK} and
     * {@link #MEASURED_STATE_TOO_SMALL}.
     */
    protected final void setMeasuredDimension(int measuredWidth, int measuredHeight) {
        boolean optical = isLayoutModeOptical(this);
        if (optical != isLayoutModeOptical(mParent)) {
            Insets insets = getOpticalInsets();
            int opticalWidth  = insets.left + insets.right;
            int opticalHeight = insets.top  + insets.bottom;

            measuredWidth  += optical ? opticalWidth  : -opticalWidth;
            measuredHeight += optical ? opticalHeight : -opticalHeight;
        }
        setMeasuredDimensionRaw(measuredWidth, measuredHeight);
    }
4.具体计算子view的宽高。
就是根据父view的MesureMode和子view写的是固定值还是wrap_content或者match_parent来确定子view的mode和size。
具体方法是:
//这里来自ViewGroup的getChildMeasureSpec方法,无删减
public static int getChildMeasureSpec(int spec, int padding, int childDimension) {
    //根据父容器的MeasureSpec获取父容器的SpecMode和SpecSize
    int specMode = MeasureSpec.getMode(spec);
    int specSize = MeasureSpec.getSize(spec);

    //剩下的size
    int size = Math.max(0, specSize - padding);

    //最终的size和mode
    int resultSize = 0;
    int resultMode = 0;

    switch (specMode) {
    // Parent has imposed an exact size on us
    //父容器有一个确定的大小
    case MeasureSpec.EXACTLY:
        if (childDimension >= 0) {
            //子控件也是确定的大小,那么最终的大小就是子控件设置的大小,SpecMode为EXACTLY
            resultSize = childDimension;
            resultMode = MeasureSpec.EXACTLY;
        } else if (childDimension == LayoutParams.MATCH_PARENT) {
            // Child wants to be our size. So be it.
            // 子控件想要占满剩余的空间,那么就给它吧.
            resultSize = size;
            resultMode = MeasureSpec.EXACTLY;
        } else if (childDimension == LayoutParams.WRAP_CONTENT) {
            // Child wants to determine its own size. It can't be
            // bigger than us.
            //子控件想要自己定义大小,但是不能超过剩余空间 size
            resultSize = size;
            resultMode = MeasureSpec.AT_MOST;
        }
        break;

    // Parent has imposed a maximum size on us
    case MeasureSpec.AT_MOST:
        if (childDimension >= 0) {
            // Child wants a specific size... so be it
            resultSize = childDimension;
            resultMode = MeasureSpec.EXACTLY;
        } else if (childDimension == LayoutParams.MATCH_PARENT) {
            // Child wants to be our size, but our size is not fixed.
            // Constrain child to not be bigger than us.
            resultSize = size;
            resultMode = MeasureSpec.AT_MOST;
        } else if (childDimension == LayoutParams.WRAP_CONTENT) {
            // Child wants to determine its own size. It can't be
            // bigger than us.
            resultSize = size;
            resultMode = MeasureSpec.AT_MOST;
        }
        break;

    // Parent asked to see how big we want to be
    case MeasureSpec.UNSPECIFIED:
        if (childDimension >= 0) {
            // Child wants a specific size... let him have it
            resultSize = childDimension;
            resultMode = MeasureSpec.EXACTLY;
        } else if (childDimension == LayoutParams.MATCH_PARENT) {
            // Child wants to be our size... find out how big it should
            // be
            resultSize = View.sUseZeroUnspecifiedMeasureSpec ? 0 : size;
            resultMode = MeasureSpec.UNSPECIFIED;
        } else if (childDimension == LayoutParams.WRAP_CONTENT) {
            // Child wants to determine its own size.... find out how
            // big it should be
            resultSize = View.sUseZeroUnspecifiedMeasureSpec ? 0 : size;
            resultMode = MeasureSpec.UNSPECIFIED;
        }
        break;
    }
    //noinspection ResourceType
    return MeasureSpec.makeMeasureSpec(resultSize, resultMode);
}
MeasureSpec
一个view的MeasureMode怎么确定
- 如果该view的宽高是固定值,那么其mode是EXACTLY
- 如果view的宽高是MATCH_PARENT,那就继承父view的mode。
即父view的mode是EXCETLY,该view就是EXACTLY;
父View是AT_MOST,该view就是AT_MOST;
父View是UNSPECIFIED,该view也是 UNSPECIFIED。 - 如果view的宽高是WRAP_CONTENT。那就不论父view是什么mode,该view都是AT_MOST除了UNSPECIFIED。
Measure流程图
2.布局
思考一个问题,影响布局有哪些因素:
- 首先能想到的是上个步骤中测量的宽高
- 其次就是Gravity,不同的ViewGroup不一样。比如RelativeLayout和LinearLayout差别就很大。需要具体分析。layout的时候也要考虑。
- Gravity.BOTTOM
- Gravity.TOP
- Gravity.CENTER_VERTICAL
- Gravity.CENTER_HORIZONTAL
- Gravity.RIGHT
- Gravity.LEFT
- 就是layout时自定义的几个参数left,top,right,bottom
布局首先是确定四个参数:
left,top,right,bottom
什么意思呢:
这四个参数位置都是相对于父容器而言的
那么具体是怎么操作呢:
- 首先是从根节点也就是DecorView开始。
根节点的四个参数如何确定,很简单,如下所示。
//这里的host其实是根视图(DecorView)
//参数:left,top,right,bottom  这些位置都是相对于父容器而言的
host.layout(0, 0, host.getMeasuredWidth(), host.getMeasuredHeight());
- 根节点之后就开始层次遍历。
这里子view其实分为view和ViewGroup。view的话后面不要递归遍历,直接计算就行了。如果是ViewGroup还是要层次遍历,确保ViewGroup的子view都被调用到。
拿到当前view的子view的count,for循环拿到每个子view。根据子view的测量出来的宽高,以及Gravity等参数。去计算子view的四个参数。
就是该子view相对于父view的布局是什么。
然后再去递归调用子view的布局方法即layout方法。实现整个递归遍历。
3.绘制
绘制又分为两种:
如果开启并支持硬件绘制加速(从 Android 4.X 开始谷歌已经默认开启硬件加速),则走 GPU 硬件绘制的流程,否则走 CPU 软件绘制的流程。
先看一下官方给的注释:
/*
        注意了这是官方给的注释,谷歌工程师还真是贴心,把draw步骤写的详详细细,给力,点赞
     * Draw traversal performs several drawing steps which must be executed
     * in the appropriate order:
     *
     *      1. Draw the background
     *      2. If necessary, save the canvas' layers to prepare for fading
     *      3. Draw view's content
     *      4. Draw children
     *      5. If necessary, draw the fading edges and restore layers
     *      6. Draw decorations (scrollbars for instance)
     */
翻译一下就是:
- 绘制背景
- 绘制控件自己本身的内容
- 绘制子控件
- 绘制装饰(比如滚动条)和前景
整体流程比较简单:
还是从ViewRootImpl的performTraversals方法开始分析
private void performTraversals() {
    //开始绘画流程
    performDraw();
}

private void performDraw() {
    ......
    draw(fullRedrawNeeded);
    ......
}

private void draw(boolean fullRedrawNeeded){
    .....
    drawSoftware(surface, mAttachInfo, xOffset, yOffset, scalingRequired, dirty);
    .....
}

private boolean drawSoftware(Surface surface, AttachInfo attachInfo, int xoff, int yoff,
        boolean scalingRequired, Rect dirty) {
    ......
    mView.draw(canvas);
    ......
}
随着方法的调用深入,发现来到了View的draw方法
public void draw(Canvas canvas) {
    .....

    /*
        注意了这是官方给的注释,谷歌工程师还真是贴心,把draw步骤写的详详细细,给力,点赞
     * Draw traversal performs several drawing steps which must be executed
     * in the appropriate order:
     *
     *      1. Draw the background
     *      2. If necessary, save the canvas' layers to prepare for fading
     *      3. Draw view's content
     *      4. Draw children
     *      5. If necessary, draw the fading edges and restore layers
     *      6. Draw decorations (scrollbars for instance)
     */

    // Step 1, draw the background, if needed
    //1. 绘制背景
    if (!dirtyOpaque) {
        drawBackground(canvas);
    }

    // skip step 2 & 5 if possible (common case)
    final int viewFlags = mViewFlags;
    boolean horizontalEdges = (viewFlags & FADING_EDGE_HORIZONTAL) != 0;
    boolean verticalEdges = (viewFlags & FADING_EDGE_VERTICAL) != 0;
    if (!verticalEdges && !horizontalEdges) {
        // Step 3, draw the content
        //3. 绘制自己的内容
        if (!dirtyOpaque) onDraw(canvas);

        // Step 4, draw the children
        //4. 绘制子控件  如果是View的话这个方法是空实现,如果是ViewGroup则绘制子控件
        dispatchDraw(canvas);

        drawAutofilledHighlight(canvas);

        // Overlay is part of the content and draws beneath Foreground
        if (mOverlay != null && !mOverlay.isEmpty()) {
            mOverlay.getOverlayView().dispatchDraw(canvas);
        }

        // Step 6, draw decorations (foreground, scrollbars)
        //6. 绘制装饰和前景
        onDrawForeground(canvas);

        // Step 7, draw the default focus highlight
        //7. 绘制默认焦点高亮显示
        drawDefaultFocusHighlight(canvas);

        if (debugDraw()) {
            debugDrawFocus(canvas);
        }

        // we're done...
        return;
    }
    .....
}
两个比较容易混淆的方法
invalidate方法:
如果这时候视图大小没有发生变化,不会调用layout放置过程
requestLayout 方法:
当布局发生变化的时候,比如方向、尺寸变化;
比如在某些情况下需要重新测量大小,需要手动调用这个方法,而调用完这个方法后,就会去触发它的mesure和layout过程,但是不会调用draw方法。
总结
绘制完毕之后干嘛呢。会交个RenderThread处理,然后交给SurfaceFlinger,最后显示到屏幕上。
更多Android基础资料可以扫码免费领取!
Android 技术栈从入门到熟悉

Android Jetpack 全家桶全面学习
学习Java期间使用的一般都是Eclipse。
但对于Android来说,建议使用 Android Studio 而不是Eclipse ADT。
对于新手来说可能安装Android Studio存在一定困难你可以看着以下视频,一步步的跟着学习安装运行
Android Studio 安装教程
有了Java阶段的学习,这一阶段建议以视频学习为主辅以图书查漏补缺。如果以图书为主,可以根据图书讲解敲代码,辅以教学视频查漏补缺。遇到问题可以去百度,入门的问题一般会有很多人遇到,并且给出比较好的解答。
需要掌握基本知识点,比如四大组件如何使用、如何创建Service、如何进行布局、简单的自定义View、动画、网络通信等常见技术。
全套零基础教程已经为你们准备好了,需要的可以添加下方二维码免费领取