文章目录
前置知识:
一、数据库开发与实战专栏导学及数据库基础概念入门
二、MySQL 介绍及 MySQL 安装与配置
三、MySQL 数据库的基本操作
四、MySQL 存储引擎及数据类型
五、数据导入与基本的 SELECT 语句
六、MySQL 数据库练习题1(包含前5章练习题目及答案)
七、MySQL 多表查询详解(附练习题及答案----超详细)
八、MySQL 常用函数汇总(1)
九、MySQL 常用函数汇总(2)
十、MySQL 聚合函数、分组查询及过滤分组
十一、子查询详解
十二、创建和管理表
十三、表数据的增、删、改操作
十四、MySQL 约束详解
一、MySQL 官方驱动模块 — MySQL Connector
MySQL Connector 是 MySQL 官方的驱动模块,兼容性特别好。官方地址: https://dev.mysql.com/downloads/connector/python/ Windows 下载安装即可,Linux 系统下载 RPM 安装包,也可以使用 pip 进行安装,命令如下:
# Linux 系统下我使用的python版本是python3.8
pip3/pip install mysql-connector-python
1.1 连接数据库
# -*- coding: utf-8 -*-
# @Time    : 2023-02-22 23:10
# @Author  : AmoXiang
# @File    : demo1.py
# @Software: PyCharm
# @Blog    : https://blog.csdn.net/xw1680


import mysql.connector

# 第一种连接方式
# conn = mysql.connector.connect(host="127.0.0.1", port=3306, user="root",
#                                password="123456", database="mysql_study")
# conn.close()


# 第二种连接方式: 使用配置的方式连接
config = {


    "host": "127.0.0.1",
    "port": 3306,
    "user": "root",
    "password": "123456",
    "database": "mysql_study",
}
conn = mysql.connector.connect(**config)
# 查询数据
sql = "SELECT grade_level,lowest_sal,highest_sal FROM job_grades;"
# 游标(Cursor): MySQL Connector里面的游标用来执行SQL语句,而且查询的结果集也会保存在游标之中
cursor = conn.cursor()
cursor.execute(sql)
for row in cursor:
    print(row[0], row[1], row[2])
conn.close()
1.2 实战:SQL注入攻击案例
由于 SQL 语句是解释型语言,所以在拼接 SQL 语句的时候,容易被注入恶意的 SQL 语句,示例如下:
# -*- coding: utf-8 -*-
# @Time    : 2023-02-23 6:10
# @Author  : AmoXiang
# @File    : demo2.py
# @Software: PyCharm
# @Blog    : https://blog.csdn.net/xw1680

import mysql.connector

# 连接
config = {


    "host": "localhost",
    "port": 3306,
    "user": "root",
    "password": "123456",
    "database": "mysql_study"
}

conn = mysql.connector.connect(**config)
cursor = conn.cursor()
# SQL 语句
username = "1 OR 1=1"
password = "1 OR 1=1"
# SQL 拼接的第一种方式
sql1 = "SELECT COUNT(*) FROM t_user WHERE username=" + username + \
       " AND AES_DECRYPT(UNHEX(password),'HelloWorld')=" + password + ";"
# print(sql1)
# cursor.execute(sql1)
# print(cursor.fetchone()[0])
# SQL 拼接使用格式化字符串
sql2 = f"SELECT COUNT(*) FROM t_user WHERE username={

      username} AND " \
       f"AES_DECRYPT(UNHEX(password),'HelloWorld')={

      password};"
print(sql2)
cursor.execute(sql2)
print(cursor.fetchone()[0])
# 注意: 使用该种sql拼接不会引起sql注入
sql3 = f"SELECT COUNT(*) FROM t_user WHERE username='{

      username}' AND " \
       f"AES_DECRYPT(UNHEX(password),'HelloWorld')='{

      password}';"

conn.close()
解决方案:
# -*- coding: utf-8 -*-
# @Time    : 2023-02-23 6:10
# @Author  : AmoXiang
# @File    : demo2.py
# @Software: PyCharm
# @Blog    : https://blog.csdn.net/xw1680

import mysql.connector

# 连接
config = {
    "host": "localhost",
    "port": 3306,
    "user": "root",
    "password": "123456",
    "database": "mysql_study"
}

conn = mysql.connector.connect(**config)
cursor = conn.cursor()
# SQL 语句
username = "1 OR 1=1"
password = "1 OR 1=1"
# 使用%s占位符
sql = "SELECT COUNT(*) FROM t_user WHERE username=%s AND AES_DECRYPT(UNHEX(password),'HelloWorld')=%s;"
print(sql)
# execute 第二个参数为元组 如果只传入一个值 别忘记加, 例如(username,)
# 预编译SQL就是数据库提前把SQL语句编译成二进制,这样反复执行同一条SQL语句的效率就会提升
# SQL语句编译的过程中,关键字已经被解析过了,所以向编译后的SQL语句传入参数,都被当做字符串处理,
# 数据库不会解析其中注入的SQL语句
cursor.execute(sql, (username, password))
print(cursor.fetchone()[0])
conn.close()
1.3 MySQL Connector 的事务及异常处理
事务控制: Connector 为我们提供了非常简单的事务控制函数。
# -*- coding: utf-8 -*-
# @Time    : 2023-02-23 7:00
# @Author  : AmoXiang
# @File    : demo3.py
# @Software: PyCharm
# @Blog    : https://blog.csdn.net/xw1680

import mysql.connector

# 连接
config = {


    "host": "localhost",
    "port": 3306,
    "user": "root",
    "password": "123456",
    "database": "mysql_study"
}
try:
    conn = mysql.connector.connect(**config)
    conn.start_transaction()  # 开启事务
    cursor = conn.cursor()
    # SQL 语句 使用%s占位符
    sql = "INSERT INTO dept(did,dname) VALUES(%s,%s);"
    print(sql)
    cursor.execute(sql, (1005, "人事部"))  # 无返回值
    # 提交事务
    conn.commit()
except Exception as e:
    print(e)
    if "conn" in dir():
        conn.rollback()
finally:
    if "conn" in dir():
        conn.close()
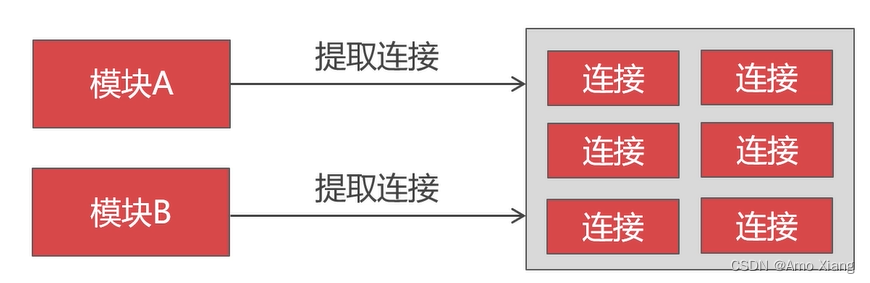
1.4 数据库连接池技术
数据库连接的昂贵之处: 数据库连接是一种关键的、有限的、昂贵的资源,在并发执行的应用程序中体现得尤为突出。
TCP连接需要三次握手,四次挥手,然后数据库还要验证用户信息。

数据库连接池的意义: 数据库连接池( Connection Pool) 预先创建出一些数据库连接然后缓存起来,避免了程序语言反复创建和销毁连接昂贵代价。
示例如下:
# -*- coding: utf-8 -*-
# @Time    : 2023-02-23 7:20
# @Author  : AmoXiang
# @File    : demo4.py
# @Software: PyCharm
# @Blog    : https://blog.csdn.net/xw1680

import mysql.connector.pooling

# 连接
config = {


    "host": "localhost",
    "port": 3306,
    "user": "root",
    "password": "123456",
    "database": "mysql_study"
}
try:
    pool = mysql.connector.pooling.MySQLConnectionPool(**config, pool_size=10)
    # 从连接池中取出链接
    conn = pool.get_connection()
    conn.start_transaction()  # 开启事务
    cursor = conn.cursor()
    # SQL 语句 使用%s占位符
    sql = "UPDATE dept SET did=%s  WHERE dname=%s;"
    print(sql)
    cursor.execute(sql, (1006, "人事部"))  # 无返回值
    # 提交事务
    conn.commit()
except Exception as e:
    print(e)
    if "conn" in dir():
        conn.rollback()
1.5 MySQL Connector 删除数据
# -*- coding: utf-8 -*-
# @Time    : 2023-02-26 3:05
# @Author  : AmoXiang
# @File    : demo5.py
# @Software: PyCharm
# @Blog    : https://blog.csdn.net/xw1680

import mysql.connector

# 数据库连接配置
config = {
    "host": "localhost",
    "port": 3306,
    "user": "root",
    "password": "123456",
    "database": "mysql_study"
}

try:
    pool = mysql.connector.pooling.MySQLConnectionPool(**config, pool_size=10)
    # 从连接池中取出连接
    conn = pool.get_connection()

    # TODO 1. 使用delete from 删除表中数据
    # conn.start_transaction()  # 开启事务
    # cursor = conn.cursor()
    # 删除表中数据
    # sql = "DELETE e,d FROM t_emp e JOIN t_dept d ON e.deptno=d.deptno WHERE d.deptno=20;"
    # cursor.execute(sql)
    # conn.commit()

    # TODO 2. 使用 truncate table 清空表 不用开启事务与提交事务
    cursor = conn.cursor()
    sql = "TRUNCATE TABLE t_emp;"
    cursor.execute(sql)
except Exception as e:
    if "conn" in dir():
        conn.rollback()
    print(e)
1.6 MySQL Connector 多条数据插入
循环执行 SQL 语句: 游标对象中的 executemany() 函数可以反复执行一条 SQL 语句。
# -*- coding: utf-8 -*-
# @Time    : 2023-02-26 3:30
# @Author  : AmoXiang
# @File    : demo6.py
# @Software: PyCharm
# @Blog    : https://blog.csdn.net/xw1680

import mysql.connector.pooling

# 数据库连接配置
config = {


    "host": "localhost",
    "port": 3306,
    "user": "root",
    "password": "123456",
    "database": "mysql_study"
}

try:
    pool = mysql.connector.pooling.MySQLConnectionPool(**config, pool_size=10)
    con = pool.get_connection()
    con.start_transaction()  # 开启事务
    cursor = con.cursor()
    sql = "INSERT INTO t_dept(deptno,dname,loc) VALUES(%s,%s,%s);"
    data = [
        [100, "A部门", "北京"],
        [110, "B部门", "上海"],
    ]
    cursor.executemany(sql, data)
    con.commit()
except Exception as e:
    if "con" in dir():
        con.rollback()
    print(e)
1.7 案例练习
1.7.1 练习一
使用 INSERT 语句把所在部门平均工资超过公司平均工资的员工信息导入到 t_emp_new 表里面,并且让这些员工隶属于 sales 部门。
# -*- coding: utf-8 -*-
# @Time    : 2023-03-03 6:59
# @Author  : AmoXiang
# @File    : demo7.py
# @Software: PyCharm
# @Blog    : https://blog.csdn.net/xw1680

import mysql.connector.pooling

"""
使用 INSERT 语句把所在部门平均工资超过公司平均工资的员工信息导入到 t_emp_new 表里面,并且让这些员工隶属于 sales 部门。
在 Python 程序中与SQL语句:将复杂的SQL语句拆分成简单的SQL语句进行执行,并将其查询的结果保存在变量中,得以复用。
"""

# 数据库连接配置
config = {


    "host": "localhost",
    "port": 3306,
    "user": "root",
    "password": "123456",
    "database": "mysql_study"
}

try:
    pool = mysql.connector.pooling.MySQLConnectionPool(**config, pool_size=10)
    conn = pool.get_connection()
    # 开启事务
    conn.start_transaction()
    cursor = conn.cursor()
    # 创建表
    sql = "CREATE TABLE IF NOT EXISTS t_emp_new LIKE t_emp;"
    cursor.execute(sql)
    # 查询出公司的平均工资
    sql = "SELECT AVG(sal) AS avg FROM t_emp;"
    cursor.execute(sql)
    temp = cursor.fetchone()
    avg = temp[0]
    print(avg)
    # 查询出部门平均工资
    sql = "SELECT deptno FROM t_emp GROUP BY deptno HAVING AVG(sal)>=%s;"
    cursor.execute(sql, [avg])
    temp = cursor.fetchall()
    zw_chr = ('%s, ' * len(temp)).strip()[:-1]
    # 插入数据
    sql = "INSERT INTO t_emp_new SELECT * FROM t_emp WHERE deptno IN(" + zw_chr + ")"
    cursor.execute(sql, [_[0] for _ in temp])
    print(sql)
    # 删除原表中的数据
    sql = "DELETE FROM t_emp WHERE deptno IN(" + zw_chr + ")"
    cursor.execute(sql, [_[0] for _ in temp])
    # 新表中的部门改为 "SALES"
    sql = "SELECT deptno FROM t_dept WHERE dname=%s;"
    cursor.execute(sql, ["SALES"])
    sales_deptno = cursor.fetchone()[0]  # 注意fetchone返回的是一个元组 要使用索引取出第1个元素
    sql = "UPDATE t_emp_new SET deptno=%s;"
    cursor.execute(sql, [sales_deptno])
    conn.commit()
except Exception as e:
    if "conn" in dir():
        conn.rollback()
    print(e)
1.7.2 练习2
编写一个 INSERT 语句向部门表插入两条记录,每条记录都在部门原有最大主键值的基础上 +10
# -*- coding: utf-8 -*-
# @Time    : 2023-03-03 8:14
# @Author  : AmoXiang
# @File    : demo8.py
# @Software: PyCharm
# @Blog    : https://blog.csdn.net/xw1680

import mysql.connector.pooling

"""
编写一个 INSERT 语句向部门表插入两条记录,每条记录都在部门原有最大主键值的基础上 +10
"""

# 数据库连接配置
config = {


    "host": "localhost",
    "port": 3306,
    "user": "root",
    "password": "123456",
    "database": "mysql_study"
}

try:
    pool = mysql.connector.pooling.MySQLConnectionPool(**config, pool_size=10)
    conn = pool.get_connection()
    # 开启事务
    conn.start_transaction()
    cursor = conn.cursor()
    sql = """INSERT INTO t_dept SELECT MAX(deptno)+10, %s, %s FROM t_dept
             UNION  SELECT MAX(deptno)+20, %s, %s FROM t_dept;"""
    cursor.execute(sql, ["A部门", "上海", "B部门", "北京"])
    conn.commit()
except Exception as e:
    if "conn" in dir():
        conn.rollback()
    print(e)
二、PyMySQL 操作数据库
Python 中使用 MySQL 建议使用的客户端库是 PyMySQL,跨平台性、兼容性更好。在开始之前,请确保已经安装好了 MySQL 数据库并且保证能够正常运行。此外还需要安装 PyMySQL 库:安装方法非常简单,执行如下命令即可:
pip install -i http://pypi.douban.com/simple --trusted-host pypi.douban.com PyMysql
2.1 连接数据库
# -*- coding: utf-8 -*-
# @Time    : 2023-03-09 12:55
# @Author  : AmoXiang
# @File    : 1.连接数据库.py
# @Software: PyCharm
# @Blog    : https://blog.csdn.net/xw1680

from pymysql import connect, Error

"""
使用pymysql连接数据库
"""

# 数据库的连接对象
conn = None
try:
    # 建立连接
    conn = connect(
        host='127.0.0.1',
        port=3306,
        user='root',
        password='',
        database='my_data_base'
    )
    print(conn)
    conn.close()
except Error as e:
    print('连接失败:{}'.format(e))
finally:
    try:
        # 关闭连接
        conn.close()
        print('数据库连接已关闭')
    except Exception as e:
        print('数据库连接关闭失败:{}'.format(e))
此外,connect() 函数还有两个常用参数设置,介绍如下:
charset:utf8用于设置MySQL字符集为UTF-8。cursorclass:pymysql.cursors.DictCursor用于设置游标类型为字典类型,默认为元组类型。
2.2 PyMySQL 的基本使用
操作 MySQL 的基本流程为:连接 MySQL → 创建游标 → 执行 SQL 语句 → 关闭连接。
【示例1】连接数据库:
import pymysql
from pymysql import Error

try:
    """
    host:MySQL运行的host 即ip 本地localhost MySQL 在远程传入公网ip即可
    user: 用户名
    password: 密码
    port: 端口
    """
    db = pymysql.connect(host="localhost", user="root", password="123456", port=3306)
    cursor = db.cursor()
    cursor.execute("SELECT VERSION();")
    data = cursor.fetchone()
    print(f"Database version: {

      data}")  # Database version: ('8.0.30',)
    cursor.execute("CREATE DATABASE spiders DEFAULT CHARACTER SET utf8mb4;")
    db.close()
except Error as e:
    if "db" in dir():
        db.rollback()
    print(e)
finally:
    if "db" in dir():
        db.close()
【示例2】创建表:
# -*- coding: utf-8 -*-
# @Time    : 2023-03-09 13:14
# @Author  : AmoXiang
# @File    : 3.创建表.py
# @Software: PyCharm
# @Blog    : https://blog.csdn.net/xw1680

import pymysql

# 创建数据库后,需要指定在哪个数据库下进行操作 db: 数据库
db = pymysql.connect(host="localhost", user="root", password="123456", port=3306, db="spiders")
cursor = db.cursor()
sql = 'CREATE TABLE IF NOT EXISTS students(id VARCHAR(255) NOT NULL, name VARCHAR(255) NOT NULL, age INT NOT NULL, ' \
      'PRIMARY KEY(id))'

cursor.execute(sql)
db.close()
【示例3】插入数据----初版。
# -*- coding: utf-8 -*-
# @Time    : 2023-03-09 13:15
# @Author  : AmoXiang
# @File    : 4.插入数据-初版.py
# @Software: PyCharm
# @Blog    : https://blog.csdn.net/xw1680

import pymysql

s_id = "20140041"
user = "Amo"
age = 18

db = pymysql.connect(host="localhost", user="root", password="123456", port=3306, db="spiders")
cursor = db.cursor()
sql = 'INSERT INTO students(id, name, age) VALUES(%s, %s, %s);'
try:
    cursor.execute(sql, (s_id, user, age))
    db.commit()
    print("insert data successfully")
except:
    db.rollback()
    print("insert data failed")
finally:
    db.close()
【示例4】插入数据----进阶版。
# -*- coding: utf-8 -*-
# @Time    : 2023-03-09 13:18
# @Author  : AmoXiang
# @File    : 5.插入数据-进阶版.py
# @Software: PyCharm
# @Blog    : https://blog.csdn.net/xw1680

import pymysql
from pymysql import Error

data = {
    "id": "20120001",
    "name": "Bob",
    "age": 20
}

data2 = {
    "id": "20220021",
    "name": "Amo",
    "age": 18
}

db = pymysql.connect(host="localhost", user="root", password="123456", port=3306, db="spiders")
with db:
    with db.cursor() as cursor:  # 游标
        table = "students"  # 定义表的名字
        keys = ", ".join(data.keys())  # id, name, age
        values = ", ".join(['%s'] * len(data))  # %s, %s, %s
        # INSERT INTO students(id, name, age) VALUES (%s, %s, %s)
        sql1 = 'INSERT INTO {table}({keys}) VALUES ({values})'.format(table=table, keys=keys, values=values)
        print(sql1)
        try:
            if cursor.execute(sql1, tuple(data2.values())):
                print("Successful")
        except Error as e:
            print(e)
            print("Failed")
            db.rollback()
        # 开启事务
        db.begin()
        try:
            if cursor.execute(sql1, tuple(data.values())):
                print("Successful")
        except Error as e:
            print(e)
            print("Failed")
            db.rollback()
        db.commit()
【示例4】插入数据(多条)----进阶版。
# -*- coding: utf-8 -*-
# @Time    : 2023-03-09 13:18
# @Author  : AmoXiang
# @File    : 5.插入数据-进阶版.py
# @Software: PyCharm
# @Blog    : https://blog.csdn.net/xw1680

import pymysql
from pymysql import Error

data = {


    "id": "20120001",
    "name": "Bob",
    "age": 20
}

data2 = {


    "id": "20220021",
    "name": "Amo",
    "age": 18
}
insert_data = [data, data2]
insert_data_values = [tuple(_.values()) for _ in insert_data]

db = pymysql.connect(host="localhost", user="root", password="123456", port=3306, db="spiders")
with db:
    with db.cursor() as cursor:  # 游标
        table = "students"  # 定义表的名字
        keys = ", ".join(insert_data[0].keys())  # id, name, age
        values = ", ".join(['%s'] * len(insert_data[0]))  # %s, %s, %s
        # INSERT INTO students(id, name, age) VALUES (%s, %s, %s)
        sql1 = 'INSERT INTO {table}({keys}) VALUES ({values})'.format(table=table, keys=keys, values=values)
        print(sql1)
        try:
            if cursor.executemany(sql1, insert_data_values):
                print("Successful")
        except Error as e:
            print(e)
            print("Failed")
            db.rollback()
        db.commit()
【示例5】更新数据----初版:
# -*- coding: utf-8 -*-
# @Time    : 2023-03-09 13:34
# @Author  : AmoXiang
# @File    : 6.更新数据-初版.py
# @Software: PyCharm
# @Blog    : https://blog.csdn.net/xw1680

import pymysql

db = pymysql.connect(host="localhost", user="root", password="123456", port=3306, db="spiders")
cursor = db.cursor()  # 游标
sql = "UPDATE students SET age = %s WHERE name = %s;"
try:
    cursor.execute(sql, (25, "Bob"))
    db.commit()
except:
    db.rollback()
db.close()
【示例6】更新数据----进阶版:
# -*- coding: utf-8 -*-
# @Time    : 2023-03-09 13:35
# @Author  : AmoXiang
# @File    : 7.更新数据-进阶版.py
# @Software: PyCharm
# @Blog    : https://blog.csdn.net/xw1680
import pymysql

db = pymysql.connect(host="localhost", user="root", password="123456", port=3306, db="spiders")
cursor = db.cursor()  # 游标

data = {


    "id": "20120001",
    "name": "Bob",
    "age": 21
}

table = "students"  # 定义表的名字
keys = ", ".join(data.keys())  # id, name, age
values = ", ".join(['%s'] * len(data))  # %s, %s, %s
sql = 'INSERT INTO {table}({keys}) VALUES ({values}) ON DUPLICATE KEY UPDATE '.format(table=table, keys=keys,
                                                                                      values=values)
update = ",".join(["{key} = %s".format(key=key) for key in data])
sql += update
print(sql)
try:
    if cursor.execute(sql, tuple(data.values()) * 2):
        print("Successful")
        db.commit()
except:
    print("Failed")
    db.rollback()
db.close()
【示例7】删除数据:
# -*- coding: utf-8 -*-
# @Time    : 2023-03-09 14:35
# @Author  : AmoXiang
# @File    : 8.删除数据.py
# @Software: PyCharm
# @Blog    : https://blog.csdn.net/xw1680

import pymysql

db = pymysql.connect(host="localhost", user="root", password="123456", port=3306, db="spiders")
cursor = db.cursor()  # 游标

table = "students"
sql = "DELETE FROM {table} WHERE age>=%s".format(table=table)
print(sql)
try:
    cursor.execute(sql, (20,))
    db.commit()
except Exception as e:
    print(e)
    db.rollback()

db.close()
【示例8】查询数据:
# -*- coding: utf-8 -*-
# @Time    : 2023-03-09 14:50
# @Author  : AmoXiang
# @File    : 9.查询数据.py
# @Software: PyCharm
# @Blog    : https://blog.csdn.net/xw1680

import pymysql
from pymysql import Error

db = pymysql.connect(host="localhost", user="root", password="123456", port=3306, db="spiders")
cursor = db.cursor()  # 游标
sql = "SELECT * FROM students;"
try:
    cursor.execute(sql)
    # print("检索一条数据---------------------------------------------:")
    # print("Count:", cursor.rowcount)
    # one = cursor.fetchone()
    # print("one:", one)

    # print("检索全部数据---------------------------------------------:")
    # results = cursor.fetchall()
    # print("Results:", results)
    # print("Results Type:", type(results))
    # for row in results:
    #     print(row)
    # 改进
    # row = cursor.fetchone()
    # while row:
    #     print("Row:", row)
    #     row = cursor.fetchone()

    print("检索指定数量的数据---------------------------------------------:")
    # results = cursor.fetchmany(2)
    # print(results)
    results = cursor.fetchmany(1)
    print(results)

except Error as e:
    db.rollback()
    print("error")
至此今天的学习就到此结束了,笔者在这里声明,笔者写文章只是为了学习交流,以及让更多学习数据库的读者少走一些弯路,节省时间,并不用做其他用途,如有侵权,联系博主删除即可。感谢您阅读本篇博文,希望本文能成为您编程路上的领航者。祝您阅读愉快!

好书不厌读百回,熟读课思子自知。而我想要成为全场最靓的仔,就必须坚持通过学习来获取更多知识,用知识改变命运,用博客见证成长,用行动证明我在努力。
如果我的博客对你有帮助、如果你喜欢我的博客内容,请点赞、评论、收藏一键三连哦!听说点赞的人运气不会太差,每一天都会元气满满呦!如果实在要白嫖的话,那祝你开心每一天,欢迎常来我博客看看。
编码不易,大家的支持就是我坚持下去的动力。点赞后不要忘了关注我哦!