从这章这开始我们以一个小案例分章介绍Entitas为我们提供的五种类型的System。
案例的主要功能比较简单,大致的流程如下:
- 在游戏启动时在屏幕上创建一个站立的小熊,
- 点击键盘上的左右按键时将小熊切换成一个对应方向的Sprite,朝对应方向移动并实时打印位置信息。松开左右按键时切换回站立的小熊Sprite,结束打印位置信息。
- 结束游戏输出一个"Game Over!"信息。
这一章我们将在游戏中通过代码创建一个小熊的GameObject,并可以看到小熊Entity的一些组件信息
案例准备
创建ViewComponent.cs
首先我们需要创建如下几个组件:
- ViewComponent 记录小熊的GameObject
- SpriteComponent 记录小熊的Sprite名称数据
- PositionComponent 记录小熊的Position数据
- DirectionComponent 记录小熊的方向数据
- MoveSpeedComponent 记录小熊的移动速度数据 (但是这里需要注意,这个组件一旦添加到小熊身上就会移动,不需要移动时需将这个组件移除,这就是我们将Component时提到过的通过修改组件来改变Entity的行为)
多个组件可以放在一个文件中可以分成多个文件,我们这里就放在一个文件中 ViewComponent.cs。
using Entitas;
using UnityEngine;

/// <summary>
/// View组件
/// </summary>
[Game]
public class ViewComponent : IComponent
{
    public GameObject gameObject;
}

/// <summary>
/// Sprite组件
/// </summary>
[Game]
public class SpriteComponent : IComponent
{
    public string value;
}

/// <summary>
/// Position组件
/// </summary>
[Game]
public class PositionComponent : IComponent
{
    public Vector2 value;
}

/// <summary>
/// MoveSpeed组件
/// </summary>
[Game]
public class MoveSpeedComponent : IComponent
{
    public float value;
}

/// <summary>
/// Direction组件
/// </summary>
[Game]
public class DirectionComponent : IComponent
{
    /// <summary>
    /// 用来表示小熊的站立,向左,向右三种朝向状态
    /// </summary>
    public enum EDirection
    {
        stand,
        left,
        right,
    }
    public EDirection value;
}
注意:每次添加新的组件代码之后需要重新生成一下代码才会被Entitas引用。
创建AddSystem.cs IInitializeSystem
我们全局只需要一个小熊实体,并在游戏开始时就创建出来,所以需要继承IInitializeSystem这个接口,并实现Initialize()方法用来执行创建小熊的逻辑。
这个接口和MonoBehaviour生命周期中的Start()方法类似。但是和MonoBehaviour不同的是如果我们有多个继承自IInitializeSystem接口的System,执行顺序是先添加到Systems中的先执行。
using Entitas;
using Entitas.Unity;
using UnityEngine;
/// <summary>
/// AddView系统 extends IInitializeSystem
/// </summary>

public class AddViewSystem : IInitializeSystem
{
    //创建一个小熊的容器
    readonly Transform gameContainer = new GameObject("Game Container").transform;

    // 需要处理的Component都是属于GameContext,所以我们需要从Contexts中拿到Game Context。
    readonly GameContext _context;

    public AddViewSystem(Contexts contexts)
    {
        _context = contexts.game;
    }

    public void Initialize()
    {
        var entity = _context.CreateEntity();
        GameObject go = new GameObject("Game Entity");
        go.transform.SetParent(gameContainer, false);
        //添加ViewComponent并为ViewComponent的gameObject字段赋值
        entity.AddView(go);

        //添加PositionComponent并为PositionComponent的value字段赋值
        entity.AddPosition(Vector2.zero);

        //添加SpriteComponent并为SpriteComponent的value字段赋值
        entity.AddSprite("monkey_stand");

        //添加DirectionComponent并为DirectionComponent的value字段赋值
        entity.AddDirection( DirectionComponent.EDirection.stand );
        // 将Entity链接到GameObject上
        go.Link(entity);
    }

}
GameSystems.cs
我们还需要一个用来管理System的Systems。并将刚才创建的AddSystem.cs添加到Systems中。我们为了能在Unity编辑器中看到System的信息,所以GameSystems继承自Feature。如果这里有什么不清楚的可以回顾一下System那一章。
using Entitas;

/// <summary>
/// GameSystems extends Feature
/// </summary>

public class GameSystems : Feature
{
    public GameSystems(Contexts contexts) : base("Game Systems")
    {
        /* -- Init System -- */
        Add(new AddViewSystem(contexts));
    }

}
GameController.cs
我们写了这么多代码但是Unity开始运行的时候并不会执行啊,所以我们还需要有一个继承自MonoBehaviour的脚本来负责创建,初始化和执行各个System。我们就叫GameController.cs吧。
using UnityEngine;
using System.Collections;
using Entitas;

public class GameController : MonoBehaviour
{
    Systems _systems;
    Contexts _contexts;
    void Start()
    {
        _contexts = Contexts.sharedInstance;
        _systems = new GameSystems(_contexts);

        _systems.Initialize();
    }

    void Update()
    {

    }

}
然后把GameController.cs挂载到Hierarchy面板中的任意一个GameObject上。
好了,现在我们可以试着运行一下游戏了,游戏运行起来之后Game试图中还是什么都没有。这是肯定的,因为我们还没有给小熊添加SpriteRenderer。但是我们已经可以在Hierarchy面板中看到这些东西了。

-
选中Hierarchy面板中Game然后可以在Inspector面板中看到这些信息

这里列出来了当前活动的Entity和被回收的Entity数量,创建Entity和回收所有Entity的按钮。 -
再选Game下的Entity_0然后可以在Inspector面板中看到这些信息

其中包含了刚才我们在AddViewSystem中为小熊实体添加的组件信息和数据信息。
-
最后选中Hierarchy面板中Game Systems然后可以在Inspector面板中看到这些信息了
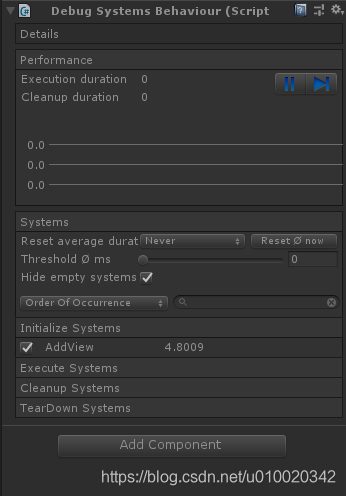
可以看到每种类型的System列表,System的性能开销。这里会每帧动态刷新。
总结: IInitializeSystem 会在游戏开始之前执行一次。在这里设置初始游戏状态,类似于Unity的Start()方法。创建游戏中的全局实体(例如,用于访问配置数据)