目录
一、torch.nn.CONV2D
官方文档:
torch.nn — PyTorch 1.13 documentation
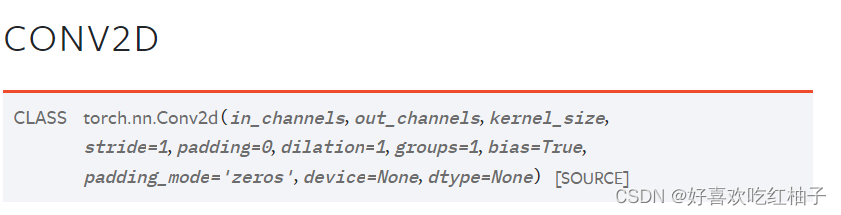
1.1 参数介绍
常用的参数主要是前五个。
(31条消息) Pytorch中dilation(Conv2d)参数详解_MaZhe丶的博客-CSDN博客_conv2d参数解释
in_channels (int) – Number of channels in the input image,输入图片的通道数
out_channels (int) – Number of channels produced by the convolution,输出图片的通道数, 代表卷积核的个数,使用n个卷积核输出的特征矩阵深度即channel就是n
kernel_size (int or tuple) – Size of the convolving kernel,卷积核的大小
e.g. if kernel size = 3, 则卷积核的大小是3*3
stride (int or tuple, optional) – Stride of the convolution. Default: 1,步径大小
padding (int, tuple or str, optional) – Padding added to all four sides of the input. Default: 0
padding_mode (str, optional) –
'zeros','reflect','replicate'or'circular'. Default:'zeros'dilation (int or tuple, optional) – Spacing between kernel elements. Default: 1
groups (int, optional) – Number of blocked connections from input channels to output channels. Default: 1
bias (bool, optional) – If
True, adds a learnable bias to the output. Default:True
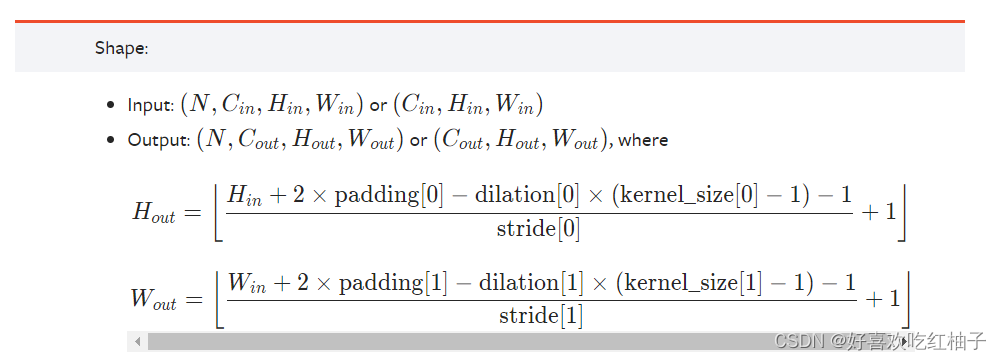
如何进行输出图片长和宽的计算?
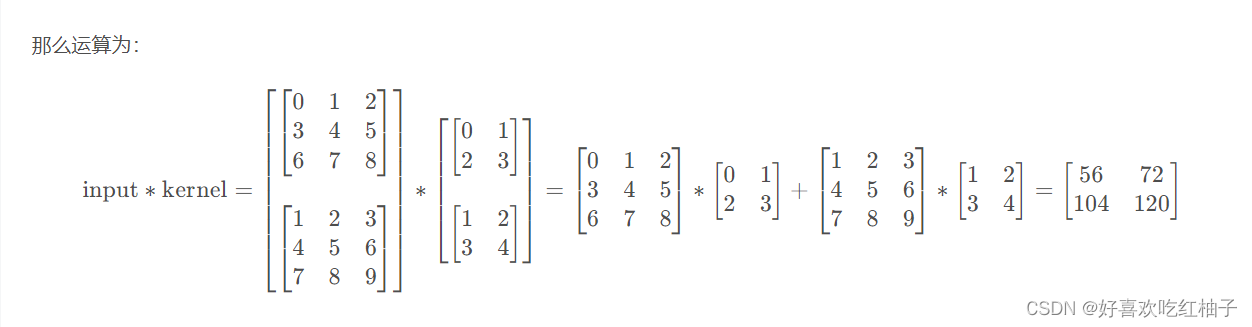
1.2 stride 和 padding 的可视化
conv_arithmetic/README.md at master · vdumoulin/conv_arithmetic · GitHub

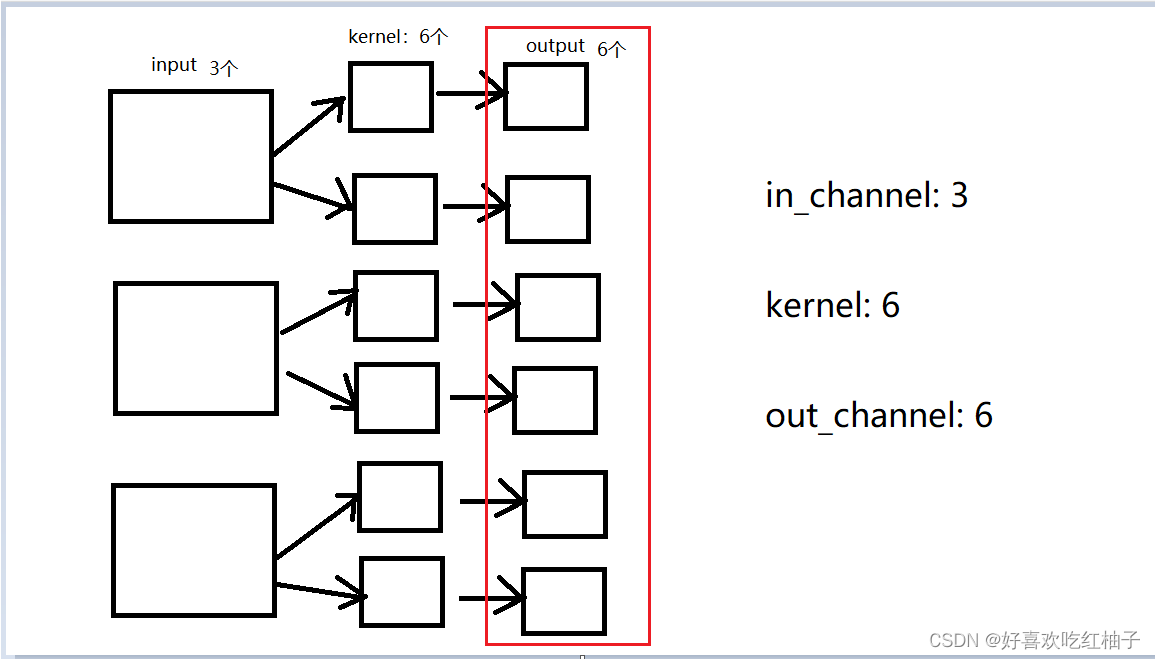
1.3 输入、输出通道数
(31条消息) 【卷积神经网络】多输入通道和多输出通道(channels)_ZSYL的博客-CSDN博客_多输出通道
(31条消息) (pytorch-深度学习系列)CNN的多输入通道和多输出通道_我是一颗棒棒糖的博客-CSDN博客
彩色图像在高和宽2个维度外还有RGB(红、绿、蓝)3个颜色通道。假设彩色图像的高和宽分别是h hh和w ww(像素),那么它可以表示为一个3 × h × w 的多维数组。我们将大小为3的这一维称为通道(channel)维。
1.3.1 多通道输入

1.3.2 多通道输出
多通道输出的通道数 = 卷积核的个数
二、卷积操作练习
2.1 数据集准备
使用cifar10数据集的验证集进行操作。
import torch
import torchvision.datasets
from torch.nn import Conv2d
from torch.utils.data import DataLoader
#数据集准备
dataset = torchvision.datasets.CIFAR10(root=".\CIFAR10",train=False,transform=torchvision.transforms.ToTensor(),download=True)
#使用dataloader加载数据集,批次数为64
dataloader = DataLoader(dataset,batch_size=64)
2.2 自定义神经网络
- 自定义名为Maweiyi的神经网络。
- 自定义的神经网络要继承nn.Module框架。
- 重写init和forward方法。
- 该神经网络调用conv2d进行一层卷积,输入通道为3层(彩色图像为3通道),卷积核大小为3*3,输出通道为6。
- 设置步长为1,padding为0,不进行填充。
import torch
import torchvision.datasets
from torch.nn import Conv2d
from torch.utils.data import DataLoader
class Maweiyi(torch.nn.Module):
def __init__(self):
super(Maweiyi, self).__init__()
self.conv1 = Conv2d(in_channels=3,out_channels=6,kernel_size=3,stride=1,padding=0)
def forward(self,x):
x = self.conv1(x)
return x
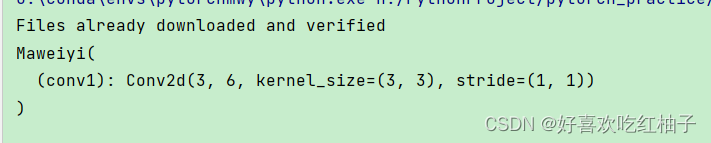
maweiyi = Maweiyi()
print(maweiyi)输出:
2.3 卷积操作控制台输出结果
使用for循环输出结果。
# 输出卷积前的图片大小和卷积后的图片大小
for data in dataloader:
    imgs, labels = data
    print(imgs.shape)
    # 卷积操作
    outputs = maweiyi(imgs)
    print(outputs.shape)
输出:

2.4 tensorboard可视化
注意:使用tensorboard输出时需要重新定义图片大小
- 对于输入的图片集imgs来说,tensor.size([64,3,32,32]),即一批次为64张,一张图片为三个通道,大小为32*32
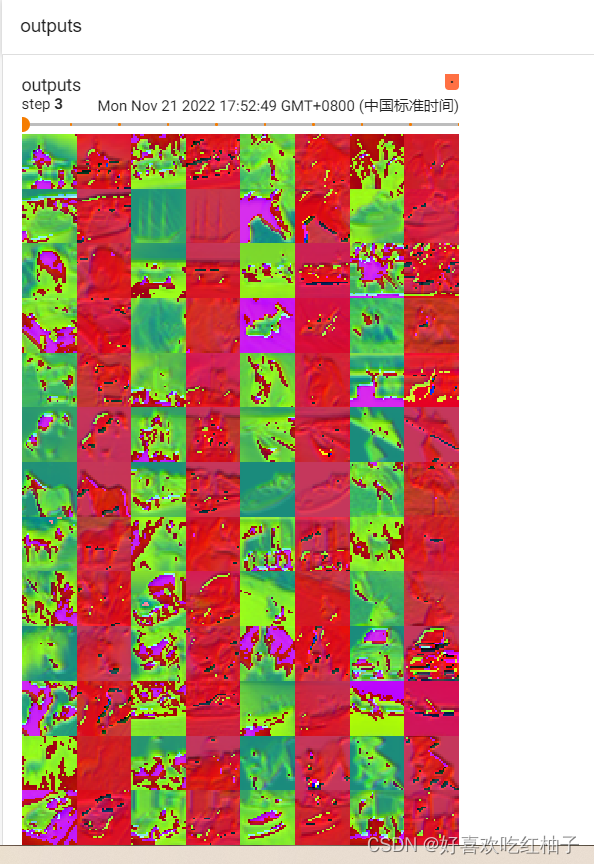
- 对于经过卷积后输出的图片集output来说,tensor.size([64,6,30,30]),通道数变成了6,tensorboard不知道怎么显示通道数为6的图片,所以如果直接输出会报错
解决方案:
- 使用reshape方法对outputs进行重定义,把通道数改成3,如果不知道批次数大小,可以使用-1代替,程序会自动匹配批次大小。
outputs = torch.reshape(outputs,(-1,3,30,30))
# 生成日志
writer = SummaryWriter("logs")
step = 0
# 输出卷积前的图片大小和卷积后的图片大小
for data in dataloader:
imgs, labels = data
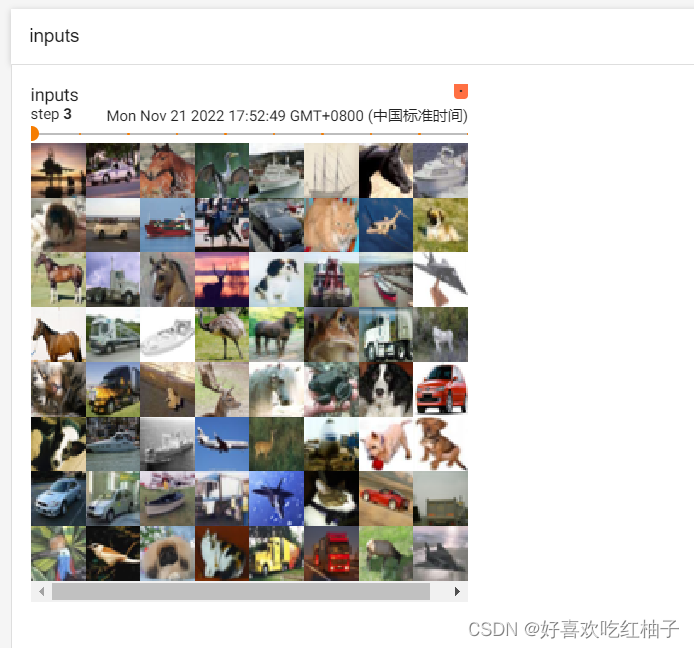
# 显示输入的图片
writer.add_images("inputs",imgs,step)
#卷积操作
outputs = maweiyi(imgs)
#重定义输出图片的大小
outputs = torch.reshape(outputs,(-1,3,30,30))
# 显示输出的图片
writer.add_images("outputs",outputs,step)
step+=1
writer.close()输出:
input:一个批次64张图片
output:一个批次128张 (64*2=128)
三、完整代码
import torch
import torchvision
from torch.nn import Conv2d
from torch.utils.data import DataLoader
# 数据集下载
from torch.utils.tensorboard import SummaryWriter

dataset = torchvision.datasets.CIFAR10(root=".\CIFAR10", train=False, transform=torchvision.transforms.ToTensor(),
                                       download=True)
# 数据加载器
dataloader = DataLoader(dataset, batch_size=64)


class Maweiyi(torch.nn.Module):
    def __init__(self):
        super(Maweiyi, self).__init__()
        # 卷积层
        self.conv1 = Conv2d(in_channels=3, out_channels=6, kernel_size=3, stride=1, padding=0)

    def forward(self, x):
        x = self.conv1(x)
        return x


maweiyi = Maweiyi()
print(maweiyi)

writer = SummaryWriter("logs")
step = 0

for data in dataloader:
    imgs, labels = data
    # 卷积操作
    output = maweiyi(imgs)
    print(imgs.shape)
    print(output.shape)
    writer.add_images("input", imgs, step)

    output = torch.reshape(output, (-1, 3, 30, 30))
    writer.add_images("output", output, step)
    step = step + 1

writer.close()